QAD Mobile Field Service
QAD Mobile FS Overview
Installing QAD Mobile FS
Using QAD Mobile FS
78-0621C QAD Mobile Field Service 1.5.1 September 2006
subject to change without notice.
QAD Inc. provides this material as is and makes no warranty of any kind, expressed or implied, including, but not limited to, the implied warranties of merchantability and fitness for a particular purpose. QAD Inc. shall not be liable for errors contained herein or for incidental or consequential damages (including lost profits) in connection with the furnishing, performance, or use of this material whether based on warranty, contract, or other legal theory.
QAD and MFG/PRO are registered trademarks of QAD Inc. The QAD logo is a trademark of QAD Inc.
Designations used by other companies to distinguish their products are often claimed as trademarks. In this document, the product names appear in initial capital or all capital letters. Contact the appropriate companies for more information regarding trademarks and
registration.
Copyright © 2006 by QAD Inc.
QAD Inc. 6450 Via Real Carpinteria, California 93013 Phone (805) 684-6614 Fax (805) 684-1890 http://www.qad.com
About This Guide . . . 1
Other MFG/PRO Documentation . . . 2
Online Help . . . 3
QAD Web Site . . . 3
Conventions . . . 4
Chapter 1
QAD Mobile FS Overview . . . 7
QAD Mobile Field Service Overview . . . 8
Installing QAD Mobile FS . . . 8
Deploying QAD Mobile FS . . . 9
OneBridge . . . 10
QDocs . . . 11
Client Components . . . 11
Using QAD Mobile FS . . . 12
Set Up QAD Mobile FS Data . . . 12
Perform an Initial Synchronization . . . 12
View and Update Calls . . . 12
Report Call Activity . . . 13
Order Parts . . . 13
Section 1 Installing QAD Mobile FS . . . 17
Chapter 2
QAD Mobile FS Requirements . . . 19
General Requirements . . . 20
MFG/PRO Database Server . . . 20
Hardware Requirements . . . 20
Software Prerequisites . . . 20
Synchronization Server . . . 21
Hardware Requirements . . . 21
Supported Operating Systems . . . 22
Software Requirements . . . 22
Client Devices . . . 23
Hardware Requirements . . . 23
Software Requirements . . . 23
Network Requirements . . . 24
Chapter 3
Installing QAD Mobile FS Components . . . 27
Overview . . . 28
Install and Configure QXtend Inbound . . . 28
Update MFG/PRO . . . 30
Update MFG/PRO Databases . . . 30
Load Field Help . . . 31
Install Progress ODBC Driver . . . 32
Install OneBridge Sync Server . . . 35
Install OneBridge Sync Server Files . . . 35
Set Up the Authentication Configuration . . . 37
Configure OneBridge Sync Server . . . 38
Install Client Components . . . 46
Install Client Components on Laptops . . . 46
Install Client Components on Pocket PC Devices . . . 47
Complete the Setup . . . 49
Chapter 4
Setting Up QAD Mobile FS . . . 53
Set Up SSM Data in MFG/PRO . . . 54
Define QAD Mobile FS Users in MFG/PRO . . . 55
Suppress QAD Mobile API Warnings in MFG/PRO . . . 62
Set Up Client Devices . . . 62
Perform Initial Full Sync . . . 65
Recreating the Device Database . . . 65
Understanding Synchronized Data . . . 66
Develop Engineer Report . . . 67
Section 2 Using QAD Mobile FS. . . 69
Chapter 5
Using QAD Mobile FS . . . 71
Overview . . . 72
Features of the User Interface . . . 72
Differences on Pocket PCs . . . 76
Synchronizing QAD Mobile FS . . . 76
Creating and Updating Calls . . . 79
Reporting Call Activity . . . 85
Ordering Parts . . . 91
Viewing Inventory . . . 96
Viewing Installed Base Details . . . 97
Other MFG/PRO Documentation 2
Online Help 3
QAD Web Site 3
This guide covers the installation, use, and administration of the QAD Mobile Field Service (FS) product. QAD Mobile FS lets field engineers or technicians access and enter service call information remotely from devices such as a personal digital assistant (PDA) or laptop. This information is automatically synchronized with your production
MFG/PRO field service data. QAD Mobile FS remote access and updates let field personnel:
• Review and update assigned calls.
• Create new calls.
• Report call activity.
• Order spare parts.
Other MFG/PRO Documentation
• For an overview of new features and software updates, see the
Release Bulletin.
• For MFG/PRO software installation instructions, refer to the appropriate installation guide for your system.
• For information on using MFG/PRO, refer to the User Guides. Information about Service/Support Management can be found in Volumes 8A and 8B.
• To view documents online in PDF format, see the Documents on CD
and Supplemental Documents on CD. The CD-ROM media includes complete instructions for loading the documents on a Windows network server and making them accessible to client computers.
Note MFG/PRO installation guides are not included on a CD. Printed copies are packaged with your software. Electronic copies of the latest versions are available on the QAD Web site.
Online Help
MFG/PRO has an extensive online help system. Help is available for most fields found on a screen. Procedure help is available for most programs that update the database. Most inquiries, reports, and browses do not have procedure help.
For information on using the help system in the different MFG/PRO environments, refer to User Guide Volume 1: Introduction and User Guide: QAD Desktop.
QAD Web Site
The QAD Web site provides a wide variety of information about the company and its products. You can access the Web site at:
http://www.qad.com
For MFG/PRO users with a QAD Web account, product documentation is available for viewing or downloading at:
http://support.qad.com/
You can register for a QAD Web account by accessing the Web site and clicking the Accounts link at the top of the screen. Your customer ID number is required. Access to certain areas is dependent on the type of agreement you have with QAD.
Most user documentation is available in two formats:
• Portable document format (PDF). PDF files can be downloaded from the QAD Web site to your computer. You can view them with the free Adobe Acrobat Reader. A link for downloading this program is also available on the QAD Web site.
• HTML. You can view user documentation through your Web browser. The documents include search tools for easily locating topics of interest.
Features also include an online solution database to help MFG/PRO users answer questions about setting up and using the product. Additionally, the QAD Web site has information about training classes and other services that can help you learn about MFG/PRO.
Conventions
MFG/PRO is available in several interfaces: Desktop (Web browser), Windows, and character. To standardize presentation, the documentation uses the following conventions:
• MFG/PRO screen captures show the Desktop interface.
• References to keyboard commands are generic. For example, choose Go refers to:
• The forward arrow in Desktop
• F2 in the Windows interface
• F1 in the character interface
In the character and Windows interfaces, the Progress status line at the bottom of a program window lists the main UI-specific keyboard commands used in that program. In Desktop, alternate commands are listed in the right-click context menu.
For complete keyboard command summaries for each MFG/PRO interface, refer to the appropriate chapters of User Guide: QAD Desktop and User Guide Volume 1: Introduction.
• Menu references
QAD Mobile Field Service is available for several MFG/PRO releases. Most of the features of MFG/PRO referenced in this guide are the same in each release. However, some menu items have changed.
In these cases, the first reference is the number in MFG/PRO eB2 followed by the menu reference in MFG/PRO eB2.1, as in the following example:
User Maintenance (36.3.18, 36.3.1 in MFG/PRO eB2.1)
This document uses the text or typographic conventions listed in the following table.
If you see: It means:
monospaced text A command or file name.
italicized monospaced text
A variable name for a value you enter as part of an operating system command; for example, YourCDROMDir.
indented command line
A long command that you enter as one line, although it appears in the text as two lines.
Note Alerts the reader to exceptions or special conditions.
Important Alerts the reader to critical information.
Warning Used in situations where you can overwrite or corrupt data, unless you follow the instructions.
QAD Mobile FS
Overview
QAD Mobile Field Service (QAD Mobile FS) is a set of programs to enable engineers and technicians to review and create data in the field using PDAs or laptops. This chapter summarizes the product
deployment, installation, use, and administration.
QAD Mobile Field Service Overview 8
Installing QAD Mobile FS 8
Deploying QAD Mobile FS 9
QAD Mobile Field Service Overview
This guide covers the installation, use, and administration of the QAD Mobile Field Service product (QAD Mobile FS). QAD Mobile FS lets field engineers or technicians access and enter service call information remotely from devices such as a personal digital assistant (PDA) or laptop.
QAD Mobile FS is a store-and-forward application. Users run the application on mobile devices independent of a connection to a central server. This requires periodic synchronization of the client and server data stores. QAD Mobile FS remote access and updates let field personnel:
• Review and update assigned calls.
• Create new calls.
• Report call activity.
• Order spare parts and parts to use for a call.
This book is divided into two sections: installation and user information. The installation section covers server and client installs. User information describes the use of the QAD Mobile FS application and details the data flow between MFG/PRO and QAD Mobile FS.
Installing QAD Mobile FS
QAD Mobile FS assumes a production installation of MFG/PRO and the QXtend Inbound product. For more information on these installations, see the installation guide for your MFG/PRO version and Technical
Reference: QXtend Inbound. Additional components that must be installed are:
ODBC Driver. The ODBC driver exposes MFG/PRO APIs to enable access to MFG/PRO.
OneBridge Server. This product ensures the currency of the mobile application and provides the means of synchronizing programs and data between the host and the clients.
OneBridge Windows Client. QAD Mobile FS runs the OneBridge client to synchronize data from MFG/PRO to the client database. It is also used to transfer QDocs from the client to the OneBridge Server.
Deploying QAD Mobile FS
QAD Mobile FS is a set of field service programs installed to field devices. It requires the MFG/PRO Service/Support Management module (SSM) as the base application. SSM serves as the source of QAD Mobile FS data and the target for QAD Mobile FS updates.
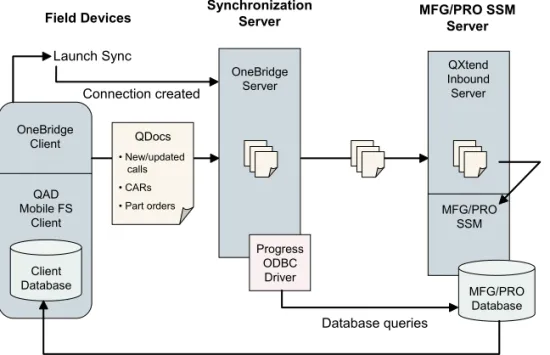
Between the QAD Mobile FS field devices and the MFG/PRO SSM server is a synchronization server. The synchronization server delivers the QAD Mobile FS application and application updates to the field devices. It also synchronizes the MFG/PRO server and the field device data.
Note On a Windows platform, the MFG/PRO server and
synchronization server could be installed on the same physical machine. However, since the OneBridge synchronization server only runs on Windows, two machines are required when MFG/PRO is running in a UNIX environment.
The software required to synchronize the data are OneBridge server, the Progress ODBC driver, and QAD’s QXtend Inbound. On the client, the OneBridge client and the QAD Mobile FS application are required. You also need the AppForge Crossfire Client on the Pocket PC.
Fig. 1.1 QAD Mobile FS Architecture MFG/PRO SSM OneBridge Client MFG/PRO SSM Server Synchronization Server Field Devices MFG/PRO Database Launch Sync OneBridge Server Connection created
Update client database with new and modified records
QXtend Inbound Server Database queries Progress ODBC Driver QDocs • New/updated calls • CARs • Part orders Client Database QAD Mobile FS Client
During a synchronization, the QAD Mobile FS client on the device first generates data to be sent to MFG/PRO of any new or changed calls, call reports, or parts orders. This data is formatted as QDocs. The OneBridge server checks the directory on the mobile device for updated QDocs. When these are found, they are moved to a directory on the MFG/PRO server that QXtend Inbound has been configured to monitor. QXtend Inbound then updates the appropriate tables in the MFG/PRO database with changes made on the device.
OneBridge then runs SQL queries to identify MFG/PRO data needed for QAD Mobile FS client. OneBridge compares the MFG/PRO data with the client database based on previous sync history. It then rebuilds each table on the client with the data that should be there. The ODBC driver allows read access to MFG/PRO so that OneBridge can retrieve the data it needs to check for changes.
Note Because data is brought to MFG/PRO from the device first, data coming back from MFG/PRO in most cases will include changes from the device. However, it is possible that because of network traffic or
bandwidth problems, not all the data will be updated in MFG/PRO before it is sent to the device. In this case it may be necessary to repeat the synchronization.
OneBridge
The OneBridge server is a third-party product that provides connectivity and synchronization between data servers—such as MFG/PRO SSM— and field devices—such as Pocket PC PDAs or laptops. The OneBridge server provides the following services for QAD Mobile FS:
• Establishing connectivity between devices and the SSM server
• Authenticating users during synchronization
• Moving QDocs from the device to a directory queue on the synchronization server
• Maintaining filters and selection criteria for SSM server data
The filtering ensures, for example, that field engineers only receive calls assigned to them, and that the call status on those calls is not closed, cancelled, or hold.
QDocs
Data sent from the field devices to the MFG/PRO server or other destinations is managed using the QAD QXtend Inbound product. QXtend Inbound provides a Web- and network-assured means of
importing data to MFG/PRO from other applications. The data document that is imported is a proprietary, XML format called a QDoc. See
Technical Reference: QXtend Inbound for more detailed information. Four QDocs templates are required for QAD Mobile FS:
• maintainCall
• maintainMaterialOrder
• recordCallActivity
• mfgAuthentication
The actual QDoc file name is built from a three-digit number that uniquely identifies the device or engineer, plus a five-digit incremental number that identifies the QDoc. This numbering scheme ensures that all records imported from field devices are unique.
The QDocs in turn receive a response from MFG/PRO. These have the same file name, but have an extension of .ok for a successful
transmission, .err for an error, or .wrn for a warning, depending on the processing result. The response documents are stored in the \response
directory of the QXtend Inbound queue manager.
Client Components
Two client components are installed on the device: a QAD Mobile FS client and a OneBridge client. The components required to create the client database are included with the QAD Mobile FS client.
QAD Mobile FS runs the OneBridge client to synchronize data from MFG/PRO to the client database. It is also used to transfer QDocs from the client to the OneBridge Server.
Using QAD Mobile FS
The production MFG/PRO application serves as the source database and application for your service and support operations. Additional tables and several additional programs in MFG/PRO are required to support QAD Mobile FS. Each user must be configured in QAD Mobile User
Maintenance (11.1.12).
You can use QAD Mobile FS from either a pocket PC (PDA) or laptop. The user interface is almost identical on both types of devices. The chapter on using QAD Mobile FS includes a description of the differences. See “Differences on Pocket PCs” on page 76.
Set Up QAD Mobile FS Data
¶See “Define QAD Mobile FS Users in MFG/PRO” on page 55.
Before beginning synchronization with devices, each device user must be defined in MFG/PRO using QAD Mobile User Maintenance (11.1.12). Settings in this program are used to authenticate the device user and also determine how data is replicated and updated on the device.
Admin settings are also provided on the device. Before you can begin the synchronization process, you must define settings such as the Windows domain for log on.
Perform an Initial Synchronization
The initial synchronization validates user credentials and creates a local database on the device that contains records related to each engineer. After the initial sync, users can perform full or partial synchronizations to keep the device up-to-date and send data back to MFG/PRO. See
“Perform Initial Full Sync” on page 65.
View and Update Calls
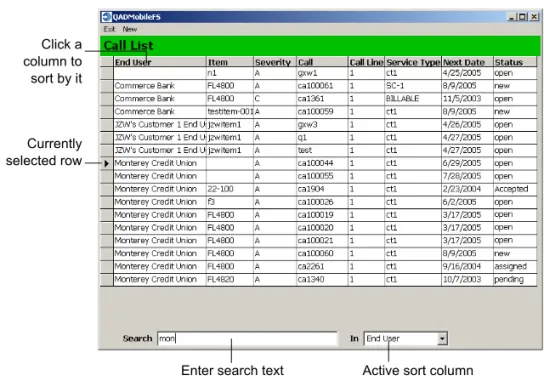
When calls are entered in Call Maintenance (11.1.1.1) in MFG/PRO, field personnel can launch QAD Mobile FS, synchronize with the server, and view a listing of the calls assigned to them and then drill down to see additional call detail. Calls of one line can also be created in the device.
The call listing is sorted by customer end user, service item, severity, and call ID number. The field engineer can make limited updates to existing calls on the device and create new calls if necessary. They can reassign the engineer and modify call status, service items, and work codes. However, they cannot add call lines or change the call ID. See “Creating and Updating Calls” on page 79.
Report Call Activity
After the field work is completed, the engineer records the activity on the call. Reporting includes labor hours, expenses, inventory and service parts, parts returned, and any relevant notes. The next time the field device is synchronized with the server, the call activity is reported back to MFG/PRO. See “Reporting Call Activity” on page 85.
Order Parts
Field engineers can also enter parts orders for required parts. When the device is synchronized with the server, the order is created in MFG/PRO. Service parts can be shipped to either the call end user address or to the field engineer; inventory parts can only be shipped to the field engineer. See “Ordering Parts” on page 91.
Synchronization Data Flow
Data may originate at either the SSM server or the field device. The synchronization process is initiated at the client device. It proceeds through the following steps:
1 Launch synchronization in the QAD Mobile FS application.
2 The user is authenticated.
The user must be a valid user on the sync server. They must also be a valid MFG/PRO user. The validation is done through the OneBridge software.
3 Send new or updated calls, call activity reports (CARs), and parts orders from the device to SSM.
Each record on the device is checked and sent or resent if one or more fields have changed on the record.
The import of data documents into MFG/PRO is accomplished using QAD’s QXtend Inbound product.
4 Process records from device on the SSM server. Record ID numbers are changed or accepted:
• Temporary ID numbers may be given to calls and parts orders created on the field device based on implementation setup. When these records are synchronized, they are given permanent ID numbers in SSM. If they are synchronized back to the device— for example, when the call remains assigned to the originating field engineer—the permanent ID appears on the device and cannot be modified.
• When permanent ID numbers are given on the device, these are accepted as is in SSM.
Time zones are entered:
• If multiple time zones (MTZ) is turned on in SSM, data is entered in the device end user’s time zone and displays in that time zone on the device and in MFG/PRO after synchronization.
5 Send new and updated calls or orders from SSM to the device. CARs are not sent from SSM to the device.
The calls and orders to be synchronized are determined by the SQL queries in OneBridge. Conflicts in data are handled on a field-by-field basis. Static data is assumed to be more correct on the server and is, therefore, overwritten on the device. Transactional data related to service activity is assumed to be more reliable in the field device and this data is left on the device as is. The server will eventually be updated with the device data when the QDoc is processed.
The export of data documents from SSM is accomplished using the ODBC driver.
6 Update the device database.
Calls are deleted from the device database if:
• The status is cancel, complete, close, or hold.
• The call is reassigned to another engineer. Calls are updated:
• With new call information
• With the permanent call ID for calls originating on the device when temporary IDs are assigned
• With service item coverage information (if no service item change occurred on the device call)
Parts orders are deleted if:
• All quantities are consumed in call activity recording.
• The associated call is reassigned to another engineer. Parts orders are updated:
• With new orders originating in SSM assigned to the field engineer
• With new order information
• With the permanent order ID for orders originating on the device when temporary IDs are assigned
Installing QAD
Mobile FS
This section covers the QAD Mobile FS installation.
QAD Mobile FS Requirements 19
Installing QAD Mobile FS Components 27
QAD Mobile FS
Requirements
This chapter provides system requirements and software prerequisites for the QAD Mobile FS server and clients:
General Requirements 20
MFG/PRO Database Server 20
Synchronization Server 21
Client Devices 23
General Requirements
Before installing QAD Mobile, Progress, MFG/PRO, and QXtend Inbound must be installed correctly. The Progress install for each platform may include UNIX kernel changes and patches.
MFG/PRO Database Server
The database server contains Progress, MFG/PRO, and Progress Client Networking. The requirements listed are only for the incremental QAD Mobile FS requirements beyond those of Progress and MFG/PRO.
Hardware Requirements
• 1 MB of free disk space• High-speed 100 Mbps network card
• ISO9660 CD-ROM
• 2 disk controller channels (minimum)
Software Prerequisites
• Operating system patches.• Progress 9.1D, Service Pack 5+, or Progress 9.1E, with Client Networking and SQL-92 Client Access. If you are using MFG/PRO eB2.1 SP4, you must have Progress OE10.
• MFG/PRO eB, Service Pack 4 or later; MFG/PRO eB2 at any service pack level up to Service Pack 11; or MFG/PRO eB2.1, Service Pack 3 or 4.
• QXtend Inbound version 1.2.1.6. This maintenance release of QXI includes some updates that are required by QAD Mobile FS 1.5.1. Since the MFG/PRO database must allow Progress 4GL and SQL client access, you may need to change your database startup scripts. See “Update MFG/PRO” on page 30.
Upgrading MFG/PRO after Installing QAD Mobile
If you decide to upgrade your underlying version of MFG/PRO after installing QAD Mobile, you will need to take special steps to preserve the data set up in the MFG/PRO database. The exact steps you need to take vary depending on the specific upgrade path you choose. See “Upgrading MFG/PRO After Installing QAD Mobile FS” on page 50 for details. Before beginning such an upgrade, contact QAD Support for specific instructions relevant to your implementation.
Synchronization Server
The synchronization server is a Windows machine that contains the OneBridge server and the ODBC driver client. QXtend Inbound can reside either on this machine or the database server. However, QAD recommends it reside on the database server to have more direct access to the MFG/PRO code and database.
Important Review the QXtend Inbound and ODBC driver documentation for version-specific requirements.
Hardware Requirements
• Pentium III, 1 GHz minimum processor or higher server-class machine—faster processor (2 GHz recommended) is required for larger installations. Dual processors enhance performance.
• A server-class machine that supports industry standards for hard drive redundancy/fail-over with sufficient storage space.
• Memory: 512 MB for up to 250 users (1 GB recommended), 1 GB for 250–500 users, 2 GB for 500–1000 users.
• Application disk space: 3 GB for 100 users, 15 GB for 500 users, 30 GB for 1000 users.
• Data/log storage: 32–64 GB.
Supported Operating Systems
• Windows Server 2003• Windows 2000 with Service Pack 2 or higher
• Windows NT Server 4.0 with Service Pack 6a or higher Additional information is available from iAnywhere regarding fail-over/redundancy provision and layering/clustering of multiple
synchronization servers and/or database sync adapters. A single machine with the above recommendations should support up to 1000 users with 10% concurrency.
Software Requirements
• OneBridge Mobile Data Suite 5.0.
• ODBC driver. QAD recommends the Progress SQL-92 ODBC driver for Progress Version 9, which must be purchased separately; Progress OpenEdge 10 ODBC driver ships with the OpenEdge 10 product.
Obtain OneBridge Mobile Data Suite 5.0
Perform the following steps to obtain OneBridge Mobile Data Suite 5.0:
1 Request a free, 30-day evaluation copy of OneBridge Mobile Data Suite from the following URL:
http://www.ianywhere.com/downloads/software/onebridge_eval.html 2 You will receive an e-mail containing important information
necessary to install OneBridge Data Suite. Follow the instructions in the e-mail to download the OneBridge Mobile Data Suite installation package. Run Installation Wizard to save the OneBridge Mobile Data Suite CD files to a folder (OMDSCDDir).
3 You will also receive an e-mail from iAnywhere with a serial number and instructions to upgrade the trial version to a permanent license. After you install OneBridge server and client components, follow the instructions to perform the upgrade. For installing OneBridge server and client components, see “Install OneBridge Sync Server Files” on page 35 and “Install Client Components” on page 46.
Client Devices
There are two possible types of client devices:
• Pocket PC PDA
• Personal computer, such as a laptop
Hardware Requirements
PDA
• 624 MHz or faster processor
• 64 MB or RAM
The QAD Mobile FS application and database requires 3–4 MB in storage, and an additional 3–4 MB in resources when executing. For supported Pocket PC devices, see the following Web sites:
• AppForge (http://www.appforge.com)
• iAnywhere (http://www.ianywhere.com)
Laptop
• Intel Pentium (or compatible) processor
• Minimum OS required disk space and memory
Software Requirements
PDA
• Pocket PC 2002 or Windows Mobile 2003/2005 operating system
• OneBridge Windows CE Client version 5.0
• QAD Mobile FS
• AppForge Crossfire Client 6.0 for Windows mobile-based Pocket PC devices (purchased separately)
You can download the latest ActiveSync version for no charge from the Microsoft download center:
http://www.microsoft.com/windowsmobile/downloads/
The AppForge Crossfire Client can be downloaded for a minimal charge per device from the AppForge, Inc. Web site:
http://www.appforge.com
To download the Crossfire Client, follow these steps:
1 Select Crossfire Client (Booster) from the Products category on the menu toolbar of the AppForge site.
2 Click the Download Crossfire Client files link on the page that displays.
3 Select the client for your Windows Mobile-based Pocket PC devices.
4 Fill in the required form to receive your client. Under Application Name, enter QAD Mobile Field Service.
Note At this time, QAD Mobile Field Service does not support other Crossfire Clients, such as Symbian or Palm OS, that are available from AppForge, Inc. Please contact QAD Services in your region for porting of the QAD Mobile FS application to Symbian or Palm OS, or if your device is not listed on the AppForge Web site.
Laptop
• Windows XP or Windows 2000 SP2+ operating system
• OneBridge Windows Client version 5.0
• QAD Mobile FS
Network Requirements
Set up your network to support Progress networking specifications. See the Progress Networking Guide for details. Minimum requirements for QAD Mobile FS are:
Proper NFS access from the sync server to the QXtend Inbound server is also needed for file transfers. A single user must have administrative rights to run the OneBridge service on the synchronization server and access to the QXtend Inbound queue directory on the QXtend server.
Installing QAD
Mobile FS
Components
QAD Mobile FS is a set of programs to enable engineers and
technicians to review and create data in the field using PDAs or laptops. This chapter describes installation of those components required to connect and synchronize the field devices with the MFG/PRO SSM server.
Overview 28
Install and Configure QXtend Inbound 28
Update MFG/PRO 30
Install Progress ODBC Driver 32
Install OneBridge Sync Server 35
Install Client Components 46
Complete the Setup 49
Overview
¶See page 53. This chapter guides you through the steps required to install and configure QAD Mobile FS. After completing these steps, you must then set up data required by the application before you can sync the devices and begin to use the product. These additional steps are described in Chapter 4. This chapter covers the following steps:
• Configure QXtend Inbound to recognize the QDocs needed to pass information from the device to MFG/PRO.
• Update MFG/PRO by loading schema and data files, compiling code, and loading field help.
Note Loading schema is not needed in MFG/PRO eB2 Service Pack 11.
• Install the required ODBC driver.
• Install the OneBridge Sync Server product.
• Install the required components on the client devices.
Install and Configure QXtend Inbound
1 Install QXtend Inbound following the QXtend Inbound installationinstructions as detailed in Technical Reference: QXtend Inbound.
2 Access the QXtend Manager at:
http://hostname:tomcat_port/qxtendserver/
3 Use the QXtend Connection Pool Manager to set up a connection pool for QAD Mobile FS following the QXtend Inbound instructions.
4 Copy the following QXtend QDoc schemas and events file from the
\Server\QXtend\mfgpro_version directory on the QAD Mobile
FS CD into a folder on a PC that has browser access to the QXtend UI:
• mfgAuthentication-eB2_1.xsd
• authenticationType-eB2_1.xsd
• utauth.xml
Note For both MFG/PRO eB2 and eB2.1, mfgpro_version is eB2.
5 From the QXtend Configuration Manager, choose Schemas and then choose Add to add mfgAuthentication as a custom schema. Enter the following values in the Add Schema screen:
Request Path: mfgAuthentication-eB2_1.xsd Request Type Path: authenticationType-eB2_1.xsd Response Path: Leave blank
Response Type Path: Leave blank Events Path: utauth.xml
Direction: in
Route: UI API Adapter Procedure: utauth.p
6 In the Configuration Manager screen, choose Receivers and set up an MFG/PRO receiver that supports the following QDocs:
• maintainCall
• maintainMaterialOrder
• recordCallActivity
• mfgAuthentication
7 Copy the following events files from the
\Server\QXtend\mfgpro_version directory on the QAD
Mobile FS CD to the WEB-INF\events\mfgpro_version folder within your QXtend Inbound install directory, overwriting the existing files:
• fscarmt.xml
• fscamt.xml
8 Use the QXtend Queue Manager to set up a queue for QAD Mobile FS. The \requests directory must be accessible by the user who starts the OneBridge service on the sync engine Windows server.
Update MFG/PRO
You must complete two steps to configure MFG/PRO for use with QAD Mobile FS:
• Load schema and data files (not required for MFG/PRO eB2 SP11) and compile code.
• Load field help for the new MFG/PRO program.
Update MFG/PRO Databases
In the following steps, use Progress tools to load new schema and data files and compile installed code. Refer to the Progress documentation for details.
1 Modify any MFG/PRO database startup scripts to use the Progress
proserve command instead of _mprosrv. This allows database
access from the Progress ODBC driver. See your Progress Database documentation on how to improve performance of SQL clients by starting multiple servers to support SQL client access.
2 Skip this step if you are using MFG/PRO eB2, Service Pack 11. Load the QADMobile.df schema file from the
\MFGPRO\DBdef\mfgpro_version directory on the QAD Mobile
FS CD into your MFG/PRO production database (qaddb).
3 Load the lbld_det.d, lbl_mstr.d, and pgmi_mst.d data files from the \MFGPRO\mfgpro_version\data directory on the QAD
Mobile FS CD into your MFG/PRO administration database (qadadm).
4 Load the remaining table .d data files from the
\MFGPRO\mfgpro_version\data directory on the QAD Mobile
FS CD into your MFG/PRO production database (qaddb).
5 Install and compile the programs from the
\MFGPRO\mfgpro_version\YourSP directory on the QAD Mobile
FS CD to a \qadmobile directory in your MFG/PRO PROPATH:
Note The PROPATH for QXtend Inbound connections must also include this new \qadmobile directory.
6 From the Progress SQL Explorer, connect to the MFG/PRO database and execute the following SQL command:
grant select on pub.mfsd_det to public; commit;
Load Field Help
Perform the following steps to add new procedure and field help to the MFG/PRO help database:
1 Log in to MFG/PRO.
2 Choose the Field Help Load (36.4.19) menu option.
3 Leave Field, Procedure, Status, and Text Type blank.
4 Complete the other fields:
• Enter an appropriate two-letter code, such as US for US English.
• In the Load File field, enter:
QADMobileInstallDir/MFGPRO/mfgpro_version/data/ qadmobileFS.fhd
• In the Skip loading help with lower status field, enter Yes.
5 Press Go to start the loading.
6 Exit Field Help Load when the load is finished.
7 Skip this step if you are using MFG/PRO eB2.1.
Update user profiles to access character-format help. For
MFG/PRO eB2 and eB2.1, use User Maintenance (36.3.18, 36.3.1 in MFG/PRO eB2.1); for MFG/PRO eB, use User Interface Profile (36.20.4).
a Leave User ID blank; this updates the profile for all users who do not have individual profiles. Press Go.
b To set the profile for character-format help, ensure that WinHelp is cleared.
Install Progress ODBC Driver
The Progress ODBC driver allows the MFG/PRO database to
communicate with the field devices. The following steps assume that you are installing the Progress SQL-92 ODBC driver.
1 You can optionally add an entry for the ODBC driver to your
services file, located at C:\winnt\system32\drivers\etc.
You can also reference the port number directly in step 4.
2 Open the Windows Control Panel and select Admin Tools. Launch the Data Sources program and select the System DSN tab.
3 Click Add. In the Create a New Data Source screen, select the MERANT driver.
4 Click Finish. Enter the values as shown in the following graphic and field descriptions.
Data Source Name. Enter a name to identify this connection record. This name can be used to distinguish connection records when using multiple MFG/PRO databases or to distinguish domains within an MFG/PRO eB2.1 database.
Description. Specify a description of the data source.
Host Name. Enter the server machine name where MFG/PRO is located.
Port Number. If you updated your services file in step 1, enter the
service reference. Otherwise, enter the specific port number.
Database Name. Specify the physical MFG/PRO database you are connecting to.
User ID. Specify a user that has administrative rights to your MFG/PRO database. On UNIX, this is typically the root user.
5 Click the Advanced tab and modify the following field.
Default Isolation Level. Select READ UNCOMMITED to prevent record locking during synchronization.
6 Make sure the MFG/PRO source database is running.
7 Choose Test Connect. The log-in screen displays with the connection information displayed.
8 Leave the password blank and click OK. A message indicates the connection status.
Install OneBridge Sync Server
The user account that starts the OneBridge service should have full administrative access to the sync engine server and the QXtend
\requests directory.
Note QAD provides a serial number for OneBridge. This license allows you to use the required OneBridge Mobile Data Suite components.
Install OneBridge Sync Server Files
1 Run OMDSCDDir\Server\Setup.exe to install the Sync Server, where OMDSCDDir is the folder where you saved the OneBridge Mobile Data Suite 5.0 CD files. See “Obtain OneBridge Mobile Data Suite 5.0” on page 22.
2 Review and accept the defaults for each of the prompts to install the server. Note the installation directory; you specify it during other installation and configuration steps.
Note The Notes/Exchange Adapters and Listeners are not needed for QAD Mobile. You do not need to run any of the Sync Wizards during the OneBridge server installation. The configuration data supplied with QAD Mobile FS provides the required information.
Important Do not start the OneBridge service when prompted at the end of the installation.
3 Optionally install the Client Deployment Wizard if you intend to use Pocket PC 2002 or Windows Mobile 2003/2005 devices.
4 Run setup.exe from the \Server\language directory on the
QAD Mobile FS CD. Accept the default directory locations. The install directory should be the OneBridge server directory; for example:
C:\Program Files\Extended Systems\OneBridge Sync Server
Note If prompted to keep existing DLLs, answer No to
DBAdapter.dll and DBhelper.dll so that they are replaced.
Answer Yes to keep all other DLLs with the version on your server.
5 If you are using MFG/PRO eB2 or eB2.1, skip this step; QDocs for MFG/PRO eB2 and eB2.1 are installed by default.
If you are using an MFG/PRO eB database, copy the following files from \Server\QXtend\eB on the QAD Mobile FS CD to
c:\Program Files\QADMobile\QDocs\Template, overwriting
the existing files:
• maintainCall.xml • maintainCallFull.xml • maintainMaterialOrder.xml • maintainMaterialOrderFull.xml • recordCallActivity.xml • recordCallActivityFull.xml
Set Up the Authentication Configuration
1 From the OneBridge server installation \bin directory, run
QADMobileConfig.exe to set up the authentication configuration.
The QAD Mobile Configuration console displays.
2 Click Add to create a new data source.
Enter your environment settings using the following field descriptions:
QAD Mobile Root Directory. Enter the root directory where QAD Mobile is installed.
Data Source. For MFG/PRO eB2, enter the database name you will configure in the OneBridge database adapter later; for MFG/PRO eB2.1, enter the MFG/PRO domain name.
Server URL. Enter the QXtend Inbound server URL.
Note Do not include \services\QdocWebService.
Receiver ID. Enter the Receiver ID set up in QXtend Inbound.
Requests Directory. Enter the requests directory set up in QXtend Inbound.
See Technical Reference: QXtend Inbound for detailed information on configuring QXtend Inbound.
Click Save to save the settings and the data source name appears in the Data Source List. You can select a data source from the list to modify its settings. To delete a data source, select it from the list and click Delete.
3 Enable MFG/PRO Authentication if you want.
Configure OneBridge Sync Server
1 Launch OneBridge Sync Admin and select QADMobileFS.xcf on
the QAD Mobile FS CD as the configuration file from the More Files... option. The OneBridge Sync Admin screen displays.
2 Right-click Database Adapters|Database Adapter under the Connect Configuration|General folder and select Configure to configure the Database Adapter. Answer Yes when prompted to start the OneBridge service.
Note If you installed the OneBridge sync server using a port other than the default 5001, you must first change the Database Adapter to use your new port also. To do this, enter your port number for the adapter and then continue with the MFG/PRO database updates.
3 Right-click MFGPRO under Database Adapter and select Configure to configure the database adapter for your MFG/PRO database. The Database window displays.
4 Edit the database connection to point to the MFG/PRO database.
a In the Display Name field, enter the same database or domain name you entered as data source in the QAD Mobile
Configuration console when you set up the authentication configuration.
b Add the ODBC administration user ID used to connect the ODBC driver to the Connection String:
Provider=MSDASQL.1;Password="";Persist Security Info= True;User ID=<userID>;Data Source=<dataSource>
c Specify the ODBC administration user ID in the User Name field in the administration section at the bottom of the screen.
Note When leaving the Database Adapter dialog, answer No when prompted to check the System Variable Table. Answer Yes when prompted to force a full synchronization.
5 If you are configuring the sync server to synchronize with multiple MFG/PRO databases, right-click Database Adapter and select New| Database Connection to add a database connection and repeat step 4 to configure it for each MFG/PRO database.
6 Expand the Action Sets folder to view action sets.
For Windows Mobile-based devices, action sets are located under the Connect Configuration|Windows CE Connection|Action Sets folder; for laptops, action sets are located under the Connect Configuration| Windows Connection|Action Sets folder in the configuration tree.
7 Edit database sync actions under these action sets.
To Edit a database sync action:
a Right-click the database sync action under the action set and select Configure.
b The Database Sync Action window displays. Click the Configure button.
MFG/PRO Release Mobile Device Action Sets Laptop Action Sets
MFG/PRO eB, eB2
SQLCEStatic SQLCETransaction SQLCEControl Win32Static Win32Transaction Win32Control MFG/PRO eB2.1 SQLCEStaticDom SQLCETransactionDom SQLCEControlDom Win32StaticDom Win32TransactionDom Win32ControlDom
c The Database Sync Action Data Source window displays. Select the database adapter and click Edit.
d The Edit Data Source window displays. Change the Display Name to the data source you configured for the MFG/PRO database in the previous steps. Click OK when finished.
e Repeat steps a through d for each action you need to configure.
8 If you are configuring the sync server to synchronize with multiple MFG/PRO databases, duplicate the following action sets and repeat step 7 to edit the new action sets. To duplicate an action set, click it and select Duplicate. A copy of the action set appears at the bottom.
9 Expand the Connect Configuration|General|Groups folder to view user groups. For MFG/PRO eB or eB2, the group is QADMobile; for MFG/PRO eB2.1, the group is QADMobileDom.
MFG/PRO Release Mobile Device Action Sets Laptop Action Sets
MFG/PRO eB, eB2
SQLCEStatic SQLCETransaction SQLCEControl Win32Static Win32Transaction Win32Control MFG/PRO eB2.1 SQLCEStaticDom SQLCETransactionDom SQLCEControlDom Win32StaticDom Win32TransactionDom Win32ControlDom
10 If you are configuring the sync server to synchronize with multiple MFG/PRO databases, create a group for each MFG/PRO database by right-clicking the existing group and selecting Duplicate. The new group appears at the bottom.
11 Configure the new groups you created.
a Right-click the group and select Configure.
b The Group Properties window displays. Click on the Triggers tab to display triggers.
c Modify the following triggers to hold the new action sets.
To modify a trigger, select the trigger and click Edit; then select the correct action set in the Modify Trigger window. Click OK to save.
Mobile Devices Laptops
SQLCEStatic SQLCETransaction SQLCEControl Win32Static Win32Transaction Win32Control
d Repeat steps a through c for each group you created.
12 Right-click Authentication on the configuration tree, select New, and then click Windows NT Authentication.
The Windows NT Authentication window displays. Select a user group and click Add to set up authentication for sync users. If you are using MFG/PRO eB or eB2, select QADMobile in the OneBridge Group drop-down list; if you are using MFG/PRO eB2.1, select QADMobileDom.
13 Double-click Variables under the Connect Configuration|General| Server Settings folder and verify the variables.
• SERVER_APP_PATH should be the QAD Mobile FS file location on the server to hold user files transferred back and forth.
• SERVER_DRIVE should be the drive location where QAD Mobile FS was installed.
• CLIENT_APP_PATH should be the QAD Mobile FS file location on the client where the application is installed.
• CLIENT_DRIVE should be the drive location for the Windows QAD Mobile FS client.
Note These values are set during installation and typically do not need to be changed.
14 Restart the OneBridge service using File|Restart Service.
15 If you are using mobile devices, run the Client Deployment Wizard to create a deployment executable. This file is then copied to a laptop and used to install required updates on client devices, as described in “Install on Device from a Laptop” on page 47.
See the OneBridge documentation for details about using the Client Deployment Wizard.
Install Client Components
The steps you take to install components on your devices depend on whether you are using laptops or PDAs. Choose the appropriate section.
Install Client Components on Laptops
Install the OneBridge Client on a Laptop
1 Run OMDSCDDir\Clients\Windows\Setup.exe to install the OneBridge Windows Client, where OMDSCDDir is the folder where you saved the OneBridge Mobile Data Suite 5.0 CD files. See “Obtain OneBridge Mobile Data Suite 5.0” on page 22.
2 When prompted for database synchronization, click Yes. Accept all the other default values to complete the installation.
3 From the start menu, choose Programs|OneBridge Windows Client| Windows Client.
4 Select Server on the Settings menu. Enter SyncServerName and
PortNumber. Choose Close.
5 Select Connect to accept the public key and retrieve an action list from the server. Enter your credentials when prompted.
6 For clients using the Dutch OS only, copy ADOXDB.dll in the OneBridge folder on the QAD Mobile FS CD to:
C:\Program Files\Extended Systems\OneBridge Windows Client
Note Do this after installing OneBridge on the client PC.
7 Choose Options|Exit.
Install the QAD Mobile FS Client on a Laptop
1 Copy QADMobileFS.CAB, setup.exe, and SETUP.LST from the
WinClient\language directory on the QAD Mobile FS CD to a
temporary working directory on the laptop.
Note Answer Yes when prompted to keep more current DLLs on your laptop.
3 Extract the files to C:\Program Files\QADMobile\MFS.
4 Continue with the activities described in “Set Up Client Devices” on page 62.
Install Client Components on Pocket PC Devices
Your can install components on a pocket PC device in two ways:
• Use ActiveSync to connect to a laptop and install from the laptop to the device. This method assumes you created a deployment
executable as described in step 15 on page 45.
• Use the device to download files from an intranet or Internet site and install them locally.
QAD recommends the first approach because it is the most
straightforward. However, the other approach is documented in case it is needed.
Install on Device from a Laptop
Prior to running these steps, make sure ActiveSync is working on the client device. Then, connect the client device to a local PC that is
connected to the company network and make sure ActiveSync establishes a connection with the device. The following steps involve installing several components to a working directory on the PC, then copying them them to the device.
Install the OneBridge Client
1 Make sure that you completed step 15 on page 45 to create an executable with the Client Deployment Wizard and that you downloaded it from the server to a working directory on your local PC. These steps assume the executable is named setup.exe.
2 From the working directory on your local PC, launch setup.exe to
install the OneBridge client files on the device. Enter credentials of the user associated with the device and follow the prompts to complete the installation.
3 From the start menu on the device, choose OneBridge.
4 Choose Server on the Settings menu. Accept the default values for the server and port number. Choose Close.
5 Choose Connect to accept the public key and retrieve an action list from the server. Enter your credentials when prompted.
6 Choose Options|Exit.
Install the QAD Mobile FS Client
1 Copy setup.exe from the WinCEClient\Language\OS directory
on the QAD Mobile FS CD to a working directory on the PC.
Note For both Windows Mobile 2003 and 2005, OS is
WindowsMobile.
2 From the PC working directory, launch setup.exe.
3 Accept the license agreement and click Finish to complete the installation.
4 Continue with the activities described in “Set Up Client Devices” on page 62.
Install on Device from the Server
Complete these steps if your device cannot connect to a PC. These steps assume that a CD image is available on an intranet or Internet site. To begin, copy the following files to the My Documents folder on the
device:
WinCEClient\us\CABFiles\SplitRecord.ARM.CAB WinCEClient\us\CABFiles\QADMobileFS.ARM.CAB
In addition, if your device is using the Windows Mobile 2003/2005 operating system, you must copy an additional file:
WinCEClient\us\CABFiles\msvbpcc.armV4.cab
Install OneBridge Client
1 Locate setup.ARM.CAB on the device using File Explorer and
execute it.
2 From the start menu, choose OneBridge.
3 Select Server on the Settings menu. Enter SyncServerName and
PortNumber.
4 Select Connect to accept the public key and retrieve an action list from the server. Enter your credentials when prompted.
5 Click OK on the log screen.
6 Choose Options|Exit.
Install the QAD Mobile FS Client
1 Execute SplitRecord.Arm.CAB and QADMobileFS.ARM.CAB on the device from My Documents.
2 If you have a Windows Mobile 2003/2005 device, also execute
msvbpcc.armV4.cab from My Documents.
3 Continue with the activities described in “Set Up Client Devices” on page 62.
Important On a pocket PC, make sure you have already installed the AppForge Pocket PC/Windows Mobile Crossfire Client, as described in “PDA” on page 23.
Complete the Setup
Continue with the steps outlined in the next chapter to set up data required before you can sync the devices.
Upgrading MFG/PRO After Installing QAD
Mobile FS
When you install QAD Mobile FS 1.5.1, updates to your database schema may be applied, depending on the release and service pack of your underlying MFG/PRO system. If you later upgrade your MFG/PRO system, you may need to take additional steps to preserve your QAD Mobile data. The steps differ for different upgrade paths.
If you are upgrading to MFG/PRO eB2 Service Pack 10 or below, no additional steps are required. However, when you dump/load data to a new database, you must apply the QADMobile.df to the target database. If your upgrade target release is MFG/PRO eB2, Service Pack 11, you must use the following steps to convert the QAD Mobile FS data.
Note You can use Progress tools to dump data from a table, drop the table, and load new schema and data files. Refer to the Progress documentation for details.
1 Dump data from the mfsd_det table in your MFG/PRO production database (qaddb) into mfsd_det.d using the dump.sh utility.
a Copy the conversion utility files from the
/MFGPRO/Conversion directory on the QAD Mobile FS CD to
a temporary directory on the UNIX MFG/PRO data server and unset the read-only attribute of the dump.pf and load.pf files.
b Use a text editor to open the dump.pf file.
c Replace <MFGPRODatabaseConnectionParameters> with
your MFG/PRO database connection parameters and save the file. Use the sample parameters provided in this configuration file.
d Use a text editor to open the dump.sh file.
e Replace <ProgressInstallDir> with your Progress installation directory path and save the file.
f Execute the dump.sh program.
g Check dump.log for errors. The log file is in the directory from
2 Use Progress tools to load the delta_QADMobile.df delta schema
file into your MFG/PRO production database (qaddb) to drop the mfsd_det table and the pt_svc_group index.
3 Load the data you dumped in step 1 (mfsd_det.d) back into the mfsd_det table using the load.sh utility.
a Use a text editor to open the load.pf file under the temporary directory you created in step 1.
b Replace <MFGPRODatabaseConnectionParameters> with your MFG/PRO database connection parameters and save the file. Use the sample parameters provided in this configuration file.
c Use a text editor to open the load.sh file.
d Replace <ProgressInstallDir> with the Progress installation
directory path and save the file.
e Execute the load.sh program.
f Check load.log for errors. The log file is in the directory from which load.sh was launched.
Setting Up QAD
Mobile FS
Before you can begin to use QAD Mobile FS, you must complete some setup steps in MFG/PRO as well as on the mobile device. This chapter covers those steps.
Set Up SSM Data in MFG/PRO 54
Set Up Client Devices 62
Perform Initial Full Sync 65
Set Up SSM Data in MFG/PRO
Before you can use QAD Mobile FS, you must set up all of the required data to support call tracking in the Service/Support Management (SSM) module. This includes data such as call statuses, types, queues, work codes, severity codes, and default call information.
Setting up call defaults helps to reduce data entry errors and ensure that the synchronization is error free. See the Setting Up Call Defaults section in MFG/PRO eB2 User Guide Volume 8A: Service/Support Management
for details. You must also define the end users you plan to support and the types of service coverage you offer.
To help streamline the synchronization of item data between MFG/PRO and the remote devices, you can associate service groups with items in Service Item Maintenance (11.3.7). You can then specify a range of service groups in QAD Mobile User Maintenance (11.1.12) to limit records to synchronize.
There are several steps to setting up users in MFG/PRO:
1 Define remote users as MFG/PRO users in User Maintenance (36.3.18, 36.3.1 in MFG/PRO eB2.1).
This step is required if you are using MFG/PRO authentication. For ease of administration, you should use the same user IDs as those defined for the synchronization server.
2 Define the remote users as employees in Employee Maintenance (2.17.1).
3 Define the remote users as engineers in the Service/Support Management (SSM) module using Engineer Maintenance (11.13.1).
4 Optionally, move inventory in each engineer’s site and location to be available for assigned calls using functions on the Inventory Control menu (3).
5 Optionally, associate the engineer with end users that they will regularly support by specifying their ID as the Engineer Code field of the Service Office Detail frame of End User Address Maintenance (11.9.1).
6 Define data required for the remote users in QAD Mobile User Maintenance (11.1.12). See the next section for details.
Define QAD Mobile FS Users in MFG/PRO
When you configure MFG/PRO, a new program is installed that lets you define the users that will access MFG/PRO from remote devices and specify settings that manage how information is updated on their devices.
Fig. 4.1
QAD Mobile User Maintenance (11.1.12)
Note If you are using MFG/PRO eB2, the MFG/PRO Domain field will not display.
Use QAD Mobile User Maintenance (11.1.12) to:
• Specify settings that determine how information is updated on remote devices. For MFG/PRO eB2, these settings apply to all users; for MFG/PRO eB2.1, you can choose to apply these settings to users in all domains or the current domain.
• Create records for individual users that access MFG/PRO through mobile devices. The program lets you link a remote user ID with an engineer defined in MFG/PRO and specify values that determine how MFG/PRO records are replicated on the device. In MFG/PRO eB2.1, the program lets you specify an MFG/PRO domain with which the engineer synchronizes data with through the sync engine user ID.
You must also create a record in QAD Mobile User Maintenance for the user ID that created your MFG/PRO database. In most cases, this user is root on UNIX systems or some other administrator user ID. This ID is needed if you plan to edit any of the field mappings in OneBridge, since OneBridge uses this user to evaluate certain values used in the
synchronization queries.
When users attempt to sync from a remote device, a configuration option lets two sets of authentications take place: one for the sync engine and one for MFG/PRO. To streamline synchronization, you can define the same IDs in the sync engine and in MFG/PRO User Maintenance (36.3.18, 36.3.1 in MFG/PRO eB2.1). You can then use the Single Sign-On for Sync Engine option to authenticate users. However, for this feature to work correctly, you must ensure that the IDs set up for the sync engine and those created in User Maintenance in MFG/PRO are exactly the same.
You also define whether data at the call header or call line level determines what displays on remote devices.
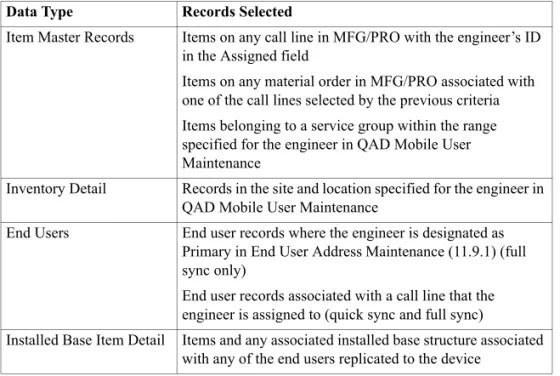
Other values defined in this program affect which item and inventory records are available on a specific engineer’s device:
• The domain in MFG/PRO eB2.1 restricts all data access to a specified domain.
• The site and location determine the inventory detail records (ld_det) available during call activity recording for service item usage and returns as well as the records listed on the Inventory List screen.
• The start and end service group filter the items (pt_mstr) replicated from the item master that can be selected for a call or for a parts order. In addition to these records, the following item data is also available on the device:
• Installed base records belonging to an end user on a call sent to the device
• Installed base records belonging to an end user whose primary engineer is the engineer associated with the device
• Items that do not match the service group but that are on a call or parts order sent to the device
Installed base records can be accessed when creating or updating a call, when returning an item while recording call activity, and when viewing the Installed Base Item List.
Configure General Sync Settings
Use the following field definitions to help you as you set up your users:
Single Sign-On For Sync Engine. Indicate how you want the system to authenticate users when they attempt to synchronize data with MFG/PRO from remote devices.
No: The remote user may be prompted twice for credentials: first for MFG/PRO and then for the sync engine.
Yes: The remote user is prompted for one set of credentials only. The system uses those credentials to also validate against the sync engine. The setting defined here sets the default for each remote user. Individual users can modify the default setting in the Admin|Settings screen, but this will only be retained for the next synchronization executed.
Important If you specify Yes and you have enabled MFG/PRO authentication in QAD Mobile FS, you must establish procedures to ensure that exactly the same IDs are set up in MFG/PRO User Maintenance and in the synchronization engine.
Even if you specify No to Single Sign-On, it is possible for the user to be prompted for credentials only once. To do this, the user must save the sync engine credentials on the device. In this case, the second prompt for credentials does not display.
This setting applies to all records you define in this program. It defaults to No until you create a record for a user. Then it defaults to the value for the first detail record. If you change the value for this field, the system prompts you to update all currently defined records with the new value. If you respond No, none of the records are updated.
Prioritize Call Header on Client. Indicate whether you want values associated with the call header or the call line to determine the work code and status displayed on the mobile device and updated in MFG/PRO.
No: The call line values display on the device. When changes are made on the device, only the call line in MFG/PRO is changed. Yes: The call header values display on the device. When changes are made on the device, the call line value is updated in MFG/PRO and the call header value is updated as well.
Note You cannot use a device to change the status of a call or call line to the close status as defined in Call Management Control. Calls can only be closed in MFG/PRO.
This setting is typically set to Yes only when you normally create calls with a single line item. When Prioritize Call Header on Client is Yes and two call lines have different statuses, the call list on the device displays the call header status for both lines.
This setting applies to all records you define in this program. It defaults to No until you create a record for a user. Then it defaults to the value for the first detail record. If you change the value for this field, the system prompts you to update all currently defined records with the new value. If you respond No, none of the records are updated.
Nonexisting End User. Indicate whether end user IDs are validated during call entry on a QAD Mobile FS device:
No: The end user ID entered on a call in QAD Mobile must exist on the client.
Yes: The mobile user can enter the ID of an end user that does not already exist on their device. When the device is synchronized, this end user record must exist in MFG/PRO or an error is generated.
Note See “Understanding Synchronized Data” on page 66 for a description of which end user records exist on the device.
Setting this field to Yes lets your remote engineer create a call for an end user for whom they have not previously provided service. This might be useful in an emergency when the regular engineer is not available.
Nonexisting Item. Indicate whether item numbers are validated during data entry on a QAD Mobile FS device:
No: The item number entered on a call or parts order in QAD Mobile must exist on the client.