HP P6000 Command View Software Suite
Installation Guide
Abstract
This guide is for customers who are experienced with Enterprise Virtual Arrays, storage area networks, and associated software.
HP Part Number: T5494-96587 Published: September 2013 Edition: 19
© Copyright 2005–2013 Hewlett-Packard Development Company, L.P.
Confidential computer software. Valid license from HP required for possession, use or copying. Consistent with FAR 12.211 and 12.212, Commercial Computer Software, Computer Software Documentation, and Technical Data for Commercial Items are licensed to the U.S. Government under vendor's standard commercial license.
The information contained herein is subject to change without notice. The only warranties for HP products and services are set forth in the express warranty statements accompanying such products and services. Nothing herein should be construed as constituting an additional warranty. HP shall not be liable for technical or editorial errors or omissions contained herein.
Acknowledgments
Microsoft® and Windows® are U.S. registered trademarks of Microsoft Corporation. Java™ is a registered trademark of Oracle Corporation.
UNIX® is a registered trademark of The Open Group.
Itanium® is a registered trademark of Intel Corporation or its subsidiaries in the U. S. and other countries.
NOTE: IPv6 is supported on array-based management HP P6000 Command View Software Suite beginning with version 9.2.
NOTE: USGv6 is supported on array-based management HP P6000 Command View Software Suite beginning with version 10.1. Internet Protocol Security (IPsec) is not supported with HP P6000 Command View Software Suite array-based management.
Contents
1 Preparation...6
Installation prerequisites...7
Server-based management prerequisites...8
P6000 Command View software suite...8
HP SMI-S EVA...10
Management server types...11
Setting credentials...11
Management server...11
Ensuring successful authorization...12
Array-based management prerequisites...12
HP Insight Remote Support software...13
2 Installing server-based software...14
Installing the software suite on a management server...14
Starting the installer...15
Introduction and license agreement...15
Choosing software and options...15
Security groups configuration...16
HP P6000 Performance Advisor database folder...16
Ports Configuration...16
HP firewall configuration...19
HP Insight Remote Support software...19
Install complete...19
Checking services and icons...19
Removing server-based software...20
Upgrading HP P6000 Command View software...20
PMM backup during an upgrade from Command View version 10.2 to version 10.3...21
Backup file locations...21
Upgrading EVA P6000 Performance Advisor from version 10.1 or 10.2 to 10.3...22
Removing the software suite...23
Retaining HP P6000 Performance Data Collector performance data...23
Removing individual components...24
Removing HP P6000 Performance Advisor...24
Downgrading HP P6000 Command View...24
3 Upgrading array-based software...25
Installing ABM package files...25
Verifying installations...26
Logging in...26
Updating the HP Command View software suite on the management module...26
Verifying the installation on the management module...27
4 Logging in to HP P6000 browser-based applications...28
Verify application installation...28
Installing Management Group security certificates...28
5 Installing HP EVAInfo software...29
HP EVAInfo files on the DVD...29
Installing HP EVAInfo files...29
6 Installing HP SSSU software...30
HP SSSU files ...30
Installing HP SSSU files...31
Verifying HP SSSU installations...31
7 Installation troubleshooting...32
SmartStart required software popup...32
HP Management Integration Framework installation troubleshooting...32
Failed to connect to discovery...32
HP firewall exception ports check...32
HP SMI-S EVA CIMOM installation troubleshooting...33
HP SMI-S EVA CIMOM ports check...33
Antivirus software may degrade performance...33
Command View 10.2 or later Postgres installation fails in default installation directory...34
8 Completing storage system installations ...37
Completing installations overview...37
Verifying the communication path...37
Initializing newly installed storage systems...37
Creating a storage system password...38
Enabling management of a password-protected storage system...38
Setting the date and time on the storage system...38
9 Support and other resources...39
Contacting HP...39
HP technical support...39
Subscription service...39
Product feedback...39
Documentation feedback...39
Related information...39
Documents...39
Websites...39
Typographic conventions...40
A HP P6000 Command View Software Suite components...41
B Illegal characters in names and comments...43
C Server-based software...44
Adding users to security groups...44
Upgrading HP P6000 software suite...44
Backup file locations...44
Supported upgrade paths...45
Unsupported upgrade paths...45
D Server-based HP P6000 Command View...46
Installing HP P6000 Command View and HP Systems Insight Manager on the same server...46
Localization and supported languages...46
Excluding antivirus software scans...46
Configuring the VMware guest operating system for HP P6000 Command View...47
Downgrading server-based HP P6000 Command View...49
E HP SMI-S EVA configuration...50
Configuring HP SMI-S EVA after installation...50
Configuring HP SMI-S EVA to discover arrays...51
Importing Single Sign-on trust certificates with the Discoverer tool...51
Manually importing a Single Sign-on Trust Certificate...51
HP SMI-S EVA caching and performance...51
Using the Discoverer tool ...52
Using the Discoverer tool in interactive mode...52
Using the Discoverer tool in noninteractive mode...52
Importing the HP SIM SSL certificate for indication delivery...53
Configuring CIM indications...54
Lifecycle indication...54
Alert indication...55
Configuring HP SMI-S EVA to generate alerts using HP Insight Remote Support...55
Configuring HP SMI-S EVA logging using the dynamic log-level setting tool...56
Installer log files...56
Using the CollectLogs tool...56
Ensuring successful restart of CIMOM...57
Other CIMOM server configurable properties...57
Other Provider configurable properties...57
Restarting the CIMOM service...58
Using the CLIRefresh tool...59
Using the GetArrayRefreshStatus tool...59
Removing HP SMI-S EVA...60
F Array-based HP P6000 Command View...62
Security group configuration...62
Controller time zone reset to UTC after upgrading...62
G HP P6000 Performance tools...63
HP P6000 Performance Advisor...63
HP P6000 Performance Advisor installation planning...63
HP P6000 Performance Data Collector...63
HP P6000 Performance Data Collector installation planning...63
Retaining HP P6000 Performance Data Collector data...63
H HP P6000 software TCP ports...64
TCP ports summary...64
I Browser configuration...66
Configuring Internet Explorer for single sign-on...66
Configuring Firefox for single sign-on...66
Internet Explorer settings...66
Mozilla browser settings...68
Clearing the browser cache...69
Glossary...70
Index...73
1 Preparation
IMPORTANT: Be sure to read the following before installing or upgrading server-based HP P6000 Command View. If you install this software and have any of these legacy components, you will be unable to manage the arrays. HP strongly recommends that you contact HP Support before upgrading a configuration that contains these arrays.
Server-based HP P6000 Command View, version 10.x and later, cannot be used to manage the following legacy products:
• HP 3000 EVA storage systems
• HP 5000 EVA storage systems
• Controller software XCS 5.x running on HP 4000 EVA storage systems
• Controller software XCS 5.x running on HP 6000 EVA storage systems
• Controller software XCS 5.x running on HP 8000 EVA storage systems
The HP P6000 Command View Software Suite kit contains the following components.
• HP P6000 Command View Software (server-based)
• HP P6000 Performance Advisor Software
• HP P6000 Performance Data Collector Software
• HP P6000 Control Panel Software
• HP P6000 SmartStart Software (Windows)
• HP EVAInfo
• HP Management Integration Framework Software
• HP SMI-S EVA CIMOM
• HP Storage System Scripting Utility (multi-platform)
• HP P6000 Replication Solutions Manager Software (server)
• HP P6000 Replication Solutions Manager Software (host agents)
• HP P6000 SmartStart Software (Linux)
• HP EVA to 3PAR StoreServ Online Import
• Documentation
For descriptions of software suite components and details about DVD and CD contents, see the HP
P6000 Command View Software Suite Kit Contents or“ HP P6000 Command View Software Suite components” (page 41). For an explanation of acronyms and terms, see the“Glossary”.
You will need the following documents to complete the installation:
• HP P6000 Command View Software Suite Release Notes • HP P6000 Enterprise Virtual Array Compatibility Reference
If you plan to migrate EVA data to a 3PAR storage system, you will also need the EVA to 3PAR
Online Import Migration Guide.
When you purchase HP P6000 Command View, you can choose to receive a software DVD or an E-Delivery kit. If you choose an E-Delivery kit, you will receive an email from HP with download instructions.
The HP IT Resource Center (ITRC) reached its end of life in June 2011. The new HP Support Center will provide you a more personalized online support experience with access to information, tools and experts to keep your technology running in the Instant-On connected world.
1. Sign-in to the HP Support Center (http://www.hp.com/go/hpsc) with HP Passport (or register first for HP Passport if you have not already obtained one.)
2. Start your ITRC migration by clicking on the Profile Migration Feature in the home page on HP Support Center.
3. Provide your ITRC username and password. After the system verifies and confirms that you are the owner of the ITRC username and password, the migration will begin. You will get a confirmation from the system when the migration is complete.
NOTE: If you used a single ITRC login (username and password) for multiple users, you will need separate HP Passport sign-ins for each individual on the HP Support Center. An ITRC account can only be migrated once, and only to one HP Passport account on HP Support Center. HP recommends that you identify an individual within your team to claim the ITRC account. This person will then need to create shares to enable others to obtain the important benefits of the linked entitlements.
If you had a linked contract on ITRC, this contract is migrated to your HP Passport account and is now available on HP Support Center. Any members who shared the contract in ITRC will be part of the new share and will have access to the same services as on ITRC once they complete the migration steps above.
NOTE: The owner of the share does not have to migrate first. Migration can be done in any order by the owner or any of the individuals who share the linked entitlement.
4. Use HP Support Center to review your profile, contracts and warranties (including managing sharing).
If you have questions or require additional assistance go to:
http://welcome.hp.com/country/us/en/wwcontact_us.htmland select your country/region.
Installation prerequisites
Server-based P6000 Command View software runs on general purpose servers, including c-class and p-class blades, or servers that meet the following hardware and software requirements:
Hardware requirements
• X86 and x64 architectures are supported
• 1.26Ghz processor (minimum)
• 2 GB memory (minimum)
• Disk Space Requirements
200 MB for HP Command View software installation
◦
◦
2 GB for HP Command View log files◦
10 MB for each managed array◦
550 MB for HP Replication Solutions Manager◦
Additional 300-400 MB for HP Replication Solutions Manager installation to accommodate log and database growthFor additional information, see the HP P6000 Enterprise Virtual Array Compatibility Reference, Tables 3.6, “Management module software compatibility” and 4.2, “Supported P6000 software operating environments.”
Server-based management prerequisites
Ensure that you have satisfied the prerequisites before starting your installation.
P6000 Command View software suite
Before you install the software suite:
Read the HP P6000 Command View Software Suite Release Notes for any installation or post-installation requirements specific to this release.
IMPORTANT: Do not change the localhost mapping in theetc\hostsfile (by default 127.0.0.1 is mapped tolocalhost) or the HP P6000 Performance Advisor database service may fail to start.
Software requirements
To install HP P6000 Command View without HP P6000 Performance Advisor and without HP EVA to 3PAR StoreServ Online Import, the following free space is required:
• 1 GB for installation (Windows system drive)
• 1 GB for use (software destination directory)
To install HP P6000 Command View with HP P6000 Performance Advisor and HP EVA to 3PAR StoreServ Online Import, the following free space is required:
• 5 GB for installation
• 1 GB for use
• 20 GB for database storage
HP EVA P6000 Command View Software Suite is supported on the Windows Server 2012, Windows Server 2012 Datacenter edition, and Windows Server 2008 R2 English base operating systems with the Multilingual User Interface (MUI) set to the German, French, Spanish, Italian, or Portuguese Language Pack. The language support is in addition to English and Japanese which is currently supported by HP P6000 Command View Software. The HP P6000 Command View Software is localized to English or Japanese only.
To install and use HP P6000 Command View Software 10.0 or later on a German, French, Spanish, Italian, or Portuguese Windows Server 2008 R2 MUI Language Pack locale, or equivalent, on the Windows Server 2012 Datacenter edition, the following requirements must be met:
• The management server must be a Windows Server 2008 R2, or Windows Server 2012 Datacenter edition with the English base Operating System.
• Before installation, create the Administrators group and Administrator user account using English locale spelling.
• Using theControl Panel > Change display language, under the Format tab, ensure that the keyboard input language is set to ‘English (United States) – US’.
• Install the HP P6000 Command View Software Suite as described later in this document. HP P6000 Command View Software with the Japanese language is supported on either a Windows Japanese or English (with Japanese Language Pack) base Operating System. The keyboard input language can be set to either ‘English (United States) – US’ or ‘Japanese’.
TIP: The HP P6000 Command View Software Suite GUI is only localized to English and Japanese. Running the HP P6000 Command View Software Suite on a German, French, Spanish, Italian, or Portuguese operating system displays GUI content in English, or Japanese, if a Japanese localized copy is used.
1. To install the entire software suite, your environment must include the following:
• One or more arrays.
• A management server running a supported version of Microsoft Windows (see the HP
P6000 Enterprise Virtual Array Compatibility Reference for supported versions). • Management server with dual-core 1.86 GHz processor or above.
• 4 GB memory.
• More than 20 GB free space on the hard drive for the HP P6000 Performance Advisor database.
• If your server is a domain node, to install HP P6000 Command View, the logged-in user must have read and execute permission at the OS drive and user-installation drive levels.
• Adobe Flash Player plugin is required when using the browser to access HP P6000 Command View. (See Adobe Flash port configuration details athttp://www.adobe.com; search for configure ports for specific information.)
• If using firewalls, take the ports in“TCP ports summary” (page 64)into consideration.
• If using firewalls and if fixed ports are required in the MIF process, consult the HP
Management Integration Framework Administrator Guide to configure them.
• If the time set on your system is not your local time, the installation may fail. Check the time set on your system to ensure it is set for local time.
2. If your environment includes iSCSI or multifunction router devices, see the Manuals page on the HP Support Center website:
http://www.hp.com/support/manuals
For EVA Array iSCSI Connectivity Option documentation, under storage, selectOptions and Accessoriesand then selectStorage Array Optionsunder Options and Accessories for Storage. Finally, selectStorage EVA Array iSCSI Connectivity Option.
For MPX200 Multifunction Router documentation, under storage, select Storage Networking
and then selectHP MPX200 Multifunction Routerunder Routers/Gateways/Multiplexes. 3. If you use the VMware guest operating system, you must have a host running VMware 3.5 or
later and a virtual machine connected to the VMware host running a supported version of Windows (the guest operating system on the virtual machine). See your operating system documentation for details about setting up a virtual machine. Installing, upgrading, and removing HP P6000 Command View on a virtual machine is the same as installing HP P6000 Command View on a management server (a physical machine).
When using the VMware guest operating system, two methods are supported:
• Virtualized SCSI Mode: With this method, only the active path to LUN 0 of a single controller can be made visible to HP P6000 Command View on the virtual machine. Virtualized SCSI Mode is enabled by default when you install HP P6000 Command View 9.3 or later.
• VMDirectPath (PCI pass-through): Supported on HP P6000 Command View 9.3 or later. See Table 4.0, HP software deployment options, in the HP P6000 Enterprise Virtual Array
Compatibility Reference for VMDirectPath hardware requirements. For information on
VMDirectPath support and to configure VMDirectPath, see “Configuring VMDirectPath I/O for HP ProLiant Servers,” which is available on the VMware website at:
http://kb.vmware.com/kb/1025641
IMPORTANT: Do not install HP P6000 Command View on a virtual disk. Because HP P6000 Command View is the sole management interface for the array, it must be available at all times.
4. See the HP P6000 Enterprise Virtual Array Compatibility Reference for a list of supported operating systems.
5. Configure the browser settings for any server that will be used to access the HP P6000 Command View user interface. See“Browser configuration” (page 66)for details on browser configuration.
For information about upgrading from previous versions, see“Upgrading HP P6000 Command View software” (page 20).
HP Management Integration Framework (MIF) is installed automatically when you install HP P6000 Command View.
• HP MIF is intended primarily for security administrators.
• HP MIF has two interfaces (Configuration and Security), which you can access from HP P6000 Command View, or you can browse to each interface directly.
• Accessing or browsing to either HP MIF interface requires an Adobe Flash Player plugin on the browser.
• You may need to install Management Group digital certificates to access these HP MIF interfaces.
• You can install HP MIF without Command View, if desired. For example, you may want to install MIF to gain the ability to do single sign-on to HP Command View, MIF, and the Control Panel.
See the HP Management Integration Framework Administrator Guide for more information.
HP SMI-S EVA
NOTE: If you have layered applications requiring HP SMI-S EVA, you can install the HP SMI-S EVA component on any server that is either connected to the array/SAN or has access to HP P6000 Command View via the Ethernet. You can access the array-based version of HP P6000 Command View using the Discoverer tool.
Before you install HP SMI-S EVA, note the following:
• HP strongly recommends that you install HP Insight Remote Support software to complete the installation or upgrade of your product. For more information, see“HP Insight Remote Support software” (page 13).
• You can install HP SMI-S EVA separately; it does not need to be on the same management server as HP P6000 Command View. However, if HP SMI-S EVA is installed on the same server, ensure that you are logged in to the management server as a local user with local administrative privileges (the user must be a member of the local Administrators group).
• Install SLP, which enables you to receive information about applications that are registered with it. For example, when CIMOM is registered with SLP, you can receive information about CIMOM, such as the CIMOM URL and attributes.
• You can install HP P6000 Command View and HP SMI-S EVA on the same server as the HP P9000 Command View Advanced Edition Software.
Management server types
When using server-based management, you can install the software on the following servers:
• General-purpose server—A server that runs customer applications, such as file and print services
• Dedicated management server—A Windows host intended solely for HP storage software, such as HP OpenView Storage Node Manager, HP OpenView Storage Area add-on software modules, or HP array-integrated software
• HP X1000/X3000 Network Storage Systems and Gateways—A server similar to the
general-purpose server, used to manage arrays in the SAN as well as traditional NAS-based applications
For hardware and software specifications, see the HP P6000 Enterprise Virtual Array Compatibility
Reference.
Setting credentials
NOTE: The information in this section applies only to HP P6000 Command View server-based management. For array-based management, there is one admin account and one user account. The default user name for the admin account is admin; for the user account, it is user. By default, there is no password for either account. See the HP P6000 Command View Software Suite User
Guide for information about changing account information.
The existence of groups and users during software installation ensures:
• Authentication of users by login to the underlying operating system
• Assignment of predefined privileges to users
NOTE: In this section, unless a reference is made to the HP Storage Users group, user refers to anyone who can access HP P6000 Command View.
Management server
The installation process creates Groups automatically. If the management server is part of a domain or a domain controller, you can also create Groups manually before starting the software installation.
NOTE: In HP P6000 Command View 8.0 or later, HP SMI-S EVA, HP P6000 Performance Data Collector, HP P6000 Performance Advisor, and HP P6000 Replication Solutions Manager use the same groups.
Uninstallation does not delete groups created during installation. To create groups and users on the management server:
1. You must have administrator privileges.
2. Use the Windows operating system feature to create the following global groups:
• HP Storage Admins whose members can view and perform all tasks
• HP Storage Users whose members can only view information
IMPORTANT: To ensure successful authorization of groups, you must create the group names exactly as described in this step. See your Windows documentation for instructions on creating groups and users.
These groups are created for local authentication only. If the management server is part of a domain or domain controller, as administrator, you can create these groups manually and you can modify these group names during installation.
These groups have the following default privileges: members of the HP Storage Admins group can view and perform all tasks; members of the HP Storage Users group can only view information.
3. Create users and assign them to groups by entering a name and password for each user and assigning each user to a group.
IMPORTANT: Ensure that theUser must change password at next logonoption is not selected when creating users.
For information on configuring HP P6000 Command View credentials, see Installing Management Group security certificates in the HP Management Integration Framework Administrator Guide.
Ensuring successful authorization
Windows accounts used for authentication must have theAccess this computer from the network
permission enabled. By default, this permission is granted to Everyone, but some systems have a more restrictive setting where Everyone is removed and permission is enabled for application-specific groups; on such a system, you cannot authenticate with valid credentials.
To ensure successful authentication:
1. Access the Local Security Policy feature on the Windows operating system. The Local Security Settings window opens.
2. SelectSecurity Settings > Local Policies > User Rights Assignment.
3. Double-click theAccess this computer from the networkpolicy in the right content pane. 4. ClickAdd User or Group.
5. Add the users you have created to this permission.
Array-based management prerequisites
Array-based management applies only to the following:
• An HP EVA4400, P63x0 or P65x0
• A server running any supported operating system that you can connect to an EVA4400, P63x0 or P65x0
Ensure that your environment includes the following:
• Adobe Flash Player plugin is required when using the browser to access HP P6000 Command View. (See Adobe Flash port configuration details athttp://www.adobe.com; search for
configure ports for specific information.)
• If using firewalls, take the ports in“TCP ports summary” (page 64)into consideration.
• If using firewalls and if fixed ports are required in the MIF process, consult the HP Management
Integration Framework Administrator Guide to configure them.
IMPORTANT: When first setting up array-based management, connect directly to the Ethernet port to configure the array-based management IP address.
TIP: Whenever a Management Integration Framework configuration is changed, the user is prompted to restart the MIF ports; it can take up to a minute to restart the array-based management system.
These arrays are shipped with HP P6000 Command View pre-installed on the management module.
• Read the HP P6000 Command View Software Suite Release Notes for any installation or post-installation requirements specific to the latest release.
• Configure the browser settings for any server that will be used to access HP P6000 Command View.
• See“Updating the HP Command View software suite on the management module” (page 26)
for the procedure to update management module software.
HP Insight Remote Support software
HP strongly recommends that you install HP Insight Remote Support software to complete the installation or upgrade of your product and to enable enhanced delivery of your HP Warranty, HP Care Pack Service, or HP contractual support agreement. Notifications may be sent to your authorized HP Channel Partner for on-site service, if configured and available in your country. The software is available in two variants:
• HP Insight Remote Support Standard supports server and storage devices, is optimized for environments with 1-50 servers, and is ideal for customers who can benefit from proactive notification but do not need proactive service delivery and integration with a management platform.
• HP Insight Remote Support Advanced provides comprehensive remote monitoring and proactive service support for most HP servers, storage, network, and SAN environments, and selected non-HP servers with a support obligation with HP. It is integrated with HP Systems Insight Manager. HP recommends that a dedicated server host both HP Systems Insight Manager and HP Insight Remote Support Advanced.
For more information or to download either HP Insight Remote Support Standard or HP Insight Remote Support Advanced, go tohttp://www.hp.com/go/insightremotesupport.
2 Installing server-based software
This chapter provides information on how to install the HP P6000 Command View software suite on the management server (server-based management), how to remove it from the management server, and how to install it on the management module. For information on how to install HP P6000 Command View with HP P6000 Replication Solutions Manager and HP P6000 Command View for Tape Libraries, see the latest version of the HP P6000 Command View Software Suite
Release Notes. HP Management Integration Framework can be installed alone and is mandatory
for installing HP P6000 Command View, HP P6000 Performance Advisor, HP P6000 Performance Data Collector and HP SMI-S. It cannot be uninstalled if any of these were installed. HP P6000 Command View and HP Storage System Scripting Utility are installed and removed together. HP P6000 Performance Advisor, HP P6000 Performance Data Collector, HP P6000 SMI-S EVA, and HP EVA to 3PAR StoreServ Online Import can be optionally installed.
IMPORTANT: Do not use Remote Desktop to install or upgrade the HP P6000 Command View software suite. HP recommends that you close all applications on the server before starting the installation.
When installing on Windows Server 2008 or later, use theRun as Administratoroption to install the software.
Upgrading HP P6000 Command View does not reboot the system after uninstalling the previous version. The installer prompts for the server reboot. Once the reboot occurs, you must start the HP P6000 Command View installation manually.
If the firewall is enabled, the CV Suite installer creates a firewall exception for:
1. Command View ports
2. Management Integration Framework ports
3. HP EVA to 3PAR StoreServ Online Importports
Installing the software suite on a management server
HP P6000 SmartStart installs the HP P6000 Command View suite installer that installs the following software components:
• HP Management Integration Framework (always installed in the default location)
• HP P6000 Command View
• HP P6000 Performance Data Collector
• HP SMI-S EVA (SMI-S EVA Provider and CIMOM)
• HP P6000 Performance Advisor
• HP Storage System Scripting Utility
• HP EVA to 3PAR StoreServ Online Import
If you are using server-based management, you can install any combination of these components (typical or custom installation).
HP P6000 Command View suite installer provides an option to select the target installation directory for typical or custom installation.
To import data from EVA to 3PAR, see the EVA to 3PAR Online Import Migration Guide.
Starting the installer
1. Insert DVD 1. The HP P6000 SmartStart wizard opens.
Allow 1 to 2 minutes for the HP P6000 SmartStart wizard to automatically begin. If the HP P6000 SmartStart wizard does not automatically start, navigate to the DVD in Windows Explorer and double-click the fileP6000SmartStart.exe. The HP P6000 SmartStart wizard opens in a browser window.
In rare cases, a popup may appear. See“SmartStart required software popup” (page 32). 2. Read the HP P6000 SmartStart End User License Agreement and clickAccept. A Welcome
page opens.
3. Click theInstall HP P6000 Command View Suitebutton. The HP P6000 Command View Software Suite installer opens in a separate window. Allow 1 to 2 minutes for the installer window to open.
Introduction and license agreement
1. Read the introduction and important information before proceeding.
2. Read and respond to the licensing information and navigate until the Choose Install Set page opens.
If the same version of HP P6000 Command View is already installed, the Introduction and License Agreement pages are not displayed.
Choosing software and options
The following steps show installation of a full install set — all components. If some software in the suite has been previously installed, or if you choose a partial install set, some of the following steps will not be required. Your requirements determine if you do not need all the components shown.
1. Do one of the following:
• To install the suite in the default folder, accept Typical in the Install Set box.
• To install the suite in a folder that you specify or install only some of the items shown, select Custom in the Install Set box and uncheck those items you do not want to install.
2. ClickNext
• If you accept Typical, the Security Groups Configuration page opens.
• If you select Custom, the Install Options page opens. Specify the folder to install in and clickNext.
Only components that can be installed or upgraded on a Windows server or host are displayed. Components of the same version that are already installed are not displayed.
The installer prompts you when certain components must be installed together. For example, when installing HP P6000 Command View, HP Management Integration Framework must also be installed on the same server.
Security groups configuration
The installer verifies or creates the following Windows security groups on the server:
• Admin Group: HP Storage Admins
• User Group: HP Storage Users
You can use local or domain security groups to control access (log in) to HP P6000 software components.
1. AcceptUse local security groupsor selectUse domain security groups as appropriate and clickNext.
2. Read the on screen reminder to add users to these groups and clickNext. The Windows security groups are automatically created if they do not already exist.
HP P6000 Performance Advisor database folder
Installation includes installation of a database for HP P6000 Performance Advisor. 1. Do one of the following:
• Accept the default location.
• ClickChooseand specify a location. You can use this choice to specify the location for a new database or to specify a database that already exists in a custom location. 2. ClickNext. The installer checks folder choices and available space and the Pre-installation
Summary page opens.
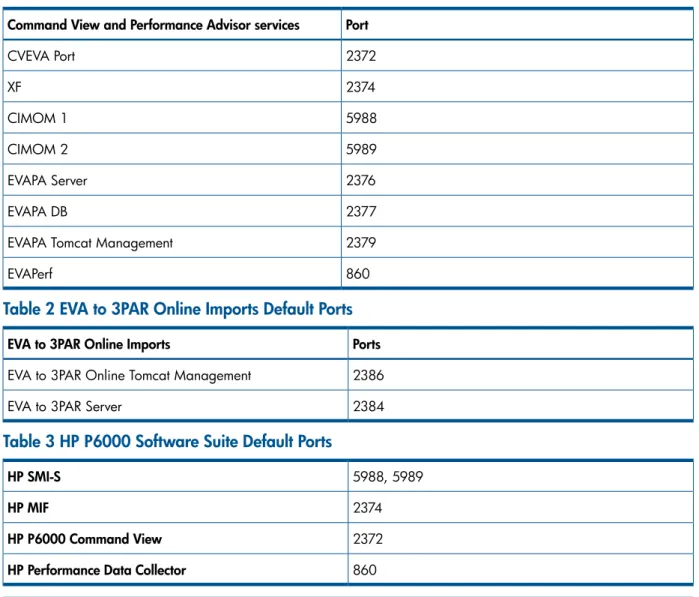
Ports Configuration
If the default ports for the applications are in use, the installation tool asks the user to enter free ports in the available range.
When the Configuration Settings Port Configuration window displays ports available on the management server.
IMPORTANT: This window appears only if the installation wizard detects that any of the default ports are in use, as follows:
Table 1 HP P6000 Command View and HP P6000 Performance Advisor Default Ports Port
Command View and Performance Advisor services
2372 CVEVA Port
2374 XF
5988 CIMOM 1
5989 CIMOM 2
2376 EVAPA Server
2377 EVAPA DB
2379 EVAPA Tomcat Management
860 EVAPerf
Table 2 EVA to 3PAR Online Imports Default Ports Ports EVA to 3PAR Online Imports
2386 EVA to 3PAR Online Tomcat Management
2384 EVA to 3PAR Server
Table 3 HP P6000 Software Suite Default Ports
5988, 5989
HP SMI-S
2374
HP MIF
2372
HP P6000 Command View
860
HP Performance Data Collector
Keep the ports that are displayed or enter the port numbers that you want to use. If port 2372 is busy, the following screen appears:
When installing HP SMI-S EVA CIMOM, the installer checks for ports 5988 and 5989, which are used with the CIMOM service. If the ports are not available, the Ports busy screen with the following message is displayed:
CIMOM Port 1 port is not available, CIMOM Port 2 port is not available.
It displays the available port numbers and provides an option to edit the port number, if the user wants to change any port number.
HP firewall configuration
See also“HP P6000 software TCP ports” (page 64).
• When installing HP P6000 Command View, the installer checks to see if a Windows firewall is enabled on the server. Windows firewalls may apply to HP P6000 Command View, HP Management Integrations Framework and HP EVA to 3PAR StoreServ Online Import. If a Windows firewall is already enabled, one of the following messages is displayed so that the port can be configured for use:
Setup has detected that a Windows firewall is enabled on the system. Do you want setup to configure port 2372 for HP P6000 Command View on Windows firewall?
Setup has detected that a Windows firewall is enabled on the system. Do you want setup to configure port 2374 for Management Integration Framework on Windows firewall?
Setup has detected that a Windows firewall is enabled on the system. Do you want setup to configure port 2386 for HP EVA to 3PAR StoreServ Online Importon Windows firewall?
NOTE: If the ports are busy, CV suite installer displays the available ports.
If you enable the specific port, the installer configures it on the firewall. Check the“HP P6000 software TCP ports” (page 64)to verify port usage.
The XF secure web service ports and XF unsecure web service ports must be enabled otherwise accessing the HP Command View software from a remote system fails. By default, the XF secure web service ports and XF unsecure web service ports are selected by system. These ports can be defined and then they can be enabled.
See also“HP P6000 software TCP ports” (page 64).
HP Insight Remote Support software
HP recommends installing HP Insight Remote Support software (available separately). For more information, see“HP Insight Remote Support software” (page 13).
1. Review the information about installing HP Insight Remote Support software. 2. ClickNext. The Install complete page opens.
Install complete
HP recommends that you sign up to receive support alerts. 1. Review the information about receiving support alerts. 2. ClickDone. The installer window closes.
Checking services and icons
Windows services for the applications should be in the Started state.
• HP P6000 Command View. The service name is HP P6000 Command View. The desktop icon is .
• HP P6000 Performance Data Collector. The service name is HP P6000 Performance Data
Collector. The desktop icon is .
• HP SSSU. The desktop icon is .
• HP P6000 Performance Advisor. The service names are HP P6000 PA Server and HP P6000
PA Database.
• HP Management Integration Framework. The service name is HP MIF.
• HP EVA to 3PAR StoreServ Online Import. The service name is HP EVA to 3PAR StoreServ Online Import.
• HP SMI-S EVA. The service name is HP StorageWorks CIM Object Manager.
Removing server-based software
The following steps remove all HP P6000 Command View Software Suite components. Removal (uninstallation) of all components can take several minutes.
1. In Windows, select the feature to remove programs. For example, in Windows server 2008: selectStart > Control Panel > Programs and Features > HP P6000 Command View Software Suite.
2. ClickUninstall/Change. The Uninstall_HP Suite window opens.
3. Read the Uninstaller Introduction, then click Next. The Uninstall Options page opens. 4. Accept the Complete Uninstall choice, or select Uninstall Specific Features, then clickNext.
The HP P6000 Performance Advisor Data page opens.
5. Accept the choice to Retain P6000 PA Data, or select Uninstall P6000 PA Data, then click
Uninstall. Uninstallation progress is shown, then the Uninstall Complete page opens 6. ClickDone.
Uninstalling the software applications does not remove the HP Storage Admins and HP Storage Users groups.
Upgrading HP P6000 Command View software
For details about supported upgrade paths, see Table 2.1, HP P6000 Command View upgrade support, in the HP P6000 Enterprise Virtual Array Compatibility Reference.
IMPORTANT: HP recommends that before starting the HP P6000 Command View upgrade you:
• Close all applications.
• Back up your existing HP P6000 Command View configuration files. (SeeTable 5 (page 22)
for locations.)
• If the upgrade fails, all installed components are removed. This applies to upgrades from both HP Command View 10.1 and 10.2 to 10.3.
HP recommends that you upgrade all HP P6000 Command View 10.1 or 10.2 servers to the latest version of HP P6000 Command View 10.3 as follows:
1. Upgrade all HP Command View GUI Servers from HP Command View 10.1 or 10.2 to HP Command View 10.3.
TIP: Non-GUI Servers will not display the aggregate GUI Tree on the SPoG. 2. Upgrade all other HP Command View 10.2 servers to HP Command View 10.3.
For unsupported upgrade paths, the previous version must be removed first. If the previous version is not removed, the following error message appears when installing the latest version of HP P6000 Command View:
An older version of CV is detected on the target machine. Uninstall it from Add/Remove panel and try installing Command View 10.3
If this message is displayed, do the following:
2. Locate any directories namedHP_MasterInstallerXXand delete them.
There may be a directory for each previous version of HP P6000 Command View that was installed on the system.
3. Continue with the upgrade.
For supported upgrade paths, you do not have to remove the earlier version before upgrading to the latest version of the HP P6000 Command View Software Suite. During the upgrade, the following message is displayed:
IMPORTANT: The installer has detected an earlier version of HP Command View EVA. The following actions will be performed during upgrade: The earlier version will be removed. Note: Back up your existing Command View EVA configuration files and close all open applications before proceeding with the upgrade process
To continue with the upgrade, ensure that all other applications are closed, and then clickOK. All software components that were installed with the earlier version are upgraded to the latest version.
If limited software components were installed with the earlier version, select the additional software components when prompted during the upgrade.
NOTE: If an error occurs during the upgrade (for example, files are marked for deletion), a system reboot is required. After rebooting, you must start the installation manually. The installation proceeds as an upgrade. Backup data is restored, if required.
PMM backup during an upgrade from Command View version 10.2 to version 10.3
During an upgrade from Command View version 10.2 to 10.3, thePMM_Bkp folder is created and all the files required for the backup are copied to this folder. After successful installation of HP Command View 10.3, the backup files are restored to their respective HP EVA to 3PAR StoreServ online directories andPMM_Bkpfolder is deleted.
NOTE: If the backup is required for future reference, take the backup of the files manually.
Backup file locations
During an upgrade, the EVAPA_Bkp folder is created, and the files are copied to the folder. After successful installation of HP Command View 10.3, the backup files are restored to their respective HP EVA Performance Advisor directories. The data folder is not uninstalled and remains during the upgrade. As part of the upgrade procedure, Postgre SQL scripts are executed to upgrade the Postgre SQL database.
NOTE: Do not select a 64–bit location for the EVAPA data folder because the EVAPA database is a 32–bit application.
Table 4 Backup files Subfolder\Filename Folder
EvapaTools\tomcat\32bit\apache-tomcat-6.0.24\webapps\p6000pa\exporttoevaperffromat EVAPA
EvapaTools\tomcat\32bit\apache-tomcat-6.0.24\webapps\p6000pa\mibfile\evapamib.mib EVAPA
EvapaTools\tomcat\32bit\apache-tomcat-6.0.24\webapps\p6000pa\reports\*.* EVAPA
EvapaTools\tomcat\32bit\apache-tomcat-6.0.24\webapps\p6000pa\companyLogo\*.* EVAPA
EvapaTools\tomcat\32bit\apache-tomcat-6.0.24\webapps\WEB-INF\classes\applicationConfig.properties EVAPA
Table 4 Backup files(continued) Subfolder\Filename Folder
EvapaTools\tomcat\32bit\apache-tomcat-6.0.24\conf\server.xml\ EVAPA
DataBase\Postgres\postgresql.conf\ EVAPA
Table 5 (page 22) lists the locations of the HP P6000 Command View backup files.
NOTE: During the upgrade, HP SMI-S CIMOM and Provider files are restored from the directory
<SMIS_INSTALL_DIR>\SMIS_<Installed version>\_bkp_<SYS_DATE_TIME>to the
directory<SMIS_INSTALL_dir>.
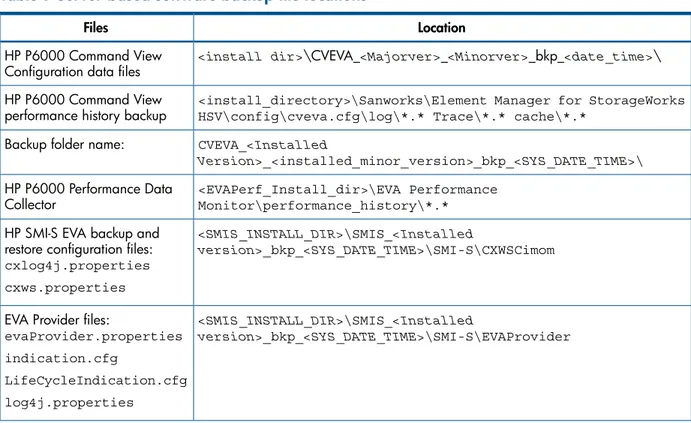
Table 5 Backup file locations
Location Files
<install dir>\CVEVA_<Majorver>_<Minorver>_bkp_<date_time>\ HP P6000 Command View
configuration data files
CVEVA_<Installed Version>\_bkp_<SYS_DATE_TIME>\
HP P6000 Command View and HP P6000 Performance Data Collector performance history backup
<SMIS_INSTALL_DIR>\SMIS_<Installed
version>\_bkp_<SYS_DATE_TIME>\SMI-S\CXWSCimom HP SMI-S EVA backup and
restore configuration files:
cxlog4j.properties cxws.properties
<SMIS_INSTALL_DIR>\SMIS_<Installed
version>\_bkp_<SYS_DATE_TIME>\SMI-S\EVAProvider EVA Provider files:
evaProvider.properties indication.cfg
LifeCycleIndication.cfg log4j.properties
Upgrading EVA P6000 Performance Advisor from version 10.1 or 10.2
to 10.3
During an EVA P6000 Performance Advisor upgrade from version 10.1 or 10.2 to version 10.3, retain the data folder from the location<Install Dir>\EVAPA\DataBase\Postgres\data
NOTE: The following files and folders must be backed up and restored during the upgrade:
• applicationconfig.propertiesfile. After the upgrade, this file must be merged with the new version of the file.
• <Install
Dir>\EVAPA\EvapaTools\tomcat\32bit\apache-tomcat-6.0.24\webapps\p6000pa\reports
folder
• <Install
Dir>\EVAPA\EvapaTools\tomcat\32bit\apache-tomcat-6.0.24\webapps\p6000pa\companyLogo
folder
• Folder containing generated db export files
To upgrade the database (DB):
• To upgrade database from version 10.1 to 10.3, run SQL upgrade scripts to upgrade from version 10.1 to 10.2 first, and then from version 10.2 to 10.3.
• To upgrade database from version 10.2 to 10.3, run SQL upgrade scripts to upgrade from version 10.2 to 10.3.
Removing the software suite
NOTE: This procedure applies to server-based management only. You cannot remove HP P6000 Command View from the management module.
Performance data from HP P6000 Performance Advisor and HP P6000 Performance Data Collector remains in theperformance_historyfolder when you remove the software suite. See“Retaining HP P6000 Performance Data Collector performance data” (page 23)for more information. If you are removing HP P6000 Command View from one drive and installing it on another drive, after you remove it, HP recommends that you reboot the server to clear services that may still be running.
To remove the software suite:
An uninstallation can be done only by an administrator. If the logged in user is not an administrator, the uninstaller will exit the following error message:
The current user does not have administrator privileges. Only a user with administrator privileges can run the uninstallation.
1. SelectHP P6000 Command View Software Suitein Add or Remove Programs, and then click
Remove.
The InstallAnywhere window opens. 2. ClickNext.
The Uninstall Options window opens.
3. SelectComplete Uninstall, which removes all installed components from the server. 4. ClickUninstall.
When removal is complete, the summary information window opens. 5. ClickFinish.
6. A reboot is required only if a message appears during uninstallation as files are marked for deletion and services are in a disabled state.
Retaining HP P6000 Performance Data Collector performance data
When running HP P6000 Command View 9.0 or later (including HP P6000 Performance Data Collector), the performance history of HP P6000 Performance Data Collector is retained by default, when you remove the software. The performance history is available at:
<Install_Location>\CVEVAxx_bkp_<date_time>\EVA Performance
Monitor\performance_history
If you are running HP P6000 Command View 8.x or earlier (including HP P6000 Performance Data Collector) and the performance history folder contains any files or folders, you are prompted to retain the performance history. Select one of the following options:
• Clickyesto retain the performance history.
• Clicknoto remove the performance history folder.
If you choose to keep the performance history, the following message is displayed when software removal is complete:
Unable to remove directory: <Install_Location>\EVA Performance Monitor. Removing the software suite 23
Removing individual components
NOTE: This procedure applies only to server-based management.
If the user uninstalls only HP Management Integration Framework, the following error message will be displayed:
Management Integration Framework cannot be uninstalled when other features are already installed.
To remove individual components:
1. SelectHP P6000 Command View software suitein Add or Remove Programs, and then click
Remove.
The InstallAnywhere window opens. 2. ClickNext.
The Uninstall Options window opens. 3. SelectUninstall Specific Feature.
4. Select the components to be removed and clickUninstall.
When removal is complete, the summary information window opens. 5. ClickFinish.
Removing HP P6000 Performance Advisor
IMPORTANT: While removing HP P6000 Performance Advisor, you are prompted to either retain or remove HP P6000 Performance Advisor data. If you choose to retain the data, HP P6000 Performance Advisor is removed but the Performance Advisor database remains intact.
Downgrading HP P6000 Command View
To downgrade to an earlier version of HP P6000 Command View:
1. Remove the current version of HP P6000 Command View from the management server. 2. Install the applicable earlier version of the software.
See the HP P6000 Enterprise Virtual Array Compatibility Reference for supported downgrade paths.
IMPORTANT: After downgrading a system from HP P6000 Command View 10.3 to 10.2, 10.1, 10.0, 9.4, 9.3, or 9.2:
• For an array-based management system, reset the system using the reset button.
• For a server-based management system, perform a complete uninstall of HP P6000 Command View 10.3 and reinstall the earlier version.
3 Upgrading array-based software
Array-based software is factory-installed on the following HP P6000 EVA storage system models:
• HP EVA4400
• HP P6300/6350
• HP P6500/P6550
This chapter describes how to upgrade factory-installed software using HP P6000 ABM package files, which contain:
• Array-based HP P6000 Command View software
• HP P6000 Control Panel software
• HP Management Integration Framework software
Installing ABM package files
You will need:
• DVD 1 from the kit
• A server with DVD drive
• A LAN cable
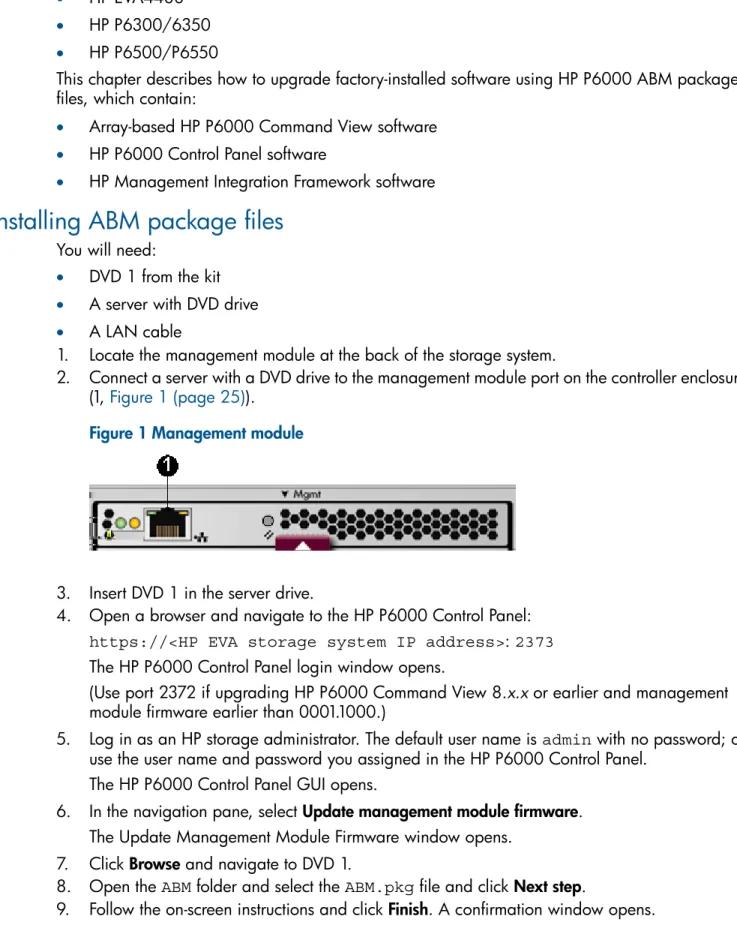
1. Locate the management module at the back of the storage system.
2. Connect a server with a DVD drive to the management module port on the controller enclosure (1,Figure 1 (page 25)).
Figure 1 Management module
3. Insert DVD 1 in the server drive.
4. Open a browser and navigate to the HP P6000 Control Panel:
https://<HP EVA storage system IP address>:2373
The HP P6000 Control Panel login window opens.
(Use port 2372 if upgrading HP P6000 Command View 8.x.x or earlier and management module firmware earlier than 0001.1000.)
5. Log in as an HP storage administrator. The default user name isadminwith no password; or use the user name and password you assigned in the HP P6000 Control Panel.
The HP P6000 Control Panel GUI opens.
6. In the navigation pane, selectUpdate management module firmware. The Update Management Module Firmware window opens.
7. ClickBrowseand navigate to DVD 1.
8. Open theABMfolder and select theABM.pkgfile and click Next step.
9. Follow the on-screen instructions and clickFinish. A confirmation window opens.
10. ClickOK.
The Management Module Restart in Progress window opens and the image files are loaded. Upon completion, the HP P6000 Control Panel login window opens. This step can take several minutes.
Verifying installations
Logging in
Log in to the interfaces to verify that applications are installed. See“Installing Management Group security certificates” (page 28)for dealing with a blocked connection.
The management module will restart upon completion of the update. Allow up to 15 minutes to re-establish a browser connection. Do not reseat, restart, or reset the management module during this interval if you are unable to reconnect from your browser.
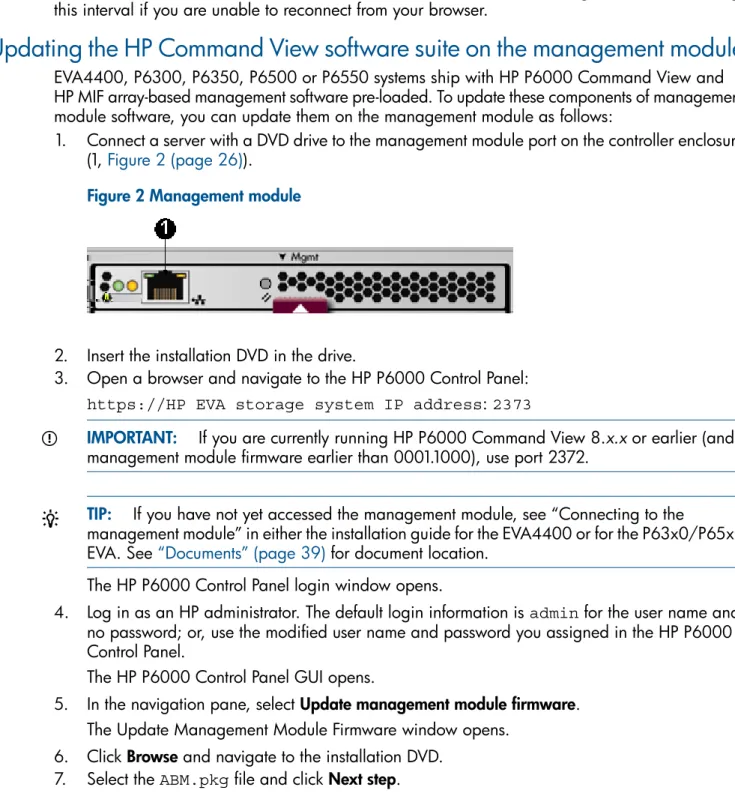
Updating the HP Command View software suite on the management module
EVA4400, P6300, P6350, P6500 or P6550 systems ship with HP P6000 Command View and HP MIF array-based management software pre-loaded. To update these components of management module software, you can update them on the management module as follows:
1. Connect a server with a DVD drive to the management module port on the controller enclosure (1,Figure 2 (page 26)).
Figure 2 Management module
2. Insert the installation DVD in the drive.
3. Open a browser and navigate to the HP P6000 Control Panel:
https://HP EVA storage system IP address:2373
IMPORTANT: If you are currently running HP P6000 Command View 8.x.x or earlier (and management module firmware earlier than 0001.1000), use port 2372.
TIP: If you have not yet accessed the management module, see “Connecting to the
management module” in either the installation guide for the EVA4400 or for the P63x0/P65x0 EVA. See“Documents” (page 39)for document location.
The HP P6000 Control Panel login window opens.
4. Log in as an HP administrator. The default login information isadminfor the user name and no password; or, use the modified user name and password you assigned in the HP P6000 Control Panel.
The HP P6000 Control Panel GUI opens.
5. In the navigation pane, selectUpdate management module firmware. The Update Management Module Firmware window opens.
6. ClickBrowseand navigate to the installation DVD. 7. Select theABM.pkgfile and click Next step.
8. Follow the online instructions and clickFinish. A confirmation window opens.
9. ClickOK.
The Management Module Restart in Progress window opens and the image files are loaded. Upon completion, the HP P6000 Control Panel login window opens. This step can take several minutes.
IMPORTANT: The management module will restart upon completion of this update. Allow up to 15 minutes to re-establish a browser connection. Do not reseat, restart, or reset the management module during this interval if you are unable to reconnect from your browser.
Verifying the installation on the management module
NOTE: Adobe Flash Player plugin is required. To verify that the software was installed successfully:
1. Open a browser and navigate to HP P6000 Command View:
https://EVA storage system IP address:2372
2. Log in using the same login credentials that you use for the HP P6000 Control Panel login. 3. Verify that the correct local time is set:
a. On the Initialized Storage System Properties window, selectSystem Options. b. SelectSet time options.
c. Verify that the time displayed in theCurrent system time box is correct. If it is incorrect, enter the correct time and save your changes.
IMPORTANT: If the time set on your system in not your local time, the installation can fail. For instructions to recover, see the HP P6000 Command View Software Suite Release Notes.
4 Logging in to HP P6000 browser-based applications
Verify application installation
Log in to the interfaces to verify that applications are installed. See“Installing Management Group security certificates” (page 28).
Viewing HP P6000 browser-based interfaces requires a supported browser and Flash Player plug-in. Supported browsers and Flash Players are listed in the HP Enterprise Virtual Array Compatibility
Reference.
• Server-based HP P6000 Command View, HP P6000 Performance Advisor, and HP EVA to 3PAR StoreServ Online Import— browse to the application login page: https://<server
name or IP address>:2374 / <free port chosen during MIF installation>
• Array-based HP P6000 Command View — browse to the login page:https://<P6000
EVA storage system IP address>:2374 / <free port chosen during MIF
installation>
• HP P6000 Control Panel — browse to the login page: https://<P6000 EVA storage
system IP address>:2373
• HP Management Integration Framework configuration interface — browse to the login page:
https://<machine name or IP address>:2374/Configuration
Machine name includes names of servers and HP P6000 storage system with array-based
management.
• HP Management Integration Framework security interface — browse to the login page:
https://<machine name or IP address>:2374/Security / <free port chosen during MIF installation>
Machine name includes names of servers and HP P6000 storage system with array-based
management.
Installing Management Group security certificates
Installation of HP P6000 browser-based applications generates Management Group security certificates. The first time a browser attempts to connect to the application login window, the connection is blocked. To continue, do the following:
1. Allow the browser to continue to the blocked page. A login page opens indicating that the Management Group certificate may not be installed. This does not indicate a problem. This is a normal security feature of HP Management Integration Framework software.
2. On the login page, click the linkClick here to install the Management Group certificate. 3. Follow the on-screen instructions to install the certificate and refresh and close the browser. 4. When the login page reappears, you can log in.
For more information, see the appropriate application user guide or the HP Management Integration
5 Installing HP EVAInfo software
HP EVAInfo is command-line software that helps you map HP-UX and Linux files to virtual disks (LUNs) on HP P6000 EVA storage systems, and displays information about connected ports and controllers.
• HP EVAInfo can be installed on hosts that are connected to HP P6000 EVA storage systems.
• To install HP EVAInfo software, copy executable files from DVD 1 to the hosts.
HP EVAInfo files on the DVD
Table 6 EVAInfo files on the DVD Files Directory
evainfo_HPUX_11.11_PARISC evainfo_HPUX_11.31_PARISC hp-ux(Also works on version
11.23.)
evainfo_HPUX_11.31_IA64 evainfo_LINUX64_ITANIUM linux(Works on 64–bit versions
of SUSE 10, RHEL 4, and RHEL 5.)
evainfo_LINUX_AMD64 linux(Works on 64–bit AMD
versions of SUSE 10 and RHEL 4.)
evainfo_LINUX_INTEL linux(Works on 32–bit versions
of SUSE 10, RHEL 4 and RHEL 5.)
evainfo_RHEL_AMD64 linux(Works on 64–bit AMD
versions of RHEL 5.)
Installing HP EVAInfo files
To Install HP EVAInfo files:
1. Insert DVD 1 in the drive on the host.
2. Navigate to theEVAInfo folder on the DVD.
3. Select the executable file for the applicable host operating system (Table 6 (page 29)). 4. Copy the file to the server or host.
5. Ensure that the binary file has execute permission. You can use thechmodcommand to set execute permission. For example,# chmod 555 evainfoor# chmod u+x evainfo.
6. Execute the binary as root.
6 Installing HP SSSU software
HP SSSU provides a command line interface that lets you script and run repetitious and complex storage system tasks.
• HP SSSU (Windows) is automatically installed on, and removed from, a server when you install or remove server-based HP P6000 Command View.
• You can also install HP SSSU by itself by copying HP SSSU executable files to hosts.
• HP SSSU cannot be directly installed on storage systems that run array-based HP P6000 Command View, but you can install HP SSSU on hosts with network access to those storage systems.
• HP SSSU (Windows) requires the Microsoft Visual C++ 2008 SP1 Redistributable Package. When server-based HP P6000 Command View is installed, the C++ package is automatically installed. The C++ package is also available for download from the Microsoft Download Center websitehttp://www.microsoft.com/downloads/en/default.aspx.
• You can install HP SSSU from the DVD included in the HP P6000 Command View Software Suite media kit.
See the HP Storage System Scripting Utility Reference for HP SSSU post installation configuration and use.
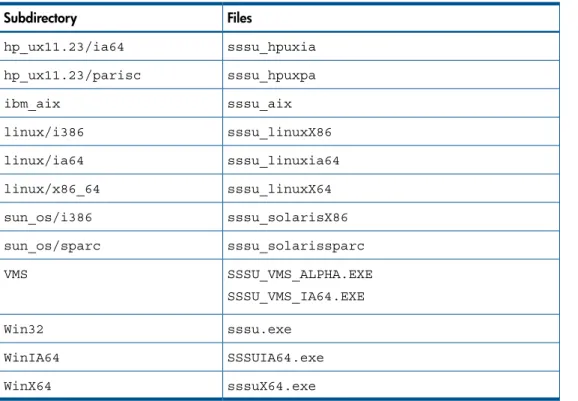
HP SSSU files
Table 7 Files in SSSU folder on the DVD Files Subdirectory
sssu_hpuxia hp_ux11.23/ia64
sssu_hpuxpa hp_ux11.23/parisc
sssu_aix ibm_aix
sssu_linuxX86 linux/i386
sssu_linuxia64 linux/ia64
sssu_linuxX64 linux/x86_64
sssu_solarisX86 sun_os/i386
sssu_solarissparc sun_os/sparc
SSSU_VMS_ALPHA.EXE SSSU_VMS_IA64.EXE VMS
sssu.exe Win32
SSSUIA64.exe WinIA64
sssuX64.exe WinX64
NOTE: HP SSSU can be installed on non-Windows operating system manually. The procedure for OpenVMS is shown below; other non-Windows operating systems follow their standard installation procedure.
Mounting the DVD on an HP OpenVMS host
For example:
$ mount/media_format=dvd/undefined_FAT=fixed:none:8192/over=id IA641$DQA0:
Installing HP SSSU files
To install HP SSSU on a Windows host:
1. Insert DVD 1. Allow 1 to 2 minutes for the HP P6000 SmartStart wizard to automatically begin. If the HP P6000 SmartStart wizard does not automatically begin, navigate to the DVD in Windows Explorer and double-click the fileP6000SmartStart.exe. The HP P6000 SmartStart wizard opens in a browser window.
2. Read the HP P6000 SmartStart End User License Agreement and clickAccept. A Welcome page opens.
3. Click theSSSU package filebutton. The folder of SSSU files opens in a separate window. 4. Select the executable file (Table 7 (page 30)).
5. Copy the file to the host.
To install HP SSSU on a non-Windows host:
1. Insert DVD 1 in the drive on the host and mount it. 2. Navigate to theSSSUfolder on the DVD.
3. Copy the file to the host.
Verifying HP SSSU installations
For management serverThe default installation location for the HP SSSU Windows executable is:C:\Program Files\ Hewlett-Packard\Sanworks\Element Manager for StorageWorks HSV.
1. On the management server Windows desktop, locate the HP SSSU icon.
2. Double-click the icon. The display should showSSSU for HP P6000 Command Viewwith the version and build number.
For hosts
1. Open the HP SSSU executable on the host.
2. The display should showSSSU for HP P6000 Command Viewwith the version and build
number.
7 Installation troubleshooting
SmartStart required software popup
If the server does not have the required Microsoft .NET 4.0 or Windows Hotfix KB932755, the HP P6000 SmartStart wizard provides following options
• Install the required software and continue with the HP P6000 SmartStart wizard.
• Cancel the wizard and run the HP P6000 Command View Suite installer. Select the appropriate option and proceed with the installation.
HP Management Integration Framework installation troubleshooting
Failed to connect to discovery
If you see the warning message:
Failed to connect. The Management Group (MG) may not be installed. Please refer to help for more information.
Install the Management Group Certificate in the browser and then restart the browser. See the HP
Management Integration Framework Administrator Guide, version 1.4 or later, for more information.
HP firewall exception ports check
When installing HP Management Integration Framework software (either explicitly or silently with other software), the installer checks to see if a Windows firewall is enabled on the server.
• Port 2372 is the default port for logging in to HP P6000 Command View. If a Windows firewall is enabled, the following message is displayed:
Setup has detected that a Windows firewall is enabled on the system. Do you want setup to configure port 2372 for HP P6000 Command View on Windows firewall?
• Port 2374 is the default port for logging in to HP P6000 Management Integration Framework and the HP P6000 software components that it supports.
If a Windows firewall is enabled, the following message is displayed:
Setup has detected that a Windows firewall is enabled on the system. Do you want setup to configure port 2374 for Management Integration Framework on Windows firewall?
• Port 2386 is the default port for logging in to HP EVA to 3PAR StoreServ Online Import. If a Windows firewall is enabled, the following message is displayed:
Setup has detected that a Windows firewall is enabled on the system. Do you want setup to configure port 2386 for HP EVA to 3PAR StoreServ Online Importon Windows firewall?
See the HP Management Integration Framework Administrator Guide, version 1.4 or later, for more information about HP MIF ports.
HP SMI-S EVA CIMOM installation troubleshooting
HP SMI-S EVA CIMOM ports check
• When installing HP SMI-S EVA CIMOM, the installer checks for ports 5988 and 5989, which are used with the CIMOM service. If the ports are not available, the Ports busy screen with the following message is displayed:
CIMOM Port 1 port is not available, CIMOM Port 2 port is not available.
It displays the available port numbers and provides an option to edit the port number, if the user wants to change any port number.
To continue the installation, you must enter alternate port numbers (in the range 60000 to 65536).
See also“HP P6000 software TCP ports” (page 64).
Antivirus software may degrade performance
To avoid HP P6000 Command View performance issues when antivirus software is installed on the management server, HP recommends that you exclude from the antivirus software scan the log-related files that change frequently, including the following:
• \Program Files\Hewlett-Packard\Sanworks\Element Manager for StorageWorks HSV\cache
• \Program Files\Hewlett-Packard\Sanworks\Element Manager for StorageWorks HSV\log
• \Program Files\Hewlett-Packard\Sanworks\Element Manager for StorageWorks HSV\logs
• \Program Files\Hewlett-Packard\Sanworks\Element Manager for StorageWorks HSV\trace
If HP P6000 Performance Data Collector is installed:
• \Program Files\Hewlett-Packard\EVA Performance Monitor\logs
• \Program Files\Hewlett-Packard\EVA Performance Monitor\cache
If HP SMI-S EVA is installed:
• \Program Files\Hewlett-Packard\SMI-S\CXWSCimom\logs
• \Program Files\Hewlett-Packard\SMI-S\EVAProvider\logs
If HP EVA to 3PAR StoreServ Online Importis installed:
• \Program Files\Hewlett-Packard\PMM\PMMTools\tomcat\32-bit\ apache-tomcat-7.0.27\logs
If HP P6000 Performance Advisor is installed:
• \Program Files\Hewlett-Packard\EVAPA\EvapaTools\tomcat\32bit\ apache-tomcat-6.0.24\logs
• \Program Files\Hewlett-Packard\EVAPA\DataBase\Postgres\data\pg_log
NOTE: If HP P6000 Command View is installed on a 64-bit machine, the top level folder is
\ProgramFiles (x86).
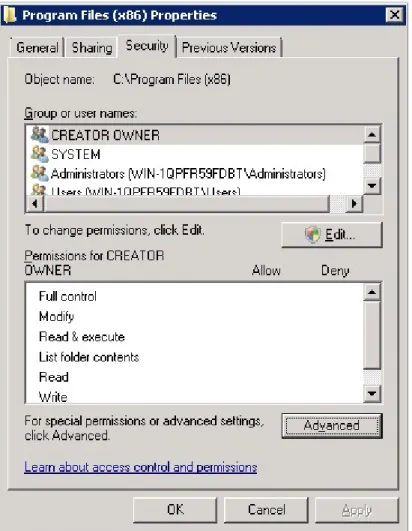
Command View 10.2 or later Postgres installation fails in default installation
directory
The logged-in user does not have permission to install Command View 10.2 or later in the Program Files (x86) folder, even though the user had set the permission at the Windows drive itself. Due to this, the Command View 10.2 or later Postgres installation failed.
To assign the correct permissions to the Program Files (x86) directory:
1. Right-click Program Files (x86) Properties, select theSecuritytab and then click Advanced. Figure 3 Program Files (x86) Properties
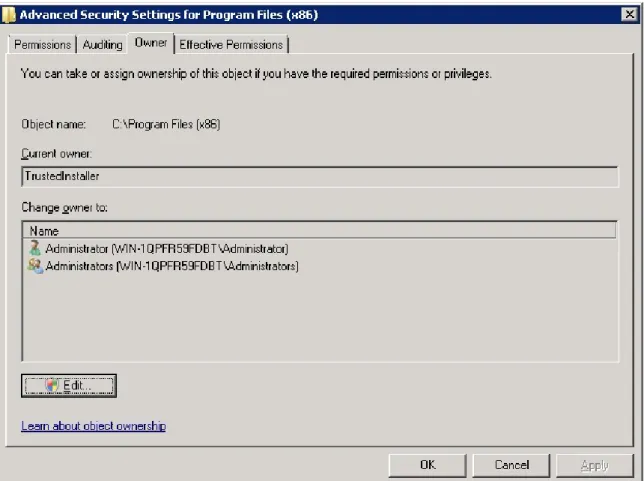
Figure 4 Advanced Security Settings for Program Files
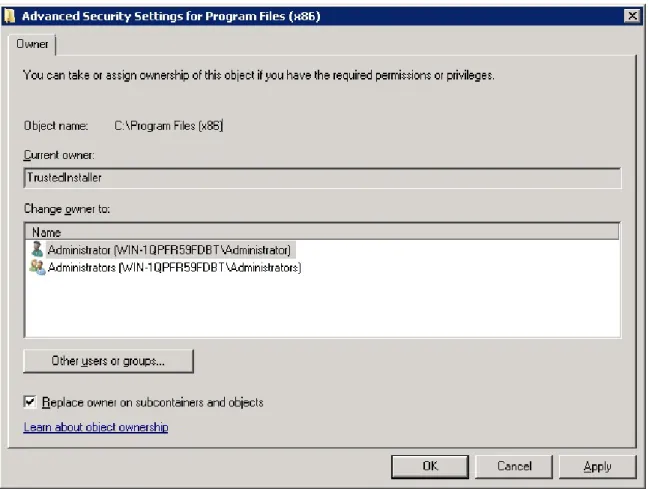
3. SelectAdministratorfromChange owner to, selectReplace owner on subcontainers and objects
and then clickApply.
Figure 5 Advanced Security Settings
After assigning the correct permissions to the Program Files (x86) directory, add the Administrator user and provide read, write, and execute permissions for the Program Files (x86) folder.