View Installation
VMware Horizon 6
Version 6.2
This document supports the version of each product listed and
supports all subsequent versions until the document is
replaced by a new edition. To check for more recent editions
of this document, see http://www.vmware.com/support/pubs.
You can find the most up-to-date technical documentation on the VMware Web site at:
http://www.vmware.com/support/
The VMware Web site also provides the latest product updates.
If you have comments about this documentation, submit your feedback to:
Copyright © 2015 VMware, Inc. All rights reserved. Copyright and trademark information.
VMware, Inc.
3401 Hillview Ave. Palo Alto, CA 94304 www.vmware.com
Contents
View Installation 5
1
System Requirements for Server Components 7
View Connection Server Requirements 7 View Administrator Requirements 9 View Composer Requirements 10
2
System Requirements for Guest Operating Systems 13
Supported Operating Systems for View Agent 13
Supported Operating Systems for Standalone View Persona Management 14 Remote Display Protocol and Software Support 14
3
Installing View in an IPv6 Environment 19
Setting Up View in an IPv6 Environment 19
Supported vSphere , Database, and Active Directory Versions in an IPv6 Environment 20 Supported Operating Systems for View Servers in an IPv6 Environment 20
Supported Windows Operating Systems for Desktops and RDS Hosts in an IPv6 Environment 21 Supported Clients in an IPv6 Environment 21
Supported Remoting Protocols in an IPv6 Environment 21 Supported Authentication Types in an IPv6 Environment 22 Other Supported Features in an IPv6 Environment 22
4
Installing View in FIPS Mode 25
Overview of Setting Up View in FIPS Mode 25 System Requirements for FIPS Mode 26
5
Preparing Active Directory 27
Configuring Domains and Trust Relationships 27 Creating an OU for Remote Desktops 29
Creating OUs and Groups for Kiosk Mode Client Accounts 29 Creating Groups for Users 29
Creating a User Account for vCenter Server 29
Creating a User Account for a Standalone View Composer Server 30 Create a User Account for View Composer AD Operations 30 Configure the Restricted Groups Policy 31
Using View Group Policy Administrative Template Files 31 Prepare Active Directory for Smart Card Authentication 32
Disable Weak Ciphers in SSL/TLS for View Composer and View Agent Machines 34
6
Installing View Composer 37
Configuring an SSL Certificate for View Composer 44 Install the View Composer Service 45
Configuring Your Infrastructure for View Composer 47
7
Installing View Connection Server 49
Installing the View Connection Server Software 49 Installation Prerequisites for View Connection Server 49 Install View Connection Server with a New Configuration 50 Install a Replicated Instance of View Connection Server 56 Configure a Security Server Pairing Password 62
Install a Security Server 62
Firewall Rules for View Connection Server 70
Reinstall View Connection Server with a Backup Configuration 71 Microsoft Windows Installer Command-Line Options 73
Uninstalling View Components Silently by Using MSI Command-Line Options 75
8
Configuring SSL Certificates for View Servers 77
Understanding SSL Certificates for View Servers 77 Overview of Tasks for Setting Up SSL Certificates 79 Obtaining a Signed SSL Certificate from a CA 80
Configure View Connection Server, Security Server, or View Composer to Use a New SSL Certificate 81
Configure Client Endpoints to Trust Root and Intermediate Certificates 86 Configuring Certificate Revocation Checking on Server Certificates 88 Configure the PCoIP Secure Gateway to Use a New SSL Certificate 89
Setting View Administrator to Trust a vCenter Server or View Composer Certificate 93 Benefits of Using SSL Certificates Signed by a CA 93
Troubleshooting Certificate Issues on View Connection Server and Security Server 94
9
Configuring View for the First Time 95
Configuring User Accounts for vCenter Server and View Composer 95 Configuring View Connection Server for the First Time 98
Configuring Horizon Client Connections 109 Replacing Default Ports for View Services 115
Sizing Windows Server Settings to Support Your Deployment 120
10
Configuring Event Reporting 123
Add a Database and Database User for View Events 123 Prepare an SQL Server Database for Event Reporting 124 Configure the Event Database 125
Configure Event Logging for Syslog Servers 126
View Installation
View Installation explains how to install the VMware Horizon™ 6 server and client components.
Intended Audience
This information is intended for anyone who wants to install VMware Horizon 6. The information is written for experienced Windows or Linux system administrators who are familiar with virtual machine technology and datacenter operations.
System Requirements for Server
Components
1
Hosts that run View server components must meet specific hardware and software requirements. This chapter includes the following topics:
n “View Connection Server Requirements,” on page 7 n “View Administrator Requirements,” on page 9 n “View Composer Requirements,” on page 10
View Connection Server Requirements
View Connection Server acts as a broker for client connections by authenticating and then directing incoming user requests to the appropriate remote desktops and applications. View Connection Server has specific hardware, operating system, installation, and supporting software requirements.
n Hardware Requirements for View Connection Server on page 8
You must install all View Connection Server installation types, including standard, replica, and security server installations, on a dedicated physical or virtual machine that meets specific hardware requirements.
n Supported Operating Systems for View Connection Server on page 8
You must install View Connection Server on a supported Windows Server operating system. n Virtualization Software Requirements for View Connection Server on page 8
View Connection Server requires certain versions of VMware virtualization software. n Network Requirements for Replicated View Connection Server Instances on page 9
When installing replicated View Connection Server instances, you must usually configure the instances in the same physical location and connect them over a high-performance LAN. Otherwise, latency issues could cause the View LDAP configurations on View Connection Server instances to become inconsistent. A user could be denied access when connecting to a View Connection Server instance with an out-of-date configuration.
Hardware Requirements for View Connection Server
You must install all View Connection Server installation types, including standard, replica, and security server installations, on a dedicated physical or virtual machine that meets specific hardware requirements.
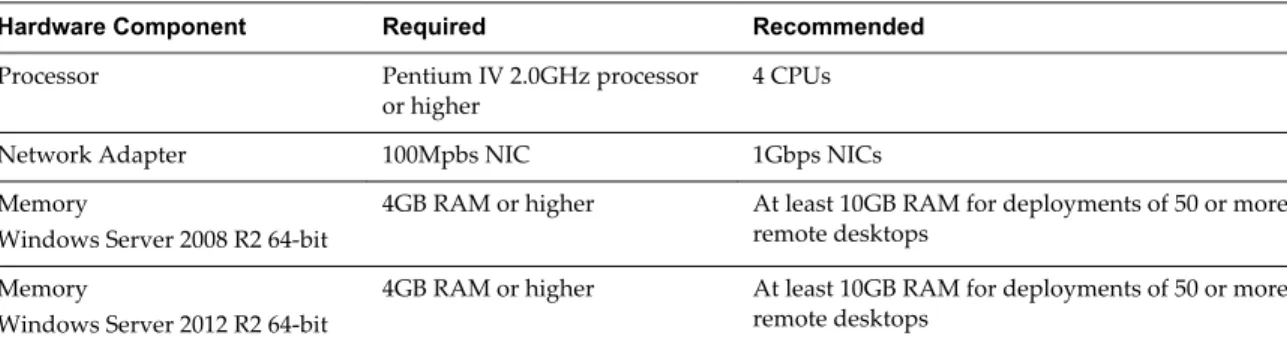
Table 1‑1. View Connection Server Hardware Requirements
Hardware Component Required Recommended
Processor Pentium IV 2.0GHz processor
or higher 4 CPUs
Network Adapter 100Mpbs NIC 1Gbps NICs
Memory
Windows Server 2008 R2 64-bit
4GB RAM or higher At least 10GB RAM for deployments of 50 or more remote desktops
Memory
Windows Server 2012 R2 64-bit
4GB RAM or higher At least 10GB RAM for deployments of 50 or more remote desktops
These requirements also apply to replica and security server View Connection Server instances that you install for high availability or external access.
IMPORTANT The physical or virtual machine that hosts View Connection Server must have an IP address that does not change. In an IPv4 environment, configure a static IP address. In an IPv6 environment, machines automatically get IP addresses that do not change.
Supported Operating Systems for View Connection Server
You must install View Connection Server on a supported Windows Server operating system.
The following operating systems support all View Connection Server installation types, including standard, replica, and security server installations.
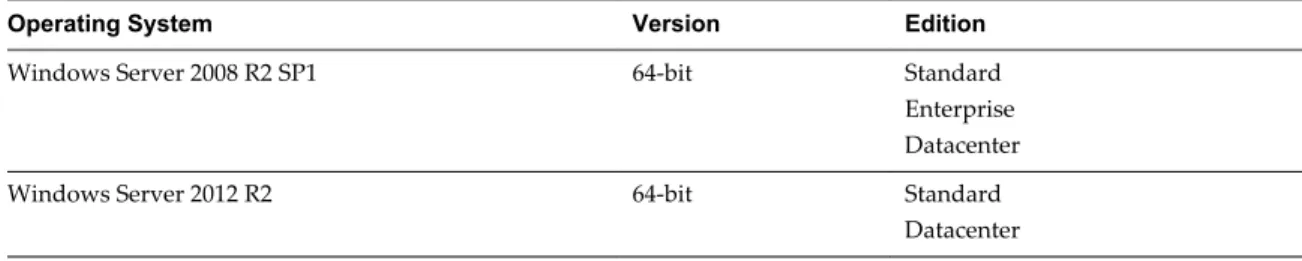
Table 1‑2. Operating System Support for View Connection Server
Operating System Version Edition
Windows Server 2008 R2 SP1 64-bit Standard
Enterprise Datacenter
Windows Server 2012 R2 64-bit Standard
Datacenter NOTE Windows Server 2008 R2 with no service pack is no longer supported.
Virtualization Software Requirements for View Connection Server
View Connection Server requires certain versions of VMware virtualization software.
If you are using vSphere, you must use a supported version of vSphere ESX/ESXi hosts and vCenter Server. For details about which versions of View are compatible with which versions of vCenter Server and ESXi, see the VMware Product Interoperability Matrix at
Network Requirements for Replicated View Connection Server Instances
When installing replicated View Connection Server instances, you must usually configure the instances in the same physical location and connect them over a high-performance LAN. Otherwise, latency issues could cause the View LDAP configurations on View Connection Server instances to become inconsistent. A user could be denied access when connecting to a View Connection Server instance with an out-of-date configuration.
IMPORTANT To use a group of replicated View Connection Server instances across a WAN, MAN (metropolitan area network), or other non-LAN, in scenarios where a View deployment needs to span datacenters, you must use the Cloud Pod Architecture feature. You can link together four View pods to provide a single large desktop brokering and management environment for two geographically distant sites and manage up to 20,000 remote desktops. For more information, see Administering View Cloud Pod
Architecture.
View Administrator Requirements
Administrators use View Administrator to configure View Connection Server, deploy and manage remote desktops and applications, control user authentication, initiate and examine system events, and carry out analytical activities. Client systems that run View Administrator must meet certain requirements.
View Administrator is a Web-based application that is installed when you install View Connection Server. You can access and use View Administrator with the following Web browsers:
n Internet Explorer 9 (not recommended) n Internet Explorer 10
n Internet Explorer 11
n Firefox (latest supported versions) n Chrome (latest supported versions) n Safari 6 and later releases
To use View Administrator with your Web browser, you must install Adobe Flash Player 10.1 or later. Your client system must have access to the Internet to allow Adobe Flash Player to be installed.
The computer on which you launch View Administrator must trust the root and intermediate certificates of the server that hosts View Connection Server. The supported browsers already contain certificates for all of the well-known certificate authorities (CAs). If your certificates come from a CA that is not well known, you must follow the instructions in “Configure Client Endpoints to Trust Root and Intermediate Certificates,” on page 86.
To display text properly, View Administrator requires Microsoft-specific fonts. If your Web browser runs on a non-Windows operating system such as Linux, UNIX, or Mac OS X, make sure that Microsoft-specific fonts are installed on your computer.
Currently, the Microsoft Web site does not distribute Microsoft fonts, but you can download them from independent Web sites.
View Composer Requirements
With View Composer, you can deploy multiple linked-clone desktops from a single centralized base image. View Composer has specific installation and storage requirements.
n Supported Operating Systems for View Composer on page 10
View Composer supports 64-bit operating systems with specific requirements and limitations. You can install View Composer on the same physical or virtual machine as vCenter Server or on a separate server.
n Hardware Requirements for Standalone View Composer on page 10
If you install View Composer on a different physical or virtual machine from the one used for vCenter Server, you must use a dedicated machine that meets specific hardware requirements. n Database Requirements for View Composer and the Events Database on page 11
View Composer requires an SQL database to store data. The View Composer database must reside on, or be available to, the View Composer server host. You can optionally set up an Events database to record information from View Connection Server about View events.
Supported Operating Systems for View Composer
View Composer supports 64-bit operating systems with specific requirements and limitations. You can install View Composer on the same physical or virtual machine as vCenter Server or on a separate server.
Table 1‑3. Operating System Support for View Composer
Operating System Version Edition
Windows Server 2008 R2 SP1 64-bit Standard
Enterprise Datacenter
Windows Server 2012 R2 64-bit Standard
Datacenter NOTE Windows Server 2008 R2 with no service pack is no longer supported.
If you plan to install View Composer on a different physical or virtual machine than vCenter Server, see
“Hardware Requirements for Standalone View Composer,” on page 10.
Hardware Requirements for Standalone View Composer
If you install View Composer on a different physical or virtual machine from the one used for vCenter Server, you must use a dedicated machine that meets specific hardware requirements. A standalone View Composer installation works with vCenter Server installed on a separate Windows Server machine or with the Linux-based vCenter Server appliance. VMware recommends having a one-to-one mapping between each View Composer service and vCenter Server instance.
Table 1‑4. View Composer Hardware Requirements
Hardware Component Required Recommended
Processor 1.4 GHz or faster Intel 64 or
AMD 64 processor with 2 CPUs 2GHz or faster and 4 CPUs Networking One or more 10/100Mbps
Table 1‑4. View Composer Hardware Requirements (Continued)
Hardware Component Required Recommended
Memory 4GB RAM or higher 8GB RAM or higher for deployments of 50 or more remote desktops
Disk space 40GB 60GB
IMPORTANT The physical or virtual machine that hosts View Composer must have an IP address that does not change. In an IPv4 environment, configure a static IP address. In an IPv6 environment, machines automatically get IP addresses that do not change.
Database Requirements for View Composer and the Events Database
View Composer requires an SQL database to store data. The View Composer database must reside on, or be available to, the View Composer server host. You can optionally set up an Events database to record information from View Connection Server about View events.
If a database server instance already exists for vCenter Server, View Composer can use that existing instance if it is a version listed in Table 1-5. For example, View Composer can use the Microsoft SQL Server instance provided with vCenter Server. If a database server instance does not already exist, you must install one. View Composer supports a subset of the database servers that vCenter Server supports. If you are already using vCenter Server with a database server that is not supported by View Composer, continue to use that database server for vCenter Server and install a separate database server to use for View Composer.
IMPORTANT If you create the View Composer database on the same SQL Server instance as vCenter Server, do not overwrite the vCenter Server database.
The following table lists the supported database servers and versions as of the publication date of this document. For the most up-to-date information about supported databases, see the VMware Product Interoperability Matrixes at http://www.vmware.com/resources/compatibility/sim/interop_matrix.php. For
Solution/Database Interoperability, after you select the product and version, for the Add Database step, to
see a list of all supported databases, select Any and click Add.
Table 1‑5. Supported Database Servers for View Composer and for the Events Database
Database Service Packs/Releases Editions
Microsoft SQL Server 2014 (32- and 64-bit)
No SP, SP1 Standard
Enterprise Microsoft SQL Server 2012
(32- and 64-bit)
SP1, SP2 Express
Standard Enterprise Microsoft SQL Server 2008 R2
(32- and 64-bit)
SP2, SP3 Express
Standard Enterprise Datacenter Microsoft SQL Server 2008
(32- and 64-bit)
SP4 Express
Standard Enterprise
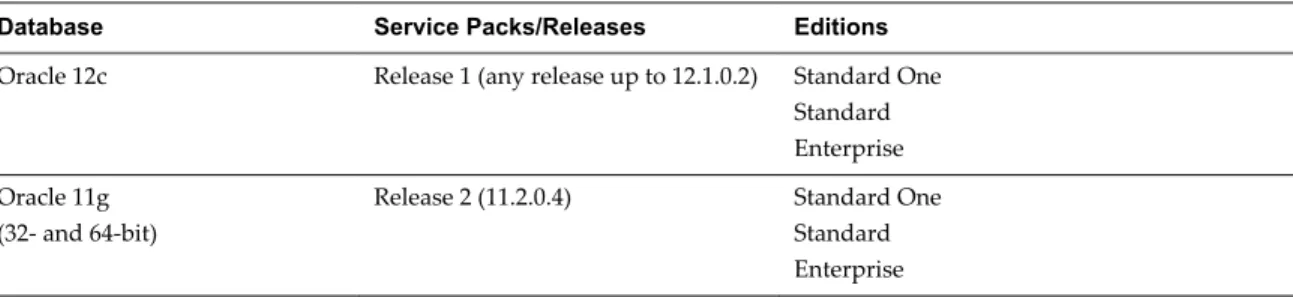
Table 1‑5. Supported Database Servers for View Composer and for the Events Database (Continued)
Database Service Packs/Releases Editions
Oracle 12c Release 1 (any release up to 12.1.0.2) Standard One Standard Enterprise Oracle 11g
(32- and 64-bit)
Release 2 (11.2.0.4) Standard One Standard Enterprise
NOTE The following versions are no longer supported: Oracle 10g Release 2, Oracle 11g Release 1, , Microsoft SQL Server 2008 R2 SP1, Microsoft SQL Server 2012 with no SP.
System Requirements for Guest
Operating Systems
2
Systems running View Agent or Standalone View Persona Management must meet certain hardware and software requirements.
This chapter includes the following topics:
n “Supported Operating Systems for View Agent,” on page 13
n “Supported Operating Systems for Standalone View Persona Management,” on page 14 n “Remote Display Protocol and Software Support,” on page 14
Supported Operating Systems for View Agent
The View Agent component assists with session management, single sign-on, device redirection, and other features. You must install View Agent on all virtual machines, physical systems, and RDS hosts.
The following table lists the Windows operating system versions that are supported on single-session virtual machines in a desktop pool. The virtual machine version must support the guest operating system. For example, to install Windows 8.1, you must use a vSphere 5.1 or later virtual machine.
Table 2‑1. Operating Systems for Linked-Clone and Full-Clone Remote Desktops
Guest Operating System Version Edition Service Pack
Windows 10 64-bit and 32-bit Enterprise None
Windows 8.1 64-bit and 32-bit Enterprise and
Professional Latest update
Windows 8 64-bit and 32-bit Enterprise and
Professional None
Windows 7 64-bit and 32-bit Enterprise and
Professional SP1
Windows Server 2012 R2 64-bit Datacenter None
Windows Server 2008 R2 64-bit Datacenter SP1
IMPORTANT View Agent 6.1 and later releases do not support Windows XP and Windows Vista desktops. View Agent 6.0.2 is the last View release that supports these guest operating systems. Customers who have an extended support agreement with Microsoft for Windows XP and Vista, and an extended support agreement with VMware for these guest operating systems, can deploy the View Agent 6.0.2 version of their Windows XP and Vista desktops with the latest version of View Connection Server.
To use the View Persona Management setup option with View Agent, you must install View Agent on Windows 8, Windows 7, Windows Server 2012 R2, or Windows Server 2008 R2 virtual machines. This option does not operate on physical computers or RDS hosts.
You can install the standalone version of View Persona Management on physical computers. See
“Supported Operating Systems for Standalone View Persona Management,” on page 14.
The following table lists the Windows operating systems versions that are supported for creating desktop pools and application pools on an RDS host.
Table 2‑2. Operating Systems for RDS Hosts, Providing Remote Desktops or Applications
Guest Operating System Edition Service Pack
Windows Server 2008 R2 Standard, Enterprise, and
Datacenter SP1
Windows Server 2012 Standard and Datacenter None
Windows Server 2012 R2 Standard and Datacenter Latest update
For enhanced security, VMware recommends configuring cipher suites to remove known vulnerabilities. For instructions on how to set up a domain policy on cipher suites for Windows machines that run View Composer or View Agent, see “Disable Weak Ciphers in SSL/TLS for View Composer and View Agent Machines,” on page 34.
Supported Operating Systems for Standalone View Persona
Management
The standalone View Persona Management software provides persona management for standalone physical computers and virtual machines that do not have View Agent installed. When users log in, their profiles are downloaded dynamically from a remote profile repository to their standalone systems.
NOTE To configure View Persona Management for View desktops, install View Agent with the View
Persona Management setup option. The standalone View Persona Management software is intended for
non-View systems only.
Table 2-3 lists the operating systems supported for the standalone View Persona Management software.
Table 2‑3. Operating System Support for Standalone View Persona Management
Guest Operating System Version Edition Service Pack
Windows 8 64-bit and 32-bit Enterprise and Professional None Windows 7 64-bit and 32-bit Enterprise and Professional SP1
Windows Server 2012 R2 64-bit Datacenter None
Windows Server 2008 R2 64-bit Datacenter SP1
The standalone View Persona Management software is not supported on Microsoft Remote Desktop Services.
Remote Display Protocol and Software Support
Remote display protocols and software provide access to remote desktops and applications. The remote display protocol used depends on the type of client device, whether you are connecting to a remote desktop or a remote application, and how the administrator configures the desktop or application pool.
n PCoIP on page 15
PCoIP (PC over IP) provides an optimized desktop experience for the delivery of a remote application or an entire remote desktop environment, including applications, images, audio, and video content for a wide range of users on the LAN or across the WAN. PCoIP can compensate for an increase in latency or a reduction in bandwidth, to ensure that end users can remain productive regardless of network conditions.
n Microsoft RDP on page 16
Remote Desktop Protocol is the same multichannel protocol many people already use to access their work computer from their home computer. Microsoft Remote Desktop Connection (RDC) uses RDP to transmit data.
PCoIP
PCoIP (PC over IP) provides an optimized desktop experience for the delivery of a remote application or an entire remote desktop environment, including applications, images, audio, and video content for a wide range of users on the LAN or across the WAN. PCoIP can compensate for an increase in latency or a reduction in bandwidth, to ensure that end users can remain productive regardless of network conditions. PCoIP is supported as the display protocol for remote applications and for remote desktops that use virtual machines, physical machines that contain Teradici host cards, or shared session desktops on an RDS host.
PCoIP Features
Key features of PCoIP include the following:
n Users outside the corporate firewall can use this protocol with your company's virtual private network (VPN), or users can make secure, encrypted connections to a security server or Access Point appliance in the corporate DMZ.
n Advanced Encryption Standard (AES) 128-bit encryption is supported and is turned on by default. You can, however, change the encryption key cipher to AES-192 or AES-256.
n Connections to Windows desktops with the View Agent operating system versions listed in “Supported
Operating Systems for View Agent,” on page 13 are supported. n Connections from all types of client devices.
n Optimization controls for reducing bandwidth usage on the LAN and WAN. n 32-bit color is supported for virtual displays.
n ClearType fonts are supported.
n Audio redirection with dynamic audio quality adjustment for LAN and WAN. n Real-Time Audio-Video for using webcams and microphones on some client types.
n Copy and paste of text and, on some clients, images between the client operating system and a remote application or desktop. For other client types, only copy and paste of plain text is supported. You cannot copy and paste system objects such as folders and files between systems.
n Multiple monitors are supported for some client types. On some clients, you can use up to 4 monitors with a resolution of up to 2560 x 1600 per display or up to 3 monitors with a resolution of 4K (3840 x 2160) for Windows 7 remote desktops with Aero disabled. Pivot display and autofit are also supported. When the 3D feature is enabled, up to 2 monitors are supported with a resolution of up to 1920 x 1200, or one monitor with a resolution of 4K (3840 x 2160).
n USB redirection is supported for some client types.
n MMR redirection is supported for some Windows client operating systems and some remote desktop operating systems (with View Agent-installed).
For information about which desktop operating systems support specific PCoIP features, see "Feature Support Matrix for View Agent" in the View Architecture Planning document.
For information about which client devices support specific PCoIP features, go to
https://www.vmware.com/support/viewclients/doc/viewclients_pubs.html.
Recommended Guest Operating System Settings
1GB of RAM or more and a dual CPU is recommended for playing in high-definition, full screen mode, or 720p or higher formatted video. To use Virtual Dedicated Graphics Acceleration for graphics-intensive applications such as CAD applications, 4GB of RAM is required.
Video Quality Requirements
480p-formatted video You can play video at 480p or lower at native resolutions when the remote
desktop has a single virtual CPU. If you want to play the video in high-definition Flash or in full screen mode, the desktop requires a dual virtual CPU. Even with a dual virtual CPU desktop, as low as 360p-formatted video played in full screen mode can lag behind audio, particularly on Windows clients.
720p-formatted video You can play video at 720p at native resolutions if the remote desktop has a
dual virtual CPU. Performance might be affected if you play videos at 720p in high definition or in full screen mode.
1080p-formatted video If the remote desktop has a dual virtual CPU, you can play 1080p formatted
video, although the media player might need to be adjusted to a smaller window size.
3D rendering You can configure remote desktops to use software- or hardware-accelerated
graphics. The software-accelerated graphics feature enables you to run DirectX 9 and OpenGL 2.1 applications without requiring a physical graphics processing unit (GPU). The hardware-accelerated graphics features enable virtual machines to either share the physical GPUs (graphical processing unit) on a vSphere host or dedicate a physical GPU to a single virtual machine desktop.
For 3D applications, up to 2 monitors are supported, and the maximum screen resolution is 1920 x 1200. The guest operating system on the remote desktops must be Windows 7 or later.
Hardware Requirements for Client Systems
For information about processor and memory requirements, see the "Using VMware Horizon Client" document for the specific type of desktop or mobile client device. Go to
https://www.vmware.com/support/viewclients/doc/viewclients_pubs.html.
Microsoft RDP
Remote Desktop Protocol is the same multichannel protocol many people already use to access their work computer from their home computer. Microsoft Remote Desktop Connection (RDC) uses RDP to transmit data.
Microsoft RDP is a supported display protocol for remote desktops that use virtual machines, physical machines, or shared session desktops on an RDS host. (Only the PCoIP display protocol is supported for remote applications.) Microsoft RDP provides the following features:
n RDP 7 has true multiple monitor support, for up to 16 monitors.
n You can copy and paste text and system objects such as folders and files between the local system and the remote desktop.
n 32-bit color is supported for virtual displays. n RDP supports 128-bit encryption.
n Users outside the corporate firewall can use this protocol with your company's virtual private network (VPN), or users can make secure, encrypted connections to a View security server in the corporate DMZ.
Hardware Requirements for Client Systems
For information about processor and memory requirements, see the "Using VMware Horizon Client" document for the specific type of client system. Go to
https://www.vmware.com/support/viewclients/doc/viewclients_pubs.html.
NOTE Mobile client devices use only the PCoIP display protocol.
Installing View in an IPv6
Environment
3
View supports IPv6 as an alternative to IPv4. The environment must be either IPv6 only or IPv4 only. View does not support a mixed IPv6 and IPv4 environment.
Not all View features that are supported in an IPv4 environment are supported in an IPv6 environment. View does not support upgrading from an IPv4 environment to an IPv6 environment. Also, View does not support migration between IPv4 and IPv6 environments.
IMPORTANT To run View in an IPv6 environment, you must specify IPv6 when you install all View components.
This chapter includes the following topics:
n “Setting Up View in an IPv6 Environment,” on page 19
n “Supported vSphere, Database, and Active Directory Versions in an IPv6 Environment,” on page 20 n “Supported Operating Systems for View Servers in an IPv6 Environment,” on page 20
n “Supported Windows Operating Systems for Desktops and RDS Hosts in an IPv6 Environment,” on page 21
n “Supported Clients in an IPv6 Environment,” on page 21
n “Supported Remoting Protocols in an IPv6 Environment,” on page 21 n “Supported Authentication Types in an IPv6 Environment,” on page 22 n “Other Supported Features in an IPv6 Environment,” on page 22
Setting Up View in an IPv6 Environment
To run View in an IPv6 environment, you must be aware of the requirements and choices that are specific to IPv6 when you perform certain administrative tasks.
Before you install View, you must have a working IPv6 environment. The following View administrative tasks have options that are specific to IPv6.
n Installing View Connection Server. See “Install View Connection Server with a New Configuration,” on page 50.
n Installing View Replica Server. See “Install a Replicated Instance of View Connection Server,” on page 56.
n Installing View Security Server. See “Install a Security Server,” on page 62.
n Configuring the PCoIP External URL. See “Configuring External URLs for Secure Gateway and Tunnel
n Setting the PCoIP External URL. See “Set the External URLs for a View Connection Server Instance,” on page 113.
n Modifying the PCoIP External URL. See “Set the External URLs for a View Connection Server Instance,” on page 113.
n Installing View Agent. See the View Agent installation topics in the Setting Up Desktop and Application
Pools document.
n Installing Horizon Client for Windows. See the VMware Horizon Client for Windows document in
https://www.vmware.com/support/viewclients/doc/viewclients_pubs.html. Only Windows clients are supported.
NOTE View does not require you to enter an IPv6 address in any administrative tasks. In cases where you can specify either a fully qualified domain name (FQDN) or an IPv6 address, it is highly recommended that you specify an FQDN to avoid potential errors.
Supported vSphere , Database, and Active Directory Versions in an
IPv6 Environment
In an IPv6 environment, View supports specific vSphere, database server, and Active Directory versions. The following vSphere versions are supported in an IPv6 environment.
n 6.0 n 5.5 U2
The following database servers are supported in an IPv6 environment.
Database Server Version Edition
SQL Server 2012 SP1 32/64-bit Standard, Enterprise SQL Server 2012 Express 32/64-bit Free
Oracle 11g R2 32/64-bit Standard, Standard Edition One, Enterprise
The following Active Directory versions are supported in an IPv6 environment. n Microsoft Active Directory 2008 R2
n Microsoft Active Directory 2012 R2
Supported Operating Systems for View Servers in an IPv6
Environment
In an IPv6 environment, you must install View servers on specific Windows Server operating systems. View servers include View Connection Server instances, replica servers, security servers, and View Composer instances.
Operating System Edition
Windows Server 2008 R2 Standard, Enterprise
Windows Server 2008 R2 SP1 Standard, Enterprise
Supported Windows Operating Systems for Desktops and RDS Hosts
in an IPv6 Environment
In an IPv6 environment, View supports specific Windows operating systems for desktop machines and RDS hosts. RDS hosts provide session-based desktops and applications to users.
The following Windows operating systems are supported for desktop machines.
Operating System Version Edition
Windows 7 SP1 32/64-bit Enterprise, Professional
Windows 8 32/64-bit Enterprise, Professional
Windows 8.1 32/64-bit Enterprise, Professional
Windows Server 2008 R2 SP1 Datacenter
The following Windows operating systems are supported for RDS hosts.
Operating System Edition
Windows Server 2008 R2 SP1 Standard, Enterprise, Datacenter
Windows Server 2012 R2 Standard, Datacenter
Supported Clients in an IPv6 Environment
In an IPv6 environment, View supports clients that run on specific desktop operating systems.
Operating System Version Edition
Windows 7 32/64-bit Home, Professional, Enterprise, Ultimate Windows 7 SP1 32/64-bit Home, Professional, Enterprise, Ultimate
Windows 8 32/64-bit Enterprise, Professional
Windows 8.1 32/64-bit Enterprise, Professional
The following types of clients are not supported.
n Clients that run on OS X, Android, iOS, Linux, or Windows Store n Horizon Client for Windows with the Local Mode option n PCoIP Zero Client
Supported Remoting Protocols in an IPv6 Environment
In an IPv6 environment, View supports specific remoting protocols. The following remoting protocols are supported:
n RDP
n RDP with Secure Tunnel n PCoIP
n PCoIP through PCoIP Secure Gateway
The following remoting protocols are not supported: n HTML Access
n HTML Access through Blast Secure Gateway
Supported Authentication Types in an IPv6 Environment
In an IPv6 environment, View supports specific authentication types. The following authentication types are supported:
n Password authentication using Active Directory n Smart Card
n Single Sign-On
The following authentication types are not supported: n SecurID
n RADIUS n SAML
Other Supported Features in an IPv6 Environment
In an IPv6 environment, View supports certain features that are not covered in previous topics. The following features are supported:
n Automated desktop pools, including full virtual machines and View Composer linked clones n Manual desktop pools, including vCenter Server virtual machines, physical computers, and virtual
machines not managed by vCenter Server n RDS desktop pools
n Application pools n View Storage Accelerator n Disk space reclamation n Native NFS snapshots (VAAI) n ThinApp
n Virtual Printing n Events
n Role-based administration n System health dashboard n LDAP backup
n View Composer database backup
n Customer Experience Improvement Program (CEIP) n Single Sign-on, including the Log in as current user feature n Audio-out
The following features are not supported: n Virtual SAN
n Virtual Volumes n Cloud Pod Architecture
n Scanner redirection n USB redirection
n Multimedia redirection (MMR) n Real-time audio-video (RTAV) n Persona Management
n vRealize Operations Desktop Agent n Lync
n Syslog n Log Insight n Serial redirection n Flash URL redirection n Teradici TERA host card
Installing View in FIPS Mode
4
View can perform cryptographic operations using FIPS (Federal Information Processing Standard) 140-2 compliant algorithms. You can enable the use of these algorithms by installing View in FIPS mode.
Not all View features are supported in FIPS mode. Also, View does not support upgrading from a non-FIPS installation to a FIPS installation.
NOTE To ensure that View runs in FIPS mode, you must enable FIPS when you install all View components. This chapter includes the following topics:
n “Overview of Setting Up View in FIPS Mode,” on page 25 n “System Requirements for FIPS Mode,” on page 26
Overview of Setting Up View in FIPS Mode
To set up View in FIPS mode, you must first enable FIPS mode in the Windows environment. Then you install all the View components in FIPS mode..
The option to install View in FIPS mode is available only if FIPS mode is enabled in the Windows environment. For more information about enabling FIPS mode in Windows, see
https://support.microsoft.com/en-us/kb/811833.
NOTE View Administrator does not indicate whether View is running in FIPS mode. To install View in FIPS mode, perform the following View administrative tasks.
n When installing View Connection Server, select the FIPS mode option. See “Install View Connection
Server with a New Configuration,” on page 50.
n When installing View Replica Server, select the FIPS mode option. See “Install a Replicated Instance of
View Connection Server,” on page 56.
n Before installing a security server, deselect the global setting Use IPSec for Security Server
Connections in View Administrator and configure IPsec manually. See http://kb.vmware.com/kb/2000175.
n When installing View Security Server, select the FIPS mode option. See “Install a Security Server,” on page 62.
n Disable weak ciphers for View Composer and View Agent machines. See “Disable Weak Ciphers in
SSL/TLS for View Composer and View Agent Machines,” on page 34.
n When installing View Composer, select the FIPS mode option. See Chapter 6, “Installing View
n When installing View Agent, select the FIPS mode option. See the View Agent installation topics in the
Setting Up Desktop and Application Pools document.
n When installing Horizon Client for Windows, select the FIPS mode option. See the VMware Horizon
Client for Windows document in
https://www.vmware.com/support/viewclients/doc/viewclients_pubs.html. Only Windows clients are supported.
System Requirements for FIPS Mode
To support FIPS mode, your View deployment must meet the following requirements.
vSphere n vCenter Server 6.0 or later
n ESXi 6.0 or later
View desktop n Windows 7 SP1 (32- or 64-bit)
n View Agent 6.2 or later
Horizon Client n Windows 7 SP1 (32- or 64-bit)
n Horizon Client 3.5 or later
Preparing Active Directory
5
View uses your existing Microsoft Active Directory infrastructure for user authentication and management. You must perform certain tasks to prepare Active Directory for use with View.
View supports the following Active Directory Domain Services (AD DS) domain functional levels: n Windows Server 2003
n Windows Server 2008 n Windows Server 2008 R2 n Windows Server 2012 n Windows Server 2012 R2
This chapter includes the following topics:
n “Configuring Domains and Trust Relationships,” on page 27 n “Creating an OU for Remote Desktops,” on page 29
n “Creating OUs and Groups for Kiosk Mode Client Accounts,” on page 29 n “Creating Groups for Users,” on page 29
n “Creating a User Account for vCenter Server,” on page 29
n “Creating a User Account for a Standalone View Composer Server,” on page 30 n “Create a User Account for View Composer AD Operations,” on page 30 n “Configure the Restricted Groups Policy,” on page 31
n “Using View Group Policy Administrative Template Files,” on page 31 n “Prepare Active Directory for Smart Card Authentication,” on page 32
n “Disable Weak Ciphers in SSL/TLS for View Composer and View Agent Machines,” on page 34
Configuring Domains and Trust Relationships
You must join each View Connection Server host to an Active Directory domain. The host must not be a domain controller.
Active Directory also manages the View Agent machines, including single-user machines and RDS hosts, and the users and groups in your Horizon 6 deployment. You can entitle users and groups to remote desktops and applications, and you can select users and groups to be administrators in View Administrator.
You can place View Agent machines, View Composer servers, and users and groups, in the following Active Directory domains:
n The View Connection Server domain
n A different domain that has a two-way trust relationship with the View Connection Server domain n A domain in a different forest than the View Connection Server domain that is trusted by the View
Connection Server domain in a one-way external or realm trust relationship
n A domain in a different forest than the View Connection Server domain that is trusted by the View Connection Server domain in a one-way or two-way transitive forest trust relationship
Users are authenticated using Active Directory against the View Connection Server domain and any additional user domains with which a trust agreement exists.
If your users and groups are in one-way trusted domains, you must provide secondary credentials for the administrator users in View Administrator. Administrators must have secondary credentials to give them access to the one-way trusted domains. A one-way trusted domain can be an external domain or a domain in a transitive forest trust.
Secondary credentials are required only for View Administrator sessions, not for end users' desktop or application sessions. Only administrator users require secondary credentials.
You can provide secondary credentials by using the vdmadmin -T command.
n You configure secondary credentials for individual administrator users.
n For a forest trust, you can configure secondary credentials for the forest root domain. View Connection Server can then enumerate the child domains in the forest trust.
For details, see "Providing Secondary Credentials for Administrators Using the -T Option" in the View
Administration document.
NOTE Because security servers do not access any authentication repositories, including Active Directory, they do not need to reside in an Active Directory domain.
Trust Relationships and Domain Filtering
To determine which domains it can access, a View Connection Server instance traverses trust relationships beginning with its own domain.
For a small, well-connected set of domains, View Connection Server can quickly determine the full list of domains, but the time that it takes increases as the number of domains increases or as the connectivity between the domains decreases. The list might also include domains that you would prefer not to offer to users when they connect to their remote desktops and applications.
You can use the vdmadmin command to configure domain filtering to limit the domains that a View
Connection Server instance searches and that it displays to users. See the View Administration document for more information.
If a forest trust is configured with name suffix exclusions, the configured exclusions are used to filter the list of forest child domains. Name suffix exclusion filtering is applied in addition to the filtering that is specified with the vdmadmin command.
Creating an OU for Remote Desktops
You should create an organizational unit (OU) specifically for your remote desktops. An OU is a subdivision in Active Directory that contains users, groups, computers, or other OUs.
To prevent group policy settings from being applied to other Windows servers or workstations in the same domain as your desktops, you can create a GPO for your View group policies and link it to the OU that contains your remote desktops. You can also delegate control of the OU to subordinate groups, such as server operators or individual users.
If you use View Composer, you should create a separate Active Directory container for linked-clone desktops that is based on the OU for your remote desktops. Administrators that have OU administrator privileges in Active Directory can provision linked-clone desktops without domain administrator privileges. If you change administrator credentials in Active Directory, you must also update the credential
information in View Composer.
Creating OUs and Groups for Kiosk Mode Client Accounts
A client in kiosk mode is a thin client or a locked-down PC that runs the client software to connect to a View Connection Server instance and launch a remote desktop session. If you configure clients in kiosk mode, you should create dedicated OUs and groups in Active Directory for kiosk mode client accounts.
Creating dedicated OUs and groups for kiosk mode client accounts partitions client systems against unwarranted intrusion and simplifies client configuration and administration.
See the View Administration document for more information.
Creating Groups for Users
You should create groups for different types of users in Active Directory. For example, you can create a group called View Users for your end users and another group called View Administrators for users that will administer remote desktops and applications.
Creating a User Account for vCenter Server
You must create a user account in Active Directory to use with vCenter Server. You specify this user account when you add a vCenter Server instance in View Administrator.
You must give the user account privileges to perform certain operations in vCenter Server. You can create a vCenter Server role with the appropriate privileges and assign the role to the vCenter Server user. The list of privileges you add to the vCenter Server role varies, depending on whether you use View with or without View Composer. See “Configuring User Accounts for vCenter Server and View Composer,” on page 95 for information on configuring these privileges.
If you install View Composer on the same machine as vCenter Server, you must add the vCenter Server user to the local Administrators group on the vCenter Server machine. This requirement allows View to
authenticate to the View Composer service.
If you install View Composer on a different machine than vCenter Server, you do not have to make the vCenter Server user a local administrator on the vCenter Server machine. However, you do have to create a standalone View Composer Server user account that must be a local administrator on the View Composer machine.
Creating a User Account for a Standalone View Composer Server
If you install View Composer on a different machine than vCenter Server, you must create a domain user account in Active Directory that View can use to authenticate to the View Composer service on the standalone machine.
The user account must be in the same domain as your View Connection Server host or in a trusted domain. You must add the user account to the local Administrators group on the standalone View Composer machine.
You specify this user account when you configure View Composer settings in View Administrator and select Standalone View Composer Server. See “Configure View Composer Settings,” on page 102.
Create a User Account for View Composer AD Operations
If you use View Composer, you must create a user account in Active Directory that allows View Composer to perform certain operations in Active Directory. View Composer requires this account to join linked-clone virtual machines to your Active Directory domain.
To ensure security, you should create a separate user account to use with View Composer. By creating a separate account, you can guarantee that it does not have additional privileges that are defined for another purpose. You can give the account the minimum privileges that it needs to create and remove computer objects in a specified Active Directory container. For example, the View Composer account does not require domain administrator privileges.
Procedure
1 In Active Directory, create a user account in the same domain as your View Connection Server host or in a trusted domain.
2 Add the Create Computer Objects, Delete Computer Objects, and Write All Properties permissions to the account in the Active Directory container in which the linked-clone computer accounts are created or to which the linked-clone computer accounts are moved.
The following list shows all the required permissions for the user account, including permissions that are assigned by default:
n List Contents n Read All Properties n Write All Properties n Read Permissions n Reset Password
n Create Computer Objects n Delete Computer Objects
NOTE Fewer permissions are required if you select the Allow reuse of pre-existing computer accounts setting for a desktop pool. Make sure that the following permissions are assigned to the user account: n List Contents
n Read All Properties n Read Permissions n Reset Password
3 Make sure that the user account's permissions apply to the Active Directory container and to all child objects of the container.
What to do next
Specify the account in View Administrator when you configure View Composer domains in the Add vCenter Server wizard and when you configure and deploy linked-clone desktop pools.
Configure the Restricted Groups Policy
To be able to connect to a remote desktop, users must belong to the local Remote Desktop Users group of the remote desktop. You can use the Restricted Groups policy in Active Directory to add users or groups to the local Remote Desktop Users group of every remote desktop that is joined to your domain.
The Restricted Groups policy sets the local group membership of computers in the domain to match the membership list settings defined in the Restricted Groups policy. The members of your remote desktop users group are always added to the local Remote Desktop Users group of every remote desktop that is joined to your domain. When adding new users, you need only add them to your remote desktop users group.
Prerequisites
Create a group for remote desktop users in your domain in Active Directory.
Procedure
1 On the Active Directory server, navigate to the Group Policy Management plug-in.
AD Version Navigation Path
Windows 2003 a Select Start > All Programs > Administrative Tools > Active Directory Users and Computers.
b Right-click your domain and click Properties.
c On the Group Policy tab, click Open to open the Group Policy Management plug-in.
d Right-click Default Domain Policy, and click Edit.
Windows 2008 a Select Start > Administrative Tools > Group Policy Management.
b Expand your domain, right-click Default Domain Policy, and click Edit.
2 Expand the Computer Configuration section and open Windows Settings\Security Settings. 3 Right-click Restricted Groups, select Add Group, and add the Remote Desktop Users group.
4 Right-click the new restricted Remote Desktop Users group and add your remote desktop users group to the group membership list.
5 Click OK to save your changes.
Using View Group Policy Administrative Template Files
View includes several component-specific group policy administrative (ADM and ADMX) template files. All ADM and ADMX files that provide group policy settings for View are available in a bundled .zip file
named VMware-Horizon-View-Extras-Bundle-x.x.x-yyyyyyy.zip, where x.x.x is the version and yyyyyyy is
the build number. You can download the file from the VMware download site at
https://my.vmware.com/web/vmware/downloads. Under Desktop & End-User Computing, select the VMware Horizon 6 download, which includes the bundled .zip file.
You can optimize and secure remote desktops by adding the policy settings in these files to a new or existing GPO in Active Directory and then linking that GPO to the OU that contains your desktops. See the View Administration and Setting Up Desktop and Application Pools in View documents for information on using View group policy settings.
Prepare Active Directory for Smart Card Authentication
You might need to perform certain tasks in Active Directory when you implement smart card authentication.
n Add UPNs for Smart Card Users on page 32
Because smart card logins rely on user principal names (UPNs), the Active Directory accounts of users and administrators that use smart cards to authenticate in View must have a valid UPN.
n Add the Root Certificate to Trusted Root Certification Authorities on page 33
If you use a certification authority (CA) to issue smart card login or domain controller certificates, you must add the root certificate to the Trusted Root Certification Authorities group policy in Active Directory. You do not need to perform this procedure if the Windows domain controller acts as the root CA.
n Add an Intermediate Certificate to Intermediate Certification Authorities on page 33
If you use an intermediate certification authority (CA) to issue smart card login or domain controller certificates, you must add the intermediate certificate to the Intermediate Certification Authorities group policy in Active Directory.
n Add the Root Certificate to the Enterprise NTAuth Store on page 34
If you use a CA to issue smart card login or domain controller certificates, you must add the root certificate to the Enterprise NTAuth store in Active Directory. You do not need to perform this procedure if the Windows domain controller acts as the root CA.
Add UPNs for Smart Card Users
Because smart card logins rely on user principal names (UPNs), the Active Directory accounts of users and administrators that use smart cards to authenticate in View must have a valid UPN.
If the domain a smart card user resides in is different from the domain that your root certificate was issued from, you must set the user’s UPN to the Subject Alternative Name (SAN) contained in the root certificate of the trusted CA. If your root certificate was issued from a server in the smart card user's current domain, you do not need to modify the user's UPN.
NOTE You might need to set the UPN for built-in Active Directory accounts, even if the certificate is issued from the same domain. Built-in accounts, including Administrator, do not have a UPN set by default.
Prerequisites
n Obtain the SAN contained in the root certificate of the trusted CA by viewing the certificate properties. n If the ADSI Edit utility is not present on your Active Directory server, download and install the
appropriate Windows Support Tools from the Microsoft Web site.
Procedure
1 On your Active Directory server, start the ADSI Edit utility.
2 In the left pane, expand the domain the user is located in and double-click CN=Users.
3 In the right pane, right-click the user and then click Properties.
4 Double-click the userPrincipalName attribute and type the SAN value of the trusted CA certificate.
Add the Root Certificate to Trusted Root Certification Authorities
If you use a certification authority (CA) to issue smart card login or domain controller certificates, you must add the root certificate to the Trusted Root Certification Authorities group policy in Active Directory. You do not need to perform this procedure if the Windows domain controller acts as the root CA.
Procedure
1 On the Active Directory server, navigate to the Group Policy Management plug-in.
AD Version Navigation Path
Windows 2003 a Select Start > All Programs > Administrative Tools > Active Directory
Users and Computers.
b Right-click your domain and click Properties.
c On the Group Policy tab, click Open to open the Group Policy Management plug-in.
d Right-click Default Domain Policy, and click Edit.
Windows 2008 a Select Start > Administrative Tools > Group Policy Management. b Expand your domain, right-click Default Domain Policy, and click
Edit.
2 Expand the Computer Configuration section and open Windows Settings\Security Settings\Public
Key.
3 Right-click Trusted Root Certification Authorities and select Import.
4 Follow the prompts in the wizard to import the root certificate (for example, rootCA.cer) and click OK.
5 Close the Group Policy window.
All of the systems in the domain now have a copy of the root certificate in their trusted root store.
What to do next
If an intermediate certification authority (CA) issues your smart card login or domain controller certificates, add the intermediate certificate to the Intermediate Certification Authorities group policy in Active
Directory. See “Add an Intermediate Certificate to Intermediate Certification Authorities,” on page 33.
Add an Intermediate Certificate to Intermediate Certification Authorities
If you use an intermediate certification authority (CA) to issue smart card login or domain controller certificates, you must add the intermediate certificate to the Intermediate Certification Authorities group policy in Active Directory.
Procedure
1 On the Active Directory server, navigate to the Group Policy Management plug-in.
AD Version Navigation Path
Windows 2003 a Select Start > All Programs > Administrative Tools > Active Directory Users and Computers.
b Right-click your domain and click Properties.
c On the Group Policy tab, click Open to open the Group Policy Management plug-in.
d Right-click Default Domain Policy, and click Edit.
Windows 2008 a Select Start > Administrative Tools > Group Policy Management.
b Expand your domain, right-click Default Domain Policy, and click Edit.
2 Expand the Computer Configuration section and open the policy for Windows Settings\Security
Settings\Public Key.
3 Right-click Intermediate Certification Authorities and select Import.
4 Follow the prompts in the wizard to import the intermediate certificate (for example,
intermediateCA.cer) and click OK.
5 Close the Group Policy window.
All of the systems in the domain now have a copy of the intermediate certificate in their intermediate certification authority store.
Add the Root Certificate to the Enterprise NTAuth Store
If you use a CA to issue smart card login or domain controller certificates, you must add the root certificate to the Enterprise NTAuth store in Active Directory. You do not need to perform this procedure if the Windows domain controller acts as the root CA.
Procedure
u On your Active Directory server, use the certutil command to publish the certificate to the Enterprise
NTAuth store.
For example: certutil -dspublish -f path_to_root_CA_cert NTAuthCA
The CA is now trusted to issue certificates of this type.
Disable Weak Ciphers in SSL/TLS for View Composer and View Agent
Machines
To achieve greater security, you can configure the domain policy GPO (group policy object) to ensure that View Composer and Windows-based machines running View Agent do not use weak ciphers when they communicate using the SSL/TLS protocol.
Procedure
1 On the Active Directory server, edit the GPO by selecting Start > Administrative Tools > Group Policy
Management, right-clicking the GPO, and selecting Edit.
2 In the Group Policy Management Editor, navigate to the Computer Configuration > Policies >
Administrative Templates > Network > SSL Configuration Settings.
3 Double-click SSL Cipher Suite Order.
4 In the SSL Cipher Suite Order window, click Enabled.
5 In the Options pane, replace the entire content of the SSL Cipher Suites text box with the following cipher list:
TLS_ECDHE_RSA_WITH_AES_128_CBC_SHA256_P256, TLS_ECDHE_RSA_WITH_AES_128_CBC_SHA256_P384, TLS_ECDHE_RSA_WITH_AES_128_CBC_SHA_P256, TLS_ECDHE_RSA_WITH_AES_128_CBC_SHA_P384, TLS_ECDHE_RSA_WITH_AES_256_CBC_SHA_P256, TLS_ECDHE_RSA_WITH_AES_256_CBC_SHA_P384, TLS_RSA_WITH_AES_128_CBC_SHA256,
TLS_RSA_WITH_AES_128_CBC_SHA, TLS_RSA_WITH_AES_256_CBC_SHA256, TLS_RSA_WITH_AES_256_CBC_SHA
The cipher suites are listed above on separate lines for readability. When you paste the list into the text box, the cipher suites must be on one line with no spaces after the commas.
6 Exit the Group Policy Management Editor.
7 Restart the View Composer and View Agent machines for the new group policy to take effect.
Installing View Composer
6
To use View Composer, you create a View Composer database, install the View Composer service, and optimize your View infrastructure to support View Composer. You can install the View Composer service on the same host as vCenter Server or on a separate host.
View Composer is an optional feature. Install View Composer if you intend to deploy linked-clone desktop pools.
You must have a license to install and use the View Composer feature. This chapter includes the following topics:
n “Prepare a View Composer Database,” on page 37
n “Configuring an SSL Certificate for View Composer,” on page 44 n “Install the View Composer Service,” on page 45
n “Configuring Your Infrastructure for View Composer,” on page 47
Prepare a View Composer Database
You must create a database and data source name (DSN) to store View Composer data.
The View Composer service does not include a database. If a database instance does not exist in your network environment, you must install one. After you install a database instance, you add the View Composer database to the instance.
You can add the View Composer database to the instance on which the vCenter Server database is located. You can configure the database locally, or remotely, on a network-connected Linux, UNIX, or Windows Server computer.
The View Composer database stores information about connections and components that are used by View Composer:
n vCenter Server connections n Active Directory connections
n Linked-clone desktops that are deployed by View Composer n Replicas that are created by View Composer
Each instance of the View Composer service must have its own View Composer database. Multiple View Composer services cannot share a View Composer database.
For a list of supported database versions, see “Database Requirements for View Composer and the Events Database,” on page 11.
n Create a SQL Server Database for View Composer on page 38
View Composer can store linked-clone desktop information in a SQL Server database. You create a View Composer database by adding it to SQL Server and configuring an ODBC data source for it. n Create an Oracle Database for View Composer on page 41
View Composer can store linked-clone desktop information in an Oracle 12c or 11g database. You create a View Composer database by adding it to an existing Oracle instance and configuring an ODBC data source for it. You can add a new View Composer database by using the Oracle Database Configuration Assistant or by running a SQL statement.
Create a SQL Server Database for View Composer
View Composer can store linked-clone desktop information in a SQL Server database. You create a View Composer database by adding it to SQL Server and configuring an ODBC data source for it.
Procedure
1 Add a View Composer Database to SQL Server on page 38
You can add a new View Composer database to an existing Microsoft SQL Server instance to store linked-clone data for View Composer.
2 (Optional) Set SQL Server Database Permissions By Manually Creating Database Roles on page 39 By using this recommended method, the View Composer database administrator can set permissions for View Composer administrators to be granted through Microsoft SQL Server database roles. 3 Add an ODBC Data Source to SQL Server on page 40
After you add a View Composer database to SQL Server, you must configure an ODBC connection to the new database to make this data source visible to the View Composer service.
Add a View Composer Database to SQL Server
You can add a new View Composer database to an existing Microsoft SQL Server instance to store linked-clone data for View Composer.
If the database resides locally, on the system on which View Composer will be installed, you can use the Integrated Windows Authentication security model. If the database resides on a remote system, you cannot use this method of authentication.
Prerequisites
n Verify that a supported version of SQL Server is installed on the computer on which you will install View Composer or in your network environment. For details, see “Database Requirements for View Composer and the Events Database,” on page 11.
n Verify that you use SQL Server Management Studio to create and administer the database. Alternatively, you can use SQL Server Management Studio Express, which you can download and install from the following Web site.
http://www.microsoft.com/en-us/download/details.aspx?id=7593
Procedure
1 On the View Composer computer, select Start > All Programs > Microsoft SQL Server 2014, Microsoft
SQL Server 2012 or Microsoft SQL Server 2008.
2 Select SQL Server Management Studio and connect to the SQL Server instance. 3 In the Object Explorer panel, right-click the Databases entry and select New Database.
You can use the default values for the Initial size and Autogrowth parameters for the database and
4 In the New Database dialog box, type a name in the Database name text box. For example: ViewComposer
5 Click OK.
SQL Server Management Studio adds your database to the Databases entry in the Object Explorer panel.
6 Exit Microsoft SQL Server Management Studio.
What to do next
Optionally, follow the instructions in “(Optional) Set SQL Server Database Permissions By Manually Creating Database Roles,” on page 39
Follow the instructions in “Add an ODBC Data Source to SQL Server,” on page 40.
(Optional) Set SQL Server Database Permissions By Manually Creating Database
Roles
By using this recommended method, the View Composer database administrator can set permissions for View Composer administrators to be granted through Microsoft SQL Server database roles.
VMware recommends this method because it removes the requirement to set up the db_owner role for View Composer administrators who install and upgrade View Composer.
In this procedure, you can provide your own names for the database login name, user name, and database roles. The user [vcmpuser] and database roles, VCMP_ADMIN_ROLE and VCMP_USER_ROLE, are example names. The dbo schema is created when you create the View Composer database. You must use the dbo schema name.
Prerequisites
n Verify that a View Composer database is created. See “Add a View Composer Database to SQL Server,” on page 38.
Procedure
1 Log in to a Microsoft SQL Server Management Studio session as the sysadmin (SA) or a user account with sysadmin privileges.
2 Create a user who will be granted the appropriate SQL Server database permissions.
use ViewComposer go
CREATE LOGIN [vcmpuser] WITH PASSWORD=N'vcmpuser!0', DEFAULT_DATABASE=ViewComposer, DEFAULT_LANGUAGE=us_english, CHECK_POLICY=OFF
go
CREATE USER [vcmpuser] for LOGIN [vcmpuser] go
use MSDB go
CREATE USER [vcmpuser] for LOGIN [vcmpuser] go
3 In the View Composer database, create the database role VCMP_ADMIN_ROLE. 4 In the View Composer database, grant privileges to the VCMP_ADMIN_ROLE.
a Grant the schema permissions ALTER, REFERENCES, and INSERT on the dbo schema. b Grant the permissions CREATE TABLE, CREATE VIEW, and CREATE PROCEDURES. 5 In the View Composer database, create the VCMP_USER_ROLE.