SSL VPN User Guide
Access Manager 3.2 SP2
Legal Notice
THIS DOCUMENT AND THE SOFTWARE DESCRIBED IN THIS DOCUMENT ARE FURNISHED UNDER AND ARE SUBJECT TO THE TERMS OF A LICENSE AGREEMENT OR A NON-DISCLOSURE AGREEMENT. EXCEPT AS EXPRESSLY SET FORTH IN SUCH LICENSE AGREEMENT OR NON-DISCLOSURE AGREEMENT, NETIQ CORPORATION PROVIDES THIS DOCUMENT AND THE SOFTWARE DESCRIBED IN THIS DOCUMENT "AS IS" WITHOUT WARRANTY OF ANY KIND, EITHER EXPRESS OR IMPLIED, INCLUDING, BUT NOT LIMITED TO, THE IMPLIED WARRANTIES OF MERCHANTABILITY OR FITNESS FOR A PARTICULAR PURPOSE. SOME STATES DO NOT ALLOW DISCLAIMERS OF EXPRESS OR IMPLIED WARRANTIES IN CERTAIN TRANSACTIONS; THEREFORE, THIS STATEMENT MAY NOT APPLY TO YOU.
For purposes of clarity, any module, adapter or other similar material ("Module") is licensed under the terms and conditions of the End User License Agreement for the applicable version of the NetIQ product or software to which it relates or
interoperates with, and by accessing, copying or using a Module you agree to be bound by such terms. If you do not agree to the terms of the End User License Agreement you are not authorized to use, access or copy a Module and you must destroy all copies of the Module and contact NetIQ for further instructions.
This document and the software described in this document may not be lent, sold, or given away without the prior written permission of NetIQ Corporation, except as otherwise permitted by law. Except as expressly set forth in such license agreement or non-disclosure agreement, no part of this document or the software described in this document may be reproduced, stored in a retrieval system, or transmitted in any form or by any means, electronic, mechanical, or otherwise, without the prior written consent of NetIQ Corporation. Some companies, names, and data in this document are used for illustration purposes and may not represent real companies, individuals, or data.
This document could include technical inaccuracies or typographical errors. Changes are periodically made to the information herein. These changes may be incorporated in new editions of this document. NetIQ Corporation may make improvements in or changes to the software described in this document at any time.
U.S. Government Restricted Rights: If the software and documentation are being acquired by or on behalf of the U.S. Government or by a U.S. Government prime contractor or subcontractor (at any tier), in accordance with 48 C.F.R. 227.7202-4 (for Department of Defense (DOD) acquisitions) and 48 C.F.R. 2.101 and 12.212 (for non-DOD acquisitions), the government’s rights in the software and documentation, including its rights to use, modify, reproduce, release, perform, display or disclose the software or documentation, will be subject in all respects to the commercial license rights and restrictions provided in the license agreement.
© 2013 NetIQ Corporation and its affiliates. All Rights Reserved.
Contents
About This Guide 5
1 Overview of SSL VPN 7
1.1 Access Modes . . . 7
1.1.1 Kiosk Mode . . . 7
1.1.2 Enterprise Mode . . . 8
1.2 Client Machine Requirements . . . 8
1.2.1 Linux Requirements . . . 8
1.2.2 Macintosh Requirements . . . 9
1.2.3 Windows Requirements . . . 9
1.2.4 Kiosk Mode Limitations on Windows . . . 10
2 Accessing SSL VPN in Kiosk Mode 11 2.1 Accessing the SSL VPN User Portal . . . 11
2.2 Switching from Kiosk Mode to Enterprise Mode . . . 13
3 Accessing SSL VPN in Enterprise Mode 15 3.1 Prerequisites . . . 15
3.2 Accessing SSL VPN When You Are an Admin or root User . . . 15
3.3 Accessing SSL VPN as a Non-Admin User . . . 17
3.4 Switching from Enterprise Mode to Kiosk Mode . . . 19
3.5 Enabling the Sudo Command for Standard Users in the Mac OS . . . 19
4 Accessing Published Citrix Applications through SSL VPN 21 4.1 Accessing Published Citrix Applications in Kiosk Mode . . . 21
4.2 Accessing Published Citrix Applications in Enterprise Mode . . . 21
5 Using SSL VPN 23 5.1 Using the SSL VPN Home Page . . . 23
5.2 Using the Policies Page . . . 24
5.3 Configuring the Cleanup Options . . . 25
5.4 Viewing SSL VPN Logs . . . 26
5.5 Enabling Applications for SSL . . . 27
5.5.1 Enabling Linux Applications for SSL . . . 27
5.5.2 Enabling Macintosh Applications for SSL . . . 28
5.5.3 Enabling Terminals for SSL . . . 28
5.6 Logging Out of the Active SSL VPN Session . . . . 28
5.7 Using the Sandbox Feature . . . 28
5.8 Error . . . 29
5.9 Connecting after the Session Timeout Period . . . 30
A Error Messages 31
B Troubleshooting SSL VPN 49
B.1 SSL VPN Fails to Load If Firefox 3.0 Is Used on Vista 64-bit . . . 50
B.2 Error: Failed to Fetch CIC Policy from the Server . . . 50
B.3 Stability Issues when You Use a Firefox Browser on a Vista 64-Bit Machine . . . 50
B.4 Unable to Connect to SSL VPN Because of the OpenVPN Error . . . 50
B.5 The SSL VPN Applet Fails to Download on a SLED 11 64-Bit Machine . . . 51
B.6 Unable to Connect to SSL VPN . . . 51
B.7 Unable to Connect to SSL VPN from the Same Internet Explorer Browser Session . . . 52
B.8 The SSL VPN Connection Fails with an OpenVPN Connection Error . . . 52
B.9 The Browser Cache Is Not Cleared When Multiple Tabs Are Used in Vista . . . 52
B.10 Failed to Connect to SSL VPN . . . 52
B.11 Mozilla Firefox Browser Displays an “X” Mark . . . 53
B.12 Applications Are Not Enabled from the Terminal after Running the su Command . . . 53
B.13 SSL VPN Session Disconnects after Approximately 10 Hours . . . 53
B.14 Error: Failed to Download the SSL VPN Files from Gateway . . . 53
B.15 Unable to Connect After the Previous Connection Ended Abruptly . . . 54
B.16 SSL VPN Client Displays the Nonsecure Items Dialog Box. . . 54
B.17 Clear Cache Option Retains Some Image Files in the Temporary Internet Folder . . . 54
B.18 SSL VPN Fails to Retrieve Help Pages When There Is an Error . . . 55
B.19 The Browser Becomes Non-Responsive If Clear Browser Private Data Is Repeatedly Clicked . . . . 55
B.20 SSL VPN Issues with the Latest Versions of JRE 1.6 . . . 55
B.21 Unable to Access Protected HTTP Applications through a Safari Browser . . . 55
B.22 Linux Browser Issues in Kiosk Mode . . . 55
B.23 Issues with the Intlclock Toolbar Application . . . 56
B.24 Socks Client Logs Are Displayed under Service Logs . . . 56
B.25 Connection Fails in SSL VPN If the Root User Password Is Not Set in Macintosh . . . 56
B.26 SSL VPN Log In Displays Error . . . 56
B.27 SSL VPN Fails to Connect after SP2 Upgrade due to IP Address Assignment Error . . . 56
B.28 Applications Do not Use DNS Configured at SSL VPN Server When DNS Is Manually Configured at Mac Leopard Machine . . . 57
About This Guide
This document is intended to help you understand and use the SSL VPN user portal. It contains the following information:
Chapter 1, “Overview of SSL VPN,” on page 7
Chapter 2, “Accessing SSL VPN in Kiosk Mode,” on page 11 Chapter 3, “Accessing SSL VPN in Enterprise Mode,” on page 15
Chapter 4, “Accessing Published Citrix Applications through SSL VPN,” on page 21 Chapter 5, “Using SSL VPN,” on page 23
Appendix A, “Error Messages,” on page 31
Appendix B, “Troubleshooting SSL VPN,” on page 49
Audience
This guide is intended for NetIQ Access Manager SSL VPN end users.
Feedback
We want to hear your comments and suggestions about this manual and the other documentation included with this product. Please use the User Comments feature at the bottom of each page of the online documentation and enter your comments there.
Documentation Updates
For the most recent version of the SSL VPN User Guide, visit the NetIQ Access Manager Documentation Web site (http://www.netiq.com/documentation/novellaccessmanager32).
Additional Documentation
NetIQ Access Manager 3.2 SP2 SSL VPN Server Guide NetIQ Access Manager 3.2 SP2 Installation Guide NetIQ Access Manager 3.2 SP2 Setup Guide
NetIQ Access Manager 3.2 SP2 Administration Console Guide NetIQ Access Manager 3.2 SP2 Identity Server Guide
NetIQ Access Manager 3.2 SP2 Access Gateway Guide
1
1Overview of SSL VPN
The NetIQ Access Manager SSL VPN allows you to use a Web browser to access corporate resources securely from a remote site. It uses a Secure Socket Layer (SSL) with a virtual private connection (VPN). It is a clientless solution, and it eliminates the need to install or configure a VPN client on your desktop or laptop. This gives you the flexibility to access the corporate resources from a laptop, a home computer, or a Web browsing kiosk.
When you access the SSL VPN server through a Web browser, a Java applet or an ActiveX control is installed on your machine after the successful connection. This encrypts the traffic passing through the tunnel and sends it to the SSL VPN server.
This section describes the following features of the SSL VPN:
Section 1.1, “Access Modes,” on page 7
Section 1.2, “Client Machine Requirements,” on page 8
1.1
Access Modes
The SSL VPN uses both clientless and thin-client access methods. The clientless method is called the Kiosk mode SSL VPN and the thin-client method is called the Enterprise mode SSL VPN.
Section 1.1.1, “Kiosk Mode,” on page 7 Section 1.1.2, “Enterprise Mode,” on page 8
1.1.1
Kiosk Mode
The Kiosk mode is the usual choice for computers not controlled by the organization, such as home computers and computers in Web-browsing kiosks. When you connect to SSL VPN in the Kiosk mode, only a limited set of applications are enabled for SSL.
Applications that were opened before the SSL VPN connection was established are not enabled for SSL. You must manually enable the applications that were opened before the SSL VPN connection. For more information, see Section 5.5, “Enabling Applications for SSL,” on page 27.
You are connected to SSL VPN in the Kiosk mode if:
You do not have administrator rights or root privileges to the workstation, and you do not know the credentials of the administrator or root user of the machine.
You have administrator rights or root privileges to the workstation, but you are required by the system administrator to connect in the Kiosk mode only.
For more information on using the Kiosk mode, see Chapter 2, “Accessing SSL VPN in Kiosk Mode,” on page 11.
1.1.2
Enterprise Mode
The Enterprise mode is the usual choice for computers that are controlled by the organization, such as notebooks provided by the organization for employees.When you connect to the SSL VPN in the Enterprise mode, all applications are enabled for SSL regardless of whether they were opened before or after connecting to the SSL VPN. This includes your desktop applications and toolbar applications. You are connected to the SSL VPN in the Enterprise mode if:
You are administrator or root user of a workstation, if the system administrator has not required you to connect in the Kiosk mode only.
You are not administrator or root user of a workstation, but you know the credentials of the administrator or root user.
If someone with administrator access has preinstalled the SSL VPN thin-client components on your machine, you can connect to SSL VPN in the Enterprise mode. For more information on preinstalling the thin-client components, see “Preinstalling the SSL VPN Client Components” in the NetIQ Access Manager 3.2 SP2 SSL VPN Server Guide.
For more information on using Enterprise mode, see Chapter 3, “Accessing SSL VPN in Enterprise Mode,” on page 15.
1.2
Client Machine Requirements
This section explains the operating software and browser requirements for the client machine, in order to access the SSL VPN user portal.
Section 1.2.1, “Linux Requirements,” on page 8 Section 1.2.2, “Macintosh Requirements,” on page 9 Section 1.2.3, “Windows Requirements,” on page 9
Section 1.2.4, “Kiosk Mode Limitations on Windows,” on page 10
1.2.1
Linux Requirements
When you access the SSL VPN user portal in Linux, a Java applet is downloaded to the client
machine. The following table lists the supported versions of operating software and browsers for the Linux environment:
Table 1-1 Supported Linux Configurations
Component Requirement
Operating Systems SUSELinux Enterprise Desktop (SLED) 10.0 and SLED 11 are supported for 32-bit and 64-32-bit platforms.
OpenSSL 0.9.7 or higher. If your OpenSSL version is higher than 0.9.7, you must install an OpenSSL 0.9.7 compatible library.
Shells bash
NOTE: If you are using SLED 11.0 64-bit client, make sure that you have the latest JRE installed on your machine.
1.2.2
Macintosh Requirements
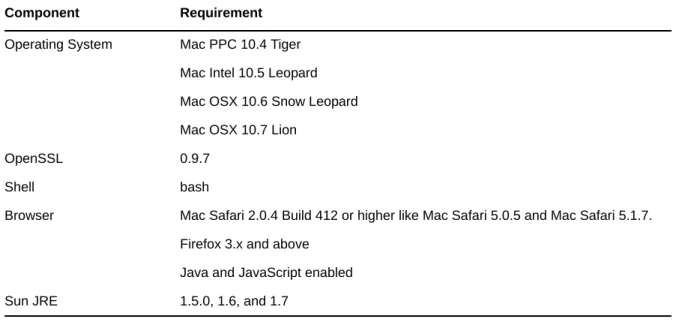
When you access the SSL VPN user portal in the Macintosh environment, a Java applet is downloaded to the client machine. The following table lists the supported versions of operating software and browsers in the Mac environment:
Table 1-2 Supported Macintosh Configurations
NOTE: GroupWise 7.0 and 8.0 does not work when SSL VPN Kiosk mode is running on Macintosh Tiger OS.
1.2.3
Windows Requirements
When you access the SSL VPN user portal in the Windows environment, an ActiveX control is downloaded to the client machine. If you want to download the Java applet on your machine instead of the ActiveX control, the administrator needs to perform some server-side configurations. For more information, refer to “Configuring SSL VPN to Download the Java Applet on Internet Explorer” in the NetIQ Access Manager 3.2 SP2 SSL VPN Server Guide.
The following table lists the supported versions of operating software and browsers in the Windows environment:
Sun JRE 1.5.0_11 or higher
Component Requirement
Component Requirement
Operating System Mac PPC 10.4 Tiger Mac Intel 10.5 Leopard Mac OSX 10.6 Snow Leopard Mac OSX 10.7 Lion
OpenSSL 0.9.7
Shell bash
Browser Mac Safari 2.0.4 Build 412 or higher like Mac Safari 5.0.5 and Mac Safari 5.1.7. Firefox 3.x and above
Java and JavaScript enabled Sun JRE 1.5.0, 1.6, and 1.7
Table 1-3 Supported Windows Configurations
1.2.4
Kiosk Mode Limitations on Windows
The 64-bit Windows clients are not supported.
Browsers are not supported for data transfer in the 32-bit Windows 7 client.
SSL VPN does not work in Kiosk Mode for Windows 7.
Component Requirement
Operating System Windows XP SP2/SP3 - 32-bit and 64-bit Windows Vista - 32-bit and 64-bit Windows 7 32-bit and 64-bit
NOTE: Windows 64-bit is supported only in the Enterprise Mode Browser Internet Explorer 8.0 and above
Mozilla Firefox 3.x and above
NOTE: Do not use Windows Explorer to run SSL VPN.
Sun JRE 1.4.1 or higher
NOTE: If you are using the latest Firefox version, use the latest version of Sun JRE.
2
2Accessing SSL VPN in Kiosk Mode
The Kiosk mode is the usual choice for computers not controlled by the organization, such as home computers and computers in Web-browsing kiosks.
In the Kiosk mode of SSL VPN, only those applications that are opened after connecting to the SSL VPN server are enabled for SSL. You must manually add the applications that were opened before connecting to the SSL VPN to enable them for SSL. For more information on manually adding the applications, see Section 5.5, “Enabling Applications for SSL,” on page 27.
This section has the following information on accessing the SSL VPN in the Kiosk mode:
Section 2.1, “Accessing the SSL VPN User Portal,” on page 11
Section 2.2, “Switching from Kiosk Mode to Enterprise Mode,” on page 13
For information on connecting to the SSL VPN user portal in the Enterprise mode, see Chapter 3, “Accessing SSL VPN in Enterprise Mode,” on page 15.
2.1
Accessing the SSL VPN User Portal
1 Log in to the SSL VPN server by using the following URL:
https://<dns_name>/sslvpn/login
2 Specify the username and password, then click Login.
3 Click Yes in the warning message to accept and download the signed ActiveX control or Java applet required for the SSL VPN client. The SSL VPN mode selection dialog box is displayed.
4 Do one of the following:
Select Kiosk Mode (Current) to connect to the SSL VPN in the Kiosk mode for the current session. When you select this option, you are prompted to enter the username and password for the administrator user the next time you log in.
Click Kiosk Mode (Always) to always connect to the SSL VPN in the Kiosk mode. When you select this option, you are connected to the SSL VPN in the Kiosk mode in the subsequent logins without being prompted to select the mode. If you want to connect to the SSL VPN in the Enterprise mode in one of the subsequent connections, you can do so. For more
information, see Section 2.2, “Switching from Kiosk Mode to Enterprise Mode,” on page 13.
5 Click OK. If you click Cancel you are connected to the SSL VPN in the Kiosk mode for the current session.
6 (Conditional) If you are a non-admin user and if you are using Internet Explorer to connect to the SSL VPN, click the link displayed in option 2 of the following screen to proceed with the SSL VPN connection.
This page is displayed because a non-admin user of the machine cannot download the ActiveX control, which is essential to establish the SSL VPN connection. Clicking the link downloads the applet on your machine and establishes the connection.
7 If the SSL VPN connection is successful, the SSL VPN Home page is displayed. Make sure that you keep the browser open throughout the SSL VPN session, and continue with Step 8.
or
If the SSL VPN connection fails, an error message is displayed. Skip to Step 9.
8 Do one of the following, depending on whether you are a Linux, Macintosh, or Windows user:
Linux: If you are a Linux user, open a new terminal to launch applications that need to be enabled for SSL. For more information, see Section 5.5.1, “Enabling Linux Applications for SSL,” on page 27.
Macintosh: If you are a Macintosh user, open a new terminal to launch applications that need to be enabled for SSL. For more information, see Section 5.5.2, “Enabling Macintosh Applications for SSL,” on page 28.
Windows: If you are a Windows user, open applications that you want to access from your protected network.
9 If the SSL VPN connection fails, click Logout to close the session and retry. For more information on these error messages, see Appendix A, “Error Messages,” on page 31
2.2
Switching from Kiosk Mode to Enterprise Mode
If you selected Kiosk Mode (Always) when you first connected to the SSL VPN, you get connected to the SSL VPN in the Kiosk mode in subsequent connections. However, you can switch to the Enterprise mode after you connect.
1 Connect in the Kiosk mode.
2 Click Exit to log out of the current session.
3 Select the Enable Enterprise mode check box in the Exit SSL VPN page.
4 Log in again in the Enterprise mode.
For more information on connecting to the SSL VPN in the Enterprise mode, see Chapter 3, “Accessing SSL VPN in Enterprise Mode,” on page 15.
3
3Accessing SSL VPN in Enterprise Mode
The Enterprise mode is the usual choice for computers that are controlled by the organization, such as notebooks provided by the organization for employees.
When you access the SSL VPN user portal in the Enterprise mode, all applications are enabled for SSL, whether they were opened before or after the SSL VPN connection was made.
This section contains the following information on using the SSL VPN user portal in the Enterprise mode:
Section 3.1, “Prerequisites,” on page 15
Section 3.2, “Accessing SSL VPN When You Are an Admin or root User,” on page 15 Section 3.3, “Accessing SSL VPN as a Non-Admin User,” on page 17
Section 3.4, “Switching from Enterprise Mode to Kiosk Mode,” on page 19
Section 3.5, “Enabling the Sudo Command for Standard Users in the Mac OS,” on page 19
For information on connecting to the SSL VPN user portal in the Kiosk mode, see Chapter 2, “Accessing SSL VPN in Kiosk Mode,” on page 11.
3.1
Prerequisites
To connect to the SSL VPN in the Enterprise mode:
You should be an admin user in the Windows environment or root user in the Linux or Macintosh environment, or a user with the administrative or root user access.
If you are a non-admin or a non-root user and do not have admin or root user access, you must pre-install the client components. For more information on pre-installing the client components, see “Preinstalling the SSL VPN Client Components” in the NetIQ Access Manager 3.2 SP2 SSL VPN Server Guide.
You must have the recommended browser or operating software installed in your system. For more information, see Section 1.2, “Client Machine Requirements,” on page 8.
If you are a standard user, make sure that the sudo command is enabled. For more information, see Section 3.5, “Enabling the Sudo Command for Standard Users in the Mac OS,” on page 19.
3.2
Accessing SSL VPN When You Are an Admin or root User
If you are an admin or a root user, the Enterprise mode of SSL VPN is enabled by default unless the SSL VPN administrator has configured you to connect in the Kiosk mode only.
1 Log in to the SSL VPN server by using the following URL:
https://<dns_name>/sslvpn/login
2 Specify the username and password, then click Login.
3 Click Yes in the warning message to accept and download the signed applet components required for SSL VPN.
4 (Conditional) If the connection is successful, the SSL VPN Home page is displayed, allowing access to all the resources listed on the Policy tab. Make sure that you do not close this browser during the SSL VPN session.
5 (Conditional) If you see this error message, click Logout to log out of the session. For more information on these error messages, see Appendix A, “Error Messages,” on page 31.
3.3
Accessing SSL VPN as a Non-Admin User
If you are a non-admin or a non-root user, but you know the credentials of the administrator or root
user, you can connect to the SSL VPN in the Enterprise mode as follows:
1 Log in to the SSL VPN server by using the following URL:
https://<dns_name>/sslvpn/login
Replace <dns_name> with the DNS name of your SSL VPN server.
2 Specify the username and password of the administrator or the root user of the machine, then click Login.
3 Click Yes to download the signed applet components required for the SSL VPN.
4 Select Enterprise mode login in the dialog box prompting you to select a mode of the SSL VPN.
5 Specify the username and password of the administrator or root user, then click OK.
You are connected to the SSL VPN in the Enterprise mode in subsequent connections. You are not prompted for the administrator or root username and password the next time you log in. If you click OK in the dialog box to enable the Enterprise mode of SSL VPN and you later want to switch to the Kiosk mode on the same machine, see Section 3.4, “Switching from Enterprise Mode to Kiosk Mode,” on page 19
6 (Conditional) If you are using the Internet Explorer browser and the ActiveX control is not installed, click the toolbar of the following screen to download the ActiveX control:
7 (Conditional) If the connection is successful, the SSL VPN Home page is displayed, allowing access to all the resources listed on the Policy page. Make sure that you do not close this browser during the SSL VPN session.
If the SSL VPN connection fails, an error message is displayed. For more information on these error messages, see Appendix A, “Error Messages,” on page 31.
3.4
Switching from Enterprise Mode to Kiosk Mode
If you are a non-admin or non-root user and you enabled the Enterprise mode of the SSL VPN, you get connected to the SSL VPN in the Enterprise mode in subsequent logins. You can return to the Kiosk mode on the same workstation during the next login.
1 Connect in the Enterprise mode.
2 Click Exit to log out of the current session.
3 Select the Uninstall Enterprise mode check box on the Exit SSL VPN page.
4 Log in again in the Kiosk mode.
For more information on connecting to the SSL VPN in the Kiosk mode, see Chapter 2, “Accessing SSL VPN in Kiosk Mode,” on page 11.
3.5
Enabling the Sudo Command for Standard Users in the Mac
OS
The SSL VPN uses the sudo command to gain root privileges for non-root users in the Mac OS. This command is not enabled by default for standard users in the Mac OS.
To manually enable the command:
1 Open /etc/sudoers
2 Add the following lines:
Defaults targetpw ALL ALL=(ALL) ALL
4
4Accessing Published Citrix Applications
through SSL VPN
You can access published Citrix applications through the SSL VPN.
Section 4.1, “Accessing Published Citrix Applications in Kiosk Mode,” on page 21 Section 4.2, “Accessing Published Citrix Applications in Enterprise Mode,” on page 21
4.1
Accessing Published Citrix Applications in Kiosk Mode
1 Connect to a Citrix server by using the following URL:
http://<DNS name of Citrix Server>/Citrix/MetaFrame
Replace <DNS name of Citrix Server> with the DNS name of your Citrix server. The Access Manager login page is displayed.
2 Specify your login credentials.
3 Click Allow to accept and download signed certificates and change the browser setting.
4 Click OK in the dialog box when you are prompted.
The SSL VPN connection is automatically established. You can now access the published applications by clicking the corresponding icons on the Citrix Web page.
4.2
Accessing Published Citrix Applications in Enterprise
Mode
1 Connect to a Citrix server by using the following URL:
http://<DNS name of Citrix Server>/Citrix/MetaFrame
Replace <DNS name of Citrix Server> with the DNS name of your Citrix server. The Access Manager login page is displayed.
2 Specify your login credentials. You are authenticated to both the Citrix and SSL VPN servers.
3 Depending on your server-side configuration, you might need to accept and download signed certificates. When you are prompted, click Allow.
The SSL VPN connection is automatically established. You can now access the published applications by clicking the corresponding icons on the Citrix Web page.
5
5Using SSL VPN
When you connect successfully to the SSL VPN, the SSL VPN Home page is displayed by default. Use this page as the central point for your SSL VPN activities.
Make sure that you do not close the browser during a session. To access Web pages from the protected network, use another browser instance.
Section 5.1, “Using the SSL VPN Home Page,” on page 23 Section 5.2, “Using the Policies Page,” on page 24
Section 5.3, “Configuring the Cleanup Options,” on page 25 Section 5.4, “Viewing SSL VPN Logs,” on page 26
Section 5.5, “Enabling Applications for SSL,” on page 27
Section 5.6, “Logging Out of the Active SSL VPN Session,” on page 28 Section 5.7, “Using the Sandbox Feature,” on page 28
Section 5.8, “Error,” on page 29
Section 5.9, “Connecting after the Session Timeout Period,” on page 30 Section 5.10, “Downloading the Applet on Internet Explorer,” on page 30
5.1
Using the SSL VPN Home Page
Click the Home icon to display the Home page. How this page is displayed to you depends on how your organization has customized this page.
The following figure displays the default SSL VPN home page.
Figure 5-1 SSL VPN Home Page
This page displays the following:
Home: Displays the customer or the product information. This page can be customized for different organizations.
Logout: Click the Logout icon to log out of the current session.
Policies: Displays the resources accessible by the user, based on the traffic policies configured for your role. The traffic policies are configured by the administrator on the server. For more information on the Policies page, see Section 5.2, “Using the Policies Page,” on page 24.
Cleanup Options: This page lists some of the desktop cleanup options that can be selected before logging out of an active SSL VPN connection.
For more information on the Cleanup options page, see Section 5.6, “Logging Out of the Active SSL VPN Session,” on page 28.
Log Entries: Displays ActiveX or Java applet logs. For more information on the Log Entries page, see Section 5.4, “Viewing SSL VPN Logs,” on page 26.
Applications: Specifies steps to add desktop applications to SSL VPN. This tab is available only in the Kiosk mode of Linux and Macintosh, because in these two platforms, applications that were opened before establishing the SSL VPN connection are not enabled for SSL. For more information on the Applications page, see Section 5.5, “Enabling Applications for SSL,” on page 27.
Username: Specifies the name of the currently logged-in user in the top left corner of the page.
Duration: Specifies the duration that the SSL VPN connection has been on.
Sent: Displays bytes sent through the tunnel.
Received: Displays bytes received through the tunnel.
Idle: Displays the time left in minutes before disconnecting, if there is no data transfer happening in the tunnel.
Status of Connection: Indicates the state of connection. The following table describes the different connection statuses:
5.2
Using the Policies Page
1 On the SSL VPN Home page, click the Policies icon.
Status Description
<Mode> Indicates that the Java applet or ActiveX has successfully established a connection to the SSL VPN server. It also displays the connection mode. Disconnected Indicates that the user has logged out of the SSL VPN server. This status is
displayed when the user clicks the Exit button.
Connecting Indicates that the connection is in progress. To avoid problems, the user must wait until a successful connection status is displayed before clicking any other button.
Disconnecting Indicates that disconnection is in progress. To avoid problems, the user must wait until a successful disconnection status is displayed before clicking any other button.
Error: Message Indicates that ActiveX or the Java applet has an error. Check ActiveX or the Java applet log for more information on the error. For more information on error messages, see Appendix A, “Error Messages,” on page 31.
2 Review the information on the page.
This page displays the resources you can access, based on the traffic policies configured by your system administrator for your role. The information is displayed as follows:
Name: The name of the traffic policy applicable for your role.
Destination: The IP address of the destination network.
Port: The destination port.
Protocol: TCP, UDP, or ICMP.
Action: The action can be Encrypt or Deny. If the action is Encrypt, you are permitted to access the protected resources. If the action is Deny, you are denied access to the protected resources.
5.3
Configuring the Cleanup Options
1 On the SSL VPN Home page, click the Cleanup Options icon.
2 Select one or more of the following options before you log out of the SSL VPN session:
NOTE: In Firefox and Safari browsers, all the components downloaded on the system to establish the SSL VPN connection, and the cookies, Internet Explorer add-on, and cache are deleted from the system when all instances of the browser are closed after disconnecting.
Leave Behind the Client Components: Select this option to reduce the connection time when you log in again. When you select this option, some of the SSL VPN components are left behind in the client. This reduces the time to connect in subsequent logins because these components need not do not need to be downloaded again.
Uninstall Enterprise Mode: This option is displayed only if you are the administrator or
root user of the machine and have connected in the Enterprise mode, or if you selected the
Enterprise mode option in the SSL VPN dialog box. If you want to switch to Enterprise mode when you connect to the SSL VPN the next time you log in, you must select this option before clicking Exit.
Enable Option for Enterprise Mode: This option is displayed only if you have selected the
Kiosk Mode (Always) option. You must select this option before clicking Exit if you want to connect to the SSL VPN in the Enterprise Mode the next time you log in.
Clear Browser Private Data: If you use Internet Explorer to establish the SSL VPN
connection, this option appears as a check box. If you use Firefox to establish the SSL VPN connection, this option appears as a button. Select the appropriate option in order to clear the browser history and cache when you log out.
Unregister ActiveX Control: This option is displayed only if you use the Internet Explorer to connect to SSL VPN.
Clear Java Cache: This option is available only if you use Firefox to connect to SSL VPN. Select this check box to clear the Java cache when you log out. This clears not only the files and the applet used by SSL VPN, but clears all files and applets in the cache.
NOTE: If you are using Firefox or the Force JRE option in Internet Explorer, the logout options selected during the previous login are not displayed if you use the same instance of the browser to connect to the SSL VPN again.
3 Click Remember My Option to remember the logout options that you have selected. If you select this option, the option selection dialog box is not displayed the next time you log out of the SSL VPN.
5.4
Viewing SSL VPN Logs
The Log Entries page displays the log files. These log files are useful to you or your system administrator for troubleshooting any issues that come up during the connection.
1 On the SSL VPN Home page, click the Log Entries icon. The Log Entries page is displayed.
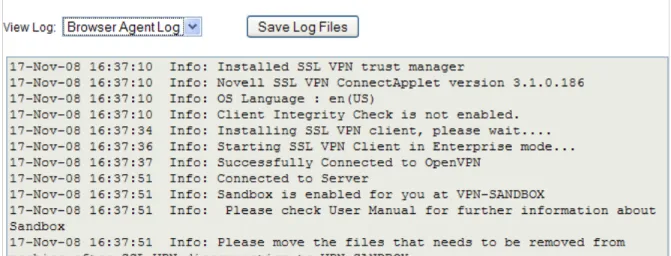
2 To view logs for a particular component or action, click one of the following links in the View Log
list:
Browser Agent Logs: Displays the ActiveX or applet logs.
Install Logs: Displays the installation logs.
NOTE: When you click the installation logs, you might notice the log message Sandbox is enabled for you at VPN-SANDBOX. This message indicates that a folder named
VPN-Copy or download all the files into this folder. This folder, along with its contents, is deleted automatically, when you disconnect the SSL VPN connection. Section 5.7, “Using the Sandbox Feature,” on page 28
Tunnel Logs: Displays the tunnel logs. This contains STunnel logs if the SSL VPN connection is in Kiosk mode and OpenVPN logs if the SSL VPN connection is in Enterprise mode.
Service Logs: Displays logs about the SSL VPN service.
CIC Logs: Displays the Client Integrity Check logs.
Cleanup Logs: Displays the cleanup logs. However, no desktop cleanup logs are displayed if you are using ActiveX.
NOTE: Occasionally, the cleanup logs might display messages such as Error copying file or
File not found exception. These messages indicate that there was an error in making a backup of some of the files. These messages do not affect the desktop cleanup or indicate that the desktop cleanup process is incomplete.
3 Click Save Logs, then select a location to save the log files. You can alternatively use one of the following shortcut keys to save logs, depending on your browser.
NOTE: If you are using Mac OS, manually specify a name for the folder where you want to save logs.
If you are using Firefox, press Alt+Shift+s.
If you are using Safari, press Alt+Shift+Ctrl+s.
If you are using Internet Explorer, press Alt+s.
5.5
Enabling Applications for SSL
If you are a Kiosk mode user in Linux or Macintosh, you must enable applications for SSL if they were opened before the SSL VPN connection was established.
This section has the following information:
Section 5.5.1, “Enabling Linux Applications for SSL,” on page 27 Section 5.5.2, “Enabling Macintosh Applications for SSL,” on page 28 Section 5.5.3, “Enabling Terminals for SSL,” on page 28
5.5.1
Enabling Linux Applications for SSL
1 Start the SSL VPN services.
2 Create desktop shortcuts for application that you want to enable for SSL.
3 On the SSL VPN page, click the Application tab, then click SSLize Application.
4 Launch the application from the desktop shortcut.
5.5.2
Enabling Macintosh Applications for SSL
1 Create an alias for the application you want to enable for SSL by selecting the application and pressing Command+L.
2 Drag and drop the newly created alias into the SSL VPN folder on desktop.
3 On the SSL VPN Home page, click the Application tab, then click SSLize Application.
4 Launch the application by using the alias in the SSL VPN folder on desktop.
5.5.3
Enabling Terminals for SSL
To enable terminals that were opened either before or after the start of SSL VPN for SSL in Linux or Macintosh, do one of the following:
Run bash on bash shell.
Run tcsh on tcsh or csh shell.
5.6
Logging Out of the Active SSL VPN Session
Use the following procedure to log out of the active SSL VPN session. Do not disconnect the session by closing the browser. If you close the browser without exiting the session, the client components that were downloaded to establish the SSL VPN connection might not be deleted from your machine.
NOTE: If you have logged into SSL VPN from multiple machines by using the same credentials, you are logged out of all the machines when you log out of one of them.
To log out of the active SSL VPN session:
1 On the SSL VPN Home page, click the Logout icon. The Confirm Logout dialog box is displayed.
2 Click OK to confirm logout.
5.7
Using the Sandbox Feature
have created into this folder. This folder is automatically deleted when the SSL VPN connection is terminated. This is a very useful feature if you are browsing from an Internet Kiosk and you do not want any sensitive information to reach other persons.
Figure 5-2 Sandbox Folder on Your Desktop
The Browser Agent logs indicate that the Sandbox folder has been created on your desktop. For more information on how to view SSL VPN logs, see Section 5.4, “Viewing SSL VPN Logs,” on page 26.
Figure 5-3 Log Message in the Sandbox Folder
5.8
Error
This page is displayed if you click the Cleanup Options icon or if the SSL VPN connection fails and disconnects. If the SSL VPN connection fails, an error message is displayed. For more information on error messages, see Error Messages.
5.9
Connecting after the Session Timeout Period
If there is no data communication over the SSL VPN channel for more than the specified timeout period, the connection becomes inactive. You must log in again to establish the SSL VPN session. Do not use the Refresh, Back, or Forward options in the browser.
5.10
Downloading the Applet on Internet Explorer
The SSL VPN client components are downloaded to the client desktop through a Java applet or through ActiveX, along with the policies and the required client components.
Some Windows clients do not allow ActiveX controls to run in Internet Explorer. In such scenarios, the user can force the Windows client to load a Java-based applet instead of the ActiveX controls. In order to force load the applet, enter the following URL to launch the SSL VPN user interface:
A
AError Messages
Some frequently encountered error messages and their explanations are given below:
“AM.1000: Client Integrity Check Failed. Check Error Logs for More Information.” on page 34 “AM.1001: Server Is not Responding.” on page 34
“AM.1002: Client Is Inactive for More Than <x> Minutes. Please Log Out.” on page 34 “AM.1003: Problem with One of the Underlying Components/ Connection Error. Please Log
Out.” on page 34
“AM.1004: Problem with One of the Underlying Components/Connection. Please Log Out.” on page 34
“AM.1005: Failed to Find Free Ports on the Client.” on page 34 “AM.1006: Resource Not Found on the Gateway.” on page 35
“AM.1007: Failed to Download SSL VPN Files from the Gateway.” on page 35
“AM.1008: Unable to Fetch Configuration Information from the Gateway.” on page 35 “AM.1009: Unable to Fetch Policy Information from the Gateway.” on page 35
“AM.100A: User Denied Access. Please Contact the System Administrator.” on page 35 “AM.100B: OpenSSL Needs to Be Installed. Please Log Out.” on page 35
“AM.100C: Dependent Components Are not Available in this System. Please Log Out.” on page 35
“AM.100D: Another Instance of SSL VPN Is Running. Please Close this Browser.” on page 36 “AM.100E: SSL VPN Session Disconnected as Because the Server Is Not Responding. Please Log
Out.” on page 36
“AM.100F: Gateway Internal Error. Please contact the System Administrator.” on page 36 “AM.100G: The Enterprise Server Is Down. Please Contact the System Administrator.” on
page 36
“AM.100H: The Kiosk Server Is Down. Please Contact the System Administrator.” on page 36 “AM.100I: Your SSL VPN connection was terminated by the System Administrator. Please Log
Out.” on page 36
“AM.100J: Your SSL VPN connection was terminated because of configuration changes in the server or because the server was restarted. Please log out.” on page 36
“AM.101A: Failed to find free ports for CIC on the client” on page 37 “AM.101B: Failed to install the CIC package” on page 37
“AM.101C: Failed to accept CIC call” on page 37
“AM.101D: Invalid message type received from CIC” on page 37 “AM.101E: Connection closed by CIC” on page 37
“AM.101F: Failed to Uninstall the CIC Package” on page 37 “AM.101G: Error in CIC Policy Processing” on page 37
“AM.101H: Failed to Run CIC” on page 38
“AM.101I: Failed to send policy to CIC.” on page 38
“AM.101J: Failed to download the SSL VPN CIC client” on page 38 “AM.101K: CIC might not be running. Please log out.” on page 38
“AM.1010: Unable to Contact the Gateway. Please Close this Browser.” on page 38 “AM.1011: This Operating System Is not Supported. Please Log Out.” on page 38
“AM.1012: The User Does Not Seem to Have Enough Privileges. Please Log Out.” on page 39 “AM.1013: Unable to Fetch the Certificate Subject Name from the Gateway” on page 39 “AM.1014: Unable to Fetch the CA Certificate from the Gateway” on page 39
“AM.1015: Failed to Install the SSL VPN Client.” on page 39
“AM.1016: Failed to Fetch the CIC Policy from the Server” on page 39 “AM.1017: There Are No Policies Configured for This User” on page 39 “AM.1018: Server Disconnected” on page 39
“AM.1019: Failed to Start the Client Using Thin Client. Please Log Out.” on page 40 “AM.1020: Failed to Fetch the Cookie from the Server” on page 40
“AM.1020A: Failed to Fetch the Cookie from the Browser” on page 40 “AM.1020B: Unable to Fetch Username from the Server” on page 40 “AM.1021: Failed to Send a Keepalive Message to Server” on page 40 “AM.1022: Failed to Send Cookie Message to Polresolver” on page 40 “AM.1023: Failed to Send a DNS Message to Polresolver” on page 40 “AM.1023A: Failed to Send a Policy Message to Polresolver” on page 41 “AM.1024: Failed to Uninstall the SSL VPN Package” on page 41 “AM.1025: Unable to fetch a HASH from server” on page 41
“AM.1026: Error occurred during service communication” on page 41 “AM.1100: Received Zero Length Data from the SOCKS Client.” on page 41
“AM.1101: Policy Resolution Request from the SOCKS Client Was Not in The Correct Format (Incorrect Message Length).” on page 41
“AM.1102: Unable to Reply to the Policy Resolution Request by the SOCKS Client.” on page 41 “AM.1103: Policy Resolution Request from the SOCKS Client Was Not in the Correct Format
(Incorrect Message Type)” on page 42
“AM.1201: Failed to Open the File. Please Check Logs for More Information.” on page 42 “AM.1203: Error Parsing the Home URL. Please Check Logs For More Information.” on page 42 “AM.1301: Unable to Send Statistics Reply to the Applet” on page 42
“AM.1302: Cookie Received from the Applet Was Not in the Correct Format (Incorrect Message Length)” on page 42
“AM.1303: Unable to Send Acknowledgment to the Applet for the Cookie Received” on page 42 “AM.1304: Incorrect DNS Information Message Received from the Applet (Incorrect Length of
Message)” on page 42
“AM.1307: Unable to Send Acknowledgment to the Applet for the Disconnect Message Received” on page 43
“AM.1308: Polresolver Received an Incomplete Message.” on page 43 “AM.1309: Failed to Allocate Memory for Internal Operation.” on page 43 “AM.1500: Failed to Send Statistics Request to Stunnel.” on page 43
“AM.1501: Statistics Response Message from Stunnel was Incorrect (Incorrect Message Length)” on page 43
“AM.1502: Unable to Send Disconnect Message from Stunnel” on page 43
“AM.1503: Disconnect Acknowledgment Message from Stunnel Was Incorrect (Incorrect Length of Message)” on page 44
“AM.1504: Incorrect Message from Stunnel (Incorrect Length of Message)” on page 44 “AM.1505: Invalid Message from Stunnel (Message Type Unknown)” on page 44 “AM.1506: SSL VPN Server Certificate Validation Failed. Please Log Out.” on page 44 “AM.1507: Disconnected Because of Hibernation/Standby. Please Log Out.” on page 44 “AM.1701: OpenVPN Authentication Failed. Please Log Out.” on page 44
“AM.1702: OpenVPN Connection Error. Please Log Out.” on page 44
“AM.1703: Received a Fatal Error from OpenVPN. Please Log Out.” on page 45 “AM.1704: Policy Initialization Failed. Please Log Out.” on page 45
“AM.1705: Tunnel Adapter Interface Is Down. Please Log Out.” on page 45
“AM.1706: System Routing table has been modified in Full Tunneling mode. Disconnecting.” on page 45
“AM.1801: Service Is not Running. Please Log Out.” on page 45 “AM.1801A: Connection to Service Failed” on page 45
“AM.1801B: Failed to Run SSL VPN Services” on page 46
“AM.1804: Maximum Attempts to Enter Password Reached. Please Close the Browser.” on page 46
“AM.1805: Timeout Occurred While Entering Credentials. Please Close the Browser.” on page 46 “AM.1805A: You Have Been Forced to Use the Enterprise Mode. Please Close the Browser” on
page 46
“AM.1806: Unable to Initialize Browser Cache Cleaner” on page 46 “AM.1807: Failed to Update the Thin Client with Policies” on page 47 “AM.1808: Pop-up Window Inactivity Time Is Up” on page 47
“AM.1809: Error: Failed to Start SSL VPN Desktop Cleanup” on page 47
“AM.1810: Please Log Out of the Current Session or Close the Browser before Connecting Again” on page 47
“AM.1811: For More Information on the Error, Please Check the Logs or the Error Codes Page in the Online Help” on page 47
“AM.1812: You have not accepted the security certificate. Please log out.” on page 47 “Object Does Not Support This Property or Method” on page 48
AM.1000: Client Integrity Check Failed. Check Error Logs for More Information.
Possible Cause: The SSL VPN connection requires software or a package that is currently not running in your system.
Action: Click Log Entries, then select CIC Logs from View Logs to check details on the software or package that is missing in your system. Install the software or package, then try to reconnect.
Possible Cause: The administrator has not configured any Client Integrity Check levels for your role.
Action: Click Log Entries, select Browser Agent Logs from View Logs to check details, then contact your system administrator.
AM.1001: Server Is not Responding.
Possible Cause: Either the SSL VPN server or Access Manager is down or the network connection has failed.
Action: Check the network connectivity and reconnect.
AM.1002: Client Is Inactive for More Than <x> Minutes. Please Log Out.
Possible Cause: The client is not active or there was no data transfer from the VPN client to the server. However, this does not log the client out of Access Manager.
Action: Log out of the SSL VPN connection, then log in again to connect.
AM.1003: Problem with One of the Underlying Components/ Connection Error.
Please Log Out.
Possible Cause: There was an error starting the Kiosk mode binaries. The binaries could have been exited with errors.
Action: Click Log Entries, select Polresolver Logs,Tunnel Logs, and Service Logs, from View Logs to check details, then contact your system administrator.
AM.1004: Problem with One of the Underlying Components/Connection. Please
Log Out.
Possible Cause: A forward proxy is configured in the browser and UDP is configured in the SSL VPN server.
Action: Click Log Entries, select Polresolver Logs, Tunnel Logs and Service Logs from View Logs to check details, then contact your system administrator.
Possible Cause: The SSL VPN tunnel is down.
Action: Click Log Entries, then select Tunnel Logs from View Logs to check details. Try reconnecting again. If the problem persists, contact your system administrator.
AM.1006: Resource Not Found on the Gateway.
Possible Cause: The client binaries failed to download properly.
Action: Try reconnecting from a fresh instance of the browser. If the problem persists, contact your system administrator.
AM.1007: Failed to Download SSL VPN Files from the Gateway.
Possible Cause: The client binaries failed to download properly.
Action: Try reconnecting from a fresh instance of the browser. If the problem persists, contact your system administrator.
AM.1008: Unable to Fetch Configuration Information from the Gateway.
Possible Cause: There was an error while reading your configuration from the server.
Action: Try reconnecting from a fresh instance of the browser. If the problem persists, contact your system administrator.
AM.1009: Unable to Fetch Policy Information from the Gateway.
Possible Cause: There was an error while reading your access control policy from the server. Action: Try reconnecting from a fresh instance of the browser. If the problem persists,
contact your system administrator.
AM.100A: User Denied Access. Please Contact the System Administrator.
Possible Cause: There are no policies configured for your role. Action: Contact your system administrator.
AM.100B: OpenSSL Needs to Be Installed. Please Log Out.
Possible Cause: OpenSSL is not installed on your machine.
Action: Click Log Entries, then select Install Logs from View Logs to check details. Try reconnecting. Save the logs and contact your system administrator.
Possible Cause: OpenSSL is not installed in the correct path.
Action: Click Log Entries, then select Install Logs from View Logs to check details. Try reconnecting. Save the logs and contact your system administrator.
AM.100C: Dependent Components Are not Available in this System. Please Log
Out.
Possible Cause: OpenSSL is not installed on the client.
Action: Click Log Entries, then select Install Logs from View Logs to check details. Try reconnecting. Save the logs and contact your system administrator.
Possible Cause: OpenSSL is not installed in the correct path.
Action: Click Log Entries, then select Install Logs from View Logs to check details. Try reconnecting. Save the logs and contact your system administrator.
AM.100D: Another Instance of SSL VPN Is Running. Please Close this Browser.
Possible Cause: Check if SSL VPN is running in another browser.
Action: Log out of the SSL VPN connection and close the browser.
Possible Cause: Check if openvpn, polresolver, or stunnel are running in your system.
Action: If any of these processes are running, terminate the processes, close all instances of browser, and reconnect.
Possible Cause: The previous connection terminated without a proper logout. Action: Click Logout to log out of the active SSL VPN connection.
AM.100E: SSL VPN Session Disconnected as Because the Server Is Not
Responding. Please Log Out.
Possible Cause: Your network connectivity is lost.
Action: Check your network connection and try reconnecting.
Possible Cause: The load on the SSL VPN server is high, so it is taking some time to respond. Action: Try reconnecting from a fresh instance of the browser.
AM.100F: Gateway Internal Error. Please contact the System Administrator.
Possible Cause: The SSL VPN server is down and must be restarted by the system administrator. Action: Contact your system administrator.
AM.100G: The Enterprise Server Is Down. Please Contact the System
Administrator.
Possible Cause: The SSL VPN server is down and must be restarted by the system administrator. Action: Contact your system administrator.
AM.100H: The Kiosk Server Is Down. Please Contact the System Administrator.
Possible Cause: The SSL VPN server is down and must be restarted by the system administrator. Action: Contact your system administrator.
AM.100I: Your SSL VPN connection was terminated by the System Administrator.
Please Log Out.
Possible Cause: The system administrator has disconnected your connection.
Action: Try reconnecting. If the problem persists, contact your system administrator.
AM.100J: Your SSL VPN connection was terminated because of configuration
changes in the server or because the server was restarted. Please log out.
Possible Cause: One of the SSL VPN server components might have gone down. Action: Log out of SSL VPN connection. Try reconnecting after a few minutes.
AM.101A: Failed to find free ports for CIC on the client
Possible Cause: All the system ports are in use.
Action: Log out of the current session. Close all instances of the browser and try reconnecting from a fresh browser instance.
If the problem persists, try reconnecting after a while.
AM.101B: Failed to install the CIC package
Possible Cause: The CIC MSI package failed to install.
Action: Click Log Entries, then select CIC Logs for more details. If the problem persists, contact your system administrator.
AM.101C: Failed to accept CIC call
Possible Cause: Action:
AM.101D: Invalid message type received from CIC
Possible Cause: CIC sent a message in an invalid message type.
Action: Click Log Entries, then select CIC Logs for more details. Try reconnecting again from a fresh instance of the browser.
AM.101E: Connection closed by CIC
Possible Cause: The CIC process might not be running.
Action: Click Log Entries, then select CIC Logs for more details. Check if the following processes are running:
lincic.rpm in Linux
wincic.exe in Windows
maccic.rpm in Mac
Try reconnecting again from a fresh instance of the browser.
AM.101F: Failed to Uninstall the CIC Package
Possible Cause: The CIC MSI package failed to uninstall.
Action: Check uninstall_log.txt in the <userhome> directory for more details. If the problem persists, contact your system administrator.
AM.101G: Error in CIC Policy Processing
Action: Close all instances of the browser and try reconnecting. If the problem persists, contact the system administrator.
AM.101H: Failed to Run CIC
Possible Cause: Failed to execute the Windows CIC process.
Action: Click Log Entries, then select Browser Agent Logs from View Logs for more details. Make sure that wincic.exe is installed at
<userhome>\Novell\SSLVPN\Wincic\. If the problem persists, contact the system administrator.
AM.101I: Failed to send policy to CIC.
Possible Cause: The CIC policies were not sent to CIC.
Action: Click Log Entries, then select CIC Logs for more details. Try reconnecting from a fresh instance of the browser. If the problem persists, contact your system administrator.
AM.101J: Failed to download the SSL VPN CIC client
Possible Cause: The CIC client failed to download from the server.
Action: Click Log Entries, then select Browser Agent Logs from View Logs for more details. Make sure that there is sufficient free disk space on your workstation. Clear the browser cache, close all instances of browser, and try connecting again. If the problem persists, contact the system administrator.
AM.101K: CIC might not be running. Please log out.
Possible Cause: The CIC process might not be running.
Action: Click Log Entries, then select CIC Logs for more details. Check if the following processes are running:
lincic.rpm in Linux
wincic.exe in Windows
maccic.rpm in Mac
Try reconnecting again from a fresh instance of the browser.
AM.1010: Unable to Contact the Gateway. Please Close this Browser.
Possible Cause: You are already successfully logged out of the session.
Action: Close the browser. If you want to reconnect, initiate the connection from a fresh instance of the browser.
AM.1011: This Operating System Is not Supported. Please Log Out.
Action: Click Log Entries, then select Browser Agent Logs from View Logs for more information. Check the Novell Access Manager 3.1 SSL VPN User Guide (http:// www.novell.com/documentation/novellaccessmanager31/sslvpn_userguide/ index.html?page=/documentation/novellaccessmanager31/sslvpn_userguide/ data/bookinfo.html) for supported platforms.
AM.1012: The User Does Not Seem to Have Enough Privileges. Please Log Out.
Possible Cause: There was a problem in installing the SSL VPN client component.
Action: Click Log Entries, then select Install Logs from View Logs to check details. Save the logs and contact your system administrator.
AM.1013: Unable to Fetch the Certificate Subject Name from the Gateway
Possible Cause: The browser agent is unable to fetch the subject name from the gateway because of authentication or network problems.
Action: Make sure that you have entered proper log in credentials. Close all instances of the browser and try connecting from a fresh instance of the browser.
If the problem persists, contact the system administrator.
AM.1014: Unable to Fetch the CA Certificate from the Gateway
Possible Cause: Either the certificate file is not present in the gateway or there is a problem with the connectivity.
Action: Try reconnecting from a fresh instance of the browser. If the problem persists, contact your system administrator.
AM.1015: Failed to Install the SSL VPN Client.
Possible Cause: There was a problem in installing the SSL VPN client.
Action: Click Log Entries, select Install Logs and Browser Agent Logs from View Logs and Save Logs, then contact your system administrator.
AM.1016: Failed to Fetch the CIC Policy from the Server
Possible Cause: Some of the server components are down.
Action: Try disconnecting and reconnecting to the SSL VPN server. If the problem persists, contact your system administrator.
AM.1017: There Are No Policies Configured for This User
Possible Cause: The administrator has not configured a policy for the user’s role. Action: Contact your system administrator
AM.1018: Server Disconnected
Possible Cause: The SSL VPN server might be down or the network connectivity was lost. Action: Try reconnecting after some time. If the problem persists, contact your system
AM.1019: Failed to Start the Client Using Thin Client. Please Log Out.
Possible Cause: The thin client or the client service might not be installed properly.
Action: Click Log Entries, select Service Logs and Tunnel Logs from View Logs and Save Logs, then contact your system administrator.
AM.1020: Failed to Fetch the Cookie from the Server
Possible Cause: Failed to fetch session information from the server.
Action: Check your network connectivity. Clear the browser cache, close all instances of browser, and try connecting again. If the problem persists, contact the system administrator.
AM.1020A: Failed to Fetch the Cookie from the Browser
Possible Cause: Failed to fetch session information from the browser.
Action: Make sure that the browser or the version of the browser that you are using is supported by Novell SSL VPN. For more information, see Novell Access Manager 3.1 SSL VPN User Guide (http://www.novell.com/documentation/ novellaccessmanager31/sslvpn_userguide/index.html?page=/documentation/ novellaccessmanager31/sslvpn_userguide/data/ba9j4uq.html).
If your browser is supported by Novell SSL VPN, close all instances of the browser and try connecting from a fresh instance of the browser.
AM.1020B: Unable to Fetch Username from the Server
Possible Cause: Failed to fetch username from the server. This error might be a certificate issue. Action: Delete the old certificate and create a new certificate. Clear the browser cache.
Open a new browser and then try again, it works.
AM.1021: Failed to Send a Keepalive Message to Server
Possible Cause: Failed to send the session persistence packets to the server.
Action: Click Log Entries, then select Browser Agent Logs from View Logs for more details. Check your network connectivity. Clear the browser cache, close all instances of browser, and try connecting again. If the problem persists, contact the system administrator.
AM.1022: Failed to Send Cookie Message to Polresolver
Possible Cause: The polresolver process might not be responding.
Action: Click Log Entries, select Browser Agent Logs from View Logs, and check if the polresolver binary is running. If it is not running, log out of the current session and reconnect after some time.
Action: Click Log Entries, select Browser Agent Logs from View Logs, and check if the polresolver binary is running. If it is not running, log out of the current session and reconnect after some time.
AM.1023A: Failed to Send a Policy Message to Polresolver
Possible Cause: The policy information was not sent to the policy resolver.
Action: Click Log Entries, select Browser Agent Logs from View Logs, and check if the polresolver binary is running. If it is not running, log out of the current session and reconnect after some time.
AM.1024: Failed to Uninstall the SSL VPN Package
Possible Cause: Uninstalling the SSL VPN client MSI package has failed.
Action: Check the MSI uninstall_log.txt in <userhome> for more details. If the problem persists, contact the system administrator.
AM.1025: Unable to fetch a HASH from server
Possible Cause: The browser agent is unable to get the HASH values from the gateway.
Action: Check the network connectivity. Log out of the current session. Close all browser instances and try connecting from a fresh instance of the browser.
AM.1026: Error occurred during service communication
Possible Cause: Problem in connection with the Enterprise client service.
Action: Click Log Entries, then select Browser Agent Logs and Service Logs from View Logs
for more information. Check if the enterprise thin client service binary novell-sslvpn-serv is running.
AM.1100: Received Zero Length Data from the SOCKS Client.
Possible Cause: The SSL-enabled application crashed while performing a policy resolution. Action: Run the application again. If the problem persists, contact your system
administrator.
AM.1101: Policy Resolution Request from the SOCKS Client Was Not in The
Correct Format (Incorrect Message Length).
Possible Cause: A message from the SOCKS client is corrupted. Action: Contact your system administrator.
AM.1102: Unable to Reply to the Policy Resolution Request by the SOCKS Client.
Possible Cause: The SSL-enabled application that requested policy resolution crashed. Action: Run the application again. If the problem persists, contact your system
AM.1103: Policy Resolution Request from the SOCKS Client Was Not in the
Correct Format (Incorrect Message Type)
Possible Cause: Possible hack by an intruder.
Action: Restart your session. Check the list of currently running processes in the system for viruses.
AM.1201: Failed to Open the File. Please Check Logs for More Information.
Possible Cause: Unable to open the file.
Action: Click Log Entries, then select Browser Agent Logs from View Logs for more details. If the problem persists, contact the system administrator.
AM.1203: Error Parsing the Home URL. Please Check Logs For More Information.
Possible Cause: Wrong format of the server URL.
Action: Click Log Entries, then select Browser Agent Logs from View Logs for more details. Check your network connectivity. Clear the browser cache, close all instances of browser, and try connecting again. If the problem persists, contact the system administrator.
AM.1301: Unable to Send Statistics Reply to the Applet
Possible Cause: The user closed the browser or the applet closed without sending a disconnect. Action: Contact your system administrator if the problem persists.
AM.1302: Cookie Received from the Applet Was Not in the Correct Format
(Incorrect Message Length)
Possible Cause: Polresolver – Applet communication is bad.
Action: Disconnect the session and reconnect. Contact your system administrator if the problem persists.
AM.1303: Unable to Send Acknowledgment to the Applet for the Cookie Received
Possible Cause: Polresolver – Applet communication is bad.
Action: If the problem persists, the session is disconnected automatically.
AM.1304: Incorrect DNS Information Message Received from the Applet
(Incorrect Length of Message)
Possible Cause: Incorrect DNS message from the applet.
Action: Disconnect the session and connect again to be able to use DNS across the protected network.