©1990, 1992, 1995, 1997 Claris Corporation. All Rights Reserved. Claris Corporation
5201 Patrick Henry Drive Santa Clara, California 95054 http://www.claris.com
Claris, ClarisImpact, ClarisWorks, FileMaker, and ScriptMaker are trademarks of Claris Corporation, registered in the U.S. and other countries, and Claris Home Page is a trademark of Claris Corporation. Apple, AppleScript, AppleShare, AppleTalk, HyperCard, Mac, Macintosh, Macintosh Quadra, and QuickTime are trademarks of Apple Computer, Inc., registered in the U.S. and other countries. All other trademarks are the property of their respective owners.
Portions of the software are © 1990 Access Softek
This software is based in part on the work of the Independent JPEG Group.
Mention of third party companies and products is for informational purposes only and constitutes neither an endorsement nor recommendation.
All persons and companies listed in the examples are purely fictitious and any resemblance to existing persons and companies is purely coincidental.
Contents III
Contents
Preface: Getting help
Customer support and registration XIII
Using Help and the user’s guide together XIII
Using FileMaker Pro Help XIV
Opening FileMaker Pro Help XIV
Managing FileMaker Pro Help XIV
Using the Help contents XV
Using the Help window XVI
Using the Help index XVI
Using Find XVIII
Getting additional help XIX
Using the FileMaker Pro documentation XIX
Chapter 1: FileMaker Pro basics
Understanding FileMaker Pro 1-1
What’s a database? 1-1
What’s a FileMaker Pro database file? 1-4
Fields and field definitions 1-4
Records 1-5
Access privileges and passwords 1-6
Using relationships in a database 1-6
Working with modes 1-7
Managing files 1-9
Creating and opening files 1-9
Closing files 1-11
Saving a copy of a file 1-11
Leaving FileMaker Pro 1-13
Checking your spelling 1-13
Checking your spelling in a file 1-13
Checking your spelling as you type 1-14
Working with spelling dictionaries 1-15
Selecting a spelling dictionary 1-16
IV FileMaker Pro User’s Guide
Chapter 2: Creating a database file
Planning a database file 2-1
Defining database fields 2-3
Assigning a field type 2-4
Choosing data entry options 2-6
Defining global fields 2-9
Defining repeating fields 2-10
Indexing fields 2-11
Understanding formulas 2-13
Expressions 2-14
Constants 2-14
Field references 2-15
Operators 2-15
Stored and unstored calculation results 2-19
Functions 2-20
Writing formulas for calculation fields 2-20
Defining summary fields 2-23
Changing field definitions 2-25
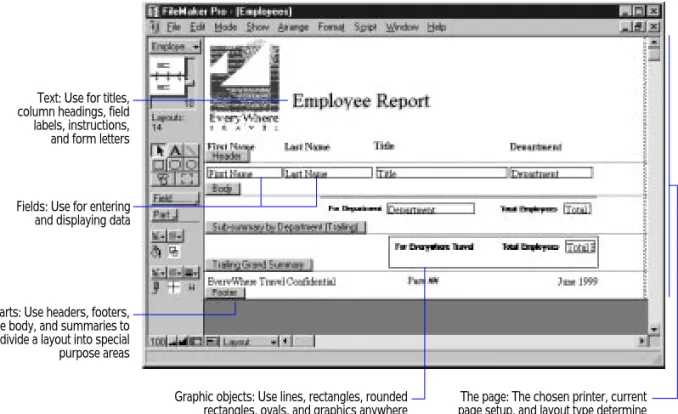
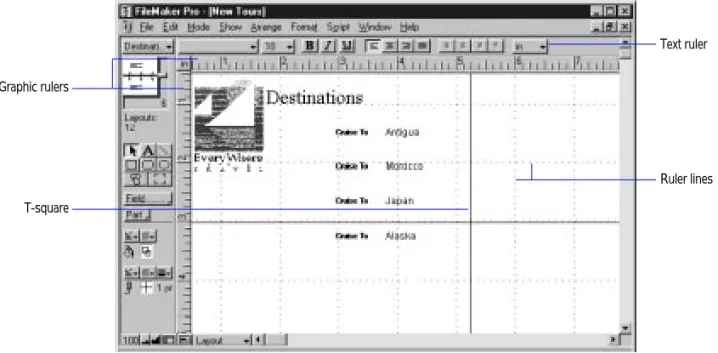
Chapter 3: Laying out and arranging information
Understanding layouts 3-1
Working with predefined layout types 3-4
Using Standard, Single-page form, and Blank layouts 3-7
Using Columnar report and Extended
columnar layouts 3-9
Using Labels layouts 3-11
Using Envelope layouts 3-17
Arranging records in columns 3-20
Managing layouts 3-23
Working with layout parts 3-24
Adding layout parts 3-26
Adding objects to a layout part 3-29
About summary layout parts 3-29
Adding a summary part 3-30
Paginating a layout 3-32
Changing layout parts 3-35
Reordering parts 3-35
Resizing parts 3-36
Changing part types and options 3-36
Contents V
Working with all object types 3-37
Working with the drawing tools 3-38
Positioning and sizing objects 3-39
Editing objects and data quickly using the
context menu 3-42
Showing button, text, and field boundaries 3-43
Arranging objects 3-43
Changing the appearance of objects 3-48
Protecting objects from change 3-51
Working with graphic objects 3-51
Drawing objects in a layout 3-51
Adding graphics in a layout 3-52
Working with fields in a layout 3-53
Adding fields to a layout 3-54
Adding merge fields 3-56
Deleting a field from a layout 3-57
Defining display formats for fields 3-58
Determining data entry in fields 3-67
Setting the tab order for data entry 3-68
Adding scroll bars to fields 3-70
Formatting repeating fields 3-71
Adding borders, fill, and baselines to fields 3-72
Defining value lists 3-74
Formatting fields with value lists 3-76
Working with text 3-78
Typing text 3-79
Selecting text 3-80
Editing text 3-81
Displaying special information 3-81
Formatting text paragraphs 3-82
Changing the appearance of text 3-86
Changing several text attributes at once 3-87
Chapter 4: Working with information in records
Working in Browse mode 4-1
Adding data to a file 4-3
Selecting a field for data entry 4-3
Adding and duplicating records 4-3
Entering and changing data in fields 4-4
Entering data from a value list 4-9
Viewing and inserting data from another source 4-10
Copying and moving values and records 4-12
Using drag and drop to move information 4-13
Replacing field values 4-15
Working with records 4-17
Browsing records 4-17
Moving through records 4-18
Finding information 4-19
Defining find requests 4-19
Finding information in different field types 4-22
Finding different sets of criteria 4-24
Repeating, editing, and deleting find requests 4-25
Omitting records 4-25
Copying the found set 4-28
Deleting records 4-28
Sorting records 4-29
Sorting by summary fields 4-32
Chapter 5: Using ScriptMaker and buttons
Understanding scripts 5-1
Understanding ScriptMaker steps 5-3
Control steps 5-4
Navigation steps 5-5
Sort, find, and print steps 5-5
Editing steps 5-6
Fields steps 5-6
Records steps 5-7
Import and export steps 5-7
Windows steps 5-8
Files steps 5-8
Spelling steps 5-9
Open Menu Item steps 5-9
Miscellaneous steps 5-10
Planning scripts 5-10
Defining scripts 5-12
Storing settings for a script 5-14
Changing and duplicating scripts 5-15
Reordering scripts in the Script menu 5-16
Performing, resuming, or stopping scripts 5-17
Using buttons with scripts 5-18
Defining buttons 5-19
Copying, changing, or deleting buttons 5-21
Examples of ScriptMaker scripts 5-21
Entering and printing data 5-21
Finding data 5-23
Displaying customized layouts 5-25
Finding duplicate records 5-26
Chapter 6: Previewing and printing information
Preparing to print 6-1
Displaying margins 6-2
Setting margins 6-3
Removing spaces at the end of fields and parts 6-5
Keeping objects from printing 6-9
Printing Extended columnar layouts 6-9
Printing layouts with subsummaries 6-10
Printing labels and envelopes 6-10
Previewing before printing 6-10
Printing 6-11
Specifying a printer 6-13
Chapter 7: Networking and access privileges
Sharing files 7-1
Opening files as the host 7-3
Opening files as a guest 7-4
Working with shared files 7-5
Closing shared files 7-7
Protecting your files 7-8
Defining passwords 7-10
Deleting or changing passwords 7-14
Defining groups 7-14
Deleting or changing groups 7-17
Chapter 8: Importing and exporting data
Understanding import and export 8-1
Importing data into FileMaker Pro 8-4
Importing data into an existing file 8-5
Importing data into a new file 8-9
Exporting data from FileMaker Pro 8-9
Exporting subsummary data 8-12
Exporting repeating field data 8-14
Chapter 9: Customizing FileMaker Pro
Setting application preferences 9-1
Setting general application preferences 9-2
Setting layout preferences 9-3
Setting memory preferences 9-4
Setting preferences for dialing phone numbers 9-5
Setting up plug-ins 9-8
Setting document preferences 9-8
Setting document spelling preferences 9-10
Setting Web Companion preferences 9-10
Chapter 10: Using data from related files
Looking up and displaying data from other files 10-1
Understanding the terminology 10-2
Understanding lookups 10-3
Understanding relational databases 10-5
Lookups and relational databases: a comparison 10-8
Understanding relationships 10-9
Defining lookups between files 10-11
Defining a lookup 10-11
Defining a relationship for a lookup 10-13
Updating lookup values 10-14
Working with relational databases 10-14
Planning a relational database 10-15
Creating a relational database 10-20
Deciding where to place related fields 10-20
Defining relationships for a relational database 10-21
Creating a portal to hold related fields 10-23
Placing related fields in a layout or portal 10-25
Changing related fields and portals 10-26
Selecting, moving, or deleting related fields
Changing the appearance of related fields
and portals 10-27
Copying and pasting related fields and portals 10-28
Choosing a different relationship for a portal 10-28
Changing relationships 10-28
Working with related files and fields 10-30
Working with related files 10-30
Working with related fields 10-30
Working with related records 10-31
Creating related records 10-32
Deleting related records 10-34
Finding and omitting related records 10-34
Sorting records with related fields 10-35
Invoicing example 10-36
Example step 1: Plan the system 10-37
Example step 2: Define fields 10-40
Example step 3: Define relationships 10-41
Example step 4: Define fields that use relationships 10-41
Example step 5: Create layouts 10-42
Example step 6: Enter data 10-42
Chapter 11: Publishing files on the Web
About the World Wide Web 11-1
About FileMaker Pro Web Companion 11-1
What the Web Companion does 11-2
Why publish a database on the Web? 11-3
Publishing your database on the Web—an overview 11-3
Instant Web Publishing 11-3
Custom Web Publishing 11-4
Getting ready to publish your files on the Web 11-5
Internet access 11-5
Preparing files for the Web 11-5
Security considerations before you publish
a database 11-6
Setting up FileMaker Pro Web Companion 11-7
Configuring FileMaker Pro Web Companion 11-8
Enabling Instant Web Publishing 11-9
Specifying a home page for your database 11-9
Choosing a language 11-10
Remote password administration 11-10
Web security 11-11
Specifying a port number 11-11
Setting up Instant Web Publishing 11-12
Setting options for Web display 11-12
Setting sort options 11-13
About the browser views 11-14
Database security 11-18
FileMaker Pro access privileges 11-18
Web Security database 11-19
Web Security database remote password
administration 11-22
Helping Web users find your database 11-22
Custom Web Publishing 11-24
The CDML Reference database 11-24
The CDML Tool 11-25
Sample Web solutions 11-27
Appendix A: Recovering damaged files A-1
Appendix B: Working with international files
Using the current system formats B-1
Defining scripts for system formats B-3
Appendix C: Summary of functions
Understanding functions C-1
Text functions C-3
Number functions C-4
Date functions C-5
Time functions C-6
Aggregate functions C-6
Summary functions C-9
Repeating functions C-11
Financial functions C-12
Trigonometric functions C-13
Logical functions C-14
Status functions C-16
Design functions C-18
Appendix D: Linking and embedding objects
Understanding Object Linking and Embedding D-1
Adding OLE objects to your database D-3
Working with OLE objects D-6
Showing OLE objects D-6
Copying and pasting OLE objects D-7
Activating and deactivating OLE objects D-7
Editing OLE objects D-9
Updating and changing links D-9
Converting OLE objects to a different format D-11
Working with OLE on a network D-12
Welcome to the FileMaker Pro application from Claris Corporation. FileMaker Pro is designed to help you manage information easily and effectively.
If you’re new to Microsoft Windows you need to learn about Windows conventions and using the mouse and keyboard. See the documentation that came with your computer.
Important If you are using a Windows operating system other than Windows 95 (such as Windows NT, Windows 3.1, or Windows for Workgroups), what you see on your screen might not match the illustrations in the documentation.
Customer support and registration
Please take the time to complete and mail the product registration card that is included in this package. Refer to our Web site at http://www.claris.com for information about customer support.
U.S. and Canadian retail customers can also refer to the Claris Service
Directory included with the software. For customers outside of the U.S.
or Canada, refer to the Technical Support brochure included with the software.
Using Help and the user’s guide together
Throughout this guide you see Help icons in the margin, along with instructions, that tell you what keywords to use to find a related Help topic. A keyword is like a term in an index. In some cases, Help gives you additional information about a subject. For more information about using Help keywords, see “Using the Help index” on page XVI.
Use the FileMaker Pro Quick Reference on the back cover of this user’s guide to get at-a-glance information about using the FileMaker Pro tools and status area controls.
Choose FileMaker Help Index from the Help menu, and then type:
E
Help, usingGlossary terms are available in the Help Reference section, as well as underlined with a dotted line in Help topics.
Note The examples in this documentation show dates and numbers in U.S. formats such as November 30, 1998 and $1,234.50.
Using FileMaker Pro Help
FileMaker Pro Help is available whenever FileMaker Pro is running. It contains some information not in the printed documentation, like troubleshooting tips. As you get comfortable with FileMaker Pro, you’ll be able to find all the information you need in FileMaker Pro Help.
Opening FileMaker Pro Help
To open Help when FileMaker Pro is running, choose a command from the Help menu:
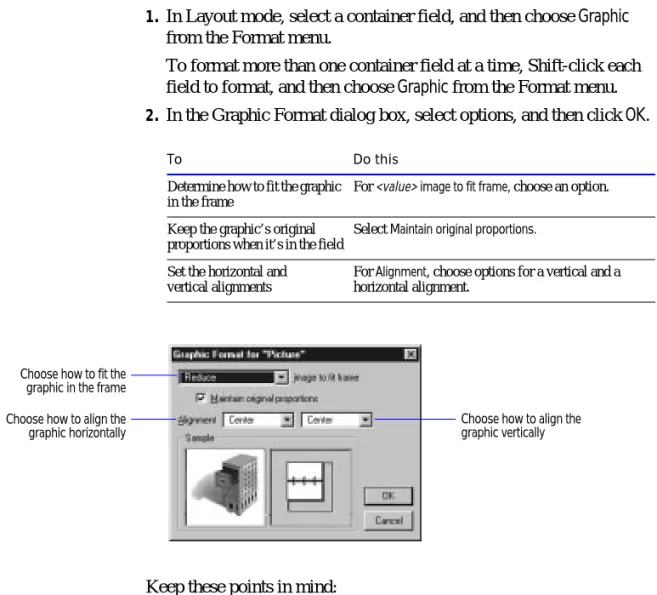
Keep these points in mind:
1
Whenever you open FileMaker Pro Help, you start the Windows Help application, which runs independently of FileMaker Pro.1
As you move your pointer in the FileMaker Pro window, notice thestatus bar help—text at the bottom of the window that gives brief
descriptions of FileMaker Pro tools, icons, and menus.
Managing FileMaker Pro Help
Here are some ways to manage FileMaker Pro Help and the windows on your screen:
Choose To see
FileMaker Help A Help pointer with which you can get context-sensitive Help
FileMaker Help Topics Topic titles in a table of contents
FileMaker Help Index An alphabetical list of index entries (keywords)
About FileMaker Pro Version, copyright information, and other details about this
release of FileMaker Pro
To Do this
Work in FileMaker Pro while FileMaker Pro Help is running
Start FileMaker Pro or click a FileMaker Pro window. Move a window Drag the window’s title bar.
Using the Help contents
When you open FileMaker Pro Help, you see a list of Help topics, like the table of contents in a book. You can double-click topic titles (with book icons) to see any subtopics, and then double-click topics (with document icons) to move to the information you need.
Arrange windows for easy access
Click the right mouse button in an open area on the task bar, and then click Cascade, Tile Horizontally, or Tile Vertically. Switch between the Help
window and a FileMaker Pro file window
Click the window you want to work with.
Keep the Help window on top of all other open windows
Choose Keep Help on Top from the Options menu in the Help window.
Close FileMaker Pro Help and leave it running
Click the minimize button in the upper-right corner of the window. Windows Help continues to run in the background. To show Help again, click the FileMaker Pro Help button in the task bar.
Exit FileMaker Pro Help and the Windows Help application
Click the Help window to make it active, and then choose
Exit from the File menu.
Using the Help window
To navigate in the Help system, you click buttons and underlined text in the Help window.
Click solid underlined text to jump to a topic related to the current topic. To return to any topic you viewed during a help session, choose Display History Window from the Options menu, and then double-click the topic title.
Using the Help index
FileMaker Pro Help comes with a list of index entries, which are significant words and phrases (called keywords), to help you find the topics containing the information you want. Each index entry is associated with one or more topics.
This user’s guide gives you keywords throughout the documentation to help you find related topics by their index entries in Help.
Displays the title of the current topic
Click to see the index
Click to move to the next or previous topic Click to return to the last topic viewed
Click to return to the help contents
Click dotted underlined text to see a definition Click to print
To use the Help index:
1. If you aren’t in Help, choose FileMaker Help Index from the Help menu. 2. In the Index window, type all or part of the keyword to find.
You see the keywords in the list.
3. Select the keyword you want and click Display.
1
If only one topic corresponds to the keyword, you see that topic.1
If more than one topic matches the keyword, you see a list of the matching topics in the Topics Found window. Select a topic and click Display.To browse the index, scroll through the alphabetical list or type the first few letters of the entry you’re looking for
Click to create a list to use for searching on specific words and phrases in topics
Using Find
You can search for specific words in FileMaker Pro Help: 1. Click the Find tab.
The first time you do this, the Find Setup Wizard dialog box appears. Follow the instructions it provides.
2. Type the word or words you want to search for in box 1.
3. If you want, select some matching words in box 2 to narrow your search. You can hold down Ctrl to select more than one matching word.
4. In box 3, click a topic, then click Display.
Click to find a specific word
Type the word you want
Select one or more matching words if you want
Click the topic you want to see, then click Display
Getting additional help
To get context-sensitive help for menu items, dialog boxes, tools, and screen elements, press F1 or Shift-F1. Pressing Shift-F1 displays a pointer you can use to click on areas of the screen not available when you press F1.
Use Help to get information on these additional tasks:
Using the FileMaker Pro documentation
This guide and the other documentation in the set give you all the information you need to know about installing and using FileMaker Pro. Start by reading chapter 1, “FileMaker Pro basics,” for an overview of FileMaker Pro, and for information about managing files and
performing common tasks. Then read chapter 2, “Creating a database file,” for information about designing FileMaker Pro database files. You can then move to the chapters you need for doing your work, such as using layouts, or entering, finding, and sorting information.
Use the following additional tools to help you with FileMaker Pro.
For information on
Choose FileMaker Help Index from the Help menu, and then type
Printing a Help topic Help, printing Adding your own notes or instructions to a
topic (annotations)
Help, customizing Creating bookmarks to quickly access topics you
use often
Help, customizing Copying all or part of a topic to an application
that supports text, to compile help information you use often
Help, using
Setting Help preferences to customize the way you use Help
Help, customizing
Use To
FileMaker Pro Installation and New Features Guide
Install FileMaker Pro on your hard disk. If you’ve used previous versions of FileMaker Pro, you can read about features new to this version.
FileMaker Pro Tutorial (an onscreen tutorial)
To get an overview of how to use and design a FileMaker Pro database. You can complete the tutorial in one session, or one segment at a time. To use the tutorial, double-click the Tutorial file in the Tutorial folder.
FileMaker Pro template files
See and work with database files created with FileMaker Pro. You can use the templates for your business or personal work— as they are, or change them to suit your needs. (See “Creating and opening files” on page 1-9.)
FileMaker Pro Help Get complete, onscreen, step-by-step instructions and reference information for using FileMaker Pro as you work. (See “Using FileMaker Pro Help” on page XIV.)
Status Bar Help See brief descriptions of FileMaker Pro tools, icons, and menus. As you move your pointer in the window, the text at the bottom of the window changes.
CDML Developer’s Guide Get information on publishing custom Web database solutions. Open the CDML Reference.fp3 file in the Web Tools folder, in the FileMaker Pro 4.0 folder.
Web browser Help Get help while working with a database in a browser. Available by clicking the ? icon in the Instant Web Publishing interface. Sample custom HTML
pages and databases
Use as models for creating your own custom Web databases. Available in the Web folder, in the FileMaker Pro 4.0 folder.
You’re using FileMaker Pro software because you have information to manage, or information you would like to publish on the World Wide Web. This information could be just about anything: accounts, inventories, suppliers, sales contacts, employees, or products. The power, flexibility, and ease of use of FileMaker Pro help you manage that information, so you can:
1
find information quickly1
update and maintain information1
print documents like invoices, form letters, and mailing labels1
analyze information using onscreen and printed reportsImportant Before you read this chapter, be sure you know how to use FileMaker Pro Help, as explained in the preface, “Getting help.”
Understanding FileMaker Pro
Before you begin to work with FileMaker Pro, you should be familiar with the basics of FileMaker Pro. If you’re new to databases, start with the next section, “What’s a database?” If you’re familiar with databases but new to FileMaker Pro, start with “What’s a FileMaker Pro database file?” on page 1-4.
What’s a database?
A database is a collection of information, or data, that you can organize, update, sort, search through, and print as needed. A database doesn’t just hold information—you use a database to organize and analyze
information so that you understand its significance.
A database can be one file, such as Clients, which might hold the names, addresses, and phone and fax numbers of all your clients.
A database can also be many files that, together, contain all the information about a particular topic, or related topics (sometimes called a database system). For example, a database for a travel agency can include files that hold information about clients, tours, invoices, and accounting.
Using the relational capabilities of FileMaker Pro, you can join information between files to create a relational database. For example, one file can show you which clients went on a particular tour and a
related file can show how much they paid. (For more information about
relational databases, see chapter 10, “Using data from related files.”)
Trip file
Clients file
A database file contains one or more records. Each record holds all the information about one subject (like one person or one identification number). For example, each record in a Clients file would contain the name and address of one client.
Each piece of information in a record—like name, address, and telephone number—is stored in a field. You create the fields for each database file.
Choose FileMaker Help Index from the Help menu, and then type:
E
FileMaker ProRecords in a Clients file
Fields in a record
What’s a FileMaker Pro database file?
Each FileMaker Pro database file contains information about the file’s structure, like fields and their definitions, access privileges and passwords, calculations, layouts, and scripts. A FileMaker Pro database file also contains the data you enter and work with.
Fields and field definitions
Fields are the basis of a database file. Fields store, calculate, and display the data you have entered or calculated. For example, you might create a field named Tour Name to hold a descriptive name for each tour you add to a Tours database file.
The information you put into a field—by typing, copying, looking up, or importing—is its value. Field values in a FileMaker Pro file can be:
1
text1
a number1
a date1
a time1
a graphic, sound, movie, or OLE object1
the result of a formula that calculates the field’s value1
a summary of the values in the field for a group of records Each field has a set of characteristics that defines how it will store, display, and interpret data, and whether the value is typed or entered into the field or is the result of a calculation. These characteristics are thefield definition. You create a field in a file and define it to suit your
needs. For example, the type of data in the field and whether to calculate the field’s value are both part of the field definition.
Records
To enter data in a database file, you create a record and then enter data into the fields. After you have records in a file, you can work with them in various ways, such as sorting them, finding a group of records that contains particular data, or importing and exporting records.
Choose FileMaker Help Index from the Help menu, and then type:
E
records, overviewThis field is designed to hold only numbers
This field is designed to calculate a value based on other values in the record
One record contains all the information about a single activity, individual, or subject
Access privileges and passwords
Access privileges and passwords promote file security by controlling who can use a file and particular fields and layouts, and which tasks they can do. In the FileMaker Pro Web Companion, a password controls who can browse and edit a file on the World Wide Web.
A file doesn’t require access privileges and passwords; you can create or change them as needed. For more information see chapter 7,
“Networking and access privileges” and chapter 11, “Publishing files on the Web.”
Using relationships in a database
Whether you create a database with one file (sometimes called a flat-file
database) or many files (a relational database), you can use data from
other files as if the data were in the current file. A file that contains data used in another file is a related file.
1
To copy data from a related file and store it in the current file, define a lookup (see “Looking up and displaying data from other files” on page 10-1).1
To view and work with data from different files in the current file without storing that data in the current file, create a relational database (see “Working with relational databases” on page 10-14). To learn more about these differences, see “Lookups and relational databases: a comparison” on page 10-8.You can publish both flat-file and relational databases on the World Wide Web using FileMaker Pro Web Companion. For more information, see chapter 11, “Publishing files on the Web.”
Choose FileMaker Help Index from the Help menu, and then type:
E
access privilegesWorking with modes
You work in FileMaker Pro in four modes. You switch between modes by choosing a menu command for the mode you want.
In this mode You do this
Browse Work with the data in a file. You can view, add, change, sort, omit, and delete records. Browse mode is where you’ll do much of your work. For more information, see chapter 4, “Working with information in records.” Layout Determine how information is presented on your screen or in printed
reports, labels, and forms. You design layouts for specific tasks, like data entry or printing invoices or envelopes. For more information, see chapter 3, “Laying out and arranging information.”
Find Search for particular records that match a set of criteria. You can then work with these records, called the found set. After you find a group of records, FileMaker Pro returns to Browse mode so you can begin working with them. For more information, see “Finding information” on page 4-19. Preview See on your screen how data in records, forms, or reports will look before
you print on paper. For more information, see chapter 6, “Previewing and printing information.”
Note Some FileMaker Pro tasks, like defining fields and relationships and using ScriptMaker, can be performed in any mode.
Choose FileMaker Help Index from the Help menu, and then type:
E
modesBrowse mode
Find mode
Layout mode
Preview mode
Managing files
The following sections tell you how to work with FileMaker Pro files.
Creating and opening files
You can create a file when you start FileMaker Pro or after FileMaker Pro is already running.
Create a file from a copy of a template—a predefined file that you use as is, or modify to suit your particular needs. Or create a file from scratch, without using a template. (If you didn’t install templates and want to use them, see the FileMaker Pro Installation and New Features Guide.) After you name a new file, you see the Define Fields dialog box, where you create the database fields and define their characteristics. (See chapter 2, “Creating a database file.”)
The following table describes the ways to create or open a file in FileMaker Pro. If FileMaker Pro isn’t already running, start it by choosing Programs from the Start menu, and then FileMaker Pro 4.0. You can also double-click the application icon. When you start FileMaker Pro, you see the New Database dialog box, and you can skip the first (Choose New...) step in the following directions.
To Do this
Create a file using a template file
In FileMaker Pro, choose New from the File menu. In the New Database dialog box, select Create a new file using a template, choose a template category from the drop-down list, and then double-click the name of a template file. In the Create Copy dialog box, type a name for the file (choose a different folder, if needed), and then click Save. If you don’t type a file extension, FileMaker Pro adds .FP3 for you.
Create a file without using a template file
In FileMaker Pro, choose New from the File menu. In the New Database dialog box, select Create a new empty file, and then click
OK. In the New File dialog box, type a name for the file (choose a different folder, if needed) and then click Save. If you don’t type a file extension, FileMaker Pro adds .FP3 for you.
Keep these points in mind:
1
To keep FileMaker Pro from displaying the New Database dialog box, select No longer show this dialog in the New Database dialog box. You can redisplay the dialog box by setting a preference in the General area of the Application Preferences dialog box. (See “Setting general application preferences” on page 9-2.)Open an existing file If FileMaker Pro isn’t running, double-click the name of the file to open. Or drag the file onto the FileMaker Pro application icon to open it.
You can also double-click the FileMaker Pro application icon. In the New Database dialog box, select Open an existing file, and then click OK. In the Open File dialog box, double-click the name of the file to open. If you’re asked for a password, type the password, and then click OK.
If FileMaker Pro is running, choose Open from the File menu, and then double-click the name of the file to open. If you’re asked for a password, type the password, and then click OK.
If you have opened the file recently, you can also choose the filename from the listing in the File menu if you have selected this option in application preferences. For more information, see chapter 9, “Customizing FileMaker Pro.”
To Do this
Create a file
Select to stop showing this dialog box
Choose a category of templates
1
When you open a file created with FileMaker Pro versions 2.0 and 2.1, you see a message telling you the file must be converted to FileMaker Pro 4.0 format. To rename the original file, keep theRename old file as checkbox selected and type a name (or use the FileMaker Pro default). The new file is converted to the current FileMaker Pro file format. The original file has a new name, but the contents don’t change. (For more information about converting files from previous versions of FileMaker Pro, see the FileMaker Pro
Installation and New Features Guide.)
1
When you open a file saved with internal default formats different from the system formats set on your computer, you might see an alert message. For information about this situation, see appendix B, “Working with international files.”1
You can open a file created in another application, like Lotus 1-2-3, Microsoft Excel, or ClarisWorks software, in FileMaker Pro and convert it to FileMaker Pro format. See “Importing data into a new file” on page 8-9.Closing files
FileMaker Pro saves changes you make to a file as you work and whenever you close a file or leave the application.
To close a file, be sure the file’s window is active, and then do one of these:
1
Click the close button (in the upper-right corner of the file’s window).1
Double-click the document icon in the upper-left corner of the menu bar.1
Choose Close from the File menu.Saving a copy of a file
Although FileMaker Pro saves changes to a file as you work, you can save a copy of a file for various purposes.
Choose FileMaker Help Index from the Help menu, and then type:
E
creatingE
opening filesChoose FileMaker Help Index from the Help menu, and then type:
E
closing database files?
Important Always save a copy before you make extensive changes. You can’t restore data after you delete a field from the Define Fields dialog box or remove records using the Delete Record or Delete All commands. 1. Make the file you want to save the active file, and choose Save a Copy
As from the File menu.
2. In the Create Copy dialog box, for Save a, choose an option from the drop-down list.
3. To rename the file, for File name, type a name.
4. Click Save.
Choose To
Copy of current file Duplicate the entire file, including the field definitions, layouts,
scripts, page setup options, and data. Copying a file is useful before you make extensive changes.
Compressed copy (smaller)
Compress the entire file into less disk space by reclaiming unused space in the file. Compressing a file may take time, so it’s a good idea to compress a file only when you’re archiving it.
Clone (no records) Make a copy that contains all the field definitions, layouts,
scripts, and page setup options, but no data. Make a clone when you want a template of the file.
Choose FileMaker Help Index from the Help menu, and then type:
E
saving filesOptions for saving a copy Name of the new file
Leaving FileMaker Pro
When you’re finished working in FileMaker Pro, choose Exit from the File menu.
Important Always exit FileMaker Pro before you turn off your computer.
Checking your spelling
You can use the installed spelling dictionaries to check the spelling in a file, all at once or as you type. FileMaker Pro compares your text with its main dictionary (which contains almost 100,000 words) and a user
dictionary, in which you can store up to 32,000 unique terms. Each file
can have its own user dictionary. This is useful when, for example, you have files that contain unique terms (like medical or legal terms). You can check the spelling of a selected word or passage, all words in the current record or layout, or all words in the records most recently found (the current found set) or browsed in Browse mode.
When FileMaker Pro finds a word it doesn’t recognize, you can correct it, skip it, or add it to your user dictionary.
Note Before you begin, be sure the dictionaries currently selected are the ones you want to use. See “Working with spelling dictionaries” on page 1-15.
Checking your spelling in a file
1. Display the layout or record, find the set of records, or select the text to check.
2. Choose Spelling from the Edit menu, and then:
Choose FileMaker Help Index from the Help menu, and then type:
E
closing database filesTo check the spelling of Choose
A selected word or passage Check Selection
Text in the current record Check Record
Field names and text on the current layout (you must be in Layout mode) Check Layout
The set of records most recently found or browsed Check All
3. In the Spelling dialog box, make any changes.
4. When all questionable words are resolved, click Done.
Checking your spelling as you type
As you type, FileMaker Pro can alert you to errors with either a flash in the menu bar, or a beep.
Checking your spelling as you type is much slower than checking the entire file at one time.
1. Choose Preferences from the Edit menu, and then choose Document.
To Do this when you see a questionable word
Replace a misspelled word with one in the dictionary
Select a word from the list of suggestions, and then click
Replace. (You can’t change a misspelled word in a restricted or
password-protected file or field. In that case, click Next.) Revise a misspelled
word that’s not in the dictionaries by typing in your own
For Word, retype the word. (Or use standard text-editing methods to replace only the portion to change.) Then click
Check. When the word is spelled as you want, click Replace.
(You can’t change a misspelled word in a restricted or password-protected file or field. In that case, click Next.) Skip a word Click Skip. (FileMaker Pro skips every occurrence of the word.) Add a word to the
user dictionary
Click Learn. (To add, remove, and change words in your user dictionary, see “Editing a spelling dictionary” on page 1-17.)
Choose FileMaker Help Index from the Help menu, and then type:
E
checking spellingSuggestions for replacement Word with questionable spelling
Click to see the questionable word in context
Revise the word if the correct word isn’t in the list
2. In the Document Preferences dialog box, click the Spelling tab. Select how you want to be alerted and where you want the Spelling dialog box to appear.
3. Click Done.
When you’re alerted to a spelling error, you can do one of these:
1
Correct the last word typed.1
Choose Spelling from the Edit menu, and then choose Correct Word,before you press Tab or Enter. Use the Spelling dialog box to correct the word. (See “Checking your spelling” on page 1-13.)
Working with spelling dictionaries
When you check spelling, you can use the main dictionary and the user dictionary installed with FileMaker Pro, or you can use a user dictionary you created.
The main dictionary is associated with all your FileMaker Pro files. User dictionaries work with specific files. After you select a user dictionary for a file, FileMaker Pro uses that dictionary until you select a different one.
Choose FileMaker Help Index from the Help menu, and then type:
E
checking spellingSelect how you want to be alerted as you type
Have the Spelling dialog box appear where you place it
Choose Spelling
Selecting a spelling dictionary
Before you can check spelling, select the spelling dictionaries to use. (If the dictionaries you want to use are already selected, you don’t need to reselect them.) Select dictionaries when:
1
your spelling dictionaries are in a place other than the FileMaker Pro folder or the Claris folder (usually Program Files\Claris Corp\Claris)1
you want to make more than one spell-checking pass through a file using different dictionaries (for example, dictionaries of different languages)1
you want to switch to a different dictionary (like one that contains special terms) after checking with the dictionary currently selectedTo select, ignore, or create a spelling dictionary:
1. Choose Spelling from the Edit menu, and then choose Select Dictionaries. 2. In the Select Dictionaries dialog box, choose an option.
To Do this
Select or switch a dictionary
For Files of type, choose Main Dictionary or User Dictionary. If needed,
locate the correct folder. Then double-click the dictionary name. Ignore your user dictionary For Files of type, choose User Dictionary, and then click None. Create a user dictionary For Files of type, choose User Dictionary. For File Name, type a unique,
distinguishing name for the new user dictionary, followed by the extension .UPR, and then click New.
Making changes to a user dictionary
You can edit, import text to, and export text from a user dictionary.
Editing a spelling dictionary
Before you begin, be sure the dictionary to edit is selected. (See “Selecting a spelling dictionary” on page 1-16.)
1. Choose Spelling from the Edit menu, and then choose EditUser Dictionary.
2. In the User Dictionary dialog box, make any changes, and then click OK.
Choose FileMaker Help Index from the Help menu, and then type:
E
creatingTo Do this
Add a word For Entry, type the word, and then click Add. Remove a word from the list Select the word, and then click Remove.
Change a word Remove the word from the list, type a replacement, and then click Add.
Select the type of dictionary to find
Importing or exporting a spelling dictionary
Before you begin, make sure the currently installed dictionary is the one you want to import into or export from.
1. Choose Spelling from the Edit menu, and then choose EditUser Dictionary.
2. In the User Dictionary dialog box, click the Text File control, and then:
3. When importing or exporting is complete, click OK, and then click
OK again.
Choose FileMaker Help Index from the Help menu, and then type:
E
editingTo Do this
Import a text file Click Import. (If necessary, locate the correct folder.) Then double-click the name of the file to import. (To cancel importing, press Esc.)
Export a text file Click Export. (If necessary, choose a different folder.) Type a name for the file to export to, and then click Save.
Choose FileMaker Help Index from the Help menu, and then type:
E
exporting, dictionariesE
importing dataCurrently installed user dictionary Words in dictionary
?
This chapter tells you how to design a database file:
1
to use by itself1
to use as part of a relational databaseThis chapter also explains some limitations on options available when designing a file to use with FileMaker Pro Web Companion.
For information about creating a relational database, which includes more than one database file, see chapter 10, “Using data from related files.” Important Before you read this chapter, be sure you know how to use FileMaker Pro Help, as explained in the preface, “Getting help.”
Planning a database file
Plan a database before you create it to save time and effort later on. Although you can change the design later, the more you plan ahead, the fewer changes you’ll need to make. Whether you plan to publish your database on the World Wide Web or not, the concepts are the same. Follow these general steps when you plan a database:
1. Decide which categories of information you work with, and plan a separate database file for each major category.
For example, for a small business, you might need one database file for products, one for customers, and another for employees.
2. Analyze your current information management system to determine the tasks you perform.
For example, do you print mailing labels and invoices? What reports do you produce? Are there new tasks you want to do?
3. Decide what data you want the file to contain, and plan the fields to hold the data.
For example, to print invoices, you need fields for a billing address, shipping address, quantity, product code, and so on, and calculated fields for subtotal, sales tax, shipping charge, and invoice total.
4. Determine relationships between your file and other files whose data you can use.
For example, if data you want already exists in another file, you can use it in the current file by defining a relationship to the other file and then defining lookups or adding fields from that file on a layout of the current file.
5. Decide what layouts you need, and plan a separate layout for each task.
For example, plan layouts for data entry, order entry, printing mailing labels, printing form letters, and for each type of report you produce. 6. If others will use your database, think about who can use the file and
which tasks they can perform.
If security is important to your data, you can restrict who can do which tasks by assigning passwords and access privileges to the file. 7. Put your ideas on paper, listing the files you need and the fields for each
file. Also list the forms and reports you will generate from each file.
After you have all the basic parts in place, you can begin creating your database, as described in “Defining database fields” on page 2-3. Start with a simple design and use it for a while. You can change it as needed. Keep these points in mind as you plan database fields:
1
Use separate fields for first name and last name so you can search or sort records based on either.1
Use separate fields for city, state, and postal code. If you combine them, you can’t sort records based on the individual fields.1
Make a separate field for titles (to hold values like Dr., Mr., and Ms.).Defining database fields
When you create a file, you begin by defining the database fields. To define a new field, give it a name, and then select options that determine how the field interprets, enters, calculates, stores, and displays data. All these characteristics make up the field definition. After you define fields, you can add, change, or delete field definitions as needed.
1. Create a file, or, in Browse or Layout mode, choose Define from the File menu and then choose Fields.
2. In the Define Fields dialog box, for Field Name, type a unique name for the field.
Don’t use the following symbols or words:, (comma), +, –, *, /, ^, &, =, >, <, (, ), ", :, ::, AND, OR, XOR, NOT, or a FileMaker Pro function name. Don’t begin a field name to be used in a calculation formula with a period (.) or a number.
3. For Type, select a field type, and then click Create. See “Assigning a field type” on page 2-4.
4. Define options for the field.
If the field type is Do this
Text, number, date, time, or container
In the field definitions list, double-click the field name (or select the field, and then click Options), and then set entry options for the field. See “Choosing data entry options” on page 2-6. Calculation In the Specify Calculation dialog box, define a formula for the
field. See “Understanding formulas” on page 2-13.
Summary In the Options for Summary Field dialog box, select summary options. See “Defining summary fields” on page 2-23. Global In the Global Field Options dialog box, select global options.
5. Define the fields you want for the file, and then click Done.
When the file is new, you see the fields in Browse mode. Otherwise, you return to where you were before you defined fields.
Assigning a field type
When you define a field, you must decide the kind of data it will contain and then select the appropriate field type. FileMaker Pro uses the field type to interpret the data when sorting and performing calculations. The following table explains each field type.
Choose FileMaker Help Index from the Help menu, and then type:
E
adding new fieldsSelect this
field type If the field’s data will be
Text Up to 64,000 characters of letters, symbols, and numbers used as text. You can sort records based on a text field and use a text field in formulas for calculations and summary fields. Text fields are usually sorted alphabetically (from first character to last character in the alphabet, or last to first), starting with the first character in the field. For more information, see “Sorting records” on page 4-29.
Number Up to 255 characters of numbers or other characters, of which only the
numbers are treated as numeric. You can sort records based on a number field and use number fields in formulas for calculations and summary fields. Number fields are sorted numerically (lowest to highest or highest to lowest), based on the numeric part of the data.
Field names and definitions
Type a name for a new field Select a field type
After you type a field name and select a field type, click Create Choose the way fields are listed in the dialog box
Keep these points in mind:
1
Because they often include non-numeric characters like hyphens or parentheses, define postal codes and telephone numbers as text fields, not number fields.1
You can’t search or sort records based on container fields, but you can define text fields to describe or identify them. Then search and sort based on the description or identifying number of the field’s value.1
You can change the way data is displayed in text, number, date, and time fields. See “Defining display formats for fields” on page 3-58.Date Dates only. A date field must include at least the day and month portion (dd and mm) of a date. If you enter no year, and have not typed a separator character for a year, FileMaker Pro enters the current year for you. You can sort records based on a date field and use date fields in formulas for calculation and summary fields. Date fields are sorted chronologically (from earliest to latest or latest to earliest).
Time Times only. A time field can contain only the hours, minutes, or seconds portion (hh, mm, and ss) of a time. You can sort records based on a time field and use time fields in formulas for calculation and summary fields. Time fields are sorted chronologically (from earliest to latest or latest to earliest).
Container A graphic, sound, QuickTime movie, or OLE object. You enter data in a
container field in different ways, depending on the type of data. Container fields can be used in calculation fields and summary fields. See “Working with container fields” on page 4-6.
Calculation The result of a calculation formula that uses field values from the current
record or related records. The formula can use values of all field types. The result can be text, a number, date, time, or container. See “Understanding formulas” on page 2-13.
Summary A value that’s produced by summarizing field values from more than one
record in the same file. See “Defining summary fields” on page 2-23.
Global One value to be used in all records of the file. A global field can be text,
number, date, time, or container. Use the value of a global field in calculations and scripts. You can’t use a global field to find records. See “Defining global fields” on page 2-9.
Select this
1
The characters displayed for the decimal separator and thousands separator in number fields, and the part separators in date and time fields, and the order in which date and time parts appear depend on the system formats set for the file and the display format for the field. See appendix B, “Working with international files,” and “Defining display formats for fields” on page 3-58.Choosing data entry options
For each text, number, date, time, and container field, you can set or change options to make entering data fast and accurate. You can have default data entered in the field and have the data checked against validation requirements set for the field.
1. Create a file, or choose Define from the File menu and then choose Fields.
2. In the Define Fields dialog box, double-click a field you want to set data entry options for.
3. In the Entry Options dialog box, click a tab for the type of entry options to set (at the top of the dialog box).
1
To have a default value automatically entered in the selected field for each record, click Auto-Enter.1
To have data in the field checked against validation requirements you set for the field in each record, click Validation.4. Define repetitions and storage options.
1
To make the field a repeating field, select Repeating field with a maximum of n repetitions, and then type the number of repetitions. (See “Defining repeating fields” on page 2-10.) To set options for indexing the field’s values, click Storage Options, and then select indexing options. You can also choose a language for indexing and sorting text fields. (See “Indexing fields” on page 2-11.)5. Select options for automatically entering and validating data. Choose FileMaker Help Index from the Help menu, and then type:
E
fields, definingFor To Do this
Auto Enter Turn off automatically entered data Select Nothing.
Enter the date, time, or user name when the record was last created or changed
Choose an option from the drop-down list. Assign a unique, sequential number to the field in each
record
Select Serial number, and then type a starting value (for example, 1001) and the number to increment by. Enter the value from the previously accessed record Select Value from previous record.
Enter data you specify Select Data, and then type the data you want, up to 255 characters.
Enter the result of a calculation in the field Select Calculated value, and then define the formula. (See the note at the end of this section and “Understanding formulas” on page 2-13.)
Enter a value that’s copied from a field in the same or a different file
Select Looked-up value, and then define the lookup. (See “Defining lookups between files” on page 10-11.) Prevent users from changing an automatically entered
value
Select Prohibit modification of value.
Validation Check that the data is a number, date, or time Select Of type and then choose a type from the drop-down
list. Check that the field is not empty, or that the value is unique or already existing in the file
Select Not empty, Unique, or Existing.
Check that the value is in the value list you specify Select Member of value list, and then choose a value list from the drop-down list, or define a value list. (See “Defining value lists” on page 3-74.)
Check that the value falls within the range you specify Select In range, and then type a starting value and ending value for the range.
Check that the value matches the result of a calculation Select Validation by calculation, click Specify, and then define a formula. The result must be Boolean—“true” or “false,” “yes” or “no,” and so on. (See “Understanding formulas” on page 2-13.) The result is false when the result is 0 or null (empty); otherwise the result is true.
Prevent users from entering invalid data Select Strict: Do not allow user to override validation.
Display a message you specify when the data doesn’t meet the validation requirements
Select Display custom message if validation fails, and then type a message (up to 255 characters).
6. Click OK, and then click Done. Keep these points in mind:
1
You can’t set FileMaker Pro to enter data automatically for calculation, summary, and global fields.Set entry options for entering default data in the field Click Auto-Enter to have default data entered in the field
Set validation options for the current field
Click Validation to set validation options for the current field
1
If you create or edit records using FileMaker Pro Web Companion, auto-entered data appears only after the record has been submitted from the browser software.1
Select Calculated value to calculate a value only when a record is first created or when a value in a field the calculation refers to changes (as long as the field with the calculation doesn’t already contain a value). If necessary, you can enter a different value in the field (when Prohibit modification of field isn’t selected). However, when you want a calculated value that’s always up to date and which you can’t change by entering data in the field, define the field as a calculation field. See “Defining database fields” on page 2-3 and “Understandingformulas” on page 2-13.
1
When the data in a validated field doesn’t meet the validation requirements, users see a warning message when they try to move out of the current record. If Strict: Do not allow user to override validation is set for the field, users must correct the data before moving out of the record. You can use Display custom message if validation fails to give users the data requirements.1
To save time during data entry and to validate fields, define value lists. Value lists aren’t attached to any field definition. You can format value lists to display in a pop-up (drop-down) list or menu, or as checkboxes or radio buttons. See “Defining value lists” on page 3-74.Defining global fields
A global field contains one value that’s used for all records in a file. Use the value of a global field:
1
to declare variables in If, Else, End If, Loop, End Loop, and Exit Loop If script steps1
for fields that rarely need to be updated. For example, use a global field to put your company logo (a graphic) and address (text fields) on several layouts. You can quickly update the field if needed without having to update each layout.1
as a fixed value to be used in calculations in all records in a file Choose FileMaker Help Index from the Help menu, and then type:E
data entry options?
You can also use a global field in layouts and calculations and as repeating fields. You can’t use a global field for finding data. 1. Create a new file, or choose Define from the File menu and then
choose Fields.
2. In the Define Fields dialog box, for Field Name, type a name for the field. 3. For Type, select Global, and then click Create.
4. In the Global Field Options dialog box, select options.
5. Click OK, and then click Done.
Note If you’re working with global fields in a shared file, see “Working with shared files” on page 7-5.
Defining repeating fields
A repeating field holds more than one value (up to 1000), each in a separate repetition (row) of a field of any type except summary. For example, use a repeating field to show all available tours for a cruise line.
To Do this
Choose a data type for the field
For Data type, choose a type from the drop-down list. (See
“Assigning a field type” on page 2-4.) Make the field
repeating and set the number of repetitions
Select Repeating field with a maximum of n repetitions, and then type the number of repetitions. (See the next section, “Defining repeating fields.”)
Choose FileMaker Help Index from the Help menu, and then type:
E
global fieldsChoose a data type for the field You can make the field repeating
You can use repeating fields for calculating values and finding and sorting records. FileMaker Pro includes all values in a repeating field for calculations, summaries, and find requests, even those that aren’t visible in the current layout. For sorting, FileMaker Pro uses only the first value in a repeating field.
You can make a calculated field repeating when you define a calculation. (See “Writing formulas for calculation fields” on page 2-20.) You can make a global field repeating when you choose global field options. (See “Defining global fields” on page 2-9.)
To define a text, number, date, time, or container field to be repeating: 1. Create a file, or, in Browse or Layout mode, choose Define from the
File menu and then choose Fields.
2. In the Define Fields dialog box, double-click the name of the field to be repeating.
3. In the Entry Options dialog box, select Repeating field with a maximum of n repetitions, and then type the number of repetitions you want. 4. Click OK, and then click Done.
To change the number of repetitions visible on a layout, see “Formatting repeating fields” on page 3-71.
Indexing fields
FileMaker Pro indexes each value in fields used for these tasks (unless you deselect the automatic index option):
1
validating fields with unique or existing validation criteria1
matching fields in a related or lookup file1
matching fields in a master file (to find data in a field based on the relationship)Choose FileMaker Help Index from the Help menu, and then type:
E
repeating fieldsEach value in a repeating field is a single, separate value
You can index all field types (except container, summary, or global) to improve performance for tasks like finding data. Indexing uses additional disk space and can slow performance of some operations, especially in large files.
1. Create a new file, or, in Browse or Layout mode, choose Define from the File menu and then choose Fields.
2. In the Define Fields dialog box, double-click the name of the field to index.
3. In the Entry Options dialog box, click Storage Options.
4. In the Storage Options dialog box, for Indexing, click On. If you are working with a text field, choose a language from the drop-down list. In most cases, keep Automatically turn indexing on if needed selected. Otherwise, tasks like finding take much longer on unindexed fields.
5. Click OK twice, and then click Done. Keep these points in mind:
1
You can set indexing options for a calculated field when you define the calculation. (See “Writing formulas for calculation fields” on page 2-20.)1
To use the index for data entry, see “Working with the index” on page 4-11. Choose FileMaker Help Index from the Help menu, and then type:E
indexChoose the language to index and sort values by Index each value in
the current field Select this to speed up finding on unindexed fields
Understanding formulas
You write a formula (a specific operation on one or more values in the database) for a calculation or summary field. For example, suppose your file contains two number fields—Unit Price and Quantity—and one calculation field, Subtotal. You want to calculate a value for Subtotal in each record, so you write the calculation formula:
Unit Price * Quantity
for the Subtotal field. Then, each time you type values in Unit Price and Quantity, the formula multiplies those values and displays the result in Subtotal.
Use a calculation field to calculate a result from values in other fields in the current record (or from other related records, using a relationship). Use a summary field to produce a result using values in more than one record in the database.
Contains a formula that multiplies the value in Unit Price by the value in Quantity
Contains a formula that multiplies the value in Tax Rate by the value in Subtotal and adds the result to Subtotal
The values you calculate can come from all field types. You can produce different values in a summary field, depending on whether you’re browsing all or some of the records, whether records have been sorted, and where you place the summary field on the layout.
The formula’s result can be text, number, date, time, or container. The result of a calculation depends on the field type of the values it calculates and whether the field type is calculation or summary.
A formula contains one or more parts arranged in a particular order (called syntax) that determines the values to use and the operations to perform to produce the result you want. The following sections explain each formula part and its syntax.
Important In the United States, commas act as list separators in functions, formulas, and calculations. In other countries, semicolons might be used as list separators. The separator that is used depends on the operating system your computer uses, as well as the one used when the file was created.
Expressions
An expression is a value or any computation that produces a value. Expressions can be combined to produce other expressions.
Constants
A constant is a fixed value that’s part of the formula and doesn’t change from record to record. A constant can be text, or a number, date, or time, like the text value “Europe” or the numeric value 0.05.
Type of expression Example
Text constant "London"
Number constant 2.15
Field reference TaxRate
Function Length(ShipToAddress)
FileMaker Pro interprets the type of data of a constant value according to the way you type the constant in a formula. Be sure to type each constant in a consistent format. (Quotation marks indicate a text expression.)
Field references
A field reference is a field name that acts as a placeholder for the field’s value. When FileMaker Pro evaluates the formula in the current record, the value in the field represented by the field reference is used in the calculation. (Quotation marks indicate a text expression.)
Operators
You combine expressions using operators, symbols that determine which operation to perform on the expressions. You place operators between the expressions you want to perform the operation on, as in:
Subtotal + Tax
For this type of data
Do this when you
type a constant Examples
Text Enclose the text in quotation marks (") "Montréal" "514 555 1212"
Number Don’t include thousand separators or currency symbols
123 1234.56
Date Use the value as a parameter of the Date function or TextToDate function. See appendix C, “Summary of functions.”
Date(2,1,1998)
TextToDate("03/04/1998")
Time Use the value as a parameter of the Time function or TextToTime function. See appendix C, “Summary of functions.”
Time(4,14,32)
TextToTime("02:47:35")
This expression Returns
Invoice Total*0.075 7.5 when the value in the Invoice Total field
is 100
First Name & " " & Last Name "John Jones" when the value in the First Name field is “John” and the value in the Last Name field is “Jones”
Relationship Name::Invoice Total*0.075
7.5 when the value in the Invoice Total field is 100. The Invoice Total field is located in a related database