This document is a print-formatted version of the information contained in the context-sensitve help system in Specify 6.5.
Post Mortem, We Sort 'Em
Specify Software Project Contact Information The Specify Software Project
Biodiversity Research Center The University of Kansas
1345 Jayhawk Blvd. Lawrence, KS 66045-7561 USA
Table Of Contents
Welcome to Specify 6
Registration 6
Services and Support 7
Usage and Usability Statistics 7
Updating 8
Using Specify Help 8
About Specify 8
Contact Information 9
Login to Specify 9
Specify Setup 13
Configuration Overview 15
Adding Institutional Levels 17
Add Divisions 19
Add Disciplines 30
Add Collections 40
Field Format Editor 45
Editing System Pick Lists 48
User Defined Pick Lists 51
Editing Preparation Type 55
Adding Users and Setting Permissions 56
Adding Users 58
Setting User Permissions 59
Editing the Schema Configuration 61
Change Captions 64
Hide Unused Tables/Fields 65
Edit Usage Notes 65
Format a Table 66 Aggregate a Table 69 Required Fields 72 Format a Field 72 Collection Relationships 76 Web Links 81
Global Web Links
Field Web Links 83
New Field Web Links 84
URL Web Links 84
Using Backup and Restore 85
Setting Specify Preferences 86
Attachments 87
File: Complete Specify Help Revised 26 August 2013
EMail 88 Formatting 89 GoogleEarth 93 GEOLocate 94 Loan 95 Login 97 MySQL 98 Network 100 Task Bar 100 Tree 101 System 102 Introduction to Specify 104 Components in Specify 105 Change Collection 108 Statistics 109
Using Forms in Specify 110
Related Information 111
Form Controls 113
Unique Field Boxes 118
Field Uses 120
Keyboard Functions 121
Carry Forward 123
Auto Numbering 124
Using Bar Codes 127
Series Data Entry 125
Batch Identify 126
How Editing Affects Related Records 127
Data Forms 129
Side Bar Configuration 129
Working with Forms and Trees 130
Container 130 Taxon Form 134 Determinations Form 134 Locality Form 135 Collecting Event 145 Agent Form 146 Preparations Form 147 Attachments Form 147 Interactions Forms 151
Side Bar Configuration Accessions
Gifts and Loans 152
Information Requests 156
Borrows 157
Exchange In / Exchange Out 157
Repository Agreements 157 Attachments 158 View 158 Store 159 Backup 160 Attachment Tools 160
Show All Attachments
Show All Images 163
Import Attachments 164
Import Mapping File 166
Trees in Specify 168 Tree Terminology 168 Building Trees 169 Using Trees 170 Move a Node 173 Synonymize Node Merge Node 174
Collection Object Counts 175
More Options 175
Find 176
Tree Definitions 177
Edit the Tree Title 177
Tree Ranks 178
Predefined Ranks
Searching Data 179
Simple Search 179
Using Simple Search 180
Simple Search Wild Cards 181
Simple Search Results 182
Configuring Simple Search 183
Configuring Search Fields 184
Configuring Related Searches 184
Configuring the Order of Results 185
Query Builder 185
Configure Query Side Bar 185
Choose Fields
Choose Tables 186
Query Expressions 188
Using Wild Cards 191
Editing a Query
Using Query Results 193
Saved Query Menu 194
Import and Export Queries 195
Delete a Query 196
Record Sets 197
Creating a Record Set 197
Adding Records to a Record Set 197
Using Record Sets 198
Record Set Context Menu 199
Reports and Labels 201
Reports Side Bar Tools 202
SpecifyiReport 204
Creating a Report from a Query 205
Report Properties 206 Report Bands 206 Report Groups 210 Report Panes 207 Task Examples 209 Including Barcodes 211 Saving a Report 212 Plugins 212 Google Earth 213 GEOLocate 214
Importing and Exporting Resources 220
Import/Export Forms and Reports 221
Lifemapper 224
Exporting Data 226
Web Portal 227
Web Publishing 227
Schema Mapping 228
Data Exporter Application 234
Stand-Alone Specify Applications 236
Specify Setup Wizard 236
Field Format Editor 259
Specify EZDB Setup Wizard 262
Data Exporter 283
Security Wizard 286
WorkBench 294
Data Sets 297
New Data Set 298
Create from Record Set 301
Import Data 304
CSV Import 305
MS Excel Import 313
Import Images 320
Edit Data Set Mapping 323
Edit Properties 325
Grid Editing 326
Form Editing 331
Data Format Guidelines 334
Exporting Data 337
Export Data Set 337
Export Excel Template 339
Image Window 340
Reports 344
Data Set Summary 345
Basic Label 347
Chart 349
Top 10 350
Special Tools 352
BioGeomancer 354
Record Mapping Tool 361
Google Earth 362
Lat Long Converter 364
WorkBench Uploader 365
Specify File Slicer 373
WorkBench Schema Configuration 374
Introducing SGR 376
Using SGR 378
Welcome to Specify 6
Over 250 years of botanical and zoological exploration have produced billions of biological specimens in museums worldwide which document the distribution of life on earth. The Internet has changed the way we catalog, computerize and discover those specimens, but we are just at the beginning of utilizing the communication and computational power of the net. The goal of Specify 6 is to extend collections computing beyond simple specimen description, discovery and data retrieval--to capabilities for integration and synthesis that will enable researchers to utilize collections data for broader, quicker, research impact, in efficient, network-based collaborations.
Specify 6 is based on the same core collections concepts as Specify 5, but has been completely rewritten in Java and can run on Windows, Mac OS X, and Linux. It is also greatly updated to allow drag and drop and multi-tasking with only one open application.
Specify is an open source project and welcomes software collaboration.
Registration
The concept of software registration for Specify 6 has changed to align with commercial software practice. A registration popup window request is activated in Specify whenever a new collection database is created. Specify asks the administrator of the database for identifying information such as the name of the collection, contact name and e-mail address. Registration enables automatic updates of Specify software and adds the registration contact email address to the Specify Project e-mail list for news and announcements. Anyone may register a Specify collection: US or foreign, academic, government or commercial, museum curator, graduate student, or member of the general public. We also accept registrations from collections-based research projects which are not collection catalogs but “virtual” collections of specimen records aggregated from multiple sources for the purpose of supporting taxonomically or geographically-scoped research. Registration is optional.
Specify will ask if you want to register the first time it opens and thereafter if you are not registered.
You can also register by clicking Help > Software Registration. A message will appear telling you that your institution is registered if you do not need to register.
Institutions that are not registered will not receive automatic updates for Specify 6.
Services and Support
Institutional Support Agreements ("ISAs") are agreements set on paper with U.S. research institutions to formalize a support relationship. With U.S. National Science Foundation funding, U.S. collections institutions have access the Specify Project’s professional services for data migration from a legacy systems, Specify customization and configuration support, and miscellaneous other help desk services directly related to the installation and operation of the program. (ISAs are equivalent to Specify 5 registrations.)
Projects which propose to create specimen or observation species occurrence databases with data from various sources, i.e. virtual collections created for some specific research objective, e.g. Ants of the World, Trees of Madagascar, a multi-institutional collaborative Tree of Life Project, will be eligible to establish an ISA and receive support services from the Project. These project databases are usually scoped systematically or geographically, and are essentially virtual, special-purpose collections. This is an extension of our current Sp5 policy to reflect Sp6’s enhanced schema for U.S. research project specimen databases. To receive Services and Support:
1. Contact the Specify Project for the ISA form.
2. Once you have completed and signed the form, you will receive an ISA Number.
3. In Specify, on the main menu click Help > Support Agreement. 4. Type your ISA Number in the dialog that appears.
Once your ISA is complete you will qualify for Specify Support and Updates.
Usage and Usability Statistics
Usage and Usability Statistics (UUS) communications is a new network feature in Specify 6, which returns information on the frequency of specific Specify component use and information over the Internet to the Specify Project. Specify is instrumented with checkpoints which log whether a particular module was successfully used or whether an internal error (a handled exception) was encountered. This information is highly useful for
assessing the usability of particular modules and for identifying engineering defects and prioritizing fixes and enhancements. Our vision with the UUS facility is to connect to Specify users to anticipate their troubleshooting needs by rapidly identifying error conditions, and to prioritize software enhancements based on usage paths and frequency. UUS communications can be turned on or off as a user preference.
Auto-updates
Auto-updates are an automatic software update delivery service built into Specify and available to all registered users. It delivers and installs the latest Specify releases automatically to registered installations over the Internet. When Specify is started, the program checks with a Project server to see if there are any updates available and if there are, the user is offered the opportunity to download the update software and install it within Specify. Specify software updates can also be manually obtained at anytime through the ‘Check for Updates’ option on the Help menu. The online update service will update versions of Specify compiled by the University of Kansas.
Users with computers that do not have internet access should turn off the 'Check for Updates' function in the System section of User Preferences. For help performing this task visit theSystem Preferencehelp page.
Using Specify Help
The Specify Help system can be opened from anywhere in the application by typing the F1 key, or function + F1 keys. The help system was designed to provide an overview of the modules within Specify as well as a guide for a given task. This is referred to as context-sensitive help. When performing a given task in the application, type F1 and Specify Help will open to the corresponding documentation page. In the same sense, Specify Help is best read while viewing and using the corresponding module in the application. A Table of Contents is also provided. Specify Help was written in Java Help and includes full-text search capabilities by clicking on the (search) button.
About Specify
Specific information about your instance of Specify can be found by choosing Specify > About Specify. This information includes the Institution and Collection GUID.
The system information in the About Specify dialog can be copied to the clipboard by clicking the button.
Contacting the Specify Software Project
The Specify Software Project Biodiversity Institute
The University of Kansas 1345 Jayhawk Blvd. Lawrence, KS 66045-7561 USA
Phone: (785) 864-4400, 8 – 5 p.m. (UTC/GMT-6), Monday–Friday, or leave a message at any time.
Fax: (785) 864-5335 Email: [email protected]
Website: www.specifysoftware.org
Specify Login
When Specify is launched it automatically checks for updates and allows the user to choose to download and install the update, then provides a login mechanism.
Types of Specify Logins
The security for Specify 6 uses both a Master username and password, which gains access to the MySQL Database, as well as a User username and password, which in return gains access to the Specify application. Specify uses only one Master username and password for all users, but encrypts the Master password with the User information, creating an encrypted string, or key. This allows the Master information to become unique for each user.
Some of the administrative tasks in Specify, such as creating new disciplines or divisions, require an IT password. The IT password refers to the password used to login to the MySQL database manager. It has full administrator privileges within the MySQL database manager. Specify is accessing these priviledges when it creates these changes and therefore must login directly to MySQL.
In review, there are four (4) different types of credentials in Specify: • User username and User password
• Master username and Master password
• Master Key, (Encrypted username / password )
• IT username and IT password (used to gain access to the MySQL database manager)
Starting Specify for the First Time
The very first time a user is required to login to Specify they will need to know their User username and password as well as their Encryption Key. An Encryption Key can be created from within the Login tool; however, it requires that the user know the Master username and password to create a new key.
The User credentials are stored on the users machine. This allows the Login tool to automatically fill in the Username and Encryption Key for previous users. When opening Specify the username will be pre-filled with the username last user to open Specify.
If you are accessing Specify on a new computer you will be required to fill in your User username and password as well as a valid Encryption Key, just as you did when logging into Specify for the first time.
Specify Login
The log in process includes dialog windows for entering all types of login information.
Login Dialog
Users with an existing Username and Password can simply log in using the correct fields. Users that are logging in for the first time, or wish to login to a different database than they were previously using must click the More Information button.
Expanded Login Dialog
When the Specify database is created using the Specify Wizard the Database and Server information should be included in the dialog. If the database and server information is not included in the dialog you may type them into the drop-down menu box. If you do not know the name of your database or server and you are running Specify on a local machine please consult your IT administrator. If more than one database and server are available the dialog will list all the choices for both.
If you are accessing a remote server, you will need to fill in the Database and Server name (this can be an IP address if the IP is 'Static').
Users wishing to configure their server and firewall to use a Port other than the default (3306) port may do so and type the new port number into the box provided. If your port has not been reconfigured for a specific port the default port is 3306.
Users needing to create their encrypted Master Key should click the Configure Master Key ... button.
Dialog for creating the Encryption Key
The Master Source information refers to the location that the encryption is stored. At this time Specify does not support obtaining an encryption key from a web service, so choose Encryption key stored in local preferences.
Encrypted Username / Password refers to the Encryption Key, or string that results when the Master username and password are Encrypted using the User username and password. This can be created by the IT administrator when a new user is created in the Specify application and then given to the user, or it can be created by clicking the Generate Master ... button.
Creating the Encryption Key
Type in the information for both the User and Master credentials click the Generate button. The Show Password button can be used to turn off the encryption characters and show the actual textual password information.
The encrypted Master Username and Password now appears in the Encrypted box.
Completed Login Dialog
The first login dialog is now presented. Click the Login button to complete the process.
Specify Setup
Specify's flexible design can accommodate a single user with a single collection, or multiple collections representing multiple disciplines within an institution - all sharing the same database. This is accomplished by creating relationships among collection data, as well as modeling how collections are organized within institutions themselves, and then configuring components within Specify specifically for each institutional level.
What this means for the user, is that Specify 6 can be configured to work congruently with existing collection management procedures, but it requires a thoughtful setup process. This process may vary depending on how Specify was installed. If you were a Specify 5 user and have worked with the Specify staff to convert your data, many of the setup steps will have been performed for you. However, it is still recommended that you read the help sections for each of the modules to better understand how each module can be utilized for your specific needs.
If you installed Specify 6 and ran the Specify Setup Wizard to create a new, blank database, the Specify 6 team recommends that you now perform the following procedures to customize the Specify setup to your particular needs.
1. Add institutional levels (divisions, disciplines, collections)
Systems that were created by first running the Specify Setup Wizard will include one of each of the institutional levels (institution, division, discipline, collection and user). Most systems will require more than one of each of these institutional levels.
Add collections, disciplines and divisionsin the System Configuration at System > System Setup > Configuration.
2. Add users and set user permissions
Once these institutional levels are configured, users can be added to each of the collections. Specify offers an extensive permission system which controls each user's access to both the data and tools within Specify.
Add users and set user permissionsusing the Security tools found at System > System Setup > Security Tools.
Once the institutional levels, users and permissions are complete, information specific to each discipline can be configured.
3. Check and/or set Tree Definitions
A Storage tree that can be accessed by the entire institution was created using the Setup Wizard. Taxon, Geography, Lithostratigraphy and Chronostratigraphy (if applicable) trees were also created, which are shared by each collection within the division.
The ranks in the trees as well as the Enforced ranks and Full Name configuration were also created for each tree in a division. These are considered part of the Tree Definition, and it is recommended that users check theseTree Definitionsbefore entering data. Tree Definitions are found by clicking the Tree button on the Tab Bar, then clicking the appropriate Tree Definition button on the side bar.
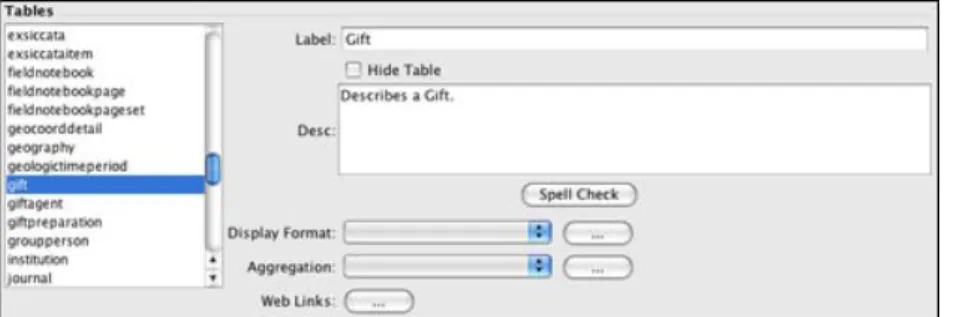
4. Customize the Schema Configuration
A number of changes can be made to the fields and tables within Specify by using the Schema Configuration tool:
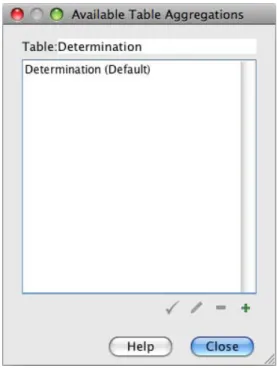
• Hide Fields • Change Captions • Set Required Fields • Change Table Format • Change a Field Format • Configure Table Aggregation
Editing the schema configurationallows users to customize fields and tables within Specify for each of the disciplines. The Schema Configuration tool is found at System > Schema Configuration.
5. Customize System Pick Lists and Preparation Types
A variety of System Pick Lists exist within the Specify form system as drop-down lists. These can be edited in a System Configuration module, found at System > System Setup > Configuration. System Pick Lists refer to fields that are denoted as Pick Lists within Specify itself. Fields that are not denoted as Pick Lists by Specify are referred to as User-Defined Pick Lists. User-Defined Pick Lists require a change to any forms that include the field and should NOT be changed until the new form has been imported into Specify.
The Preparation Type pick list ships with specific data for each discipline, which can be edited in the Configuration tool as well.
6. Create Reports
Reports can be created for use in Specify. Reports may include labels for specimens or invoices for loans as well as reports for collection data. Each institution will have different needs. It is helpful to have reports created before users start entering data into the database that are based on your specific needs. Specify harnesses the power of iReport 3.0, an open source report writing software package, by modifying the original iReport version to interact with Queries created in Specify 6 and data supplied from the Specify 6 database.
SpecifyiReport is a separate application and must be launched separately from Specify. SpecifyiReport is located in the Specify application bin directory.
7. Change Attachment Storage Location
Attachments are copied, renamed using a unique name, and stored in an Attachment Storage location. Only the path to the attachment storage location is stored in the Specify database. The Specify Setup Wizard sets a default storage location on the local drive but this location can be changed in System Preferences:
• For Mac: Specify > Preferences > System > Attachment Storage Location.
• For PC and Linux: Choose Edit > Preferences > System > Attachment Storage Location.
8. Customize the Backup and Restore function
A Backup and Restore tool ships with Specify as a separate application. It allows IT personnel to backup and restore the database to the MySQL location on the server, or a local disk. BackupAndRestore is located in the Specify application directory, in the bin file, which stores the executable files for Specify.
Configuration Overview
The Configuration tool within Specify is found by clicking Configuration at System > System Setup > Configuration. It offers many tools for setting up Specify for your specific institution as well as
individual collections within the institution. The Configuration tool (and menu) is only available to Administrators.
Side Bar Global Data
The side bar offers Institution, Division, Discipline and Collection forms for adding these levels within Specify. Users that have run the Specify Setup Wizard have their Institution as well as one Division, Discipline and Collection already configured within Specify. If more of any of these Institutional levels are required within Specify they need to be added before any data is entered. Directions for performing these tasks can be found at Adding Collections, Disciplines and Divisions.
Side Bar Discipline Data
Preparation Types are Pick Lists that have an additional function; they determine if specimens with specific preparations can be loaned. For this reason they have a form for editing purposes. Simply click Preparation Type on the side bar to bring up the form. For additional information please refer toEditing the Preparation Type.
Pick Lists that are included on the default Specify forms are referred to as 'System Pick Lists' and can be edited for individual Disciplines within Specify. This is accomplished using the Pick List Editor. System Pick Lists can also be imported and exported using additional buttons on the side bar. Please refer to Editing System Pick Lists for additional information.
Cleanup Syononyms, released with Specify 6.5, is a specially designed function for Specify 6 databases which have been created from data conversions from Specify 5. The taxon synonym cleanup operations the tool performs will not affect collection databases created for the first time in Specify 6, nor on Specify 6 databases converted from other legacy systems. For Specify 6 databases converted from Specify 5, visit the Specify Project web site (www.specifysoftware.org) and read the document entitled, Specify 6 Synonym Cleanup Tool, before using this function.
Block Logins will block all other users from logging in to Specify. This feature is only available to a Specify Administrator. While the logins are blocked the administrator that blocked the logins can still login and use Specify in a normal capacity. This feature is often helpful when maintenance tasks for the Specify database are being performed.
Close Specify Database Button
When logins are being blocked the button will change to allow logins.
Open Specify Database Button
Any users that try to login to Specify while they are being blocked will be alerted that they may not login until logins are allowed.
Activate Subform allows a Collection Object Attribute, Preparation and/or Determination record to be automatically created at the same time a new Collection Object is created. If a form has been edited to include a default value the new record will be created and include the default value. For instance, if a collection uses only one Preparation and does not wish to create a new Preparation each time a new Collection Object is added to their collection, the Preparation form can be edited to include a default value and when a new Collection Object is created a new Preparation will automatically be created for that Collection Object.
Note: Preparation requires a default value to be set on the form before Specify will
automatically create a Prepation for each new Collection Object. If a default value has not been set in the new Collection Object Attribute and/or Determination form a blank record will be created.
Show Users Logged In displays a list of users currently logged in to Specify.
Adding Institutional Levels
The Specify data management levels mimic the common levels of hierarchy within institutions. Access to information and Specify tools are set at the various levels both within the application itself and through the User Permissions.
• Institution o Division
- Discipline - Collection
- Users
The Divisions, Disciplines and Collections for each institution are added and edited in the System Configuration module of Specify;Configuration at System > System Setup > Configuration. All tabs need to be closed before opening the Configuration. This tool is available to Administrators only. Collection information in Specify 6 databases is also organized at these institution levels to meet requirements for data integrity and data sharing among collections. Some data elements are commonly shared among all collections within an institution, while others are shared only among collections in the same taxonomic discipline, i.e. "at the Discipline level" in Specify. Before creating the institution levels it is imperative that an administrator also understand the data that is held at each level to create the correct setup.
When using a database that was created using the Wizard any additional Division levels should be added first, then Discipline and then Collection. Each is added at the level above it. For instance, Divisions are added within the Institution form.
Edit Institution
Information for the Institution is edited in the Configuration tool; System > System Setup > Configuration. There may only be one Instituation for each instance of Specify.
Open the Institution form by clicking Institution on the side bar. • Name is the official name of the institution.
• Security can be turned on or off for the entire Specify application on the Institution form by checking the box Is Security On. The status of security is shown on the status bar with an icon; (security on), or (security off). It is recommended that most instituations leave security on unless the application is being used by a single user. • Alt. Name is typically used when more than one code is used by an institution.
• The Code is typically an acronym, codon, abbreviation or short name for your institution (not your collection), if you don't know of one, put in a placeholder, this can be edited at a later date. Institution codes is a Darwin Core field used in DiGIR/TAPIR web services.
• Min. Password Length allows a minimum password length to be enforced within Specify. The Specify default is eight (8) characters.
• GUID Authority refers to the location of institution information for the unique GUID number given by Specify. This is typically the url for the instition.
• IPR
• Copyright, Terms of Use and Disclaimer may be used for legal information regarding the use of the name of the institution. This information can be queried and included on reports.
• Remarks can be used for any additional information required regarding the institution. Click on the Address button to edit the address of the institution.
Add/Edit Divisions
New divisions, disciplines and collections are added using the Configuration tool;Configuration at System > System Setup > Configuration.
Divisions are added within a subform on the Institution form, and can be edited either from the institution subform or the division form.
1. Click the Institution button on the side bar of the Configuration tool to edit the institution or add a division.
At least one division should appear in the division sub form.
Name is the only required field and is used in any lists of divisions within Specify
as well as in the institution hierarchy.
Abbreviation refers to an existing abbreviation for the Division.
Alt Name provides another field for name. This is often useful when a particular
Division has changed names or uses a longer name than is applicable to the Hierarchy list.
URI stands for Uniform Resource Identifier and refers to a resource on the
internet (a Division web site).
Icon URI This is a field for ABCD field. This is the path to an icon on the
website that could be downloaded by another institution and displayed on their website to indicate a partnership.
Description can be used to store further information about the Division.
2. Click the (add) button to add a division. A Wizard will appear to help you setup your new division as well as one discipline and one collection within the division.
Create a Division
Division
This window is used to create a single division within your institutional hierarchy. Additional divisions can be added later from within Specify.
The Name will appear on the division form and can be queried and used in reports. A division is used to collectively name similar collections e.g. the Division of Paleontology may include Vertebrate Paleontology, Invertebrate Paleontology and Paleobotany collection. The Name is a field within the Specify database and is displayed on the Institution form. It can be edited, queried and used in reports.
The Code can be a short name, acronym, codon or abbreviation. If your division does not have a code, put in a placeholder, (this is a required field), this can be edited at a later date. Division codes are sometimes required for web services.
Choose a Discipline Type
Discipline
Choose a taxonomic Discipline Type from the drop-down menu. Specify uses this information to load the correct default data entry forms, trees and schema (tables and fields) based on the predefined disciplines within Specify.
The Name will display within Specify and can be any user specific variation of the discipline type. It can be edited, queried and used in reports.
Configure the Taxon Tree Taxon Tree
This table will create the tree definition for the taxon tree. The taxon tree operates at the discipline level and can be used by all collections within the discipline you created in the last window. Nodes to the taxon tree can be added later in the Wizard as well as from within Specify.
• The Level column displays the available levels. This name can be edited from within Specify. Click the Include box to place the level in the tree. • Include places the level in the tree definition. Levels that are not included
can not be Enforced or added to the full name.
• Is Required is not editable, but an indication of the tree levels that are used by Specify as a system requirement. These are automatically added to the tree and can not be deleted on this screen or later.
• Is Enforced ensures that the level can not be skipped when adding nodes lower down the tree.
• Is in Full Name includes the level when building a full name expression for any associated Collection Objects (which appears in the Taxon Full Name field of the taxon table). The full name is also displayed in the Preferred Taxon field on the determinations form and is useful when running queries and reports when the full name is desired. The full name generally includes at least the binomial genus and species fields together with any levels below species (if used) . Create the full name by checking the desired boxes.
At least one level for Full Name must be checked before the Next button will become enabled.
• Separator refers to the character that separates the levels when displaying the full name. This can be any single character, such as a comma (,) or a space. To make the separator a space simply double click inside the column and delete the comma, then press your spacebar one time.
• Full Name Order will reverse the full name as shown in the Full Name
Example.
Preload Taxon Records/Nodes
Pre-Load Taxon Authority File
The Wizard not only defines the taxon tree but also allows loading of an authority file for the discipline you are creating. Authority files were created using data from the Catalog of Life Project for some of the disciplines within Specify. If this window does not appear, there are no existing authority files for your chosen discipline.
If you choose to load the data into your tree the Taxon tree will be populated with hundreds of taxon nodes and all associated data. Then, when adding Collection Objects into your database you can simply choose a taxa from the Taxon field rather than adding each individually as needed.
Please note that loading the Taxon tree will also affect the tree definition. If you load the provided Taxon authority file for your discipline the accompanying tree definition may include Levels that were not defined by you in the previous window, but are necessary to include all the predefined Taxon information.
Additional discipline-specific trees can be loaded from within Specify at the time new disciplines are created.
Click the Choose button for a list of taxon files for the discipline you are creating. Not all disciplines offer more than one taxon file. Once the taxon file is chosen, information will display in the Source, Coverage and Description fields for that file.
Note: Botany and Entomology authority files are partial due to the size of these files. Contact the Specify team at [email protected] for additional authority files.
The Downloadable File section in this window allows you to choose taxon files from your hard drive. The Setup Wizard can only install files that were downloaded from the Specify website. The Specify team is currently in the process of creating more of these files.
Configure and Load Geography Tree Geography
The Geography tree operates at the Discipline level and is used by all Collections within the Discipline. Nodes to the Geography tree can be added later in the Wizard as well as from within Specify
• The Level column displays the available levels. This name can be edited from within Specify. Click the Include box to place the level in the tree.
• Include places the Level in the tree definition. Levels that are not included can not be Enforced or added to the Full Name.
• Is Required is not editable, but an indication of the tree levels that are used by Specify as a system requirement. These are automatically added to the tree and can not be deleted on this screen or later.
• Is Enforced ensures that the level can not be skipped when adding nodes lower down the tree.
• Is in Full Name includes the level when building a full name expression, which can be queried and used in reports. Create the full name by checking the desired boxes.
At least one level for Full Name must be checked before the Next button will become enabled.
• Separator refers to the character that separates the levels when displaying the full name. This can be any single character, such as a comma (,) or a space. To make the separator a space simply double click inside the column and delete the comma, then press your spacebar one time.
• Full Name Order will reverse the full name as shown in the Full Name
Example.
The Wizard will automatically load data for the Geography tree, including Continents, Countries, and States throughout the world as well as Counties within the United States. Data for the Geography tree was converted from the online website of the World Gazetteer. Unwanted or unneccessary nodes can be deleted later from within the Tree tool.
Create a Collection
Collection
Enter the Name and internationally recognized Collection Code to create a single Collection within the Discipline. This is the name that will appear within Specify on the Collection form and can be queried and used in reports.
The Code should be your standard collections community assigned code for your collection. This Code will be used in data exports and web interfaces in upcoming releases of Specify.
Create a Catalog Number Format Catalog Number Format
Specify is able to accept data for collection objects or observations without assigning a Catalog Number. But when Catalog Numbers are used, they must be unique for each lot, specimen or observation. Many collections routinely assign catalog numbers to incoming specimens, perhaps as part of the accessioning process. These numbers may require a format with specific sections for data such as Institution Code and year or they may simply use an incrementing number. Catalog Numbers can either be unique to each Collection, shared by several collections or be used throughout the Institution. The Catalog Number chosen at this time will not affect where it is used relative to other collections, this will be configured from within the Specify application. The Catalog Number format for this collection can not be edited once it is chosen.
Several formats are also available within this drop-down menu list: • Format offers several choices in the drop-down menu list:
None is the default setting, which is a 60 character string field. Create allows you to create your own format. Choosing Create
will open the Field Formatting Editor. ClickHEREfor the Field Formatting Editor help page.
CatalogNumber (2009-######) The year will appear automatically in the first section (2009) of the format, and can also be manually edited inside Specify. The '###' section of the format is a number that is six digits in length. This section can be automatically incremented when Auto Numbering is turned on in Specify or manually entered when Auto Numbering is turned off. These two sections are separated by a dash.
CatalogNumberAlphaNumByYear (2009-######) The year will
appear automatically in the first section (2009) of the format, and can also be manually edited from within Specify. The '###' section of the format is a number that is six digits in length. This section can be automatically incremented when Auto Numbering is turned on in Specify or manually entered when Auto Numbering is turned off. These two sections are separated by a dash.
CatalogNumberNumeric (#########) This is a nine digit
number that is automatically incremented when Auto Numbering is turned on in Specify or manually entered when Auto Numbering is turned off.
CatalogNumberString (XXXXXXXXXX) This is a ten digit
string that can include numbers, alphabet or characters • Is Numeric will display a 'yes' if the format is numeric.
• Pattern displays the pattern used to create each format (these are explained in further detail above).
• Is Auto Incremented displays a 'yes' if the format is automatically incremented.
Collections that do not use one specific format for their Catalog Number may wish to choose CatalogNumberString from the list, this will allow any format to be entered as long as they are all of the chosen character length.
Note: Auto incrementing will not work with the Catalog Number format.
Create an Accession Number Format
Accession Numbers
Note: If you chose to manage your Accessions globally your accession number format will already be the same for each division and this screen will be inactive. If this is the case, simply click on the Next button to proceed in the Wizard.
Accession Numbers may require a format or may simply use a number. Choose None to leave the Accession Number as a text field on the Accession form. Accession Number formats are not editable once data has been entered in the database.
• Format offers several choices in the drop-down menu list:
None is the default setting, which is a 60 character string field. Create allows you to create your own format. Choosing Create
will open the Field Formatting Editor. ClickHEREfor the Field Formatting Editor help page.
Accession Number (2009-AA-###) The year will appear
automatically in the first section (2009) of the format, and can also be manually edited. The 'AA' section of the format is alphanumeric and accepts both characters a through z and numbers. The ### section of the format is a number that is automatically incremented when Auto Numbering is turned on in Specify and manually
entered when Auto Numbering is turned off. This format offers two alphanumeric characters and three incremented numbers.
AccessionNumberByYear (2009-AA-AAA) The year will appear
automatically in the first section (2009) of the format, and can also be manually edited. The 'A' sections of the format are
alphanumeric and accept both characters a through z and numbers. This format offers two alphanumeric sections, the first is two characters in length and the second is three characters in length.
AccessionStringFormatter (AAAAAA) This is a single
alphanumeric format that accepts characters a through z and numbers. The Accession number would be seven characters in length.
• Pattern displays the pattern used to create each format (these are explained in further detail above).
• Is Auto Incremented displays a 'yes' if the format is automatically incremented.
Summary Window Summary
Congratulations! You have finished the Specify Setup Wizard. This last screen displays all the data that has been created using the information provided in the preceding windows. If edits are required simply click the Back button until the desired window displays and re-enter the information.
Add/Edit Disciplines
New Divisions, Disciplines and Collections are added using the Configuration tool;Configuration at System > System Setup > Configuration.
Click the Division button on the side bar. The Divison form includes a Discipline subform for adding or editing a discipline.
Edit the discipline information on the division subform: • Data Type
• Specify uses the Type information to load the correct default data entry Forms, Trees and schema (tables and fields) within Specify.
• The Name will display within Specify and can be anything you wish. It can be queried and used in reports.
The Division form includes information for each of the existing Divisions. The new Discipline will be added in the Division that is currently displayed in the work space. Use the navigation control at the very bottom of the window to step to the Division that will include the new Discipline.
Navigation Control
In the Discipline sub form click the (add) button to add a Discipline.
It is important to note that Specify will require users to shut down and reopen the application after adding a Discipline.
A Discipline Wizard will walk you through adding not only a Discipline, but a Collection within the Discipline as well as Taxon and Geography Tree Definitions and nodes (names of Taxa and Geographical locations) and Catalog and Accession number. Each of these windows is explained below.
Choose a Discipline Type
Discipline
Choose a taxonomic Discipline Type from the drop-down menu. Specify uses this information to load the correct default data entry forms, trees and schema (tables and fields) based on the predefined disciplines within Specify.
The Name will display within Specify and can be any user specific variation of the discipline type. It can be edited, queried and used in reports.
Configure the Taxon Tree Taxon Tree
This table will create the tree definition for the taxon tree. The taxon tree operates at the discipline level and can be used by all collections within the discipline you created in the last window. Nodes to the taxon tree can be added later in the Wizard as well as from within Specify.
• The Level column displays the available levels. This name can be edited from within Specify. Click the Include box to place the level in the tree. • Include places the level in the tree definition. Levels that are not included
can not be Enforced or added to the full name.
• Is Required is not editable, but an indication of the tree levels that are used by Specify as a system requirement. These are automatically added to the tree and can not be deleted on this screen or later.
• Is Enforced ensures that the level can not be skipped when adding nodes lower down the tree.
• Is in Full Name includes the level when building a full name expression for any associated Collection Objects (which appears in the Taxon Full Name field of the taxon table). The full name is also displayed in the Preferred Taxon field on the determinations form and is useful when running queries and reports when the full name is desired. The full name generally includes at least the binomial genus and species fields together with any levels below species (if used) . Create the full name by checking the desired boxes.
At least one level for Full Name must be checked before the Next button will become enabled.
• Separator refers to the character that separates the levels when displaying the full name. This can be any single character, such as a comma (,) or a space. To make the separator a space simply double click inside the column and delete the comma, then press your spacebar one time.
• Full Name Order will reverse the full name as shown in the Full Name
Example.
Preload Taxon Records/Nodes
Pre-Load Taxon Authority File
The Wizard not only defines the taxon tree but also allows loading of an authority file for the discipline you are creating. Authority files were created using data from the Catalog of Life Project for some of the disciplines within Specify. If this window does not appear, there are no existing authority files for your chosen discipline.
If you choose to load the data into your tree the Taxon tree will be populated with hundreds of taxon nodes and all associated data. Then, when adding Collection Objects into your database you can simply choose a taxa from the Taxon field rather than adding each individually as needed.
Please note that loading the Taxon tree will also affect the tree definition. If you load the provided Taxon authority file for your discipline the accompanying tree definition may include Levels that were not defined by you in the previous window, but are necessary to include all the predefined Taxon information.
Additional discipline-specific trees can be loaded from within Specify at the time new disciplines are created.
Click the Choose button for a list of taxon files for the discipline you are creating. Not all disciplines offer more than one taxon file. Once the taxon file is chosen, information will display in the Source, Coverage and Description fields for that file.
Note: Botany and Entomology authority files are partial due to the size of these files. Contact the Specify team at [email protected] for additional authority files.
The Downloadable File section in this window allows you to choose taxon files from your hard drive. The Setup Wizard can only install files that were downloaded from the Specify website. The Specify team is currently in the process of creating more of these files.
Configure and Load Geography Tree Geography
The Geography tree operates at the Discipline level and is used by all Collections within the Discipline. Nodes to the Geography tree can be added later in the Wizard as well as from within Specify
• The Level column displays the available levels. This name can be edited from within Specify. Click the Include box to place the level in the tree.
• Include places the Level in the tree definition. Levels that are not included can not be Enforced or added to the Full Name.
• Is Required is not editable, but an indication of the tree levels that are used by Specify as a system requirement. These are automatically added to the tree and can not be deleted on this screen or later.
• Is Enforced ensures that the level can not be skipped when adding nodes lower down the tree.
• Is in Full Name includes the level when building a full name expression, which can be queried and used in reports. Create the full name by checking the desired boxes.
At least one level for Full Name must be checked before the Next button will become enabled.
• Separator refers to the character that separates the levels when displaying the full name. This can be any single character, such as a comma (,) or a space. To make the separator a space simply double click inside the column and delete the comma, then press your spacebar one time.
• Full Name Order will reverse the full name as shown in the Full Name
Example.
The Wizard will automatically load data for the Geography tree, including Continents, Countries, and States throughout the world as well as Counties within the United States. Data for the Geography tree was converted from the online website of the World Gazetteer. Unwanted or unneccessary nodes can be deleted later from within the Tree tool.
Create a Collection
Collection
Enter the Name and internationally recognized Collection Code to create a single Collection within the Discipline. This is the name that will appear within Specify on the Collection form and can be queried and used in reports.
The Code should be your standard collections community assigned code for your collection. This Code will be used in data exports and web interfaces in upcoming releases of Specify.
Create a Catalog Number Format Catalog Number Format
Specify is able to accept data for collection objects or observations without assigning a Catalog Number. But when Catalog Numbers are used, they must be unique for each lot, specimen or observation. Many collections routinely assign catalog numbers to incoming specimens, perhaps as part of the accessioning process. These numbers may require a format with specific sections for data such as Institution Code and year or they may simply use an incrementing number. Catalog Numbers can either be unique to each Collection, shared by several collections or be used throughout the Institution. The Catalog Number chosen at this time will not affect where it is used relative to other collections, this will be configured from within the Specify application. The Catalog Number format for this collection can not be edited once it is chosen.
Several formats are also available within this drop-down menu list: • Format offers several choices in the drop-down menu list:
None is the default setting, which is a 60 character string field. Create allows you to create your own format. Choosing Create
will open the Field Formatting Editor. ClickHEREfor the Field Formatting Editor help page.
CatalogNumber (2009-######) The year will appear automatically in the first section (2009) of the format, and can also be manually edited inside Specify. The '###' section of the format is a number that is six digits in length. This section can be automatically incremented when Auto Numbering is turned on in Specify or manually entered when Auto Numbering is turned off. These two sections are separated by a dash.
CatalogNumberAlphaNumByYear (2009-######) The year will
appear automatically in the first section (2009) of the format, and can also be manually edited from within Specify. The '###' section of the format is a number that is six digits in length. This section can be automatically incremented when Auto Numbering is turned on in Specify or manually entered when Auto Numbering is turned off. These two sections are separated by a dash.
CatalogNumberNumeric (#########) This is a nine digit
number that is automatically incremented when Auto Numbering is turned on in Specify or manually entered when Auto Numbering is turned off.
CatalogNumberString (XXXXXXXXXX) This is a ten digit
string that can include numbers, alphabet or characters • Is Numeric will display a 'yes' if the format is numeric.
• Pattern displays the pattern used to create each format (these are explained in further detail above).
• Is Auto Incremented displays a 'yes' if the format is automatically incremented.
Collections that do not use one specific format for their Catalog Number may wish to choose CatalogNumberString from the list, this will allow any format to be entered as long as they are all of the chosen character length.
Note: Auto incrementing will not work with the Catalog Number format.
Create an Accession Number Format
Accession Numbers
Note: If you chose to manage your Accessions globally your accession number format will already be the same for each division and this screen will be inactive. If this is the case, simply click on the Next button to proceed in the Wizard.
Accession Numbers may require a format or may simply use a number. Choose None to leave the Accession Number as a text field on the Accession form. Accession Number formats are not editable once data has been entered in the database.
• Format offers several choices in the drop-down menu list:
None is the default setting, which is a 60 character string field. Create allows you to create your own format. Choosing Create
will open the Field Formatting Editor. ClickHEREfor the Field Formatting Editor help page.
Accession Number (2009-AA-###) The year will appear
automatically in the first section (2009) of the format, and can also be manually edited. The 'AA' section of the format is alphanumeric and accepts both characters a through z and numbers. The ### section of the format is a number that is automatically incremented when Auto Numbering is turned on in Specify and manually
entered when Auto Numbering is turned off. This format offers two alphanumeric characters and three incremented numbers.
AccessionNumberByYear (2009-AA-AAA) The year will appear
automatically in the first section (2009) of the format, and can also be manually edited. The 'A' sections of the format are
alphanumeric and accept both characters a through z and numbers. This format offers two alphanumeric sections, the first is two characters in length and the second is three characters in length.
AccessionStringFormatter (AAAAAA) This is a single
alphanumeric format that accepts characters a through z and numbers. The Accession number would be seven characters in length.
• Pattern displays the pattern used to create each format (these are explained in further detail above).
• Is Auto Incremented displays a 'yes' if the format is automatically incremented.
Summary Window Summary
Congratulations! You have finished the Specify Setup Wizard. This last screen displays all the data that has been created using the information provided in the preceding windows. If edits are required simply click the Back button until the desired window displays and re-enter the information.
Add/Edit Collections
New Divisions, Disciplines and Collections are added using the Configuration tool;Configuration at System > System Setup > Configuration.
Click the Discipline button on the side bar to edit a Discipline or add a Collection.
The Discipline information will appear at the top of the form with a Collections sub form underneath. The new Collection will be added in the Discipline that is currently displayed in the Workspace. Use the navigation control at the bottom of the window to step to the desired Discipline before adding the new Collection.
Navigation Control Click the (add) button to add a Collection.
It is important to note that Specify will require users to shut down and reopen the application after adding a Collection.
A Collection Wizard will step you through the process of adding a collection as well as a Catalog Number format and Accession format (if applicable).
Create a Collection
Collection
Enter the Name and internationally recognized Collection Code to create a single Collection within the Discipline. This is the name that will appear within Specify on the Collection form and can be queried and used in reports.
The Code should be your standard collections community assigned code for your collection. This Code will be used in data exports and web interfaces in upcoming releases of Specify.
Create a Catalog Number Format Catalog Number Format
Specify is able to accept data for collection objects or observations without assigning a Catalog Number. But when Catalog Numbers are used, they must be unique for each lot, specimen or observation. Many collections routinely assign catalog numbers to incoming specimens, perhaps as part of the accessioning process. These numbers may require a format with specific sections for data such as Institution Code and year or they may simply use an incrementing number. Catalog Numbers can either be unique to each Collection, shared by several collections or be used throughout the Institution. The Catalog Number chosen at this time will not affect where it is used relative to other collections, this will be configured from within the Specify application. The Catalog Number format for this collection can not be edited once it is chosen.
Several formats are also available within this drop-down menu list:
• Format offers several choices in the drop-down menu list:
None is the default setting, which is a 60 character string field. Create allows you to create your own format. Choosing Create
will open the Field Formatting Editor. ClickHEREfor the Field Formatting Editor help page.
CatalogNumber (2009-######) The year will appear automatically in the first section (2009) of the format, and can also be manually edited inside Specify. The '###' section of the format is a number that is six digits in length. This section can be automatically incremented when Auto Numbering is turned on in Specify or manually entered when Auto Numbering is turned off. These two sections are separated by a dash.
CatalogNumberAlphaNumByYear (2009-######) The year will
appear automatically in the first section (2009) of the format, and can also be manually edited from within Specify. The '###' section of the format is a number that is six digits in length. This section can be automatically incremented when Auto Numbering is turned on in Specify or manually entered when Auto Numbering is turned off. These two sections are separated by a dash.
CatalogNumberNumeric (#########) This is a nine digit
number that is automatically incremented when Auto Numbering is turned on in Specify or manually entered when Auto Numbering is turned off.
CatalogNumberString (XXXXXXXXXX) This is a ten digit
string that can include numbers, alphabet or characters • Is Numeric will display a 'yes' if the format is numeric.
• Pattern displays the pattern used to create each format (these are explained in further detail above).
• Is Auto Incremented displays a 'yes' if the format is automatically incremented.
Collections that do not use one specific format for their Catalog Number may wish to choose CatalogNumberString from the list, this will allow any format to be entered as long as they are all of the chosen character length.
Note: Auto incrementing will not work with the Catalog Number format.
Create an Accession Number Format
Accession Numbers
Note: If you chose to manage your Accessions globally your accession number format will already be the same for each division and this screen will be inactive. If this is the case, simply click on the Next button to proceed in the Wizard.
Accession Numbers may require a format or may simply use a number. Choose None to leave the Accession Number as a text field on the Accession form. Accession Number formats are not editable once data has been entered in the database.
• Format offers several choices in the drop-down menu list:
None is the default setting, which is a 60 character string field. Create allows you to create your own format. Choosing Create
will open the Field Formatting Editor. ClickHEREfor the Field Formatting Editor help page.
Accession Number (2009-AA-###) The year will appear
automatically in the first section (2009) of the format, and can also be manually edited. The 'AA' section of the format is alphanumeric and accepts both characters a through z and numbers. The ### section of the format is a number that is automatically incremented when Auto Numbering is turned on in Specify and manually
entered when Auto Numbering is turned off. This format offers two alphanumeric characters and three incremented numbers.
AccessionNumberByYear (2009-AA-AAA) The year will appear
automatically in the first section (2009) of the format, and can also be manually edited. The 'A' sections of the format are
alphanumeric and accept both characters a through z and numbers. This format offers two alphanumeric sections, the first is two characters in length and the second is three characters in length.
AccessionStringFormatter (AAAAAA) This is a single
alphanumeric format that accepts characters a through z and numbers. The Accession number would be seven characters in length.
• Pattern displays the pattern used to create each format (these are explained in further detail above).
• Is Auto Incremented displays a 'yes' if the format is automatically incremented.
Summary Window
Summary
Congratulations! You have finished the Specify Setup Wizard. This last screen displays all the data that has been created using the information provided in the preceding windows. If edits are required simply click the Back button until the desired window displays and re-enter the information.
Edit Collections
Collections can be edited on the Collection form which will open by clicking the Collection button on the Configuration side bar.
• The Collection Name will be used on any Specify Collection lists as well as in the Institution Hierarchy.
• Add Collecting Event Automatically creates a new, unique Collecting Event record for each Collection Object. This is required for Collections that include a one-to-one relationship between their Collecting Event and Collection Object on their Collection Object form. When using the default Specify forms all Collections except those in an Ichthyology Discipline will need to check this box.
• ABCD Schema Fields is a sub form for adding this information to the Collection.
Field Formatting Editor
If you have chosen to Create a new Catalog Number or Accession Number format from either the Specify Setup Wizard or Configuration window in Specify you are now seeing the Field Formatting Editor.
Field Formatting Editor
Field Formatting Editor
A format allows a field to include sections for different data, such as static text, a date or an incremented number.
The table, field and field length information is located on the top left.
• Name is used within the application files. It should be text only and will not be displayed to the user anywhere else in the application.
• Title will be displayed in any application format lists that are presented to the user.
• Reset Counter Every Year will become enabled when a Numeric section that 'Is Incremented' is added to the format (this is explained in more detail in the following text). Checking this box will start a new count each year.
A format can be made up of one or many sections.
1. Begin creating a format by clicking the (add) button on the right side of the editor to add a section.
2. Next, choose the type of section to add.
Field Format Section Types
• Numeric may only be numbers and can be auto incremented by checking the 'Is Incrementer' box and using Auto Numbering when entering data. When auto numbering Specify will start incrementing from the highest number present for the section within the database. A numeric section can be set between 1 and 10 characters in length. To start a new count for each year, check the Restart counter every year box. It is important to remember that different field formats are implemented at different levels and that formats that include a section that 'Is Incremented' will include a numbering scheme that may be shared. For instance, an Accession number can be implemented at either an Institution or Division level. An Accession number implemented at a Division level configured with 'Is Incrementer' checked will increment in all collections and disciplines for that division. In other words, they share a numbering scheme.
Collection Numbers are implemented at a Collection level and increment automatically for single collections only. Users that wish to increment Collection Numbers between more than one collection should contact the Specify team at
[email protected] for help setting that paramater.
• Alphanumeric may use both alphabetic characters a through z and numbers. A length field will appear which allows the section to be set between 1 and 10 characters in length.
• Alpha may only be alphabetic characters a through z. A length field will appear which allows the section to be set between 1 and 10 characters in length.
• Separator refers to a character that separates the various sections. Separator choices include - . / ' ' _ and are one character in length.
• Year will automatically add the current year on a form, but can be edited.
• Any char(acter) allows any alphabetic characters a through z, any number or any other keyboard character. A length field will appear which allows the section to be set between 1 and 10 characters in length.
• Constant refers to any section that will remain constant and is not editable on a form. This type of section is useful when an institution code is part of a format. Type the characters for the constant in the text field labeled Text located under the Type box.
3. Once the section information is configured correctly add it to the format by clicking the button.
The section will appear in the window with the appropriate information in each of the columns.
• Type refers to the Type of section that was chosen from the pick list.
• Value shows the character used to represent the segment in the Sample at the bottom of the window.
• Size refers to the number of characters chosen for the section. This is not applicable to the Separator or Year section types.
• Is By Year refers only the Year section type.
• Is Incrementer refers only to the Numeric section type that is incremented. On the Wizard's Collection Number window, it will display in the Is Numeric section.