Norton Save and Restore User's Guide
The software described in this book is furnished under a license agreement and may be used only in accordance with the terms of the agreement.
Documentation version 7.0
Legal Notice
Copyright © 2007 Symantec Corporation. All rights reserved.
Federal acquisitions: Commercial Software - Government Users Subject to Standard License Terms and Conditions.
Symantec, the Symantec Logo, Norton, LiveUpdate, and Symantec pcAnywhere are trademarks or registered trademarks of Symantec Corporation or its affiliates in the U.S. and other countries. Other names may be trademarks of their respective owners. Microsoft, Windows, Windows NT, Windows Vista, MS-DOS, .NET, and the Windows logo are registered trademarks or trademarks of Microsoft Corporation in the United States and other countries. VeriSign® is a registered trademark of Verisign, Inc.
Gear Software is a registered trademark of GlobalSpec, Inc. Maxtor OneTouch is a trademark of Maxtor Corporation
The product described in this document is distributed under licenses restricting its use, copying, distribution, and decompilation/reverse engineering. No part of this document may be reproduced in any form by any means without prior written authorization of Symantec Corporation and its licensors, if any.
THE DOCUMENTATION IS PROVIDED "AS IS" AND ALL EXPRESS OR IMPLIED CONDITIONS, REPRESENTATIONS AND WARRANTIES, INCLUDING ANY IMPLIED WARRANTY OF MERCHANTABILITY, FITNESS FOR A PARTICULAR PURPOSE OR NON-INFRINGEMENT, ARE DISCLAIMED, EXCEPT TO THE EXTENT THAT SUCH DISCLAIMERS ARE HELD TO BE LEGALLY INVALID. SYMANTEC CORPORATION SHALL NOT BE LIABLE FOR INCIDENTAL OR CONSEQUENTIAL DAMAGES IN CONNECTION WITH THE FURNISHING PERFORMANCE, OR USE OF THIS DOCUMENTATION. THE INFORMATION CONTAINED IN THIS
DOCUMENTATION IS SUBJECT TO CHANGE WITHOUT NOTICE.
The Licensed Software and Documentation are deemed to be "commercial computer software" and "commercial computer software documentation" as defined in FAR Sections 12.212 and DFARS Section 227.7202.
Symantec Corporation 20330 Stevens Creek Blvd. Cupertino, CA 95014 USA http://www.symantec.com
Symantec Software License Agreement
1. License:
You may:
You may not:
2. Limited Warranty:
3. Disclaimer of Damages:
4. U.S. Government Restricted Rights:
5. Export Regulation:
6. General:
Chapter 1
Installing Norton™ Save and Restore
Preparing for installation ... 11
System requirements ... 11
Supported file systems and removable media ... 12
Unavailable features ... 13
Installing Norton Save and Restore ... 14
Completing the installation ... 15
Activating Norton Save and Restore later ... 16
Setting up your first backup ... 17
About ensuring the recovery of your computer ... 17
Testing Symantec Recovery Disk ... 17
If driver validation fails ... 18
Starting Norton Save and Restore ... 19
Configuring Norton Save and Restore default options ... 20
Selecting a default backup destination ... 22
Adjusting the effects of a backup on computer performance ... 23
Adjusting default tray icon settings ... 24
Managing file types ... 25
Logging Norton Save and Restore messages ... 27
Enabling email notifications for product (event) messages ... 28
Updating Norton Save and Restore ... 29
Uninstalling the product ... 30
Chapter 2
Introducing Norton™ Save and Restore
About Norton Save and Restore ... 31What's new in Norton Save and Restore ... 32
Key product components ... 33
How you use Norton Save and Restore ... 34
Where to find more information ... 35
Chapter 3
Best practices for backing up
Best practices for backing up ... 37About backups ... 37
Before you back up ... 38
During a backup ... 39
When the backup is complete ... 39
Additional tips about backups ... 40
Chapter 4
Backing up your data
About backing up dual-boot computers ... 44Choosing a backup type ... 44
Defining a drive-based backup ... 45
Running a One Time Backup ... 50
Files excluded from drive-based backups ... 52
About network credentials ... 52
Defining a file and folder backup ... 53
Folders excluded by default from file and folder backups ... 56
After defining your backup ... 56
Running an existing backup immediately ... 56
Verifying that a backup is successful ... 57
Enabling event-triggered backups ... 58
About selecting a backup destination ... 59
About setting a compression level for drive-based backups ... 61
Setting advanced options for drive-based backups ... 62
Editing advanced backup options ... 63
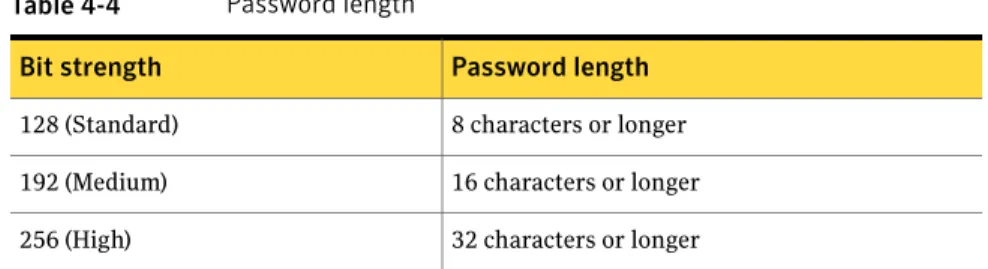
About recovery point encryption ... 63
Verifying a recovery point after creation ... 64
Viewing the progress of a backup ... 65
Adjusting the speed of a backup ... 65
Editing a backup schedule ... 66
Editing backup settings ... 66
Turning off a backup job ... 67
Adding users who can back up your computer ... 67
Stopping a backup or recovery task ... 67
Deleting backup jobs ... 68
Rescanning a computer’s hard disk ... 68
Using the Advanced page ... 69
Chapter 5
Monitoring the status of your backups
About monitoring backups ... 71Monitoring backup protection from the Home page ... 72
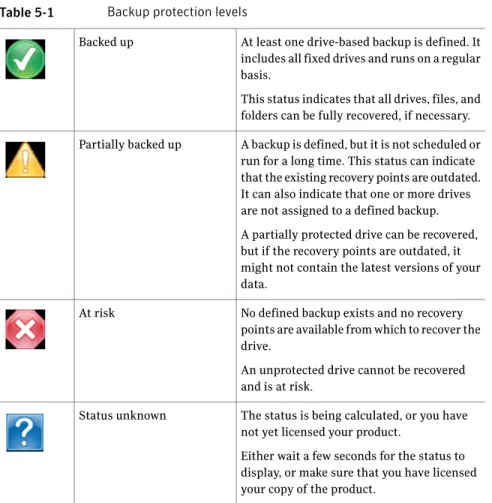
Monitoring backup protection from the Status page ... 73
Customize status reporting ... 76
Viewing drive details ... 77
Improving the protection level of a drive ... 78
Contents 6
Chapter 6
Exploring the contents of a recovery point
About exploring recovery points ... 81
Exploring a recovery point through Windows Explorer ... 82
Mounting a recovery point from Windows Explorer ... 83
Opening files within a recovery point ... 83
Using a search engine ... 84
Unmounting a recovery point drive ... 84
Viewing the drive properties of a recovery point ... 85
Chapter 7
Managing backup destinations
About backup destinations ... 87How backup data works ... 87
About drive-based backups ... 88
About file and folder backups ... 88
Managing recovery points ... 89
Cleaning up old recovery points ... 89
Deleting a recovery point set ... 90
Deleting recovery points within a set ... 90
Making copies of recovery points ... 91
Managing file and folder backup data ... 92
Viewing how much file and folder backup data is being stored ... 93
Limiting the number of file versions to keep ... 93
Manually deleting files from your file and folder backup ... 93
Finding versions of a file or folder ... 94
Automating management of backup data ... 94
Moving your backup destination ... 95
Chapter 8
Recovering files, folders, or entire drives
Responding to emergencies ... 97About recovering lost data ... 98
Recovering files and folders by using file and folder backup data ... 99
Recovering files and folders by using a recovery point ... 100
Opening files and folders stored in a recovery point ... 102
If you cannot find the files or folders you want ... 102
Recovering a secondary drive ... 103
Chapter 9
Recovering a computer
About recovering a computer ... 107Starting a computer by using the recovery environment ... 108
Configuring your computer to boot from a CD ... 109
7 Contents
Preparing to recover a computer ... 110
Scanning for viruses ... 110
Checking your hard disk for errors ... 112
Recovering a computer ... 112
Restoring multiple drives by using a system index file ... 116
Recovering files and folders from the recovery environment ... 117
Exploring your computer ... 119
Using the networking tools in the recovery environment ... 119
Starting networking services ... 119
Using the pcAnywhere thin host for a remote recovery ... 119
Mapping a network drive in the recovery environment ... 121
Configuring network connection settings ... 122
Viewing properties of recovery points and drives ... 123
Viewing properties of a recovery point ... 123
Viewing the properties of a drive within a recovery point ... 124
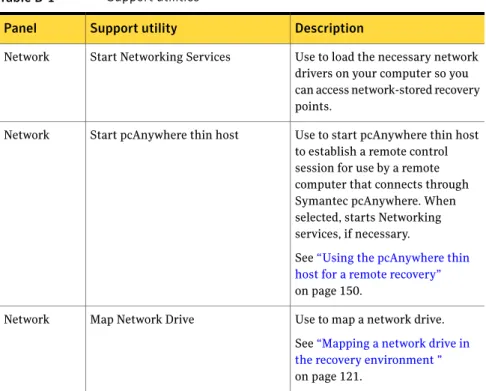
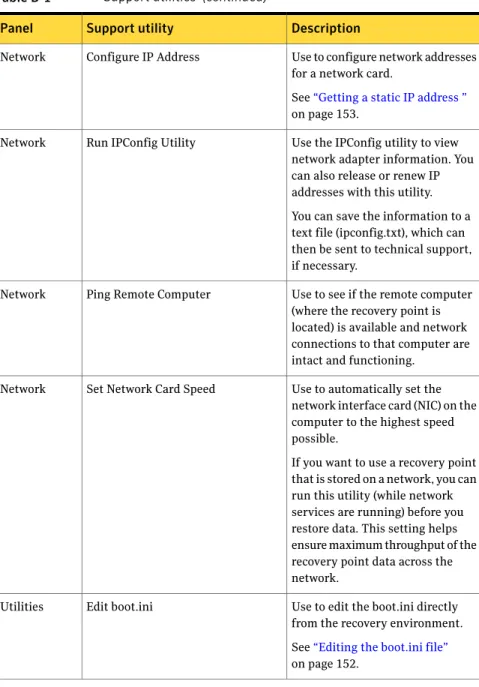
About the Support Utilities ... 125
Chapter 10
Copying a drive
About copying a drive ... 127Preparing to copy drives ... 128
Copying one hard drive to another hard drive ... 129
Drive-to-drive copying options ... 129
Appendix A
Using a search engine to search recovery points
About using a search engine to search recovery points ... 131Enabling search engine support ... 131
Recovering files using Google Desktop's Search Desktop feature ... 133
If a file cannot be found using Google Desktop ... 134
Appendix B
Troubleshooting Norton Save and Restore
About troubleshooting Norton Save and Restore ... 135Using event log information to troubleshoot problems ... 136
Troubleshooting installation ... 136
Locating required system information ... 136
Drive letter changes ... 137
About Microsoft .NET Framework ... 137
Troubleshooting recovery points ... 137
Burning recovery points to a CD or DVD ... 137
Support for CD/DVD burners ... 138
Support for DVD-ROM drives ... 138
About hiberfile.sys and pagefile.sys files ... 138
Contents 8
Troubleshooting scheduled backups ... 139
Recovery points are no longer being created ... 139
Define Backup wizard does not show the correct time settings ... 140
Checking the status of the agent ... 140
Testing the scheduling of your backups ... 140
Backup errors occur after you deleted a drive ... 141
Troubleshooting recovery from within Windows ... 141
About using a recovery point that is spanned across multiple CDs or DVDs ... 141
About recovering a system drive in Windows ... 141
When a drive cannot be found after a failed or cancelled recovery job ... 142
Troubleshooting the recovery environment ... 142
How Symantec Recovery Disk works ... 143
Using the support utilities ... 144
Starting a computer from the CD drive ... 147
You cannot access the local drive where your recovery points are saved ... 148
You cannot access or see the USB device where your recovery points are saved ... 149
A warning message indicates that Windows might not run correctly because of insufficient memory ... 149
Your recovery point is on CD, but you cannot use the drive because the Symantec Recovery Disk CD is running the recovery environment ... 149
Finding your network from the recovery environment ... 150
USB devices in the recovery environment ... 150
Using the pcAnywhere thin host for a remote recovery ... 150
Connecting remotely to the pcAnywhere Thin Host ... 151
Mapping a network drive in the recovery environment ... 152
Editing the boot.ini file ... 152
Getting a static IP address ... 153
Workgroups and restoring ... 154
Restoration of a recovery point in a workgroup environment ... 155
Restoration of a DHCP server ... 155
Setting the time zone and then exiting the recovery environment ... 155
Using a SAN ... 156
Using dual-ported fiber channel cards ... 156
Wireless devices ... 156
Viewing your IP address or other configuration information ... 156
9 Contents
Restoring after setting encryption on an NTFS volume ... 156
Using the recovery environment to perform multiple restorations to the same location ... 157
Troubleshooting drives on Windows ... 157
Troubleshooting error messages ... 157
Recovery Point Browser error messages ... 157
General error messages ... 158
General troubleshooting ... 163
How to create recovery points directly to tape ... 163
How to break up an existing recovery point file into a spanned file set ... 163
How to test the scheduling feature without actually creating a schedule ... 164
Norton Save and Restore agent and Windows Services ... 164
Viewing the status of an agent ... 165
Best practices for using services ... 165
Starting, stopping, or restarting the agent service ... 166
Setting up recovery actions when the agent fails to start ... 167
Viewing agent dependencies ... 168
Index
Contents 10Installing Norton™ Save and
Restore
This chapter includes the following topics:
■ Preparing for installation
■ Installing Norton Save and Restore ■ Setting up your first backup
■ About ensuring the recovery of your computer ■ Starting Norton Save and Restore
■ Configuring Norton Save and Restore default options ■ Updating Norton Save and Restore
■ Uninstalling the product
Preparing for installation
Before you install Norton Save and Restore, make sure that your computer meets the system requirements.
System requirements
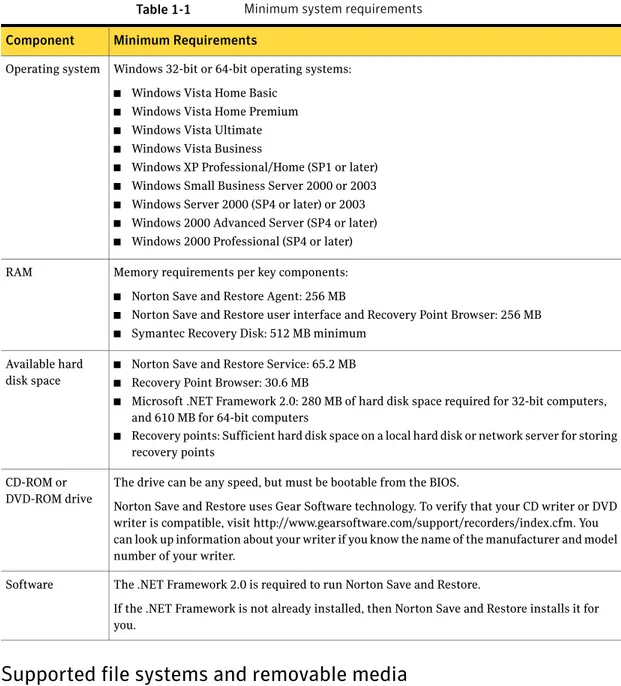
Table 1-1lists the system requirements for Norton Save and Restore.
1
Table 1-1 Minimum system requirements
Minimum Requirements Component
Windows 32-bit or 64-bit operating systems: ■ Windows Vista Home Basic
■ Windows Vista Home Premium ■ Windows Vista Ultimate ■ Windows Vista Business
■ Windows XP Professional/Home (SP1 or later) ■ Windows Small Business Server 2000 or 2003 ■ Windows Server 2000 (SP4 or later) or 2003 ■ Windows 2000 Advanced Server (SP4 or later) ■ Windows 2000 Professional (SP4 or later) Operating system
Memory requirements per key components: ■ Norton Save and Restore Agent: 256 MB
■ Norton Save and Restore user interface and Recovery Point Browser: 256 MB ■ Symantec Recovery Disk: 512 MB minimum
RAM
■ Norton Save and Restore Service: 65.2 MB ■ Recovery Point Browser: 30.6 MB
■ Microsoft .NET Framework 2.0: 280 MB of hard disk space required for 32-bit computers, and 610 MB for 64-bit computers
■ Recovery points: Sufficient hard disk space on a local hard disk or network server for storing recovery points
Available hard disk space
The drive can be any speed, but must be bootable from the BIOS.
Norton Save and Restore uses Gear Software technology. To verify that your CD writer or DVD writer is compatible, visit http://www.gearsoftware.com/support/recorders/index.cfm. You can look up information about your writer if you know the name of the manufacturer and model number of your writer.
CD-ROM or DVD-ROM drive
The .NET Framework 2.0 is required to run Norton Save and Restore.
If the .NET Framework is not already installed, then Norton Save and Restore installs it for you.
Software
Supported file systems and removable media
Norton Save and Restore supports the following file systems and removable media:
Installing Norton™ Save and Restore Preparing for installation 12
Norton Save and Restore supports FAT16, FAT16X, FAT32, FAT32X, NTFS, dynamic disks, Linux Ext2, Linux Ext3, and Linux swap partitions.
Note:You must decrypt encrypted NTFS drives before you attempt to restore them. You cannot view the files that are in a recovery point for an encrypted NTFS drive.
Supported file systems
You can save recovery points locally (that is, on the same computer where Norton Save and Restore is installed) or to most CD-R, CD-RW, DVD-R(W), and DVD+RW recorders. You can find an updated list of supported drives on the Symantec Web site.
Norton Save and Restore also lets you save recovery points to most USB devices, 1394 FireWire devices, REV, Jaz, Zip drives, and magneto-optical devices.
Removable media
Unavailable features
Norton Save and Restore is packaged to meet various markets. Some features might not be available, depending on the product you have purchased. However, all features are documented. You should be aware of which features are included with the version of the product you have purchased. If a feature is not accessible in the product user interface, it is likely not included with your version of the product.
Refer to the Symantec Web site for information about features included with your version of Norton Save and Restore.
When you delay licensing
If you choose to delay installation of the product license (for a maximum of 30 days from the date of installation), the following features are unavailable until you install a valid license:
■ Copy Drive
All other features are enabled during the 30 day grace period.
If you are using an Evaluation copy of the product, it also expires after 30 days. However, all features are enabled until the end of the evaluation period, at which time you must purchase the product or uninstall it. You can purchase a license at any time (even after the evaluation period expires) without reinstalling the software.
Note:If this product came pre-installed from a computer manufacturer, your trial period could be as long as 90 days. The product licensing or activation page during install will indicate the duration of your trial period.
See“Activating Norton Save and Restore later”on page 16.
13 Installing Norton™ Save and Restore
Installing Norton Save and Restore
Before you begin, you should review the requirements and scenarios for installing Norton Save and Restore.
See“System requirements”on page 11.
Note:During the installation process, you might be required to restart the computer. To ensure proper functionality after the computer restarts, log in again with the same user credentials.
The installation program scans your hardware for the required drivers. If the program does not find the required drivers on your system, you receive a driver validation message. If you receive this message, you should test the Symantec Recovery Disk to verify whether the drivers are required or if the devices on your system have compatible drivers that are available on the Symantec Recovery Disk. The driver validation process should not interfere with your ability to install the product.
For more information about Driver Validation, seeAbout ensuring the recovery of your computer.
Warning:The Symantec Recovery Disk (SRD) provides the tools that you need to recover your computer. It is included with your product either on a separate CD, or on your product CD, depending on the version of the product that you purchased. You should store the CD in a safe place.
To install Norton Save and Restore
1
Insert the Norton Save and Restore product CD into the media drive of the computer.The installation program should start automatically.
2
If the installation program does not start, on the Windows taskbar, click Start> Run, type the following command, then click OK.
<drive>:\autorun.exe
where <drive> is the drive letter of your media drive.
For Windows Vista, if the Run option is not visible, do the following:
■ Right-click the Start button, and click Properties.
■ On the Start Menu tab, click Customize.
■ Scroll down and check Run command.
Installing Norton™ Save and Restore Installing Norton Save and Restore 14
■ Click OK.
3
In the CD browser panel, click Install Norton Save and Restore.4
In the Welcome panel, click Next.5
Read the license agreement, and then click I accept the terms in the licenseagreement.
6
Click Next.7
If you want to change the default location for the Norton Save and Restore program files, click Change, locate the folder in which you want to install Norton Save and Restore, and then click OK.8
Click Next.9
Click Install.A progress screen shows the status of the installation.
10
If a driver that is used on your computer is not available on the Symantec Recovery Disk, you receive a notification message that includes the name of the driver. Write down the name of the driver file, and then click OK to dismiss the message.Drivers are critical in the event that you need to use the Symantec Recovery Disk to recover your system drive (the drive where your operating system is installed).
See“About ensuring the recovery of your computer”on page 17.
11
Click Finish to complete the installation.12
Remove the product CD from the media drive, and then click Yes to exit the installation wizard and restart the computer.You must restart your computer before you run Norton Save and Restore.
Completing the installation
After you install the product, you are prompted to license or activate your product. You can then run LiveUpdate to check for product updates, and then configure your first backup.
Note:If this product came pre-installed from a computer manufacturer, your trial period could be as long as 90 days. Refer to the Activate later label.
15 Installing Norton™ Save and Restore Installing Norton Save and Restore
To complete the installation
1
In the Welcome panel, click Next.If the product was installed by your computer manufacturer, the Welcome page might appear the first time that you run Norton Save and Restore.
2
Do one of the following:3
Click Next.4
Click Run LiveUpdate to check for any product updates since the product shipped.5
Click Launch Easy Setup to open the Easy Setup box when you complete the install process.6
Click Enable Google Desktop File and Folder Recovery if you want use Google Desktop to search your recovery points for the files and folders that you want to recover.If you select this option, Norton Save and Restore automatically catalogs each file as it creates a recovery point. Google Desktop can then use this catalog to search for files by name. It does not index the content of the files.
Note:This option is available only if Google Desktop already is installed on your computer. If you plan to install Google Desktop, you can enable search engine support later. See“About using a search engine to search recovery points”on page 131.
7
Click Finish.If you enabled Google Desktop File and Folder Recovery, click Yes when you are prompted to install the Google plug-in. If you click No, you cannot search the recovery points with Google Desktop.
Activating Norton Save and Restore later
If you do not activate or license Norton Save and Restore within 30 days of installing it, the software stops working. You can activate it after the 30 days have expired.
To activate Norton Save and Restore at any time after installation
1
On the Help menu, click Unlock Trial Product.2
Refer to step2in the To complete the installation procedure.Installing Norton™ Save and Restore Installing Norton Save and Restore 16
Setting up your first backup
Unless you unchecked the Run Easy Setup check box during installation, the Easy Setup box appears. If you don't run Easy Setup at install time, it appears the first time you open the Run or Manage Backups window.
When the Easy Setup box opens, you can either accept the default drive and file and folder backup settings, or you can click on any of the settings to modify them. If you want the new backup to run immediately, be sure to select Run backup
now, and then click OK.
About ensuring the recovery of your computer
If Windows fails to start or it does not run normally, you can recover your computer by using the Symantec Recovery Disk. The drivers that are included on the recovery disk must match the drivers required to run your computer's network cards and hard disks.
To help ensure that you have the drivers that you need to recover your computer, the installation process runs a driver validation test. The driver validation tool compares hardware drivers that are contained on the recovery disk with the drivers that are required to run your computer's network cards and hard disks. The installation process automatically runs the driver validation test, unless you cancel it. But you can run a validation test at anytime by running the Symantec Recovery Disk Wizard.
See“If driver validation fails”on page 18.
You should run the driver validation test any time you make changes to the NIC cards or storage controllers on a computer.
Note:Wireless network adapter drivers are not supported by the driver validation tool or by Symantec Recovery Disk.
Testing Symantec Recovery Disk
You should test Symantec Recovery Disk to ensure that the recovery environment runs properly on your computer.
17 Installing Norton™ Save and Restore
Note:Depending on which version of the product you have purchased, the SRD is either included on your product CD, or as a separate CD. You should place the CD containing the SRD in a safe place. Should you lose the CD, you can create a new one if you have have a CD burner.
You can use the testing to identify and solve the following types of problems:
■ You cannot boot into the recovery environment.
See“Starting a computer from the CD drive ”on page 147.
■ You do not have the necessary storage drivers to access recovery points on the computer.
See“You cannot access the local drive where your recovery points are saved ”on page 148.
■ You need information about your system to help you run the recovery environment.
See“Locating required system information ”on page 136. See“Troubleshooting the recovery environment ”on page 142.
To test Symantec Recovery Disk
1
Run the driver validation tool to test whether Symantec Recovery Disk works with the network cards and storage devices on the computer.2
Boot your computer using the Symantec Recovery Disk.See“Starting a computer by using the recovery environment ”on page 108.
3
When you have booted into the recovery environment, do one of the following:■ If you want to store recovery points on a network, run a mock restore of a recovery point that is stored on a network to test the network connection.
■ If you want to store recovery points on the computer, run a mock restore of a recovery point that is stored locally to test the local hard-drive connection.
If driver validation fails
The driver validation test verifies whether the drivers for all storage devices and network cards in use by the computer are available in the recovery environment. If the drivers are available on the recovery disk, you receive a validation message. If any drivers are missing from the recovery disk, the Driver Validation Results dialog appears.
Without access to the correct drivers, a device cannot be used while running the SRD. Therefore, if the recovery points required for recovering your computer are stored on a network or a local hard drive, you might not have access to them.
Installing Norton™ Save and Restore
About ensuring the recovery of your computer 18
You can find the drivers and copy them to a CD or a floppy disk, or you can create a custom Symantec Recovery Disk CD.
Note:You must have a writeable DVD/CD-RW drive to create a custom Symantec Recovery Disk.
To create a custom Symantec Recovery Disk
1
Start Norton Save and Restore.2
Attach and turn on all storage devices and network devices that you want to make available.3
Insert the Symantec Recovery Disk CD into your CD-ROM drive.4
From the main Norton Save and Restore window, click File > Create RecoveryDisk, and then click Next.
5
If prompted, click Browse, select the drive that contains the Symantec Recovery Disk CD, click OK, and then click Next.6
Do one of the following:■ Click Automatic (Recommended), and then click Next.
■ Click Custom, and then click Next.
Select this option only if you know which drivers to select.
7
Follow the on-screen instructions to complete the wizard.Starting Norton Save and Restore
Norton Save and Restore is installed in the Windows Program Files folder by default. During installation, a program icon is installed in the Windows system tray from which you can open Norton Save and Restore. You can also open Norton Save and Restore from the Windows Start menu.
To use the full version of Norton Save and Restore, you must activate the software. See“Activating Norton Save and Restore later”on page 16.
To start Norton Save and Restore
◆ Do one of the following:
■ On the classic Windows taskbar, click Start > Programs > Symantec >
Norton Save and Restore.
■ On the Windows 2003 taskbar, click Start > All Programs > Symantec >
Norton Save and Restore.
19 Installing Norton™ Save and Restore
■ On the Windows XP or Windows Vista taskbar, click Start > All Programs
> Symantec > Norton Save and Restore.
■ In the Windows system tray, double-click the Norton Save and Restore tray icon.
■ In the Windows system tray, right-click the Norton Save and Restore tray icon, and then click Open Norton Save and Restore.
To start Norton Save and Restore
◆ Do one of the following:
■ On the classic Windows taskbar, click Start > Programs > Norton Save
and Restore.
■ On the Windows 2003 taskbar, click Start > All Programs > Norton Save
and Restore.
■ On the Windows XP or Windows Vista taskbar, click Start > All Programs
> Norton Save and Restore.
■ In the Windows system tray, double-click the Norton Save and Restore tray icon.
Configuring Norton Save and Restore default options
The Options dialog box includes five tabs that let you configure the following default settings:
Description Tab
Specify a default location where a backup will create and store recovery points and file and folder backup data. If the location you choose is on a network, you can enter your user authentication information.
See“Selecting a default backup destination ”on page 22. General
Installing Norton™ Save and Restore
Configuring Norton Save and Restore default options 20
Description Tab
Lets you specify a default speed for backup or recovery processes. Moving the slider closer to Fast increases the speed at which the program backs up or recovers your computer. However, choosing a slower speed could improve the performance of your computer, especially if you are working on your computer during a backup or recovery.
You can also configure network throttling to limit the effects of backups on network performance.
Note:During a backup or recovery, you have the option to override this default setting to fit your needs at the time. See“Adjusting the effects of a backup on computer performance”on page 23.
See“Enabling network throttling ”on page 23. Performance
You can turn the system tray icon on or off and specify whether to show only error messages when they occur, or to show both error messages and other information, such as the completion of a backup.
See“Adjusting default tray icon settings ”on page 24. Tray Icon
Lets you manage file types and file type categories, which are used as a method for selecting the types of files you want included in a file and folder backup.
See“Managing file types ”on page 25. File Types
If Google Desktop is installed on your computer when you install Norton Save and Restore, you have the option of enabling Google Desktop file and folder recovery. When you enable this feature, you can search for files (by file name) inside a recovery point that was created with search engine support enabled.
If Google Desktop is not installed on your computer when you install Norton Save and Restore, you have the option of clicking a link to the Web site where you can download and install Google Desktop for free.
See“About using a search engine to search recovery points” on page 131.
Google Desktop
21 Installing Norton™ Save and Restore Configuring Norton Save and Restore default options
Description Tab
Lets you specify the types of product messages to log (errors, warnings, and information), where to store the log file, and set a maximum file size for the log file.
See“Logging Norton Save and Restore messages”on page 27. Log File
Lets you specify the types of product messages to log (errors, warnings, and information) in the Windows event log. See“Logging Norton Save and Restore messages”on page 27. Event Log
To configure default options
1
Start Norton Save and Restore and click Tasks > Options.2
Select an option you want to modify, make any necessary changes, and then click OK.Selecting a default backup destination
You can specify the default destination for storing recovery points and file and folder backup data created when you run a backup. This default location is used if you do not specify a different location when you define a new backup.
To set a default backup destination
1
On the menu bar, click Tasks > Options.2
Click General.3
Check Append computer name to backup data files.This is especially useful if you back up more than one computer to the same drive. For example, you might back up a laptop and a desktop computer to the same USB or network drive. By appending the computer name, you can more easily identify where the backup data is for each computer.
4
Enter a path to a folder where you want to store recovery points and file and folder backup data, or click Browse to look for a location.Note:You cannot use an encrypted folder as your backup destination. If you want to encrypt your backup data to prevent another user from accessing it, refer to the Advanced options when you define or edit a backup.
Installing Norton™ Save and Restore
Configuring Norton Save and Restore default options 22
5
If you entered the path to a location on a network, enter the user name and password required to authenticate to the network.6
Click OK.Adjusting the effects of a backup on computer performance
If you are working on your computer when a backup is running—especially one that is creating an independent recovery point—your computer might slow down. This is because Norton Save and Restore is using your computer's hard disk and memory resources to perform the backup.
However, you can actually modify the speed of the backup as a way of minimizing the impact of Norton Save and Restore on your computer while you work.
To adjust the default effect of a backup on my computer's performance
1
On the main menu bar, click Tasks > Options.2
Click Performance.3
If you want to improve your computer's speed performance, move the slider bar closer to Slow.4
If you want the backup to complete more quickly, move the slider bar closer to Fast.5
Click OK.Note:During a backup or recovery, you'll have the option of overriding this default setting to fit your needs at that moment.
See“Adjusting the speed of a backup ”on page 65.
Enabling network throttling
Similar to computer performance adjustments, you can also limit the impact of a backup on network performance.
However, because network performance is affected by many variables, you should consider the following issues before enabling this feature:
■ Network cards: Is your network wired or wireless? What are the speeds of your network cards?
■ Network backbone: What is the size of your network pipeline? Does it support 10 MB transfer rates, or 1 GB transfer rates?
■ Network server: How robust is your server hardware? How fast is its' processor? How much RAM does it have? Is it fast or slow?
23 Installing Norton™ Save and Restore Configuring Norton Save and Restore default options
■ Backing up: How many computers are scheduled to back up at the same time?
■ Network traffic: Are backups scheduled to run when network traffic is heavy or light?
Consider using this feature only when you know what your network can handle. If you schedule your backups at staggered intervals, and if you schedule them when network traffic is low, you will likley not need to use this feature. Gather the required information about your network's performance and then schedule backups accordingly. Then, if necessary, enable this feature and set the Maximum network throughput to a setting that matches the circumstances.
To enable network throttling
1
On the main menu bar, click Tasks > Options.2
Click Performance.3
Check Enable network throttling.4
In the Maximum network throttling field, enter the maximum amount (in KB) of network throughput that Norton Save and Restore can send per second.5
Click OK.Adjusting default tray icon settings
You can turn the system tray icon on or off and specify whether to show only error messages when they occur, or to show both error messages and other information, such as the completion of a backup.
Installing Norton™ Save and Restore
Configuring Norton Save and Restore default options 24
To adjust default tray icon settings
1
On the main menu bar, click Tasks > Options.2
Click Tray Icon and select one of the following:Displays the Norton Save and Restore icon in the system tray.
You must select this option to enable or disable any of the remaining options. Show system tray icon
Notifies you when a backup was scheduled but did not run.
This can happen when your computer was turned off at the time a backup was scheduled to run.
Show missed backups
Offers helpful prompts in the form of questions that can help you keep your data backed up.
Show system tray questions
Displays messages about the status of backup operations, such as notifying that a backup has started, or that your backup destination is getting full.
Show status messages
Displays error messages when errors occur so that you can resolve any issues that might hinder data protection.
Show error messages
3
Click OK.Managing file types
When you define a file and folder backup, file types are a quick way to include files you use the most. For example, if you keep music files on your computer, you can configure a file and folder backup to include all music files (for example, .mp3, .wav).
The most common file types and extensions are already defined for you. But you can define additional file type categories as needed, and then edit them at any time. For example, if you install a new program that requires the use of two new file extensions (.pft and .ptp, for example), you can define a new file type and define the two file extensions for that category. Then when you define a file and folder backup, you can select the new category. When the backup is run, all files ending with .pft and .ptp are backed up.
25 Installing Norton™ Save and Restore Configuring Norton Save and Restore default options
To create a new file type and extensions
1
On the main menu bar, click Tasks > Options.2
Click File Types.3
Click the Add a file type (+) button to add a file type category.4
Type a descriptive name of the new file type category, and then press Enter.5
Select *.New Extension in the Extensions for column and click the Edit anextension (checkmark icon below the Extensions for column) button.
6
Type an asterisk (*) and a period, followed by the extension of the file type you want to define, and then press Enter.7
Click OK.To edit a file type and extensions
1
On the main menu bar, click Tasks > Options.2
Click File Types.3
Select a file type from the File types list, and then do one of the following:■ Click the Edit a file type (checkmark icon below the Extensions for column) button to edit the name of the selected file type.
■ Select an extension in the Extensions for column and click the Edit an
extension (checkmark icon below the Extensions for column) button to
edit the name of the extension.
■ Click either the Restore default file types list or the Restore default
extension list button to restore all default file types or extensions.
Caution:Any file types and extensions you have set up are removed. Once removed, you will have to add them again manually.
4
Click OK.To delete a file type (and all of its extensions)
1
On the main menu bar, click Tasks > Options.2
Select a file type in the File types column.You cannot delete a default file type. You can delete all but one extension of a default file type, and you can add additional extensions to a default file type.
3
Click the Remove a file type (-) button , and then click OK.Use this same procedure to remove file extensions from the Extensions list.
Installing Norton™ Save and Restore
Configuring Norton Save and Restore default options 26
Logging Norton Save and Restore messages
You can specify which product messages (errors, warnings, and information) are logged as they occur, and where the log file is stored. Product messages can provide useful information about the status of backups or related events, and can also provide helpful information when you are troubleshooting.
Two logging methods are available: Norton Save and Restore logging, and the Windows application log.
From the Options page, you can configure both methods.
To configure a Norton Save and Restore log file
1
On the main menu bar, click Tasks > Options.2
Under Notifications, click Log File.3
Click the Select the priority and type of messages drop-down list and select the priority level at which a message should be logged.Send all messages, regardless of priority levels.
All messages
Send only medium and high priority messages.
Medium and high priority messages
Send only high priority messages. High priority messages only
Do not send any messages, regardless of priority levels.
No messages
4
Select one or more of the following options:■ Errors
■ Warnings
■ Information
5
In the Log file location field, enter a path to where the log file should be created and stored.If you don't know the path, click Browse and select a location.
6
In the Maximum file size field, specify a maximum size (in kilobytes) that the log file is allowed to grow.The file is kept within the limit you set by replacing the oldest logged items in the file with new items as they occur.
7
Click OK.27 Installing Norton™ Save and Restore Configuring Norton Save and Restore default options
To configure which product events are written to a Windows event log
1
On the main menu bar, click Tasks > Options.2
Under Notifications, click Event Log.3
Click the Select the priority and type of messages drop-down list and select the priority level at which a message should be logged.Send all messages, regardless of priority levels.
All messages
Send only medium and high priority messages.
Medium and high priority messages
Send only high priority messages. High priority messages only
Do not send any messages, regardless of priority levels.
No messages
4
Select one or more of the following options:■ Errors
■ Warnings
■ Information
5
Click OK.Enabling email notifications for product (event) messages
Email notifications can be sent to a specified email address if there are any errors or warnings that occurred when a backup is run.
Note:If you do not have an SMTP server, this feature is unavailable to you.
Notifications can also be sent to the system event log and a custom log file located in the Agent folder of the product installation.
If notifications are not being delivered, check the setup of your SMTP server to ensure that it is functioning properly.
To enable email notifications
1
On the main menu bar, click Tasks > Options.2
Under Notifications, click SMTP E-mail.Installing Norton™ Save and Restore
Configuring Norton Save and Restore default options 28
3
Click the Select the priority and type of messages drop-down list and select the priority level at which an email should be sent.Send all messages, regardless of priority levels.
All messages
Send only medium and high priority messages.
Medium and high priority messages
Send only high priority messages. High priority messages only
Do not send any messages, regardless of priority levels.
No messages
4
Select one or more of the following options:■ Errors
■ Warnings
■ Information
5
In the To address text box, type the email address (for example, [email protected]) where notifications are to be sent.6
If desired, type the email address of the sender in the From address text field. If you do not specify a From address, the name of the product will be used.7
In the SMTP server text box, type the path to the SMTP server that will send the email notification (for example, smtpserver.domain.com).8
From the SMTP Authentication drop-down box, select the method to use to authenticate to the SMTP server specified above.9
Enter your SMTP username and password.If you are not sure what your username and password are, contact a system administrator.
10
Click OK.Updating Norton Save and Restore
You can receive software updates that are associated with your version of the product over your Internet connection. When you run LiveUpdate, you connect to the Symantec LiveUpdate server and select the product updates that you want to install.
29 Installing Norton™ Save and Restore Updating Norton Save and Restore
You run LiveUpdate as soon as you install the product. You should continue to run LiveUpdate periodically to obtain program updates.
To update Norton Save and Restore
1
On the Help menu, click LiveUpdate.2
In the LiveUpdate window, click Start to select the updates. Follow the on-screen instructions.3
When the installation is complete, click Close.Some program updates might require that you restart your computer before the changes take effect.
Uninstalling the product
If you want to remove Norton Save and Restore from your computer, you can do so from the Windows Control Panel.
To uninstall Norton Save and Restore
1
Do one of the following:■ On the Windows XP/2000 taskbar, click Start > Settings > Control Panel
> Add or Remove Programs.
■ On the Windows Vista taskbar, click Start > Control Panel > Programs
and Features > Uninstall or Change a Program.
2
Select Norton Save and Restore, and then click Remove (Uninstall on Windows Vista).You can choose to keep your current backup files, history files, and command files on your computer for future installations of the Norton Save and Restore product, rather than uninstalling them.
3
In the confirmation window, click Yes.You must restart your computer for the changes to take effect.
Installing Norton™ Save and Restore Uninstalling the product
Introducing Norton™ Save
and Restore
This chapter includes the following topics:
■ About Norton Save and Restore ■ What's new in Norton Save and Restore ■ Key product components
■ How you use Norton Save and Restore ■ Where to find more information
About Norton Save and Restore
Norton Save and Restore provides advanced backup and recovery for your computer. Protect your documents, financial records, presentations, photos, music, videos, historical documents, or any other kinds of data you keep on your computer by making a backup of your computer's entire hard disk. Or, limit your backup to include only those files and folders that mean the most to you. You can schedule backups to capture your changes automatically as you work from day to day. Or start a backup manually at any time. You can also easily configure Norton Save and Restore to run a backup in response to specific events. For example, a backup can be started when a particular application is started, or when a specified amount of new data has been added to the drive.
When you experience a problem with your computer, you can restore a file, folder, or an entire drive, to return your computer to a previous, working state with the operating system, applications, and data files intact. Or if you accidently delete a personal file, get it back with a few simple steps.
2
Using easy-to-follow wizards, set up fast and reliable backups that run while you continue to work. Or schedule your backups to run after hours when you are no longer using your computer.
What's new in Norton Save and Restore
Norton Save and Restore includes many enhancements and new features. Refer to the following table for information about the latest features and enhancements:
Note:Not all features listed are available in all versions of this product.
Description Feature
An improved user interface simplifies what you need to know and do to successfully back up or recover files, folders, or your entire computer. And for Norton Save and Restore experts, the Advanced page gives you a single view to most product features. Enhanced ease-of-use
Norton Save and Restore has been designed and tested to run in the new Windows Vista operating system, and still supports previous versions of Windows. SeeTable 1-1 on page 12..
Windows Vista support
Now setting up your first backup is even easier with the enhanced Easy Setup, which appears either during install (unless you choose to skip it), or automatically the first time you run Norton Save and Restore. Specify a few preferences, and Norton Save and Restore can start backing up your computer on a regular basis.
Improved Easy Setup
Limit your backup to include a select set of files or folders. File and folder backups are especially useful if your backup storage space is limited and you make frequent changes to important documents that you want to back up.
File and folder backup
Need to back up you data quickly? The new One Time Backup feature lets you define and run a backup at any time without saving the backup job for later use.
One Time backups
You can now easily edit your existing backup schedules without having to click through multiple dialogs or complete the entire backup wizard again.
Simplified schedule editor
Because recovery points and file and folder backup data require storage space, Norton Save and Restore gives you the freedom of where and how to handle the amount of disk space used for storing backup data. Norton Save and Restore offers simple tools for managing your backup data, and can even manage it for you automatically. Manage backup data
The home page offers the backup protection status in a single view. But you can also use the new Backups Calendar to view past and upcoming scheduled backups to see how protected your data really is.
Improved backup and recovery status
Introducing Norton™ Save and Restore What's new in Norton Save and Restore 32
Description Feature
Norton Save and Restore automatically detects when a new storage device is connected to your computer, and can prompt you to change your default backup destination to the new drive.
Automatic backup destination detection
Enhanced browsing of files and folders inside recovery points makes recovery quick and easy; the new file and folder backup feature also lets you quickly search for and recover files or folders.
Browse lost or damaged files and folders
In addition to scheduled and manual backups, Norton Save and Restore can detect certain events and run a backup automatically whenever they occur, providing an added level of protection for your computer.
Event-triggered backups
Manually adjust the effect of a running backup on the performance of your computer to better match your needs at the moment. This feature is especially useful if you are working on your computer and don't want the backup process to slow you down. And if you know the demographics of your network traffic, you can now set network throttling to prevent network overload.
Performance throttling
If you have a Maxtor OneTouch™ external hard drive, you can back up your computer with the push of a button. No need to start Norton Save and Restore.
Maxtor OneTouch™ integration
When you cannot start Windows, the newly enhanced Symantec Recovery Disk (SRD) makes recovery easier than ever.
If the Symantec Recovery Disk is missing specific drivers, use the Create Recovery Disk feature to create a modified Symantec Recovery Disk that includes the exact drivers needed to successfully boot your computer into the recovery enironment.
Note:If you purchased Norton Save and Restore pre-installed on a new computer, some features in the recovery environment may or may not be included, depending on how the computer manufacturer chose to install it. The recovery environment has likely been pre-installed on a special partition on your computer.
Modifiable Symantec Recovery Disk
Key product components
Norton Save and Restore includes two key components: the program itself, and the Symantec Recovery Disk.
33 Introducing Norton™ Save and Restore
Table 2-1 Key product components
Description Key Component
The Norton Save and Restore program lets you define, schedule, and run backups of your computer. When you run a backup, recovery points of your computer are created, which you can then use to recover your entire computer, or individual drives, files, and folders. You can also manage recovery point storage (backup destination), and monitor the backup status of your computer to make sure your valuable data is backed up on a regular basis.
Norton Save and Restore program (user interface)
The Symantec Recovery Disk (SRD) is used to boot your computer into the recovery environment. If your computer's operating system fails, use the SRD to recover your system drive (the drive where your operating system is installed).
Note:Depending on which version of the product you have purchased, the SRD is either included on your product CD, or as a separate CD. You should place the CD containing the SRD in a safe place. Should you lose the CD, you can create a new one if you have have a CD burner.
See“About recovering a computer ”on page 107. Symantec Recovery Disk
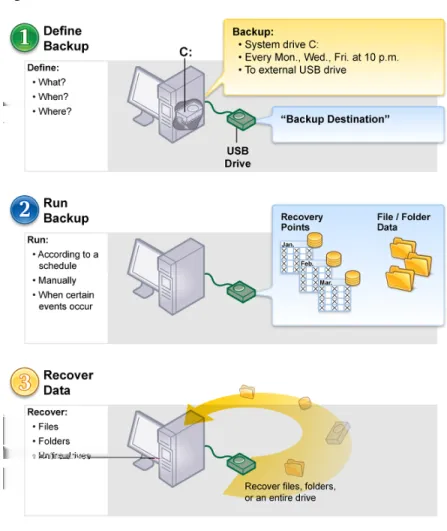
How you use Norton Save and Restore
While Norton Save and Restore does the work of backing up your files, folders, or entire drives, you need to tell Norton Save and Restore what to backup, when to back it up, and where to put the backed up data.
Using Norton Save and Restore includes the following key tasks, and doing them is easy:
■ Defining a backup
■ Running a backup
■ Recovering files, folders, or entire drives
Refer to the following figure to understand the relationship of these tasks.
Introducing Norton™ Save and Restore How you use Norton Save and Restore 34
Figure 2-1 Working with Norton Save and Restore
Where to find more information
Norton Save and Restore documentation provides a Help system, a Readme file, and a user’s guide.
In addition to Norton Save and Restore documentation, check the Symantec Web site and Knowledge Base for answers to frequently asked questions,
troubleshooting help, online tutorials, and the latest product information. www.symantec.com/techsupp
35 Introducing Norton™ Save and Restore
Introducing Norton™ Save and Restore Where to find more information 36
Best practices for backing
up
This chapter includes the following topics:
■ Best practices for backing up ■ Additional tips about backups
Best practices for backing up
As you prepare to back up your computer, review this information:
■ Before you back up ■ During a backup
■ When the backup is complete
About backups
When you back up your computer, you choose from two types of backups:
■ drive-based backup: backs up an entire hard drive
■ file and folder backup: backs up only the files and folders you select
Which backup type you choose depends on what you are trying to protect and how much storage space you have to store backup data (recovery points, and file and folder backup data).
The following table highlights the key uses of each backup type:
3
Use to Backup type
■ Back up and recover your computer (system drive, typically drive C)
■ Back up and recover a specific hard drive (any secondary drive, drives other than your system drive)
■ Recover lost or damaged files or folders using recovery points
Drive-based backup
■ Back up and recover specific files and folders, such as personal files stored in the My Documents folder ■ Back up and recover files of a specific type, such as music
(.mp3, .wav) or photographs (.jpg, .bmp) File and folder backup
Before you back up
Consider these best practices before defining and running your first backup:
Your computer must be turned on and Windows must be running at the time a backup occurs. If not, any scheduled backups are skipped until the computer is turned on again. You then are prompted to run the missed backup.
See“Choosing a backup type”on page 44. Schedule backups when you know
your computer will be turned on.
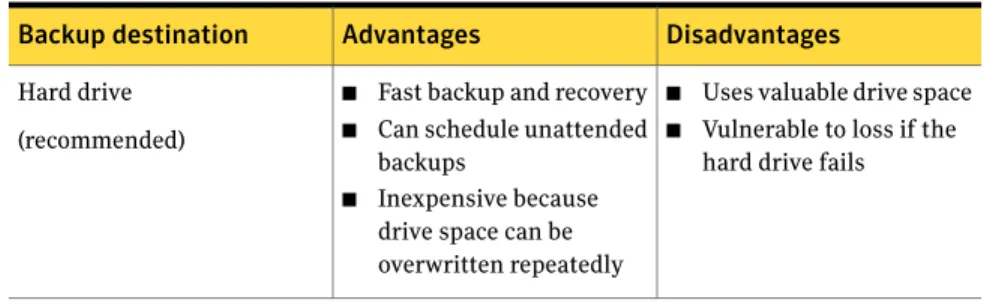
You should store recovery points on a hard disk other than your primary hard disk C. This practice helps ensure that you can recover your system in the event that your primary hard disk fails.
See“About selecting a backup destination ”on page 59. Use a secondary hard disk as your
backup destination.
When you define your backups, schedule them to run frequently so that you have recovery points that span at least the last two months.
See“Editing a backup schedule ”on page 66. See“Defining a drive-based backup ”on page 45. Run backups on a regular and
frequent basis. Best practices for backing up
Best practices for backing up 38
You should keep your operating system and software programs separate from your own data. This practice helps to speed the creation of recovery points and reduce the amount of information that needs to be restored. For example, use the C drive to run Windows and to install and run software programs. Use the D drive to create, edit, and store personal files and folders.
For other drive management solutions, go to the Symantec Web site at the following URL: www.symantec.com/.
Keep personal data on a separate drive than the drive on which Windows and your software programs are installed.
When you define a backup, you should select the option to verify the recovery point to ensure that the recovery point can be used to recover lost data. See“Choosing a backup type”on page 44. Verify the recovery point after you
create it to ensure that it is stable.
During a backup
While a backup is running, consider the following best practices:
If you are working at your computer and a backup starts to run, you might notice that the performance of your computer slows down. Norton Save and Restore requires significant system resources to run a backup. If slowing occurs, you can reduce the speed of the backup to improve computer performance until you are finished working. See“Adjusting the speed of a backup ”on page 65. Improve your computer's
performance during a backup
When the backup is complete
After a backup completes, consider the following best practices:
Periodically review the contents of your recovery points to ensure that you back up only your essential data.
For file and folder backups, click Recover My Files from either the Home or Tasks pages. Then click Search to display the latest version of all the files that are included in your backup.
For drive-based backups, seeOpening files and folders stored in a recovery point.
Review the contents of recovery points and file and folder backup data.
39 Best practices for backing up Best practices for backing up
Periodically review the Status page. You can also review the events log on the Advanced page. The event log records events when they occur, backups and any errors that might have occurred during or after a backup.
If you do not see the Advanced page tab, click View > Show Advanced Page.
See“Verifying that a backup is successful ”on page 57. Review the Status page to verify
that backups have happened and to identify any potential problems.
Delete outdated recovery points to make more hard disk space available.
Also, reduce the number of file versions that are created by file and folder backups.
See“Managing recovery points”on page 89. See“Managing file and folder backup data”on page 92. Manage storage space by
eliminating old backup data.
Check the Status page on a regular basis to ensure that each drive has a defined backup.
Review the level of protection that is provided for each of your computer's drives.
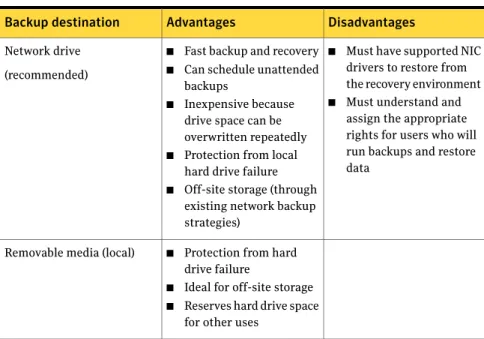
Store backup copies of your recovery points in a safe place. For example you can store them elsewhere on a network, or you can store them on CDs, DVDs, or tapes for long-term, off-site storage.
See“Making copies of recovery points ”on page 91. Maintain backup copies of your
recovery points.
Additional tips about backups
Consider the following tips when you run a defined backup:
■ Norton Save and Restore does not need to be running for a scheduled backup to start. After you define a backup, you can close Norton Save and Restore.
■ The computer that is being backed up must be turned on and Windows must be started.
■ All defined backups are saved automatically so that you can edit them or run them later.
■ Do not run a disk defragmentation program during a backup. Doing so will significantly increase the time that it takes to create the recovery point and might cause unexpected system resource issues.
■ If you have two or more drives that are dependent on each other, you should include both drives in the same backup. This provides the safest protection.
Best practices for backing up Additional tips about backups 40
■ Include multiple drives in the same defined backup to reduce the total number of backups that must be run. Doing so minimizes interruptions while you work.
■ Use the Progress and Performance feature to reduce the impact of a backup on your computer's performance. For example, if a scheduled backup starts while you are in the middle of a presentation, you can slow down the backup to give more processing resources back to your presentation program.
■ The power management features on a computer can conflict with Norton Save and Restore during a backup.
For example, your computer might be configured to go into hibernation mode after a period of inactivity. You should consider turning off the power management features during a scheduled backup.
■ If a backup is interrupted, consider running it again.
■ If you experience problems while creating a backup, you may need to reboot the computer.
41 Best practices for backing up Additional tips about backups
Best practices for backing up Additional tips about backups 42
Backing up your data
This chapter includes the following topics:
■ About backing up dual-boot computers ■ Choosing a backup type
■ Defining a drive-based backup ■ Defining a file and folder backup ■ After defining your backup
■ Running an existing backup immediately ■ Verifying that a backup is successful ■ Enabling event-triggered backups ■ About selecting a backup destination
■ About setting a compression level for drive-based backups ■ Setting advanced options for drive-based backups
■ Adjusting the speed of a backup ■ Editing a backup schedule ■ Editing backup settings ■ Turning off a backup job
■ Adding users who can back up your computer ■ Stopping a backup or recovery task
■ Deleting backup jobs
4
■ Rescanning a computer’s hard disk ■ Using the Advanced page
About backing up dual-boot computers
You can back up dual-boot computers, even if you have drives (partitions) that are hidden in the operating system from which you run Norton Save and Restore. When you run a drive backup, the entire contents of each drive is captured in a recovery point. When you restore a drive, the recovered drive is bootable.
Note:In order for your computer to boot the same from a restored system as it did from the original configuration, you must back up, and then restore, every drive that includes operating system boot information.
You should not create incremental backups of shared data drives if Norton Save and Restore is installed on both operating systems and they are both set to manage the shared drive.
Choosing a backup type
There are two types of backups available:
■ Drive-based backup: Backs up an entire hard drive
■ File and folder backup: Backs up only the files and folders that you select You can use the following guidelines to determine which type of backup to choose:
Use this backup type to do the following:
■ Back up and recover your computer's system drive (typically, the C drive, which includes your operating system).
■ Back up and recover a specific hard drive, such as a secondary drive (which is a drive other than the system drive on which your operating system is installed). ■ Recover lost or damaged files or folders from a specific
point in time. Drive-based backup
Backing up your data
About backing up dual-boot computers 44
Use this backup type to do the following:
■ Back up and recover specific files and folders, for example personal files that are stored in the My Documents folder.
■ Back up and recover files of a specific type, for example music (.mp3 or .wav) or photographs (.jpg or .bmp). ■ Recover a specific version of a file from a specific point
in time. File and folder backup
See“Before you back up”on page 38.
Defining a drive-based backup
A drive-based backup takes a snapshot of your entire hard drive, capturing every bit of information that is stored on it for later retrieval. All of your files, folders, desktop settings, programs, and your operating system are captured into a recovery point. You can then use that recovery point to restore individual files or folders or your entire computer.
For optimum protection, you should define a drive-based backup and run it on a regular basis.
By default, scheduled independent recovery points or recovery point set names are appended with 001.v2i, 002.v2i, and so forth. Recovery point set names are appended with _i001.iv2i, _i002.iv2i, and so forth. For example, if your base recovery point is called C_Drive001.v2i, the first incremental recovery point is called C_Drive001_i001.iv2i.
To define a drive-based backup
1
On the Home page, click Run or Manage Backups.2
In the Run or Manage Backups window, click Define New.If you have not yet defined a backup, the Easy Setup dialog appears instead.
3
Click Back up my computer, and then click Next.4
Select one or more drives to back up, and then click Next. Press and hold Ctrl to select multiple drives.If you do not see a drive that you expected to see, check Show Hidden Drives.
5
Do one of the following:■ If you selected a drive that has already been included in a defined backup, click Next, and then skip to step 8.
45 Backing up your data Defining a drive-based backup
■ Click Add drives to an existing backup, click the Select the backup drop-down list and select an existing backup, and then click Next.
■ Click Define a new backup to define a new backup, and then click Next.
6
Select the type of recovery point that you want the backup to create.Schedule a base recovery point with additional recovery points that contain only incremental changes that were made to your computer since the previous recovery point. Incremental recovery points are created faster than the base recovery point. They also use less storage space than an independent recovery point.
Note:You can only have one recovery point set defined for each drive. The Recovery Point Set option is not available if you have already assigned a selected drive to an existing backup and specified Recovery Point Set as the recovery point type. This option also is unavailable if you select an unmounted drive that cannot be part of a recovery point set. Recovery point set
(recommended)
Creates a complete, independent copy of the drives that you select. This backup type typically requires more storage space, especially if you run the backup multiple times. Independent recovery
point
7
Click Next.8
On the Backup Destination page, select from the following options:Browse to the location in which you want to store the recovery points.
If Backup Exec System Recovery detects that this location does not have enough available space, it alerts you. You should choose another location that has more space. Folder field
If you want to rename the recovery point, click Rename, and then type a new file name. Default file names include the name of the computer followed by the drive letter. Rename button
If you want to save the recovery point on a network share, type the user name and password for network access.
See“About network credentials”on page 52. Network Credentials
Backing up your data
Defining a drive-based backup 46