All rights reserved. No parts of this work may be reproduced in any form or by any means - graphic, electronic, or mechanical, including photocopying, recording, taping, or information storage and retrieval systems - without the written permission of the publisher.
Products that are referred to in this document may be either trademarks and/or registered trademarks of the respective owners. The publisher and the author make no claim to these trademarks.
While every precaution has been taken in the preparation of this document, the publisher and the author assume no responsibility for errors or omissions, or for damages resulting from the use of information contained in this document or from the use of programs and source code that may accompany it. In no event shall the publisher and the author be liable for any loss of profit or any other commercial damage caused or alleged to have been caused directly or indirectly by this document.
Printed: 2015
Table of Contents
0
Part I Introduction to the Principal Toolbox
7
... 7
1 Structure of Principal Toolbox
... 9
2 Hardware and Software requirements
... 9
3 Required Internet Explorer Security settings
... 10
4 Logging on
... 11
5 Navigation
Part II Basics Principal Toolbox
12
... 12
1 Home page
... 14
2 Organisational Units
... 19
3 Project management dashboard
... 20
4 Folder dashboard
... 21
5 Mobile Application
... 22
6 Permissions and roles
... 27
7 Entering and changing data
... 27 8 RAG indicators (traffic lights)
... 28 9 Views ... 30 10 Manage views ... 32 11 Document management ... 32 12 Email function ... 33 13 Search function ... 34 14 Messaging ... 35
15 Working with models
... 38
16 Advanced Customisation & Workflow (add-on)
Part III Portfolio Management (add-on)
40
... 40
1 Registering ideas
... 43
2 Working with portfolios
... 43 Portfolio overview
... 46 New portfolios
... 46 Defining new portfolios
... 46 Portfolio items
... 47 Creating portfolio items
... 49 Portfolio adm inistration
... 49 Moving portfolio items
... 49 Modifying the project reference
... 50 History log ... 50 Portfolio documents ... 50 Portfolio archive ... 51 Versioning ... 52 Managing a portfolio ... 52 Notifications
... 52 Requesting reports ... 54 Financials ... 55 Portfolio Gantt ... 56 Stakeholder reporting ... 57 Generating reports ... 58 Scenario Planning ... 59
3 Benefits definition and tracking
... 61
4 Using custom dashboards
... 63
5 Portfolio model configuration
... 63 Defining a project sheet
... 64 The reporting m odel
... 65 Field configuration
... 67 Financial configuration
Part IV Programme Management (add-on)
70
... 71
1 Programme Management Model
... 72
2 Integrated Programme Management
... 74
3 Programme to Portfolio reporting
... 75
4 Setting tolerances
Part V Project Management
77
... 78
1 Single Sheet Project
... 78
2 Generic PRINCE2 Project
... 79 Project dashboard
... 80 The use of colours w ithin projects
... 82 Planning a project
... 83 Creating a project
... 84 Defining a product breakdow n structure
... 85 Creating the product breakdow n structure
... 86 Graphical view of the product breakdow n
... 87 Editing stages
... 88 Editing w ork packages
... 89 Assigning responsibilities for products
... 91 Planning product milestones
... 91 Using the Gantt editor
... 93 Baseline support ... 94 Product page ... 95 Assigning budgets ... 96 Defining dependencies ... 99 Requesting resources ... 99 Managing a project ... 99 Progress: Planning ... 100 Registration of actual hours
... 100 Reporting
... 100 Portfolio reporting (add-on)
... 101 Copying data
... 103 Generating automated reports
... 104 Document management and approval
... 104 Adding documents and templates to products
... 104 Updating a document
... 105 Document approval (add-on)
... 107 Adding minutes of meetings
... 108 Issues, risks, quality review s and lessons learned
... 109 Issue log
... 110 Risk log
... 111 Quality review log
... 113 Change log ... 114 Daily/action log ... 115 Lessons learned ... 117 Finishing a project ... 117 Archiving a project (-model)
... 118 Removing projects and project models
... 118
3 Classic PRINCE2 Project
... 119 Planning a Project
... 119 Using the dashboard or plan tab
... 120 Using the Gantt editor
... 122 Planning products
... 123 Assigning responsibilities for products
... 124
4 Agile Project Management (add-on)
... 125 Agile Project
... 125 Agile Project Dashboard
... 126 Planning an agile project
... 126 Defining a product backlog & starting a sprint
... 127 Assigning tasks on the task board
... 129
5 Managing project models
... 129 Editing project m odels
... 130 Creating project m odels
... 130 Enterprise m odels
... 131
6 Order administration
Part VI Time Entry (add-on)
133
... 134
1 Generating, submitting and approving time sheets
... 134 Creating a tim e entry configuration
... 140 Configuring the approval process
... 143 Entering & Subm itting tim e sheets
... 148 Approving tim e sheets
... 149
2 Time and cost allocations
... 149 Defining and allocating hourly rates
... 150 Letting project managers choose hourly rates
... 152 Tim e and cost allocations against products
Part VII Resource Allocation (add-on)
152
... 153
1 Managing resources
... 154 Adding skills & resources
... 157 Non-project activities
... 158 Managing resource availability
... 159 Managing requests and allocations
... 162
2 Managing resources on projects
... 162 Requesting resources
... 163 Planning resources
Part VIII Reporting
164
... 165 1 Reports ... 170 2 Timeline reports ... 174 3 Automated reports ... 177 Autom ated Word reports
... 180 Autom ated Excel reports
... 180 Using an Excel Report
... 181 Creating an Excel Report Template
... 181 Open the basic Excel Report Template
... 183 Inserting Principal Toolbox Keyw ords
... 186 Extending the Report Data
... 187 Finishing the Excel Report Template
... 188 4 Widgets ... 189 Risk m atrix ... 190 Burn-dow n chart ... 191 PRINCE2 process diagram
... 191 Tim eline chart
... 193 Gauge m eter ... 195 Scatter plot ... 197 Bubble chart ... 199 Bar chart ... 201 Pie chart ... 202 Resource utilisation ... 205 Hour Report ... 206 Treem ap ... 207 Project m ap (Geo) ... 209 Bullet chart ... 210 Im age and Text
... 210 Prince2 Organisation
... 211 Earned Value Managem ent (EVM)
Part IX System Administrator: Configuration &
Settings
214
... 215 1 Configuration ... 216 Principal Toolbox ... 216 Em ail notification ... 217 Creating non-project activities... 220 Defining custom fields
... 221
2 Settings
... 221 Licenses
... 221 Applying for a license key
... 222 Request for additional user licenses
... 222 Renew al of an outdated license key
... 222 Setting up the license key
... 223 User adm inistration
... 225 Personal details ... 226 User Groups ... 228 Advanced options ... 229 System Settings ... 230 Updating the softw are
... 230 Classic Project Migration
Part X Troubleshooting and Solutions
233
... 233
1 Troubleshooting
1
Introduction to the Principal Toolbox
Principal Toolbox offers a powerful set of tools for the management of your projects, folders and portfolios. PRINCE2™ support for projects is offered in project models and in the way processes are supported by the Principal Toolbox by default. Customising the Principal Toolbox to follow the processes of your own organisation is easily accomplished.
This manual offers a comprehensive guide explaining how to use the Principal Toolbox. In the application itself the help is available in the right top location. You can access the help by clicking the 'Help' link located in the right-hand top of the main page. This will open the help pages available online (not integrated within the Principal Toolbox).
The complete manual is available in PDF format for download as well: Download User Manual as a PDF file
Note: This manual is to support release 8.0. Where applicable, notes about the required version is stated.
Older versions of the manual (English) can be found below:
Version Link 5.5 Manual 6.0 Manual 6.5 Manual 7.0 Manual 7.5 Manual
1.1
Structure of Principal Toolbox
As of release 8.0 organisational units have been introduced. To read about organisational units in detail click here .
The introduction of organisational units has restructured the Principal Toolbox.
The functionality within the Principal Toolbox can be organised in a hierarchical structure. This allows to enable functionality at the appropriate level.
Organisational units enables to group data according to the organisational view (countries, business units, teams, products, etc.).
For every organisational unit the time entry and the resource allocation may be combined into resource management.
It also enables local portfolio and programme/project management and additional reporting levels.
The picture below shows an example of what the hierarchy can be within the Principal Toolbox. 14
Example of an enterprise hierarchy. Each OU will have its own span of control for managing portfolio's, programmes and projects.
This structure can be changed to fit your organisation's needs. The highest level is generally referred to as the 'enterprise level'. Within every individual organisational unit, folders can be added to organise programmes and projects.
The folders can be any of the following types:
· Sub folders, programmes and projects: can contain sub folders, programmes and projects
· Sub folders and programmes: can contain sub folders and programmes
· Projects: can only contain projects
By choosing the right type of folders, the actual structure of for example programmes and projects within your organisation can be reflected in the Principal Toolbox. The enterprise hierarchy aids in keeping an overview of all programmes and projects run throughout the organisational unit(s).
The same projects that have been fit in with this hierarchy (reflecting the organisational structure), can also be made part of a portfolio. Portfolios are managed in a separate area within the Principal Toolbox, and this functionality is provided by an add-on module (Portfolio Management add-on ).
The illustration below shows how Project Management and Portfolio Management work together:
1.2
Hardware and Software requirements
The following hardware and software requirements for client computers must be in place for using Principal Toolbox.
Requirements f or general use:
Memory 1 GB or more
Browser Microsof t Internet Explorer 9 or later, FireFox or Google Chrome1, 2
Display Resolution 1024x768 or higher
Requirements f or using reports and exports:
Sof tware Microsof t Of f ice 2007 or later 3
Sof tware Adobe Acrobat Reader
If you experience problems while accessing the Principal Toolbox, please verify security settings of your browser.
1. Be sure there are no script blocking security settings or script blocking firewalls active. 2. Other browsers are supported based on best effort, issues may exist.
3. For working with automated reports in Excel, the template needs permission to execute macro's. Excel 2003 is only supported using the old reporting template. Reports based on the new report template (as of release 6.5) require Excel 2007 or later. This new report template supports Office for Mac as well.
1.3
Required Internet Explorer Security settings
The Principal Toolbox is completely web-based. This means it runs in your internet browser. Below you will find a table with the required security settings of the appropriate Internet Explorer security zone used by the Principal Toolbox. In Internet Explorer go to Tools > Internet Options, select the Security taband choose custom level to change the settings.
Sectio n
Setting Value Rem arks
Activ eX controls and plug-ins
Initialize and script Activ eX controls not marked as saf e f or scripting
Enable Script errors on dif f erent pages occurs when disabled.
Downloads
Automatic prompting f or f ile downloads Enable Functions like pack project of f line can't of f er to download the of f line project.
File download Enable When disabled, automated reports and documents can't be downloaded.
Miscellaneous
Use Pop-up Blocker Disabled Internet Explorer blocks the "Edit name f or new item" dialog af ter adding the f irst product on the Edit project plan page when enabled. On maximum security this includes all pop-up windows, ev en those that prov ide necessary f unctionality such as the calendar pop-up f or choosing a date, the help window, and more.
Allow META REFRESH Enable Internet Explorer window stay s blank af ter login when disabled
Allow websites to open windows without address or status bars
Enable Internet Explorer will display a grey address bar in all pop-ups when disabled
Submit non-encry pted f orm data Enable When disabled, Internet Explorer can't update changes in text f ields.
Scripting
Activ e scripting Enable Login button on login screen does not react. Drag and drop in Edit Project Plan window won't work when disabled
User Authentication
Logon Automatic f or logon
only in Intranet zone
When Single Sign On is enabled, this setting allows to sent username and password ov er the intranet
Other problems might be related to the use of virus scanners, firewalls or browser add-ons, like the Google toolbar which also has pop-up or script blocking. Consult your software documentation on those products for details on how to configure them to allow pop-up windows and scripts from the Principal Toolbox.
1.4
Logging on
Before you can log on to the Principal Toolbox, the system administrator must first create a user name for you. After this has been done, you can log on using the following steps.
Note: Some organisations have so-called single sign-on configuration. In this case, you are logged on automatically with your organisational account.
1. Start up Internet explorer and navigate to the Principal Toolbox homepage. The internet address is found in the email that you have received from your administrator. The user name and password are also found in this email.
2. The log on window is shown.
3. Fill in your user name and password and click OK. The Principal Toolbox will open with your homepage.
1.5
Navigation
The Principal Toolbox is a web-based application in which navigation works the same way you are used to on the internet. You perform actions by clicking with your mouse button or by clicking hyperlinks on the page.
Note: As of release 6.5+ the browsers 'Back' button may be used as well.
Navigation with organisational units:
Navigating through the Principal Toolbox is done by using the dark blue header within your browser window. 'Enterprise' is the highest level in the hierarchy for your organisational units. From there you can navigate down the branches of the organisation tree (through the drop down menu) to locate your folders (containing sub folders, folders and projects) on the appropriate 'Project Management' tab. On this tab select the appropriate folder to navigate through folders and projects within.
Project Dashboard; bread crumbs (Navigation with organisational units). Note: Classic navigation is available after migration.
Classic Navigation:
Classic navigation through the Principal Toolbox is done by using the dark blue header within your browser window. 'Enterprise' is the highest level in the hierarchy for your organisation's organisational units, folders and project tree. From there, you can navigate down the branches of the tree (through the drop down menu) to locate your projects.
On your home page, accessible through the 'Home' link in the dark blue header, you will find all projects, products and log items you are connected to. This way, you can quickly locate your projects and items you have to work on.
Throughout the application, except on your homepage, you will find the so-called bread crumbs that show you where you are in the organisational unit, folder and project tree. Click the bread crumbs anywhere higher up in the hierarchy to navigate to that location.
Project Dashboard; bread crumbs (Classic Navigation).
2
Basics Principal Toolbox
2.1
Home page
On the home page you are able to see all folders and projects you have a role/part in, as well as
products, log items (including issues, risks, etc.) that have been assigned to you. After logging on to the Principal Toolbox you will be directed to your home page.
Home page
1. Area for general information and widgets.
2. Products/documents to be approved (add-on Advanced Customisation & Workflow) 3. Time sheets to be filled in and/or approved (add-on Time sheets)
4. All portfolio's (add-on), folders and projects you have a role in.
5. All products, issues, risks, quality reviews, actions and changes assigned to you.
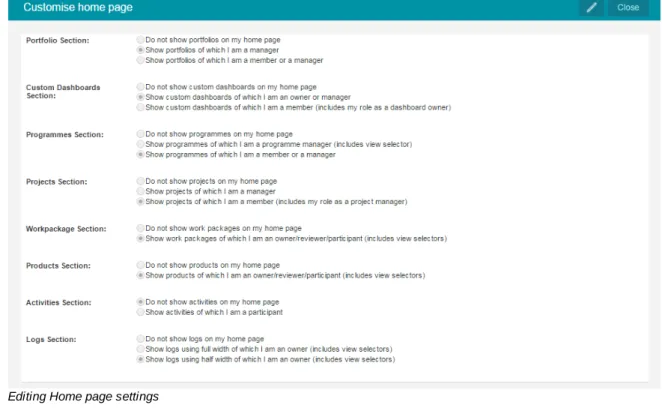
Configuring your home page
To configure the layout of your personal home page, click the button Customise Home Page. The opened window gives you the possibility to select:
· Which portfolios (add-on) should be displayed.
· Which folders should be displayed.
· Which projects should be displayed.
· How to display the products.
Editing Home page settings Tabs shown on your home page
Your home page displays several tabs. Depending on your organisation's license some tabs might not be available. Here you can see:
· Approve Hours shows all hours from other users you should approve or disapprove.
· My Time Sheets shows all your time sheets when time registration is turned on.
2.2
Organisational Units
Note: As of release 8.0 of the Principal Toolbox there is the possibility to use Organisational units (OU).
To edit the organisational units, navigate to your company by clicking on the header in the drop down menu.
You will now see an overview of all the organisational units.
By clicking on the button you can add an organisational unit.
By clicking on the button you can archive outdated organisational units. You can start editing an organisational unit by clicking on it in the overview.
Overview of the organisational units
When editing the highest level of organisational units the lower level organisational units will appear. This overview shows the location of all your organisational units and has space for editable widgets. To choose the widgets that suit you best see the widgets section of the manual.
Editing and archiving organisational units on this level is done identically to the higher level.
Example of an Organisational unit's dashboard on the lower level
When editing a lower level organisational unit click to edit the name or description of the organisational unit.
By clicking on the 'Properties' tab, the configuration for this organisational unit can be edited.
For every organisational unit this configuration can be changed independently.
Configuration of the organisational unit
To save the changes, click .
Permissions and roles
Configuring roles for organisational units can be done on all levels of organisational units and can be found on the 'Properties' tab.
There are four 'regular' roles and there are 'additional' roles.
For more information on permission and roles see the permissions and roles section of the manual.
Roles on organisational unit level
Reporting on organisational units
Reports on organisational units can be found in two place which generate reports with a different scope.
· The first option is the reports tab in the organizational unit.
The reports that report on the current level and all lower levels.
The reports generated on the reports tab for the OU include information from the current OU and all lower levels.
· The second option are the reports on local levels such as 'resource management'.
The reports that report on the current level only.
management).
Resource Management Configuration
To configure resource management and/or time entry in organisational units, navigate to the resource management tab in the organisational unit.
Next click
Resource management configuration in organisational units
Select the appropriate time entry configuration and Non-project activity set to configure the resource management.
The resources can be edited in the appropriate organisational units. Click .
Edit resources in organisational units
2.3
Project management dashboard
The Project management dashboard is the highest level in the folder and project tree. The Project Management dashboard is accessible through the link (drop down) in the blue header.
On the Project management dashboard you are able to reach all folders within the organisation and you are able to get information regarding the progress of folders as judged by the folder manager.
Enterprise dashboard
1. Tab pages
The tab pages are standardized on the enterprise dashboard. The name of the tab page indicates the content of the page.
- Project Management - Properties
: :
This is the main (default) page.
The properties and history of the projects for this organisational unit can be found here.
- Documents & Knowledge : A folder structure can be created here where files of any format can be stored and shared.
- Reports : This tab shows all reports from all underlying projects (only visible when configured, see Principal Toolbox configuration).
- Models : An overview of the project models on the enterprise level.
- Archive : Archived work areas / folders / project lists and project models on the enterprise level.
2. Area for customisation and widgets. 3. folder listing
A list of all work areas / folders and project lists on this level. Shown behind each folder name is a RAG indicator which indicates the status of the folder and the manager’s name.
4. Reports
This area is shown if you have either a manager role or a reader role on this level. Reports give you access to views (tables) concerning all folders, projects, products etc. within all project within the database.
Functions at project management level
Within the project management level, buttons are available so you can edit user roles on the Enterprise dashboard (‘Edit members’), edit the text and the image on the dashboard (‘Edit’), add and edit widgets ('Edit Widgets'), send an e-mail, print the current page and search the entire database.
2.4
Folder dashboard
The folder dashboard provides you with an overview of all sub-folders and projects within the respective folder.
Folder dashboard
1. Tabs
The tabs are standard for each folder. The name of the tab indicates the content of the page. Depending on your organisation's license some tabs might not be available.
- Dashboard : The main and default page of the folder. - Properties : An overview of the folder properties and history.
- Gantt & Dependencies : Graphical representation of all projects within the folder. - Documents & Knowledge : Archive of important documents and/or useful best-practices. - Models : An overview of the project models within the folder.
- Archive : Archived projects and project models within the folder.
Fold
2. Area for customisations and widgets. 3. List of projects (and folders when applicable)
Gives an overview of the projects within this folder. A number of figures are presented that enable you to get an overview of the project status. The traffic lights used for the planning, hours and costs are defined by the tolerances set by the folder manager.
4. List of available project models
Gives an overview of the project models available within this folder. 5. Logs
On folder level the following logs are available for use; issue, risk and daily/action log. A counter is displayed for each log indicating the number of items there are for each log and if there are new items. The log is selected by clicking the name of the log.
6. Report
Creation of reports/views about all projects and products within this folder.
Functions at folder level
Here you can make the ‘folder dashboard’ available to users (‘Edit members’), change the text and the logo of the dashboard (‘Edit Properties’), send an e-mail, print the current page, use the search function. The folder manager can also setup the tolerances for the planning, hours and costs of all projects with this folder by using the ‘Edit Tolerances’ button. Finally, the 'Edit Widgets' buttons allows administrators to define the set of widgets available to the folder.
2.5
Mobile Application
As of release 7.0 it is possible to use Mobile Reporting and Mobile Time Entry using the Fortes app. They allow for managers and stakeholders to always have the appropriate reports with them and for all employees to enter hours using only their tablet or smartphone.
Note: To start using this functionality, download the app in the appstore or google play store 75
22
75
Opening screen op the Fortes app
Principal Toolbox URL:
Enter the URL of your Principal Toolbox
Username: Enter your username Password: Enter your password
Click
The application can be used for Stakeholder Reporting and Time Entry .
2.6
Permissions and roles
Authorisation model
The Principal Toolbox allows for two types of users:
1. Administrators, who get access to everything everywhere
2. Users, who get access to entities and areas within the Principal Toolbox by assigning them roles The roles that are assigned to a user determine what access the user has. Access can be restricted to various actions, like getting read-only access or allowing full access including removing items. A user can be assigned multiple roles at the same time. Below follows an overview of the various roles and the access rights associated with them.
Note: For folders and projects security-enabled locations that have no security set, ALL members of the organisational unit have access. Please k eep this in mind if you do not want users to access such locations.
Roles on organisational units
Role Rights
Organisational unit Manager · Create and archive folders in the organisational unit
· Assign folder manager(s) to a new folder within the organisational unit
· Assign folder reader(s) to a new folder within the organisational unit
· Manage roles at the organisational unit level
· Access information of all folders and projects within the organisational unit
· Modify picture and text on organisational unit dashboard
· Defining resource availability
· Allocating project and non-project work
· Assigning and removing Non-project Activity Sets from the organisational unit
· Defining resource availability
· Allocating hours against projects and non-project activities
Organisational unit Support · Identical access rights as the Organisational unit Manager
Organisational unit Reader · Access information of all folders and projects within the organisational unit
· Read access to the resource management of the organisational unit
· This includes read access to all allocation requests, time allocations and availability data on the applicable
organisational unit
Organisational unit Member · Can be assigned to individual portfolios as readers or managers within the organisational unit
Note: before being granted access to portfolios, users first have to be a member of Portfolio Management
Additional roles on organisational units
All roles within portfolios, folders and projects can be configured for individual organisational units.
Roles on Project Management
Role Rights
Project Management Coordinator · Create and archive folders
· Assign managers and readers to individual folders
· Manage roles at all levels within the folders
· Access to all folders and their underlying data
· Remove and restore archived folders Project Management Reader · Read access to all data within project management Roles on Folders
Role Rights
Folder Manager · Create, move and archive projects and project models on assigned level
· Create, move and archive sub-folders
Role Rights
assigned level
· Assign project manager to a new project
· Manage roles (managers and readers) of assigned level
· Create, edit and remove issues, documents, risk’s etc. within assigned level
· Read all information within own and underlying levels
· Set tolerances for the projects within assigned folder / project list
· Modify layout of folder / project list dashboard Folder Support · Identical access rights as the Manager
Folder Reader · Read all information within own and underlying levels
Roles on Portfolio Management
Role Rights
Portfolio Management Coordinator · Create and archive portfolios
· Assign managers and readers to individual portfolios
· Manage roles at all levels within the portfolios
· Access to all portfolios and their data
· Create and archive portfolio items within portfolios
· Administer portfolio models
· Remove and restore archived portfolio items
· Assign a project manager when starting a project from a portfolio item
· Changing the portfolio dashboard layout Portfolio Management Reader · Read access to all data within the assigned level Roles within Portfolio's
Role Rights
Portfolio Manager · Create and archive portfolio items
· Assign managers, readers and members as owner to individual portfolio items
· Access to all portfolios and their data
· Create and archive portfolio items within portfolio
· Remove and restore archived portfolio items
· Assign a project manager when starting a project from a portfolio item
· Changing the portfolio dashboard layout
· Saving portfolio versions
Portfolio Reader · Read access to all data within the assigned level
Portfolio Members (available as of release 7.0)
· Can be assigned to individual portfolio items as owner Note: before being granted access to portfolios,
users first have to be a member of Portfolio Management
Roles on Portfolio Item (available as of release 7.0)
Role Rights
Owner · Add documents to a portfolio item
Roles within Custom Dashboards (previously known as Portfolio Dashboards)
Role Rights
Dashboard owner · Can set the dashboard filter and modify the portfolio dashboard (views, reports etc.).
Note: The viewing permissions of the dashboard owner are used to identify the list of projects for the portfolio dashboard.
A common scenario is to have the dashboard owner someone that coordinates the portfolio management setup, or an administrator. By setting the correct dashboard filter, other users can see the information they need.
Dashboard manager Dashboard managers cannot alter the dashboard filter but otherwise have full permission (except to edit project information as a portfolio dashboard is used for viewing/ reporting). Dashboard managers are allowed to create views, reports etc.
Dashboard reader Dashboard readers only have viewing access to the portfolio dashboard but cannot define additional reports.
Roles on Programmes
Role Rights
Programme Manager · Manage all information within own programme
· Edit programme plan, planning, logs, etc.
· Edit members
· Set the general status of own programme
· Modify lay-out programme dashboard Programme Support · Identical access rights as the Manager
Programme Reader · Read all information within a programme
· Add issues to the issue log
Programme Member · Access assigned items within the programme
· Add issues to the issue log
Roles within Projects
Role Rights
Project Manager and Project Support · Manage all information within own project
· Edit project plan, planning, logs, etc.
· Edit project team
· Set the general status of own project
· Modify lay-out project dashboard Project Board members
(Executive, Senior User, Senior Supplier) · Read all information within a project
· Add issues to the issue log
Team member · Read all information within a project, except project costs information.
· Add issues to the issue log
Role Rights
Owner · Add deliverables (documents) to a product
· Add new log items (issues, risks, changes, actions, quality reviews) related to the product.
· Editing all product specific and custom fields Reviewer · Add deliverables (documents) to a product
· Add new log items (issues, risks, changes, actions, quality reviews) related to the product.
· Editing all product specific and custom fields Participant · Add new issues related to the product.
Roles on Logs (Issues, Risks, Changes, Actions, Quality reviews)
Role Rights
Owner · Change all information in a log item
· Assign the log item to another project team member Creator · Change all information in a log item
· Assign the log item to another project team member Project Manager and Project Support · Change all information in a log item
· Assign the log item to another project team member
Roles within Resource Management
Role Rights
Resource Management Coordinators Has the following rights on all Resources within all underlying organisational units:
· Defining resource availability
· Allocating project and non-project work
Resource Management Reader Has the following rights on all Resources within all underlying organisational units:
· Access to all resources on the underlying organisational units.
· Reader access to all allocation requests, time allocations, and availability data
Roles within Benefits Management
Role Rights
Resource Management Coordinators Has the following rights on all Resources within all underlying organisational units:
· Defining resource availability
· Allocating project and non-project work
Resource Management Reader Has the following rights on all Resources within all underlying organisational units:
· Access to all resources on the underlying organisational units.
· Reader access to all allocation requests, time allocations, and availability data
2.7
Entering and changing data
To enter and change data, you will always have to click the Edit ( ) button. If you have the user rights to edit data and the page contains editable fields, you will always find this button on the page you are at. When creating new log items, like issues, risks etcetera, you will directly enter the editing mode, so you won't have to click edit.
2.8
RAG indicators (traffic lights)
On dashboards of folders and on your home page, the status of projects is shown with RAG indicators. These indicate the actual status on a folder, project, or product.
The red, amber and green indicators are used in respect to the status of the enterprise, folder, or the project.
For projects, indicators are shown for:
- General status : Set manually by the project manager to give the general opinion about project status.
- Planning status : Based on the tolerances of the folder / project list. Uses the number of products overdue.
- Cost status : Based on the tolerances of the folder / project list. Uses the deviation of expected costs from the budget.
- Hours status : Based on the tolerances of the folder / project list. Uses the deviation of expected spent hours from the budget.
(red)
- Major deviation from the plan on costs, hours or planning. - Based on the tolerances set.
(amber)
- Minor deviation from the plan on costs, hours or planning. - Based on the tolerances set.
(green)
- No deviation from the plan on costs, hours or planning. - Based on the tolerances set.
The tolerances on the folder can be defined by the folder manager at the dashboard of that level. These tolerances can be set in percentages or in absolute numbers.
Tolerances can be set on the folder level
The use of indicators within projects is explained in the following section . For setting the tolerances in a folder or project list see: Setting tolerances
2.9
Views
Throughout Principal Toolbox, views are available to present information in a tabular form. On all
organisational levels (e.g. enterprise, folders, project lists) and within projects (on all logs and the ‘Plan’
and ‘Report’ tab) views are used.
The Principal Toolbox contains predefined views that are generally useful, but it is also possible to define your own views for your personal purposes. All views can be used for monitoring progress or in
automated reports .
Use the drop-down list as shown in the picture above to select available views. With the View Options
drop-down menu you can define your own view and set options for views.
Note: on the Reports tab, you can choose the object you want to see information about in your project: Products, Cost/hour entries and Resource assignments are options.
Note: Resource assignments are only available when the add-on Resource Allocation is available within your organisation.
The different options in the View Options menu are:
80 75
174
Set filter : Define a filter to make a selection of the shown products / issues / etc. Set columns : Add or remove columns from the view.
Set widths : Set the column width, so the view fits better on screen or in a report. Advanced : · Define calculations on certain columns.
· Show or hide column names
Make default : This sets a view to the personal default. Save view : Save the view for later use.
Manage views : Set properties for the view. You find more information at 'Manage views '.
Note that on some pages not all functions are available for use. The following example illustrates how to define a view on the ‘Report’ tab. The view will show all finished products and totals of budgeted and actual hours and costs.
1. Go to the ‘Report’ tab.
2. In this example we will add a filter that shows all finished products in the project. Since we want to see a list of products, we choose
Products in the left hand side of the window. 3. Click Set Filter in the View Options menu.
To select finished products set the field ‘Final Status’ to ‘true’. After clicking OK you get a view of the selected, finished products. 4. With Set Columns you can add and remove columns from the view.
· To add columns to the view, select them on the left side in column 'All fields'. Click the >> button to add the columns.
· To remove columns from the view, select them on the right hand side and click << to remove.
· Set the order of columns with the up and down buttons. You can also set the Sorting order of the view. The field ‘Complete list’ will show you either 50 results per page or the entire list on one page. 5. Change the column widths with the Set Widths option. Drag the line
between columns to increase or decrease the column size.
Note: If you would lik e to use your ‘own’ views for reporting you will have to tak e into account the maximum width of a page. The columns may not be wider than the portrait or landscape headers. Otherwise the table will be too wide for the page.
How to create your own report templates is described in the section Automated Reports .
Note: the bars for portrait and landscape are of approximate size. Check the result in your reports.
6. To show totals of numerical fields click the ‘Advanced’ option, and select the columns for which you would like to know the totals. Click
OK.
7. If you want to save the newly defined view you need to save it with
Save View. To overwrite an existing view you saved before, select the name of this view at the Existing view pull down list. To create a new view enter the new name at 'New view'. Click Save to save the view. 8. Select personal, local or global. See manage views for more
information.
30
9. With the ‘Make Default’ option a specific view can be set to the personal default view on that page
10.With the button ‘Manage Views’ the views available can be managed. See Managing views.
Tip: If you define a (new) view as standard with the ‘Make Default’ button, the view will be shown when opening that tab.
2.10
Manage views
Within the Principal Toolbox all users are able to define (personal) views of the information presented on the different report pages.
As already explained in the previous section, views can be defined on the different levels (e.g. enterprise, folder), on all logs and on the ‘Plan’ and ‘Report’ tab.
With the Manage Views option, which is available on all mentioned pages, you can manage these views.
1. Go to a page where views can be defined and click Manage Views.
2. A window will pop-up which lists all available views for this page. This window shows all available views.
Built-in views : Predefined views which are standard within the Principal Toolbox. Global views : Global views defined by the organisation.
Local and personal views : Project or user specific views
The settings for the global views can be modified by the system administrator. The settings for the local and personal views can be modified by the user who has created the view and the system administrator.
List of views
3. To modify a view, click the name of the specific view. The built-in views can be hidden from the users of the Principal Toolbox (helpful for views defined only for reporting purposes). To do so click the specific view and place the tick mark.
4. General and local and personal views have some more options that can be defined; Name : To change the name of the view.
Remarks : Add remarks to the specific view.
Hidden : Makes a view not visible in the pull-down menu. The view is still available for the automated reports.
Type : Select availability for the view:
Global: view is available on all locations (all levels) and for all users.
Local: view is available on the specific location only (e.g. this project only), but for all users that have access to the location.
Personal: view is available for the current user only but on all location (all levels).
Adding a new view
5. Furthermore, you are able to import and export views. To export a particular view click the 'Export'
button and save the view to your desktop location. To import this view again click the 'Import' button on the 'Manage views' page and select the *.ptv file. This view will be added as a personal and local view. Using the buttons as described above the type of view can be changed.
6. To remove views from the Principal Toolbox use the remove button.
2.11
Document management
Within the Principal Toolbox you can store documents at various locations. Principal Toolbox will keep the document in the database, so they will be available to all users with access to the document in the Principal Toolbox. It is possible to overwrite older versions with newer ones. The Principal Toolbox will keep the old versions in storage. These will remain available for the manager of the particular level in the tool.
Note:As of release 6.5 it is possible to drag and drop documents from your local computer onto document lists within the Principal Toolbox
On top of that, it is possible to put an approval cycle on deliverables and/or documents with the add-on ‘Advanced Customisation & Workflow’. See Document management and approval for more
information about storing documents in Principal Toolbox.
2.12
Email function
From almost any page in Principal Toolbox you can create email messages. These messages will automatically be addressed to the relevant team members, or e.g. the owner of log items etc. The message itself will contain summarised info about the page you created it from, and a hyperlink to the page in Principal Toolbox.
1. Click the email button, in the upper right hand corner of a specific page. In this example a new issue is created on the Apollo project and we want to inform the members of the new issue.
2. A new page will appear with a short description of the item (in this case: issue 12). You can select the project members you wish to notify. These can be inserted manually or by clicking To,
CC or BCC.
3. Check the default contents of the message. You can make changes to it as you wish. Be careful to let the hyperlink intact, since this is very helpful to the recipient(s).
4. When finished, click Send e-mail and the mail is sent to the recipients.
Note: Since the email is sent by Principal Toolbox itself, the message will not be stored by your normal email software. For this reason, you get a 'BCC' of the email message.
2.13
Search function
Quick searchAs of release 7.0, the application provides a quick search option in the header of each main page to find and navigate to items quickly. By clicking the search box, the recently navigated items are shown and a search can be performed after typing a minimum of three characters.
Initial search box
Search results Advanced search
The advanced search function allows you to perform keyword searches. You can also use the creation period to specify the period when the item was created.
Advanced search page
2.14
Messaging
Messaging allows all users to freely inform and discuss topics related to items in the Principal Toolbox.
Note: This function is only available as of release 7.0 and when provided by Fortes Solutions via SaaS (or hosted).
Two types of buttons exist
This button is shown on all locations within the Principal Toolbox and allows to send/read messages concerning that location.
This button is shown next to your person name in the header and allows to send/read messages that concern you.
Initial message dialog Message dialog with content
Initially, the dialog will invite you to send a message. The location to which the message will refer is already set in the message using the #-tag.
Within the messages you type, you are free to refer to other locations and persons as well using the #-and @-tags.
#
Use this tag to refer to locations within the Principal Toolbox. After typing three or more characters, the system will provide matching options. Locations are referred to by name only.@
Use this tag to mention other persons that will see the message within their personal messaging. Persons are referred to by their name only.Once messages are available, they are shown within the dialog (1) and the unread indication shows for a short time after the message is considered read. You are able to reply to a certain message by the message button (2) shown in the right-corner of the message. When doing so, the current message will be started with all the #- and @-tags of the original message to ensure it pops up at all appropriate locations.
If, at any location, a message is not yet read by you, a unread indication will appear: One message is unread, open the messaging dialog to read this message.
Up to five most recent messages appear in the messaging dialog. Older messages can be viewed using the 'Loadoldermessages' button.
2.15
Working with models
In Principal Toolbox, many objects, e.g. projects, are based upon a model. Such a model defines the initial configuration and content for the objects that are created upon them. The way this works is comparable to templates for documents, only models contain not only templates but define configuration (behaviour) and content as well.
Models ensure that the same standards are used throughout the organisation. Multiple models may exist within a single application although it is recommended to keep the number of models limited to be able to efficiently control and maintain the way of working within the organisation.
Models currently exist for the following type of objects:
· Projects
· Programmes (based on MSP or old Programmes)
· Portfolio's
Models typically look identical to the type of object it defines, e.g. a project model looks like a normal project. The difference is its behaviour: it will not appear in reports and some functionality will not be available (e.g. a project model cannot be used to allocate resources).
A model can be created upon an instance of the object, e.g. a project model can be based upon a normal project. When doing so, the configuration and basic content is copied and stripped to the model. Typical information that remains available:
· main object structure (e.g. planning) and their naming
· templates
· configuration
Other information like owner, planning dates, issues etc. are stripped. Once created, a model can be modified just as its normal object type.
When creating an object based on a model, all information is copied and no data is stripped.
Configuration inheritance when working with models.
For configuration it works differently as depicted in the figure above. This illustrates that configuration can be made within a project but if non is set, it defaults to the project model configuration. Again, if no configuration is set on the model, it defaults to the system defaults. This works for all type of models (project, portfolio etc.).
Models can be exchanged between different applications using import / export functionality.
Note: Exchanging models between applications with different version of the Principal Toolbox may result is strange or erroneous behaviour. It is best to exchange models between applications running the same version.
If models are imported into an application on a higher version, the Principal Toolbox will update the project model version when possible.
Projects
All projects that have been created are based on a project model. A project model is an extensive template for projects. It contains products, document templates associated with these products, lessons learned, and automated reports. This way, it is possible to have standardised projects throughout the organisation, and project managers always have the right document and report templates available. Right from the start of the project, automated reports (if configured correctly) are available for reporting
purposes. Below, an example of the dashboard of a project model is shown.
77 70 40
Part of the dashboard of the PRINCE2 project model, which is identical to a project dashboard.
It is possible to have multiple project models within your organisation. So you can have a default PRINCE2 project model for general use and more specialised project models with specialised content. For instance, a project model for sales or for software implementation. For these purposes, you are able to build a product breakdown (see the section about product breakdown ) that matches most
situations for these specialised projects. When starting a project based on one of the models, you are able to adapt the product breakdown to fit the specific circumstances of the project.
More information about the creation and management of project models can be found in the section
Managing project models .
folders
folders are used within the Principal Toolbox for structured organisation of projects (hierarchy) in which
folder Models are used.
More information about the use of folder models can be found in the section folder Management .
Portfolio's
A portfolio model contains automated reports, pre-defined project sheets, reporting models and a financial model. It's possible to define multiple portfolio models for different portfolios. Please refer to the section about the Portfolio Model for information about setting up and configuring portfolio models.
84
129
71
70
2.16
Advanced Customisation & Workflow (add-on)
With the add-on ‘Advanced Customization & Workflow’ an organisation can define electronic forms in the different project models. These pages can be tailored to the specific needs of the organisation or folder. 1. Go to a project model and create a new product to customize or select an existing product.
2. Click the product to open the product details page.
3. First click "Layout" then click "Edit Layout" to define the layout of the page. Default layout : Standard Principal Toolbox view;
Custom layout : To choose which fields are visible on the product page.
Product page
4. Next step is to define which fields need to be available on the page. In the first pull-down menu select if the field is a project field (e.g. project name) or a product field. Then select the field to show on this custom product page.
5. The last action on the page is to select what field will be set when all the reviewers approve the data on the product. In the example given, a custom product field (product approval) is used to set on approval.
6. In this example a new page with approval cycle is defined. Click 'Approval Settings' and check 'Enable product approval'.
7. When this project model is used for a project, the project manager (or the owner) inserts data on the product and then requests approval for the product by clicking the 'Request Approval' button. 8. A new window will open where the approvers need to be selected, a due date can be set and remarks
can be inserted. To send an email to the approver(s) about this product approval, tick 'Notify approvers’.
9. The approver(s) will be informed through an email and will have a note on their ‘Home’ page.
10.To review the product page click the product name and the specific ‘Product’ page opens.
Approve or disapprove the product
3
Portfolio Management (add-on)
The Portfolio Management module enables the collection of initiatives and a subset of an organisation’s projects and folders. Additionally, the module provides functionality to monitor progress of the projects and folders within the portfolio, and to generate various portfolio related reports.
Various portfolio’s can be created, in order to get meaningful collections of related folders and projects, e.g. a portfolio of projects that have the same sponsorship or all projects that contribute to the same strategic goal(s).
To work with portfolio management, the following activities are of importance: - Defining new portfolios
- Administering portfolios
- Managing portfolios
- Creating a portfolio model
These subjects will be covered in the sections below.
3.1
Registering ideas
As of release 7.0 it is possible to register ideas within portfolio management.
Note: As of release 8.0 ideas are registered per individual organisational unit.
The ideas allow to collect any idea for projects, possibly contributing to benefits , without the need of starting an initiative within a portfolio. By doing so, selections and appreciations can be performed before starting an initiative.
Note: Ideas share the same (custom) fields as portfolio items and projects. Additionally, ideas have an owner who is allowed to edit, extend the idea information.
46 49 52
63
Indication of ideas on portfolio management dashboard
List of ideas
Ideas can be added, removed (1) and edited (2) as is common within the Principal Toolbox.
By clicking an idea, the details are opened and can be edited. The page layout of the ideas is set by using the page layout editor (3) in the same way as defining a project sheet (available to managers and administrators only).
Detail page of ideas
Within the detail page, default (1) and custom (2) fields can be edited as well as documents added or removed (3).
Once an idea is approved (procedure to be defined within the organisation), an initiative can be started within a portfolio.
Start initiative based on idea within a portfolio
On starting the initiative, information from the idea is copied to the initiative (excluding documents). The idea itself does not change and remains available.
3.2
Working with portfolios
3.2.1
Portfolio overview
Portfolio Dashboard
1. Customisation area for widgets
This section displays overall portfolio information based on widgets. The information can be altered by the administrator and configured by the portfolio manager by using the 'Edit Widgets' button. 2. Automated Reports
Displays a list of the Automated Reports that are available on the selected portfolio. 3. Reports
Shows the different categories of reports which can be used to show lists of projects, products, issues
etc. for the portfolio items contained within the active portfolio. 4. Timeline Reports
Displays a list of the timeline reports that are available on the selected Portfolio. Timeline reports allow the user to display data over a certain period, like cost information. The horizon and resolution of the table or graph can be set by the portfolio manager.
5. Report Models
The reporting of project data to the portfolio manager is based on a report model. Each portfolio can have multiple report models to support different reporting cycles, for example: a monthly highlight report and a detailed reporting model for each quarter.
6. Previous Versions
Lists all the previously saved versions of the Portfolio. This allows the portfolio manager to go back in time and compare the portfolio's status between versions. The latest status of the portfolio is saved by using the button 'Save as version'.
7. Portfolio item
This list contains the portfolio items and buttons for all the actions that can act on the individual (or a selection of) portfolio items. Some of the actions are 'Save as version', 'Send report request' and
'New'. 8. Tabs
Each portfolio contains the same tabs. Which tabs are shown may depend on the organization's license: the presence of some tabs is linked to the availability of a certain module. The purpose of each tab:
Dashbo ard
: as per the detailed description above. Properti
es
: lists all the basic information of the Portfolio, including any custom fields. Financi
als
: the financial overview tab displays the entered budgets, actual costs and the forecast. Portfolio
Gantt
: shows all the portfolio items in a Gantt based on their start and end dates. Docum
ents
: a common repository for all documents relating to the portfolio and their items.
Archive : lists all the archived portfolio items, and allows for items to be deleted or recovered from the archive.
Portfolio functions
A large number of actions can be performed on the portfolio: Edit
propertie s
: allows for editing the name, objective, the status and status description of the portfolio.
Edit member s
: to change who gets full or read access to the portfolio.
Customi ze Page Text
: for customizing the introductory text on the portfolio's dashboard.
Edit Field Configur ation
: the field configuration determines how data needs to be synchronized between project and portfolio item.
Project Layout
: edit the page layout of portfolio items, letting the portfolio manager determine what fields are important and how to display them.
Edit Widgets
: Add and edit widgets on your portfolio dashboard.
3.2.2
New portfolios
3.2.2.1 Defining new portfolios
The portfolio management module allows you to manage your business projects and ideas in portfolios. In order to do this, one or more portfolios need to be defined. For example a portfolio for every business unit or regional department in your organization, or a portfolio could consist of all projects that contribute to a strategic objective of your organization.
Defining a new Portfolio
1. Navigate to the Portfolio Management module in the dark blue header on the top of the screen. In the main window the Portfolio Management module is displayed, with three tabs: “Dashboard”, “Archive” and “Models”. The tab “Dashboard” is opened by default.
2. Click + on the dashboard to define a new portfolio. A popup window will appear in which de details of the new portfolio can be entered.
Portfolio listing
3. Click OK. You will now return to the portfolio dashboard where all portfolios are listed, including the new portfolio you just created.
3.2.2.2 Portfolio items
When opening the Portfolio Management module, which is found in the top blue bar at the top of the screen, an overview of all portfolios is shown. Click on the name of one of the portfolios to open it. A portfolio contains portfolio items of which there are various types:
· Initiative: a business idea that may well be turned into a project in the future
· Single SheetProject: a simple type of project without detailed plan
· Project: a standard project with a plan, which is managed using the project management side of the Principal Toolbox
A portfolio item can be used to store management information like the budget, information about resources, planning information, and the goals of the project. How to create a portfolio item is explained in this section: Creating portfolio items .
Each type of portfolio item has its own icon: Initiative:
Single Sheet Project:
Project / Programme:
3.2.2.3 Creating portfolio items
Note: As of release 8.0 it is possible to start projects on a selected date.
From inside a portfolio, new Ideas, Single Sheet Projects and regular Projects can be created which become part of that portfolio. A regular Project that is created and started from a Portfolio will
automatically appear as a project on the Project Management side of the Principal Toolbox. However, a Project that was started from the Project Management module, will not automatically be associated with a Portfolio. To put a link in place between an existing Project and a new Portfolio item, please refer to
'Modifying the project reference' .
When using the Portfolio Management module it's good practice to always create and start projects from within a Portfolio. This way it's guaranteed there's always a link between each Portfolio item and its corresponding Project. This way of working can be enforced by the Principal Toolbox. By enabling this setting it will prevent any project from starting without having been assigned to a portfolio.
To enable this setting:
1. Click on Setup and select Configuration.
2. Click on Principal Toolbox on the left side of the screen.
3. Change the setting 'Projects can be started from within portfolios only' to Yes
Up next are detailed instructions on the various ways projects and initiatives can be created and started.
Creating an Initiative
1. Open a portfolio and click on + to create a new entry in the portfolio.
Starting a project on the portfolio
2. Enter a name for the Portfolio Item, and the objective and remarks (optionally).
3. Assign a Project Manager to the new portfolio item (in case the portfolio item is converted to a project later on, the project will be automatically assigned to the project manager specified here). 4.Do not start a project: an Initiative is just an idea without an actual project being underway. 5. Click on OK to create the portfolio item.
Note: in case an existing Project needs to be associated with the newly created Initiative, then please follow the steps above followed by the instructions in Modifying the project reference .
49
Starting a Project when creating an Initiative
1. Follow the same procedure as when creating an Initiative (see above), but choose for Start Project
when entering the details.
2. Next, choose the Project Model the new project should be based on, and choose a folder the new project will be made part of.
3. Select a start date for the project.
4. The new project will automatically appear within the Project Management module. The Project Manager will have full access to the new project and can start entering a plan and team members as required.
Starting a new portfolio item (and project)
Note: The newly created project will appear in the Project Management Module of the Principal Toolbox. It will be assigned to the project manager (as chosen when creating the Initiative) and is associated with the portfolio item.
Starting a Project from an existing Initiative
1. Open the portfolio item (initiative) and click on the button 'Start Project'to start a project 2. Choose which Project Model to use, and in which folder the project should be created
3. After pressing OK the Project will be created. The icon of the portfolio item will have changed from in to depicting that the Project has started.
Starting a Single Sheet Project
1. To create or start a Single Sheet Project one follows the same procedure as when starting a regular Project, but when selecting the project model specifically choose the Single Sheet Project model. 2. Then choose the folder in which to create the project and press OK