Greenplum
®Database 4.2
System Administrator Guide
Copyright © 2014 Pivotal Software, Inc. All rights reserved.
Pivotal Software, Inc. believes the information in this publication is accurate as of its publication date. The information is subject to change without notice.
THE INFORMATION IN THIS PUBLICATION IS PROVIDED "AS IS." PIVOTAL SOFTWARE, INC. ("Pivotal") MAKES NO REPRESENTATIONS OR WARRANTIES OF ANY KIND WITH RESPECT TO THE INFORMATION IN THIS PUBLICATION, AND SPECIFICALLY DISCLAIMS IMPLIED WARRANTIES OF MERCHANTABILITY OR FITNESS FOR A PARTICULAR PURPOSE.
Use, copying, and distribution of any Pivotal software described in this publication requires an applicable software license.
All trademarks used herein are the property of Pivotal or their respective owners.
Table of Contents iii Greenplum Database System Administrator’s Guide 4.2 - Contents
Greenplum Database System Administrator’s Guide - 4.2 -
Contents
Preface... 1
About This Guide... 1
About the Greenplum Database Documentation Set... 1
Document Conventions... 2
Text Conventions... 2
Command Syntax Conventions... 3
Getting Support... 3
Product information and Technical Support... 3
Chapter 1: About the Greenplum Architecture... 4
About the Greenplum Master... 5
About the Greenplum Segments... 5
About the Greenplum Interconnect... 5
About Redundancy and Failover in Greenplum Database... 6
About Segment Mirroring... 6
About Master Mirroring... 7
About Interconnect Redundancy... 7
About Parallel Data Loading... 8
About Management and Monitoring... 8
Chapter 2: Starting and Stopping Greenplum... 10
Overview... 10
Starting Greenplum Database... 10
Restarting Greenplum Database... 10
Uploading Configuration File Changes Only... 11
Starting the Master in Maintenance Mode... 11
Stopping Greenplum Database... 11
Chapter 3: Configuring Your Greenplum System... 13
About Greenplum Master and Local Parameters... 13
Setting Configuration Parameters... 13
Setting a Local Configuration Parameter... 13
Setting a Master Configuration Parameter... 14
Viewing Server Configuration Parameter Settings... 15
Configuration Parameter Categories... 15
Connection and Authentication Parameters... 16
System Resource Consumption Parameters... 16
Query Tuning Parameters... 18
Error Reporting and Logging Parameters... 20
System Monitoring Parameters... 20
Runtime Statistics Collection Parameters... 21
Automatic Statistics Collection Parameters... 21
Client Connection Default Parameters... 22
Lock Management Parameters... 22
Workload Management Parameters... 22
External Table Parameters... 23
Append-Only Table Parameters... 23
Table of Contents iv Greenplum Database System Administrator’s Guide 4.2 - Contents
Past PostgreSQL Version Compatibility Parameters... 23
Greenplum Array Configuration Parameters... 23
Chapter 4: Enabling High Availability Features... 25
Overview of High Availability in Greenplum Database... 25
Overview of Segment Mirroring... 25
Overview of Master Mirroring... 26
Overview of Fault Detection and Recovery... 26
Enabling Mirroring in Greenplum Database... 27
Enabling Segment Mirroring... 27
Enabling Master Mirroring... 28
Detecting a Failed Segment... 29
Enabling Alerts and Notifications... 29
Checking for Failed Segments... 29
Checking the Log Files... 30
Recovering a Failed Segment... 30
Recovering From Segment Failures... 31
Recovering a Failed Master... 34
Restoring Master Mirroring After a Recovery... 35
Chapter 5: Backing Up and Restoring Databases... 36
Backup and Restore Operations... 36
Parallel Backup Support... 36
Non-Parallel Backup Support... 37
Parallel Restores... 37
Non-Parallel Restores... 38
Backing Up a Database... 38
Incremental Backup Support... 39
Using Direct I/O... 42
Using Data Domain Boost... 42
Using Named Pipes... 46
Automating Parallel Backups with gpcrondump... 47
Restoring From Parallel Backup Files... 48
Restoring a Database Using gpdbrestore... 48
Restoring to a Different Greenplum System Configuration... 49
Chapter 6: Expanding a Greenplum System... 51
Planning Greenplum System Expansion... 51
System Expansion Overview... 51
System Expansion Checklist... 52
Planning New Hardware Platforms... 54
Planning New Segment Initialization... 54
Planning Table Redistribution... 55
Preparing and Adding Nodes... 57
Adding New Nodes to the Trusted Host Environment... 58
Verifying OS Settings... 59
Validating Disk I/O and Memory Bandwidth... 60
Integrating New Hardware into the System... 60
Initializing New Segments... 60
Creating an Input File for System Expansion... 60
Table of Contents v Greenplum Database System Administrator’s Guide 4.2 - Contents
Rolling Back an Failed Expansion Setup... 63
Redistributing Tables... 64
Ranking Tables for Redistribution... 64
Redistributing Tables Using gpexpand... 64
Monitoring Table Redistribution... 65
Removing the Expansion Schema... 66
Chapter 7: Monitoring a Greenplum System... 67
Monitoring Database Activity and Performance... 67
Monitoring System State... 67
Enabling System Alerts and Notifications... 68
Checking System State... 71
Checking Disk Space Usage... 72
Checking for Data Distribution Skew... 73
Viewing Metadata Information about Database Objects... 74
Viewing Query Workfile Usage Information... 75
Viewing the Database Server Log Files... 77
Log File Format... 77
Searching the Greenplum Database Server Log Files... 79
Using gp_toolkit... 79
Greenplum Database SNMP OIDs and Error Codes... 79
Greenplum Database SNMP OIDs... 80
SQL Standard Error Codes... 80
Chapter 8: Routine System Maintenance Tasks... 89
Routine Vacuum and Analyze... 89
Transaction ID Management... 89
System Catalog Maintenance... 90
Vacuum and Analyze for Query Optimization... 91
Routine Reindexing... 91
Managing Greenplum Database Log Files... 91
Database Server Log Files... 92
Management Utility Log Files... 92
Chapter 9: Kerberos Authentication... 93
Requirements for using Kerberos with Greenplum Database... 94
Installing and Configuring a Kerberos KDC Server... 95
Creating Greenplum Database Roles in the KDC Database... 95
Installing and Configuring the Kerberos Client... 96
Setting up Greenplum Database with Kerberos for PSQL... 97
Setting up Greenplum Database with Kerberos for JDBC... 98
Sample Kerberos Configuration File... 99
About This Guide 1 Greenplum Database System Administrator Guide 4.2 – Preface
Preface
This guide provides information for system administrators responsible for administering a Greenplum Database system.
• About This Guide
• Document Conventions
• Getting Support
About This Guide
This guide describes system administration tasks for Greenplum Database, such as configuring the server, monitoring system activity, enabling high-availability, backing up and restoring databases, and other routine system administration tasks.
This guide assumes knowledge of Linux/UNIX system administration and database management systems. Familiarity with structured query language (SQL) is helpful. Because Greenplum Database is based on PostgreSQL 8.2.15, this guide assumes some familiarity with PostgreSQL. References to PostgreSQL documentation are provided throughout this guide for features that are similar to those in Greenplum Database.
About the Greenplum Database Documentation Set
As of Release 4.2.3, the Greenplum Database documentation set consists of the following guides.Table 0.1 Greenplum Database documentation set
Guide Name Description
Greenplum Database Database Administrator Guide
Every day DBA tasks such as configuring access control and workload management, writing queries, managing data, defining database objects, and performance troubleshooting. Greenplum Database System
Administrator Guide
Describes the Greenplum Database architecture and concepts such as parallel processing, and system administration tasks for Greenplum Database such as configuring the server, monitoring system activity, enabling high-availability, backing up and restoring databases, and expanding the system. Greenplum Database Reference
Guide
Reference information for Greenplum Database systems: SQL commands, system catalogs, environment variables, character set support, datatypes, the Greenplum MapReduce
specification, postGIS extension, server parameters, the gp_toolkit administrative schema, and SQL 2008 support. Greenplum Database Utility
Guide
Reference information for command-line utilities, client programs, and Oracle compatibility functions.
Greenplum Database Installation Guide
Information and instructions for installing and initializing a Greenplum Database system.
Document Conventions 2 Greenplum Database System Administrator Guide 4.2 – Preface
Document Conventions
The following conventions are used throughout the Greenplum Database documentation to help you identify certain types of information.
• Text Conventions
• Command Syntax Conventions
Text Conventions
Table 0.2 Text Conventions
Text Convention Usage Examples
bold Button, menu, tab, page, and field
names in GUI applications
Click Cancel to exit the page without saving your changes.
italics New terms where they are defined Database objects, such as schema, table, or columns names
The master instance is the postgres
process that accepts client connections.
Catalog information for Greenplum Database resides in the pg_catalog schema.
monospace File names and path names Programs and executables Command names and syntax Parameter names
Edit the postgresql.conf file. Use gpstart to start Greenplum Database.
monospace italics Variable information within file paths and file names
Variable information within command syntax
/home/gpadmin/config_file
COPY tablename FROM 'filename'
monospace bold Used to call attention to a particular part of a command, parameter, or code snippet.
Change the host name, port, and database name in the JDBC connection URL:
jdbc:postgresql://host:5432/m ydb
UPPERCASE Environment variables SQL commands Keyboard keys
Make sure that the Java /bin
directory is in your $PATH.
SELECT * FROM my_table;
Getting Support 3 Greenplum Database System Administrator Guide 4.2 – Preface
Command Syntax Conventions
Table 0.3 Command Syntax Conventions
Text Convention Usage Examples
{ } Within command syntax, curly
braces group related command options. Do not type the curly braces.
FROM { 'filename' | STDIN }
[ ] Within command syntax, square
brackets denote optional arguments. Do not type the brackets.
TRUNCATE [ TABLE ] name
... Within command syntax, an ellipsis
denotes repetition of a command, variable, or option. Do not type the ellipsis.
DROP TABLE name [, ...]
| Within command syntax, the pipe
symbol denotes an “OR”
relationship. Do not type the pipe symbol.
VACUUM [ FULL | FREEZE ]
$ system_command # root_system_command => gpdb_command =# su_gpdb_command
Denotes a command prompt - do not type the prompt symbol. $ and
# denote terminal command prompts. => and =# denote
Greenplum Database interactive program command prompts (psql
or gpssh, for example).
$ createdb mydatabase # chown gpadmin -R /datadir => SELECT * FROM mytable; =# SELECT * FROM pg_database;
Getting Support
Pivotal/Greenplum support, product, and licensing information can be obtained as follows.
Product information and Technical Support
For technical support, documentation, release notes, software updates, or for information about Pivotal products, licensing, and services, go to Pivotal Support. Additionally, you can still obtain product and support information from the EMCSupport Site at:
4 Greenplum Database System Administrator Guide 4.2 – Chapter 1: About the Greenplum Architecture
1.
About the Greenplum Architecture
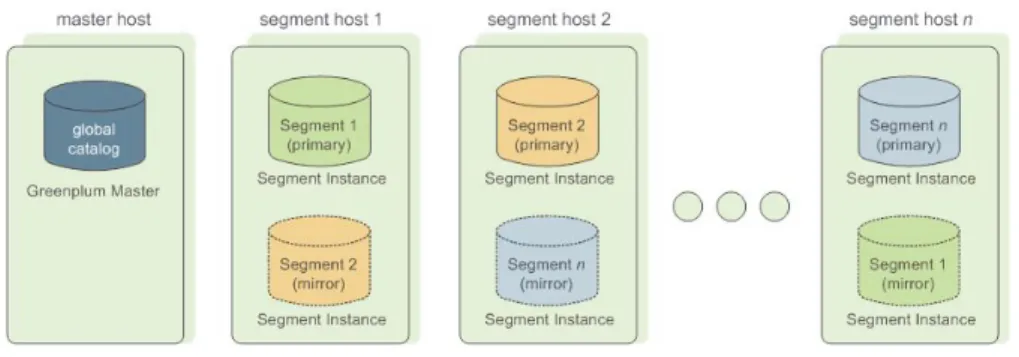
Greenplum Database stores and processes large amounts of data by distributing the data and processing workload across several servers or hosts. Greenplum Database is an array of individual databases based upon PostgreSQL 8.2 working together to present a single database image. The master is the entry point to the Greenplum Database system. It is the database instance to which clients connect and submit SQL statements. The master coordinates its work with the other database instances in the system, called segments, which store and process the data.
Figure 1.1 High-Level Greenplum Database Architecture
This section describes the components that make up a Greenplum Database system and how they work together:
• About the Greenplum Master • About the Greenplum Segments • About the Greenplum Interconnect
• About Redundancy and Failover in Greenplum Database • About Parallel Data Loading
About the Greenplum Master 5 Greenplum Database System Administrator Guide 4.2 – Chapter 1: About the Greenplum Architecture
About the Greenplum Master
The master is the entry point to the Greenplum Database system. It is the database process that accepts client connections and processes SQL commands that system users issue.
Greenplum Database end-users interact with Greenplum Database (through the master) as they would with a typical PostgreSQL database. They connect to the database using client programs such as psql or application programming interfaces (APIs) such as JDBC or ODBC.
The master is where the global system catalog resides. The global system catalog is the set of system tables that contain metadata about the Greenplum Database system itself. The master does not contain any user data; data resides only on the segments. The master authenticates client connections, processes incoming SQL commands, distributes workload among segments, coordinates the results returned by each segment, and presents the final results to the client program.
About the Greenplum Segments
In Greenplum Database, the segments are where data is stored and the majority of query processing takes place. When a user connects to the database and issues a query, processes are created on each segment to handle the work of that query. For more information about query processes, see the Greenplum Database Database Administrator Guide.
User-defined tables and their indexes are distributed across the available segments in a Greenplum Database system; each segment contains a distinct portion of data. The database server processes that serve segment data run under the corresponding segment instances. Users interact with segments in a Greenplum Database system through the master.
In the recommended Greenplum Database hardware configuration, there is one active segment per effective CPU or CPU core. For example, if your segment hosts have two dual-core processors, you would have four primary segments per host.
About the Greenplum Interconnect
The interconnect is the networking layer of Greenplum Database. The interconnect refers to the inter-process communication between segments and the network
infrastructure on which this communication relies. The Greenplum interconnect uses a standard Gigabit Ethernet switching fabric.
By default, the interconnect uses User Datagram Protocol (UDP) to send messages over the network. The Greenplum software performs packet verification beyond what is provided by UDP. This means the reliability is equivalent to Transmission Control Protocol (TCP), and the performance and scalability exceeds TCP. If the interconnect used TCP, Greenplum Database would have a scalability limit of 1000 segment instances. With UDP as the current default protocol for the interconnect, this limit is not applicable.
About Redundancy and Failover in Greenplum Database 6 Greenplum Database System Administrator Guide 4.2 – Chapter 1: About the Greenplum Architecture
About Redundancy and Failover in Greenplum Database
You can deploy Greenplum Database without a single point of failure. This section explains the redundancy components of Greenplum Database.• About Segment Mirroring
• About Master Mirroring
• About Interconnect Redundancy
About Segment Mirroring
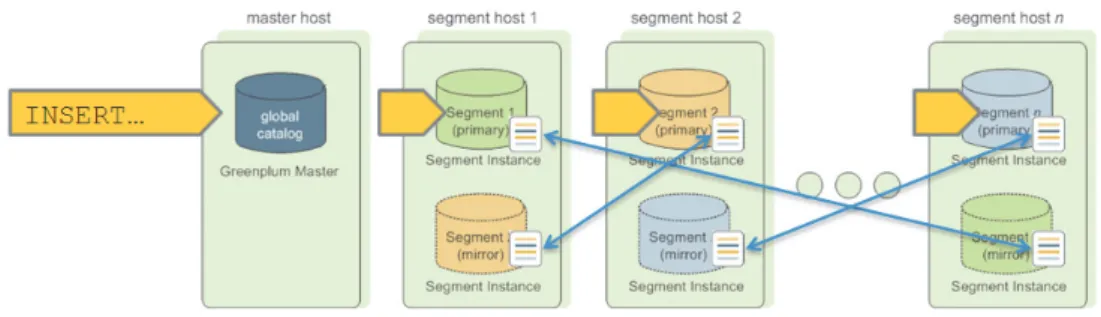
When you deploy your Greenplum Database system, you can optionally configure mirror segments. Mirror segments allow database queries to fail over to a backup segment if the primary segment becomes unavailable. To configure mirroring, you must have enough hosts in your Greenplum Database system so the secondary (mirror) segment always resides on a different host than its primary segment. Figure 1.2 shows how table data is distributed across segments when mirroring is
configured..
Figure 1.2 Data Mirroring in Greenplum Database
Segment Failover and Recovery
When mirroring is enabled in a Greenplum Database system, the system will automatically fail over to the mirror copy if a primary copy becomes unavailable. A Greenplum Database system can remain operational if a segment instance or host goes down as long as all the data is available on the remaining active segments.
If the master cannot connect to a segment instance, it marks that segment instance as down in the Greenplum Database system catalog and brings up the mirror segment in its place. A failed segment instance will remain out of operation until an administrator takes steps to bring that segment back online. An administrator can recover a failed segment while the system is up and running. The recovery process copies over only the changes that were missed while the segment was out of operation.
About Redundancy and Failover in Greenplum Database 7 Greenplum Database System Administrator Guide 4.2 – Chapter 1: About the Greenplum Architecture
If you do not have mirroring enabled, the system will automatically shut down if a segment instance becomes invalid. You must recover all failed segments before operations can continue.
About Master Mirroring
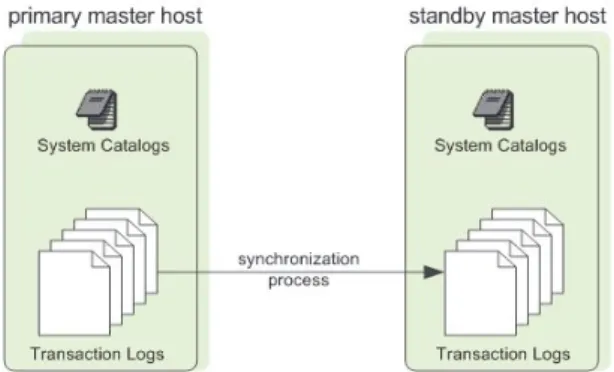
You can also optionally deploy a backup or mirror of the master instance on a separate host from the master node. A backup master host serves as a warm standby in the event that the primary master host becomes unoperational. The standby master is kept up to date by a transaction log replication process, which runs on the standby master host and synchronizes the data between the primary and standby master hosts. If the primary master fails, the log replication process stops, and the standby master can be activated in its place. Upon activation of the standby master, the replicated logs are used to reconstruct the state of the master host at the time of the last successfully committed transaction. The activated standby master effectively becomes the Greenplum Database master, accepting client connections on the master port (which must be set to the same port number on the master host and the backup master host). Since the master does not contain any user data, only the system catalog tables need to be synchronized between the primary and backup copies. When these tables are updated, changes are automatically copied over to the standby master to ensure synchronization with the primary master.
Figure 1.3 Master Mirroring in Greenplum Database
About Interconnect Redundancy
The interconnect refers to the inter-process communication between the segments and the network infrastructure on which this communication relies. You can achieve a highly available interconnect by deploying dual Gigabit Ethernet switches on your network and redundant Gigabit connections to the Greenplum Database host (master and segment) servers.
About Parallel Data Loading 8 Greenplum Database System Administrator Guide 4.2 – Chapter 1: About the Greenplum Architecture
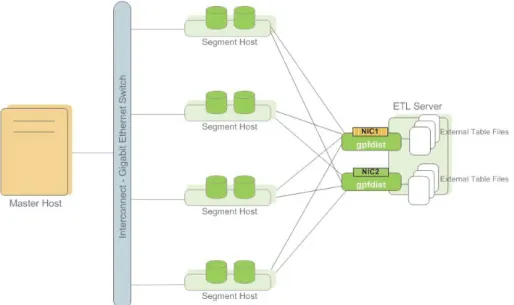
About Parallel Data Loading
In a large scale, multi-terabyte data warehouse, large amounts of data must be loaded within a relatively small maintenance window. Greenplum supports fast, parallel data loading with its external tables feature. Administrators can also load external tables in single row error isolation mode to filter bad rows into a separate error table while continuing to load properly formatted rows. Administrators can specify an error threshold for a load operation to control how many improperly formatted rows cause Greenplum to abort the load operation.
By using external tables in conjunction with Greenplum Database’s parallel file server (gpfdist), administrators can achieve maximum parallelism and load bandwidth from their Greenplum Database system.
Figure 1.4 External Tables Using Greenplum Parallel File Server (gpfdist)
About Management and Monitoring
Administrators manage a Greenplum Database system using command-line utilities located in $GPHOME/bin. Greenplum provides utilities for the following
administration tasks:
• Installing Greenplum Database on an Array • Initializing a Greenplum Database System • Starting and Stopping Greenplum Database • Adding or Removing a Host
• Expanding the Array and Redistributing Tables among New Segments • Managing Recovery for Failed Segment Instances
About Management and Monitoring 9 Greenplum Database System Administrator Guide 4.2 – Chapter 1: About the Greenplum Architecture
• Backing Up and Restoring a Database (in Parallel) • Loading Data in Parallel
• System State Reporting
Greenplum provides an optional system monitoring and management tool that administrators can install and enable with Greenplum Database. Greenplum
Command Center uses data collection agents on each segment host to collect and store Greenplum system metrics in a dedicated database. Segment data collection agents send their data to the Greenplum master at regular intervals (typically every 15 seconds). Users can query the Command Center database to see query and system metrics. Greenplum Command Center has a graphical web-based user interface for viewing system metrics, which administrators can install separately from Greenplum Database.
Figure 1.5 Greenplum Command Center Architecture
Overview 10 Greenplum Database System Administrator Guide 4.2 – Chapter 2: Starting and Stopping Greenplum
2.
Starting and Stopping Greenplum
This chapter describes how to start, stop, and restart a Greenplum Database system. This chapter contains the following topics:
• Overview
• Starting Greenplum Database
• Stopping Greenplum Database
Overview
Because a Greenplum Database system is distributed across many machines, the process for starting and stopping a Greenplum database management system (DBMS) is different than the process for starting and stopping a regular PostgreSQL DBMS. In a Greenplum Database DBMS, each database server instance (the master and all segments) must be started or stopped across all of the hosts in the system in such a way that they can all work together as a unified DBMS.
Use the gpstart and gpstop utilities to start and stop the Greenplum database, respectively. These utilities are located in $GPHOME/bin of your Greenplum Database master host installation.
Important: Do not issue a KILL command to end any Postgres process. Instead, use the database command pg_cancel_backend().
For information about gpstart and gpstop, see the Greenplum Database Utility
Guide.
Starting Greenplum Database
Use the gpstart utility to start a Greenplum Database that has already been
initialized by the gpinitsystem utility, but has been stopped by the gpstop utility. The gpstart utility starts the Greenplum Database by starting all the Postgres database instances of the Greenplum Database cluster. gpstart orchestrates this process and performs the process in parallel.
To start Greenplum Database
$ gpstart
Restarting Greenplum Database
The gpstop utility with the -r option can stop and then restart Greenplum Database
after the shutdown completes.
To restart Greenplum Database
Stopping Greenplum Database 11 Greenplum Database System Administrator Guide 4.2 – Chapter 2: Starting and Stopping Greenplum
Uploading Configuration File Changes Only
The gpstop utility can upload changes to the pg_hba.conf configuration file and to runtime parameters in the master postgresql.conf file without service interruption. Active sessions pick up changes when they reconnect to the database. Many server configuration parameters require a full system restart (gpstop -r) to activate. For information about server configuration parameters, see the Greenplum Database Reference Guide.
To upload runtime configuration file changes without restarting
$ gpstop -u
Starting the Master in Maintenance Mode
You can start only the master to perform maintenance or administrative tasks without affecting data on the segments. For example, you can connect to a database only on the master instance in utility mode and edit system catalog settings. For more information about system catalog tables, see the Greenplum Database Reference Guide.
To start the master in utility mode 1. Run gpstart using the -m option:
$ gpstart -m
2. Connect to the master in utility mode to do catalog maintenance. For example:
$ PGOPTIONS='-c gp_session_role=utility' psql template1
3. After completing your administrative tasks, stop the master in utility mode. Then, restart it in production mode.
$ gpstop -m
Warning: Incorrect use of maintenance mode connections can result in an inconsistent system state. Only Technical Support should perform this operation.
Stopping Greenplum Database
The gpstop utility stops or restarts your Greenplum Database system and always runs on the master host. When activated, gpstop stops all postgres processes in the system, including the master and all segment instances.
The gpstop utility uses a default of up to 64 parallel worker threads to bring down the Postgres instances that make up the Greenplum Database cluster. The system waits for any active transactions to finish before shutting down. To stop Greenplum Database immediately, use fast mode.
To stop Greenplum Database
Stopping Greenplum Database 12 Greenplum Database System Administrator Guide 4.2 – Chapter 2: Starting and Stopping Greenplum
To stop Greenplum Database in fast mode
About Greenplum Master and Local Parameters 13 Greenplum Database System Administrator Guide 4.2 – Chapter 3: Configuring Your Greenplum System
3.
Configuring Your Greenplum System
Server configuration parameters affect the behavior of Greenplum Database. Most are the same as PostgreSQL configuration parameters; some are Greenplum-specific. • About Greenplum Master and Local Parameters
• Setting Configuration Parameters
• Configuration Parameter Categories
About Greenplum Master and Local Parameters
Server configuration files contain parameters that configure server behavior. The Greenplum Database configuration file, postgresql.conf, resides in the data directory of the database instance.
The master and each segment instance have their own postgresql.conf file. Some parameters are local: each segment instance examines its postgresql.conf file to
get the value of that parameter. Set local parameters on the master and on each segment instance.
Other parameters are master parameters that you set on the master instance. The value is passed down to (or in some cases ignored by) the segment instances at query run time.
See the Greenplum Database Reference Guide for information about local and master server configurationparameters.
Setting Configuration Parameters
Many configuration parameters limit who can change them and where or when they can be set. For example, to change certain parameters, you must be a Greenplum Database superuser. Other parameters can be set only at the system level in the
postgresql.conf file or require a system restart to take effect.
Many configuration parameters are session parameters. You can set session
parameters at the system level, the database level, the role level or the session level. Database users can change most session parameters within their session, but some require superuser permissions. See the Greenplum Database Reference Guide for information about settingserver configurationparameters..
Setting a Local Configuration Parameter
To change a local configuration parameter across multiple segments, update the parameter in the postgresql.conf file of each targeted segment, both primary and mirror. Use the gpconfig utility to set a parameter in all Greenplum
postgresql.conf files. For example:
Setting Configuration Parameters 14 Greenplum Database System Administrator Guide 4.2 – Chapter 3: Configuring Your Greenplum System
Restart Greenplum Database to make the configuration changes effective:
$ gpstop -r
Setting a Master Configuration Parameter
To set a master configuration parameter, set it at the Greenplum master instance. If it is also a session parameter, you can set the parameter for a particular database, role or session. If a parameter is set at multiple levels, the most granular level takes
precedence. For example, session overrides role, role overrides database, and database overrides system.
Setting Parameters at the System Level
Master parameter settings in the master postgresql.conf file are the system-wide
default. To set a master parameter:
1. Edit the $MASTER_DATA_DIRECTORY/postgresql.conf file.
2. Find the parameter to set, uncomment it (remove the preceding # character), and type the desired value.
3. Save and close the file.
4. For sessionparameters that do not require a server restart, upload the
postgresql.conf changes as follows:
$ gpstop -u
5. For parameter changes that require a server restart, restart Greenplum Database as follows:
$ gpstop -r
For details about the server configuration parameters, see the Greenplum Database Reference Guide.
Setting Parameters at the Database Level
Use ALTER DATABASE to set parameters at the database level. For example:
=# ALTER DATABASE mydatabase SET search_path TO myschema;
When you set a session parameter at the database level, every session that connects to that database uses that parameter setting. Settings at the database level override settings at the system level.
Setting Parameters at the Role Level
Use ALTER ROLE to set a parameter at the role level. For example: =# ALTER ROLE bob SET search_path TO bobschema;
When you set a session parameter at the role level, every session initiated by that role uses that parameter setting. Settings at the role level override settings at the database level.
Viewing Server Configuration Parameter Settings 15 Greenplum Database System Administrator Guide 4.2 – Chapter 3: Configuring Your Greenplum System
Setting Parameters in a Session
Any session parameter can be set in an active database session using the SET
command. For example:
=# SET statement_mem TO '200MB';
The parameter setting is valid for the rest of that session or until you issue a RESET
command. For example:
=# RESET statement_mem;
Settings at the session level override those at the role level.
Viewing Server Configuration Parameter Settings
The SQL command SHOW allows you to see the current server configuration parameter settings. For example, to see the settings for all parameters:
$ psql -c 'SHOW ALL;'
SHOW lists the settings for the master instance only. To see the value of a particular parameter across the entire system (master and all segments), use the gpconfig
utility. For example:
$ gpconfig --show max_connections
Configuration Parameter Categories
Configuration parameters affect categories of server behaviors, such as resource confumption, query tuning, and authentication. This section describes Greenplum configuration parameter categories. For details about configuration parameter categories, see the Greenplum Database Reference Guide.
• Connection and Authentication Parameters • System Resource Consumption Parameters • Query Tuning Parameters
• Error Reporting and Logging Parameters • System Monitoring Parameters
• Runtime Statistics Collection Parameters • Automatic Statistics Collection Parameters • Client Connection Default Parameters • Lock Management Parameters • Workload Management Parameters • External Table Parameters
• Past PostgreSQL Version Compatibility Parameters • Greenplum Array Configuration Parameters
Configuration Parameter Categories 16 Greenplum Database System Administrator Guide 4.2 – Chapter 3: Configuring Your Greenplum System
Connection and Authentication Parameters
These parameters control how clients connect and authenticate to Greenplum Database. See the Greenplum Database Database Administrator Guide for information about configuring client authentication.
Connection Parameters • gp_vmem_idle_resource_timeout • listen_addresses • max_connections • max_prepared_transactions • superuser_reserved_connections • tcp_keepalives_count • tcp_keepalives_idle • tcp_keepalives_interval • unix_socket_directory • unix_socket_group • unix_socket_permissions
Security and Authentication Parameters
• authentication_timeout • db_user_namespace • krb_caseins_users • krb_server_keyfile • krb_srvname • password_encryption • ssl • ssl_ciphers
System Resource Consumption Parameters
Memory Consumption Parameters
These parameters control system memory usage. You can adjust
gp_vmem_protect_limit to avoid running out of memory at the segment hosts during query processing.
• gp_vmem_idle_resource_timeout • gp_vmem_protect_limit • gp_vmem_protect_segworker_cache_limit • gp_workfile_limit_files_per_query • gp_workfile_limit_per_query • gp_workfile_limit_per_segment • max_appendonly_tables • max_prepared_transactions • max_stack_depth • shared_buffers • temp_buffers
Free Space Map Parameters
These parameters control the sizing of the free space map, which contains expired rows. Use VACUUM to reclaim the free space map disk space. See the Greenplum Database Database Administrator Guide for information about vacuuming a database.
• max_fsm_pages
Configuration Parameter Categories 17 Greenplum Database System Administrator Guide 4.2 – Chapter 3: Configuring Your Greenplum System
OS Resource Parameters
• max_files_per_process
• shared_preload_libraries
Cost-Based Vacuum Delay Parameters
Warning: Greenplum does not recommend cost-based vacuum delay because it runs asynchronously anong the segment instances. The vacuum cost limit and delay is invoked at the segment level without taking into account the state of the entire Greenplum array.
You can configure the execution cost of VACUUM and ANALYZE commands to reduce the I/O impact on concurrent database activity. When the accumulated cost of I/O operations reaches the limit, the process performing the operation sleeps for a while, Then resets the counter and continues execution
• vacuum_cost_delay
• vacuum_cost_limit
• vacuum_cost_page_dirty
• vacuum_cost_page_hit
• vacuum_cost_page_miss
Transaction ID Management Parameters
• xid_stop_limit
Configuration Parameter Categories 18 Greenplum Database System Administrator Guide 4.2 – Chapter 3: Configuring Your Greenplum System
Query Tuning Parameters
Query Plan Operator Control Parameters
The following parameters control the types of plan operations the query planner can use. Enable or disable plan operations to force the planner to choose a different plan. This is useful for testing and comparing query performance using different plan types.
• enable_bitmapscan • enable_groupagg • enable_hashagg • enable_hashjoin • enable_indexscan • enable_mergejoin • enable_nestloop • enable_seqscan • enable_sort • enable_tidscan • gp_enable_adaptive_nestloop • gp_enable_agg_distinct • gp_enable_agg_distinct_pruning • gp_enable_direct_dispatch • gp_enable_fallback_plan • gp_enable_fast_sri • gp_enable_groupext_distinct_ gather • gp_enable_groupext_distinct_ pruning • gp_enable_multiphase_agg • gp_enable_predicate_ propagation • gp_enable_preunique • gp_enable_sequential_window_ plans • gp_enable_sort_distinct • gp_enable_sort_limit
Query Planner Costing Parameters
Warning: Greenplum recommends that you do not adjust these query costing parameters. They are tuned to reflect Greenplum Database hardware configurations and typical workloads. All of these parameters are related. Changing one without changing the others can have adverse affects on performance.
• cpu_index_tuple_cost • cpu_operator_cost • cpu_tuple_cost • cursor_tuple_fraction • effective_cache_size • gp_motion_cost_per_row • gp_segments_for_planner • random_page_cost • seq_page_cost
Database Statistics Sampling Parameters
These parameters adjust the amount of data sampled by an ANALYZE operation. Adjusting these parameters affects statistics collection system-wide. You can configure statistics collection on particular tables and columns by using the ALTER TABLESET STATISTICS clause.
• default_statistics_target
• gp_analyze_relative_error
Sort Operator Configuration Parameters
• gp_enable_sort_distinct
Configuration Parameter Categories 19 Greenplum Database System Administrator Guide 4.2 – Chapter 3: Configuring Your Greenplum System
Aggregate Operator Configuration Parameters
• gp_enable_agg_distinct • gp_enable_agg_distinct_pruning • gp_enable_multiphase_agg • gp_enable_preunique • gp_enable_groupext_distinct_ gather • gp_enable_groupext_distinct_ pruning • gp_workfile_compress_algorithm
Join Operator Configuration Parameters
• join_collapse_limit • gp_adjust_selectivity_for_oute rjoins • gp_hashjoin_tuples_per_bucket • gp_statistics_use_fkeys • gp_workfile_compress_algorithm
Other Query Planner Configuration Parameters
• from_collapse_limit
• gp_enable_predicate_propagation
• gp_max_plan_size
Configuration Parameter Categories 20 Greenplum Database System Administrator Guide 4.2 – Chapter 3: Configuring Your Greenplum System
Error Reporting and Logging Parameters
Log • log_rotation_age • log_rotation_size • log_truncate_on_rotation Rotation When to Log • client_min_messages • log_error_verbosity • log_min_duration_statement • log_min_error_statement • log_min_messages What to Log • debug_pretty_print • debug_print_parse • debug_print_plan • debug_print_prelim_plan • debug_print_rewritten • debug_print_slice_table • log_autostats • log_connections • log_disconnections • log_dispatch_stats • log_duration • log_executor_stats • log_hostname • log_parser_stats • log_planner_stats • log_statement • log_statement_stats • log_timezone • gp_debug_linger • gp_log_format • gp_max_csv_line_length • gp_reraise_signal
System Monitoring Parameters
SNMP Alerts
The following parameters send SNMP notifications when events occur. • gp_snmp_community
• gp_snmp_monitor_address
• gp_snmp_use_inform_or_trap
Email Alerts
The following parameters configure the system to send email alerts for fatal error events, such as a segment going down or a server crash and reset.
• gp_email_from
• gp_email_smtp_password
• gp_email_smtp_server
• gp_email_smtp_userid
Configuration Parameter Categories 21 Greenplum Database System Administrator Guide 4.2 – Chapter 3: Configuring Your Greenplum System
Greenplum Command Center Agent
The following parameters configure the data collection agents for Greenplum Command Center.
• gp_enable_gpperfmon
• gp_gpperfmon_send_interval
• gpperfmon_log_alert_level
• gpperfmon_port
Runtime Statistics Collection Parameters
These parameters control the server statistics collection feature. When statistics collection is enabled, you can access the statistics data using the pg_stat and pg_statio family of system catalog views.
• stats_queue_level
• track_activities
• track_counts
• update_process_title
Automatic Statistics Collection Parameters
When automatic statistics collection is enabled, you can run ANALYZE automatically in the same transaction as an INSERT, UPDATE, DELETE, COPY or CREATE TABLE...AS SELECT statement when a certain threshold of rows is affected (on_change), or when
a newly generated table has no statistics (on_no_stats). To enable this feature, set the following server configuration parameters in your Greenplum master
postgresql.conf file and restart Greenplum Database: • gp_autostats_mode
• log_autostats
Warning: Depending on the specific nature of your database operations, automatic statistics collection can have a negative performance impact. Carefully evaluate whether the default setting of on_no_stats is appropriate for your system.
Configuration Parameter Categories 22 Greenplum Database System Administrator Guide 4.2 – Chapter 3: Configuring Your Greenplum System
Client Connection Default Parameters
Statement Behavior Parameters
• check_function_bodies • default_tablespace • default_transaction_isolation • default_transaction_read_only • search_path • statement_timeout • vacuum_freeze_min_age
Locale and Formatting Parameters
• client_encoding • DateStyle • extra_float_digits • IntervalStyle • lc_collate • lc_ctype • lc_messages • lc_monetary • lc_numeric • lc_time • TimeZone
Other Client Default Parameters
• dynamic_library_path
• explain_pretty_print
• local_preload_libraries
Lock Management Parameters • deadlock_timeout
• max_locks_per_transaction
Workload Management Parameters
The following configuration parameters configure the Greenplum Database workload management feature (resource queues), query prioritization, memory utilization and concurrency control. • gp_resqueue_priority • gp_resqueue_priority_cpucores_per_ segment • gp_resqueue_priority_sweeper_ interval • gp_vmem_idle_resource_timeout • gp_vmem_protect_limit • gp_vmem_protect_segworker_cache_ limit • max_resource_queues • max_resource_portals_per_ transaction • resource_cleanup_gangs_on_ wait • resource_select_only • stats_queue_level
Configuration Parameter Categories 23 Greenplum Database System Administrator Guide 4.2 – Chapter 3: Configuring Your Greenplum System
External Table Parameters
The following parameters configure the external tables feature of Greenplum Database. See the Greenplum Database Database Administrator Guide for more information about external tables.
• gp_external_enable_exec
• gp_external_grant_privileges
• gp_external_max_segs
• gp_reject_percent_threshold
• readable_external_table_timeout
Append-Only Table Parameters
The following parameters configure the append-only tables feature of Greenplum Database. See the Greenplum Database Database Administrator Guide for more information about append-only tables.
• max_appendonly_tables
Database and Tablespace/Filespace Parameters
The following parameters configure the maximum number of databases, tablespaces, and filespaces allowed in a system.
• gp_max_tablespaces
• gp_max_filespaces
• gp_max_databases
Past PostgreSQL Version Compatibility Parameters
The following parameters provide compatibility with older PostgreSQL versions. You do not need to change these parameters in Greenplum Database.
• add_missing_from • array_nulls • backslash_quote • escape_string_warning • regex_flavor • standard_conforming_strings • transform_null_equals
Greenplum Array Configuration Parameters
The parameters in this section control the configuration of the Greenplum Database array and its components: segments, master, distributed transaction manager, and interconnect.
Configuration Parameter Categories 24 Greenplum Database System Administrator Guide 4.2 – Chapter 3: Configuring Your Greenplum System
Interconnect Configuration Parameters
• gp_interconnect_fc_method • gp_interconnect_hash_multiplier • gp_interconnect_queue_depth • gp_interconnect_snd_queue_depth • gp_interconnect_setup_ timeout • gp_interconnect_type • gp_max_packet_size
Dispatch Configuration Parameters
• gp_cached_segworkers_threshold
• gp_connections_per_thread
• gp_enable_direct_dispatch
• gp_segment_connect_timeout
• gp_set_proc_affinity
Fault Operation Parameters
• gp_set_read_only
• gp_fts_probe_interval
• gp_fts_probe_threadcount
Distributed Transaction Management Parameters
• gp_max_local_distributed_cache Read-Only Parameters • gp_command_count • gp_content • gp_dbid • gp_num_contents_in_cluster • gp_role • gp_session_id
Overview of High Availability in Greenplum Database 25 Greenplum Database System Administrator Guide 4.2 – Chapter 4: Enabling High Availability Features
4.
Enabling High Availability Features
This chapter describes the high-availability features of Greenplum Database and the process to recover a segment or master instance.
• Overview of High Availability in Greenplum Database
• Enabling Mirroring in Greenplum Database
• Detecting a Failed Segment
• Recovering a Failed Segment
• Recovering a Failed Master
Overview of High Availability in Greenplum Database
Greenplum Database provides several optional features to ensure maximum uptime and high availability of your system. This section summarizes these features: • Overview of Segment Mirroring• Overview of Master Mirroring
• Overview of Fault Detection and Recovery Overview of Segment Mirroring
Mirror segments allow database queries to fail over to a backup segment if the primary segment becomes unavailable. To configure mirroring, your Greenplum Database system must have enough nodes for a primary segment and its mirror to reside on different hosts. Only primary segments are active during database
operations. The system uses a file block replication process to copy changes from a primary segment to its mirror; if a failure has not occurred, only this process runs on the mirror host.
Overview of High Availability in Greenplum Database 26 Greenplum Database System Administrator Guide 4.2 – Chapter 4: Enabling High Availability Features
If a segment fails, the file replication process stops and the mirror segment
automatically starts as the active segment instance. The active mirror’s system state is Change Tracking, and all database operations as it logs changes made by transactions. When the failed segment is repaired and ready to be brought back online,
administrators initiate a recovery process and the system goes into Resynchronization state. The recovery process copies the changes made to the mirror onto the repaired segment. The system state is Synchronized when the recovery process completes. Overview of Master Mirroring
You can deploy a backup or mirror of the master instance on a separate host machine. A backup master or standby master host serves as a warm standby if the primary master host becomes nonoperational.
The standby master is kept up to date by a replication process gpsyncagent, which runs on the standby master host and keeps the transaction log data between the primary and standby masters synchronized. If a failure has not occurred on the primary master, only the replication process runs on the standby master.
If the primary master fails, the replication process stops, and an administrator can activate the standby master. Upon activation of the standby master, the replicated logs reconstruct the state of the primary master host at the time of the last successfully committed transaction. The activated standby then functions as the Greenplum Database master, accepting connections on the same port used for the failed primary master.
Since the master does not house user data, only system catalog tables are synchronized between the primary and standby masters. When these tables are updated, changes are automatically copied to the standby master to keep it current with the primary.
Figure 4.2 Master Mirroring in Greenplum Database
Overview of Fault Detection and Recovery
The Greenplum Database server (postgres) subprocess named ftsprobe handles fault detection. ftsprobe monitors the Greenplum array; it connects to and scans all segments and database processes at intervals that you can configure.
Enabling Mirroring in Greenplum Database 27 Greenplum Database System Administrator Guide 4.2 – Chapter 4: Enabling High Availability Features
If ftsprobe cannot connect to a segment, it marks the segment as “down” in the Greenplum Database system catalog. The segment remains nonoperational until an administrator initiates the recovery process.
With mirroring enabled, Greenplum Database automatically fails over to a mirror copy if a primary copy becomes unavailable. The system is operational if a segment instance or host fails provided all data is available on the remaining active segments. To recover failed segments, a Greenplum administrator runs the gprecoverseg
recovery utility. This utility locates the failed segments, verifies they are valid, and compares the transactional state with the currently active segment to determine changes made while the segment was offline. gprecoverseg synchronizes the changed database files with the active segment and brings the segment back online. Administrators perform the recovery while Greenplum Database is up and running. With mirroring disabled, the system automatically shuts down if a segment instance fails. Administrators manually recover all failed segments before operations resume.
Enabling Mirroring in Greenplum Database
You can configure your Greenplum Database system with mirroring at setup time using gpinitsystem or enable mirroring later using gpaddmirrors and
gpinitstandby. This section assumes you are adding mirrors to an existing system that was initialized without mirrors.
You can enable the following types of mirroring: • Enabling Segment Mirroring
• Enabling Master Mirroring
Enabling Segment Mirroring
Mirror segments allow database queries to fail over to a backup segment if the primary segment is unavailable. To configure mirroring, your Greenplum Database system must have enough nodes to allow the mirror segment to reside on a different host than its primary. By default, mirrors are configured on the same array of hosts as the primary segments. You may choose a completely different set of hosts for your mirror segments so they do not share machines with any of your primary segments.
Important: During the online data replication process, Greenplum Database should be in a quiescent state, workloads and other queries should not be running.
To add segment mirrors to an existing system (same hosts as primaries) 1. Allocate the data storage area for mirror data on all segment hosts. The data
storage area must be different from your primary segments’ file system location.
2. Use gpssh-exkeys to ensure that the segment hosts can SSH and SCP to each other without a password prompt.
3. Run the gpaddmirrors utility to enable mirroring in your Greenplum Database
system. For example, to add to your primary segment port numbers to calculate the mirror segment port numbers:
Enabling Mirroring in Greenplum Database 28 Greenplum Database System Administrator Guide 4.2 – Chapter 4: Enabling High Availability Features
$ gpaddmirrors -p 10000
Where -p specifies the number to add to your primary segment port numbers
To add segment mirrors to an existing system (different hosts from primaries)
1. Ensure the Greenplum Database software is installed on all hosts. See the Greenplum Database Installation Guide for detailed installation instructions.
2. Allocate the data storage area for mirror data on all segment hosts.
3. Use gpssh-exkeys to ensure the segment hosts can SSH and SCP to each other without a password prompt.
4. Create a configuration file that lists the host names, ports, and data directories on which to create mirrors. To create a sample configuration file to use as a starting point, run:
$ gpaddmirrors -o filename
The format of the mirror configuration file is:
filespaceOrder=[filespace1_fsname[:filespace2_fsname:...] mirror[content]=content:address:port:mir_replication_port:pri_ replication_port:fselocation[:fselocation:...]
For example, a configuration for two segment hosts and two segments per host, with no additional filespaces configured besides the default pg_system filespace):
filespaceOrder=
mirror0=0:sdw1:sdw1-1:52001:53001:54001:/gpdata/mir1/gp0 mirror1=1:sdw1:sdw1-2:52002:53002:54002:/gpdata/mir1/gp1 mirror2=2:sdw2:sdw2-1:52001:53001:54001:/gpdata/mir1/gp2 mirror3=3:sdw2:sdw2-2:52002:53002:54002:/gpdata/mir1/gp3
5. Run the gpaddmirrors utility to enable mirroring in your Greenplum Database system:
$ gpaddmirrors -i mirror_config_file
Where -i names the mirror configuration file you just created.
Enabling Master Mirroring
You can configure a new Greenplum Database system with a standby master using
gpinitsystem or enable it later using gpinitstandby. This section assumes you are
adding a standby master to an existing system that was initialized without one.
To add a standby master to an existing system
1. Ensure the standby master host is installed and configured: gpadmin system user created, Greenplum Database binaries installed, environment variables set, SSH keys exchanged, and data directory created. See the Greenplum Database Installation Guide for detailed installation instructions.
2. Run the gpinitstandby utility on the currently active primary master host to add a standby master host to your Greenplum Database system. For example:
Detecting a Failed Segment 29 Greenplum Database System Administrator Guide 4.2 – Chapter 4: Enabling High Availability Features
$ gpinitstandby -s smdw
Where -s specifies the standby master host name.
3. To switch operations to a standby master, see “Recovering a Failed Master” on page 34.
To check the status of the log synchronization process
If the log synchronization process gpsyncagent fails on the standby master, users may not notice. To check the log snchronization process status, Greenplum Database administrators check the gp_master_mirroring catalog. For example:
$ psql dbname -c 'SELECT * FROM gp_master_mirroring;'
If the result is that the standby master is “Not Synchronized,” check the detail_state and error_message columns to determine the cause of the errors.
To recover a standby master:
$ gpinitstandby -n
Detecting a Failed Segment
With mirroring enabled, Greenplum Database automatically fails over to a mirror segment when a primary segment goes down. Provided one segment instance is online per portion of data, users may not realize a segment is down. If a transaction is in progress when a fault occurs, the in-progress transaction rolls back and restarts automatically on the reconfigured set of segments.
If the entire Greenplum Database system becomes nonoperational due to a segment failure (for example, if mirroring is not enabled or not enough segments are online to access all user data), users will see errors when trying to connect to a database. The errors returned to the client program may indicate the failure. For example:
ERROR: All segment databases are unavailable
Enabling Alerts and Notifications
To receive notifications of system events such as segment failures, enable email and/or SNMP alerts. See “Enabling System Alerts and Notifications” on page 68. Checking for Failed Segments
With mirroring enabled, you may have failed segments in the system without
interruption of service or any indication that a failure has occurred. You can verify the status of your system using the gpstate utility. gpstate provides the status of each individual component of a Greenplum Database system, including primary segments, mirror segments, master, and standby master.
To check for failed segments
1. On the master, run the gpstate utility with the -e option to show segments with
Recovering a Failed Segment 30 Greenplum Database System Administrator Guide 4.2 – Chapter 4: Enabling High Availability Features
$ gpstate -e
Segments in Change Tracking mode indicate the corresponding mirror segment is down. When a segment is not in its preferred role, the segment does not operate in the role to which it was assigned at system initialization. This means the system is in a potentially unbalanced state, as some segment hosts may have more active segments than is optimal for top system performance.
See “To return all segments to their preferred role” on page 32 for instructions to fix this situation.
2. To get detailed information about a failed segment, check the gp_segment_configuration catalog table. For example:
$ psql -c "SELECT * FROM gp_segment_configuration WHERE status='d';"
3. For failed segment instances, note the host, port, preferred role, and data directory. This information will help determine the host and segment instances to
troubleshoot.
4. To show information about mirror segment instances, run:
$ gpstate -m
Checking the Log Files
Log files can provide information to help determine an error’s cause. The master and segment instances each have their own log file in pg_log of the data directory. The
master log file contains the most information and you should always check it first. Use the gplogfilter utility to check the Greenplum Database log files for additional information. To check the segment log files, run gplogfilter on the segment hosts using gpssh.
To check the log files
1. Use gplogfilter to check the master log file for WARNING, ERROR, FATAL or
PANIC log level messages: $ gplogfilter -t
2. Use gpssh to check for WARNING, ERROR, FATAL, or PANIC log level messages on each segment instance. For example:
$ gpssh -f seg_hosts_file -e 'source
/usr/local/greenplum-db/greenplum_path.sh ; gplogfilter -t /data1/primary/*/pg_log/gpdb*.log' > seglog.out
Recovering a Failed Segment
If the master cannot connect to a segment instance, it marks that segment as down in the Greenplum Database system catalog. The segment instance remains offline until an administrator takes steps to bring the segment back online. The process for recovering a failed segment instance or host depends on the failure cause and whether or not mirroring is enabled. A segment instance can be unavailable for many reasons:
Recovering a Failed Segment 31 Greenplum Database System Administrator Guide 4.2 – Chapter 4: Enabling High Availability Features
• A segment host is unavailable; for example, due to network or hardware failures. • A segment instance is not running; for example, there is no postgres database
listener process.
• The data directory of the segment instance is corrupt or missing; for example, data is not accessible, the file system is corrupt, or there is a disk failure.
Figure 4.3 shows the high-level steps for each of the preceding failure scenarios.
Figure 4.3 Segment Failure Troubleshooting Matrix
Recovering From Segment Failures
Segment host failures usually cause multiple segment failures: all primary or mirror segments on the host are marked as down and nonoperational. If mirroring is not enabled and a segment goes down, the system automatically becomes nonoperational.
Recovering a Failed Segment 32 Greenplum Database System Administrator Guide 4.2 – Chapter 4: Enabling High Availability Features
To recover with mirroring enabled
1. Ensure you can connect to the segment host from the master host. For example:
$ ping failed_seg_host_address
2. Troubleshoot the problem that prevents the master host from connecting to the segment host. For example, the host machine may need to be restarted or replaced.
3. After the host is online and you can connect to it, run the gprecoverseg utility from the master host to reactivate the failed segment instances. For example:
$ gprecoverseg
4. The recovery process brings up the failed segments and identifies the changed files that need to be synchronized. The process can take some time; wait for the process to complete. During this process, database write activity is suspended.
5. After gprecoverseg completes, the system goes into Resynchronizing mode and begins copying the changed files. This process runs in the background while the system is online and accepting database requests.
6. When the resynchronization process completes, the system state is Synchronized. Run the gpstate utility to verify the status of the resynchronization process:
$ gpstate -m
To return all segments to their preferred role
When a primary segment goes down, the mirror activates and becomes the primary segment. After running gprecoverseg, the currently active segment remains the primary and the failed segment becomes the mirror. The segment instances are not returned to the preferred role that they were given at system initialization time. This means that the system could be in a potentially unbalanced state if segment hosts have more active segments than is optimal for top system performance. To check for unbalanced segments and rebalance the system, run:
$ gpstate -e
All segments must be online and fully synchronized to rebalance the system. Database sessions remain connected during rebalancing, but queries in progress are canceled and rolled back.
1. Run gpstate -m to ensure all mirrors are Synchronized.
$ gpstate -m
2. If any mirrors are in Resynchronizing mode, wait for them to complete.
3. Run gprecoverseg with the -r option to return the segments to their preferred
roles.
$ gprecoverseg -r
4. After rebalancing, run gpstate -e to confirm all segments are in their preferred
roles.
Recovering a Failed Segment 33 Greenplum Database System Administrator Guide 4.2 – Chapter 4: Enabling High Availability Features
To recover from a double fault
In a double fault, both a primary segment and its mirror are down. This can occur if hardware failures on different segment hosts happen simultaneously. Greenplum Database is unavailable if a double fault occurs. To recover from a double fault:
1. Restart Greenplum Database:
$ gpstop -r
2. After the system restarts, run gprecoverseg:
$ gprecoverseg
3. After gprecoverseg completes, use gpstate to check the status of your mirrors: $ gpstate -m
4. If you still have segments in Change Tracking mode, run a full copy recovery:
$ gprecoverseg -F
To recover without mirroring enabled
1. Ensure you can connect to the segment host from the master host. For example:
$ ping failed_seg_host_address
2. Troubleshoot the problem that is preventing the master host from connecting to the segment host. For example, the host machine may need to be restarted.
3. After the host is online, verify that you can connect to it and restart Greenplum Database. For example:
$ gpstop -r
4. Run the gpstate utility to verify that all segment instances are online:
$ gpstate
If a segment host is not recoverable and you lost one or more segments, recreate your Greenplum Database system from backup files. See “Backing Up and Restoring Databases” on page 36.
When a segment host is not recoverable
If a host is nonoperational, for example, due to hardware failure, recover the segments onto a spare set of hardware resources. If mirroring is enabled, you can recover a segment from its mirror onto an alternate host using gprecoverseg. For example:
$ gprecoverseg -i recover_config_file Where the format of recover_config_file is:
filespaceOrder=[filespace1_name[:filespace2_name:...] failed_host_address:port:fselocation
[recovery_host_address:port:replication_port:fselocation[:fselocation: ...]]
For example, to recover to a different host than the failed host without additional filespaces configured (besides the default pg_system filespace):
Recovering a Failed Master 34 Greenplum Database System Administrator Guide 4.2 – Chapter 4: Enabling High Availability Features
sdw5-2:50002:/gpdata/gpseg2 sdw9-2:50002:53002:/gpdata/gpseg2
The gp_segment_configuration and pg_filespace_entry system catalog tables can help determine your current segment configuration so you can plan your mirror recovery configuration. For example, run the following query:
=# SELECT dbid, content, hostname, address, port, replication_port, fselocation as datadir
FROM gp_segment_configuration, pg_filespace_entry WHERE dbid=fsedbid
ORDER BY dbid;.
The new recovery segment host must be pre-installed with the Greenplum Database software and configured exactly as the existing segment hosts.
Recovering a Failed Master
If the primary master fails, log replication stops. Use gpactivatestandby to activate the standby master. Upon activation of the standby master, replicated logs reconstruct the master host state at the time of the last successfully committed transaction. You can specify a new standby master host when you activate the standby master.
To activate the standby master
1. Ensure a standby master host is configured for the system. See “Enabling Master Mirroring” on page 28.
2. Run the gpactivatestandby utility from the standby master host you are activating. For example:
$ gpactivatestandby -d /data/master/gpseg-1
Where -d specifies the data directory of the master host you are activating. After you activate the standby, it becomes the active or primary master for your Greenplum Database array. To configure another host as the new standby, use the
-c option when running the gpactivatestandby utility. For example:
$ gpactivatestandby -d /data/master/gpseg-1 -c new_standby_hostname
3. After the utility finishes, run gpstate to check the status:
$ gpstate -f
The newly activated master’s status should be Active. If you configured a new standby host, its status is Passive. If not configured, its status is Not Configured.
4. After switching to the newly active master host, run ANALYZE on it. For example: $ psql dbname -c 'ANALYZE;'
5. Optional: If you did not specify a new standby host when running the
gpactivatestandby utility, use gpinitstandby to configure a new standby
master at a later time. Run gpinitstandby on your active master host. For example:


![[U289.Ebook] Download Ebook Current Diagnosis And Treatment Pediatrics Twenty Third Edition Lange By William W Hay Jr Myron J Levin Robin R Deterding Mark.pdf](data:image/gif;base64,R0lGODlhAQABAIAAAP///wAAACH5BAEAAAAALAAAAAABAAEAAAICRAEAOw==)