North Dakota State Assessment
Technical Specifications
Manual for Online Testing
For Technology Coordinators
2015–2016
Published March 21, 2016 Prepared by the American Institutes for Research®
Table
of
Contents
Introduction to the Technical Specifications Manual ... 1
Manual Content ... 1
Document Conventions ... 2
Intended Audience ... 2
Other Resources ... 2
Section I. Network Configuration and Testing ... 4
Network Configuration ... 4
Guidance for Determining Required Bandwidth ... 4
Required Ports and Protocols ... 5
Configuration for Domain Name Resolution ... 6
Configuring Session Timeouts ... 6
Data Caching ... 6
Configuring Quality of Service and Traffic Shaping ... 6
Configuring for Certificate Revocations ... 6
Network Diagnostic Tools ... 7
AIR’s Network/Bandwidth Diagnostic Tool ... 7
Windows-Specific Tools ... 7
OS X-Specific Tools ... 8
Multi-Platform Tools ... 8
Section II. Hardware Configuration ... 9
Connections between Printers and Computers ... 9
Wireless Networking and Determining the Number of Wireless Access Points ... 9
Hardware for Braille Testing ... 10
Section III. Software Configuration ... 11
Configuring Commercially Available Browsers ... 11
Enabling Pop-Up Windows ... 11
Requirements for Flash ... 12
Optimal Installation Scenario for Secure Browsers ... 13
Configuring Windows for Online Testing ... 13
Disabling Fast User Switching ... 13
Enabling Web Fonts in Internet Explorer 10 and 11 ... 17
Installing Windows Media Pack for Windows 8.1 N and KN ... 18
Configuring Mac OS X for Online Testing ... 19
Disabling Exposé or Spaces... 19
Technical Specifications Manual Table of Contents
Disabling Updates to Third-Party Apps ... 21
Disabling Updates to iTunes ... 22
Disabling Look-Up Gesture ... 23
Disabling Spaces and Application Launches from the Command Line ... 23
Disabling Spaces and Application Launches on Remote Machines ... 24
Configuring Linux for Online Testing ... 25
Adding Verdana Font ... 25
Adding Flash ... 25
Configuring Mobile Devices ... 26
Configuring for Guided Access on iOS ... 26
Configuring Using Autonomous Single App Mode ... 27
Removing the Emoji Keyboard ... 35
Enabling the Secure Browser Keyboard on Android ... 35
Installing CloudReady on PCs and Macs ... 38
Configurations for Braille Requirements ... 40
Section IV. Text-to-Speech Requirements ... 41
Overview of Text-to-Speech ... 41
Using Text-to-Speech ... 41
How the Secure Browser Selects Voice Packs ... 41
About NeoSpeech Voice Packs for Windows ... 42
Configuring Windows Text-to-Speech Settings ... 43
Configuring OS X Text-to-Speech Settings ... 44
Configuring Linux Text-to-Speech Settings ... 45
Text-to-Speech and Mobile Devices ... 46
Voice Packs Recognized by Desktop Secure Browsers ... 46
Voice Packs for Windows ... 46
Voice Packs for OS X ... 47
Voice Packs for Linux ... 47
Appendix A. URLs Provided by AIR ... 48
URLs for Non-Testing Sites ... 48
URLs for Testing Sites ... 48
TA and Student Testing Sites ... 48
Online Dictionary and Thesaurus ... 49
Appendix B. Technology Coordinator Checklist ... 50
Technical Specifications Manual Table of Contents
Appendix D. User Support ... 52
List
of
Tables
Table 1. Document Conventions ... 2
Table 2. Average Bandwidth Used by Secure Browser for Testing ... 5
Table 3. Ports and Protocols for Test Delivery System ... 5
Table 4. Domain Names for OCSP ... 6
Table 5. Recommended Ratios of Devices to Wireless Access Points ... 9
Table 6. Flash Requirements ... 12
Table 7. Profile Keys for Features in iOS 8.1.3 or Later ... 28
Table 8. Voice Packs on Mobile Versions of the Secure Browser ... 42
Table 9. Packages that Include Supported Voice Packs on Linux Distributions ... 45
Table 10. Voice Packs Recognized by Secure Browsers—Windows ... 46
Table 11. Voice Packs Recognized by Secure Browsers—OS X... 47
Table 12. AIR URLs for Non-Testing Sites ... 48
Table 13. AIR URLs for Testing Sites ... 48
Table 14. AIR URLs for Online Dictionaries and Thesauruses ... 49
Introduction to the Technical Specifications Manual
This manual provides information about hardware, software, and network configurations forrunning various testing applications provided by American Institutes for Research (AIR).
The System Requirements for Online Testing lists the minimum hardware and software
requirements for online testing. Ensure your hardware complies with those requirements
before undertaking the tasks described in this manual.
Manual Content
This guide contains the following sections:
Section I, Network Configuration and Testing, provides information about configuring
networks, and lists helpful networking diagnostic tools.
Section II, Hardware Configuration, provides guidance regarding the proper infrastructure
for printers and wireless access points (WAP).
Section III, Software Configuration, outlines configurations for operating systems (desktop,
laptop, and mobile).
Section IV, Text‐to‐Speech Requirements, outlines configurations for enabling text‐to‐
speech settings on desktop operating systems. This section also lists the voice packs
recognized by the secure browser on those operating systems.
Appendix A, URLs Provided by AIR, lists AIR’s URLs that should be whitelisted in your
firewalls.
Appendix B, Technology Coordinator Checklist, lists the activities required to prepare a
facility for online testing.
Appendix C, Scheduling Online Testing, provides a worksheet for estimating the required
time to administer an online test.
Technical Specifications Manual Introduction to the Technical Specifications Manual
Document Conventions
Table 1 describes the conventions appearing in this user guide.
Table 1. Document Conventions
Element Description
Note: This symbol accompanies helpful information or reminders.
Warning: This symbol accompanies information regarding actions that may cause loss of data.
Tip: This symbol accompanies advice about performing a task efficiently.
text Boldface indicates an item you click or a drop-down list selection.
filename Monospaced text indicates a directory, filename, or text you enter in a field or at the command line.
Intended Audience
This publication is intended for technology coordinators responsible for configuring the
hardware, software, and network in a school’s online testing environment. You should be
familiar with the following concepts:
Networking—Bandwidth, firewalls, whitelisting, and proxy servers.
Configuring operating systems—Control Panel in Windows, System Preferences in OS X,
Settings in iOS, and the Linux command line.
Configuring web browsers—Settings in Chrome, Safari, Firefox, and Internet Explorer.
Other Resources
For information about supported operating systems, see the System Requirements for Online Testing.
For information about installing secure browsers, see the Secure Browser Installation Manual.
For information about securing a computer before a test session, see the Test Administrator User Guide.
Technical Specifications Manual Introduction to the Technical Specifications Manual
The above resources as well as test administration manuals and user guides for other systems
Section I.
Network Configuration and Testing
Your network’s configuration has a significant impact on Test Delivery System’s (TDS)performance. An improperly configured network can slow a TDS’s responsiveness, and possibly
impact students’ scores or an assessment’s integrity. The following sections provide guidance
on properly configuring your network, and list popular tools for diagnosing network
bottlenecks.
Network Configuration
This section provides guidance or requirements pertaining to networking configurations for
online testing.
Guidance for Determining Required Bandwidth
Bandwidth is the measure of a network’s capacity or utilization, usually measured in terms of
bits per second. Your network should have enough bandwidth to support online testing at the
required performance level. For example, if a testing program requires that web browsers
display test items within 10 seconds after sending a request, then the network must have
enough bandwidth to support that requirement.
In an online testing environment, the following factors contribute to determining the required
bandwidth:
Number of Students Simultaneously Testing—As the number of students testing at one
time increases, the required bandwidth also increases.
Size of the Test Content—The size of a test’s content is determined by two factors: (1) the
number of items on the test and (2) the average size of each item. The more items a test
contains and the larger the average test item, the higher the bandwidth requirement for a
given test. For example, some writing tests have a few questions to which the student
composes a response, and these tests are small. In contrast, some science tests have
animations or simulations; these tests are large.
Hubs or Switches—LAN performance can be hindered when hubs are used instead of
switches. A hub broadcasts signals from various network devices to propagate across the
network, potentially saturating the network and causing traffic competition or data
collisions. If you use hubs, ensure they have enough bandwidth to handle the propagation. ISP Router—For Internet networks, the most common bottleneck is the ISP’s router
connection, which typically operates at speeds of between 1.5M bits per second and 100M
bits per second. Network administrators should spend time prior to test administration
Technical Specifications Manual Network Configuration and Testing
Encryption—Encryption at WAPs may contribute to bandwidth usage. If you use encryption,
ensure the WAPs have enough bandwidth to prevent degradation of performance.
Required Response Time—When a network’s bandwidth cannot service the amount of data
requested by clients, latency starts to accumulate and the students experience delays.
Ensure your network’s bandwidth is high enough to support the required response times
between the browsers and the servers.
Table 2 displays the estimated average bandwidth used by the secure browser for testing.
When designing your network for online testing, ensure that the available bandwidth can
support these values.
Table 2. Average Bandwidth Used by Secure Browser for Testing
Number of Students Testing Concurrently in School or Building
Average Estimated Bandwidth Consumed During
Subsequent Startup of Secure Browsera
Average Estimated Bandwidth Consumed During Testingb
1 8K bits/second 5–15K bits/second 50 400K bits/second 250–750K bits/second (0.25–0.75M bits/second) 100 800K bits/second 500–1500K bits/second (0.5–1.5M bits/second) a
Bandwidth consumed when opening the secure browser and accessing an assessment for the first time is significantly more than when opening the secure browser and accessing an assessment
subsequently. This is because the initial launch of the secure browser downloads non-secure cacheable content (not test content) that can be immediately accessed upon opening the secure browser later.
b
The values in this column are based on averages from tests in a variety of subjects.
Required Ports and Protocols
Table 3 lists the ports and protocols used by the Test Delivery System. Ensure that all content
filters, firewalls, and proxy servers are open accordingly.
Table 3. Ports and Protocols for Test Delivery System
Port/Protocol Purpose
80/TCP HTTP (initial connection only) 443/TCP HTTPS (secure connection)
Technical Specifications Manual Network Configuration and Testing
Configuration for Domain Name Resolution
Appendix A, URLs Provided by AIR, lists the domain names for AIR’s testing and non‐testing
applications. Ensure the testing machines have access to a server that can resolve those names.
Configuring Session Timeouts
Session timeouts on proxy servers and other devices should be set to values greater than the
average time it takes a student to participate in a test session or to complete a given test. For
example, if your school determines that students will test in 60‐minute sessions, then consider
setting the session timeout to 65 or 70 minutes.
Data Caching
Data caching is a technique by which an intermediate server checks if it can serve the client’s
requests instead of a downstream server. While data caching is a good strategy in some
situations, its overhead is detrimental in the online testing environment. Ensure all
intermediate network elements, such as proxy servers, do not cache data.
Configuring Quality of Service and Traffic Shaping
If your testing network includes devices that perform traffic shaping, packet prioritization, or
Quality of Service (QoS), ensure the URLs in Appendix A, URLs Provided by AIR, have high
priority.
Configuring for Certificate Revocations
AIR’s servers present certificates to the clients. The following sections discuss the methods used
to check those certificates for revocation. Certificate Revocation List
To use a certificate revocation list, ensure your firewalls allow the URL http://crl.verisign.com/. Online Certificate Status Protocol
To use the Online Certificate Status Protocol (OCSP), ensure your firewalls allow the domain
names listed in Table 4. The values in the Patterned column are preferred because they are
more robust.
Table 4. Domain Names for OCSP
Patterned Fully Qualified
*.thawte.com oscp.thawte.com *.geotrust.com oscp.geotrust.com *.ws.symantec.com oscp.ws.symantec.com
Technical Specifications Manual Network Configuration and Testing
If your firewall is configured to check only IP addresses, do the following:
1. Get the current list of OCSP IP addresses from Symantec. The list is available at
https://forms.symantec.com/websurveys/servlet/ActionMultiplexer?Action_ID=ACT2000& WSD_surveyInfoID=2177.
2. Add the retrieved IP addresses to your firewall’s whitelist. Do not replace any existing IP
addresses.
Network Diagnostic Tools
You should do a performance analysis of your networking infrastructure to identify any
bottlenecks that may impact test performance. The choice of diagnostic tool depends on the
operating system running the tool, the network administrator’s technical knowledge, and the
desired level of network analysis. A number of network diagnostic tools are available, as
described in the following sections.
AIR’s Network/Bandwidth Diagnostic Tool
AIR provides a diagnostic tool that can be directly accessed from the student Practice and
Training Site test login page.
1. On the Practice and Training Site test login page, click Run Diagnostics. The Diagnostic
Screen page opens.
2. In the Network Diagnostics section, select a test.
3. Select the approximate number of students who may take that test at one time.
4. Click Run Network Diagnostics Tests.
The tool displays your current upload and download speed as well as a general idea of whether
you can reliably test the number of students you entered in step 3. You may want to run this
test several times throughout the day to verify that your upload and download speeds remain
relatively consistent.
Windows-Specific Tools
PRTG Traffic GrapherPRTG (www.paessler.com/prtg) monitors bandwidth usage and other network parameters via
Simple Network Management Protocol (SNMP). It also contains a built‐in packet sniffer. A
Technical Specifications Manual Network Configuration and Testing
NTttcp
NTttcp (www.microsoft.com/whdc/device/network/TCP_tool.mspx) is a multithreaded,
asynchronous application that sends and receives data between two or more endpoints and
reports the network performance for the duration of the transfer. Pathping
Pathping is a network utility included in Windows. It combines the functionality of the ping and
tracert commands by providing details of the path between two hosts and ping‐like statistics
for each node in the path based on samples taken over a time period.
OS X-Specific Tools
Network Utility.app
This tool is built into OS X.
Multi-Platform Tools
WiresharkWireshark (www.wireshark.org) is a network protocol analyzer. It has a large feature set and
runs on most platforms including Windows, OS X, and Linux. TCPDump
TCPDump (http://sourceforge.net/projects/tcpdump) is a common packet sniffer that runs
from the command line on Linux and OS X. It can intercept and display data packets being
transmitted or received over a network. A Windows version WinDump is available
(www.winpcap.org/windump/).
Ping, NSLookup, Netstat, Traceroute
This is a set of standard UNIX network utilities. Versions of these utilities are included in Linux,
Windows, and OS X. Iperf
Iperf (http://sourceforge.net/projects/iperf/) measures maximum TCP bandwidth, allowing the
tuning of various parameters and User Datagram Protocol (UDP) characteristics. Iperf reports
Section II.
Hardware Configuration
This section provides topology guidance for printers and WAPs. It also provides a reference for
hardware configurations that support Braille testing.
Connections between Printers and Computers
Test Administrators can print test session information and approve students’ requests to print
stimuli or test items (for students with the print‐on‐request accommodation). Nevertheless, to
maintain a secure test environment, the Test Administrator’s computer should be connected to
a single local or network printer in the testing room, and only the Test Administrator’s
computer should have access to that printer.
Wireless Networking and Determining the Number of Wireless
Access Points
Wireless networking standards have evolved over the years, with the following being the most
commonly deployed:
802.11ac has a theoretical throughput of up to 1G bits per second. 802.11n has a throughput of up to 300M bits per second.
802.11g has a theoretical throughput of up to 54M bits per second. 802.11b has a theoretical throughput of 11M bits per second.
The recommended number of devices supported by a single wireless connection depends on
the standard used for the connection. The two most common networking standards are
802.11g (54Mbps) and 802.11n (300Mbps). Table 5 lists recommendations for network
topology in which the WAP provides 802.11g and the testing devices provide 802.11g, 802.11n,
or a mixture of the two. Refer to your WAP documentation for specific recommendations and
guidelines for these or other standards.
Table 5. Recommended Ratios of Devices to Wireless Access Points
Testing Device Ratio of Devices to 802.11g WAP Ratio of Devices to 802.11n WAP
802.11g 20 40 802.11n 20 40 Mix of 802.11g and
802.11n
20 40–50 (depending on the mix of wireless cards used) Recommendations for 802.11ac routers are under investigation.
Technical Specifications Manual Hardware Configuration
Regardless of the number of WAPs, each should be configured to use WPA2/AES data
encryption.
Hardware for Braille Testing
For information about Braille hardware and software requirements, refer to the Braille Requirements document, which is available on the North Dakota State Assessment portal
Section III.
Software Configuration
This section describes how to configure the operating systems and web browsers for online
testing.
Configuring Commercially Available Browsers
This section describes how to configure commercially available browsers (Chrome, Safari,
Firefox, and Internet Explorer) for online testing.
Enabling Pop-Up Windows
AIR’s systems provide informational messages or warnings using pop‐up windows. Therefore,
enable pop‐up windows on those web browsers using AIR’s systems.
The following list describes how to enable pop‐up windows on many browsers. If your browser
is not on this list, consult its user documentation. Enabling Pop-Up Windows for All Domains
The following instructions enable pop‐up windows for all domains. If you prefer to limit pop‐up
windows to only those coming from AIR’s domains, use the instructions in Enabling Pop‐Up Windows only for AIR domains.
Firefox (Windows): Tools > Options > Content > clear Block pop‐up windows. (Firefox on
OS X and Linux is similar.)
Chrome: Menu > Settings > Show advanced settings (at the bottom of the screen) > Privacy
> Content Settings > Pop‐ups > mark Allow all sites to show pop‐ups.
Chrome browser on Android tablets: Menu > Settings > Advanced > Content Settings >
Block pop‐ups > clear checkbox.
Internet Explorer: Internet Options > Privacy tab > clear Turn On Pop‐up Blocker. Safari: Safari > clear Block Pop‐Up Windows.
Technical Specifications Manual Software Configuration
Enabling Pop-Up Windows only for AIR domains
You can allow pop‐up windows only from AIR’s domains. The following list describes how to
enable domain‐specific pop‐up windows on many browsers. If your browser is not on this list,
consult its user documentation. The list of AIR domains to use in these instructions appears in Appendix A, URLs Provided by AIR.
Firefox: Tools > Options > Content > click Exceptions. Enter domain names and select Allow
for each.
Chrome: Menu > Settings > Show advanced settings (at the bottom of the screen) > Privacy
> Content Settings > Pop‐ups > click Manage Exceptions. Enter the domain names and
select Allow for each.
Internet Explorer: Internet Options Privacy tab > Settings. Enter the domain names and click Add for each.
Safari and iOS Safari: N/A
Chrome on Android tablets: N/A
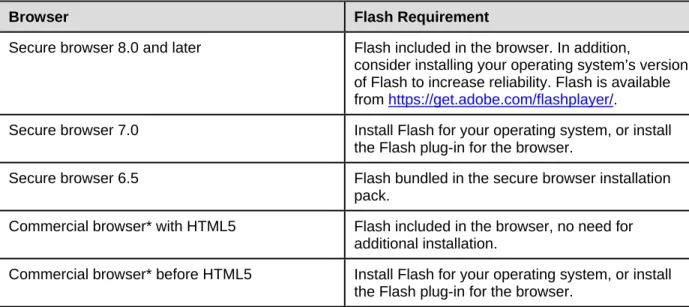
Requirements for Flash
Some test items require Flash. Table 6 lists the requirements for installing Flash on the testing
computers.
Table 6. Flash Requirements
Browser Flash Requirement
Secure browser 8.0 and later Flash included in the browser. In addition,
consider installing your operating system’s version of Flash to increase reliability. Flash is available from https://get.adobe.com/flashplayer/.
Secure browser 7.0 Install Flash for your operating system, or install the Flash plug-in for the browser.
Secure browser 6.5 Flash bundled in the secure browser installation pack.
Commercial browser* with HTML5 Flash included in the browser, no need for additional installation.
Commercial browser* before HTML5 Install Flash for your operating system, or install the Flash plug-in for the browser.
*Commercial browsers—the versions of Internet Explorer, Firefox, Chrome, Safari, and mobile browsers listed in the Online System Requirements.
Technical Specifications Manual Software Configuration
Optimal Installation Scenario for Secure Browsers
The Secure Browser Installation Manual describes several scenarios for installing the secure
browser. Some scenarios describe how to install the secure browser into a shared network
folder, and students run the secure browser from that folder. This is arguably the fastest way to
deploy the secure browser in a testing environment, but there are some performance impacts.
Running the secure browser creates competition among the students’ clients for two resources:
LAN bandwidth and shared disk drive. This performance impact can be avoided by installing the
secure browser locally on each machine.
Configuring Windows for Online Testing
This section describes how to configure Windows for online testing.
Disabling Fast User Switching
Microsoft Windows (XP, Vista, 7, 8.0, 8.1, and 10) has a “Fast User Switching” feature that
allows more than one user to be logged in at the same time. This is a security risk because
students can potentially start a new Windows session during the test and use that session to
search the Internet for answers. The following sections describe how to disable Fast User
Switching for different versions of Windows. (There is no need to manually disable Fast User
Switching on Windows 10.)
Disabling Fast User Switching in Windows XP
This section describes how to disable Fast User Switching under Windows XP. This configuration
is not necessary if the test machine is joined to a domain, because Fast User Switching is not
available in that scenario.
1. Open the Control Panel, and switch to classic
view.
2. Click User Accounts.
3. Click Change the Way Users Log On or Off.
a. Mark the Use the Welcome Screen
checkbox.
b. Clear the Use Fast User Switching
checkbox.
4. Click Apply Options.
Technical Specifications Manual Software Configuration
Disabling Fast User Switching in Windows Vista and 7
This section describes how to disable Fast User Switching under Windows Vista and Windows 7.
The process is similar for later versions of Windows. Option A: Access the Group Policy Editor
The following procedure describes how to disable Fast User Switching using the Group Policy
Editor. Some editions of Windows Vista do not support this configuration through the Group
Policy Editor; in such cases, configure Fast User Switching through the registry. See Option B
below for instructions.
1. Click Start, type gpedit.msc in the search box.
The Local Group Policy Editor window appears. 2. Navigate to Local Computer Policy >
Computer Configuration > Administrative
Templates > System > Logon.
3. Double‐click Hide entry points for Fast User
Switching.
4. Select Enabled, and click OK.
5. Close the Local Group Policy Editor window.
Technical Specifications Manual Software Configuration
Option B: Access the Registry
The following procedure describes how to disable Fast User Switching using the Windows
registry.
1. Click Start, type regedit.exe in the Start
Search dialog box, and press Enter.
2. Navigate to HKEY_LOCAL_MACHINE > SOFTWARE > Microsoft > Windows > CurrentVersion >
Policies > System.
3. Right‐click the System folder.
4. Click New, DWORD (32‐bit) value.
5. Type HideFastUserSwitching and press Enter.
6. Double‐click the HideFastUserSwitching value. 7. In the Value data field, enter 1.
8. Click OK.
9. Close the Registry Editor.
Disabling Fast User Switching in Windows 8.0 and 8.1
The following procedure describes how to disable Fast User Switching under Windows 8.0 and
8.1.
1. In the Search charm, type gpedit.msc.
Double‐click the gpedit icon in the Apps
pane. The Local Group Policy Editor window
opens.
2. Navigate to Computer Configuration >
Administrative Templates > System >
Logon.
3. In the Setting pane, double‐click Hide entry
Technical Specifications Manual Software Configuration
4. Select Enabled and then click OK.
5. In the Search charm, type run. The Run dialog
box opens.
6. Enter the command gpupdate /force into
the text box and then click OK. (Note the
space before the backslash.)
7. The command window opens. When you see
the message Computer Policy update has
completed successfully, this will be your
notification that Windows has successfully
disabled Fast User Switching.
Technical Specifications Manual Software Configuration
Enabling Web Fonts in Internet Explorer 10 and 11
Some applications, such as Practice and Training Site tests or THSS, display test items that may
require web fonts. The following procedure describes how to enable web fonts in Internet
Explorer 10 or 11.
To enable web fonts in Internet Explorer:
1. In Internet Explorer, open the tools menu
and select Internet Options. The Internet
Options dialog box opens.
2. Click the Security tab.
3. Click the Custom Level button. The Security
Settings dialog box opens.
4. Scroll to Font Download and mark the
Enable radio button.
5. Click OK. The Security Settings dialog box
closes.
6. Click OK. The Internet Options dialog box
Technical Specifications Manual Software Configuration
Installing Windows Media Pack for Windows 8.1 N and KN
Some versions of Windows 8.1 are not shipped with media software installed. As a result, you
may need to install software to enable students to listen to and record audio as well as watch
videos.
Microsoft provides additional information as well as a download package for computers with
the following Windows 8.1 versions: Windows 8.1 N
Windows 8.1 N/K with Bing Windows 8.1 Enterprise N Windows 8.1 Pro N
Windows 8.1 Pro N/K for EDU
AIR encourages downloading this software and ensuring it works with sample websites and
video and audio files prior to installing the Windows secure browser. Installation instructions
are provided on Microsoft’s download page. Microsoft Resources:
About the Media Feature Pack for Windows 8.1 N and Windows 8.1 KN Editions: April 2014
(http://support.microsoft.com/kb/2929699/en‐us)
Download Media Feature Pack for N and KN Versions of Windows 8.1
(http://www.microsoft.com/en‐us/download/details.aspx?id=42503)
Configuring ZoomText to Recognize the Secure Browser
ZoomText is a magnification and screen reading software that you can use with the secure
browser. Use the following procedure to ensure ZoomText recognizes the secure browser.
1. If ZoomText is running, close it.
2. In the Windows Explorer, go to the installation directory for your version of ZoomText. For
example, if you have ZoomText version 10.1:
o Go to C:\Program Files (x86)\ZoomText 10.1\ (Windows 64‐bit)
Technical Specifications Manual Software Configuration
4. Search for line containing the D2DPatch property, similar to the following:
<Property name="D2DPatch" value ="*,~dwm,~firefox,~thunderbird"/>
5. In the value attribute, add the prefix for your state’s secure browser:
<Property name="D2DPatch" value
="*,~dwm,~firefox,~azsecurebrowser,~thunderbird"/>
6. Save the file, and restart ZoomText.
Configuring Mac OS X for Online Testing
This section describes how to configure Mac OS X for online testing.
Disabling Exposé or Spaces
Mac OS X 10.6 through 10.11 includes an Exposé or Spaces feature that allows running more
than one desktop session. This is a security risk because students can potentially start a new
desktop session during the test, and use that session to search the Internet for answers. The
following procedure explains how to disable Exposé or Spaces on those versions of OS X. (You
can disable Spaces quickly from the command line; see Disabling Spaces and Application Launches from the Command Line for details.)
To disable Exposé or Spaces:
1. Choose Apple menu > System Preferences.
2. Click Keyboard. The Keyboard window
opens.
3. Click the Keyboard Shortcuts or Shortcuts
Technical Specifications Manual Software Configuration
4. For OS X 10.6 do the following (otherwise
skip to step 5):
a. In the left panel, click Exposé & Spaces.
The right panel lists the Exposé options. b. In the right panel, clear all the
checkboxes.
5. For OS X 10.7 and later, do the following:
a. In the left panel, click Mission Control.
The right panel lists all Mission Control
options.
b. In the right panel, clear the following
checkboxes:
Move left a space Move right a space Switch to Desktop 1
To re‐enable Exposé or Spaces, follow steps 1–5, and mark the boxes for spaces.
Disabling Application Launches from Function Keys
When students use the secure browser for testing, the Test Delivery System conducts regular
checks to ensure that other applications are not open. These checks help maintain the integrity
of the secure test environment.
Starting with OS X versions 10.6 and later, some Mac computers are factory configured to
launch iTunes and other applications by pressing the function keys (e.g., F8) on the keyboard. If
a student accidentally presses the function key, the secure browser assumes that a forbidden
application is running and pauses the student’s test. To avoid this scenario, disable the use of
function keys to launch applications.
The following instructions are based on OS X 10.9; similar instructions apply for other versions
of OS X. (You can disable application launches quickly from the command line; see Disabling Spaces and Application Launches from the Command Line for details.)
Technical Specifications Manual Software Configuration
To disable application launches from function keys:
1. Choose Apple menu > System Preferences.
2. In System Preferences, click Keyboard. The
Keyboard window opens.
3. In the Keyboard window, mark Use all F1,
F2, etc. keys as standard function keys.
If you need to launch iTunes or another
application, press the Fn key and then press
the desired function key. This combination will
launch the application. (Doing so while taking
a test causes the secure browser to pause the
test.)
Disabling Updates to Third-Party Apps
Updates to third‐party apps may include components that compromise the testing
environment. This section describes how to disable updates to third‐party apps.
The following instructions are based on OS X 10.9; similar instructions apply for other versions
Technical Specifications Manual Software Configuration
To disable updates to third‐party apps:
1. Log in to the student’s account.
2. Choose Apple menu > System Preferences.
The System Preferences dialog box opens.
3. Click App Store. The App Store window
opens.
4. Mark Automatically check for updates.
5. Clear Download newly available updates in
the background.
6. Clear Install app updates.
7. Mark Install system data files and security
updates.
Disabling Updates to iTunes
Updates to iTunes may be incompatible with the secure browser. This section describes how to
disable updates to iTunes.
The following instructions are based on OS X 10.9; similar instructions apply for other versions
of OS X.
To disable updates to iTunes:
1. Log in to the student’s account.
2. Start iTunes.
3. Select iTunes > Preferences.
4. Under the Advanced tab, clear Check for
new software updates automatically.
Technical Specifications Manual Software Configuration
Disabling Look-Up Gesture
OS X versions 10.7 and later include a look‐up gesture; highlighting a word and then tapping
with three fingers on the trackpad displays a dictionary for the highlighted word—a feature that
can comprise testing security. This section describes how to disable the look‐up gesture.
The following instructions are based on OS X 10.9; similar instructions apply for other versions
of OS X.
To disable the look‐up gesture:
1. Choose Apple menu > System Preferences. 2. Click Trackpad. The Trackpad window
opens.
3. Click the Point and Click tab.
4. Clear the Look up checkbox.
Disabling Spaces and Application Launches from the Command Line
The sections Disabling Exposé or Spaces and Disabling Application Launches from Function Keys
describe how to configure OS X through the desktop. This section describes how to perform
those configurations from the command line, which can be faster than working through the
desktop. To perform this task, you need to be familiar with logging in to OS X machines through
Terminal or other terminal emulator.
To disable spaces and application launches from the command line:
1. Log in to the machine as the user that runs the secure browser.
2. Enter the following commands:
defaults write com.apple.symbolichotkeys AppleSymbolicHotKeys ‐dict‐add 79
"{enabled = 0; value = {parameters = (65535,123, 262144); type = standard; }; }"
defaults write com.apple.symbolichotkeys AppleSymbolicHotKeys ‐dict‐add 80
Technical Specifications Manual Software Configuration
defaults write com.apple.symbolichotkeys AppleSymbolicHotKeys ‐dict‐add 81
"{enabled = 0; value = { parameters = (65535, 124, 262144); type = 'standard'; };
}"
defaults write com.apple.symbolichotkeys AppleSymbolicHotKeys ‐dict‐add 82
"{enabled = 0; value = { parameters = (65535, 124, 393216); type = 'standard'; };
}"
TIP You can paste these lines into a text file, and run the file from the command line.
These commands modify the file ~/Library/Preferences/ com.apple.symbolichotkeys.plist.
3. If you logged in to a computer running OS X 10.8.5 or later, log out and then log back in.
If you need to restore Spaces and the default application launchers, repeat steps 1–3. In step 2,
change enabled = 0 to enabled = 1.
Disabling Spaces and Application Launches on Remote Machines
The sections Disabling Exposé or Spaces, Disabling Application Launches from Function Keys,
and Disabling Spaces and Application Launches from the Command Line describe procedures
for configuring a secure test environment in OS X. This configuration is stored in the file
~/Library/Preferences/com.apple.symbolichotkeys.plist. If you have many OS X testing
machines, it may be easier to push this file to those machines instead of configuring each one
individually.
You can push the configuration file to remote machines using a variety of tools, such as the
following:
File Distributor
Apple’s Active Directory Client and Directory Utility Apple’s Open Directory and Profile Manager
Centrify & PowerBrokers Identity Enterprise Apple Remote Desktop
Technical Specifications Manual Software Configuration
Configuring Linux for Online Testing
This section describes how to configure Linux for online testing.
Adding Verdana Font
Some tests have content that requires the Verdana TrueType font. Therefore, ensure that
Verdana is installed on Linux machines used for testing. The easiest way to do this is to install
the Microsoft core fonts package for your distribution.
Fedora, Red Hat, and openSUSE—Follow the steps in the “How to Install” section of the
following website: http://corefonts.sourceforge.net/.
Ubuntu—In a terminal window, enter the following command to install the msttcorefonts
package:
sudo apt‐get install msttcorefonts
Adding Flash
If your distribution or web browser does not come with Flash, you need to install it. See your
Technical Specifications Manual Software Configuration
Configuring Mobile Devices
This section describes how to configure mobile devices for online testing.
Configuring for Guided Access on iOS
Guided Access restricts the iOS to a single application and prevents taking screenshots. This
ensures a secure test environment. (You may want to use Single App mode, which is easier to
enable and activate than Guided Access; for more details about this configuration, see Configuring Using Autonomous Single App Mode.)
The procedure in this section only enables Guided Access; to activate Guided Access before a
test, see the Test Administrator User Guide. To configure for Guided Access:
1. Tap Settings.
2. Navigate to General > Accessibility >
Learning, and turn on Guided Access.
3. Set the passcode for Guided Access. (Test
Administrators use this passcode to
deactivate Guided Access after a test.)
a. Tap Set Passcode.
b. Enter a passcode.
c. Confirm the passcode.
4. Save the passcode in a safe place. There is
Technical Specifications Manual Software Configuration
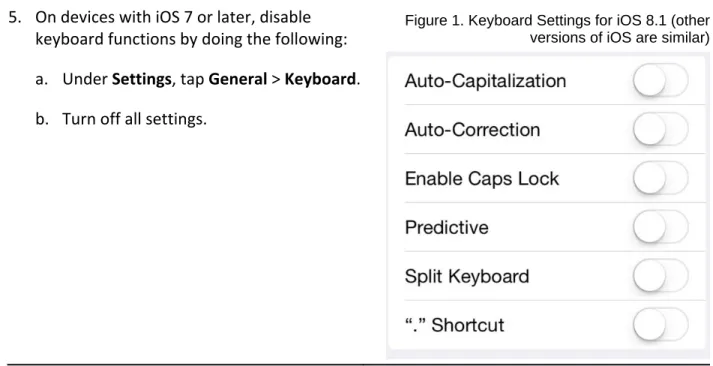
5. On devices with iOS 7 or later, disable
keyboard functions by doing the following:
a. Under Settings, tap General > Keyboard. b. Turn off all settings.
Figure 1. Keyboard Settings for iOS 8.1 (other versions of iOS are similar)
Configuring Using Autonomous Single App Mode
If you have iOS tablets running version 7.1 or higher, and if you have a Mac running version
10.10 or higher, then you can use Autonomous Single App Mode (ASAM) to quickly create a
secure testing environment on all iPads used for testing. (Tablets running a version earlier than
7.1 require Guided Access; for details about this configuration, see Configuring for Guided Access on iOS.) Compared to Guided Access, ASAM requires less time to prepare for test
sessions; there is no need to activate Guided Access on each iPad before each test session. Overview of Autonomous Single App Mode and the Secure Testing Environment
To manage multiple iPads using ASAM, you need to do the following: Step 1: Creating a Mobile Device Management Profile
Step 1a (Optional): Restricting Features in iOS 8.1.3 or later Step 2: Creating a Supervisory Profile
Step 3: Placing iPads in Autonomous Single App Mode
After completing these three steps, each time a student starts a test, the iPad enters ASAM and
the test environment is secure.
Step 1: Creating a Mobile Device Management Profile
The first step in provisioning iPads with ASAM is to create an MDM profile. Any profile with
Technical Specifications Manual Software Configuration
certain features in devices with iOS 8.1.3 or later (see Step 1a (Optional): Restricting Features in iOS 8.1.3 or later). Deploy the profile to a host that the iPads can access.
Creating an MDM profile is beyond the scope of this specification manual. The following
references provide introductory information:
IT in the Classroom, available at https://www.apple.com/education/it/mdm/.
Apple Configurator Help, available at https://help.apple.com/configurator/mac/2.0/.
Pro tip: Use OS X Server Profile Manager for MDM, available at
http://www.techrepublic.com/article/pro‐tip‐use‐os‐x‐server‐profile‐manager‐for‐mdm/. Step 1a (Optional): Restricting Features in iOS 8.1.3 or later
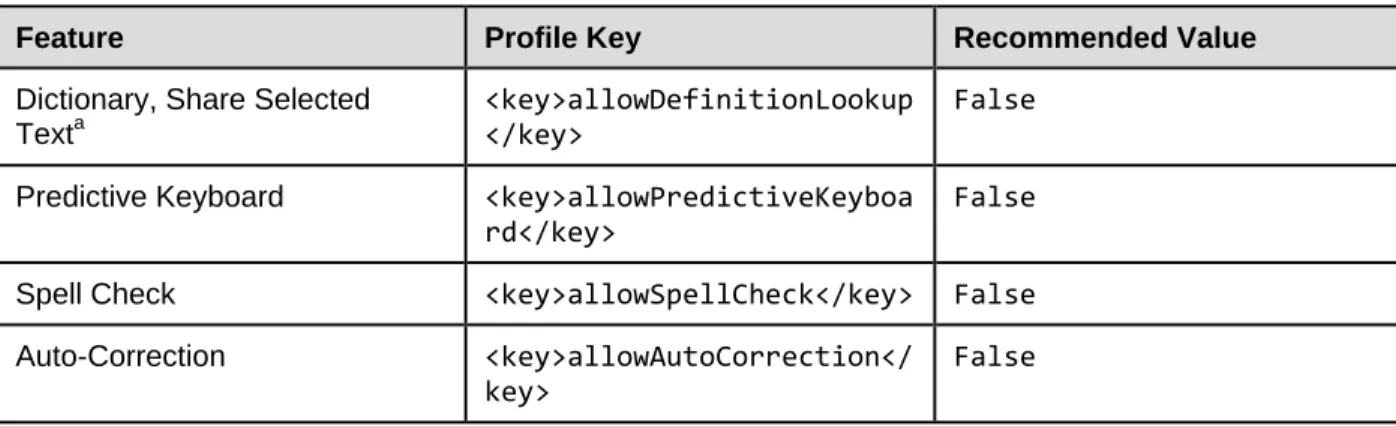
You can restrict features in supervised devices with iOS 8.1.3 or later that may give students an
unfair testing advantage, including the dictionary, predictive keyboard, spell check, and auto‐
correction. If you wish to restrict any of these features, you may do so when creating the MDM
profile for these devices.
Note: The current version of Apple Configurator does not allow you to restrict these features. If you wish to restrict these features when configuring the MDM profile, you must use a third-party MDM solution.
To restrict features in iOS 8.1.3 or later:
In the Custom Settings section of the MDM solution, insert the profile key for each feature
you wish to restrict. Table 7 provides a list of the relevant profile keys.
Table 7. Profile Keys for Features in iOS 8.1.3 or Later
Feature Profile Key Recommended Value
Dictionary, Share Selected Texta
<key>allowDefinitionLookup </key>
False
Predictive Keyboard <key>allowPredictiveKeyboa rd</key>
False
Spell Check <key>allowSpellCheck</key> False
Auto-Correction <key>allowAutoCorrection</ key>
False
a
Share Selected Text is available since iOS 9. Disabling Dictionary also disables this feature.
Technical Specifications Manual Software Configuration
The following snippet turns off the iPad’s auto‐correction feature. The snippets for dictionary,
predictive keyboard, and spell check are similar.
<dict> <key>allowAutoCorrection</key> <false /> <key>PayloadDisplayName</key> <string>Restrictions</string> <key>PayloadDescription</key> <string>RestrictionSettings</string> <key>PayloadIdentifier</key>
<string>31eb53ac‐3a08‐46f7‐8a0a‐82e872382e15.Restrictions</string> <key>PayloadOrganization</key> <string></string> <key>PayloadType</key> <string>com.apple.applicationaccess</string> <key>PayloadUUID</key> <string>56199b2c‐374d‐4152‐bc50‐166d21fa9152</string> <key>PayloadVersion</key> <integer>1</integer> </dict>
Step 2: Creating a Supervisory Profile To create a supervisory profile:
1. On a Mac 10.10, download and install Apple Configurator from the Mac App Store. When
Technical Specifications Manual Software Configuration
2. Click Prepare, then Settings. The Settings window appears.
Technical Specifications Manual Software Configuration
3. Click + below the Profiles list and select Create New Profile…. A configuration window
appears.
4. In the General section, in the Name field, enter a name for the profile.
5. In the Restrictions section, click Configure. A list of restrictions appears.
6. Make any required changes to the restrictions, or retain the default settings.
7. Click Save. You return to the Settings tab, and the profile appears in the Profiles list.
8. Click to export the profile to the Mac.
Technical Specifications Manual Software Configuration
Step 3: Placing iPads in Autonomous Single App Mode
TIP: Installing on multiple iPads at once Before starting this procedure, connect the iPads to the Mac through a USB hub. That way you can perform the installation on many of them at one time.
To install the MDM profile, supervisory profile, and secure browser:
1. On the Mac where you performed Step 2: Creating a Supervisory Profile, open the Apple
Configurator.
2. From the Apple Configurator menu, select Preferences. The Preferences window opens.
3. Under General, clear the Automatically refresh and Remove apps and profiles
Configurator did not install checkboxes.
4. Close the Preferences window.
5. Back in Apple Configurator, click Prepare, then Settings. The Settings window appears (see Figure 2).
6. In the Name field, enter a name to apply to the iPads.
7. Optional: Mark the Number sequentially starting at 1 checkbox. This adds a number to
each iPad’s name. For example, if the Name field is Garden Elementary School, and if three
iPads are connected, each device receives the name Garden Elementary School 1, Garden
Elementary School 2, and Garden Elementary School 3.
Technical Specifications Manual Software Configuration
9. Click Organization Info… The Organization Info window appears.
10. In the Name field, enter NDSA and then click Done. The Organization Info window closes.
11. If the profile you created in Step 2: Creating a Supervisory Profile does not appear in the
Profiles list, import it by doing the following:
a. Click + below the Profiles list and select Import Profile….
b. Navigate to the profile you saved in step 8 on page 31, and then click Open.
12. Mark the checkbox for the profile you want to prepare onto the iPads (see Figure 2).
13. Connect each iPad to the Mac via a USB cable or USB hub.
14. On each connected iPad, uninstall any existing versions of the secure browser.
15. In the Apple Configurator, under the Prepare tab, click Prepare at the bottom of the
Technical Specifications Manual Software Configuration
16. Click Apply in the confirmation message. Preparation starts and may take several minutes,
after which the iPad restarts. The Apple Configurator displays progress messages during the
prepare.
Note: iOS Upgrade Apple Configurator may force the iPads to upgrade to the latest version of iOS.
17. After the iPad restarts, follow the prompts on the iPad to configure it until the home screen
appears.
18. Optional: Confirm the supervisory profile is installed on the iPad. Go to Settings > General >
Profiles. The profile name you used in step 4 on page 31 appears under Configuration
Profiles.
19. On the iPad, download and install the MDM profile you created in Step 1: Creating a Mobile Device Management Profile.
20. After the MDM profile installation completes, install the secure browser onto the iPad. You
can take a copy of the secure browser for iOS from http://ndsa.portal.airast.org. (Detailed
instructions for installing the secure browser are in the section “Installing the Secure
Browser on iOS” of the Secure Browser Installation Manual.)
21. Optional: After installation completes, test it by doing the following:
a. Open the Secure Browser.
b. Log in to a test site.
c. Select a test, have the TA approve the test.
d. Start the test. The iPad enters ASAM.
Technical Specifications Manual Software Configuration
Setting the iPad into ASAM is complete. When a student starts a test, the iPad enters ASAM
mode.
Removing the Emoji Keyboard
Emoticons are characters that express an
emotion or represent a facial expression,
such as a smile or a frown. Some text
messaging apps replace sequences of
characters with an emoticon, such as
replacing :‐) with .
iOS has an Emoji keyboard that contains
emoticons. This keyboard, if activated, can be
confusing for test‐takers or scorers. Use the
following procedure to remove the emoji
keyboard from an iOS device.
Figure 3. Emoji Keyboard
To remove the Emoji keyboard:
1. Tap Settings.
2. Navigate to General > Keyboard.
3. Tap Keyboards.
4. Delete Emoji from the list by sliding it
to the left.
Enabling the Secure Browser Keyboard on Android
The default keyboard for the Android allows predictive text, which may provide students with
hints for answers to tests. For this reason, the secure browser for Android requires that a
mobile secure browser keyboard be configured for the secure browser itself. The secure
browser keyboard is a basic keyboard, with no row for predictive text functionality.
The first time you open the Mobile Secure Browser on an Android tablet, you will be prompted
Technical Specifications Manual Software Configuration
About the Secure Browser Keyboard and General Settings
Once the secure browser keyboard is set, it becomes the default keyboard for all Android tablet applications, not just for the secure browser. If you want to return to the default Android keyboard after using the secure browser, you will need to navigate to Settings > Language & Input and uncheck the secure browser keyboard.
If you change back to the default Android keyboard, you will be prompted to select the secure browser keyboard the next time you open the secure browser. The secure browser will not allow you to access the student login page until the secure browser keyboard has been selected.
The following procedure describes how to enable the secure browser keyboard. The screen
shots were taken with a Samsung Galaxy Tab 2; other Android versions may vary.
1. Select the secure browser icon on the home
screen.
2. A Change Keyboard message appears. Tap Close.
3. Tap Set up input methods. The Language
and Input settings screen opens.
4. Select the checkbox next to AIRSecureTest
so that a checkmark appears.
5. You will be prompted to acknowledge that
this selection is okay. Select OK to continue.
Note: This action allows the mobile secure
browser to use the secure browser
Technical Specifications Manual Software Configuration
6. Navigate to the secure browser to open it.
(You can use the application switcher or go
back to “Home” and select the secure
browser icon.)
7. You will be prompted to change the
keyboard. Select Close.
8. The Android tablet’s default keyboard will
still be selected.
9. Select the checkmark or circle for the AIRSecureTest keyboard.
10. Select Continue. You will be prompted to
complete the application launch using the
preferred method.
11. Select AIRSecureTest (ensure it is shaded
and highlighted blue) and then select Always.
12. You will need to acknowledge that the
secure browser’s default settings have
changed. (This is a result of selecting the
secure browser keyboard.)
13. Select OK.
Technical Specifications Manual Software Configuration
Installing CloudReady on PCs and Macs
CloudReady is a reduced‐feature operating system, built on the same technology as Chrome OS,
that runs on hardware with limited resources. If your school or district has older hardware that
does not run newer versions of Windows or OS X, consider installing CloudReady on those
machines. This installation can postpone or prevent a costly hardware upgrade.
Warning: Loss of data The procedure described in this section erases all data on the computer on which you are installing CloudReady. Be sure to back up all necessary data before starting this procedure.
To install CloudReady:
1. Ensure the computer on which you are installing CloudReady—
o is one of the supported models listed in
https://docs.google.com/document/d/1yPxKAmNFaJwk0kwikF5iROFMOxiinmkW_9KeI1 u5jVo/edit?pli=1.
o has a USB port.
o can boot from a USB drive.
2. Purchase a Neverware license for the computer. Licenses are available from http://www.neverware.com/. (Bulk licenses may be available.)
3. If you received a USB drive from Neverware with the CloudReady image, proceed to
step 18. Otherwise, prepare a bootable image by following steps 4 through 17. Ideally,
perform these steps on a computer on which the Google Chrome web browser is already
installed.
4. Obtain a blank 8 GB USB drive.
5. Install Google Chrome if it is not already installed.
6. In a web browser, go to the URL for the image file provided to you by Neverware. This URL
downloads a file with a name similar to cloudready_site646.bin. Note the location of the
file on your computer.
7. Insert the USB drive into the computer.
8. Start Chrome, and navigate to the Chrome web store at https://chrome.google.com/ webstore/.
Technical Specifications Manual Software Configuration
9. Search for the app Chromebook Recovery Utility.
10. Click ADD TO CHROME, and in the conformation prompt click Add app.
11. After installation, click Launch App.
12. Click in the top‐right corner and select Use local image.
13. Navigate to the file image file that you downloaded in step 6.
14. In the next screen, select the USB drive you inserted in step 7.
15. Click Continue.
16. In the next screen, click Create Now. The recovery utility creates a bootable image of
CloudReady onto the USB drive. This operation takes 15–30 minutes.
17. When copying is complete, eject the USB drive from the computer.
18. On the computer where you are installing CloudReady, do the following:
a. Back up all files you want to save. The installation procedure erases all data on the
Technical Specifications Manual Software Configuration
b. Boot the computer from the USB drive. Booting and installation take 10–15 minutes,
depending on your hardware. When the installation is complete, your computer turns
off.
c. Remove the USB drive, and power on the computer.
d. Install the AIRSecureTest Kiosk App; see the Secure Browser Installation Guide for
details.
Configurations for Braille Requirements
For information about configuring operating systems and software for Braille testing, see the Braille Requirements document, which is available on the North Dakota State Assessment portal
Section IV.
Text-to-Speech Requirements
This section contains information about text‐to‐speech requirements.Overview of Text-to-Speech
Using text‐to‐speech requires at least one voice pack to be installed on testing computers.
A number of voice packs are available for desktop computers, and AIR researches and tests
voice packs for compatibility with the secure browsers. Additionally, not all voice packs that
come pre‐installed with operating systems are approved for use with online testing. The voice
packs listed at the end of this section have been tested and are whitelisted by the secure
browser.
Using Text-to-Speech
Students using text‐to‐speech for the practice tests must log in using a supported secure
browser. Students can also verify that text‐to‐speech works on their computers by logging in to
a practice test session and selecting a test for which text‐to‐speech is available.
Note: We strongly encourage schools to test the text-to-speech settings before students take operational tests. You can check these settings through the diagnostic page. From the student Practice and Training Site test login screen, click the Run Diagnostics link, and then click the
Text-to-Speech Check button.
How the Secure Browser Selects Voice Packs
This section describes how AIR’s secure browsers select which voice pack to use. Voice Pack Selection on Desktop Versions of Secure Browsers
When a student who is using text‐to‐speech starts a test, the secure browser looks for voice
packs on the student’s machine. Upon recognizing an approved voice pack, the secure browser
uses the one with the highest priority.
If any of the approved voice packs has also been set as the default voice on the computer, then
Technical Specifications Manual Text-to-Speech Requirements
Voice Pack Selection on Mobile Versions of Secure Browsers
The mobile secure browser uses either the device’s native voice pack or a voice pack embedded
in the secure browser. Additional voice packs downloaded to a mobile device are not
recognized by the mobile secure browser. Table 8 lists the voice packs used by mobile versions
of the secured browser.
Table 8. Voice Packs on Mobile Versions of the Secure Browser
Platform Voice Pack Used by Secure Browser
iOS 7.0–9.2 Native iOS voice pack. Android Native Android voice pack. Chrome OS Native Chromebook voice pack.
About NeoSpeech Voice Packs for Windows
Pursuant to an agreement between NeoSpeech and the American Institutes for Research (AIR),
authorized users may download and install specific licensed NeoSpeech voice packs for use on
supported Windows computers (Windows XP Service Pack 3, Vista, 7, 8.0, and 8.1).
These voice packs can be used instead of the default Windows voice packs for English and the
commercial Spanish voice packs from Cepstral. (The default Windows voice packs as well as the
Cepstral voice packs for Windows may still be used for text‐to‐speech, if desired.) The Julie voice pack is for English text‐to‐speech users.
The Violeta voice pack is for Spanish text‐to‐speech users.
The NeoSpeech voice pack is to be used only in conjunction with, and not separate from, the
online assessments provided by AIR’s Test Delivery System.
The NeoSpeech voice packs can be downloaded from TIDE. Installation instructions are also