I
NTUITY
™
Platform Administration and Maintenance
for Release 3.0
585-310-557
Comcode 107856940
Issue 3
Copyright 1996, Lucent Technologies All Rights Reserved
Printed in U.S.A. Notice
Every effort was made to ensure that the information in this book was complete and accurate at the time of printing. However, information is subject to change.
Your Responsibility for Your System’s Security
Toll fraud is the unauthorized use of your telecommunications system by an unauthorized party, for example, persons other than your com-pany’s employees, agents, subcontractors, or persons working on your company’s behalf. Note that there may be a risk of toll fraud associ-ated with your telecommunications system and, if toll fraud occurs, it can result in substantial additional charges for your telecommunica-tions services.
You and your system manager are responsible for the security of your system, such as programming and configuring your equipment to pre-vent unauthorized use. The system manager is also responsible for reading all installation, instruction, and system administration docu-ments provided with this product in order to fully understand the fea-tures that can introduce risk of toll fraud and the steps that can be taken to reduce that risk. Lucent Technologies does not warrant that this product is immune from or will prevent unauthorized use of com-mon-carrier telecommunication services or facilities accessed through or connected to it. Lucent Technologies will not be responsible for any charges that result from such unauthorized use.
Lucent Technologies Fraud Intervention
If you suspect that you are being victimized by toll fraud and you need technical support or assistance, call Technical Service Center Toll Fraud Intervention Hotline at 1 800 643-2353.
Federal Communications Commission Statement
Part 15: Class A Statement. This equipment has been tested and
found to comply with the limits for a Class A digital device, pursuant to Part 15 of the FCC Rules. These limits are designed to provide rea-sonable protection against harmful interference when the equipment is operated in a commercial environment. This equipment generates, uses, and can radiate radio-frequency energy and, if not installed and used in accordance with the instructions, may cause harmful interfer-ence to radio communications. Operation of this equipment in a resi-dential area is likely to cause harmful interference, in which case the user will be required to correct the interference at his own expense.
Part 68: Network Registration Number. This equipment is
regis-tered with the FCC in accordance with Part 68 of the FCC Rules. It is identified by FCC registration number AS5USA-20411-VM-E.
Part 68: Answer-Supervision Signaling. Allowing this equipment to
be operated in a manner that does not provide proper answer-supervi-sion signaling is in violation of Part 68 Rules. This equipment returns answer-supervision signals to the public switched network when:
• Answered by the called station • Answered by the attendant
• Routed to a recorded announcement that can be administered by the CPE user
This equipment returns answer-supervision signals on all DID calls forwarded back to the public switched telephone network. Permissi-ble exceptions are:
• A call is unanswered
Canadian Department of Communications (DOC) Interference Information
This digital apparatus does not exceed the Class A limits for radio noise emissions set out in the radio interference regulations of the Canadian Department of Communications.
Le Présent Appareil Nomérique n’émet pas de bruits radioélectriques dépassant les limites applicables aux appareils numériques de la class A préscrites dans le reglement sur le brouillage radioélectrique édicté par le ministére des Communications du Canada.
Trademarks
See the preface of this document.
Ordering Information
Call: Lucent Technologies Publications Center
Voice 1 800 457-1235 International Voice 317 361-5353 Fax 1 800 457-1764 International Fax 317 361-5355
Write: Lucent Technologies Publications Center P.O. Box 4100
Crawfordsville, IN 47933
Order: Document No. 585-310-557 Comcode 107856940 Issue 3, September 1996
For additional documents, refer to the section in “About This Docu-ment” entitled “Related Resources.”
You can be placed on a standing order list for this and other documents you may need. Standing order will enable you to automatically receive updated versions, billed to account information that you provide. For more information or to be put on a list to receive future issues of this document, contact the Lucent Technologies Publications Center.
European Union Declaration of Conformity
Lucent Technologies Business Communications Systems declares that MAP/40 and MAP/100 equipment specified in this document con-forms to the referenced European Union (EU) Directives and Harmo-nized Standards listed below:
EMC Directive 89/336/EEC Low-Voltage Directive 73/23/EEC
The “CE” mark affixed to the equipment means that it conforms to the above directives.
Disclaimer
Intellectual property related to this product and registered to AT&T Corporation has been transferred to Lucent Technologies Incorpo-rated.
Any references within this text to American Telephone and Telegraph Corporation or AT&T should be interpreted as references to Lucent Technologies Incorporated. The exception is cross references to books published prior to December 31, 1996, which retain their original AT&T titles.
Heritage
Lucent Technologies - formed as a result of AT&T’s planned restruc-turing - designs, builds, and delivers a wide range of public and private networks, communication systems and software, consumer and busi-ness telephone systems, and microelectronics components. The world-renowned Bell Laboratories is the research and development arm for the company.
Develop-Contents
Issue 3.0 September 1996
iii
About This Book
xxxi■ Purpose xxxi
■ Intended Audience xxxi
■ How This Book Is Organized xxxi
■ Conventions Used xxxiv
■ Related Resources xxxv
■ Trademarks and Service Marks xxxvii
■ Training xxxix
■ How to Make Comments About This Book xxxix
1
Introduction and Orientation
1-1■ Overview 1-1
INTUITY AUDIX Voice Messaging 1-1
Lucent Technologies INTUITY Lodging 1-2 Lucent Technologies INTUITY FAX Messaging 1-2
Lucent Technologies INTUITY Intro Voice
Response 1-3
Lucent Technologies INTUITY Call Accounting
System 1-4
Lucent Technologies INTUITY Message Manager 1-4
■ Administration 1-4
Logins 1-5
How to Use This Document 1-5
■ Maintenance 1-6
Overview of Alarming 1-6
System Administrator Troubleshooting Strategy 1-6
On-Site Technician Troubleshooting Strategy 1-8
2
User Interface
2-1■ Using Lucent INTUITY Screens 2-1
About Screens 2-1
Screen Layout 2-2
Contents
Frame Management Menu 2-4
Selecting a Menu Option 2-7
Filling in Fields 2-7
■ INTUITY AUDIX Administration Screens 2-9
About INTUITY AUDIX Administration Screens 2-9
Screen Layout 2-9
Function Keys 2-10
Entering Commands 2-12
Filling in Fields 2-14
3
Logs
3-1■ Activity Log 3-2
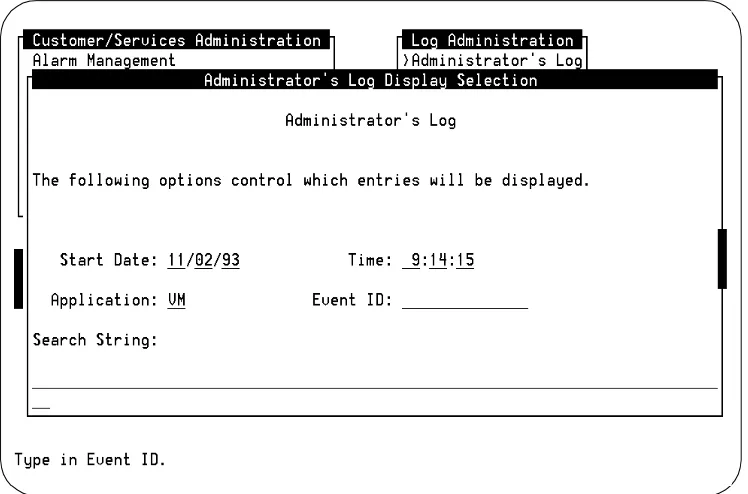
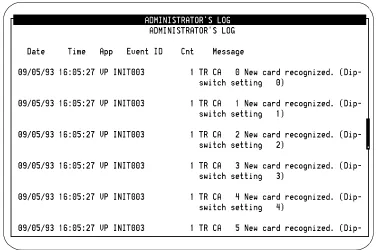
■ Administrator’s Log 3-3
Notification 3-3
Access 3-5
Administrator’s Log Display Selection Screen 3-6 Documentation of the Administrator’s Log 3-12
■ Alarm Log 3-12
Notification 3-13
Access 3-14
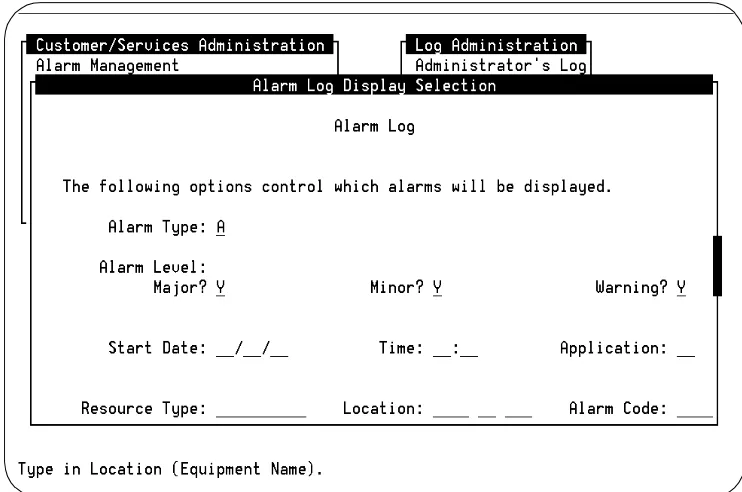
Alarm Log Display Selection Screen 3-16
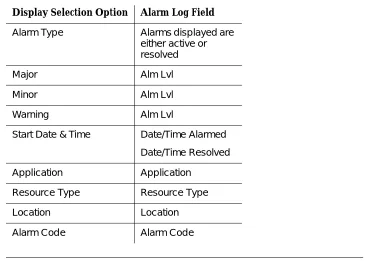
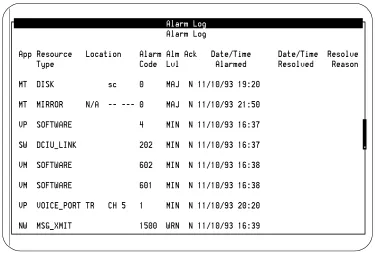
Alarm Log Format, Fields, and Display Selections 3-18
Alarm Management 3-27
■ Maintenance Log 3-31
Access 3-32
Maintenance Log Display Selection Screen 3-32
Maintenance Log Format, Fields, and
Display Selections 3-35
Documentation of the Alarm Log
and Maintenance Log 3-42
4
Getting Started
4-1Contents
Issue 3.0 September 1996
v
■ Checking the System Clock 4-5
■ Logging Out 4-7
■ Remote Administration 4-8
Allowing Multiple Remote Logins 4-8
Example Remote Login Sequence 4-9
Function Keys 4-10
■ Understanding Backups 4-10
■ Recognizing Responsibilities 4-11 ■ Administering Feature Applications 4-12
5
Administration Checklists
5-1■ Daily Tasks 5-2
Nightly Audits 5-2
■ Weekly Tasks 5-3
■ Monthly Tasks 5-3
■ Feature Administration 5-4
6
Security
6-1■ Protecting Your Voice/Fax Messaging System 6-2
Voice Messaging 6-2
Automated Attendant 6-2
■ MERLIN LEGEND Switch Administration 6-3
Restrict Outward Dialing 6-3
Restrict Toll Areas 6-3
Create Disallowed Number Lists 6-3
Create Allowed Number Lists 6-3 Restrict AMIS Networking Number Ranges 6-4
■ Switch Administration 6-4
Restrict Outward Dialing 6-4
Restrict Toll Areas 6-6
Block Subscriber Use of Trunk Access Codes
(G2, System 85 Only) 6-8
Create Restricted Number Lists (G1, G3, and
Contents
Create Allowed and Disallowed Number Lists
(MERLIN LEGEND Only) 6-8
Restrict AMIS Networking Number Ranges 6-8
■ Subscriber Password Guidelines 6-9 ■ INTUITY AUDIX Administration 6-10
Mailbox Administration 6-10
Outcalling 6-10
Basic Call Transfer (5ESS, DMS-100, MERLIN
LEGEND, and Non-Lucent Switches) 6-11 Enhanced Call Transfer (System 75, System 85,
G1, G2, G3) 6-12
Lucent INTUITY FAX Messaging 6-12
■ Detecting Voice Mail Fraud 6-13
Call Detail Recording (or SMDR) 6-13
Call Traffic Report 6-14
Trunk Group Report 6-15
SAT, Manager I, and G3-MT Reporting 6-15
ARS Measurement Selection 6-15
Automatic Circuit Assurance 6-16
Busy Verification 6-17
AUDIX Traffic Reports 6-17
■ Lucent’s Statement of Direction 6-18
Lucent Security Offerings 6-19
Lucent Toll Fraud Crisis Intervention 6-20
Lucent Corporate Security 6-20
7
Monitoring System Resources
7-1■ Mirroring 7-1
■ Voice Channels 7-2
Services 7-2
Contents
Issue 3.0 September 1996
vii
8
Using Reports
8-1■ Verifying System Installation 8-2
Accessing the Verify System Installation Screen 8-2
Results of Verify System Installation 8-3
■ Verifying System Status 8-3
Accessing the Verify System Status Screen 8-3
Results of Verify System Status 8-4
■ Viewing Installed Hardware 8-7
Accessing the View Installed Hardware Screen 8-7
Results of View Installed Hardware 8-8
■ Viewing Installed Software 8-10
Accessing the Installed Software Screen 8-10
Results of View Installed Software 8-11
■ Verifying Feature Options 8-14
Accessing the Feature Options Screen 8-14
■ Using the System Monitor 8-16
Accessing the System Monitor Screen 8-16
Format and Fields 8-17
Changing the System Monitor Refresh Rate 8-19
■ Using the Traffic Report 8-21
Accessing the Traffic Report 8-21
Options for Traffic Report Screen 8-22
Format and Fields 8-27
■ Using the Voice Equipment Screen 8-29
Accessing the Voice Equipment Screen 8-29
Options for Display 8-30
Format and Fields 8-32
Voice Equipment Function Keys 8-34
■ Using the Fax Print Queue 8-35
Accessing the Fax Print Queue 8-35
Format and Fields 8-37
Contents
9
Backing Up and Restoring Information
9-1■ Using Backup Cartridge Tapes 9-2
Cartridge Tape Insertion and Removal 9-2
Formatting Cartridge Tapes 9-3
■ Backing Up (Unattended) 9-4
Data backed up 9-4
Verifying Successful Backup 9-5 Unattended Backup on Demand 9-6
■ Backing Up (Attended) 9-8
Data Types 9-8
Attended Backup 9-9
Backing Up Lucent INTUITY Intro Voice Response
Applications 9-11
■ Restoring Backups 9-11
Restore Backup 9-11
10
Administrator’s Log Messages and
Repair Actions
10-1■ CA — Call Accounting System 10-2
■ ML — MERLIN LEGEND 10-2
■ MT — Maintenance 10-3
■ NW — Networking 10-6
■ SW — Switch Integration 10-18
■ VM — Voice Messaging 10-20
■ VP — Voice Platform 10-54
11
CA (Call Accounting System Alarms)
11-1■ CA (Call Accounting System Alarms) 11-1
12
LG (Lucent I
NTUITYLodging Alarms)
12-1Contents
Issue 3.0 September 1996
ix
13
ML (MERLIN LEGEND Alarms)
13-1■ SOFTWARE 13-4
14
MT (Maintenance Platform Alarms)
14-1■ ALARM_ORIG 14-4
■ BACKUP 14-6
■ DISK 14-11
■ DST_MON 14-12
■ MSG_QUEUE 14-13
■ MIRROR 14-14
■ RESTORE 14-16
■ SOFTWARE 14-18
■ TAPE_DRIVE 14-19
■ UNIX 14-20
15
NW (Networking Alarms)
15-1■ SOFTWARE 15-4
■ NETWK_BD 15-16
■ NETWK_CHAN 15-18
16
SW (Switch Integration Alarms)
16-1■ DCIU_LINK 16-4
■ GPSC_BOARD 16-9
■ SOFTWARE 16-10
■ SMDI_LINK 16-14
17
VM (I
NTUITYAUDIX Voice Messaging Alarms)
16-1■ ANNC 16-4
■ AUDIT 16-6
■ AUDIX_FS 16-12
■ FAXAP 16-19
Contents
■ VM_PT 16-40
18
VP (Voice Platform Alarms)
17-1■ FAXMONOANM 17-4
■ FAXNSFOANM 17-7
■ IPCQUEUETL 17-9
■ SOFTWARE 17-11
■ SPEECH_FS 17-29
■ VOICE_PORT 17-30
19
VR (Lucent I
NTUITYIntro Voice Response Alarms)
18-1■ ORACLE_DB 18-4
20
Diagnostics
20-1■ INTUITY AUDIX Digital Networking 20-2
Remote Connection Test 20-2
Test the Network Connections 20-5
Networking Board Reset 20-12 Busyout and Release Networking Channels 20-13
■ Multi-Port Serial Card Diagnostics 20-15
Accessing 20-15
Displaying Serial Port Driver Stats 20-16
Displaying Serial Port Status 20-17
Diagnostics 20-17
■ Switch Integration 20-20
View Switch Link Status 20-20
Diagnose Switch Integration Card 20-22 Reset Switch Integration Hardware and Software 20-25
Busy-Out Switch Integration Link 20-26
Release Switch Integration Link 20-27
■ TCP/IP Diagnostics 20-27
Contents
Issue 3.0 September 1996
xi
Testing the Connection between the Lucent
INTUITY System and a Subscriber’s PC 20-30
View Packet Statistics — LAN Card 20-32
■ Voice Card 20-35
Determining Card and Channel Number 20-35
Diagnose Voice Card 20-36
Busyout Voice Card or Channel 20-41
Release Voice Card or Channel 20-43 Using the System Monitor 20-44
21
Database Audits
21-1■ INTUITY AUDIX Voice Messaging 21-2
Running Audits on Demand 21-5
Audit Results 21-6
■ Networking 21-7
Networking Database Audit Results 21-8
■ Switch Integration 21-8
Platform User Database Audit 21-9
Platform User Database Audit Results 21-10
22
Common Administration and
Maintenance Procedures
22-1■ Administrator’s Log 22-2
Accessing 22-2
■ Alarm Log 22-3
Accessing 22-3
Checking for Resolved Alarms 22-4
■ Fan Filters 22-4
Cleaning the Fan Filters 22-4
■ Floppy Diskette 22-5
Cleaning 22-5
Formatting 22-6
■ Hard Disk Drives 22-6
Contents
Replacing a Hard Disk Drive 22-13
■ Replace Disk 0 (Non-Mirrored System) 22-21 ■ Replace Disk 0 (Mirrored System) 22-23
■ Mirroring 22-32
Create a Mirrored System 22-32
Remove Mirroring 22-33
■ Modem/Terminal 22-34
Adding and Removing Software 22-34
■ Maintenance Log 22-34
Accessing 22-34
■ Network Ports 22-35
Adding 22-35
■ Printer 22-36
Adding and Removing Software 22-36
■ Product ID 22-36
Accessing 22-36
■ Rebooting the UNIX System (Shutdown and Power Up) 22-37
■ Software 22-38
Reloading 22-38
■ Speech 22-39
Adding Hours of Speech 22-39
■ System Monitor 22-39
Viewing 22-39
■ Tape 22-40
Formatting 22-40
■ Voice Ports 22-41
Adding 22-41
Assigning Switch Extensions to Voice Channels 22-41 Assigning Services to Voice Channels 22-45
Busying Out and Releasing Voice Channels 22-46
■ Visual Inspection 22-49
■ Voice System 22-53
Starting the Voice System 22-53
Contents
Issue 3.0 September 1996
xiii
A
MAP/100 Hardware Replacement
A-1■ Overview A-1
Prerequisites for Hardware Replacements A-2
■ Replacing the Power Supply: Systems
with Battery Backup A-2
Removing the Power Supply A-2
Installing a Power Supply A-4
■ Replacing the Power Supply: Systems
without Battery Backup A-5
Preparing the Power Supply A-7
Removing the Power Supply in a Power Module
Assembly Equipped with a Single Power Supply A-7
Installing a Power Supply in a Power Module
Assembly Equipped with a Single Power Supply A-9 Adding a Second Power Supply in a Power
Module Assembly that has Redundant Power
Supply Capability A-10
Removing a Power Supply in a Power Module
Assembly Equipped with Two Power Supplies A-12
Installing a Power Supply in a Power Module
Assembly Equipped with Two Power Supplies A-13
■ Replacing the Battery A-13
Removing the Battery A-13
Installing a Battery A-15
■ Replacing a Fan A-15
Removing a Cooling Fan A-15
Installing a New Cooling Fan A-17
■ Replacing Fan Filters A-19
Removing Fan Filters A-19
Installing Fan Filters A-19
■ Replacing a Circuit Card A-19
Removing a Circuit Card A-19
Installing a Circuit Card A-20
■ Replacing the Hard Disk Drive A-21
Installing Hard Disk Drives A-21
Contents
Preparing to Add a Disk A-24
Readying a SCSI Disk for Installation A-25
Mounting a SCSI Disk in the MAP/100 A-38
Connecting Cables to the SCSI Drive A-39
Finishing Up A-40
■ Replacing the Floppy Disk Drive A-41
Removing the Floppy Disk Drive A-41 Installing a Floppy Disk Drive A-42
■ Replacing the SCSI Cartridge Tape Drive A-42
Types of SCSI Cartridge Tape Drives A-42 Removing the SCSI Cartridge Tape Drive A-43
Verifying Jumper Settings A-44
Installing a Cartridge Tape Drive A-45
B
MAP/40 Hardware Replacement
B-1■ Overview B-1
Prerequisites for Hardware Replacements B-5
Removing the Dress Cover B-5
Removing the Circuit Card Cage Access Panel
and Retaining Bracket B-7
■ Replacing the Fan Filter B-11
Removing the Fan Filter B-11
Installing the Fan Filter B-11
■ Replacing the Card Cage Fan Unit B-11
Removing the Card Cage Fan Unit B-11
Installing a Card Cage Fan Unit B-13
■ Replacing a Circuit Card B-14
Circuit Card Configuration Rules B-14
Removing a Circuit Card B-15 Installing a Circuit Card B-16
■ Replacing the Floppy Disk Drive B-17
Contents
Issue 3.0 September 1996
xv
Removing the Power Supply B-22
Installing a Power Supply B-24
■ Replacing a Hard Disk Drive B-27
Removing a Hard Disk Drive B-27
Installing a SCSI Hard Disk Drive B-31
Finishing Up B-39
■ Replacing the SCSI Cartridge Tape Drive B-41
Types of SCSI Cartridge Tape Drives B-41
Removing a SCSI Cartridge Tape Drive B-41
Verifying Jumper Settings B-43 Installing a SCSI Cartridge Tape Drive B-44
■ Replacing the 12-Slot Backplane B-45
Removing the 12-Slot Backplane B-46 Installing the 12-Slot Backplane B-47
C
MAP/5 Hardware Replacement
C-1■ Replacing Memory C-2
Memory and SIMM Description C-2
Determining if SIMMs Are Damaged C-4
Check This First C-4
Removing and Replacing SIMMs C-6
■ Removing Circuit Cards C-8 ■ Installing a Circuit Card C-9 ■ Removing the Auxiliary Housing C-10 ■ Replacing the Auxiliary Housing C-13 ■ Replacing the System Board C-13 ■ Removing the System Board C-14 ■ Installing the System Board C-17 ■ Reconnecting System Board Cables C-20
■ Replacing the Battery C-25
■ Removing/Replacing the Second Hard
Drive or Mounting Bracket C-26
■ Removing/Replacing the Peripheral
Bay (Drive Housing) C-27
Contents
■ Replacing the First Hard Disk Drive C-31 ■ Replacing the Tape Drive C-40 ■ Replacing the Power Supply C-43
ABB
Abbreviations
ABB-1GL
Glossary
GL-1Issue 3.0 September 1996
xxxi
About This Book
Purpose
This book, Lucent INTUITY Platform Administration and Maintenance for Release 3.0, 585-310-557, contains the procedures needed for the ongoing
administration and maintenance of the Lucent INTUITY platform.
Intended Audience
This book is intended for system administrators, on-site technicians, and Remote Service Center personnel supporting the Lucent INTUITY system.
How This Book Is Organized
This book is organized into the following chapters:
n Chapter , "About This Book"
This preface describes the book’s purpose, intended audiences, organization, conventions, trademarks and service marks, and related resources. This preface also explains how to make comments about the book.
n Chapter 1, "Introduction and Orientation"
About This Book
n Chapter 2, "User Interface"
This chapter describes the screens you use to interface with the INTUITY system.
n Chapter 3, "Logs"
This chapter describes the logs that display system activities, errors, and alarm information.
n Chapter 4, "Getting Started"
This chapter describes tasks that the INTUITY system administrator should perform after the system has been installed and acceptance tests performed.
n Chapter 5, "Administration Checklists"
This chapter provides lists of daily, weekly, and monthly tasks that the system administrator should perform.
n Chapter 6, "Security"
This chapter describes how to secure your Lucent INTUITY system against toll fraud and other forms of unwanted access.
n Chapter 7, "Monitoring System Resources"
This chapter describes methods for monitoring voice channel occupancy, disk space, and INTUITY AUDIX Digital Networking port usage.
n Chapter 8, "Using Reports"
This chapter describes the reports available on your Lucent INTUITY system and how to access them, including system verification reports, system traffic reports, and the system monitor.
n Chapter 9, "Backing Up and Restoring Information"
This chapter describes how to perform unattended and attended backups and how to restore backups.
n Chapter 10, "Administrator’s Log Messages and Repair Actions"
This chapter describes the administrator’s log messages that could be generated by your Lucent INTUITY system.
n Chapters 11 to 19 — “Alarms”
These chapters describe the alarms that could be generated by your Lucent INTUITY system and their associated repair actions.
n Chapter 20, "Diagnostics"
How This Book Is Organized
Issue 3.0 September 1996
xxxiii
n Chapter 21, "Database Audits"
This chapter describes the procedures for running and interpreting audits on the INTUITY AUDIX Voice Messaging, INTUITY AUDIX Digital Networking and switch integration databases.
n Chapter 22, "Common Administration and Maintenance Procedures"
This chapter describes the common administration and maintenance procedures referenced throughout this book.
n Appendix A, "MAP/100 Hardware Replacement"
This chapter describes how to add or replace hardware in your MAP/100, such as hard disks and circuit cards.
n Appendix B, "MAP/40 Hardware Replacement"
This chapter describes how to add or replace hardware in your MAP/40, such as hard disks and circuit cards.
n Appendix C, "MAP/5 Hardware Replacement"
This chapter describes how to add or replace hardware in your MAP/5, such as hard disks and circuit cards.
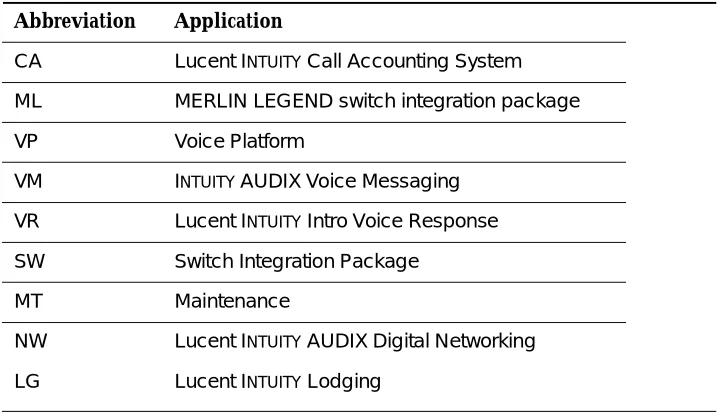
n Abbreviations
This section provides a list of abbreviations and acronyms used in the Lucent INTUITY system documentation.
n Glossary
The Glossary provides a definition of terms and acronyms used in the Lucent INTUITY system documentation.
n Index
About This Book
Conventions Used
The following conventions were used in this book:
n Rounded boxes represent keyboard keys that you press.
For example, an instruction to press the enter key is shown as
Press .
n Square boxes represent phone pad keys that you press.
For example, an instruction to press zero on the phone pad is shown as
Press .
n The word “enter” means to type a value and press .
For example, an instruction to type y and press is shown as
Enter y to continue.
n Two or three keys that you press at the same time (that is, you hold down the first key while pressing the second and/or third key) are shown as a rounded box that contains two or more words separated by hyphens. For example, an instruction to press and hold while typing the letter d is shown as
Press
n Commands and text you type or enter appear in bold.
n Values, instructions, and prompts that you see on the screen appear as follows: Press any key to continue.
n Variables that the system supplies or that you must supply appear in italics.
For example, an error message including one of your filenames appears as
The filefilenameis formatted incorrectly.
ENTER
0
ENTER
ENTER
ALT
Related Resources
Issue 3.0 September 1996
xxxv
n The sequence of menu options that you must select to display a specific screen is shown as follows:
Begin at the Lucent INTUITY Administration menu, and select the following sequence:
In this example, you would first access the Lucent INTUITY Administration menu. Then you would select the Voice System Administration option to display the Voice System Administration menu. From that menu, you would select the Voice Equipment option to display the Voice Equipment screen.
Related Resources
In addition to this book, you may need to reference the following books:
Document
Document
Number Issue
Lucent INTUITY™ Release 3.0 System Description 585-310-232 1 or later
Lucent INTUITY™ Documentation Guide 585-310-540 2 or later
Lucent INTUITY™ New System Planning for Release 3.0 585-310-605 2 or later
Lucent INTUITY™ Release 3.0 Planning for Upgrades 585-310-653 1 or later
Lucent INTUITY™ Release 3.0 Planning for Migrations 585-310-652 1 or later
Lucent INTUITY™ Installation Checklist 585-310-161 2 or later
Lucent INTUITY™ MAP/5 Hardware Installation 585-310-146 2 or later
Lucent INTUITY™ MAP/40 Hardware Installation 585-310-138 2 or later
Lucent INTUITY™ MAP/100 Hardware Installation 585-310-139 2 or later
Lucent INTUITY™ Software Installation for Release 3.0 585-310-160 2 or later
Lucent INTUITY™ Release 3.0 Upgrade Procedures 585-310-164 2 or later
Lucent INTUITY™ Release 3.0 Migration Procedures 585-310-233 2 or later
Lucent INTUITY™ Platform Administration and Maintenance for Release 3.0
585-310-557 2 or later
Lucent INTUITY™ AUDIX® Release 3.3 Administration and Feature Operations
585-310-552 3 or later
Lucent INTUITY™ FAX Messaging Administration and Addenda
585-310-558 1 or later
Continued on next page > Voice Equipment
About This Book
Lucent INTUITY™ AUDIX® Digital Networking Administration 585-310-533 2 or later
AMIS Analog Networking 585-300-512 6 or later
Lucent INTUITY™ Lodging Administration and Feature Operations
585-310-559 1 or later
Lucent INTUITY™ Lodging Property Management System Specifications
585-310-234 1 or later
Lucent INTUITY™ Call Accounting System User Guide 585-310-728 1 or later
Lucent INTUITY™ Call Accounting System Quick Reference 585-310-729 1 or later
Lucent INTUITY™ Intro Voice Response and Addenda 585-310-716 1 or later
Lucent INTUITY™ Message Manager Release 4 User’s Guide
585-310-743 1 or later
Lucent INTUITY™ Message Manager Release 4.1: Getting Started (Available late 1996)
585-310-740 1 or later
AUDIX® Administration and Data Acquisition Package 585-310-502 4 or later
Lucent INTUITY™ Integration with System 75 and DEFINITY® Communications System Generic 1 and Generic 3
585-310-214 4 or later
Lucent INTUITY™ Integration with System 85 and DEFINITY® Communications System Generic 2
585-310-215 2 or later
Lucent INTUITY™ Integration with MERLIN LEGEND® Communications System
585-310-231 2 or later
Lucent INTUITY™ Integration with the 5ESS® Switch 585-310-219 1 or later
Lucent INTUITY™ Integration with DMS-100 585-310-223 1 or later
Lucent INTUITY™ Integration with Northern Telecom® SL-1, Meridian™, and Meridian SL-1
585-310-221 2 or later
Lucent INTUITY™ Integration with Mitel™ SX-200® DIGITAL, SX-100®, and SX-200®
585-310-222 2 or later
Lucent INTUITY™ Integration with NEC® NEAX™ 585-310-216 2 or later
Lucent INTUITY™ Integration with ROLM™ 8000, 9000, 9571 585-310-220 2 or later
Lucent INTUITY™ Lodging Artwork Package 585-310-739 1 or later
Voice Messaging Quick Reference 585-300-702 3 or later
A Portable Guide to Voice Messaging 585-300-701 3 or later
Lucent INTUITY™ Voice/FAX Messaging Quick Reference 585-310-734 1 or later
Lucent INTUITY™ Voice/FAX User Guide 585-310-733 1 or later
Multiple Personal Greetings Quick Reference 585-300-705 5 or later
Voice Messaging Wallet Card 585-304-704 2 or later
Voice Messaging Outcalling Quick Reference 585-300-706 1 or later
Voice Messaging Business Card Stickers 585-304-705 2 or later
Document
Document
Trademarks and Service Marks
Issue 3.0 September 1996
xxxvii
Trademarks and Service Marks
The following trademarked products are mentioned in the books in the INTUITY library:
n AT™ is a trademark of Hayes Microcomputer Products, Inc.
n AUDIX® is a registered trademark of Lucent Technologies, Inc.
n BT-542B™ is a trademark of BusLogic Inc.
n COMSPHERE® is a registered trademark of Lucent Technologies Paradyne Corp.
n CONVERSANT® is a registered trademark of Lucent Technologies, Inc.
n DEFINITY® is a registered trademark of Lucent Technologies, Inc., in the U.S. and throughout the world.
n Dterm™ is a trademark of NEC Telephones, Inc.
Lucent INTUITY™ AUDIX® R3.3 Voice Messaging Subscriber Artwork Package
585-310-735 1 or later
Lucent INTUITY™ AUDIX® R3.3 Voice/Fax Messaging Quick Reference–Canadian French
585-310-734FRC 1 or later
Lucent INTUITY™ AUDIX® R3.3 Voice/Fax Messaging Quick Reference–British English
585-310-734ENB 1 or later
Lucent INTUITY™ AUDIX R3.3® Voice/Fax Messaging Quick Reference–Latin Spanish
585-310-734SPL 1 or later
Lucent INTUITY™ AUDIX R3.3® Voice/Fax Messaging Quick Reference–Greek
585-310-734GK 1 or later
Lucent INTUITY™ AUDIX R3.3® Voice/Fax Messaging Quick Reference–Mandarin
585-310-734CHM 1 or later
Lucent INTUITY™ Lodging Subscriber Artwork Package British English
585-310-739ENB 1 or later
Lucent INTUITY™ Lodging Artwork Package Canadian French
585-310-739FRC 1 or later
Lucent INTUITY™ Lodging Artwork Package Latin Spanish 585-310-739SPL 1 or later
Lucent INTUITY™ Lodging Artwork Package Greek 585-310-739GK 1 or later
Lucent INTUITY™ Lodging Artwork Package Mandarin 585-310-739CHM 1 or later
Lucent INTUITY™ Lodging Artwork Package Japanese 585-310-739JA 1 or later
Lucent INTUITY™ Lodging Artwork Package U.S. English (A4 Sizing)
585-310-739A4 1 or later
Document
Document
Number Issue
About This Book
n Equinox™ is a trademark of Equinox Systems, Inc.
n 5ESS® is a registered trademark of Lucent Technologies, Inc.
n INTUITY™ is a trademark of Lucent Technologies, Inc.
n MD110® is a registered trademark of Ericsson, Inc.
n MEGAPLEX™ is a trademark of Equinox System, Inc.
n MEGAPORT™ is a trademark of Equinox Systems, Inc.
n Meridian™ is a trademark of Northern Telecom Limited.
n MERLIN LEGEND® is a registered trademark of Lucent Technologies, Inc.
n Microcom Networking Protocol® is a registered trademark of Microcom, Inc.
n Microsoft® is a registered trademark of Microsoft Corporation.
n MS® is a registered trademark of Microsoft Corporation.
n MS-DOS® is a registered trademark of Microsoft Corporation.
n NEAX™ is a trademark of NEC Telephone, Inc.
n NEC® is a registered trademark of NEC Telephones, Inc.
n Netware® is a registered trademark of Novell, Inc.
n Netware® Loadable Module™ is a trademark of Novell, Inc.
n NLM® is a registered trademark of Novell, Inc.
n Northern Telecom® is a registered trademark of Northern Telecom Limited.
n Novell® is a registered trademark of Novell, Inc.
n ORACLE™ is a trademark of Oracle Corporation.
n Paradyne® is a registered trademark of Lucent Technologies, Inc.
n Phillips® is a registered trademark of Phillips Screw Company.
n Rolm® is a registered trademark of Siemens-Rolm.
n SL-1™ is a trademark of Northern Telecom Limited.
n softFAX® is a registered trademark of VOXEM, Inc.
n TMI™ is a trademark of Texas Micro Systems, Inc.
n UNIX® is a registered trademark of Novell in the United States and other countries, licensed exclusively through X/Open Company Limited.
n VOXEM® is a registered trademark of VOXEM, Inc.
n VT100™ is a trademark of Digital Equipment Corporation.
Training
Issue 3.0 September 1996
xxxix
Training
For more information about Lucent INTUITY training, call the BCS education and Training Center:
n Organizations within Lucent Technologies: (904) 636-3261
n Lucent Technologies customers: (800) 255-8988
How to Make Comments About This
Book
A reader comment card is behind the title page of this document. While we have tried to make this document fit your needs, we are interested in your suggestions for improving it and urge you to complete and return a reader comment card.
If the reader comment card has been removed, send your comments to:
Lucent Technologies, Inc.
Product Documentation Development Department Room 22-2H15
11900 North Pecos Street Denver, Colorado 80234
Please include the name and order number of this document:
Lucent INTUITY Platform Administration and Maintenance, Issue 3, 585-310-557
Issue 3.0 September 1996
1-1
1
Introduction and Orientation
This chapter is intended to introduce the system administrator to platform administration and to orient on-site technicians before they begin repair actions.
Overview
The Lucent Technologies INTUITY system is Lucent Technologies’ messaging solution that integrates several messaging applications on a single, reliable hardware and software platform. An overview of these applications appears in the following sections.
NOTE:
Your Lucent Technologies INTUITY system may not include all of the applications described.
I
NTUITYAUDIX Voice Messaging
INTUITY AUDIX Voice Messaging provides the means to record and exchange voice messages over the phone when direct communication is inconvenient or unnecessary. It contains stored voice prompts that guide users in creating, sending, retrieving, answering, saving, or forwarding spoken messages. It also answers calls for personnel who are busy or unavailable. Messages can be sent across the hall or across the world with digital and AMIS Analog Networking capabilities. Because it captures the tone and inflection of a spoken message, INTUITY AUDIX Voice Messaging provides the personal interaction that written messages lack.
Introduction and Orientation
Lucent Technologies I
NTUITYLodging
Lucent Technologies INTUITY Lodging is a simple, easy to use call answer/voice messaging application designed for hotels and other lodging providers, including hospitals or colleges. Lodging is ideal for scenarios where the same voice extension/mailbox needs to be turned on, turned off, and assigned to different people. The guest voice message interface is multi-lingual, and a guest may choose a language from the languages installed on the system. Lodging also provides the ability to interface with a Property Management System (PMS) in order to activate, deactivate, and set preference for a voice mailbox when guests check in or check out.
Lucent Technologies I
NTUITYFAX Messaging
Lucent Technologies INTUITY FAX Messaging allows INTUITY AUDIX subscribers to handle faxes using the powerful Lucent INTUITY messaging capabilities. Besides sending, receiving, and printing a fax, subscribers can also forward a fax, annotate a fax with a voice message, send a fax, and broadcast to multiple people.
Lucent INTUITY FAX Messaging combines the send and receive capabilities of a stand-alone fax machine or fax modem on a PC with the many capabilities of INTUITY AUDIX messaging. Subscribers can send, receive, annotate, forward, broadcast, and otherwise handle a fax message just as they do a voice message. With Lucent INTUITY FAX Messaging, the existing capabilities of the INTUITY AUDIX application are extended to handle the delivery and receipt of faxes.
All incoming messages are intermingled in a common incoming mailbox, which provides a common set of services for multimedia messages, including voice, fax, and voice/fax messages. This mailbox lets you handle incoming and outgoing faxes the same way that you handle voice messages. The mailbox has a common login for retrieving any kind of message, and it provides
new-message notification (login greeting with new-message count, Message Waiting Indication, and outcalling), regardless of message type.
All messages are handled over the same type of port, whether the message is a voice message or a fax message. The IVC6 card supports both fax processing and voice processing capabilities. For this reason, callers and subscribers can access voice and fax capabilities over a single call to an IVC6 port.
For more information about administering this application, see Lucent INTUITY
Overview
Issue 3.0 September 1996
1-3
Lucent Technologies I
NTUITYIntro Voice
Response
Lucent Technologies INTUITY Intro Voice Response is a set of tools that allow you to create unique applications that automate telephone transactions in your business environment. Using recorded speech, Lucent INTUITY Intro Voice Response can respond to, request from, and return information to callers. Lucent INTUITY Intro Voice Response allows either full or partial automation of transactions with callers that would otherwise be performed by a person. The Lucent INTUITY Intro Voice Response tools allow you to create applications that can do something simple: a caller requests specific information and the Lucent INTUITY system responds with the information. Lucent INTUITY Intro Voice Response may also be used to do something more complex.
1. A caller requests specific information.
2. In response, the Lucent INTUITY system asks for more information from the caller.
3. Using the information it has gathered, the Lucent INTUITY system accesses its own database and uses that information to respond to the caller.
Lucent INTUITY Intro Voice Response can interact with INTUITY AUDIX Voice Messaging to share information across databases. The following Homework Hotline example illustrates an interaction between these two applications. A local school has a high rate of absenteeism. As a result, students miss class time and homework assignments, causing frustration for the teachers, parents, and students. The Lucent INTUITY solution is a homework hotline. An
application, developed using the Lucent INTUITY system’s Lucent INTUITY Intro Voice Response tools, allows teachers to record messages daily about classroom activities and homework assignments. Parents then call the homework hotline and listen to messages recorded by their child’s teachers. After listening to the teacher’s instructions, the parent is given the option to leave a message which is placed in the appropriate teacher’s voice mailbox. The parent can record a personal, detailed voice message on the child’s status or ask questions about the assignments. This all appears seamless to the parent and the teacher, yet a sophisticated exchange of information between Lucent INTUITY Intro Voice Response and INTUITY AUDIX Voice Messaging has taken place.
Introduction and Orientation
Lucent Technologies I
NTUITYCall Accounting
System
Lucent Technologies INTUITY Call Accounting System collects and processes call records from the switch and generates a number of reports regarding facilities, extensions, and traffic.
For more information about administering this application, see LucentINTUITY
Call Accounting System User Guide, 585-310-728.
Lucent Technologies I
NTUITYMessage Manager
Lucent Technologies INTUITY Message Manager allows INTUITY AUDIX
subscribers to use their PCs to monitor and control INTUITY AUDIX messages. If Lucent INTUITY FAX Messaging is included on the system, subscribers can use Lucent INTUITY Message Manager to display and print faxes they receive in their mailboxes.
For more information about administering this application, see LucentINTUITY
AUDIX R3.3 Administration and Feature Operations, 585-310-552.
Administration
Once the Lucent INTUITY system is installed, the system must be administered according to the individual needs of your company. The system administrator uses the Lucent INTUITY system’s menus and screens to set up the system, view system status, and troubleshoot problems.
Each application on the system requires administration. In addition, underlying these applications is a set of tools, utilities, and capabilities that make up the platform. Platform capabilities are accessible to and affect all applications. For example, the alarm log records errors for all applications, and the Voice
Equipment screen is used to administer all voice channels.
Administration
Issue 3.0 September 1996
1-5
Logins
To perform the activities in this book, you must be logged on to the Lucent INTUITY system. There are several different logins available. Each provides varying levels of access to the features and capabilities of the system.
n The vm INTUITY AUDIX Voice Messaging login permits administration of the INTUITY AUDIX Voice Messaging application and access to some logs.
n The sa Lucent INTUITY system administrator login permits administration of all the Lucent INTUITY system applications, administration of system-wide features, and access to some logs.
n The craft Lucent services login permits administration of all the Lucent INTUITY system applications, administration of system-wide features, and access to all logs.
For information on how to log in, see Chapter 4, "Getting Started".
How to Use This Document
The Lucent INTUITY system administrator should use this document in the following way.
1. Perform all of the activities in Chapter 4, "Getting Started". Use Chapter 2, "User Interface", to help you maneuver within the system.
2. Read Chapter 6, "Security", and set up strict security policies as suggested.
3. Read Chapter 5, "Administration Checklists", to familiarize yourself with your responsibilities and set up daily, weekly, and monthly routines to ensure that all tasks are completed. These checklists will refer to Chapter 7, "Monitoring System Resources", Chapter 8, "Using Reports", Chapter 9, "Backing Up and Restoring Information", and Chapter 10, "Administrator’s Log Messages and Repair Actions".
4. If a warning alarm appears in the alarm log, the Lucent INTUITY system administrator is responsible for resolving it. Identify the alarm using its application code (CA, ML, MT, NW, VM, VP, VR), and use Chapters 11 through 19 to perform its corresponding repair action. For detailed descriptions of the logs themselves and their search capabilities, see Chapter 3, "Logs".
Introduction and Orientation
Maintenance
In the Lucent INTUITY system, maintenance — system repair and
troubleshooting capabilities — are a part of the platform, and thus common to all Lucent INTUITY system applications. In this way, the Lucent INTUITY system provides a single point of reference for troubleshooting problems regardless of the configuration of the system. For example, all applications use the same alarm log to report errors occurring within the application or in its interaction with other applications. The alarm log receives entries from all areas of the system, prioritizes alarms according to severity, and makes them accessible in an easy to read report.
This common maintenance platform offers a variety of other features aimed at efficient and effective maintenance of the Lucent INTUITY system.
Overview of Alarming
Error messages report the detection of a problem. Errors found by the system are recorded in the maintenance log. Not all errors are service-affecting, and the system attempts to diagnose and isolate problems that are recorded in the maintenance log before sending an alarm to the alarm log.
Error resolutions report the disappearance of error conditions. Events are simply informational messages about the system’s activities. For example, an event message is logged when the system is rebooted.
The alarm log holds two types of entries: active alarms and resolved alarms. Active alarms are the current problems in the system. Resolved alarms are alarms that have been corrected either automatically or through a repair procedure (see Chapters 11 through 19). When an active alarm is corrected, its status is changed from active to resolved.
System Administrator Troubleshooting Strategy
The following strategy suggests one of the ways in which to use the tools available to troubleshoot and resolve a problem.
1. For subscriber-reported troubles, be sure to obtain the following information from the subscriber.
— Date and time trouble was reported
— Date and time trouble occurred
— Extension at which trouble occurred
— Description of the trouble
Maintenance
Issue 3.0 September 1996
1-7
Use the activity log to understand the events and the surrounding
problem. See INTUITY AUDIX R3.3 Administration and Feature Operations, 585-310-552, for more information on the activity log.
2. Access the administrator’s log and write down the application code and event id for the most recent entries. Use Chapter 10, "Administrator’s Log Messages and Repair Actions", to understand and resolve, if necessary, the messages.
3. Access the alarm log and write down the following three pieces of information on the most severe alarm: application code, alarmed resource type, and alarm code.
4. Use the application identifier to key into Chapters 11 through 19 in this book. There is one application identifier per chapter; the application identifier is shown on the tab. Once in the correct chapter, find the alarmed resource type. Under the alarmed resource find the alarm code.
5. Follow the repair action documented. The repair action may refer you to any one of the diagnostics tools available. If there is not a specific chapter reference with a procedure name, the procedure resides in Chapter 22, "Common Administration and Maintenance Procedures".
NOTE:
With the standard Lucent maintenance contract, the Lucent INTUITY system administrator is only responsible for resolving the warning alarms. All other alarms are sent to and are the responsibility of the Lucent remote service center.
6. If you are unable to resolve the trouble, contact your remote service center.
Trouble Escalation
When you purchased the Lucent INTUITY system, your sales representative established a service escalation path (procedures for getting help) for your site. An escalation path specifies who you contact when you cannot fix problems that you are responsible for and how you are billed for those services. If you are not familiar with your site’s escalation path, contact your sales representative.
The standard Lucent maintenance contract ensures that an Lucent remote service center is notified of all major and minor alarms on your Lucent INTUITY system. If a major or minor alarm has been active for at least 5 minutes, a call is placed to the Lucent remote service center designated on the Alarm
Management screen. For more information, see Chapter 3, "Logs".
Once the remote service center receives notification, a technician can log into your machine from his/her location, diagnose, and most likely fix the problem.
Introduction and Orientation
1. What is your company name?
2. What is your name (system administrator’s name)?
3. What version of the Lucent INTUITY system software are you running?
4. What is your product id? (Alarm Management screen)
5. What is your system configuration (number of channels, types of cards installed, switch type)?
6. When (date and time) did the trouble begin?
7. Is the system actively taking calls?
8. Are all or a subset of users affected?
9. Describe the problem. Include a scenario that will allow remote service center personnel to recreate the problem.
10. Under what conditions does the trouble happen?
11. Has anything about the system changed recently (added a new card, upgraded software)?
12. What have you done to troubleshoot the problem?
On-Site Technician Troubleshooting Strategy
The following strategy suggests one of the ways in which to use the tools available to troubleshoot and resolve a problem.
1. Access the alarm log and write down the following three pieces of information on the most severe alarm: application code, alarmed resource type, and alarm code.
2. Use the application identifier to key into Chapters 11 through 19 in this book. There is one application identifier per chapter; the application identifier is shown on the tab. Once in the correct chapter, find the alarmed resource type. Under the alarmed resource find the alarm code.
3. Follow the repair action documented. The repair action may refer you to any one of the diagnostics tools available. If there is not a specific chapter reference with a procedure name, the procedure is in Chapter 22, "Common Administration and Maintenance Procedures".
— Chapter 20, "Diagnostics"
n INTUITY AUDIX Digital Networking
n Voice Card
n Multi-Port Serial Card Diagnostics
— Chapter 21, "Database Audits"
Maintenance
Issue 3.0 September 1996
1-9
Introduction and Orientation
— Appendices A, B, and C, “Adding and Replacing Hardware,” for MAP/100, MAP/40, and MAP/5.
n Power supply
n Battery
n Fan, fan filters
n Circuit cards
n Hard disk drive
n Floppy disk drive
n Cartridge tape drive
4. Continue to check the alarm log to see if repair action has resolved the alarm.
5. If you wish to gather more information on the problem, try the following:
— There are four System Verification Reports that do general status checks on the system. Use Chapter 8, "Using Reports", to access them and look for possible errors.
— The maintenance log contains a trail of events and errors leading up to the alarm that may also help you pinpoint the problem.
NOTE:
Issue 3.0 September 1996
2-1
2
User Interface
Using Lucent I
NTUITY
Screens
Your Lucent INTUITY system displays screens that allow you to interact with the system. These screens are described in the following sections.
If you are accessing INTUITY AUDIX Administration, see the section "Intuity AUDIX Administration Screens" on page 2-9.
About Screens
User Interface
Screen Layout
A sample screen is shown below:
Figure 2-1. Sample Screen Layout
Screen Title
Scroll Bar
Message Line
Function Key Commands
Using Lucent INTUITY Screens
Issue 3.0 September 1996
2-3
Each component of the screen is described below:
Standard Function Keys
Several function key commands perform standard actions regardless of the screen you are viewing. Other commands are unique to a particular screen. The standard function key commands are described below:
Screen Component Description
Screen Title A name describing the screen or menu.
Scroll Bar Indicates when a screen contains more than one page of information. If the scroll bar contains a downward arrow, you can press , , or (F3) to scroll to the additional information. The scroll bar then contains an upward arrow, and you can press , , or (F2) to scroll back.
Message Line Contains a brief instruction or message about how to use the screen.
Function Keys Boxed labels that correspond to the first eight function keys (F1 through F8) on your keyboard. Each label represents a command that is performed when you press the corresponding function key. If more than one screen is open, the commands displayed apply only to the active screen. If no command label appears for a given function key, that key is not available for the active screen.
You can display an additional set of function keys by pressing (F8).
Command Description
Displays information about the active screen, including available function key commands. To close the help screen, press .
From a field where you can type information, displays a menu of possible options, if available. For more information, see the section "Filling in Fields" on page 2-7.
Saves any changes you made in a screen.
Continued on next page
PgDn NEXTPAGE
PgUp PREVPAGE
CHG-KEYS
HELP
CANCEL CHOICES
User Interface
Frame Management Menu
The Frame Management menu lists several options that affect a screen’s appearance. All options may not appear for every screen. A sample Frame Management menu is shown below:
How to use each of the options on this menu is described in the following sections.
When a screen contains more than one page of information, scrolls to the previous page.
When a screen contains more than one page of information, scrolls to the next page.
If more that one screen is open, makes the previous screen active while still displaying the current screen. Continue pressing the key to scroll in a loop through all open screens.
If more that one screen is open, makes the next screen active while still displaying the current screen. Continue pressing the key to scroll in a loop through all open screens.
Closes the active screen and returns to the previous screen. Any unsaved changes are lost.
Toggles between two available sets of function key commands.
If you have a printer connected to your Lucent INTUITY system, prints each page of the screen that can be displayed.
Displays a menu that allows you to change several physical characteristics of the screen. For more information, see the following section,"Frame Management Menu" on page 2-4.
Command Description
Continued on next page
PREVPAGE
NEXTPAGE
PREV-FRM
NEXT-FRM
CANCEL
CHG-KEYS
Using Lucent INTUITY Screens
Issue 3.0 September 1996
2-5
List
The List option displays a list of all open screens. Use the following procedure:
1. From any screen, press (F8), if needed, and then press (F7).
The Frame Management menu is displayed.
2. Select List, and press .
The Open Frames menu is displayed, which lists the screen titles for all open screens.
3. To make one of the listed screens be the active screen, select the screen you want, and press .
The Open Frames menu is closed, and the selected screen is active.
Move
The Move option allows you to move the current screen to another location on the display. Use the following procedure:
1. Make sure that the screen you want to move is the active screen.
2. Press (F8), if needed, and then press (F7).
The Frame Management menu is displayed.
3. Select Move, and press .
The Frame Management menu is closed, and the selected screen is displayed as just four corners.
4. Use the arrow keys to reposition the four corners where you want to move the screen, and press .
The screen is redisplayed in the new location. Once you close the screen, it returns to its original location.
Reshape
The Reshape option allows you to move and resize the current screen.
NOTE:
You cannot resize a screen that allows you to fill in fields.
Use the following procedure:
1. Make sure that the screen you want to resize is the active screen.
2. Press (F8), if needed, and then press (F7).
The Frame Management menu is displayed.
CHG-KEYS FRM-MGMT
ENTER
ENTER
CHG-KEYS FRM-MGMT
ENTER
ENTER
User Interface
3. Select Reshape, and press .
The Frame Management menu is closed, and the upper left corner of the selected screen is displayed as a blinking cursor.
4. Use the arrow keys to reposition the upper left corner of the screen to its new location, and press .
The lower right corner of the screen is displayed as a blinking cursor.
5. Use the arrow keys to reposition the lower right corner of the screen to its new location, and press .
The screen is resized as specified and displayed in the new location. Once you close the screen, it returns to its original size and location.
Refresh
The Refresh option redraws the screen and eliminates any extraneous words or lines that may appear. Use the following procedure:
1. From any screen, press (F8), if needed, and then press (F7).
The Frame Management menu is displayed.
2. Select Refresh, and press .
The screen is redrawn, eliminating any extraneous information.
Color Attributes
The Color Attributes option allows you to change the colors that appear on your screens, if you are using a color terminal. Use the following procedure:
1. From any screen, press (F8), if needed, and then press (F7).
The Frame Management menu is displayed.
2. Select Color Attributes, and press .
The Color Attributes screen is displayed, as shown below:
ENTER
ENTER
ENTER
CHG-KEYS FRM-MGMT
ENTER
CHG-KEYS FRM-MGMT
Using Lucent INTUITY Screens
Issue 3.0 September 1996
2-7
3. Type the colors you want over the default settings, or press (F2) to select from a menu of possible color choices. (For information about how to use this menu, see the section "Choices Menu" on page 2-8.)
4. When you are finished changing the settings, press (F3).
The screens are displayed with the colors you specified until you log off the system. The next time you log on, the colors will return to the default settings.
Selecting a Menu Option
A menu contains a list of options that you can select. To select a menu option, you highlight the option, and press .
To highlight a menu option, use any of the following methods:
n Press and to move the cursor to the menu option you want to highlight. You can scroll in a loop through the top or bottom of the menu.
n Press to highlight the first menu option. Press to highlight the last menu option.
n Type the first character of the menu option you want. The first option beginning with that letter is highlighted. When you use this method, the following rules apply:
— If more than one option begins with the same letter, type enough letters to identify the option you want. If the cursor is already on the first letter of an option beginning with the same letter, type the second letter in the option you want.
— To move the cursor back to the beginning of a menu option’s name, press .
— This feature is not case-sensitive; you can type “a” or “A.”
Filling in Fields
Some screens contain fields where you can type information. When you fill in a field, you type in the lines displayed on the screen.
When you enter information in a screen field, the following guidelines apply:
n In most cases, the length of the line represents the maximum number of characters allowed for that field.
n The type of characters you can enter may vary depending on the screen you are viewing. Information about what you can type may appear in the message line at the bottom of the display.
n Once you type information in a field, you need to save the changes made to the screen. You also have the option to cancel your changes without saving them.
CHOICES
SAVE
ENTER
HOME END
User Interface
Moving Through Fields
You can use the following keys to move through fields on a screen:
Choices Menu
When a screen contains fields, you may be able to display a menu listing possible field settings and select one directly from that list. Use the following procedure:
1. From a screen containing fields, move the cursor to the field for which you want to display a list of choices, and press (F2).
A menu is displayed that lists possible field settings. Depending on the field, the menu may contain all possible settings or just common settings for that field. If no menu is available, a beep is sounded.
2. Select the menu option you want, and press .
The Choices menu is closed, and the field setting you selected is displayed in the current field.
Key(s) Description
, Moves the cursor to the next field, moving left to right through each field. From the last field on the screen, wraps to the first field.
+ Moves the cursor to the previous field, moving right to left through each field. From the first field on the screen, wraps to the last field.
Moves the cursor down one field. From the bottom field, wraps to the top field.
Moves the cursor up one field. From the top field, wraps to the bottom field.
Moves the cursor right one character within a field.
Moves the cursor left one character within a field.
Moves the cursor to the beginning of the current field.
Moves the cursor to the end of the current field.
, Deletes the character on which the cursor is located.
Deletes the character to the left of the cursor.
ENTER TAB
SHIFT TAB
HOME
END
DELETE DEL
BACKSPACE
CHOICES
INTUITY AUDIX Administration Screens
Issue 3.0 September 1996
2-9
I
NTUITY
AUDIX Administration
Screens
You administer most aspects of INTUITY AUDIX Voice Messaging using INTUITY AUDIX administration screens. How to use these screens is described in the following sections.
About I
NTUITYAUDIX Administration Screens
When you first access the INTUITY AUDIX administration screens, a blank screen is displayed. From this screen, you enter commands that display screens that allow you to enter or view information. Each screen has a name that you use to display the screen. From these screens, you can use a set of function keys and also receive a variety of help information.
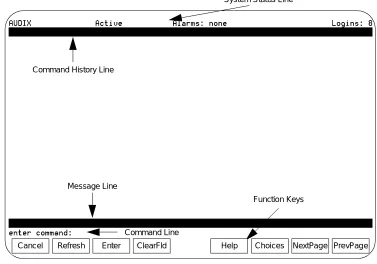
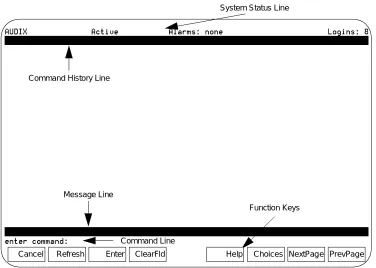
Screen Layout
The screen layout for a sample blank screen is shown below:
Figure 2-2. INTUITY AUDIX Administration Screen Layout (Blank Screen)
Command History Line
System Status Line
Message Line
Command Line
Function Keys
User Interface
Each component of an INTUITY AUDIX Administration screen is described below:
Function Keys
The function keys available for the INTUITY AUDIX Administration screens are described below:
Screen Component Description
Status Line Displays the Lucent INTUITY system status, including the following:
n The name of the machine you are logged onto
n Active: Indicates that voice mail is in service
n Alarms: w (Warning); M (Major); m (Minor); A (Administrative); none
n Logins: n, where n is the number of terminals currently logged into the system
Command History Line
Displays the command being executed and the number of pages for that screen.
Message Line Displays brief messages or instructions.
Command Line Allows you to enter INTUITY AUDIX commands. For more information about these commands, see INTUITY AUDIX
Administration and Feature Operations, 585-310-552.
Function Keys Boxed labels that correspond to the first eight function keys (F1 through F8) on your keyboard. Each label represents a command that is performed when you press the corresponding function key, as described in the following section, “Function Keys.”
Function Keys Description
(F1) From a field on a screen, ends the current command without saving any changes, and returns the cursor to the command line. From the command line, deletes the contents of the command line. From a Help screen, exits and returns to the previous location.
(F2) Redraws the screen.
Continued on next page
CANCEL
INTUITY AUDIX Administration Screens
Issue 3.0 September 1996
2-11
Changing the Function Key Labels
You can change the function key labels to correspond to the function keys that appear on Lucent INTUITY screens outside of INTUITY AUDIX administration. For this procedure, type the following at the command line:
toggle f
Use this command to toggle between the following two sets of functions key assignments:
(F3) If you entered information in a screen, saves any changes you made.
(F4) From a field on a screen, deletes the information in the field. From the command line, deletes the part of the command (verb, object, qualifier) on which the cursor is located.
(F5) From a field on a screen, displays information about the screen you are viewing. From the command line, displays information about the types of available help. (This function key displays the same information as the help command.)
(F6) Displays help information about a field or command, or displays a list of valid field entries or command parts. For more information, see the sections “Field Help” and “Command-Line Help.”
(F7) Moves forward through multiple-page screens.
(F8) Moves backward through multiple-page screens.
Function Key Labels Standard Function Keys Alternate Function Keys F1 F6 F2 F5 F3 F3 F4 F4 F5 F1
Continued on next page
Function Keys Description
Continued on next page
User Interface
Entering Commands
To display INTUITY AUDIX administration screens, type a command on the command line and execute the command. You execute a command in one of the following ways:
n Press .
n Press (F3).
Command Syntax
Commands have the following syntax:
verb object qualifier
Each part of the command syntax is described below:
F6 F2
F7 F7
F8 F8
Command Part Description
verb Single word that indicates the type of action to be performed on the specified screen. Required.
Example: add
object One or more (hyphenated) words that identify the screen to be acted on. May be required.
Example: add subscriber
qualifier A value (e.g., extension number, date, machine name) that further identifies what is to be acted on. May be required.
Example: add subscriber 12345
Function Key Labels
Standard Function Keys
Alternate Function Keys
Continued on next page
CHOICES NEXTPAGE PREVPAGE
ENTER
INTUITY AUDIX Administration Screens
Issue 3.0 September 1996
2-13
Most commands can be executed with a vm (voice messaging administrator) login ID. A few commands require the sa (system administrator) login ID. For a complete description of INTUITY AUDIX administration screens and commands, see INTUITY AUDIX Administration and Feature Operations, 585-310-552.
Command-Line Help
You cannot execute a command until you type the complete command syntax required. You can display in