Testing the DMZ
Solutions in this chapter:
■
Reconnaissance and Penetration Testing
■Testing the DMZ Hosts
■
DMZ Hardening Checklist
Appendix B
Summary
Solutions Fast Track
Introduction
Wa r fa re : For thousands of ye a rs , c ivilized and uncivilized nations alike have waged combat with each other for good, b a d , or indifferent re a s o n s . In the technical wo r l d , i t ’s much the same scenari o.You need to plan your defense against attack, whether you think you’ll be a t t a c ked or not. The attacker is the hacke r, the script kiddie, or anyone else who wants to do harm to your company and its re s o u rc e s . E ven unskilled attacke rs could attempt to p robe your defenses, no matter how fortified you think they are.This appendix looks at the seriousness of the issue from all angles so that you can understand the importance of not only having a DMZ but properly securing it, as you have been learning to do by reading this book.
The problem associated with building and maintaining a DMZ is simple:You are exposed to the public Internet.That single fact alone should be enough to alert you to the dangers of hosting services, even within a protected public network segment such as a DMZ. To move back to our reference to modern warfare, to implement a proper security posture, you need to build your defenses.This entire book has focused on just that—how to properly configure a DMZ with multiple technologies and how to securely deploy those technologies so that you do not leave back doors into your security infrastructure.
Now that you understand why we covered so much material on designing and config-uring the DMZ, let’s take a topical look at what an attacker could do to your systems if you do not take such protective measures. In this appendix we look at the offensive side and review some of the defense; from learning about the offensive, you will learn how to build a better defense. It’s always important to put on a “hacker hat” to test your own solution. In this appendix, that’s exactly what you’ll do.You will put on the security analysis hat and test what you have implemented so that you understand why it is so very important to lock down your DMZ and its contents.
In this appendix, we look at the following:
■ Reconnaissance We examine how attackers find out who you are, how they profile you and the services you have running, and the techniques used to probe your defenses.The information in this section is quite alarming; you will see that it is very simple to probe your network without expending much time or money. You will also be alarmed at how much information can be found about you and your company with a few online tools. Intelligence gathering is the most impor-tant part of successfully winning a war—and make no mistake, once attacked, you will be at war!
■ Testing Next we take a look at actual penetration testing—trying to find the open holes in your security and research ways to exploit those holes. We see how an attacker can easily find out the services you run, where you run these services, how to build a network map and thus build a strategy to take the next step, which is to attack. So if you build up a defense, you must check it to make sure that it is secure.
■ Attacking Lastly, we look at the attacks that will be used to penetrate the DMZ or cause havoc with the actual hosts and services available. Many times, it is quite impossible to actually penetrate a network segment, but you will see how weak-nesses can be exploited quite easily once they’re found with just a little research. In warfare, the strength of your opponent is matched only by your intelligence. Doing your research—finding the weaknesses and exploiting them—is how most battles are won.
In regard to these three areas, it is most important that you understand this whole methodology very clearly.This is the methodology that we hope you acquire after reading this appendix, to apply to your own security assessment—assessing your own strength after building your DMZ. Again, this appendix is not meant to be a guide on how to hack someone else’s DMZ but rather how to evaluate your own in hope of finding holes you might have missed. If you don’t hack your DMZ, someone else will.
N
OTEThe proper network-based terminology associated with this appendix is foot-printing—the art of profiling an organization based on reconnaissance tech-niques (which you’ll learn in this appendix) to create a map of the
organization’s resources.
Before we get into the nuts and bolts, we must add a disclaimer: Please do not use the information contained within this chapter to cause harm to others; use it as a guide to help test your DMZ.This is not a hacking guidebook or a common security book. All solutions revolve around the DMZ. In addition, make certain that you gain permission from your senior management to conduct such tests on the network, especially if it is a live network. If you do decide to check out someone else’s DMZ, remember, your IP address will probably be logged, so if you are not swift in your delivery (as from attacking via another machine or spoofing your address), it’s very likely that you will be caught if you do not know what you’re doing. Lastly, before we begin, we need to make it clear that by not checking your DMZ, you are likely to incur some costs down the road. If your network is penetrated suc-cessfully and you cannot catch the attacker, all damage done could be quite costly in time and resources, and you, your company, and the stockholders (if your company is public) will be the bearers of the cost.This alone should be your motivation to at least perform the due diligence of “knocking on your own door” or simply “kicking the tires.”
Now let’s begin, but first a word of caution. When testing your DMZ, you must take great care in configuring the tools or scripts, because one error could cause some unin-tended side effects, such as scanning someone else’s network.
Designing & Planning…
So, What Does It Cost?
Most folks don’t realize how much a network penetration can cost an organiza-tion. The dollar amount of damage that hacking causes has steadily increased over the past few years. According to the CSI/FBI Computer Crime and Security Survey 2005 (www.gocsi.com), the total losses due to incidents such as viruses, fraud, DoS attacks, sabotage, and other computer crimes was $130,104,542, but on a positive note, there was a 61 percent decline in the cost per response. Other interesting statistics were the following:
■ Unauthorized access to information increased per respondent, from
$51,545 in 2004 to $303,234 in 2005.
■ Theft of proprietary information increased per respondent, from
$168,529 in 2004 to $355,552 in 2005.
This shift can be credited to the heightened user awareness and new/more adopted security technology, such as antivirus tools. In addition, new laws and regulations, such as Sarbanes-Oxley and other state privacy laws, have aided in the advancement of information security.
The top security technologies used by most companies include:
■ Firewalls
■ Antivirus software
■ Intrusion detection systems
■ Server-based access control lists ■ Encryption for data in transit
Technologies such as encryption and two-factor authentication have also been on the rise as the costs and technologies have become more accepted and encouraged by adding regulations. In recent years, the use of security audits, penetration testing, and overall awareness of security is increasing. With each new published attack or security breach, people become more aware of the issues. The security arena has seen significant debate over publishing security information such as exploits and tools used. The consensus is that with today’s rapid-fire communications, hackers will have the information in a matter of days, so trying to keep the information under wraps is a disservice to people who are trying to protect networks and information.
Reconnaissance and Penetration Testing
Apenetration testis a way to determine whether you have left some doors open by accident.Open doorsis a term used to describe services, back doors, lack of security, lack of auditing, or any other means to evade detection, penetrate, or exploit a device, segment, host, or ser-vice. An open door can really mess up your day after you’ve invested an enormous amount of capital into your security infrastructure; an attacker is basically able to waltz right in without a problem. In this section we take a look at how to conduct a solid penetration test against your DMZ with most of the same tools an attacker would use.These tools are freely available to you (and aggressors) on the Internet. We chose as many freeware tools as possible simply because it’s easier (and more important) for you to learn how to duplicate these attacks with readily available tools. Some security assessment tools can be costly, and some of the freeware ones do the job just as well—at times, even better. Before we start testing, let’s look at some fundamentals that you need to learn before you start your tests.
Defense in Depth
Before we begin our discussion on penetration testing, you should understand a simple con-cept about defense that will help you understand how a hacker thinks.Defense in depthis a term used to describe a multilayer security environment. In other words, just having a fire-wall installed is not enough, nor has it ever been. A firefire-wall is necessary, but it should not be the only point of security you implement.
Take this scenario, for instance. Say that you are the security engineer for a medium-sized manufacturing company with three remote sites and an Internet connection in the core campus location.You have an Internet router and a firewall implemented.You check logs and practice maintaining all updates on the firewall and the router.To ensure that the company is not hacked through the Internet connection, you constantly keep up with activity on both devices.
One morning when you come into work, it’s very apparent that something is wrong. Your Web server hosted on your DMZ segment off the firewall is down, and the help desk has had many calls about the outage. It is not responsive, and you aren’t sure why.You have checked the logs on the firewall and router, but nothing is showing up that alerts you to what might have happened.You then move to the Web server (which is running Solaris) to realize that had you set up auditing or IDS on the system itself, you might have been able to dig up some more clues. Worse yet, you realize that the administrator responsible for the server has not removed any extra software nor applied any security patches since the box was placed on the DMZ four months earlier.
S c a ry? You shouldn’t be shocke d , because this is a common occurre n c e. L e t ’s break this s c e n a rio down—not to point fin g e rs or find fault (we can see that the Web server adminis-trator has not done his or her job and that the security engineer should have known about the p o s s i ble holes in the Web serve r ) , but more to make this a learning experi e n c e.The first thing w rong here is that the security engineer was not invo l ved with the security level set on the
DMZ host and that the Web server administrator was not invo l ved in hardening the serve r, using auditing, a ny host-based IDS, or service pack application. W h a t ’s wo rs e, the security per-sonnel we re not invo l ved with other depart m e n t s ’ s e c u rity implementations, or possible holes in the system would have been found as soon as the server was placed in the DMZ.
The last portion of fault here is directly placed on a lack of security beyond the firewall. This is a lack of defense in depth. As we just mentioned, without taking a hard look at your systems and penetration testing them, you will not know that such holes are open, and worse yet, you could find that any security posture beyond the firewall is nonexistent.That is why defense in depth is so important to not only know about but to understand and follow closely, to ensure that you are not the most vulnerable target to an attacker.You can see an example of defense in depth in Figure B.1. Here you should not only use a firewall but also auditing, IDS, policies, ACLs, hardening, logging, and so on. This is also why security is commonly considered to have multiple layers.
Figure B.1
The Concept of Defense in DepthDefense in depth is a commonsense-based approach to security. Defense in depth gives your security posture breadth as well as depth. Make sure this concept stays fresh in your mind as you perform your penetration testing. Make a list of what is missing from your envi-ronment. Here is a simple checklist to follow as you move through the testing process:
1. Does your infrastructure meet your security policy needs?
2. Is there an external router? If so, does it use AAA? Is it logging enabled? Is it secured from inappropriate access? Do you have ACLs in place to block traffic? Have you applied all the proper security patches? Have you followed the vendor (for example, Cisco) checklist in the appropriate chapter or on the appropriate Web site to harden this router? Are you running a current OS?
3. Do you have a firewall in place? Is it controlling traffic as it should? Just like the router, is it patched, and does it have the proper security applied to it in the form of hardening?
4 Do you have IDS? Is it NIDS or HIDS? Do you have a host-based IDS? Are the signatures up to date? Does the IDS need patching and hardening? Do you have HIDS deployed on your DMZ hosts, regardless of whether you have a NIDS? 5. Are you using an internal router? Does it have the same attention applied to it as
the external router did?
6. Do you have auditing enabled? Are they hardened, patched, and up to the proper service pack levels? Have you gone through checklists to clean off any unneeded services?
7. Do you have any excessive protocols or services running on any device, as is common? Have you checked to ensure that once you did find unwanted services, you safely removed them?
8. Have you secured access to the DMZ both in band and out of band, as well as physical access? This means through Telnet, SSH, dialup, and physical console access to any device.
9. Do you even have a policy, and if you do, is the DMZ addressed within it in any way?
10. Have you secured internal threats to the DMZ and all its devices and hosts? (Remember, many attacks come from within.) Have you made certain that you can catch internal attacks as well as external ones?
This list is not complete; you could find other items you might want to place in it. Simply add them as you see fit.This is a good top-10 list to start with because these are some of the most general questions you can ask yourself when you’re designing your DMZ.
N
OTEIn this book we highlighted how to lock down Windows, Solaris, and Linux on the DMZ, how to harden hosts, and how to implement all the solutions we mention in this chapter. As you follow the hacking guidelines in this appendix, you will need to refer back to earlier chapters, where you were taught now to properly lock down these systems and check them.
Recon 101
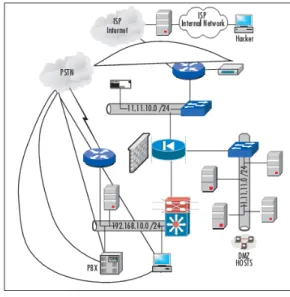
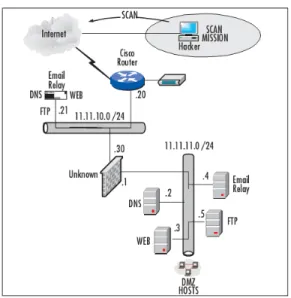
As we move back into penetration testing, we break this section down into subsections dealing with each portion of the DMZ, to make it easier for you to follow.You will find this layout throughout this appendix. We move external to internal, as illustrated in Figure B.2. The external network is the dialup connection as well as the ISP-based Internet connection. Figure B.2 shows a basic DMZ with an internal segment, an external segment, and a DMZ segment. We can penetration test each section at a time so that we have a standard process to follow. Whether you think this DMZ design is proper is not the point; you didn’t build it because you are in the shoes of the hacker now.You are simply looking at someone else’s design, and there could be design mistakes in here, which possibly makes more for you to exploit.
Figure B.2
Penetration Testing the DMZN
OTEIn looking at Figure B.2, it is imperative that you understand that as an attacker, you will not know what any of this looks like. This topology map is simply for you to follow as we move through the testing. The map is something you want to “create” when we cover the section on network mapping and topology map building.
Now that you have a general idea of what the DMZ you attack will look like, let’s take a look at how this map can be built remotely, and more important, how many tests you can
do to find all this information out for yourself. Before we do that, remember that you want to gather as much information as possible, so pay very close attention to any details that can give you the following information about any particular company:
■ Where the company is physically located and logically located (on the Internet) ■ Any analog connections; these result in phones, fax, dialup lines, any out-of-band
connectivity
■ Any contact information online, in phone books, or elsewhere; people’s names and phone numbers
■ Companies that could be “connected” to the company you are profiling; business partners are key
■ Any information you can glean on the company that results in a possible exploitation
Picking a Target
Your first and only target in penetration testing is your own network. In this section, it should be clear that you are scanning your own network for vulnerabilities, not the network of an intended victim. We switch to the mindset of the hacker here so that you can under-stand how the information-gathering process works. Before we start gathering information, we must choose a target. Attackers choose a victim network for a variety of reasons:
■ They want to have fun. (Doesn’t everyone?)
■ There is a motive behind the attack (anger, monetary reasons, dismissal, personal vendetta).
■ They want to see if they can beat the challenge the network represents.
Some of these reasons are common, but they all lead to the same problem: Attackers are coming after you for whatever reason they choose. Once the attacker has selected the target, the next step is to start gathering information. Let’s look at this process in detail.
Basic Information Gathering
In the information-gathering phase, you will most likely start a written log to record all your findings and when you found each item. It’s not wise to do everything at once, because if you simply “go for broke” on the first day, you will likely get caught. Most attackers do not attack a heavily fortified and maintained DMZ all at once; instead, they nibble on it here and there, checking out what defenses are in place.The information-gathering phase can be out-lined by the following tasks:
■ Start a log. Make sure you document all your findings and place the time and date in the log.
■ Start with getting a domain name and an IP address in use by the company. Do a
whoislookup.
■ Start a vulnerability scan on the range of IPs in use by the organization.
■ Set up a network topology map for the external portion of the network as well as any hosts that reside on that segment.
■ Start a vulnerability scan on all documented hosts.
■ Try to match services to hosts. For instance, if you find a host on a DMZ segment with port 25 open, it could be an e-mail relay server.This is an assumption, but that is how you start to build your map.
■ Try to find any exposure or any open services or vulnerabilities, and document these in detail. Use the Internet to find open holes through missing patches or ser-vice packs.
■ Test all remote access points, including VPN, PBX, or other possible methods. ■ Document all your findings, and make an assessment on where vulnerabilities lie
and what you might be able to do to exploit them.
■ When you have a basic network map in place, perform a masterful string of social engineering attacks to gather all other details you need.
■ Start your next phase, which is to test each exploit without getting caught. Look at your log and start either developing the tools you need or acquiring them based on need.
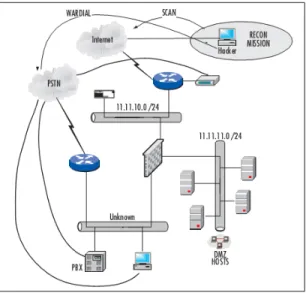
Figure B.3 shows a basic network map made from a light reconnaissance mission.
Figure B.3
Basic Network Map Made from a Light Reconnaissance MissionBasically, through scanning and mapping, we have the following information in our first map:
■ Awhoislookup provides us with an IP address to start with as well as a phone number.
■ A vulnerability scan provides us with host types (DNS server, FTP server). ■ A scan with a network-mapping tool shows us the whole IP range in use. ■ Wardialing has produced out-of-band connections through or past the DMZ. ■ Wardriving (or walking) has checked for the existence of a wireless access point in
the DMZ.
So now that you have a basic understanding of how an attacker begins, let’s take a look at how we built this map, the tools we used, and some detail on why.
N
OTEThere is debate over whether port scanning and information gathering are illegal. In other words, if someone ran up to your house and knocked on your door to sell you something and realized that your door was ajar, no law is broken if the person doesn’t do anything about it. However, if the person walked into your house through that open door, opened your fridge, and grabbed a cold one, the police could rightfully take them away. This concept holds true with information gathering. You can check things out, but if you do not belong there or you start to penetrate, you are breaking the law. Keep tabs on these laws for your own personal knowledge because network security and law enforcement are in flux, but as of today, its not a crime to skateboard nor knock on someone’s door—yet.
Note that we don’t cover wireless attacks in this appendix since it is not a common best practice to even have wireless access in a DMZ. If you need to learn exposure points on a WDMZ, refer to the relevant chapters of this book to research those areas.
The rest of this section covers the “how to” for the list we just went through. It is important that you really understand that this is not a race; accuracy of your results, not speed, is the main objective.
Whois
Lookup
Information gathering always starts with the easiest way to get basic information—a general
whoislookup. Basically, when you register a domain name online (which most companies do), you can use the following Web sites:
■ www.whois.org
■ www.networksolutions.com/whois/index.jsp
So, now that you know where to go, visit one of these URLs and pop in the domain name that you want to investigate. (Put in your own as well to check it out.) Figure B.4 shows the whoislookup page.
Figure B.4
The Whois Lookup PageL e t ’s keep this simple by picking a we l l - k n own domain that we know hosts its DNS s e rve rs on a DMZ segment as well as a domain name that we know will not be easily hacke d or vulnerabl e. N ovell.com is a good example. If you can penetrate Nove l l , you are pretty good, but we do not recommend trying it, because you will get caught unless you are an elite hacke r. It is critical that you do a solid risk assessment of your target before you start your attack. A s we said before, you could be caught, and hacking just isn’t wo rth getting caught—as Kev i n Mitnick found out when he was made an example of (www. kev i n m i t n i c k . c o m ) .
Once we run a lookup on the domain name www.novell.com, it is easy to see some very useful information, including company location, a personal contact, a phone number, a hostname, and an IP address:
Registrant:
Novell, Inc. (DOM-395574) 1800 South Novell Place Provo UT 84606
US
Registrar Name: Markmonitor.com
Registrar Whois: whois.markmonitor.com
Registrar Homepage: http://www.markmonitor.com
Administrative Contact:
Bruce Wayne (NIC-14357857) Novell, Inc. 1800 South Novell Place
Provo UT 84606 US
[email protected] +1.8018615331 Fax- +1.8018616336
Technical Contact, Zone Contact:
Bruce Wayne (NIC-14357857) Novell, Inc. 1800 South Novell Place
Provo UT 84606 US
[email protected] +1.8018615331 Fax- +1.8018616336
Created on...: 1989-Nov-20. Expires on...: 2006-Nov-19.
Record last updated on..: 2006-May-17 11:10:55.
Domain servers in listed order:
NS.NOVELL.COM NS.UTAH.EDU NS1.WESTNET.NET
Let’s dissect this information for a moment. First, we can see that Novell has registered the name. We can see that Novell is headquartered in Utah, which confirms what we know about the company. We always check the record expiration date first, just to see if the domain name is at least up to date.Then we record the phone number and the IP addresses. We can see that there are three DNS servers here—a primary, a secondary, and a tertiary. Lastly, we have the name and e-mail address of a personal contact.The name cited is Bruce Wayne; this could be a Batman reference and distracter—listing a bogus contact like this is common, but at least we still have a name. Had this been an unprofessional company, you might be able to do more with the contacts via social engineering, but again, we chose this domain because it is known to be very hard to exploit.
An attacker can start his or her social engineering, network mapping, network vulnera-bility, and wardialing assessments from this information alone.The attacker now has an IP address to start with and a phone number to start dialing. Social engineering is also benefi-cial to getting needed information beyond what is listed here, but it warrants its own spebenefi-cial section later in the chapter.
Checking the Connection
Just because an attacker does a whoislookup does not mean that he is on the right track. A
whoislookup shows the provider that hosts your DNS and the IP addresses of the DNS servers.The way an attacker can get a more granular set of information about whether this IP address is valid is to check it out with pingand traceroutetools.The more secure way of accomplishing this task is to use an Internet-based looking glass, which can be found online at www.traceroute.org or http://traffic.stealth.net/nph-trace.cgi:
C:\WINDOWS>ping www.novell.com
Pinging www.novell.com [130.57.5.25] with 32 bytes of data:
Reply from 130.57.5.25: bytes=32 time=49ms TTL=54 Reply from 130.57.5.25: bytes=32 time=75ms TTL=54 Reply from 130.57.5.25: bytes=32 time=84ms TTL=54 Reply from 130.57.5.25: bytes=32 time=60ms TTL=54
Ping statistics for 130.57.5.25:
Packets: Sent = 4, Received = 4, Lost = 0 (0% loss), Approximate round trip times in milli-seconds:
Minimum = 49ms, Maximum = 84ms, Average = 67ms
Attackers can also use the tracertutility to get more information, such as the path that data travels to and from the DMZ in which the server may be kept:
C:\WINDOWS>tracert www.novell.com
Tracing route to www.novell.com [130.57.5.25] over a maximum of 30 hops:
1 2 ms <1 ms <1 ms 192.168.1.1
2 * * * Request timed out.
3 9 ms * 11 ms GE-1-4-rr01.plano.tx.dallas.comcast.net [68.87.205.253] 4 19 ms * 9 ms te-9-1-ar01.plano.tx.dallas.comcast.net [68.87.207.81] 5 20 ms 9 ms 9 ms 12.118.225.5 6 39 ms 43 ms 40 ms tbr2-p013801.dlstx.ip.att.net [12.123.16.102]
7 42 ms 41 ms 38 ms tbr2-cl33.dvmco.ip.att.net [12.122.12.126] 8 49 ms 39 ms 42 ms tbr1-cl2381.dvmco.ip.att.net [12.122.10.141] 9 40 ms 37 ms 40 ms gar1-p360.slkut.ip.att.net [12.122.2.237] 10 41 ms 41 ms 47 ms 12.127.106.34 11 42 ms 44 ms 50 ms www.novell.com [130.57.5.25] Trace complete.
Smart attackers use publicly accessible routers so that they have a device between them-selves and the host they are checking out and doing reconnaissance on. A looking-glass router will be the host in the middle that is generally available and free to use over the Internet, as can be seen in this section. Just be aware that if a company has disabled ICMP outbound from any device on the DMZ segment (which is highly advisable), it might not only stop ICMP-based attacks but also impede the reconnaissance phase of the attack. ICMP is used with both pingand traceroute.
N
OTEOften a hacker will use a host that he or she controls as a zombie to do this type of check. Just as a hacker will launch DoS attacks from zombies, they can also be used in the recon process.
Internal vs. Externally Hosted DNS
Once an attacker has a real IP address and knows it is valid and in use, it is ready to be checked out more deeply via network mapping. Generally, companies design their infrastruc-tures by placing externally facing systems in an offsite, managed, or collocated location so that they do not have to invest many dollars in security solutions; they just outsource their e-mail, DNS, and Web server solutions to third parties and let them worry about them. An attacker can either go after the sites, servers, and services at the provider, or he can stick to his intended plan to penetrate the DMZ at the local company. Either way, the attacker can find out with the whoislookup. In the lookup, you will see information such as this: Registration Service Provider:
Domain Name Systems as low as $10 domain name registrations http://www.domainnamesystems.com
This company may be contacted for domain login/passwords, DNS/Nameserver changes, and general domain support questions.
That really says it all. As you can see,whoislookups are pretty informational; worst of all, the attacker hasn’t even run an attack or exposed himself at all—hence the reconnaissance mission!
Depending on how badly they want to tap into this network, attackers could spend some money and set up an account with the same provider, then find out more about the internal structure of the hosting provider, but again, this is more for their knowledge. Let’s get back on track to hacking your own DMZ to assess it and move on to the next possible information-gathering step: social engineering.
Social Engineering
If you are not good at social engineering or if you know little about it, you had better start learning now. Basically, social engineering is the art of lying to gain access to information that would normally not be disclosed. Social engineering is the biggest tool in your arsenal for information gathering. Normally, people at work are too busy or are uninformed about their professional conduct during business hours. Most people don’t know what a security policy is, even though they might have signed one when they were hired.This is bad for you but good for the attacker on recon.
We have alluded to this type of attack quite a few times in this appendix; now it’s time to explain why it is so useful. For one, it’s been known for a long time that a hacker, quick on his feet and with the right speaking skills, can undermine your entire network security infrastructure with a simple phone call. He merely calls the company he would like to tap into, posing as a product vendor, and tries to get to the IT department, to talk to the security staff members. As soon as he finds that there is no one in charge of security, he makes his first few assumptions:
■ They gave this information out freely; they must not know the dangers of social engineering.They must not have been told that this is dangerous.
■ They don’t have a security department or security staff. Well, maybe I can talk to one of the administrators or help desk staff on the phone to gather some more information.
■ If I try to sell them an IDS system or firewall, they tend to tell me too much information right off the bat, such as “We already have a PIX firewall in place,” “We don’t need an IDS system at this time,” or “We use Snort for IDS and it works fine.” Any information is good information, so this helps.
As a DMZ architect, you most likely work in engineering, architecture, or security, and if this is the case, its up to you to make sure that none of this information leaks out. We gen-erally tell companies to ensure that any questions directly related to security are sent to a supervisor or the security staff on board. No answers or information are to be given out for any reason, no matter what. As a security analyst, you should have in your security policy a statement that no one (and we mean no one) is to divulge any meaningful information about the network over the phone.
N
OTESome social engineering attacks, if done properly, can expose actual credentials on systems that are accessible over the Internet (such as Linux servers on the DMZ that can be reached via Telnet or SSH), and these are commonly the first to get blown off the map by attackers—all from a simple phone call.
Designing & Planning…
Penetration or Occupation?
Often an attacker will wonder, “Do I want to merely pierce this DMZ and exploit it, or do I want to try to take over one of these hosts and sit and wait, to maybe take over the system and use it as a zombie in a DoS attack or to store warez?” With the scan completed, they can adjust their penetration testing in a couple of ways. One way is to decide whether this is a firewall test or a router test. Furthermore, the attacker can decide to test applications such as Windows-based IIS. The penetration test is not merely “Can I get to the firewall/IDS?”; it also should cover whether you can use the ID of the device and become a trusted nodeon the network, to get further into the system. For example, if you can com-promise a server in the DMZ, you can now launch a man-in-the-middle (MITM) exploit, where the network thinks the host is trusted when in reality you are sit-ting between two trussit-ting hosts and capturing data. This allows you to possibly get the data you need to move further into the network.
Scanning Techniques
There are as many techniques to scan a network as there are tools. Most engineers find a couple of tools they like and become very proficient with them.You also have to know your tools and their limitations. One other rule is to never become fixated on a single method. Keep trying new methods of scanning and use different tools until you find the toolset that you like and are conformable with. Be careful where you scan your networks from as well. If you do it from your home PC, you will most likely get caught, depending on your ISP’s rules. When most ISPs detect that scanning is occurring, they will shut down that account without first asking any questions. Some ISPs will do absolutely nothing at all.
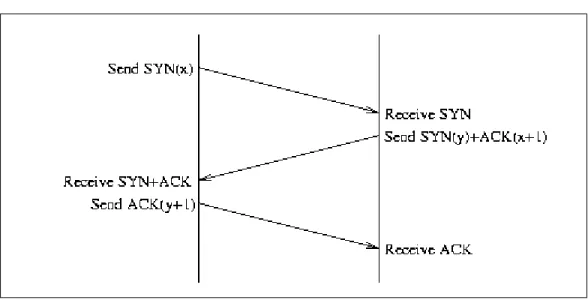
A scanning program can use different methods of scanning the target. Some consist of a simple network sweep scanner and use the ICMP protocol. Others use certain features of the TCP/IP handshake against the target.You will see that you can scan using SYN or FIN packets, which are less likely to trip a scan detector.The way you can break the rules is to learn how the TCP protocol works.The TCP connection is a three-part handshake.You can see the normal three-way handshake illustrated in Figure B.5.
Figure B.5
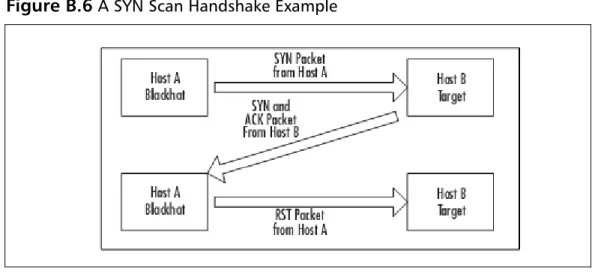
A TCP Three-Way Handshake for a Normal ConnectionIn the normal handshake, Host A sends a SYN packet to Host B. Host B responds with both a SYN and the ACK packets. Host A then returns an ACK packet, and the connection setup is completed. In the SYN scan or “half-open” connection scan, Host A (a black hat) sends a SYN packet to Host B (target). Host B sends back the SYN-ACK response, and then Host A immediately sends an RST packet to reset the connection. Figure B.6 shows a SYN scan handshake example.
Figure B.6
A SYN Scan Handshake ExampleThe SYN scan has a few advantages over the TCP connection scan. It never makes the full TCP connection so it doesn’t show up in many logs; the SYN scan can be very fast rela-tive to a three-way scan.The downside is that you might find that you launched an inadver-tent DoS attack by the outstanding SYNs. Many scanner programs such as Nmap send an RST right after the SYN-ACK comes in, to clear the connection.This is stealthier than the plain old TCP connection, but we can take it further.The next level of bending the TCP rules is to launch FIN packets against the target.The FIN packets instruct the TCP stake to tear down a connection, but there is no TCP connection—so what happens? The FIN packet arrives and if the port is open, the target responds with a RESET. If it is not open, there is no response. So, by breaking the three-way handshake, we have found a simple way to scan a system for open ports and not be tracked ourselves most of the time.
There are more scans like these, but these are the major ones you should be aware of.
N
OTEAll the scans mentioned here can be done with the tools listed in this chapter, especially Nmap.
The easiest scan is to look for open ports such as 23 (Telnet), 25 (SMTP), 110 (POP3), and others. When a port like this is found to be open on the Internet, it’s effectively an open door. In addition, never assume that you are the first one that has targeted this host. Look for exploits already present on the target. Depending on the scanning software you use, you can get just a simple report of ports open or very detailed information about the system itself.
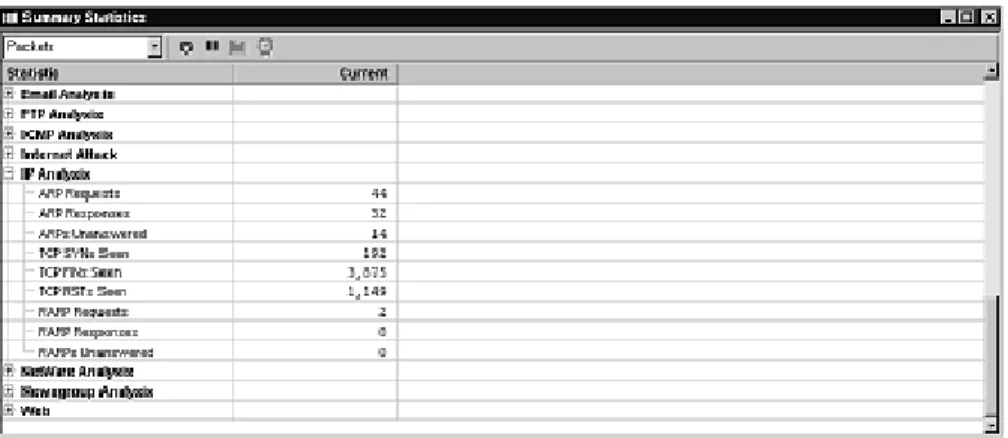
When scanning a target, be aware that you yourself might be leaving fingerprints or triggering an alert.The scanners can trigger the alert by the amount of scanning they per-form in a period of time or even by the fingerprint of the scanner software itself.The sample trace shown in Figure B.7 is from Nmap running a scan using FIN packets. Even though this is a stealthy scan, if there is an IDS that looks for this type of traffic, it will see you.
Figure B.7
Etherpeek Trace of Nmap Running a FIN ScanYou can see that Nmap sends a group of packets with the FIN bit set.Then the response comes back from the target.This cycle repeats until Nmap has scanned all the requested ports.This shows up on a sniffer or IDS as a high number of FINs relative to SYNs, as shown in Figure B.8.
Network Mapping
Now that you have accumulated some decent information, you will want to start your assessment. We don’t need to use a public domain (www.novell.com) anymore because it’s not necessary; we did so before only to give you an idea what a hacker will do to find infor-mation about a target. Let’s now direct our attention to attacking our own DMZ (as a hacker would) so that you can see that all your hardening efforts have paid off, and if they didn’t, you will know.
Mapping a DMZ is quite simple. As long as you feel confident that you’re not being monitored, you can continue to scan and search as much as you want. Again, it’s common to do this in intervals so that your presence is not noticed.You must assume that logs are not constantly checked. Larger companies most likely have a security staff on board, so you might want to steer clear of these types of companies as a hacker unless you are a pro, or you will most likely get caught. If you are a member of that staff, it’s up to you to keep that fear alive.This book has covered many ways to do this besides hardening the servers, checking logs, and installing and working with honeypots.There are still many other methods to keep your security posture strong.
Anyway, now that you have your initial IP address, you know it’s up and pingable or traceable, so it’s on to mapping the network segment. For this task we use Network Mapper, or Nmap, a free Windows and Unix (Linux) based tool that allows you to map a network segment as well as check for open services.
Using Nmap
Nmap is an open-source utility for network exploration or security auditing. It was designed to rapidly scan large networks, although it works fine against single hosts. Nmap uses raw IP packets in novel ways to determine the hosts available on the network, the services (ports) they are offering, the operating system (and OS version) they are running, the type of packet filters or firewalls in use, and dozens of other characteristics. Nmap runs on most types of computers, and both console and graphical versions are available. Nmap is free software, available with full source code under the terms of the GNU GPL.
You can download Nmap from the insecure.org Web site: www.insecure.org/nmap/. Once you download and install it to your system, you can run it from a Linux system very easily from the command line.This next example lists the options you can use with Nmap to use it properly:
Nmap 4.11 ( http://www.insecure.org/nmap )
Usage: nmap [Scan Type(s)] [Options] {target specification} TARGET SPECIFICATION:
Can pass hostnames, IP addresses, networks, etc.
Ex: scanme.nmap.org, microsoft.com/24, 192.168.0.1; 10.0.0-255.1-254 -iL <inputfilename>: Input from list of hosts/networks
--exclude <host1[,host2][,host3],...>: Exclude hosts/networks --excludefile <exclude_file>: Exclude list from file
HOST DISCOVERY:
-sL: List Scan - simply list targets to scan
-sP: Ping Scan - go no further than determining if host is online -P0: Treat all hosts as online -- skip host discovery
-PS/PA/PU [portlist]: TCP SYN/ACK or UDP discovery to given ports -PE/PP/PM: ICMP echo, timestamp, and netmask request discovery probes -n/-R: Never do DNS resolution/Always resolve [default: sometimes] --dns-servers <serv1[,serv2],...>: Specify custom DNS servers --system-dns: Use OS's DNS resolver
SCAN TECHNIQUES:
-sS/sT/sA/sW/sM: TCP SYN/Connect()/ACK/Window/Maimon scans -sN/sF/sX: TCP Null, FIN, and Xmas scans
--scanflags <flags>: Customize TCP scan flags -sI <zombie host[:probeport]>: Idlescan -sO: IP protocol scan
-b <ftp relay host>: FTP bounce scan PORT SPECIFICATION AND SCAN ORDER:
-p <port ranges>: Only scan specified ports
Ex: -p22; -p1-65535; -p U:53,111,137,T:21-25,80,139,8080 -F: Fast - Scan only the ports listed in the nmap-services file) -r: Scan ports consecutively - don't randomize
SERVICE/VERSION DETECTION:
-sV: Probe open ports to determine service/version info
--version-intensity <level>: Set from 0 (light) to 9 (try all probes) --version-light: Limit to most likely probes (intensity 2)
--version-all: Try every single probe (intensity 9)
--version-trace: Show detailed version scan activity (for debugging) OS DETECTION:
-O: Enable OS detection
--osscan-limit: Limit OS detection to promising targets --osscan-guess: Guess OS more aggressively
TIMING AND PERFORMANCE:
Options which take <time> are in milliseconds, unless you append 's' (seconds), 'm' (minutes), or 'h' (hours) to the value (e.g. 30m). -T[0-5]: Set timing template (higher is faster)
--min-hostgroup/max-hostgroup <size>: Parallel host scan group sizes --min-parallelism/max-parallelism <time>: Probe parallelization
--min-rtt-timeout/max-rtt-timeout/initial-rtt-timeout <time>: Specifies probe round trip time.
--host-timeout <time>: Give up on target after this long
--scan-delay/--max-scan-delay <time>: Adjust delay between probes FIREWALL/IDS EVASION AND SPOOFING:
-f; --mtu <val>: fragment packets (optionally w/given MTU) -D <decoy1,decoy2[,ME],...>: Cloak a scan with decoys -S <IP_Address>: Spoof source address
-e <iface>: Use specified interface
-g/--source-port <portnum>: Use given port number --data-length <num>: Append random data to sent packets --ttl <val>: Set IP time-to-live field
--spoof-mac <mac address/prefix/vendor name>: Spoof your MAC address --badsum: Send packets with a bogus TCP/UDP checksum
OUTPUT:
-oN/-oX/-oS/-oG <file>: Output scan in normal, XML, s|<rIpt kIddi3, and Grepable format, respectively, to the given filename. -oA <basename>: Output in the three major formats at once -v: Increase verbosity level (use twice for more effect)
-d[level]: Set or increase debugging level (Up to 9 is meaningful) --packet-trace: Show all packets sent and received
--iflist: Print host interfaces and routes (for debugging)
--log-errors: Log errors/warnings to the normal-format output file --append-output: Append to rather than clobber specified output files --resume <filename>: Resume an aborted scan
--stylesheet <path/URL>: XSL stylesheet to transform XML output to HTML --webxml: Reference stylesheet from Insecure.Org for more portable XML --no-stylesheet: Prevent associating of XSL stylesheet w/XML output MISC:
-6: Enable IPv6 scanning
-A: Enables OS detection and Version detection
--datadir <dirname>: Specify custom Nmap data file location
--send-eth/--send-ip: Send using raw ethernet frames or IP packets --privileged: Assume that the user is fully privileged
-V: Print version number
-h: Print this help summary page. EXAMPLES:
nmap -v -A scanme.nmap.org
nmap -v -sP 192.168.0.0/16 10.0.0.0/8 nmap -v -iR 10000 -P0 -p 80
SEE THE MAN PAGE FOR MANY MORE OPTIONS, DESCRIPTIONS, AND EXAMPLES
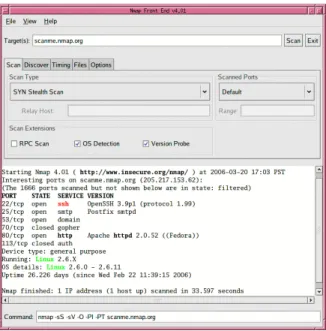
You can also use a GUI-based client for Nmap, as shown in Figure B.9. Either way, you now have a nice listing of the options available to you.
Figure B.9
Using Nmap’s GUINow that you have Nmap installed and ready, let’s check a scan of a host at
192.168.50.3. In this example we use a private IP address, but in your scan you will obvi-ously be scanning a public range available over the Internet.Your DMZ will be using public IP addresses.
What comes from the port scan is s e rvices identific a t i o n.This is the start of the gathering of i n f o rmation to find out exactly what the target might be (identific a t i o n ) .This can be simple i n f o rmation such as the services that are running against the ports that are open, or something l i ke a TCP fin g e rp ri n t , which takes a guess at what the OS is running as far as services and p o rts go. E ve ry IP stack has a fin g e rp ri n t , just as humans do, and there are tools that will match the fin g e rp ri n t s .These tools give you a better idea of what attacks or exploits might wo r k against the target. In other wo rd s , l e t ’s say that you have a DMZ-based host running an e-mail re l ay serv i c e.This is ve ry common in a DMZ segment, as we have learned in this book. M o re i m p o rt a n t , you have to understand that this is going to be a ve ry large target for mass-mail s p a m m e rs , and if you leave this hole open too long (an open e-mail re l ay ) , you could fin d yo u rself added to a blacklist of open re l ays like the one found in the Open Relay Database ( w w w. o rd b. o r g / fa q / ) . As a re s u l t , you will have issues with companies that do not allow spam or don’t want spam from yo u . Due to this possibility, you should try to hide a footprint that s h ows you are running an e-mail re l ay.You could start by scanning the host with Nmap (as the h a c ker would) and check to see if port 110 and port 25 are open. If they are, a hacker wo u l d attempt to Telnet to the port via the IP address to see what you are ru n n i n g :
Telnet 11.11.11.1 25
200 LINUX.rsnetworks.net GroupWise Internet Agent 5.5 Ready (C) Novell
This little footprint tells you a lot: that you can probably spam off your relay, and that your e-mail relay platform is currently Novell NetWare GroupWise Internet Agent
(GWIA.NLM) running on the system.You can do this with any e-mail relay/system vendor if the port is open; it’s up to you to secure the banner information from attackers.You could also only allow via ACL,Telnet access only via certain IP addresses. Regardless of what you choose, just remember that your scan with Nmap started it all. It opened the door so that you could see what services were running. It’s up to you to then go to an active attack mode and start trying to access the systems.
This being said, it is important for you to check to see if you are running an open relay, if it is disclosing too much information about you, and more important (if you were a hacker), you would be very concerned about scanning the entire DMZ for hosts to see what services they are running, then exploit them if possible.
Run Nmap against your entire DMZ’s IP range. Check the external IP address range and then go as far as you can go via the reconnaissance work you did earlier. An example of this attack from the hacker’s perspective could look like this with Nmap:
1. The hacker first finds a company he or she would like to attack.This process is largely hit and miss, unless you have a company or individual in mind that you would like to personally attack. Once this is decided, the next step is to figure out what public IPs are in use for the organization. We have already taken care of these tasks.
2. The next step is to map the network. To do this, you need an IP address to start with. In this example, we use Cisco. Cisco, of course, has publicly accessible IP addressing because it has a Web site that can be reached via the Internet and seen within your Web browser. We already did this as well.
3. Next, choose the range (or single IP for a single host) and scan it with Nmap. In this example, we look at a host we scanned on the public Internet, checking a DMZ bastion host for vulnerabilities:
[root@LINUX root]# nmap -v -sS 10.0.0.1
Starting nmap V. 4.01 ( www.insecure.org/nmap/ ) Host (10.0.0.1) appears to be up ... good. Initiating SYN Stealth Scan against (10.0.0.1) Adding open port 3268/tcp
Adding open port 88/tcp Adding open port 139/tcp Adding open port 389/tcp
Adding open port 3372/tcp Adding open port 1083/tcp Adding open port 3269/tcp Adding open port 25/tcp Adding open port 445/tcp Adding open port 80/tcp Adding open port 135/tcp Adding open port 443/tcp Adding open port 1080/tcp Adding open port 1029/tcp Adding open port 3389/tcp Adding open port 1026/tcp Adding open port 636/tcp Adding open port 464/tcp Adding open port 53/tcp Adding open port 593/tcp
The SYN Stealth Scan took 4 seconds to scan 1601 ports. Interesting ports on (10.0.0.1):
(The 1581 ports scanned but not shown below are in state: closed)
Port State Service
25/tcp open smtp 53/tcp open domain 80/tcp open http 88/tcp open kerberos-sec 135/tcp open loc-srv 139/tcp open netbios-ssn 389/tcp open ldap 443/tcp open https 445/tcp open microsoft-ds 464/tcp open kpasswd5 593/tcp open http-rpc-epmap 636/tcp open ldapssl 1026/tcp open LSA-or-nterm 1029/tcp open ms-lsa 1080/tcp open socks 1083/tcp open ansoft-lm-1 1433/tcp open ms-sql-s 3268/tcp open globalcatLDAP 3269/tcp open globalcatLDAPssl 3372/tcp open msdtc 3389/tcp open ms-term-serv [root@LINUX root]#
Whoa, that’s pretty shocking to see from a system running on the DMZ! A hacker could have a field day with this system.To be honest, to get this listing, we installed a Windows 2000 server, set it up to be scanned, and even with Service Pack 3 and all current security hotfixes up to date, it was scanned, and it still showed us a lot. Windows on the DMZ is dangerous and should be watched very carefully for vulnerabilities.The whole point of this is, if a hacker were profiling our DMZ, he would basically figure out in about 3 seconds that we were running a Windows system on our DMZ and that it has a ton of open ports for him to play with.
For example, he can tell that we have SQL running from port 1433.This is instant death to your system because you will soon be dealing with a SQL slammer problem.
Furthermore, 3389 tells the hacker we are running terminal services, so of course he will try to set up a terminal server connection from the internal network. He can also see that we are running all NetBIOS services, so he can gather information about our system remotely. He can see that our SMTP service is also running. He can relay off this system even if it isn’t an e-mail relay. Beginning with Windows 2003 the IIS and SMTP services are not installed by default and have to be installed manually. Refer back to Chapter 2, which discussed Windows-based services in the DMZ.
Designing & Planning…
What Services Should You Be Looking For?
When working on DMZs, you should always pay attention to a group of services that are the biggest culprits aiding a hacker’s penetration and attack method-ology. Make certain that when you are securing (or testing) DMZ-based services, you take a very close look at the following services and address them against all that you have learned by reading this book:
■ Login services: ■ Telnet -(23/tcp) ■ SSH -(22/tcp) ■ FTP -(21/tcp) ■ NetBIOS -(139/udp) ■ Rlogin -(512-514/tcp) ■ RDP (3389/tcp) ■ NetBIOS on Windows: ■ Port 135 (tcp/udp)
■ Port 137 (tcp/udp) ■ Port 138 (udp) ■ Port 139 (tcp) ■ X-Windows: ■ Ports 6000–6255 (tcp) ■ Naming services: ■ DNS (53/udp) ■ LDAP (389/tcp/udp) ■ Mail services: ■ SMTP (25/tcp) ■ POP (109-110/tcp) ■ IMAP (143/tcp) ■ Web services: ■ HTTP (80/tcp) ■ SSL (443/tcp) ■ Common (8000,8080,8888/tcp) ■ Small services:
■ Ports below 20 (tcp/udp) ■ Time (37/tcp 37/udp) ■ Miscellaneous services: ■ TFTP (69/udp) ■ Finger (79/udp) ■ NNTP (119/udp) ■ Syslog (514/udp) ■ SNMP (161 tcp/udp) VNC (5900/tcp) ■ ICMP services:
■ Block inbound echo request ■ Block outbound echo replies ■ Block outbound time exceeded
■ Block outbound destination unreachable except “packet too big”
This wraps up our discussion of network mapping.To reiterate, you basically run through each host on the network, testing the system to see what services are running and if
the host is alive so that you can map it on your log. After you use Nmap, your log should resemble the diagram shown in Figure B.10.
Figure B.10
Adding More Detail to Your MapNow let’s say that we have learned the following from penetration testing our network, especially using Nmap. (See how easy it is to effortlessly map a network?)
■ We are running a Cisco router. We found this out by running an XMAS tree attack on it through Nmap and crashing it. We also Telneted to it and were able to read the banner, where the engineer left the wordCiscoin it.The banner also pro-vided a company name.
■ We saw a host on the 11.11.10.0 network with an IP address of 11.11.10.21. This host has a bunch of services open. We can’t really tell what it is, maybe a Windows server, or worse, it could be a trap. We can tell this because the single host with all services running like that could be a honeypot—in other words, the security per-sonnel who work at this company are looking for us to tap on the door of .21 so they can see who we are. We will ignore this host; it’s not worth our trouble and it is probably a trap.
■ We can see that the network obviously has some form of firewall in place, but we can’t tell what it is. Most firewalls by default are highly restrictive, we probably won’t get far with this one.
■ We can see our DMZ segment utilizing the 11.11.11.0 network, with active hosts on .2 through .5.
■ From a scan of each system, we can see that each host is completely hardened, with only the following systems running specific services:
■ .2 is running DNS, port 53 is open.
■ .3 is running a Web site.This is obvious as seen through a browser. ■ .4 is running ports 25 and 110, telling us that it’s an e-mail relay (we can
Telnet to it).
■ .5 is running the FTP service, and we can check it with an anonymous login. Now, this map might not be completely accurate as you scan, but we are not too far from the real map! See what we can learn with only a few tools and some time. Make sure you log all your new information before you move on.
Configuring & Implementing…
Ping Sweeping
If you have access to a Linux box, you can quickly see the hosts that are available on a segment. Simply move to a Linux prompt (if you have f p i n g installed) and launch the tool against an IP range. You can create a text file to use with it as well. To get f p i n g, download it from www.fping.com and install it on your Linux system. To create a text file, open the vi editor and create a file with your IP range in use. For example, if your DMZ hosts are 11.11.11.1–10, you can make the file like this:
11.11.11.1 11.11.11.2 11.11.11.3 11.11.11.4 11.11.11.5 11.11.11.6 11.11.11.7 11.11.11.8 11.11.11.9 11.11.11.10
Name the file dmz.txt. When you invoke fping, simply type the following:
[root@LINUX root]# fping –f dmz.txt
You will want to use fpingbecause it is lightning-fast and you never have to wait; the tool just reads the file and responds quickly. You can use a tool like this to quickly scan the DMZ segment and check to see what hosts answer.
Now you have defined the first half of the topology map and documented most of the hosts that are readily available and the services they are running.You now need to scan the hosts for vulnerabilities. Vulnerability scanning is a little different from other kinds of scan-ning. Vulnerability scanning takes your network map deeper because it allows you to check what’s exploitable on each mapped device.
Vulnerability Scanning
Networking mapping is simply used to map out the topology. It can be argued that Nmap will be able to also show many vulnerabilities (which it can), but it is limited. A vulnerability scanner can also perform network mapping, so the lines pretty much blur. We separate the two techniques here because they are technically two different tools that provide different forms of information. A network mapper maps the network for you; a vulnerability scanner shows you open and unpatched services, among other things. In this example we look at two freely available scanners available on the Internet: Nessus and LANGuard.
Using Nessus
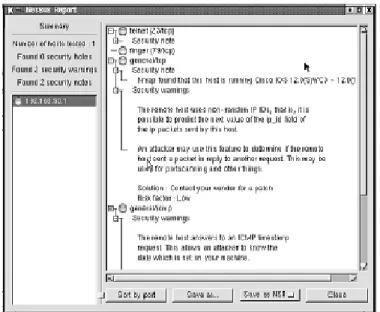
Once you have the system information, you can research the possible attacks or exploits that can be used against it. Nessus is a program that can run a set of exploits against a target in a nonintrusive way or with the intent to crash the system as part of the test. Nessus is a great scanner, even though it is free, as long as you know how to use it. In this section we look at how we can scan our DMZ (as a hacker would), looking for possible vulnerabilities. In Figure B.11, showing the Nessus report of a host, you can see Nessus in use. Simply plug the IP address into Nessus and let it check your host.
The Nessus Project aims to provide to the Internet community a fre e, p owe r f u l , u p t o -d a t e, an-d easy-to-use remote security scanner. A security scanner is softwa re that re m o t e l y audits a given network and determines whether hacke rs might be able to break into it or misuse it in some way. U n l i ke many other security scanners , Nessus takes nothing for gr a n t e d . That is, it will not consider that a given service is running on a fixed port—for example, if yo u run your Web server on port 1234, Nessus detects it and tests its securi t y. It does not make its s e c u rity tests re g a rding the ve rsion number of the remote services but attempts to exploit the v u l n e r a b i l i t y. Nessus is ve ry fast and re l i a ble and has a modular arc h i t e c t u re that allows you to fit it to your needs.You can get Nessus free at w w w. n e s s u s . o r g / a b o u t / .
LANGuard
LANGuard is another vulnerability scanner. In Figure B.12, you can see that we scanned a DMZ host and were able to find quite a bit open here.The Windows 2000 host on the DMZ we scanned had IIS installed, and this is what it returned:
■ An issue with SMTP running on this system. If you are not using it, it will become a spam relay immediately.
■ FTP is running. We tested it and it was completely open for business. ■ Terminal Services is running—very bad if not used.
■ A Web server is running, but there’s no site up and in use.This tells us that the server could be used for something else. Basically, it has IIS installed and running, but the administrator might not know that. Perfect for exploiting!
■ There are also a few alerts. We can see where the vulnerability scanner’s true strength comes in—showing where the common gateway interface (CGI) vulnera-bilities are.
Basically, you can see that as we continue to test, you are getting deeper into the map, just as we planned. Our efforts to penetrate the DMZ might just pay off with all this recon-naissance. We have already started a map and populated it with a great amount of informa-tion. We know what hosts are where, what OSs they are running, what vulnerabilities that have exposed, and more.
At this point in the game, stealth and patience are virtues. We need to be stealthy to avoid tripping any IDS, and we need patience for working past these blocks to gather infor-mation that might be slow in coming.
Although penetration tests sound like and can be fun even while being serious, there are legal issues about which we must be very concerned.The DMCA has cast a shadow across the land of security since, in the strictest sense of the law, writing about how a marker can bypass CD security is a violation of the DMCA’s provisions. We do not purport to be legal experts and strongly suggest that before you do any testing, you consult an attorney and make sure that you have a contract in which the testing parameters are clearly stated and that the customer signs it.There have been cases in which someone has contracted for testing but did not really have the authority to approve security testing against a production network. The network engineer ends up in the middle, trying to explain that he or she is not hacking the network for which they are under contract to run tests. As you might see, such a situa-tion can get very messy in a short period of time.
N
OTEOther available scanners that you can use include:
■ Nessus, which is an exploit and vulnerability scanner ■ Security Administrators Integrated Network Tool (SAINT)
■ Netcat, which has been called the Swiss Army knife of network tools ■ Nikto
■ Hunt Freeware sniffer with hijack capabilities
■ Wireshark or other trace analysis tools such as tcpdump or Etherpeek ■ A hex editor to make custom packets or to examine the results of a
sniff
■ A software emulator such as Virtual PC or VMWare, which we use to
run Linux concurrently with Windows
■ A Telnet client such as Teraterm
■ A wardialer such as THC-SCAN for those forgotten doorways in ■ An SNMP string cracker like the one in Cain & Able (www.oxid.it)
The SANS Top 20
Did you ever need help taking down systems? If you think like a hacker, you would appre-ciate sites like sans.org that very nicely puts up top-10 lists of common vulnerabilities found in systems worldwide. We summarize the most commonly known and exploited ones here. These are the top vulnerabilities to Windows systems as reported by the FBI and SANS:
■ Windows services The family of Windows operating systems supports a wide variety of services, networking methods, and technologies. Many of these compo-nents are implemented as Service Control Programs (SCP) under the control of Service Control Manager (SCM), which runs as Services.exe. Vulnerabilities in these services that implement these OS functionalities are one of the most common avenues for exploitation. Remotely exploitable buffer overflow vulnera-bilities continue to be the number-one issue that affects Windows services. Several of the core system services provide remote interfaces to client components
through Remote Procedure Calls (RPC).They are mostly exposed through named pipe endpoints accessible through the Common Internet File System (CIFS) pro-tocol, well known TCP/UDP ports, and, in certain cases, ephemeral TCP/UDP ports. Windows also contains several services that implement network interfaces based on a variety of other protocols, including several Internet standards such as SMTP and NNTP. Many of these services can be exploited via anonymous ses-sions (i.e., sesses-sions with null username and password) to execute arbitrary code with “SYSTEM” privileges. Earlier versions of the operating system, especially Windows NT and Windows 2000, enabled many of these services by default for a better out-of-the-box experience.These nonessential services increase the exploit surface significantly.
Critical vulnerabilities were reported in the following Windows Services within the past year:
■ MSDTC and COM+ Service (MS05-051) ■ Print Spooler Service (MS05-043)
■ Plug and Play Service (MS05-047, MS05-039)
■ Server Message Block Service (MS05-027, MS05-011) ■ Exchange SMTP Service (MS05-021)
■ Message Queuing Service (MS05-017) ■ License Logging Service (MS05-010) ■ WINS Service (MS04-045)
■ NNTP Service (MS04-036) ■ NetDDE Service (MS04-031) ■ Task Scheduler (MS04-022)
Exploit code is available for most of these vulnerabilities and has been seen in the wild.The Zotob worm and its variants exploited the buffer overflow in Plug and Play service. Note that the patches 047 and 027 replace MS05-039 and MS05-011, respectively.
■ Internet Explorer Microsoft Internet Explorer is the most popular browser for Web surfing and is installed by default on each Windows system. Internet Explorer contains multiple vulnerabilities that can lead to memory corruption, spoofing, and execution of arbitrary scripts. The most critical issues are the ones that lead to remote code execution without any user interaction when a user visits a malicious Web page or reads an e-mail. Exploit code for many of the critical Internet Explorer flaws are publicly available.These flaws have been widely exploited to install spyware, adware, and other malware on user systems.The spoofing flaws have been leveraged to conduct phishing attacks. In many cases, the vulnerabilities were 0 days—in other words, no patch was available at the time the vulnerabilities were publicly disclosed.
During the past year Microsoft has released multiple updates for Internet Explorer.
■ Cumulative Security Update for Internet Explorer (MS05-052) ■ Cumulative Security Update for Internet Explorer (MS05-038) ■ JView Profile Remote Code Execution (MS05-037)
■ Cumulative Security Update for Internet Explorer (MS05-025) ■ Cumulative Security Update for Internet Explorer (MS05-020) ■ Cumulative Security Update for Internet Explorer (MS05-014) ■ Windows Shell Remote Code Execution (MS05-008)
■ Cumulative Security Update for Internet Explorer (MS04-040) ■ Cumulative Security Update for Internet Explorer (MS04-038) ■ Cumulative Security Update for Internet Explorer (MS04-025)
Note that the latest cumulative update for Internet Explorer includes all the previous cumulative updates.
■ Wi n d ows librari e s Wi n d ows applications leverage a large number of system l i b r a ries often packaged in DLL fil e s .These libraries are used for many common t a s k s , such as HTML pars i n g , image format decoding, and protocol decoding. L o c a l as well as remotely accessible applications use these librari e s .T h u s , a critical vulnerability in a library usually impacts a range of applications from Microsoft and third -p a rty ve n d o rs that rely on that library. Often the ex-ploitation is -possible via mu l t i -p l e
attack ve c t o rs . For instance, the flaws in image-processing libraries can be exploited via Internet Explore r, O f fic e, and image viewe rs . In most cases, the libraries are used by all flavo rs of Wi n d ows operating systems, which increases the number of systems ava i l a ble for attacks.The critical libraries affected during past ye a r:
■ Windows Graphics Rendering Engine Remote Code Execution (MS05-053) ■ Microsoft DirectShow Remote Code Execution (MS05-050)
■ Microsoft Color Management Module Remote Code Execution (MS05-036) ■ HTML Help Remote Code Execution (MS05-026, MS05-001, MS04-023) ■ Web View Remote Code Execution (MS05-024)
■ Windows Shell Remote Command Execution (MS05-049, MS05-016, MS04-037, MS04-024)
■ Windows Hyperlink Object Library Remote Code Execution (MS05-015) ■ PNG Image Processing Remote Code Execution (MS05-009)
■ Cursor and Icon Processing Remote Code Execution (MS05-002) ■ Windows Compressed Folder Remote Code Execution (MS04-034) ■ JPEG Processing Remote Code Execution(MS04-028)
For most of these vulnerabilities, exploit code is publicly available. Attacks exploiting these vulnerabilities have been seen in the wild. An example of a large-scale attack reported involved exploiting the Cursor and Icon Handling flaws to install malware on users’ systems.Trojan Phel.A was reported to exploit the flaw in the HTML Help Library. Note that for some libraries such as HTML Help and Windows Shell, a newer update includes the older updates. Hence, only the latest update needs to be applied for yet unpatched systems.
■ Microsoft Office and Outlook Express Microsoft Office is the most widely used e-mail and productivity suite worldwide.The applications include Outlook, Word, PowerPoint, Excel, Visio, FrontPage, and Access. Note that Outlook Express, a basic e-mail client, is installed on all versions of Microsoft Windows starting with Windows 95. Vulnerabilities in these products can be exploited by following attack vectors:
The attacker sends the malicious Office document in an e-mail message. Viruses can exploit this attack vector.The attacker hosts the document on a Web server or shared folder and entices a user to browse the Web page or the shared folder. Note that Internet Explorer automatically opens Office documents. Hence, browsing the malicious Web page or folder is sufficient for the vulnerability exploitation.The attacker runs a server such as a news server that sends malicious responses to trigger a buffer overflow in e-mail clients.