DEVELOPMENT OF THREE PHASE BACK TO BACK CONVERTER WITH OUTPUT VOLTAGE CONTROL USING RASPBERRY PI
MICROCONTROLLER
MUHAMAD NOR HAFIZ BIN MOKTARUDIN
A project report submitted in partial fulfilment of the requirement for the award of the
Degree of Master of Electrical Engineering
Faculty of Electrical and Electronic Engineering Universiti Tun Hussein Onn Malaysia
ABSTRACT
ABSTRAK
CONTENTS
TITLE i
DECLARATION ii
ACKNOWLEDGEMENT iii
ABSTRACT iv
CONTENTS vi
LIST OF TABLE ix
LIST OF FIGURE x
LIST OF SYMBOL AND ABBREVIATIONS xii
LIST OF APPENDICES xiii
CHAPTER 1 INTRODUCTION 1
1.1 Background 1
1.2 Problem Statement 3
1.3 Objective 4
1.4 Scope of Project 5
CHAPTER 2 LITERATURE REVIEW 6
2.1 Introduction to Back-to-Back Converter 6
2.2 Rectifier Vac to Vdc 6
2.2.1 Single Phase Rectifier 7
2.2.2 Three Phase Rectifier 8
2.3 Inverter Vdc to Vac 9
2.4 Pulse Width Modulation (PWM) 10
2.4.1 Sinusoidal PWM (SPWM) 10
2.5 Control system 12
2.5.1 PID Controller 13
2.5.2 Fuzzy Logic Controller 14
2.6.1 Raspberry PI Series 17
2.6.2 Raspberry PI Model B 17
2.6.3 Raspberry PI as a Microcontroller 18
2.7 Others Power Converter Controller 19
2.7.1 FPGA for PWM Generation 19
2.7.2 PIC Microcontroller 20
CHAPTER 3 METHODOLOGY 21
3.1 Introduction 21
3.2 Detail Block Diagram 23
3.3 Rectifier Circuit 24
3.4 Inverter Circuit 25
3.5 Voltage Sensor (Vac to Vdc) 27
3.6 Analogue to Digital Converter (ADC) using Arduino 29
3.7 Gate Driver Circuit 32
3.8 MATLAB Simulink 34
3.8.1 3-bit Input Data 35
3.8.2 PID Controller 37
3.8.3 SPWM Generation 39
3.8.4 Overall Simulation 40
CHAPTER 4 RESULTS 43
4.1 Introduction 43
4.2 Overall Simulation Result 43
4.2.1 Open Loop Simulation 43
4.2.2 Closed Loop Simulation 49
4.3 Hardware Part 56
4.3.1 Rectifier Circuit 57
4.3.2 Voltage Sensor Circuit 58
4.3.3 Arduino and RPI 60
4.3.4 Gate Driver from RPI 63
4.3.5 RPI Switching Frequency 63
4.4 Overall Hardware Result 66
4.4.2 Hardware Closed Loop 68
CHAPTER 5 CONCLUSION AND RECOMMENDATION 77
5.1 Conclusion 77
5.2 Recommendation 78
REFERENCES 79
LIST OF TABLE
Table 2.0.1. Raspberry PI Model B General Specification 17
Table 3.1. Component list for inverter circuit 27
Table 2.2. Output voltage actual and output voltage after voltage divider 29
Table 2.3 Component for Voltage sensor circuit 29
Table 3.4. Analogue to digital output 31
Table 3.5. List of component for gate driver 34
Table 3.6. 3-bit input truth table 35
Table 4.1. RLC filter value 48
Table 4.2. Actual voltage VS sensor input 59
Table 4.3. Value for Simulink model 60
LIST OF FIGURE
Figure 1.1. Block diagram 3
Figure 2.1. Forward biased and reverse biased 7
Figure 2.2. Half wave rectifier output 7
Figure 2.3. Full bridge rectifier circuit and output 8
Figure 2.4. Three phase rectifier 9
Figure 2.5. Voltage source inverter 10
Figure 2.6. Principle of PWM 12
Figure 2.7. Simplified Description of Control System 12
Figure 2.0.8. Conventional Control system 13
Figure 2.9. Fuzzy logic controller architecture 14
Figure 2.10. Linguistic term 15
Figure 2.11. RPI Model B board 18
Figure 3.1. Project flow chart 22
Figure 3.2. Detail block diagram of the project 23
Figure 3.3. Bridge rectifier 24
Figure 3.4. Single phase uncontrolled rectifier 25
Figure 3.5. MOSFET for the circuit 26
Figure 3.6. Three phase inverter circuit 26
Figure 3.7. Voltage sensor circuit 27
Figure 3.8. Bridge rectifier for voltage sensor 28
Figure 3.9. Complete voltage sensor circuit 28
Figure .10. Flowchart of the ADC conversion 30
Figure 3.11. 5 Vdc to 3.3 Vdc converters 31
Figure 3.12. Arduino circuit with LCD display 32
Figure 3.13. Gate driver schematic diagram 33
Figure 3.14. Gate driver circuit 34
Figure 3.15. 3-bit data Simulink 36
Figure 3.17. PID Function Block Parameters 38
Figure 3.18. PWM Generation 39
Figure 3.19. Overall simulation 41
Figure 3.20. Hardware set up 42
Figure 4.1. PWM generation 44
Figure 4.2 Overall open loop inverter test 45
Figure 4.3. PWM waveform for Inverter model 46
Figure 4.4. Output voltage before filter 47
Figure 4.5. Output waveform after filter 48
Figure 4.6 Overall Closed loop model 50
Figure 4.7. PWM signal for Vreference = 20V 51
Figure 4.8. Output voltage before filter for Vreference = 20 Vac 52 Figure 4.9. Output voltage after filter for Vreference = 20 Vac 53
Figure 4.10. SPWM signal for Vreference = 18 Vac 54
Figure 4.11. Output voltage before filter 55
Figure 4.12. Output voltage for Vreference = 18 Vac after filter 56
Figure 4.13. Rectifier circuit 57
Figure 4.14. Vdc from rectifier circuit 58
Figure 4.15. Arduino reading and LED light 59
Figure 4.16. Connection between RPI and Arduino 61
Figure 4.17. 3-bit data conversion 62
Figure 4.18. Gate driver waveform 63
Figure 4.19. Overrun detection 64
Figure 4.20. Signal without overrun state 65
Figure 4.21. Open loop hardware model 67
Figure 4.22. PWM signal with 50 Hz frequency 67
Figure 4.23. Output before filter and after filter 68
Figure 4.24. Analogue to digital 3-bit data 70
Figure 4.25. Closed loop model for Vreference = 20V 71 Figure 4.26. Closed Loop PWM signal and output at 20 Vref 72 Figure 4.27. 3-bit analogue to digital data for V reference of 18V 73
Figure 4.28 Closed loop model for Vreference = 18V 74
LIST OF SYMBOLS AND ABBREVIATIONS
Ω - Ohm
AC - Alternating Current
DC - Direct Current
Vac - Alternating Current Voltage Vdc - Direct Current Voltage
MOSFET - Metal-Oxide-Semiconductor Field-Effect Transistor SPWM - Sinusoidal Pulse Width Modulations
RPI - Raspberry Pi
P - Proportional
I - Integral
D - Derivative
PID - Proportional Integral Derivative Controller MATLAB - Matrix laboratory
PWM - Pulse Width Modulation Kp - Proportional Controller Gain Ki - Integral Controller Gain Kd - Derivative Controller Gain
V - Volt
HVDC - High Voltage Direct Current IGBT - Insulated Gate Bipolar Transistor HDMI - High-Definition Multimedia Interface GPIO - General Purpose Input/Output
GPU - Graphical Processing Unit RAM - Random-access Memory ADC - Analogue Digital Converter
Fc - Carrier Frequency
LIST OF APPENDICES
APPENDIX TITLE PAGE
1
CHAPTER 1
INTRODUCTION
1.1 Background
The first electronics revolution began in 1948 with the invention of the silicon transistor at Bell Telephone Laboratories by Bardeen, Bratain, and Schockley. Most of today’s advanced electronic technologies are traceable to that invention, and modern microelectronics has evolved over the years from these silicon semiconductors. The second electronics revolution began with the development of a commercial thyristor by the General Electric Company in 1958. That was the beginning of a new era of power electronics. Since then, many different types of power semiconductor devices and conversion techniques have been introduced [1].
With the advancement of power electronics, microprocessors and digital electronics, typical electric drive systems nowadays are becoming more compact, efficient, cheaper and versatile. The objective is simple, to varies the electric source and can be used for communication, high voltage engineering, green energy technology and many more.
The combination of Rectifiers and Inverter with the mid voltage of DC voltage (Vdc) or called as DC link, past researcher came with the idea of Back-To-Back converter. The idea is to generate the AC source voltage from AC voltage (Vac) with diversion from AC to DC and divert back to AC. This approach eliminates the main drawback of diode rectifiers and introduces a number of advantages like increased DC link voltage and minimized energy storage as well as active filtering and reactive power compensation capabilities [2].
In this project, the main idea is to convert the single phase AC voltage to DC voltage and DC voltage to three phase AC voltage. The first part of the converter is known as Rectifier which transfers an AC voltage to DC voltage. The second part of the converter is known as Inverter which transfers the DC voltage to AC voltage. By using Metal-Oxide-Semiconductor Field-Effect Transistor (MOSFET) as a power electronics device, it will control the voltage bias based on the signal entered to it. The control signal or wave sequence algorithm is required (by using Sinusoidal Pulse Width Modulations or SPWM) to control the signalling pulse to the MOSFET and produced a wave sequence algorithm as required. Unfortunately, to trigger the MOSFET is not simple. It required the high DC voltage from 10 VDC to 15 VDC. To coup with this problem, the Gate Drive have been use to boost up the voltage to meet the required voltage [3].
As the source of signalling will be produce by an external controller. In this case, the Raspberry Pi (RPI) microcontroller will be used to generate the signal and been supported by MATLAB Simulik Toolbox software as the algorithm. This algorithm similarly operates as a close-loop system to control the output with the information from the feedback signal. The controlling concept use conventional or numeric controller types such as Proportional (P) Controller, Proportional-Derivative (PD) Controller, Proportional-Integral (PI) Controller and Proportional-Integral-Derivative (PID) Controller [3]. The feedback signal will be measured by voltage sensor (designing Bridge rectifier with voltage divider) and give the reading back to RPI and will be compare with reference value and the controller will make and necessary adjustment so that the output not exceeding the reference value.
language tool for modelling, simulating and analysing. Raspberry PI has an ability to control the system comes with advantages like low cost and compact size [5].
[image:14.595.135.504.255.500.2]Figure 1.1 below shows the block diagram of this project. This project consist uncontrolled Rectifier that convert the single phase AC source to DC voltage. The DC voltage will pass thru Inverter (controlled) andthe output voltage on Inverter will be measured by voltage sensor and will feed the readings to RPI to simulate with Simulink program. After comparing the output voltage with reference voltage, the RPI automatically send back the signal to Inverter to meet the desired voltage.
Figure 1.1. Block diagram 1.2 Problem Statement
Nowadays renewable energy has become one of the global agenda in energy production. In addition to preserving the environment, it also reduces human dependence on fuel to produce energy. One of the renewable energy is wind and engineer has come out with an idea to develop a wind turbine to produce voltage source using back to back converter. The problem is, this system have to transfer the generated voltage from rotating blade that produce an Vac with unstable frequency to desired Vac with stable frequency and voltage for resident use.
PWM control method is mostly used in power converter applications.These PWM signals can be generated using analogue circuit as well as digital circuit. PWM
Rectifier
Three phase Inverter
Voltage Sensor
ADC Gate
Driver
generation using analogue circuit requires large number of discrete circuits such as triangular carrier wave generator circuit, sine wave generator circuit; comparator, adder circuits and phase shifters etc. Each of this circuit is formed by connecting many discrete components together such as transistors, resistors, capacitors, inductors, op-amps and so on. In addition analogue method of three phase PWM generation requires accurately designed phase shifter circuits and other circuit. Also the response of analogue circuit may get affected by environmental conditions, noise, changes in the voltages and currents in the circuit and so on. Thus analogue method is critical and increases complexity and cost of the circuit. Digital method of PWM generation requires only microcontroller and its minimum configuration [6].
There are many controller have been used in power converter circuit. The function is to maintain the output value from the back to back converter. This is important if the voltage is higher than a set point, it not suitable for the user and could damage the electrical equipment or appliance. One of the controller that been used in power converter is Hysteresis controller [2]. By using limit-cycle oscillation in the line current vector, the controller is kept inside a small area of some shape in the current vector space. The problem for the controller is switching pattern is more or less random, making it hard to predict power converter losses [2].
1.3 Objective
This project has state four main objectives to be achieved. The objectives are: i. To develop the three phase back-to-back converter hardware.
ii. To design back to back converter model with PID controller and PWM generation using MATLAB Simulink.
iii. To run back- to-back converter hardware using Raspberry Pi with MATLAB Simulink model.
1.4 Scope of Project
To more specific with the objective of the project, the project scope is created. Scope of project is a limitation on the project. These scopes parallel with the objectives of the project.
i. This project will consider being supply with 20 Vac single phases to the back to back converter. The set point value for the three phase inverter output is 18 Vac and 20 Vac. Output from back to back converter will be connected with Resistor, Inductor and Capacitor (RLC) filter to produce 50 Hz sinusoidal wave.
ii. Develop Pulse Width Modulation (PWM) generation using MATLAB Simulink R2014a. The model can be tested in simulation for open loop and closed loop. For the PWM signal, maximum pulse frequency is up to 250 Hz. iii. Integrate the communication between MATLAB Simulink software and
Raspberry PI microcontroller board thru local area network via Ethernet port in Raspberry PI board. This MATLAB Simulink software and RPI microcontroller will generate the PWM pulse to back-to-back converter from Raspberry PI GPIO pin.
iv. The development of gate driver with the rating of the voltage is around 10 V to 16 V since the MOSFET gate switching within this value of voltage. The gate driver receive three input signal from Raspberry PI and produce 6 output signal to operate 6 MOSFET on the back to back circuit.
CHAPTER 2
LITERATURE REVIEW
2.1 Introduction to Back to Back Converter
Back to back converter widely known as a power electronics device that can convert AC source voltage to DC voltage and back to AC voltage. The concept are by using the combination of rectifier that produce pure DC voltage and the DC voltage will be redirect to inverter and be back to AC source. Back-to-back converter has been use in much application such as High Voltage DC voltage (HVDC), Wind Turbine generation system, double fed induction machine and many more.
By using power electronics such as IGBT or MOSFET in the system, the voltage bias can be tune base on the switching pulse generated to the rectifier or inverter. The result of the controlling process, the output voltage and frequency can be controlled based on the desired reference. Another main component must be added in the controller is a filter such as capacitor and inductor. This is important to smooth the output weather for rectifier side or inverter side.
2.2 Rectifier Vac to Vdc
Rectifier is important nowadays due to industrial application, power transmission and renewable energy developing rapidly. The concept is to control the input voltage (Vac) to flow in one way (pass thru electronics component such as diode, thyristor, IGBT, MOSFET and etc.) and produce a direct current voltage (Vdc).
in single phase to let the voltage pass thru one direction is diode. For heavy industry that required high power input with power switching, the three phase rectifier is preferred. With the capability to control the switching pulse (control the switching to the power electronics component), it can make the output voltage controllable.
2.2.1 Single Phase Rectifier
For the single phase rectifier, it can be conclude the basic rectification can be dividing into two, half wave rectifier and full wave rectifier. In half wave rectifier, only the positive or negative Vac wave is passed with the other half is blocked. Since the half phase is blocked, the output must be filtered aggressively to eliminate the harmonics. Figure 2.1 shows the half wave rectifier output circuit and Figure 2.2 shows the output waveform.
[image:18.595.142.501.352.441.2]. Figure 2.1. Forward biased and reverse biased [4]
Figure 2.2. Half wave rectifier output [4]
[image:18.595.138.501.495.682.2]become positive. When the Vac input directed in positive cycle, two diodes will pass thru the voltage with the same amplitude and another two will blocked the negative cycle. It also apply the same method with the negative cycle. Unfortunately during each half cycle the current flows through two diodes instead of just one so the amplitude of the output voltage is two voltage drops ( 2 x 0.7 = 1.4V ) less than the input Vin amplitude [5]. The formula as follows;
Vout = Vin – (2 x 0.7V) (2.1)
[image:19.595.148.498.342.617.2]After completing transforming the voltage cycle, the voltage must be filtered so that the output will become Vdc and follow the desired result. Figure 2.3 shows the circuit and output waveform after filter.
Figure 2.3. Full bridge rectifier circuit and output [5]
2.2.2 Three Phase Rectifier
control the AC sine wave and produce a smooth DC voltage with the filtering by capacitor. In general, control strategy for switching patterns and their duty cycles on the rectifier uses voltage or current. Figure 2.4 represents the topology of the three phase active rectifier proposed. The dynamic model of rectifier consists of a three-phase network connected to three-three-phase supply voltage ea , eb , ec by assuming a balanced three-phase system, the three-phase input line currents ia, ib, ic and va, vb, vc which represent the three-phase voltages generated by the PWM active rectifier. R and L are the resistance and inductance of the line, a smoothing capacitor, and the load represented by a current source [6].
Figure 2.4. Three phase rectifier [6]
2.3 Inverter Vdc to Vac
A power inverter, or inverter, is an electronic device or circuitry that changes direct
Figure 2.5. Voltage source inverter [8]
2.4 Pulse Width Modulation (PWM)
In electronic power converters and motors, PWM is used extensively as a means of powering alternating current (AC) devices with an available direct current (DC) source or for advanced DC/AC conversion. Variation of duty cycle in the PWM signal to provide a DC voltage across the load in a specific pattern will appear to the load as an AC signal, or can control the speed of motors that would otherwise run only at full speed or off. The pattern at which the duty cycle of a PWM signal varies can be created through simple analogue components, a digital microcontroller, or specific PWM integrated circuits [9].
The PWM control requires the generation of both reference and carrier signals that feed into a comparator which creates output signals based on the difference between the signals [9].
2.4.1 Sinusoidal PWM (SPWM)
SPWM concepts are similar with the PWM generation. Only the difference for SPWM is it requires a sinusoidal signal as a reference signal. The reference signal is sinusoidal and at the frequency of the desired output signal, while the carrier signal is
T1 T2 T3
T4 T5 T6
often either a sawtooth or triangular wave at a frequency significantly greater than the reference. When the carrier signal exceeds the reference, the comparator output signal is at one state, and when the reference is at a higher voltage, the output is at its second state [9].
When the reference signal is greater than the carrier signal the PWM will generate high pulse until the signal cross with each other (sinusoidal signal in positive state after comparing with the triangular wave). When the triangular wave is greater than the reference signal, the PWM will generate low pulse to the system. As a result, the pulse will only generate in digital signal.
The principle of the SPWM illustrated in Figure 2.6. The sinusoidal modulating signal (Um) refers to the required output waveform. The high frequency triangle carrier signal (Uc) is synchronized by the Vac supply. Usually the carrier frequency is much greater the reference frequency [10]. The amplitude ratio, Um / Uc is called modulation index. Various PWM schemes allow Um / Uc < 1 that represent an important performance criterion as the inverter maximum power depends on the maximum voltage at load terminals [10]
Figure 2.6. Principle of PWM
2.5 Control System
A control system consists of subsystems and process assembled for the purpose of obtaining a desired output with desired performance, given a specified input [15]. Figure 2.7 shows a control system in its simple’s form, where the input represents a desired output.
Figure 2.7. Simplified Description of Control System [15]
Open loop control system and closed loop control system are common classes in control system. For open loop control system, the output result based on the input
Control system Input; Stimulus
Desired Response
value but for the closed loop control system, current output value is taken into consideration and correction made based on feedback. Nowadays, the common control system widely used in industry is PID controller and also the Fuzzy logic controller.
2.5.1 PID Controller
PID is an acronym for “Proportional, Integral and Derivative”. The PID controller was first placed in 1939 and has remained the most widely used controller in process control until today. [11]
PID control is the method of feedback control that uses the PID controller as the main tool. The basic structure of conventional feedback control system is shows in Figure 2.8, using a block diagram representation. In the figure, the process is the object to be controlled. The purpose of control is to make the process variable (y) follow the set point (r). To achieve the purpose, the manipulated variable (u) is changed at the command of the controller [11].
As an example of process, consider a heating tank in which some liquid is heated to a desired temperature by burning fuel gas. The process variable (y) is the temperature of the liquid, and the manipulated variable (u) is the flow of the fuel gas. The “disturbance” is any factor, other than the manipulated variable, that influences the process variable [11].
[image:24.595.149.502.612.722.2]The error (e) is defined by e = r-y. The compensator C(s) is the computational rule that determines the manipulated variable (u) based on its input data, which is the error (e) in the case of Figure 2.8 [11]. The data from the feedback (y) is measured by detector (sensor) and send the signal back to controller to be process.
Figure 2.0.8. Conventional Control system [11]
y d
P (s) C (s)
r + -
e u +
+
Early PID control system had exacly the structure same with Figure 2.7, where the PID controller is used as the compensator C(s). When used in this way, the three element of PID controller porduce outputs with the following nature:
P element: proportional to the error at the instant t, this is the “present” error. I element: proportional to the integral of the error up to the instant t, which
can be interpreted as the accumulation of the “past” error.
D element: proportional to the derivative of the error at the instant t, which can be interpreted as the prediction of the “future” error. [11]
2.5.2 Fuzzy Logic Controller
Fuzzy logic has rapidly become one of the most successful of today's technology for developing sophisticated control systems. Several studies show, both in simulations and experimental results that fuzzy logic control yields superior results with respect to those obtained by conventional control algorithms. Thus, in industrial electronics the fuzzy logic control has become an attractive solution in controlling the power converter controller [17].
[image:25.595.114.537.521.679.2]Fuzzy control provides a formal methodology for representing, manipulating, and implementing a human’s heuristic knowledge about how to control a system [18]. Figure 2.9 shows the fuzzy logic controller architecture.
Figure 2.9. Fuzzy logic controller architecture [18]
The fuzzy controller has four main components: The “rule-base” holds the knowledge, in the form of a set of rules, of how best to control the system. The
r(t) Output F uz zyf ica ti on
Rule-Base De
fuz zifica ti on Inference Mechanism
Reference Input Input
u(t)
Proces
inference mechanism evaluates which control rules are relevant at the current time and then decides what the input to the plant should be. The fuzzification interface simply modifies the inputs so that they can be interpreted and compared to the rules in the rule-base. And the defuzzification interface converts the conclusions reached by the inference mechanism into the inputs to the plant [18].
To develop the fuzzy logic controller, there are several steps to be considered. First step is to choose the state and control variable. State variable consist of input variable of the fuzzy control system while control variable is the output variable of the fuzzy control system.
Second step is to determine the inference method to be used in the fuzzy control system. The commonly used methods in fuzzy control system are Mamdani, Larsen and Tsukamoto [19]. The third step is the process of making crisp quantity fuzzy or fuzzification. If it is assumed that input data do not contain noise of vagueness, a fuzzy singleton can be used. If the data are vague or perturbed by noise, they should be converted into a fuzzy number [18].
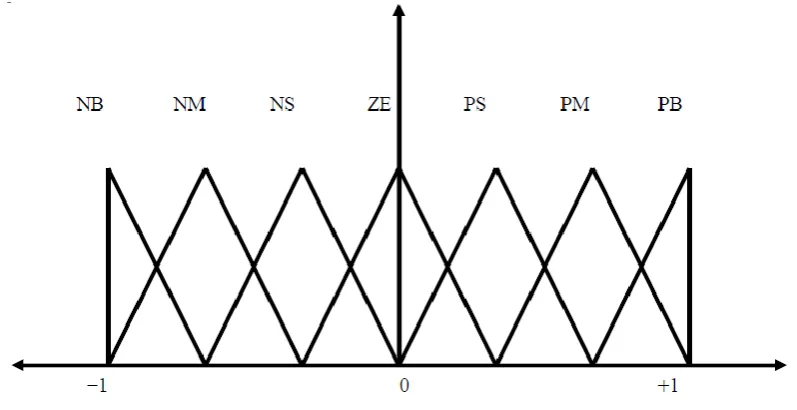
[image:26.595.119.518.504.709.2]Next step is to develop the knowledge based for the fuzzy controller. There are two parts in developing the knowledge based. The first part is data based and the second part is rule base. Data based is the partition of the variable spare with the partition is determined based on how many terms should exist in a term set. It also to find the number of primary fuzzy sets (linguistic terms). Figure 2.10 shows the 7 linguistic terms are often used.
NB are refer to Negative Big, NM refer to Negative Medium, NS refer to Negative Small, ZE equal to Zero, PS refer to Positive small, PM refer to Positive Medium and PB refer to Positive Big.
Another part is rule base for fuzzy control. Source of the fuzzy logic rule come from expert knowledge and control engineering knowledge. Also came from observation of operator’s actions. Another source is linguistic description of the dynamic properties [18].
After completing the knowledge base for the fuzzy controller, the data then will be defuzzification. In many practical applications, a control command is given as a crisp value. So the defuzzification is a process to get a non-fuzzy control action that best represents the possibility distribution of an inferred fuzzy control action. There are no systematic procedures for choosing a good defuzzification strategy. Centroid, Mean-of-maximum and Weighted-average are the example of defuzzification method. Lastly the system will be tested and tuned. The processes consist of adjusting the data based, adjusting the rule base, try difference inference method and try different defuzzification methods [18].
2.6 Raspberry Pi Microcontroller
Raspberry pi (RPI) is a small but powerful computer (with its size) is designed to help a people of using and understand the computing world. With the size about a credit card, it can be run like a normal computer. But with its different processor, it can’t be install with Microsoft Windows and only can use the Linux operating system. Not only can be used to write an email, it also can surf the internet and many more used.
2.6.1 Raspberry PI Series
Since the release of RPI, the models of the product have thrived globally. From the time being, the RPI have variant model starting form RPI Model A, Model A+, Model B and Model B+. Each of the model have the advantage from each other. All RPI model also powered with 700 MHz processor, video core IV GPU and build in RAM with the capacity up to 512 megabytes. It can be so handy to carry and solve the problems for rural people who have limited access to use a computer.
2.6.2 Raspberry Pi Model B
[image:28.595.108.531.408.610.2]Before raspberry Pi Model B+ is launched, the top rating RPI is Model B type. The function is also the same with other RPI but the improvement on some specification lead the RPI Model B higher. Table 2.1 shows the specification on RPI Model B type.
Table 2.0.1. Raspberry PI Model B General Specification [13]
Item RPI Model-B Rev 1
CPU 700 MHz ARM11 ARM1176JZF-S core
GPU: Broadcom VideoCore IV,OpenGL ES
2.0,OpenVG 1080p30 H.264 high-profile
encode/decode
Memory (SDRAM)iB 512 MiB (since 15 Oct 2012)
USB 2.0 ports: 2 (via integrated USB hub)
Power ratings: 700 mA, (3.5 W)
Size: 85.0 x 56.0 mm x 17mm
Weight: 40g
Onboard Network 10/100 wired Ethernet RJ45
manage the connection via Ethernet connection regarding to the IP address. Figure 2.11 shows the RPI Model B board. Despite of its size, its still can handle up to 19 GPIO from 34 GPIO (including 5Vdc source, 3.3 Vdc and ground).
[image:29.595.158.521.263.460.2]The advantages of using the RPI is it act like a small computer. The user can connect the circuit with internet via Ethernet port and can access the RPI automation control through internet where subject of the received communication signal such as email or via MATLAB Simulink is read by the developed algorithm fed into raspberry Pi and system responds to the corresponding instructions [14].
Figure 2.11. RPI Model B board [14]
2.6.3 Raspberry PI as a Microcontroller
Raspberry Pi model B has dedicated general purpose input outputs pins. These GPIO pins can be accessed for controlling hardware such as LEDs, motors, and relays, which are all examples of outputs. As for inputs, raspberry pi can read the status of buttons, switches, or it can read sensors like temperature, light, motion, or proximity sensors. Some GPIO pins have alternate function such as UART, SPI, I2C and etc. [16].
12 bit digital output. MCP3208 is 12 bit 8 channels ADC which can be interfaced with Raspberry Pi using SPI protocol [16].
The problem when using MCP3208 is it will used 12 bit on the raspberry pi as an input. Number of GPIO pins of Raspberry Pi is limited [16]. To coup with the problem, the bit of the input must be reduce and also can integrate the raspberry pi with another microcontroller to help the raspberry pi to read analogue signal.
2.7 Others Power Converter Controller
The new innovations in industrial power conditioning equipment resulted in the process development. This technological innovations are only because of the revolution in the field of digital electronic control by microcontroller, digital signal processor (DSP), complex programmable logic device (CPLD), field programmable gate array (FPGA), and application specific integrated circuit (ASIC) technologies [15]. Digital electronic controller is used to generate necessary pulses to drive the power electronics devices.
For efficient power utilization, various new PWM techniques are developed and still developing [16]. With the support of control circuit, the PWM generation can be done basically with some of requirement in the controller such as gate count and clock speed [15]. Some of the controller can be used to generate the PWM signal to the rectifier, inverter or back-to-back converter.
2.7.1 FPGA for PWM Generation
in run-time to fulfil the needs of the whole system by dynamically reconfiguring it [15].
Since the back to back converter widely used in many application such as uninterruptible power supplies (UPS), electrical drives, and wind energy conversion systems, the selection of controller also important [17]. FPGA have the higher gate count, easiness of hardware/software resources, high clock speed and low cost [15].
FPGA based controller can be used to generate necessary pulses to drive the devices of the rectifier or inverter in back to back converter. FPGA can be programmed by using VHDL or (VHSIC Hardware Description Language) or Digital Signal Processing Block (DSPBlock) [18].
2.7.2 PIC Microcontroller
PIC or Programmable Integrated Circuit widely used in PWM control method and mostly used in power converter applications. Digital method of PWM generation requires only microcontroller and its minimum configuration. With the advent in the technology now many microcontrollers has in built feature of PWM generation. While some special controller ICs are also available that are designed and fabricated for three phase PWM generation and control purpose. PWM generation digitally require only knowledge of internal architecture of controller and good programming skill [17].
CHAPTER 3
METHODOLOGY
3.1 Introduction
This chapter will be discussing about the method or flow in doing this project. It’s all start with the understanding about the project first. The problem, the objective and scope must be clarifying before start the project. After the introduction is clearly understood, the project begins. The study on the project must be done and does some Literature Review. In this process, detail study is important. By referring others book, journal, article and many reading source to find the others finding about this project.
From the information gathered, the designing phase is started. By doing some basic step on developing the integration between the RPI and Matlab Simulink, the data is started to be collect. After the integration has successful result, the simulation process take part. By developing the project part by part simulation (rectifier study and inverter study), the two part will be combined to get the full circuit control.
Figure 3.1. Project flow chart TROUBLESHOOT
NO
END
REPORT WRITING START
PROBLEM STATEMENT, OBJECTIVE, SCOPE
LITERATURE REVIEW
SOFTWARE DEVELOPMENT
SUCCESS?
HARDWARE DEVELOPMENT
FUNCTION?
INTRERFACE SOFTWARE AND HARDWARE TROUBLESHOOT
YES NO
3.2 Detail Block diagram
[image:34.595.108.545.75.381.2]~
Figure 3.2. Detail block diagram of the project
Figure 3.2 shows the detail block diagram of the project. There are seven important block in this project. The first block and the first process to start is the software block by using MATLAB Simulink. This block consists of the development in PID controller, SPWM and 3-bit input data. PID controller will control the feedback from voltage sensor via ADC to make sure the desired output control from SPWM same as the target.
Second block is the rectifier block. The single phase Vac is injected to the single phase rectifier. For this project the full wave bridge rectifier will be use in this project. The rectifier than convert the Vac to Vdc voltage and transfer the Vdc thru dc link and pass thru the inverter.
The inverter as the third block will convert the Vdc to three phase Vac by using the power electronics device (MOSFET) and the switching of the MOSFET is controlled by the help RPI that connected with MATLAB Simulink. Before the signal is injected to the MOSFET, the fourth block or the voltage sensor will sense the output voltage and convert it from Vac signal to Vdc signal so that the ADC
Software Development Hardware Development
Rectifier
Three phase Inverter
Voltage Sensor
ADC Gate
Driver
Raspberry PI Board
device (Arduino) can read it directly. Unfortunately the Arduino pin can only read the analogue signal only up to 5 Vdc. So the voltage divider is needed to step down the voltage to the range of 0 to 5 Vdc only.
The ADC as fifth block will generate the 3-bit data to be feed to the RPI. After completing the analogue to digital conversion, the sixth block or Raspberry PI will receive the input data and produce the output to the seventh block or gate driver. The gate driver will boost the signal from 3.3 Vdc (from RPI) up to 16 Vdc and also can divide the signal into the not-state to be fed to the MOSFET. This means the RPI only need to produce 3 true-state data and the gate driver will automatically provide the not-state data (from RPI 3 input produce 6 output).
3.3 Rectifier Circuit
[image:35.595.136.504.492.716.2]The development of rectifier circuit starts with the research of the suitable single phase uncontrolled rectifier. The best result of the research is by using the full wave bridge rectifier. Despite it’s easy to understand, the rectifier also produce the output closer to the input value. The selection of KBPC3504 is made. This bridge rectifier can control the input and output up to 35A and 400V maximum. Figure 3.3 shows the bridge rectifier.
REFERENCES
[1] M. H. RASHID, POWER ELECTRONICS HANDBOOK, Florida: ACADEMIC PRESS, 2001.
[2] A. Carlsson, The back to back converter control and design, Lund: Department of Industrial Electrical Engineering and Automation Lund Institute of Technology, 1998.
[3] I. D. d. Vries, "A Resonant Power MOSFET / IGBT Gate Driver," Applied Power Electronics Conference and Exposition, 2002. APEC 2002. Seventeenth
Annual IEEE , vol. 1, no. 2, pp. 179-185, 2002.
[4] R. G. Kanojiya, "Method For Speed Control of DC Motor," pp. 117- 122, 2012. [5] Jaseman, "The Pioneers," The MagPi, pp. 7-8, 2012.
[6] S. B. D. Sonali S. Lagu, "Raspberry Pi for Automation of Water Treatment Plant," 2014 In terna tionai Conference on Advances in Computing, Communications and Informatics (ICACCI), no. 14, pp. 1999-2003, 2014.
[7] S. J. Amol Sutar, "Advanced Three Phase PWM Inverter Control Using Microcontroller," IOSR Journal of Electrical and Electronics Engineering (IOSR-JEEE), vol. 5, no. 2, pp. 21-28, 2013.
[8] U. A.P.Godse, Basic Electronics Engineering, Pune, India: Technical Publication Pune, 2008.
[9] W. Storr, "Basic Electronics Tutorial Site," Basic Electronics Tutorial, 2 Jan
2015. [Online]. Available:
http://www.electronics-tutorials.ws/diode/diode_6.html. [Accessed 5 Jan 2015].
2, pp. 156-161, 2012.
[11] "The Authoritative Dictionary of IEEE Standards Terms," IEEE Press, 2000, p. 588.
[12] D. Van, "Pulse width modulation inverter," 1988, pp. 189-195. [13] D. E. J. S. Jim Doucet, DC/AC Pure Sine Wave Inverter, 2007. [14] R. J. Valery Vodovozov, POWER ELECTRONICS CONVERTER.
[15] N. S. Nise, Control System Engineering, USA: John Wiley and Sons, 2011. [16] M. Araki, "eolss.net," 9 Mar 2011. [Online]. Available:
http://www.eolss.net/ebooks/Sample%20Chapters/C18/E6-43-03-03.pdf. [Accessed 7 January 2015].
[17] C. A. S. Tony Mathew, "Closed Loop Control of BLDC Motor Using a Fuzzy Logic Controller and Single Current Sensor," 2013 International Conference on Advanced Computing and Communication Systems (ICACCS -2013), no. 13, pp.
1-6, 2013.
[18] S. Y. Kevin M. Passino, Fuzzy Control, Ohio: Addison Wesley Longman, 1997. [19] R. Liberacki, "EFFECT OF ADOPTED RULES OF INFERENCE AND METHODS OF DEFUZZIFICATION ON THE FINAL RESULT OF THE EVALUATION OF RELIABILITY MADE USING THE FUZZY LOGIC METHODS," Journal of Polish CIMAC, vol. 2, 2011.
[20] D. Smith, "University of Strathclyde," 2012. [Online]. Available: www.strath.ac.uk/cis. [Accessed 11 June 2014].
[21] A. Kurniawan, Getting Started with Matlab Simulink and Raspberry PI, Berlin, 2013.
Optimization and Information Technology, pp. 277-280, 2014.
[23] DaveAuld, "Code Project," The Code Project Open License (CPOL), 13 9 2013. [Online]. Available: http://www.codeproject.com/Articles/424615/Raspberry-Pi-Episode-The-journey-begins.
[24] R. C.Sreekanth, "Dynamically Reconfigurable PWM Controller for a Single Phase Rectifier," 2013 International Conference on Circuits, Power and Computing Technologies [ICCPCT-2013] , pp. 258-264, 2013.
[25] P. P. M. R. Z. Mahmoud Shahbazi, "FPGA-Based Reconfigurable Control for Fault-Tolerant Back-to-Back Converter Without Redundancy," IEEE TRANSACTIONS ON INDUSTRIAL ELECTRONICS, vol. 60, no. 8, pp. 3360-3371, 2013.
[26] S. Spence, "Arduinotronics," 7 June 2013. [Online]. Available: http://arduinotronics.blogspot.com/2013/06/ac-voltmeter-and-temperature-monitor.html. [Accessed 3 Jan 2015].
[27] N. Kuyvenhoven, "PID Tuning Methods," An Automatic PID Tuning Study with MathCad, 2002.
[28] T. L. Z. Z. L. Y. F. L. L. Y. Kai Li, "Carrier Based Implementation of Reduced Common Mode Voltage PWM Strategies," ECCE Asia Downunder (ECCE Asia), 2013 IEEE, no. 13, pp. 578 - 584, 2013.
[29] A. A. Bakar, "Design of FPGA Based SPWM Single Phase Inverter," Proceedings of MUCEET2009 Malaysian Technical Universities Conference on
Engineering and Technology , 2009.
[30] Mathworks, "Mathworks-Simulink support package for Raspberry PI," The
Mathwork Inc, 1994-2015. [Online]. Available:
http://www.mathworks.com/help/supportpkg/raspberrypi/ug/detect-and-fix-overruns-on-raspberry_pi-hardware.html?refresh=true. [Accessed 1 2 2015]. [31] J. D. O. J. B. Sergio Busquets-Monge, "Closed-Loop Control of a Three-Phase

![Figure 2.1. Forward biased and reverse biased [4]](https://thumb-us.123doks.com/thumbv2/123dok_us/8764768.895829/18.595.138.501.495.682/figure-forward-biased-reverse-biased.webp)
![Figure 2.3. Full bridge rectifier circuit and output [5]](https://thumb-us.123doks.com/thumbv2/123dok_us/8764768.895829/19.595.148.498.342.617/figure-bridge-rectifier-circuit-output.webp)
![Figure 2.4. Three phase rectifier [6]](https://thumb-us.123doks.com/thumbv2/123dok_us/8764768.895829/20.595.137.499.268.430/figure-three-phase-rectifier.webp)
![Figure 2.5. Voltage source inverter [8]](https://thumb-us.123doks.com/thumbv2/123dok_us/8764768.895829/21.595.149.447.85.299/figure-voltage-source-inverter.webp)

![Figure 2.0.8. Conventional Control system [11]](https://thumb-us.123doks.com/thumbv2/123dok_us/8764768.895829/24.595.149.502.612.722/figure-conventional-control-system.webp)
![Figure 2.9. Fuzzy logic controller architecture [18]](https://thumb-us.123doks.com/thumbv2/123dok_us/8764768.895829/25.595.114.537.521.679/figure-fuzzy-logic-controller-architecture.webp)
![Table 2.0.1. Raspberry PI Model B General Specification [13]](https://thumb-us.123doks.com/thumbv2/123dok_us/8764768.895829/28.595.108.531.408.610/table-raspberry-pi-model-b-general-specification.webp)
