&RQWHQWV
Getting started . . . 1
Hardware and software requirements . . . .2
Before installing 6110 CCM . . . 7
Installing the server . . . 7
Installing Windows NT Server . . . .8
Installing Windows 2000 Server . . . .13
Installing Windows 2000 Professional . . . .17
Installing 6110 CCM . . . 20
Installing 6110 CCM . . . .21
Upgrading to 6110 CCM version 3.0 . . . 24
Backing up your database . . . .24
Upgrading . . . .24
Re-summarizing . . . .24
After re-summarizing . . . .24
Automatic Synchronization - Automatic update of the database with 6115 ICC . .25
New security model . . . .25
If you need help . . . .26
After installing 6110 CCM . . . 27
Verifying that your server IP address and IP port number are correct . . . .28
Verifying the configuration of your data collection points . . . .29
Installing Microsoft Data Access Components MDAC 2.6 . . . .30
Verifying that ACD/Agent Shift and SMDR data is streaming . . . .32
Enabling pop-up alerts . . . .33
Re-Initializing the Collector Service . . . .33
Installing Critical Component Pack and Client Component Pack on the server . . .34
Installing ActiveX controls on the server . . . .36
Configuring 6110 CCM . . . .37
Setting up 6110 CCM security . . . .52
Re-configuring the default password in SQL . . . .54
Specifying wall sign comport settings . . . .54
Installing AgentAdvisor . . . .55
Installing CyberTerminal . . . .56
Beginning to use 6110 CCM . . . 57
Setting up the client computer to use 6110 CCM . . . .58
Starting 6110 CCM on the client computer . . . .58
Installing the Critical and Client Component Packs on the client computer . . . .59
Installing ActiveX controls on the client computer . . . .61
Configuring Report Distributor . . . .61
Configuring 6110 CCM from the client computer . . . .62
6110 CCM Enterprise Node . . . 64
Setting up Enterprise services . . . 66
Configuring 6110 CCM Enterprise nodes . . . 67
Installing and configuring CEN software . . . 73
Configuring CEN with Management Console Node . . . 73
PBX hardware requirement for the MiTAI Gateway . . . 75
Installing the MiTAI Gateway for 6115 ICC with an SX-2000 . . . 76
Installing the Fiber HCI Link . . . 76
Installing MiTAI software . . . 82
Installing MiTAI with an Application Fiber Controller (AFC) Card (for the SX-2000 PBX) 82
Installing MiTAI with Remote PBX Access (for the 3300 ICP) . . . 84
Programming SX-2000/3300 ICP assignment forms
Connectivity to the 6110 CCM Enterprise server . . . 86
Common SX-2000 programming errors . . . 86
SX-2000 connectivity to the 6110 CCM Enterprise server . . . 86
SX-2000 connectivity to the 6110 CCM Enterprise server with 6115 ICC . . . 88
3300 ICP connectivity to the 6110 CCM Enterprise server . . . 89
3300 ICP connectivity to the 6110 CCM Enterprise server with 6115 ICC . . . 89
Setting the MiTAI Node for the 3300 ICP connectivity . . . 90
Installing a DigiBoard . . . 91
SX-2000 real-time architecture . . . 92
External and Internal SMDR . . . 93
Programming dataset connections . . . 94
Data Circuit Descriptor Assignment Form . . . 94
DNI Circuit Descriptor Assignment Form . . . 97
Dataset Assignment Form . . . 97
System Port Assignment Form . . . 99
Application Logical Port Assignment Form . . . 100
Programming reporting options . . . 101
SMDR Options Assignment Form . . . 101
Class of Service Options Assignment Form . . . 102
Path Assignment Form . . . 103
Agent Group Assignment Form . . . 104
Programming SX-200 with real-time assignment forms
SX-200 EL/ML LIGHTWARE 17 Release 4.0 and greater . . . 106
Common SX-200 with real-time programming errors . . . .106
SX-200 with real-time connectivity to the 6110 CCM Enterprise server . . . .107
SX-200 with real-time architecture . . . .109
Programming dataset connections . . . 110
Data Circuit Descriptor Form . . . .110
Data Assignment Form . . . .112
Directed I/O Form . . . .113
Activating ACD Reporting . . . .113
Programming reporting options . . . 114
COS Define Form . . . .114
System Options Form . . . .115
ACD Path Form . . . .115
ACD Agent Group Form . . . .116
Trunk Group Form . . . .117
Programming SX-200 assignment forms
EL/ML LIGHTWARE 17 Release 4.0 and greater . . . 119
Common SX-200 programming errors . . . .119
SX-200 connectivity to the 6110 CCM Enterprise server . . . .120
SX-200 architecture . . . .121
Programming dataset connections . . . 123
Data Circuit Descriptor Form . . . .123
Data Assignment Form . . . .125
Directed I/O Form . . . .126
Programming reporting options . . . 127
COS Define Form . . . .127
System Options Form . . . .128
ACD Path Form . . . .128
ACD Agent Group Form . . . .129
Trunk Group Form . . . .130
Activating Agent Shift reporting on the Maintenance port . . . .130
Appendix A
Performing diagnostics with Management Console . . . 135
Using Management Console . . . 135
Gaining access to database menu options . . . 139
Viewing 6110 CCM Database objects . . . 139
Editing data alarm and nightly maintenance settings . . . 140
Editing registry settings . . . 140
Loading the SQL database . . . 140
Backing up the YourSite Configuration database . . . 141
Restoring the YourSite Configuration database . . . 141
Backing up the 6110 CCM Database . . . 141
Restoring the 6110 CCM Database . . . 141
Setting up Microsoft Proxy Server 2.0 . . . 142
Appendix B
Modifying the InstallShield 6.0 Setup . . . 147
Appendix C
The MDR Millennium Telecom Billing System . . . 149
7DEOHV
Table 1: 6110 CCM server hardware and software requirements . . . 2
Table 2: 6115 ICC server hardware and software requirements . . . 3
Table 3: Enterprise Node hardware and software requirements . . . 4
Table 4: 6110 ICC, 6115 ICC, and 6150 MCC concurrently . . . 5
Table 5: 6110 CCM, Enterprise Node, 6155 ICC, and 6160 concurrently . . . 6
Table 6: YourSite Database programming . . . 51
Table 7: PBX hardware requirements for the MiTAI Gateway . . . 75
Table 8: Cabinet Assignment Form . . . 77
Table 9: System Configuration Form . . . 77
Table 10: Class of Service Options Assignment for agent sets . . . 77
Table 11: Class of Service Options Assignment for agents . . . 77
Table 12: IRQ and I/O Base Address Programming . . . 78
Table 13: All possible IRQ settings on the AFC card . . . 78
Table 14: State of the Communication Processor card . . . 81
Table 15: Communications Processor card state command results . . . 81
Table 16: Drivers (.nob files) . . . 83
Table 17: Dataset Circuit Descriptor Assignment Form headings . . . 94
Table 18: Dataset Circuit Descriptor Assignment Form settings . . . 95
Table 19: DNI Assignment Form headings . . . 97
Table 20: Dataset Assignment Form headings . . . 97
Table 21: System Port Assignment Form headings . . . 99
Table 22: Application Logical Port Assignment Form headings . . . 100
Table 23: SMDR Options Assignment Form headings . . . 101
Table 24: Class of service Assignment Form headings . . . 102
Table 25: Path Assignment Form headings . . . 103
Table 26: Path Reporting Numbers and the corresponding database entry . . . 103
Table 27: Agent Group Assignment Form headings . . . 104
Table 28: Group Reporting Numbers and the corresponding database entry . . . 104
Table 29: Dataset Circuit Descriptor Form headings . . . 110
Table 30: Dataset Circuit Descriptor Form settings . . . 110
Table 31: Data Assignment Form headings . . . 112
Table 32: Directed I/O Form headings . . . 113
Table 33: COS Define Form headings . . . 114
Table 34: System Options Form headings . . . 115
Table 35: ACD Path Form headings . . . 115
Table 36: ACD Path Number and the corresponding database entries . . . 116
Table 37: ACD Agent Group Form headings . . . 116
Table 38: Trunk Group Form headings . . . 117
Table 39: Dataset Circuit Descriptor Form headings . . . 123
Table 40: Dataset Circuit Descriptor Form settings . . . 123
Table 41: Data Assignment Form headings . . . 125
Table 42: Directed I/O Form headings . . . 126
Table 43: COS Define Form headings . . . 127
Table 45: ACD Path Form headings . . . 128
Table 46: Access Code Number and the corresponding database entries . . . 129
Table 47: ACD Agent Group Form headings . . . 129
Table 48: Trunk Group Form headings . . . 130
)LJXUHV
Figure 1: 6160 CCM setup . . . .7
Figure 2: Formatting your hard disk drive . . . .13
Figure 3: Formatting your hard disk drive . . . .17
Figure 4: 6110 CCM installation flowchart . . . .20
Figure 5: Management Console: Enterprise tab . . . .28
Figure 6: Upgrading SQL scripts . . . .31
Figure 7: Network Monitor . . . .32
Figure 8: Hyperterminal: Path Assignments Form . . . .38
Figure 9: Hyperterminal: Show print . . . .39
Figure 10: Hyperterminal: Enable print . . . .40
Figure 11: Text file . . . .41
Figure 12: Interpret Mitel Assignment Forms: Agent Groups . . . .42
Figure 13: Interpret Mitel Assignment Forms: Results . . . .43
Figure 14: Management Console: Setting the MiTAI Node . . . .45
Figure 15: Queue window . . . .46
Figure 16: Queue window: Entering dialable and reporting numbers . . . .47
Figure 17: Employee window: Updating real-time clients . . . .48
Figure 18: Management Console: Setting the re-synchronization time . . . .49
Figure 19: Enterprise setup . . . .65
Figure 20: Call Center Site 1 - Los Angeles . . . .66
Figure 21: Management Console: CEN settings . . . .68
Figure 22: Management Console: local node settings for Los Angeles example .69
Figure 23: Management Console: remote node settings (Los Angeles example) 72
Figure 24: Management Console: Boston local node example . . . .74
Figure 25: Jumper positions . . . .79
Figure 26: Hosts.txt . . . .85
Figure 27: Testing the MiTAI connection . . . .85
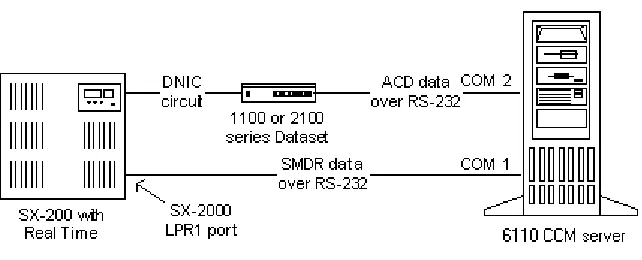
Figure 28: SMDR stream delivered from LPR1 port . . . .87
Figure 29: SMDR stream delivered from DNIC circuit . . . .87
Figure 30: SX-2000 connectivity . . . .88
Figure 31: 3300 ICP connectivity to 6110 CCM . . . .89
Figure 32: 3300 ICP connectivity to 6110 CCM with 6115 ICC . . . .89
Figure 33: Management Console: Setting the MiTAI Node for 3300 ICP . . . .90
Figure 34: SX-2000 architecture . . . .92
Figure 35: CyberTerminal window . . . .107
Figure 36: SX-200 with real-time connectivity . . . .108
Figure 37: SX-200 with real-time architecture . . . .109
Figure 38: SX-200 connectivity to 6110 CCM . . . .120
Figure 39: SX-200 architecture when installed on the 6110 CCM server . . . . .121
Figure 40: SX-200 architecture when not installed on the 6110 CCM server . .122
Figure 41: Management Console . . . .136
Figure 42: Traditional SMDR Connectivity . . . .149
Mitel Networks™ 6110 CCM (Contact Center Management) provides data collection, analysis and storage, security, forecasting, real-time monitoring, reporting, and wall sign programming for use in call center management.
Using the Microsoft Distributed interNet Applications (DNA) Architecture, 6110 CCM passes information from a client through the Internet/intranet, to a Windows server through an SQL Server database, and back again.
Microsoft products support 6110 CCM in the following ways. 6110 CCM uses Microsoft Internet Information Server (IIS) to provide data to clients over the Internet. IIS is a Web-based server that allows call center information to be displayed in a Web browser. Using IIS, you can check the status of company operations and program your call center from anywhere, at anytime. 6110 CCM uses a Windows server operating and security system for the computer running as the 6110 CCM Enterprise server, and SQL Server 2000 as the database engine. 6110 CCM uses Excel 97, Excel 2000, or Excel XP to present and customize historical and forecast report tables and charts.
prairieFyre uses the Microsoft BackOffice Server family of products—notably Windows NT, Windows 2000 Server, or Windows 2000 Professional, SQL Server 2000, and IIS 5.0—to provide 6110 CCM, an Internet/intranet application that provides access to data on a Web browser.
6110 CCM is designed for the SX-2000, SX-200 with real-time (SX-200 EL/ML LIGHTWARE 17 Release 4.0 and greater), SX-200, and soon to be released SX-2000 MiTAI telephone systems.
6;$&'
The SX-2000 ACD system runs with ACD Telemarketer 2000 (ACD-2) software. It has SMDR and ACD real-time data streams delivered over RS-232 or TCP/IP.
6;8&'
The SX-2000 UCD system runs without ACD Telemarketer 2000 (ACD-2) software. It has a single SMDR data stream delivered over RS-232 or TCP/IP. It does not provide agent real-time information. All data is derived from the SMDR stream.
6;(/0//,*+7:$5(5HOHDVHDQGJUHDWHU
The SX-200 post LIGHTWARE 17 Release 4.0 (SX-200 with real-time) system has both SMDR and ACD real-time data streams delivered over RS-232 or TCP/IP.
6;
The SX-200 system does not have an ACD real-time data stream. It has SMDR and Agent Shift records delivered over a single data connection, either RS-232 or TCP/IP. It does not provide agent real-time information. A separate data set provides real-time data using the VT-100 connection to the SX-200 telephone system.
6;0L7$,
,&3,&3,QWHJUDWHG&RPPXQLFDWLRQV3ODWIRUP
The 3300 ICP is newly released. It is a Windows NT based system that provides unified messaging and Web-based management.
+DUGZDUHDQGVRIWZDUHUHTXLUHPHQWV
NOTE: Microsoft Windows 2000 Professional and Microsoft XP are workstation platforms and are not
recommended for contact centers that have the requirements below. Windows 2000 Professional and Windows XP support SQL Server 2000 Desktop Engine (MSDE), but do not support SQL Server 2000 Standard Edition Software (reference SQL part number 9146-600-412-NA). If you have SQL Server 2000 Standard Edition, then Microsoft Windows 2000 Server is required. For more details, please read
Microsoft SQL (Basic versus Advanced) located on the prairieFyre Web site at http://
www.prairiefyre.com/files/sql.pdf.
• Contact centers with a multi-site configuration
• Contact centers with 5+ supervisors requiring reporting capabilities • Contact centers that plan to store 2+ years of summarized historical data • Contact centers that share enterprise data
&&0VHUYHUKDUGZDUHDQGVRIWZDUHUHTXLUHPHQWV
Before you install 6110 CCM, ensure the server meets the minimum hardware and software requirements listed in the following table. The 6110 CCM server is referred to as the Enterprise server. See 6110
hardware and software requirements located on the prairieFyre Web site at http://www.prairiefyre.com/
files/requirements.pdf.
7DEOH&&0VHUYHUKDUGZDUHDQGVRIWZDUHUHTXLUHPHQWV
&RPSRQHQW 5HTXLUHG
Operating system Windows NT 4.0 server, with Service Pack 5 or greater, Windows 2000 Server with Service Pack 2, or
Windows 2000 Professional (MSDE support only) with Service Pack 2, or Windows XP (MSDE support only)
Processor Pentium II-350 MHz Memory (RAM) 128 megabytes (MB) RAM
Monitor SVGA or better, 800 x 600 resolution, video card with 65,000 colors or greater CD-ROM drive x 4 or greater
Hard drive 8-gigabyte (GB) hard disk drive or greater (10-GB hard disk drive recommended)
Communication ports for ACD and SMDR data streams
2 dedicated comports (3 if you have a Reader Board) 2 or 4-port PCI Digi card (or 2 or 4 port USB card)
Network card Yes
6110 CCM runs over the Web in Internet Explorer; you install it on your server and it automatically deploys to all intranet and Internet users.
NOTE: If you intend to use the 6110 CCM Enterprise server as both a server and a client, you require
Excel 97 Office Service Packs 1 and 2, Excel 2000, or Excel XP on the server.
NOTE: Ensure the date and time are correct on the 6110 CCM Enterprise server computer. The calendar
year set on this computer is used in naming raw data files.
0LWHO1HWZRUNV,&&,QWHUDFWLYH&RQWDFW&HQWHUVHUYHUKDUGZDUHDQG VRIWZDUHUHTXLUHPHQWV
Before you install 6115 ICC, ensure your server meets the hardware and software requirements listed in the following table. See 6110 hardware and software requirements located on the prairieFyre Web site at http://www.prairiefyre.com/files/requirements.pdf.
7DEOH,&&VHUYHUKDUGZDUHDQGVRIWZDUHUHTXLUHPHQWV
&RPSRQHQW 5HTXLUHG
Operating system Windows NT 4.0, with Service Pack 5 or greater, Windows 2000 Server with Service Pack 2, or
Windows 2000 Professional (MSDE support only) with Service Pack 2, or Windows XP (MSDE support only)
Processor Pentium II-350 MHz
Motherboard 1 available ISA slot (if you have an SX-2000 system)
Memory (RAM) 128 MB RAM
Monitor SVGA or better, 800 x 600 resolution, video card with 65,000 colors or greater
CD-ROM drive x 4 or greater
Hard drive 8-gigabyte (GB) hard disk drive or greater (10-GB hard disk drive recommended)
Communication ports for ACD and SMDR data streams
2 dedicated comports (3 if you have a Reader Board) 2 or 4-port PCI Digi card (or 2 or 4 port USB card)
Network card Yes
Mouse Yes
Telephone system-specific requirements
SX-2000: SX-2000/Server Connectivity Kit-100 Sessions, SX-2000 MiTAI Runtime 7.5.3 or 8.0
&&0(QWHUSULVH1RGHKDUGZDUHDQGVRIWZDUHUHTXLUHPHQWV
Before you install the 6110 CCM software, ensure your system meets the hardware and software requirements listed in the following table.
&RQFXUUHQWDSSOLFDWLRQVKDUGZDUHDQGVRIWZDUHUHTXLUHPHQWV
The hardware and software requirements change when you combine 6110 CCM with add-on applications.
&&0(QWHUSULVH1RGHDQG,&&
If you installed an AFC card for 6115 ICC on the 6110 CCM Enterprise server, and you intend to collect SMDR and ACD real-time data over RS-232 ports (as is the case for 1103 and 2103 datasets), you must install a PCI based Digiboard serial port co-processor.
&&0DQG,&&RQDQ,&3
If 6110 CCM, and 6115 ICC are working in conjunction with an 3300 ICP, then the MiTAI link, SMDR, and ACD data collection are provided over a network connection. prairieFyre recommends you have a dedicated NIC interface between the 3300 ICP and 6110 CCM over a private network connection. This guarantees network delivery of SMDR, ACD real-time, and MiTAI data without having to traverse the customer’s corporate network.
7DEOH(QWHUSULVH1RGHKDUGZDUHDQGVRIWZDUHUHTXLUHPHQWV
&RPSRQHQW 5HTXLUHG
Operating system Windows NT 4.0 Workstation, or
Windows 2000 Server with Service Pack 2, or Windows 2000 Professional with Service Pack 2, or Windows XP
Processor Pentium II - 350 MHz
Memory (RAM) 64 MB RAM for Windows NT 4.0 Workstation OR
128 MB RAM for Windows XP, Windows 2000 Professional Hard drive 2 GB or greater
Comports 2 dedicated comports
Network card Yes
&&0,&&DQG0&&
If you are running 6110, 6115, and 6150 concurrently on the same server, prairieFyre recommends you have the following requirements.
7DEOH,&&,&&DQG0&&FRQFXUUHQWO\KDUGZDUHDQG VRIWZDUHUHTXLUHPHQWV
&RPSRQHQW 5HTXLUHG
Server software Windows 2000 Server, Service Pack 2 Microsoft Exchange 2000
Microsoft Outlook 2000 or greater Microsoft SQL 2000
6110 CCM
Internet Explorer 6 Processor Pentium III -800 MHz
Memory (RAM) 512 MB RAM (1 GB recommended)
Monitor SVGA or better, 800 x 600 resolution, video card with 65,000 colors or greater
CD-ROM drive x 4 or greater
Hard drive 20-GB hard disk drive or greater Communication ports for
ACD and SMDR data streams
2 dedicated comports (3 if you have a Reader Board) 2 or 4-port PCI Digi card (or 2 or 4 port USB card)
Network card Yes
Mouse Yes
&&0(QWHUSULVH1RGH,&&DQG
If you are running 6110 CCM, 6115 ICC, and 6160 concurrently on the same server, prairieFyre recommends you have the following hardware.
7DEOH&&0(QWHUSULVH1RGH,&&DQGFRQFXUUHQWO\ UHTXLUHPHQWV
&RPSRQHQW 5HTXLUHG
Operating system Windows NT 4.0, with Service Pack 5, or Windows 2000 Server with Service Pack 2, or
Windows 2000 Professional (MSDE support only) with Service Pack 2, or Windows XP (MSDE support only)
Processor Pentium III -800 MHz
Memory (RAM) 256 MB RAM
Monitor SVGA or better, 800 x 600 resolution, video card with 65,000 colors or greater
CD-ROM drive x 4 or greater
Hard drive 20-GB hard disk drive or greater Communication ports for
ACD and SMDR data streams
2 dedicated comports (3 if you have a Reader Board) 2 or 4-port PCI Digi card (or 2 or 4 port USB card)
Network card Yes
Mouse Yes
Motherboard 1 available ISA slot ( if you have an SX-2000 system) PCI Dialogic card 4 or 12-port
%HIRUHLQVWDOOLQJ&&0
Before you install 6110 CCM you must perform the following steps:
,QVWDOODQHWZRUNFDUGDQGYHULI\WKDWLWZRUNV
,QVWDOO7&3,3QHWZRUNLQJDQGYHULI\WKDWLWLVHQDEOHG ,QVWDOOD'LJLERDUGRSWLRQDODQGYHULI\WKDWLWZRUNV 9HULI\WKDWWKHFRPSRUWVZRUN
,QVWDOODYLGHRGULYHUZLWKFRORUVDQGYHULI\LWZRUNV
3URJUDPWKHWHOHSKRQHV\VWHPVRWKDWGDWDFDQIORZIURPWKHWHOHSKRQHV\VWHPWR WKH&&0(QWHUSULVHVHUYHU6HH³3URJUDPPLQJ6;,&3DVVLJQPHQW IRUPV´RQSDJH ³3URJUDPPLQJ6;ZLWKUHDOWLPHDVVLJQPHQWIRUPV´RQ SDJH RU³3URJUDPPLQJ6;DVVLJQPHQWIRUPV´RQSDJH
,QVWDOOLQJWKHVHUYHU
You must install Windows NT 4.0 Service Pack 5 with NT Option Pack, Windows 2000 Server with Service Pack 2, or Windows 2000 Professional (MSDE support only) with Service Pack 2 on your server prior to installing 6110 CCM and supporting applications. The 6110 CCM Setup automatically installs Microsoft SQL Server 2000 Desktop Engine (MSDE) and Microsoft Internet Explorer 5.5. You must install Microsoft SQL Server 2000 Standard Edition following the 6110 CCM installation (if you purchased SQL Server 2000 Standard Edition).
The following figure illustrates the setup.
)LJXUH&&0VHWXS
The 6110 CCM setup installs the 6110 CCM User Guide.
To open the guide
,QVWDOOLQJ:LQGRZV17DVDVHUYHU
)RUPDWWLQJ\RXUKDUGGULYHSULRUWRLQVWDOOLQJ:LQGRZV176HUYHU
Before you install Windows NT Server, you must format your hard drive. An example follows using an 8-GB hard drive.
To format your hard drive:
8VLQJ)'LVNH[HFUHDWHD*%0%17)6SDUWLWLRQ
2SHQ'LVN$GPLQLVWUDWRULQ:LQGRZV17DQGIRUPDWWKHUHPDLQLQJ*% ,QVWDOOWKH:LQGRZV17RSHUDWLQJV\VWHPRQWKH17)6SDUWLWLRQ
,QVWDOOWKH64/RU06'(GDWDEDVHRQWKH*%GULYHEHFDXVHLWUHTXLUHVURRPIRU JURZWK
,QVWDOOLQJ:LQGRZV17VHUYHU
Please refer to the Microsoft Windows NT Installation Guide while performing the Windows NT setup. The following steps augment the Windows NT Installation Guide by specifying 6110 CCM requirements:
/RFNWKHKDUGGLVNGULYH
6WDUWWKH:LQGRZV17VHUYHUVHWXS *DWKHULQIRUPDWLRQRQ\RXUFRPSXWHU ,QVWDOO:LQGRZV17QHWZRUNLQJ )LQLVKWKHZLQGRZV17VHUYHUVHWXS /RFNLQJWKHKDUGGLVNGULYH
You must lock the hard drive so that it can be used exclusively for the Windows NT setup. To lock the hard disk drive:
<RXFDQVWDUWWKHKDUGGULYHIURPWKH&'520RUWKHIORSS\GLVN,I\RXZDQWWRVWDUW WKHV\VWHPIURPWKH&'520\RXPXVWORDGWKH&'520GULYHUV
$OWHUQDWHO\XVHDERRWGLVNWKDWERRWVWR'26DQGFRQQHFWVWRWKH&'520GULYH 2SHQ\RXU&'520GULYHLQ'26WKDWLV'?!RU(?!
7\SHFGLWRRSHQWKHLGLUHFWRU\DQGSUHVV(QWHU 7\SHORFNFDQGSUHVV(QWHU
7\SH\WRORFNLQFDQGSUHVV(QWHU
6WDUWLQJWKH:LQGRZV17VHUYHUVHWXS
NOTE: prairieFyre recommends you create NT boot floppy disks and use them to start the Windows NT
server setup. Also, have several pre-formatted blank floppies on hand. To start the Windows NT server setup from the NT boot floppy disks:
7\SHZLQQWDWWKH'?L!SURPSWDQGSUHVV(QWHU
$OWHUQDWLYHO\LI\RXDUHQRWXVLQJWKH17ERRWIORSS\GLVNVWRERRWW\SHEIROORZLQJ
ZLQQWDQGSUHVV(QWHU
3UHVV(QWHUWRDFFHSWWKHGHIDXOWORFDWLRQIRUWKH:LQGRZV176HUYHUILOHV
The system copies files to your hard drive.
5HPRYHWKH17ERRWIORSS\GLVNIURPWKHGLVNGULYH 3UHVV(QWHUWRUHVWDUW\RXUFRPSXWHU
3UHVV(QWHUDIWHU\RXUHDGWKHLQIRUPDWLRQRQWKH:HOFRPHVFUHHQ 3UHVV(QWHUZKHQVHWXSUHFRJQL]HV\RXUKDUGGLVN
5HDGWKHVRIWZDUHOLFHQVHDJUHHPHQWDQGSUHVV)WRDFFHSWWKHDJUHHPHQW
8VLQJWKHXSDUURZVHOHFW$XWR'HWHFWDQGSUHVV(QWHUThe setup lists the hardware it has detected on your computer. You can change some of the hardware entries. To ensure the setup runs smoothly, prairieFyre recommends you specify the monitor as Standard VGA. After the setup is complete you can upgrade your video driver (to match the video card installed) using the CD provided by the video card manufacturer.
6HOHFWWKH6WDQGDUG9*$FKHFNER[DQGSUHVV(QWHU
/RFDWH1R&KDQJHV7KHDERYHOLVWPDWFKHVP\FRPSXWHUDQGSUHVV(QWHU 6HOHFWWKHGHIDXOWSDUWLWLRQZKHUH:LQGRZ176HUYHULVWREHLQVWDOOHGDQGSUHVV
(QWHU
6HOHFWWKH&RQYHUWWKHILOHWR17)6FKHFNER[WRIRUPDW\RXUKDUGGULYHDVDQ17ILOH V\VWHP
7\SH&WRFRQILUPWKHFRQYHUVLRQWR17)6
3UHVV(QWHUWRVHOHFWWKHGHIDXOWGLUHFWRU\IRULQVWDOOLQJ:LQGRZV176HUYHUILOHV
NOTE: prairieFyre recommends you conduct the hard drive examination. However, you can optionally
press ESC to omit this step.
3UHVV(QWHUWREHJLQDQH[KDXVWLYHH[DPLQDWLRQRI\RXUKDUGGULYHIRUFRUUXSWLRQ
You have configured Windows NT Server on a low level.
3UHVV(QWHUWRUHVWDUW\RXUFRPSXWHUDQGFRQWLQXHWKH:LQGRZV176HUYHU6HWXS
*DWKHULQJLQIRUPDWLRQRQ\RXUFRPSXWHU
To type user information and specify the server configuration:
&OLFN1H[WDIWHU\RXUHDGWKHLQIRUPDWLRQSUHVHQWHGRQWKHVFUHHQ 7\SH\RXUXVHUQDPHDQGFRPSDQ\QDPHDQGFOLFN1H[W
7\SH\RXUGLJLW&'NH\DQGFOLFN1H[W
6HOHFW\RXUOLFHQVLQJPHWKRGDQGW\SHWKHQXPEHURIFXUUHQWFRQQHFWLRQV\RXKDYH FOLHQWDFFHVVOLFHQVHV\RXKDYHSXUFKDVHGDQGFOLFN1H[W
$VVLJQDQDPHWRWKHFRPSXWHUUXQQLQJ:LQGRZV176HUYHUDQGFOLFN1H[W
You must indicate whether the server is a Primary Domain Controller (PDC) or a Member Server (Stand-Alone) in the next step. Do not install a Backup Domain Controller (BDC); installing a BDC slows down your NT Server operations considerably.
In PDC and Member Server Setups the administrator manually adds users to pre-defined user groups in the NT security module. (There are no default domain users on the network.) You can then control which users have access to various 6110 CCM applications.
NOTE: If a trust is established between the 6110 CCM Enterprise server PDC and an existing PDC, users
on the existing PDC will be available to add to user groups in the NT security module.
6HOHFW3ULPDU\'RPDLQ&RQWUROOHURU6WDQG$ORQHDQGFOLFN1H[W 7\SHDSDVVZRUGIRUWKHDGPLQLVWUDWRUDFFRXQW
&OLFN<HVWRFUHDWHDQHPHUJHQF\UHSDLUGLVNDQGFOLFN1H[W
&OLFN1H[WWRVHOHFWWKHGHIDXOW176RIWZDUH&RPSRQHQWVVHWWLQJ ,QVWDOOLQJWKHQHWZRUNFDUG
To install the network card:
&OLFN1H[WWRLQGLFDWHWKDW\RXUFRPSXWHULVZLUHGWRWKHQHWZRUN &OHDUWKH,QVWDOO0LFURVRIW,QWHUQHW,QIRUPDWLRQ6HUYHUFKHFNER[ &OLFN6WDUW6HDUFKWRGHWHFW\RXUQHWZRUNFDUG
NOTE:
• If the setup cannot detect your network card, or it detects it incorrectly, click Select and pick the network card from the list.
• If the card is not listed, click Have Disk, insert the floppy disk that came with your network card, and then type the location of your NT driver files.
:KHQ\RXUQHWZRUNFDUGPRGHOLVVKRZQLQWKH1HWZRUN$GDSWHUVOLVWZLWKDFKHFN PDUNEHVLGHLWFOLFN1H[W
6HOHFWWKH7&3,3FKHFNER[DQGDQ\DGGLWLRQDOSURWRFROVXVHGRQ\RXUQHWZRUN &OLFN1H[WWKUHHWLPHV
NOTE: 6110 CCM requires a static IP address. If you have a Dynamic Host Configuration Protocol
(DHCP) server, be sure to have your system administrator reserve an IP address.
&OLFN<HVLI\RXUQHWZRUNKDVD'+&3VHUYHURU1RLILWGRHVQRW
• If you select Yes correctly because you have a DHCP server, NT auto loads DHCP settings. • If you select No erroneously because you have a DHCP server, you will have to enter DHCP server
settings manually.
• If you select Yes erroneously because you do not have a DHCP server, networking will not be available.
The Default Network Settings screen appears. If you are unsure of what settings to type, please contact your network administrator.
'HSHQGLQJRQZKDW\RXDUHUXQQLQJUHVSRQGDSSURSULDWHO\
• If you are running TCP/IP only, type the IP address, Subnet Mask and DNS.
• If you are running TCP/IP with Microsoft Proxy Server, only configure the IP address in Subnet Mask.
• If you are running a WINS Server, configure WINS on the WINS tab.
&OLFN1H[WWRVHOHFWWKHGHIDXOWQHWZRUNELQGLQJV
,I\RXKDYHLQVWDOOHGWKHVHWXSDVD3ULPDU\'RPDLQ&RQWUROOHUW\SHDGRPDLQQDPHWR LQIRUPWKHVHWXSRIZKLFKGRPDLQLWFRQWUROV
7RMRLQDQH[LVWLQJGRPDLQW\SHWKHQDPHRIWKHGRPDLQVHOHFW&UHDWH&RPSXWHU $FFRXQWDQGW\SHDXVHUQDPHDQGSDVVZRUG
The setup creates the domain structure.
&OLFN)LQLVKWRFRPSOHWHWKHVHWXS 6HOHFWDWLPH]RQHDQGFOLFN&ORVH &OLFN2.WZLFH
)LQLVKLQJWKH:LQGRZV176HUYHU6HWXS
To complete the Windows NT Server Setup:
7\SHWKHSDVVZRUG\RXGHILQHGIRUWKHDGPLQLVWUDWRUDFFRXQWGXULQJWKH:LQGRZV17 VHUYHUVHWXS
&RQVXOW\RXUYLGHRFDUGXVHUGRFXPHQWDWLRQIRUGHWDLOVRQVHWWLQJXS\RXUYLGHRFDUG GULYHUV
NOTE: You might have to install Windows NT Service Pack 5 prior to installing 6110 CCM because of
video card requirements. It is sometimes necessary to perform step 3 of “Installing 6110 CCM and Supporting Applications” prior to changing your display resolution.
6HW\RXUGLVSOD\UHVROXWLRQWR[GSL ,QVHUW\RXUYLGHRFDUG&'
(QDEOLQJUHPRWHDFFHVVWRDYRLG5'6HUURUV
&OLFN6WDUW !3URJUDPV !$GPLQLVWUDWLYH7RROV !,QWHUQHW6HUYLFHV0DQDJHU ([SDQGWKH,QWHUQHW6HUYLFHV0DQDJHUWUHH
([SDQGWKH'HIDXOW:HEVLWHWUHH 5LJKWFOLFN06$'&DQGFOLFN3URSHUWLHV &OLFNWKH'LUHFWRU\6HFXULW\WDE
8QGHU,3DGGUHVVDQGGRPDLQQDPHUHVWULFWLRQVFOLFN(GLW &OLFN*UDQWHG$FFHVV
&OLFN2.
5XQWKHIROORZLQJUHJLVWU\<RXFDQXVH:LQGRZV([SORUHU
c:\Program Files\Common Files\System\msadc\handunsf.reg
'RXEOHFOLFNKDQGXQVIUHJ &OLFN<HV
&OLFN2.
,QVWDOOLQJ:LQGRZV6HUYHU
Please refer to the appropriate Microsoft installation guide while performing the server setup. The following steps augment the Windows installation guide by specifying 6110 CCM requirements:
&UHDWHERRWIORSS\GLVNV )RUPDW\RXUKDUGGLVNGULYH 6WDUWWKHVHUYHUVHWXS (QDEOHUHPRWHDFFHVV &UHDWLQJERRWIORSS\GLVNV
7RFUHDWHERRWIORSS\GLVNVIURPWKH:LQGRZVLQVWDOODWLRQ&'
2QWKHURRWRIWKH&'GRXEOHFOLFNWKH%RRWGLVNIROGHU 'RXEOHFOLFN0DNHEH[H
6HOHFWWKHIORSS\GULYHWRZKLFK\RXZLOOFRS\WKHILOHV ,QVHUWWKHILUVWRIIRXUGLVNVDQGSUHVV(QWHU
:KHQWKHVHWXSKDVILQLVKHGFRS\LQJILOHVWRWKHGLVNUHPRYHWKHGLVNDQGODEHOLW 5HSHDWVWHSVDQGWRFRS\ILOHVWRWKHRWKHUGLVNV
)RUPDWWLQJ\RXUKDUGGLVNGULYH
On the 6110 CCM Enterprise server computer, format your hard disk drive for the Windows server. (Partitioning is optional.) An example follows using an 8-GB hard drive.
)LJXUH)RUPDWWLQJ\RXUKDUGGLVNGULYH
To format your hard drive:
8VLQJ)'LVNH[HFUHDWHD*%0%17)6SDUWLWLRQ
2SHQ'LVN$GPLQLVWUDWRULQ:LQGRZV17DQGIRUPDWWKHUHPDLQLQJ*% ,QVWDOOWKH:LQGRZV17RSHUDWLQJV\VWHPRQWKH17)6SDUWLWLRQ
6WDUWLQJWKHVHWXS To start the setup:
,QVHUWWKHILUVWGLVNLQWKH&&0(QWHUSULVHVHUYHUFRPSXWHUDQGSUHVV(QWHU ,QVHUWWKHVHFRQGGLVNZKHQWKHVHWXSSURPSWV\RXWRGRVRDQGSUHVV(QWHU 5HSHDWVWHSWRWUDQVIHUWKHLQIRUPDWLRQIURPWKHUHPDLQLQJWZRGLVNVWRWKH
&&0(QWHUSULVHVHUYHUKDUGGULYH 3UHVV(QWHUWRVWDUWWKHVHWXS
The Windows Licensing Agreement screen appears.
3UHVV(QWHU
5HDGWKHVRIWZDUHOLFHQVHDJUHHPHQWDQGSUHVV)WRDFFHSWWKHDJUHHPHQW
Windows 2000 Professional and Windows 2000 Server all support large disc drive sizes and both FAT and NTFS partitions.
3UHVV(QWHUWRSURFHHGZLWKWKHLQVWDOODWLRQ
The setup restarts your computer.
3UHVV(QWHUDIWHU\RXUHDGWKHLQIRUPDWLRQRQWKH:HOFRPHVFUHHQ
The setup detects and installs devices on your computer. The Regional Settings screen appears.
&OLFN&XVWRPL]HDQGVHOHFWV\VWHPRUXVHUORFDOHVHWWLQJV &OLFN&XVWRPL]HDQGVHOHFWNH\ERDUGOD\RXWVHWWLQJV &OLFN1H[W
The Personalize Your Software screen appears.
7\SH\RXUQDPHDQGWKHQDPHRI\RXURUJDQL]DWLRQ
For the Windows 2000 Server setup only, the Licensing Modes screen appears.
6HOHFWDSHUVHUYHURUSHUVHDWOLFHQVLQJPRGHDQGFOLFN1H[W
The Computer Name and Administrator Password screen appears.
7\SHDSDVVZRUGIRUWKHDGPLQLVWUDWRUDFFRXQW &RQILUPWKHSDVVZRUGDQGFOLFN1H[W
For the Windows 2000 Server setup only, the Windows 2000 Components screen appears.
&OLFN1H[WWRDFFHSWWKHGHIDXOWFRPSRQHQWVHWWLQJV
The Date and Time Settings screen appears.
Wait while Windows installs networking components. The Network Settings screen appears.
&OLFN1H[WWRDFFHSWW\SLFDOQHWZRUNVHWWLQJV
The Workgroup or Computer Domain screen appears.
6SHFLI\DZRUNJURXSRUFRPSXWHUGRPDLQFRQILJXUDWLRQDQGFOLFN1H[W
The Join Computer to Domain screen appears.
7\SHWKHDGPLQLVWUDWRUXVHUQDPHDQGSDVVZRUGDQGFOLFN2.
Wait while the setup installs Windows components. The Performing Final Tasks Screen appears.
$IWHUVHWXSKDVFRPSOHWHGFOLFN1H[W &OLFN)LQLVK
The setup restarts your computer.
The Network Identification Wizard screen appears.
&OLFN1H[WWRFRQQHFW\RXUFRPSXWHUWRDQHWZRUN
The Connecting to the Network screen appears.
&OLFN1H[WWRDFFHSWWKHGHIDXOWVHWWLQJ
6HOHFWWKHRSWLRQWKDWEHVWGHVFULEHV\RXUFRPSDQ\QHWZRUNDQGFOLFN1H[W &OLFN1H[WDIWHUWKHVHWXSJDWKHUVQHWZRUNLQIRUPDWLRQ
(QWHU\RXUXVHUQDPHSDVVZRUGDQGGRPDLQDQGFOLFN1H[W (QWHU\RXUFRPSXWHUQDPHDQGFRPSXWHUGRPDLQDQGFOLFN1H[W (QDEOLQJUHPRWHDFFHVVWRDYRLG5'6HUURUV
&OLFN6WDUW !3URJUDPV !$GPLQLVWUDWLYH7RROV !,QWHUQHW6HUYLFHV0DQDJHU ([SDQGWKH,QWHUQHW6HUYLFHV0DQDJHUWUHH
([SDQGWKH'HIDXOW:HEVLWHWUHH 5LJKWFOLFN06$'&DQGFOLFN3URSHUWLHV &OLFNWKH'LUHFWRU\6HFXULW\WDE
8QGHU,3DGGUHVVDQGGRPDLQQDPHUHVWULFWLRQVFOLFN(GLW &OLFN*UDQWHG$FFHVV
&OLFN2.
5XQWKHIROORZLQJUHJLVWU\<RXFDQXVH:LQGRZV([SORUHU
c:\Program Files\Common Files\System\msadc\handunsf.reg
'RXEOHFOLFNKDQGXQVIUHJ &OLFN<HV
&OLFN2.
&RQILJXULQJ3RZHU2SWLRQV
&OLFN6WDUW !6HWWLQJV !&RQWURO3DQHO 6HOHFW3RZHU2SWLRQV
The Power Options Properties window appears.
$IWHU7XUQRIIKDUGGULYHVFOLFN1HYHU $IWHU6\VWHPVWDQGE\VHOHFW1HYHU &OLFN2.
,QVWDOOLQJ:LQGRZV3URIHVVLRQDO
Please refer to the appropriate Microsoft installation guide while performing the server setup. The following steps augment the Windows installation guide by specifying 6110 CCM requirements:
&UHDWHERRWIORSS\GLVNV )RUPDW\RXUKDUGGLVNGULYH 6WDUWWKHVHUYHUVHWXS (QDEOHUHPRWHDFFHVV &UHDWLQJERRWIORSS\GLVNV
7RFUHDWHERRWIORSS\GLVNVIURPWKH:LQGRZVLQVWDOODWLRQ&'
2QWKHURRWRIWKH&'GRXEOHFOLFNWKH%RRWGLVNIROGHU 'RXEOHFOLFN0DNHEH[H
6HOHFWWKHIORSS\GULYHWRZKLFK\RXZLOOFRS\WKHILOHV ,QVHUWWKHILUVWRIIRXUGLVNVDQGSUHVV(QWHU
:KHQWKHVHWXSKDVILQLVKHGFRS\LQJILOHVWRWKHGLVNUHPRYHWKHGLVNDQGODEHOLW 5HSHDWVWHSVDQGWRFRS\ILOHVWRWKHRWKHUGLVNV
)RUPDWWLQJ\RXUKDUGGLVNGULYH
On the 6110 CCM Enterprise server computer, format your hard disk drive for the Windows server. (Partitioning is optional.) An example follows using an 8-GB hard drive.
)LJXUH)RUPDWWLQJ\RXUKDUGGLVNGULYH
To format your hard drive:
8VLQJ)'LVNH[HFUHDWHD*%0%17)6SDUWLWLRQ
2SHQ'LVN$GPLQLVWUDWRULQ:LQGRZV17DQGIRUPDWWKHUHPDLQLQJ*% ,QVWDOOWKH:LQGRZV17RSHUDWLQJV\VWHPRQWKH17)6SDUWLWLRQ
6WDUWLQJWKHVHWXS To start the setup:
,QVHUWWKHILUVWGLVNLQWKH&&0(QWHUSULVHVHUYHUFRPSXWHUDQGSUHVV(QWHU ,QVHUWWKHVHFRQGGLVNZKHQWKHVHWXSSURPSWV\RXWRGRVRDQGSUHVV(QWHU 5HSHDWVWHSWRWUDQVIHUWKHLQIRUPDWLRQIURPWKHUHPDLQLQJWZRGLVNVWRWKH
&&0(QWHUSULVHVHUYHUKDUGGULYH 3UHVV(QWHUWRVWDUWWKHVHWXS
The Windows Licensing Agreement screen appears.
3UHVV(QWHU
5HDGWKHVRIWZDUHOLFHQVHDJUHHPHQWDQGSUHVV)WRDFFHSWWKHDJUHHPHQW
Windows 2000 Professional and Windows 2000 Server all support large disc drive sizes and both FAT and NTFS partitions.
3UHVV(QWHUWRSURFHHGZLWKWKHLQVWDOODWLRQ
The setup restarts your computer.
3UHVV(QWHUDIWHU\RXUHDGWKHLQIRUPDWLRQRQWKH:HOFRPHVFUHHQ
The setup detects and installs devices on your computer. The Regional Settings screen appears.
&OLFN&XVWRPL]HDQGVHOHFWV\VWHPRUXVHUORFDOHVHWWLQJV &OLFN&XVWRPL]HDQGVHOHFWNH\ERDUGOD\RXWVHWWLQJV &OLFN1H[W
The Personalize Your Software screen appears.
7\SH\RXUQDPHDQGWKHQDPHRI\RXURUJDQL]DWLRQ
For the Windows 2000 Server setup only, the Licensing Modes screen appears.
6HOHFWDSHUVHUYHURUSHUVHDWOLFHQVLQJPRGHDQGFOLFN1H[W
The Computer Name and Administrator Password screen appears.
7\SHDSDVVZRUGIRUWKHDGPLQLVWUDWRUDFFRXQW &RQILUPWKHSDVVZRUGDQGFOLFN1H[W
For the Windows 2000 Server setup only, the Windows 2000 Components screen appears.
&OLFN1H[WWRDFFHSWWKHGHIDXOWFRPSRQHQWVHWWLQJV
The Date and Time Settings screen appears.
6HWWKHFXUUHQWGDWHWLPHDQGWLPH]RQHIRU\RXUFRPSXWHUDQGFOLFN1H[W
The Network Settings screen appears.
&OLFN1H[WWRDFFHSWW\SLFDOQHWZRUNVHWWLQJV
The Workgroup or Computer Domain screen appears.
6SHFLI\DZRUNJURXSRUFRPSXWHUGRPDLQFRQILJXUDWLRQDQGFOLFN1H[W
The Join Computer to Domain screen appears.
7\SHWKHDGPLQLVWUDWRUXVHUQDPHDQGSDVVZRUGDQGFOLFN2.
Wait while the setup installs Windows components. The Performing Final Tasks Screen appears.
$IWHUVHWXSKDVFRPSOHWHGFOLFN1H[W &OLFN)LQLVK
The setup restarts your computer.
The Network Identification Wizard screen appears.
&OLFN1H[WWRFRQQHFW\RXUFRPSXWHUWRDQHWZRUN
The Connecting to the Network screen appears.
&OLFN1H[WWRDFFHSWWKHGHIDXOWVHWWLQJ
6HOHFWWKHRSWLRQWKDWEHVWGHVFULEHV\RXUFRPSDQ\QHWZRUNDQGFOLFN1H[W &OLFN1H[WDIWHUWKHVHWXSJDWKHUVQHWZRUNLQIRUPDWLRQ
(QWHU\RXUXVHUQDPHSDVVZRUGDQGGRPDLQDQGFOLFN1H[W (QWHU\RXUFRPSXWHUQDPHDQGFRPSXWHUGRPDLQDQGFOLFN1H[W (QDEOLQJUHPRWHDFFHVVWRDYRLG5'6HUURUV
5XQWKHIROORZLQJUHJLVWU\<RXFDQXVH:LQGRZV([SORUHU
c:\Program Files\Common Files\System\msadc\handunsf.reg
'RXEOHFOLFNKDQGXQVIUHJ &OLFN<HV
&OLFN2.
,QVWDOOLQJ&&0
The following figure outlines the steps required to install 6110 CCM:
,QVWDOOLQJ&&0
When you install 6110 CCM, if the setup detects that a supporting application is not installed on your system, it will install it and restart your computer.
NOTE:
• If you have not done so, enable remote access now. See “Enabling remote access (to avoid RDS errors):” on page 15.
• If you are performing a first time install, the process should take between 5 and 10 minutes. If you are performing an upgrade, the process can take up to 1 hour.
• If you have installed Windows 2000 Professional/Server, some of the following components may already be installed.
To install 6110 CCM and supporting applications on the 6110 CCM server:
,QVHUWWKH&&0&'LQWKH&'520GULYH &OLFN6HWXSH[H
The setup prompts you to install Acrobat Reader v4.05 if it was not previously install.
&OLFN<HVWRLQVWDOO$FUREDW5HDGHU &OLFN6HWXSH[H
The setup prompts you to view the 6110 CCM Installation Guide.
NOTE: If you click Yes that you do want to view the 6110 CCM Installation Guide and click Next, and
then you decide that you do not want to view it, do not click Back and select No. You must reboot and restart the setup.
&OLFN1R2QO\ZKHQ\RXDUHVXUHWKDWDOOVXSSRUWLQJDSSOLFDWLRQVKDYHEHHQLQVWDOOHG VKRXOG\RXYLHZWKH&&0,QVWDOODWLRQ*XLGH
The setup prompts you to install Microsoft Data Access Components (MDAC) 2.6 if you did not previously install it.
&OLFN<HVWRLQVWDOO0'$&
6HOHFW<HV,DFFHSWDOORIWKHWHUPVRIWKHSURFHHGLQJOLFHQVHDJUHHPHQWDQG FOLFN1H[W
&OLFN1H[W
&OLFN)LQLVKWREHJLQLQVWDOODWLRQ
&OLFN/HWVHWXSUHVWDUWWKHV\VWHPQRZ &OLFN)LQLVK
Your computer quits and restarts.
The setup prompts you to view the 6110 CCM Installation Guide.
&OLFN1R2QO\ZKHQ\RXDUHVXUHWKDWDOOVXSSRUWLQJDSSOLFDWLRQVKDYHEHHQLQVWDOOHG VKRXOG\RXYLHZWKH&&0,QVWDOODWLRQ*XLGH
The setup prompts you to install the 6110 CCM Client Download
&OLFN<HVWRUXQWKH&&0&OLHQW'RZQORDGLQVWDOODWLRQ &OLFN1H[WWRVWDUWLQVWDOOLQJFOLHQWGRZQORDGFRPSRQHQWV
&OLFN<HV,ZDQWWRUHVWDUWP\FRPSXWHUQRZDQGFOLFN)LQLVK
Your computer quits and restarts.
/RJRQXVLQJWKHDGPLQLVWUDWRUSDVVZRUG %URZVHWR&&0LQWKH&'520'ULYH &OLFN6HWXSH[H
The setup prompts you to view the 6110 CCM Installation Guide.
&OLFN<HVWRYLHZWKH&&0,QVWDOODWLRQ*XLGH &OLFN1H[W
7\SHWKH8VHU1DPH&RPSDQ\1DPHDQG6HULDO1XPEHU &OLFN1H[W
9LHZWKHSUDLULH)\UH6RIWZDUHOLFHQVHDQGWKHQFOLFN<HVWRDJUHHZLWKDOOWKHWHUPV
The 6110 CCM server installation begins.
&OLFN1H[W
&OLFN1H[WWRVHOHFWWKHGHIDXOWGHVWLQDWLRQRIWKHPDLQ&&0DSSOLFDWLRQ GLUHFWRU\
$OWHUQDWLYHO\FOLFN%URZVHWRVHOHFWDQDOWHUQDWLYHGHVWLQDWLRQRIWKHPDLQ&&0 DSSOLFDWLRQGLUHFWRU\DQGWKHQFOLFN1H[W
A caution box will appear if it is determined that the location of the main 6110 CCM application directory is not large enough to contain the directory.
&OLFN1H[WWRVHOHFWWKHGHIDXOWGHVWLQDWLRQRIWKH64/GDWDEDVHWKDWVWRUHVDOO UHSRUWLQJLQIRUPDWLRQ
$OWHUQDWLYHO\FOLFN%URZVHWRVHOHFWDQDOWHUQDWLYHGHVWLQDWLRQRIWKH64/GDWDEDVH WKDWVWRUHVDOOUHSRUWLQJLQIRUPDWLRQDQGWKHQFOLFN1H[W
&OLFN&&06HUYHUDQG&&0(QWHUSULVH1RGH &OLFN1H[W
&OLFN1H[WWRVHOHFWWKHGHIDXOWIROGHUIRUWKHSURJUDPLFRQV
The setup prompts you to install the 6110 CCM Documentation.
&OLFN<HVWR'R\RXZDQWWRUXQWKH&&0'RFXPHQWDWLRQ,QVWDOODWLRQ 1RZ"
&OLFN1H[W &OLFN)LQLVK
NOTE: If you are performing a first time install, the process should take between 5 and 10 minutes. If you
are performing an upgrade, the process can take up to 1 hour.
&OLFN2.
&OLFN2.WRVWDUWWKH0DQDJHPHQW&RQVROHDSSOLFDWLRQ
The setup starts the Management Console application. You must configure the following settings in Management Console prior to starting the prairieFyre services:
• Sign Comport • HTTP Server
• Data Alarms Schedule
• Data Alarm Time Out Minutes • Auto Restart Data Ports • Low Disk Space Threshold • Time Maintenance Manager Runs
• Stop and Start SQL Server Once During Maintenance • Enable MDR SMDR Buffering
• MiTAI Runtime Version • Enable SMDR Trace Reports
• Stop and Start IIS Once During Maintenance
9HULI\WKHVHUYHU,3DGGUHVVDQG,3SRUWQXPEHUDQGVHWFRQILJXUDWLRQSDUDPHWHUV VHH³9HULI\LQJWKDW\RXUVHUYHU,3DGGUHVVDQG,3SRUWQXPEHUDUHFRUUHFW´RQ SDJH
&OLFN)LQLVK
8SJUDGLQJWR&&0YHUVLRQ
NOTE: Upgrading from version 2.xx to version 3.xx can take up to one hour.%DFNLQJXS\RXUGDWDEDVH
Before you upgrade, you must backup your database.
2QWKH&&0VHUYHUFRS\F?3URJUDP)LOHV?0LWHO1HWZRUNV?&\EHU$&'?$&' 0DQDJHU?'DWD'LUHFWRU\?1RGHB 3DVWHWKHVHILOHVWRDQRWKHUFRPSXWHU 5HSHDWVWHSIRUHDFKQRGH 2QWKH&&0VHUYHUFRS\WKHEDFNXSILOHVZLWKWKHPRVWUHFHQWGDWHIRUH[DPSOH FRS\F?3URJUDP)LOHV?0LWHO1HWZRUNV?&\EHU$&'?$&'0DQDJHU? 'DWD'LUHFWRU\?3)%.B 3DVWHWKHVHILOHVWRDQRWKHUFRPSXWHU
The DataDirectory\Node_1, and other node directories, contain the raw data collected from the telephone switch. The data is in the form of .txt, .zip, and .sql files. The .sql files are backups of the YourSite
Configuration. You do not have to backup the actual SQL database itself as these .sql files are the source of the data.
8SJUDGLQJ
,QVHUWWKH&&0,QVWDOODWLRQ&'LQWKH&&520 6HH³,QVWDOOLQJ&&0´RQSDJH
NOTE: The upgrade can take up to one hour.
$WWKHHQGRIWKHVHUYHUFRPSRQHQWV\RXZLOOEHSURPSWHGWRXSJUDGH\RXUROG GDWDEDVH5HVSRQG<HV &ORVHWKHGLDORJER[ &ORVH0DQDJHPHQW&RQVROH )LQLVKWKHLQVWDOODWLRQ
5HVXPPDUL]LQJ
You will need to resummarize the data to create reports with data prior to the upgrade, since the database has moved.
&OLFN6WDUW !3URJUDPV !0LWHO1HWZRUNV !SUDLULH)\UH&RQVROH0DQDJHPHQW 6HOHFWWKH'DWDEDVHPHQX 6HOHFW6XPPDUL]H'DWH 7\SHWKH6WDUWGDWH 7\SHWKH(QGGDWH &OLFN6XPPDUL]H
$IWHUUHVXPPDUL]LQJ
After you upgrade from a previous version of 6110 CCM, you must update some of the supporting
$XWRPDWLF6\QFKURQL]DWLRQ$XWRPDWLFXSGDWHRIWKH
GDWDEDVHZLWK,&&
Automatic Synchronization is only available if you have Mitel Networks 6115 Interactive Contact Center (ICC). Automatic Synchronization reads the PBX Agent ID/Names, Agent groups/Names, and Paths/ Names (only if you have DNIS*), then it dynamically updates the YourSite database.
*If you do not have DNIS, you can enter the Path Dialable and Reporting numbers, and then the Paths/ Names will be automatically synchronized.
NOTE: Ensure you have licenses for each employee before you begin. If you have more employees than
you have licenses for, the Automatic Synchronization will not add employees to the database. You will have to add the employees and then associate them to the agents.
To configure your database you must 6HWWKH0L7$,QRGH
(QWHUWKH4XHXHGLDODEOHDQGUHSRUWLQJQXPEHUVDQGHQDEOH,QWHUDFWLYHLQWKH GDWDEDVH
:DLWDSSUR[LPDWHO\ILYHPLQXWHVIRU$XWRPDWLF6\QFKURQL]DWLRQ 5HIUHVKWKHVFUHHQ
6HWWKHUHV\QFKURQL]DWLRQWLPH
Your database will be updated. See “Automatic Synchronization with 6115 ICC” on page 85 of the Mitel Networks 6110 Contact Center Management User Guide for more details.
1HZVHFXULW\PRGHO
The security model changed in version 2.8. You will find the new security model more flexible and easier to maintain than the previous permissions model. Mitel Networks 6110 user accounts and permissions are now managed as part of security. That means that you cannot create users on the Management Console. You must now create users on the Web site, under YourSite=>Security. The User Manager and the Permissions link found on the Web site are no longer offered.
+RZGR,ORJRQWRWKHVLWHDIWHUDQLQVWDOOWRFUHDWHRUPDQDJHXVHUV"
Every time the new install is run a default user is created. The default gives both prairieFyre staff and the installer the assurance that there is at least one account with which to access the Web site.
• Username: _Admin • Password: _Password
• Security Role: Not Restricted, may do anything
NOTE: You must change the account password from the default to a unique password after EACH
installation of Mitel Networks 6110 CCM.
+RZGR,FUHDWHQHZXVHUV"
:KDWKDSSHQHGWRP\H[LVWLQJXVHUVIURPSUHUHOHDVHV"
Existing users were copied to the new user structure. The username and password remain the same, however, any security settings relating to the previous versions have been lost. Every migrated user is now associated with the default Not Restricted security role.
:KDWKDSSHQHGWRP\SHUPLVVLRQVVHWWLQJVIURPSUHUHOHDVHV"
These settings have been lost as they are not compatible with the new security model.
,I\RXQHHGKHOS
$IWHULQVWDOOLQJ&&0
Complete the following steps in preparation for using 6110 CCM:
9HULI\WKDW\RXUVHUYHU,3DGGUHVVDQG,3SRUWQXPEHUDUHFRUUHFW 9HULI\WKHFRQILJXUDWLRQRI\RXUGDWDFROOHFWLRQSRLQWV
,QVWDOOLQJ0LFURVRIW'DWD$FFHVV&RPSRQHQWV0'$& 9HULI\$&'$JHQW6KLIWDQG60'5GDWDLVVWUHDPLQJ
,QVWDOOVXSSRUWLQJDSSOLFDWLRQV&OLHQW&RPSRQHQW3DFNRQWKH&&0 (QWHUSULVHVHUYHU
,QVWDOO$FWLYH;FRQWUROVRQWKHVHUYHU
&RQILJXUH&&0ZLWKWKH<RXU6LWH&RQILJXUDWLRQ'DWDEDVH 6HWXS&&0VHFXULW\
5HFRQILJXUHWKHGHIDXOWSDVVZRUGLQ64/
6HWXSDGLVDVWHUUHFRYHU\EDFNXSIRUWKHGDWDGLUHFWRU\ 6SHFLI\ZDOOVLJQFRPSRUWVHWWLQJV
9HULI\LQJWKDW\RXUVHUYHU,3DGGUHVVDQG,3SRUWQXPEHU
DUHFRUUHFW
Before you use 6110 CCM, you must verify that your 6110 CCM Enterprise server IP address and port number are correct in Management Console. You must then configure 6110 CCM data collection points for each telephone system in your Enterprise.
&OLFNWKH(QWHUSULVHWDE
,QWKHOHIWSDQHFOLFN(QWHUSULVH
The Enterprise tab displays the 6110 CCM Enterprise server computer IP address and IP port number. This is the IP address and IP port number over which the server communicates with all clients.
9HULI\WKDWWKHVHUYHU,3DGGUHVVDQG,3SRUWQXPEHUDUHFRUUHFW
To change the IP address and IP port number, see “Performing diagnostics with Management Console” on page 135.
9HULI\LQJWKHFRQILJXUDWLRQRI\RXUGDWDFROOHFWLRQSRLQWV
9HULI\LQJWKHSULPDU\GDWDFROOHFWLRQSRLQW
A node is a data collection point for a single SX-2000 or SX-200 telephone system. Local nodes reside in call centers that have 6110 CCM Enterprise server software installed. When you install 6110 CCM Enterprise server software, a local collector is automatically installed on the same computer.
Remote nodes, or 6110 CCM Enterprise Nodes (CENs), reside in call centers within your Enterprise that do not have 6110 CCM Enterprise server software installed. You manually install remote collector software on computers running Windows NT with Service Pack 5 or greater, Windows 2000 Server, or Windows 2000 Professional. (See “6110 CCM Enterprise Node” on page 64 for information on configuring remote nodes).
NOTE: Local nodes share the same IP address as the 6110 CCM Enterprise server, but have unique IP port
numbers. 2QWKH(QWHUSULVHWDEH[SDQGWKH(QWHUSULVHWUHH 5LJKWFOLFN/RFDO1RGHDQGDVVLJQLWDPHDQLQJIXOQDPH 7DNHQRWHRIWKH,3SRUWQXPEHUDVVLJQHGWRWKHFROOHFWRU7KLVLVWKHSRUWRYHUZKLFK WKHFROOHFWRUZLOOWDONWRWKH&&0(QWHUSULVHVHUYHUVHUYLFH 9HULI\WKHWHOHSKRQHV\VWHPW\SHIRUWKHQRGH &OLFNWKH2SHUDWHVKRXUVDGD\FKHFNER[LI\RXUFDOOFHQWHURSHUDWHVRYHUWKH PLGQLJKWKRXU &OLFNWKH&UHGLW1RQ$QVZHUHG2XWERXQG&DOOVFKHFNER[LI\RXZDQWWRLQFOXGH QRQDQVZHUHGRXWERXQGFDOOVLQWKHGDWDFROOHFWHGIRUUHSRUWLQJ 9HULI\WKH60'5DQG$&'FRPSRUWVVHWWLQJVIRUWKHQRGH ,I\RXKDYHDZDOOVLJQRQWKH6\VWHP6HWWLQJVWDEGRXEOHFOLFN6LJQ&RPSRUWDQG VSHFLI\ZDOOVLJQFRPSRUWVHWWLQJV &OLFN6DYH&KDQJHV &RQILJXULQJWKHVHFRQGDU\GDWDFROOHFWLRQSRLQW
You must configure the data collection point for each telephone system within your call center. If you have a second telephone system in your call center, contact prairieFyre for the license number required for 6110 CCM to collect data for this node, and configure the node.
5LJKWFOLFN/RFDO1RGHVDQGFOLFN$GG/RFDO 7\SHDPHDQLQJIXOQDPHIRUWKHQRGH
NOTE: Ensure that this second local IP port number is unique.
,QVWDOOLQJ0LFURVRIW'DWD$FFHVV&RPSRQHQWV0'$&
8VLQJWKH&&06HWXSWRLQVWDOO0'$& 6WDUWWKH&&06HWXS &OLFN<HVWRLQVWDOO0'$& 6HOHFW<HV,DFFHSWDOORIWKHWHUPVRIWKHSURFHHGLQJOLFHQVHDJUHHPHQWDQG FOLFN1H[W &OLFN1H[WWRVWDUWLQVWDOOLQJ0'$&FRPSRQHQWV &OLFN)LQLVKZKHQWKHVHWXSLVFRPSOHWHYour computer restarts.
/RJRQXVLQJWKHDGPLQLVWUDWRUSDVVZRUG 0DQXDOO\UHVWDUWWKH&&06HWXS
&OLFN<HVWRUXQWKH&&0&OLHQW'RZQORDGLQVWDOODWLRQ &OLFN1H[WWRVWDUWLQVWDOOLQJFOLHQWGRZQORDGFRPSRQHQWV
&OLFN)LQLVKZKHQWKHVHWXSLVFRPSOHWH
The Service Pack 2 Not Found screen appears if Service Pack 2 was not previously installed.
&OLFN<HVWRLQVWDOO6HUYLFH3DFN
&OLFN1H[WDIWHU\RXUHDGWKHLQIRUPDWLRQRQWKH:HOFRPHVFUHHQ &OLFN<HVDIWHU\RXUHDGWKHVRIWZDUHOLFHQVHDJUHHPHQW
The Connect to Server screen appears.
&OLFN1H[WWRDFFHSWWKH:LQGRZVDFFRXQWLQIRUPDWLRQ &OLFN1H[WWRVWDUWFRS\LQJILOHV
&OLFN)LQLVKZKHQWKH6HUYLFH3DFN6HWXSLVFRPSOHWH 8VLQJWKH&&06HWXSWRXSJUDGH64/VFULSWV
If the 6110 CCM Setup detects an existing SQL database you will be asked if it is okay to install or upgrade SQL scripts. Otherwise, it installs the necessary 6110 CCM scripts automatically.
To install 6110 CCM scripts:
/RJRQXVLQJWKHDGPLQLVWUDWRUSDVVZRUG 0DQXDOO\UHVWDUWWKH&&06HWXS
The setup prompts you to install components the 6110 CCM Enterprise server requires to run under Windows NT, Windows 2000 Server, or Windows Professional.
&OLFN1H[WWRVWDUWLQVWDOOLQJQHFHVVDU\&&0(QWHUSULVHVHUYHUFRPSRQHQWV &OLFN1H[WDIWHU\RXUHYLHZ\RXU&&0OLFHQVHLQIRUPDWLRQ &OLFN<HVDIWHU\RXUHDGWKHVRIWZDUHOLFHQVHDJUHHPHQW &OLFN1H[WDIWHU\RXUHDGWKHLQIRUPDWLRQRQWKH:HOFRPHVFUHHQ &OLFN1H[WDIWHUFKRRVLQJWKHGHVWLQDWLRQIRUWKH&&0DSSOLFDWLRQILOHV &OLFN1H[WWRVSHFLI\ZKHUHWKH64/GDWDEDVHZLOOEHFUHDWHGDQGPDLQWDLQHG &OLFNWKH&&0(QWHUSULVHVHUYHUDQG&&0(QWHUSULVH1RGH/RFDO 3%;'DWD&ROOHFWRUFKHFNER[HVDQGFOLFN1H[W &OLFN1H[WWRDFFHSWWKHGHIDXOWQDPLQJIRUWKHIROGHUFRQWDLQLQJSURJUDPLFRQV
If you are running Windows 2000 Server and did not perform the steps required to enable remote access to Windows 2000 Server, do so now. (See Enabling remote access to the Windows 2000 server, page 16.)
NOTE:
• When you purchase the SQL Server 2000 Standard Edition software, prairieFyre provides it on a separate installation CD. If you purchased the SQL Server 2000 Standard Edition software, install it now.
• If you currently have SQL Server 7.0 installed, the setup prompts you to install service packs.
• SQL Server 2000 Standard Edition supports multiple instances on the same computer. However, 6110 CCM runs on the default instance of SQL Server 2000 only.
4XLWDQ\DSSOLFDWLRQVFXUUHQWO\UXQQLQJRQ\RXUFRPSXWHU ,QVHUWWKH64/6HUYHU6WDQGDUG(GLWLRQ&'
&OLFN64/6HUYHU&RPSRQHQWV
&OLFN1H[WDIWHU\RXUHDGWKH:HOFRPHVFUHHQ
&OLFN1H[WWRDFFHSWWKHORFDOFRPSXWHUGHIDXOWORFDWLRQ
&OLFN8SGDWHUHPRYHRUDGGFRPSRQHQWVWRDQH[LVWLQJLQVWDQFHRI64/ 6HUYHU
)LJXUH8SJUDGLQJ64/VFULSWV
&OLFN1H[W
7\SHWKHGLJLW,'NH\SURYLGHGE\WKH0LFURVRIW64/UXQWLPHOLFHQVHDQGFOLFN 1H[W
&OLFN1H[WWRXSJUDGHWKHH[LVWLQJLQVWDQFHRIWKH64/GDWDEDVH &OLFN1H[WWRXSJUDGH\RXUH[LVWLQJ64/6HUYHU
&OLFNWKH<HVXSJUDGHP\SURJUDPWR6WDQGDUG(GLWLRQFKHFNER[DQGFOLFN1H[W 8QGHU3HU6HDWIRUW\SHIRUWKHQXPEHURIGHYLFHVDQGFOLFN&RQWLQXH
&OLFN<HVWRLQVWDOODGGLWLRQDOFRPSRQHQWV
6HOHFWWKH0DQDJHPHQW7RROVDQG%RRN2QOLQHFKHFNER[HVWRLQVWDOOWKHVH FRPSRQHQWVLQDGGLWLRQWRWKH6HUYHU&RPSRQHQWDQG&OLHQW&RQQHFWLYLW\ FRPSRQHQWVDOUHDG\VHOHFWHGDQGFOLFN1H[W
&OLFN1H[WWRVWDUWFRS\LQJILOHV
,IWKHVHWXSSUHVHQWV\RXZLWKWKH6KXWWLQJ'RZQ7DVNVVFUHHQFOLFN1H[WDV\RX ZLOOQHHGWRUHVWDUW\RXUFRPSXWHUDQ\KRZ
9HULI\LQJWKDW$&'$JHQW6KLIWDQG60'5GDWDLVVWUHDPLQJ
Ensure your telephone system is connected to the 6110 CCM Enterprise server as follows: • SX-2000 = two RS-232 links for SMDR (Comport 1) and ACD (Comport 2) data streams
• SX-200 = one RS-232 link for SMDR and Agent Event streams (Comport 1) and one RS-232 link for an 1103 Dataset (Comport 2)
The cable specifications are as follows:
• From switch to 6110 CCM Enterprise server: GENERIC RS-232; 9M/9F SERIAL STRAIGHT THRU • From dataset to 6110 CCM Enterprise server: GENERIC RS-232; 9F/25M SERIAL STRAIGHT THRU
To view real-time data collection for all nodes (collection points):
&OLFN6WDUW !3URJUDPV !0LWHO1HWZRUNV !&&01HWZRUN0RQLWRU
The prairieFyre Network Monitor (a black figure) appears in the system tray on your desktop. The prairieFyre Network Monitor communicates with the collector to which you are connected. If the data is not streaming, an alarm will show.
To view data and system alarms for a node:
• Double-click the 6110 CCM Network Monitor.
The Network Monitor displays the status of all alarms for the node currently selected.
To view more detailed alarm information:
• Click Data links.
The Data links informs you if/of
• The current time of the Collector Service computer as derived from the telephone system data stream • The number of error records received by the Collector Service
• The Collector Service is not receiving SMDR or ACD data
• The telephone system is truncating agent IDs and extension numbers that exceed four characters (must be enabled on the phone switch, see “Common SX-2000 programming errors” on page 87. Management Console
These two items were on the Network Monitor and are now located on the Management Console. • The disk space is low on the disk housing the text files
• The time interval during which the system raises data alarms if it detects the Collector Service is not receiving data
(QDEOLQJSRSXSDOHUWV
You can enable pop-up alerts that display system and data alarm information.
To enable pop-up alerts:
5LJKWFOLFNWKH&&01HWZRUN0RQLWRULFRQDQGFOLFN3RSXSRQ$ODUPV
If a system or data alarm occurs, the Network Monitor appears on top of all open applications.
This message informs you that the Collector Service for the node has been disconnected from the telephone system.
5H,QLWLDOL]LQJWKH&ROOHFWRU6HUYLFH
The ReInitialize Collector command reconnects the ACDLink application to the Collector Service. If you accidentally disconnect the ACDLink monitor from the Collector Service, or the system detects Collector Service errors, the 6110 CCM Network Monitor icon turns red and blinks. You can select the Summary of Alarm Status screen to see a summary of the errors.
To re-initialize the Collector Service:
&OLFN6WDUW !3URJUDPV !0LWHO1HWZRUNV !&&01HWZRUN0RQLWRU
The 6110 CCM Network Monitor (a black figure) appears in the system tray on your desktop. It communicates with the collector to which you are connected.
,QVWDOOLQJ&ULWLFDO&RPSRQHQW3DFNDQG&OLHQW&RPSRQHQW
3DFNRQWKHVHUYHU
If you intend to use the 6110 CCM Enterprise server as both a server and a client, you must install supporting applications first (the Critical Component Pack), and then optional applications (the Client Component Pack).
,QVWDOOLQJWKH&ULWLFDO&RPSRQHQW3DFN
The 6110 CCM Critical Component Pack consists of the following supporting applications: Microsoft Visual Basic Version 6 Runtimes, Microsoft MFC 6.2 Version Runtimes, Microsoft MDAC 2.6 Runtimes, Microsoft Standard OCX and DLL Redistributables, and Third Party Licensed Redistributables required by 6110 CCM/6150 MCC Programs.
To install the Critical Component Pack on the server:
2QWKHFOLHQWFRPSXWHUVWDUW,QWHUQHW([SORUHULQWKHEURZVHU 7\SHLQ\RXU&&0(QWHUSULVHVHUYHU,3DGGUHVVKWWS>\RXU&&0(QWHUSULVH VHUYHUDGGUHVV@&&0$OWHUQDWLYHO\GRXEOHFOLFNWKH&&0GHVNWRSLFRQ &OLFN+HOS !&OLHQW'RZQORDG &OLFN&ULWLFDO&RPSRQHQW3DFNWRLQVWDOOWKHFULWLFDODSSOLFDWLRQV 6HOHFWWKH5XQWKLVSURJUDPIURPLWVFXUUHQWORFDWLRQFKHFNER[ &OLFN1H[WDIWHU\RXUHDGWKH:HOFRPHVFUHHQ &OLFN<HVWRDFFHSWWKHOLFHQVHDJUHHPHQW &OLFN1H[WDIWHU\RXUHDGWKHLQIRUPDWLRQSUHVHQWHG &OLFN)LQLVKDIWHUWKH&&0&ULWLFDO&RPSRQHQW3DFNVHWXSKDVILQLVKHGLQVWDOOLQJ RQ\RXUFRPSXWHU ,QVWDOOLQJWKH&OLHQW&RPSRQHQW3DFN
The 6110 CCM Client Component Pack consists of the following optional applications: AgentAdvisor, Excel Report Templates, Report Distributor, Network Monitor, AutoUpdate, and Mitel Networks 6150 MCC (Multimedia Contact Center) Outlook Extensions.
NOTE: The Client Component Pack applications all offer configuration options which can be changed at
any time.
To install the Client Component Pack on the 6110 CCM Enterprise server:
NOTE: All users of 6110 CCM client software must have full permissions to this directory.
&OLFN1H[WWRVHOHFWWKHGHIDXOWGHVWLQDWLRQRIWKH&RQILJXUDWLRQ'DWD'LUHFWRU\ $OWHUQDWLYHO\FOLFN%URZVHWRVHOHFWDQDOWHUQDWLYHGHVWLQDWLRQRIWKH&RQILJXUDWLRQ
NOTE: When selecting the destination of the Configuration Data Directory, ensure that the space available
is greater than the space required.
6HOHFWWKHFRPSRQHQWV\RXZDQWWRLQVWDOODQGFOHDUWKHFRPSRQHQWV\RXGRQRWZDQW WRLQVWDOODQGWKHQFOLFN1H[W
7\SHWKH,3$GGUHVVRIWKH&&0VHUYHUZKLFKWKHVHFOLHQWDSSOLFDWLRQVZLOOEH FRQQHFWLQJWR
7\SHWKH,3$GGUHVVWKH,33RUWDQGWKH(PSOR\HHIRU<RXU$JHQW$GYLVRU &RQILJXUDWLRQDQGWKHQFOLFN1H[W
&OLFN(QJOLVKRU)UHQFKIRU<RXU$JHQW$GYLVRUDQGWKHQFOLFN1H[W
&RQILJXUHWKH5HSRUW'LVWULEXWRU60730DLO6HWWLQJVDQGWKHQFOLFN1H[W &OLFN(QJOLVKRU)UHQFKIRUWKH5HSRUW'LVWULEXWRUDQGWKHQFOLFN1H[W
7\SHWKHQDPHRIWKH&RQILJXUH5HSRUW'LVWULEXWRU'HIDXOW6LWHDQGWKHQFOLFN1H[W 7\SHWKH,3$GGUHVVWKH8VHUQDPHDQGWKH3DVVZRUGIRUWKH&RQILJXUH5HSRUW
'LVWULEXWRU'HIDXOW6LWHDQGWKHQFOLFN1H[W
&OLFN<HVRU1RLQUHVSRQVHWRZKHWKHUWKH:HEVHUYHUDVVRFLDWHGZLWKWKLVVLWHXVHV 6HFXUH6RFNHWV/D\HU66/
7\SHWKH1DPH,3$GGUHVVDQGWKH,33RUWIRUWKH1HWZRUN0RQLWRU&RQILJXUDWLRQ DQGWKHQFOLFN1H[W
&OLFN(QJOLVKRU)UHQFKIRUWKH1HWZRUN0RQLWRUDQGWKHQFOLFN1H[W
NOTE: AutoUpdate settings will be shared by all users of this machine.
7\SHWKH3UR[\IRUWKH$XWR8SGDWHVHWWLQJVDQGWKHQFOLFN1H[W
7\SH<HVRU1RLQUHVSRQVHWRZKHWKHUWKH:HEVHUYHURQWKH&&0VHUYHUXVHV 6HFXUH6RFNHWV/D\HU66/DQGWKHQFOLFN1H[W
&OLFN)LQLVK
,QVWDOOLQJ$FWLYH;FRQWUROVRQWKHVHUYHU
ActiveX provides you with a security warning when attempting to download files. You then have the choice of continuing to download the file or aborting the download.
To install ActiveX controls on the server:
&RQILJXULQJ&&0
There are now three ways to configure Mitel Networks 6110 CCM: the quick configuration tool (for those with SX-2000 or the 3300 ICP), the Automatic Synchronization (for those with 6110 CCM version 3.x and 6115 ICC version 3.x), or manual configuration.
4XLFN&RQILJXUDWLRQ7RRO
The Quick Configuration Tool works only for the SX-2000 and 3300 ICP.
prairieFyre created the Quick Configuration Tool to help our customers configure Mitel Networks 6110 CCM quickly and accurately.
First, you must convert the Mitel Assignment forms to .txt files. The Agent Group Assignment Form and the Path Assignment Form are found on the PBX. Then you configure Agents, Agent Groups, and Queues with the Quick Configuration Tool.
&RQYHUWLQJ0LWHOIRUPVWRDW[WILOH
&OLFN6WDUW !3URJUDPV !$FFHVVRULHV !&RPPXQLFDWLRQV !+\SHU7HUPLQDO 2QWKH&RQQHFWLRQ'HVFULSWLRQZLQGRZXQGHU1DPHW\SHWKHQDPHRIWKLV
FRQQHFWLRQHJ&RQQHFWLRQ &OLFN2.
$IWHU&RQQHFWXVLQJVHOHFWWKHFRPSRUWHJ&20 &OLFN2.
The COM1 Properties window appears.
9HULI\WKDWWKHELWVSHUVHFRQGGDWDELWVSDULW\VWRSELWVDQGIORZFRQWURODUH FRUUHFW
&OLFN2.
The Connection1 HyperTerminal window appears.
&OLFN)LOH3URSHUWLHV 6HOHFWWKH6HWWLQJVWDE
8QGHU(PXODWLRQVHOHFW97 &OLFN2.
2Q\RXUNH\ERDUGSUHVV&WUODQGZVLPXOWDQHRXVO\
The SX-2000 terminal session page refreshes.
7\SHIRUPSULQWSDWKDOOSRUWOSUWRFRQYHUWWKH3DWK$VVLJQPHQWV)RUPWRWH[W
NOTE: The lpr3 printer is not the default printer.
)LJXUH+\SHUWHUPLQDO3DWK$VVLJQPHQWV)RUP
)LJXUH+\SHUWHUPLQDO6KRZSULQW
&OLFN7UDQVIHU !&DSWXUH7H[W
The Capture Text window appears.
&OLFN%URZVHDQGVHOHFWWKHGHVWLQDWLRQRIWKHWH[WILOH &OLFN6WDUW
7RHQDEOHSULQWLQJW\SHHQDEOHSULQWQ
When printing is completed, the Mitel main screen appears.
7\SHIRUPSULQWDJHQWJURXSDOOSRUWOSUWRFRQYHUWWKH$JHQW*URXS$VVLJQPHQW )RUPWRWH[W
5HSHDWVWHSV
:KHQERWKWKH0LWHOIRUPVDUHFRQYHUWHGWRWH[WFORVHWKH&RQQHFWLRQ+\SHU7HUPLQDO ZLQGRZ
NOTE: If you open the .txt file, it will look similar to the file below.
)LJXUH7H[WILOH
On the PBX, you now send all valid Agent Group Assignments and Path Assignment to the file. Save the text file and proceed to Configuring Agents, Agent Groups, and/or Queues.
&RQILJXULQJ$JHQWV$JHQW*URXSVDQGRU4XHXHV
&OLFN6WDUW !3URJUDPV !0LWHO1HWZRUNV !SUDLULH)\UH0DQDJHPHQW&RQVROH &OLFN'DWDEDVH !,PSRUW&RQILJXUDWLRQIURP0LWHO$VVLJQPHQW)RUPV
The Interpret Mitel Assignment Forms window appears.
$IWHU6HOHFWD)LOHFOLFN%URZVH
6HOHFWWKHGDWDILOHFUHDWHGE\WKH6;WHOHSKRQHVZLWFK &OLFN2.
The Interpret Mitel Assignment Forms window reappears.
&OLFN5HDG)LOH
Under Results, the information retrieved from the forms is displayed.
A legend appears that indicates if the data has been successfully added, if it already exists, or if it was not selected.
&OLFN&ORVH
)LJXUH,QWHUSUHW0LWHO$VVLJQPHQW)RUPV5HVXOWV
$XWRPDWLF6\QFKURQL]DWLRQZLWK,&&
Automatic Synchronization is only available if you have Mitel Networks 6115 Interactive Contact Center. Automatic Synchronization reads the PBX Agent ID/Names, Agent groups/Names, and Paths/Names (only if you have DNIS*), then it dynamically updates the YourSite database.
*If you do not have DNIS, you can enter the Path Dialable and Reporting numbers, and then the Paths/ Names will be automatically synchronized.
NOTE: Ensure you have licenses for each employee before you begin. If you have more employees than
To configure your database you must
6HWWKH0L7$,QRGH
(QWHUWKH4XHXHGLDODEOHDQGUHSRUWLQJQXPEHUVDQGHQDEOH,QWHUDFWLYHLQWKH GDWDEDVH
:DLWDSSUR[LPDWHO\ILYHPLQXWHVIRU$XWRPDWLF6\QFKURQL]DWLRQ 5HIUHVKWKHVFUHHQ
6HWWKHUHV\QFKURQL]DWLRQWLPH
Your database will be updated.
7KHHIIHFWVRI$XWRPDWLF6\QFKURQL]DWLRQ Employee IDs/Agent IDs
The Employee name and ID (Identification number) will now be the same as the Agent name and ID.
Reporting numbers/Dialable numbers
Reporting numbers that are known to 6110 CCM will remain unchanged.
Reporting numbers that are unknown to 6110 CCM will appear in the following format: MDialable Number (M1600). For example, M1600 is the reporting number for the agent group with the dialable number 1600.
New Queues
As new queues are entered into the switch, MiTAI will automatically update the database to include them.
Changing Device names
6HWWLQJWKH0L7$,1RGH
&OLFN6WDUW !3URJUDPV !0LWHO1HWZRUNV !0DQDJHPHQW&RQVROH &OLFN(QWHUSULVH
([SDQGWKH/RFDO1RGHVDQGVHOHFWWKH0L7$,QRGH)RUH[DPSOHVHOHFW7RURQWR $IWHU6ZLWFK7\SHVHOHFWWKH0L7$,VZLWFK
7\SHWKH1RGH1DPH,3$GGUHVVDQG,33RUW &OLFN6DYH&KDQJHV