Hyperion
™
ALADIN UPDATE Dec. 15/83
The first two pages (sheet) contain a list, referenced by page number, of detected errors. We recommend that you enter the corrections into the manual in ink.
The 8 pages that follow replace pages 111-127 through
111-134 of the Tutorial. Please remove those pages from your copy
of the Hyperion Aladin Guide and replace them with the pages
numbered 111-127 through 111-134 in this package.
PAGE III-3 111-27 111-33 III-34 111-46 III-51 III-55 111-66 111-83 III-91 111-92 111-95 III-101 III-105 III-126 CORRECTION
Note that drive C must be lOOK before SETUPRAM can be performed.
Disregard step 44.
As the cursor is already at CITY, step 68 is not neces-sary.
As the cursor is already at CITY, step 74 is not neces-sary.
In step 102, F5 «) should be F6 «).
In step 109, Fl (Cancel) should be Fl (Aladin). After step 111, Aladin does not display the soft key line in Fig. III-8, but the one described in Table III-I.
If Aladin prompts ~~Extend definition?", see the top of
III-167.
After step 171, the ~~street sign" and the prompt should be transposed.
In step 188, F7 (Group) should be F6 (Group).
You must use the Jump facility to make SPECS the current file.
In step 201, ~~right arrow key" should be ~~left arrow key".
After step 215, Aladin prompts ~~Evaluate".
Aladin retabulates in the last display mode selected, and, depending on that mode, the display may not match Fig. 111-19.
ALADIN UPDATE Dec. 15/83
PAGE
111-129 111-154 111-163 111-164
111-165 111-169 111-179 111-179 111-181
CORRECTION
Replace pages 111-129 to 111-134 with attached pages. In step 101, F3 (YES) should be F6 (YES).
Reverse steps 11 and 12.
In steps 18 and 19, F2 (STORE) should be F5 (STORE).
In steps 24, F2 (STORE) should be F5 (STORE). In step 36, F8 (SORT) should be F7 (SORT).
HYPERION ALADIN GUIDE
This manual is a non-technical user's guide to the Aladin relational data base system for the Hyperion personal business computer. The manual is broken into sections on preparing to use Aladin, a tutorial on Aladin's functions, and a reference section on Aladin's modules and their components.
This manual describes programs supplied under license. (c) Copyright 1982, 83 ADI America Inc.,
Bytec Management Corporation
Can. manufactured Hyperions
UL#86H2 CSALR33921
U.S.A. manufactured Hyperions
UL #86H2 CSALR53711 FCC Ident. CTJ7YM3012
FCC Regist. CTJ6YM-70433-DT-E
FCC Ident. CTJ7JN3012 FCC Regist. CTJ7JN-70433-DT-E
Hyperion MS-DOS Microsoft MULTIPLAN IN:SCRIBE IN:TOUCH IBM Aladin Trademarks
is a trademark of Bytec Management Corporation. is a trademark of Microsoft Corporation
is a trademark of Microsoft Corporation is a trademark of Microsoft Corporation
is a trademark of Bytec Management Corporation. is a trademark of Bytec Management Corporation.
is a trademark ofI!lternational Business Machines Corporation. is a trademark of Advanced Data Institute America Inc.
Disclaimer
The information in this manual has been carefully prepared and checked for completeness and accuracy. There is however, always the possibility of omission or error. In such an event Bytec Management Corporation cannot assume liability for any damages resulting from the use ofthis manual.
Service Requirements
In the event of equipment malfunction, all repairs must be performed by Bytec Management Corporation, an authorized agent (dealer) of Bytec Manage-ment Corporation or any other organization authorized by your warranty agreement.
Avoiding Radio-Television Interference
Hyperion Aladin Guide Contents
TABLE OF CONTENTS
SECTION PAGE
INTRODUCTION
1. THE STARTUP PROCEDURES 1-1
1.1 Check to Make Sure You Have Received
Everything 1-2
1.2 Install Utilities on Your Aladin Diskettes 1-2
1.3 Prepare Data Diskettes on which to Store
Your Future Relational Data Bases 1-5
1.4 Copying Your Diskettes 1-6
1. THE HYPERION KEYBOARD 11-1
2. THE DISPLAY SCREEN 11-5
3. RELATIONAL DATA BASES 11-6
4. THE RELATIONAL PROBLEM SOLVER 11-6
5. OPERATION 11-7
6. RECORDS, FILES AND FIELDS 11-7
7. REPORTS 11-8
Contents Hyperion Aladin Guide
TABLE OF CONTENTS (cont)
SECTION PAGE
1. INTRODUCTION 111-1
A - WORKING WITH AN EXISTING DATA BASE
2. STARTING AND STOPPING ALADIN 111-3
2.1 Starting Aladin III-3
2.2 Access a Relational Data Base 1II-5
2.3 Stopping and Exiting from Aladin (Return to DOS) 1II-7
3. PRESSING SOFT KEYS TO ENTER
ALADIN COMMANDS 111-9
4. MOVING THE CURSOR ABOUT THE
SCREEN FORM 111-17
5. JUMPING TO DIFFERENT FILES 111-21
6. USING HELP 111-25
7. ENTERING, CHANGING, AND
REMOVING DATA 111-27
7.1 Enter Data III-27
7.2 User Another Record to Enter Data III-30
7.3 Change an Existing Record III-32
7.4 Remove a Record III-35
Hyperion Aladin Guide
TABLE OF CONTENTS (cont)
SECTION
Parl III (conl)
10. CREATING A REPORT
10.1 Set Up the Query
10.2 Saving a Report for Later Use
10.3 Generating a Report
11. CHECK THE STATUS OF YOUR
RELATIONAL DATA BASE
11.1 The INFORMATION Module
12. USING ALADIN WITH A WORD
PROCESSOR
12.1 U sing a Query to Prepare Information
12.2 Merging that Information into a Report/Letter
13. USING THE ALADIN STATISTICS
MODULE
13.1 Some Examples of Statistical Evaluations
B - CREATING AND MODIFYING DATA BASES
14. 14.1 14.2 14.3 14.4 14.5 14.6 15.4
CREATING A NEW RELATIONAL DATA BASE SYSTEM
Elements of a Relational Data Base Select Your Fields and Screen Format Access the INSTALL Program
Entering Each Field and Field Property Allocating Space for Your New Data Base Formatting Your Screen (Record Layout) Secure Your Data Base from Unwanted
Contents Hyperion Aladin Guide
TABLE OF CONTENTS (cont)
SECTION
Part III (cont)
15. CHANGING AN EXISTING DATA BASE
15.1 Planning Your Changes
15.2 Adding a New File
15.3 Branching Fields
15.4 Adding New Fields
15.5 Saving Your Additions and Changes
15.6 Creating and Modifying the Record Formats
C -PROBLEM SOLVING WITH ALADIN
16. 16.1 16.2 16.3 17. 17.1 17.2 18. 18.1 18.2
THE ALADIN CALCULATOR Changing the CAR Data Base Define Your Calculation Defining a Report
MULTILEVEL SORTING WITH ALADIN Processing the Calculation
Generating the Report
USING THE BATCH MODE FACILITY (SCRIPT)
Types of Commands in Script Generating a Script File
Hyperion Aladin Guide Contents
TABLE OF CONTENTS (cont)
SECTION PAGE
Part IV (cont)
3. 4. 4.1 4.2 5. 6.
THE DATA MODULE
ENTER - Enter Data into an Existing Relational System Data Base
CHANGE - Change the Existing Data in a Field REMOVE - Delete Existing Data from a Record VIEW - Examine Existing Data Records without
Modifying Them
SRVICE - Access Service Control Functions
THE REPORT MODULE
Accessing a Previously Entered Query Accessing a Previously Entered Calculation
DEFINE - Define a New Report
SAVE - Save a Report Which Has Previously Been Defined
RECALL - Make a Previously Saved Report Definition the Current Definition VIEW - Display the Current Report Definition GENER - Create a Report Using the Current
Definition
SRVICE - Access Service Control Functions
THE QUERY MODULE
IV-7 IV-8 IV-13 IV-17 IV-19 IV-21 IV-23 IV-24 IV-25 IV-26 IV-32 IV-34 IV-35 IV-36 IV-37 IV-39
DEFINE - Construct a New Query IV-40
SA VE - Save a Query to a Diskette File for Later
Use IV-48
RECALL - Retrieve a Query That Was Saved to
Diskette IV -49
VIEW - Display the Definition of the Current
Query IV-51
SRVICE - Access Service Control Functions IV-51
. THE CALCULATOR MODULE
DEFINE - Define a Calculation
SAVE - Save a Calculation Definition to a
Contents Hyperion Aladin Guide
TABLE OF CONTENTS (cont)
SECTION PAGE
Part IV (cont)
7.
7.1 7.2 7.3 8. 9. 9.1RECALL - Make a Saved Calculation Definition
the Current Definition IV -59
VIEW - Display the Listing of the Current
Calculation IV -61
SRVICE - Access Service Control Functions IV-61
THE WORD PROCESSING MODULE Bridge to Word Processing Systems File and Filename Conventions
Combining Text Files with Aladin Data
THE GROUP MODULE
DEFINE - Create a Group (Table) Format for the Statistical Evaluation of Data
SAVE - Save a Defined Group
RECALL - Retrieve a Saved Group Definition VIEW - Display the Definition of a Group SRVICE - Access Service Control Functions
THE STATISTICS MODULE Statistical Evaluations
DEFINE - Define the Statistical Evaluation to be Performed
SAVE - Save a Defined Statistical Evaluation to a Diskette File
RECALL - Take a Defined Statistical
Hyperion Aladin Guide
TABLE OF CONTENTS (cont)
SECTION
Part IV (cont)
10.1
10.1
10.2
11.
THE CONTROL FUNCTIONS AND SWITCHES
The Control Functions
OUTPUT - Select the Output Device INPUT - Select the Input Device
SCREEN - Set the Contrast between Screen Forms and Data
JUMP - Branch from One File to Another in Your Relational System Data Base Variables (Switches)
THE INFO MODULE
INFO - Display a Report on Available Diskette
Contents PAGE IV-99 IV-99 IV-102 IV-104 IV-107 IV-109 IV-Ill IV-115
Storage Space IV-II 7
MAP - Display the Relationships between Files
in Your DataBase IV-119
FORMAT - Set Up the Report Format IV-121
B - CREATING AND MODIFYING DATA BASES
12. 12.1 13. 13.1 13.2 13.3 13.4 13.5 13.6 13.7 13.8 13.9 13.10
ACCESS THE ALADIN SYSTEM INSTALL MODULES
The Main Aladin Install Menu
THE INSTALL MODULE Entering the Files
Entering Fields
Field Type and Field Length Field Access Protection Key Fields
Branching Fields
Establishing Storage Requirements Storing Your Data Base Definition for
Contents Hyperion Aladin Guide
TABLE OF CONTENTS (cont)
SECTION PAGE
Parl IV (conl)
14. 14.1 14.2 14.3 15. 15.1 15.2 15.3 15.4 15.5 15.6 15.7 16.
THE CHANGE MODULE
U sing INSTALL to Change a Data Base Using CHANGE to Modify a Data Base Exiting from the CHANGE Module
CANCEL - Ends a Change Session without Saving any Modifications
IV-145 IV-145 IV-146 IV-14S
IV-150 SAVE - Ends a Change Session, Saving any
Modifications to an Existing Data Base IV -151 INS LIN - Insert a Blank Line into the Data Base
Description IV-152
DELLIN - Deletes an Existing Line from the Data Base Description
TOP - Moves the Cursor to the First Field in the Data Base Description Screen
PROT - Freeze the Current Definition Parameters
THE SCREEN FORMS MODULE
Access the Desired File Screen Description
Moving Fields about the Screen Restoring the Original Screen Form The SETUP Command
Saving the Screen Form Common Errors
THE ACCESS RIGHTS MODULE
Hyperion Aladin Guide
TABLE OF CONTENTS (cont)
SECTION
Part IV (cont)
C - ADVANCED PROCEDURES
17. DISK HOUSEKEEPING
17.1 Key Index File
17.2 Data Storage Allocations
17.3 Reorganizing Your Data Base
18. GLOBAL OPERATIONS
18.1 The GL Switch
18.2 The Global Update
18.3 The INFO Switch
18.4 Removing Records
19. MERGING DATA FILES
19.1 Changing Your Input Source to "File"
19.2 Entering Data from a File
19.3 Updating a Data Base from an External
File
19.4 Removing Files
20. SCRIPT FILES
20.1 Prepare a Script File
20.2 Running a Script File
20.3 Scri pt Commands
APPENDICES
A
B C
INDEX
NOTICE TO
ALL ALADIN* USERS
11 Jan 1984
When installing your Aladin system,
nos
loads Aladin
into drive C (the RAMdisk). Drive C must therefore have enough
room to accommodate the Aladin program. There must be at least
100 K
bytes of free space available in drive
C.To change the
si ze of dri ve eto·
100 Kbytes, you must use the
MODEcommand
in [lOS (found on the Master IIser Diskette) and reboot the
system.
The MODE
command is described in the Hyperion User
Guide.
The system can automatically be made to empty the
contents of drive
C
by including the appropriate command line
into the SETUPRAM.RAT file on the Aladin System Diskette and
Aladin Install Diskette:
STEP
1)
Use the EDLIN or IN:SCRIRE text editors to
add the following command line
to
the
beginning of the SETUPRAM.RAT batch file:
ERASE C:*.*
on both Aladin System Diskettes and the
Aladin Install Diskette.
When using the SETUP RAM command to access Aladin, as
described in the
H~~erionAladin Guide, the system will
automatically erase a
existing files from drive C and make
the space available for the Aladin programs.
Hyperion Aladin Guide Introduction
INTRODUCTION
The Hyperion Aladin Guide is composed of Startup,
Tutorial, and Reference sections. It is the main source of
information on Aladin and its functions. To locate information within the manual, check the following areas:
- The Table of Contents. This gives you an overview of
the manual's contents.
- The Index. This gives you an alphabetical listing of
significant words and phrases (referenced to page numbers).
- Appendix B, The Glossary. This lists Aladin terms
and their definitions.
The Hyperion Aladin Guide is divided into four parts. Part I - Getting Started, is your entrance to the Aladin Relational Data Base System. Operating a software package is more than just pushing keys: you must first understand what
forces you are putting into motion. Getting Started is preparing
you to handle these forces.
Part II - Aladin & You. This part covers some basic
concepts of using Aladin on the Hyperion. It discusses the
"hardware" of the Hyperion, and how it is used by Aladin. This is an overview on what you can expect from the system during your lessons on its use.
Part III - The Tutorial. Aladin's tutorial provides a
logical, step-by-step, method on how to use each of Aladin's modules. Once you master the basics of entering data, activating soft keys, issuing commands, etc., you will be able to begin using Aladin as a part of your daily routine.
Introduction Hyperion Aladin Guide
Part IV - The Reference Section. The reference provides a module-by-module, function-by-function guide to Aladin. In addition to command syntax and concise explanations, the reference section also provides examples for both reference and learning purposes.
This reference is not meant to be read sequentially from
beginning to end. It is organized to enable a user to quickly
access only the information being looked for. Once this location in the manual is found, all the information necessary to accomplish the given task is presented.
The Appendices provide information on a variety of Aladin items: keys, terms, error messages, etc.
The Hyperion Aladin Guide is one of eight available Hyperion manuals:
1) The Hyperion Setup Guide, which was the first book
you read about the Hyperion, describes first-time setup procedures.
2) The Hyperion User Guide is the second in the series. It
describes how to use the Disk Operating System (DOS), and the single-line text editing system EDLIN.
3) A Hyperion Programmer Guide. This is a BASIC and
Assembler reference manual and explains these soph-isticated programming languages which you may wish to use when you become more familiar with your Hyperion.
Hyperion Aladin Guide I - Getting Started
Part I
GETTING STARTED
The first fifteen minutes you spend with Aladin may well be the most significant time spent with this package, as it will lay the groundwork for all future use with your Hyperion. Then, as you learn more about Aladin's capabilities and how to use them, there will certainly be hours of important work ahead of you.
The short procedures that follow are designed to take the guesswork out of installation, preparation and startup. They should be read carefully before proceeding to the hands-on tutorial in Part III.
In any event, you should take the time to read this manual and the other Hyperion documentation available to you: the
Hyperion Setup Guide, and the Hyperion User Guide. What follows are the initial steps required to use Aladin on your Hyperion.
1. THE STARTUP PROCEDURES
This is what you will do in this section:
1) Check to make sure you have received everything. 2) Prepare your Aladin System and Aladin Install
diskettes for use with your DOS and Hyperion. 3) Copy the Aladin Install Diskette.
1 - Getting Started Hyperion Aladin Guide
1.1 CHECK TO MAKE SURE YOU HAVE RECEIVED
EVERYTHING
The Aladin assembly, as shipped with your Hyperion, is made up of several parts. Make sure that you have each of the following:
a) Hyperion Aladin Guide. The manual is loose-leaf,
three-hole punched, and shrink-wrapped; it is enclosed in a linen binder and slipcase. Remove the shrink-wrapping and insert the manual into the binder, Check the manual against the table of contents to make sure that your copy is complete.
b) Diskettes. Aladin's software comes on three diskettes:
Aladin Demo & Examples Diskette, Aladin System
Diskette and Aladin Install Diskette. You should also have a fourth diskette, a copy of the Aladin System Diskette for backup.
1.2 INSTALL UTILITIES ON YOUR ALADIN
DISKETTES
The Aladin System Diskette and the Aladin Install Diskette were shipped from the factory with their programs, but without the MS-DOS utilities in place. This means that as they stand, these diskettes cannot be used to start the Hyperion.
Hyperion Aladin Guide I - Getting Started
For a Double-Drive Hyperion
STEP
1) Insert your Hyperion Master User Diskette into drive A, and start the Hyperion by press-ing the amber power button.
2) After the system startup is complete (about 30 to 45 seconds), remove the Aladin System Diskette from its pocket in the rear of the
Hyperion Aladin Guide, and insert it into drive B.
3) Enter the command B:SETUP, then press Rtn.
When this command is entered, the automatic installation program will transfer a copy of two DOS utilities to the Aladin System Diskette in drive B.
Putting these utilities onto the Aladin diskettes will enable you, in future, to start up Aladin after booting with a DOS or user diskette.
When the utilities have been transferred to the Aladin System Diskette:
STEP
4) Remove the Aladin System Diskette from drive B, and return it to its envelope at the back of the manual.
5) Remove the Aladin Install Diskette from its protective envelope, and place it in drive B.
I - Getting Started Hyperion Aladin Guide
Your Aladin System Diskette and Aladin Install Diskette now carry your current version of the MS-DOS utilities and can be used to start up Aladin after the Hyperion has been booted with a user disk.
The Aladin Demo & Examples Diskette contains only the
necessary data base file for the tutorial in Part III, and does not require any utilities.
For a Single-Drive Hyperion
Aladin will work as well on a single-drive version of the Hyperion as it does on a double-drive version. However, it does require a slightly different procedure to transfer the DOS utilities than that for the double-drive Hyperion.
STEP
1) Place your Hyperion User Diskette in drive A.
2) Enter the command B:SETUP, then press Rtn.
Although the setup procedure is the same as that for the double-drive Hyperion, you must swap the Hyperion Master Diskette with the Aladin System or Install Diskette when and as the system prompts you.
Hyperion Aladin Guide 1 - Getting Started
1.3 PREPAREDATADISKETTESONWHICHTO STORE YOUR FUTURE RELATIONAL
DATABASES
The three diskettes shipped with Aladin (Aladin System
Diskette, Aladin Install Diskette, and Aladin Demo & Examples
Diskette) contain the system files, the files necessary to modify and create a data base, and the tutorial examples respectively.
You should purchase at least ten 5-114" floppy diskettes, and prepare them for future data storage. The preparation is described below.
As Aladin is based on the MS-DOS operating system, it is
recommended that you read over the Hyperion User Guide,
paying particular attention to the following commands:
FORMAT
COpy
DISKCOPY DISKCOMP CHKDSK DIR
For a Double-Drive Hyperion
STEP
1) Following the instructions in the Hyperion
User Guide, format several blank diskettes. 2) Using a felt-tipped pen, label the blank
I - Getting Started liyperion Aladin Guide
For a Single-Drive Hyperion
Using Aladin with a single-drive requires that certain system files be present on the data diskettes. While this does limit the space available for your relational system, it is necessary in order for the system to operate correctly.
The Aladin System and Aladin Install diskettes contain slightly different programs, therefore it will be necessary to follow the instructions below once for each diskette.
STEP
1) Start up the Hyperion, with your Hyperion Master Diskette.
2) Remove the Hyperion Master Diskette from dri ve A, and insert your Aladin System Diskette.
3) Enter the command COPY A:ALADINE.PC B:.
4) Follow the screen prompts to switch diskettes, until the file transfer is complete.
5) Enter the command COPY A:ALADINI.PC B:.
Hyperion Aladin Guide 1 - Getting Started
1.4 COPYING YOUR DISKETTES
The Aladin System Diskette is copy-protected. This means that it cannot be copied. This is why you have been given two Aladin System Diskettes.
The Aladin Install Diskette, however, is not copy-protected, and should be copied onto a blank formated diskette as soon as possible. When using the Aladin Install program, you should use the copy. Keep the original Aladin Install Diskette only to generate future copies from.
2. ADDITIONAL ALADIN FEATURES
Graphing Facilities
Aladin can display statistical facts as a bar-chart, making the information contained in masses of numbers much more accessible.
Speed of Operation
Aladin is the fastest data base program currently available for the Hyperion.
On-line HELP
Wherever you are in Aladin, pressing FlO (the HELP soft
1 - Getting Started Hyperion Aladin Guide
Soft Keys
Aladin is completely driven by soft keys. This means that the menu items you are used to seeing on your screen are also displayed in the 10 soft key labels on the 25th line of the Hyperion screen. These labels correspond to the 10 soft keys (labelled F1 through FlO) at the top left of the Hyperion keyboard. Pressing a soft key selects the appropriate menu item.
Printer Control
Aladin can select different printer widths, allowing you to change the format of a printed report.
Script Files
With Aladin, you can create a "script" of commands, which Aladin will follow, just as an actor follows his script. Using this facility, repetitive tasks can be generated by a single keystroke. This feature not only saves time but reduces the chances of en try error.
Exchange of Information
Aladin is compatible with other software packages. This means that Aladin enhances the scope and abilities of other
Hyperion software packages, i.e., IN:SCRIBE and
Hyperion Aladin Guide II - Aladin & You
Part II
ALADIN&YOU
With the team of Aladin & Hyperion, you have an
enormously powerful and flexible data management tool at your fingertips. Now its time to look under the surface, and examine the different parts of the Hyperion as they relate to Aladin.
1. THE HYPERION KEYBOARD
The keyboard (see Fig. II-l) is your primary communica-tion device with Aladin. While the entry of commands and data ("input" in computerese) may sometimes occur from other sources (i.e., Aladin input files), 90 to 99% of your input will be entered via the keyboard.
So, let's take a closer look.
The Hyperion's keyboard has four distinct sections:
a) the soft keys, b) the special keys, c) the alphabetical keys,
d) the cursor control/numeric keypad.
Soft Keys
The soft keys (sometimes called "function" keys) are "soft" because their meanings change as you move through Aladin. There are 10 of these keys, at the upper left corner of the keyboard, each key corresponding to a label which is displayed on the 25th line of the screen (see Fig. II-2). Part IV, Reference, provides a complete map of these different labels.
II - Aladin & You Hyperion Aladin Guide
Hyperion Aladin Guide II - Aladin & You
Special Keys
The special keys have independent meanings, which stay the same throughout Aladin.
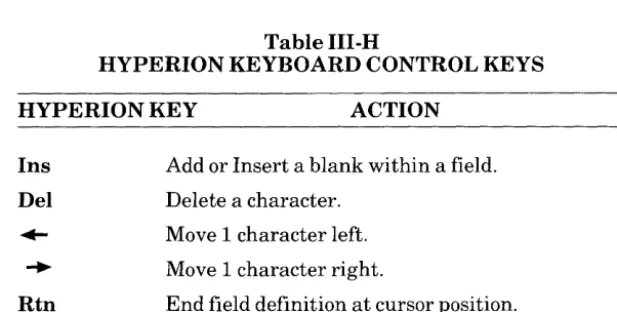
Table II·A
SPECIAL KEYS AND THEIR FUNCTIONS
KEY Home End Del Caps Lock Shift NumLock FUNCTION
Moves the cursor to the top field in the current screen form.
Moves the cursor to the bottom field in the current screen form.
Moves the cursor to the previous field in the form.
Moves the cursor to the next field in the form. Inserts a blank with the field at the cursor position.
Deletes a character within a field at the cursor position.
Locks the alphabetical portion of the keyboard so that all characters are displayed in upper case. When Caps Lock is on, an up arrow is displayed in the middle of the screen, next to the clock. Changes the meaning of alphabetical and cursor control/numeric keypad keys. When Shift is held down, any key that is struck has its meaning re-versed, i.e., lower case characters become upper case, and cursor control movements are trans-lated into numbers.
Num Lock has the same effect on the cursor
control/numeric keypad as Caps Lock has on
II -Aladin & Yau Hyperian Aladin Guide
CAR. SPECS (CON',CON) (---) Data. Vi ew
Manufacturer: > _ _ _ _
~lodel: _ _ _ _ _ _ _ _
Horse_Power _i n _PS: Vol ume_of Jngi ne_i n_CM:
Maximum_Speed_i n_MPH: Accel erati on_ time_from _0_ to _60:
Fuel_Consumption_City_Highway_HS: _ _ _ Gasoline_Type:
Five_Gear _Model_Avai 1 abl e: Automati c_Transmi ssi on_Avail ab 1 e:
Number of 000 rs: • Sun _Roof_Ava; 1 abl e:
Colors_Avail ab 1 e:
=======================:~!~!::~~::=============================================
Hyperion Aladin Guide II - Aladin & You
The Alphabetical Keys
These keys function just like a typewriter. When the key marked "W" is pressed, a "W" is displayed on the screen. When the Shift key is held and an alphabetical key is struck, it will be displayed in upper case; or in the case of a number, the symbol displayed over the number will be entered and displayed on the screen.
The Cursor Control/Numeric Keypad
On the right-hand side of the keyboard is a cluster of 14 keys (see Fig. II-I). These keys provide both numeric entry and cursor control, depending on whether or not Nurn Lock is on or off, and whether or not the Shift key is depressed.
When N urn Lock is on (or the Shift key is depressed) it is possible to enter the digits displayed on the upper left corner of the keys.
When Nurn Lock is off (and the Shift key is not
depressed), then the cursor control actions (cursor up, cursor
down, cursor left, cursor right, Home, End, Ins and Del) are
activated.
2. THE DISPLAY SCREEN
The Hyperion's screen is where Aladin displays prompts (messages) for you, as well as the masks and forms you define to hold the data in your relational data base.
These masks and forms are the physical layout of fields into which you may enter or extract data. During the tutorial, you will be using the CAR Relational Data Base system, so we have chosen one of those forms (for the SPEC file) to display in Fig. II-2.
II - Aladin & You Hyperion Aladin Guide
3. RELATIONAL DATA BASES
A relational data base consists of independent files, which mayor may not be related to each other. Depending on how you set up your relational data base, you can create reports or queries which draw on similar (related) information contained in many different files.
Each file within the relational system is composed of fields, and may contain up to 571 fields. Each field is defined by a number of constraints. These constraints include: type of field; number of times to repeat the field; length of field (this is related to type offield); protected field; key field.
The meaning and assignment of each of these constraints is shown in the tutorial.
4. THE RELATIONAL PROBLEM SOLVER
What is a "Relational Problem"? When the data in your file is more than just a list of information but is interrelated in some way then you have a relational problem which most data base management systems cannot solve. If, for example, you are an automobile dealer, you might maintain a file that contains specific information on many different autos. You may also keep a file of the various auto manufacturers, their distributors and other pertinent information.
In this case, there is an obvious relationship between each automobile and a particular manufacturer, every car has a single manufacturer.
Hyperian Aladin Guide II - Aladin & Yau
With Aladin, things are much easier. You can establish a relational system which solves your relational problem. In this case, you would maintain the two files, one for the cars and one for the manufacturers, within a single database. Then, when you want to find the manufacturer's information for a given car, Aladin will automatically take you to the correct record with only two keystrokes.
This "relational" approach can be applied to many prob-lems in the real world, not only to speed up your work, but also to accomplish tasks that would have been very difficult with a manual system.
5. OPERATION
Aladin is an interactive, soft-key driven program with on-line HELP. This means that a session with Aladin resembles a conversation. The program suggests some things that you may wish to do, and you make a reply. At most stages, your replies are really selections from a "menu" of possible choices, displayed on the Hyperion's soft key line.
Help information is available throughout Aladin to guide you in the meanings of the various choices. To get help at any
time, just press FlO (HELP).
6. RECORDS, FILES AND FIELDS
Aladin is a data base management system that you can use to model and solve most of the information processing problems you encounter.
II - Aladin & You Hyperion Aladin Guide
A group of similar records, such as the card catalogue in a
library, is referred to as a file. So, if you need to process
information about 5000 books, you will need 5000 records, all part of the same file.
If you examine the individual cards in a card catalog, you can see that they each contain the same types of information: Author, Title, Call Number, etc. For collecting this type of information, people often create a written form with a number of boxes or blanks that are then filled in with the appropriate data.
Each card may be considered to be a record. Within this record, the fields are the equivalent of the boxes on the library record card. The boxes, or fields, contain specific pieces of data, which are elements of a record. Aladin stores these fields together as a record, and the records together in files.
One of the basic applications of Aladin, therefore, is to serve as an "electronic filing cabinet". However, with Aladin you can create your own forms and organize them into various files without ever touching a piece of paper. Aladin can also look up a record, add a new record or delete an old one.
For further explanation of this and other terminology refer to Appendix B - Glossary, at the rear of this manual.
7. REPORTS AND OTHER MODULES
Hyperion Aladin Guide III - Tutorial
Part
IIITHE TUTORIAL
1. INTRODUCTION
The purpose of this tutorial is to give you hands-on experience with your Aladin system. The lessons that follow take a minimum of time and will fully demonstrate the power, versatility and user friendliness of Aladin.
The TUTORIAL is broken into three lessons:
A) Working with an Existing Data Base uses a factory-installed relational data base to demonstrate the Aladin modules used to manipulate your data. The Aladin System Diskette is used for this section.
B) Creating and Modifying Data Bases demonstrates the planning and implementation of a relational data base customized to your needs. After you have created a new relational system, you are shown how to modify it, in order to adapt to growing business needs. The Aladin Install Diskette is used for this section.
C) Problem Solving with Aladin gives practical examples of how Aladin's modules can be linked together to perform calculations, sort data, or move data from one file to another. Aladin's ability to perform repetitive tasks with a single keystroke is also demonstrated
here. This section requires the Aladin System
Diskette.
Single- and Double-Drive Considerations
A
Hyperion Aladin Guide III - Tutorial
STARTING AND SSTOPPING
Section 2
ST ARTING AND STOPPING ALADIN
The most crucial, and often overlooked, part of any software package is how to start and stop the system. For this reason, we have put this vital information front and center for you.
Before continuing, however, make sure that you have read Part I - Getting Started, copied your Aladin Install Diskette, and formatted some blank diskettes. For Section A of the
tutorial, you will also be using the Aladin Demo & Examples
diskette, or, more accurately, the relational data base contained on that diskette.
2.1 STARTING ALADIN
STEP
1) Insert your MS-DOS operating system diskette into drive A and power on your Hyperion.
2) After your operating system is in place, remove the MS-DOS diskette from drive A, and insert the Aladin System Diskette into drive A, and the Aladin Demo & Example Diskette into drive B.
3) Enter the words SETUPRAM and press Rtn .
... continued
SETUPRAM is a DOS batch file which transfers certain
system files to C:, for faster operation. Drive C must be 100 K for
III - Tutorial
STARTING AND STOPPING Hyperion Aladin Guide
While Aladin can operate without drive C, it is recom-mended that you use SETUPRAM to take advantage of the Hyperion RAM. Without RAM, Aladin uses the disk drives much more, and is consequently much slower.
STEP
4) If you have a double-drive Hyperion, enter the command A:ALADIN A:S,
OR
If you have a single-drive Hyperion, enter the command A:ALADIN B:S
5) Press Rtn.
Hyperion Aladin Guide III - Tutorial
STARTING AND STOPPING
2.2 ACCESS A RELATIONAL DATA BASE
In a few seconds Aladin will prompt you as follows:
Enter Relational System Name:
STEP
6) Type in the word CAR and press Rtn. Aladin will prompt:
Userid:
7) Type: ADI and press Rtn. Aladin will prompt:
Passwd:
8) Type: ADI and press Rtn.
...continued
NOTE: ALADIN scrambles the password for your security, so do not be dismayed when you type "ADI" and it is displayed on the screen as "RTM" or something else.
When you have completed the logon procedure, Aladin will display the screen shown in Fig. III-I.
The three names listed under the Userid and Passwd are the files within the CAR relational data base. There are three files: SPECS, DEALER, and CUSTOMER.
At the bottom of the screen, the last two lines are reserved for the soft key line title, and the soft key labels. As you can see,
this soft key line is called ALADIN. It is the main soft key line,
III - Tutorial
STARTING AND STOPPING
CAR
A.D.1. --- ALADHJ.EXEC v2.6 09/17/83
A.D.!. GmbH Karlsruhe, West Germany, Relational System: ALADIN
{cl Copyright by A.D.!. GmbH Karlsruhe, West Germany 1983
Enter Relational System name (<return> exits) = car ••
Useri d = adi Passwd = REX ••••••••
SPECS DEALER CUSTOMER
Hyperion Aladin Guide
ALADIN ~ ~ IReportl1 Query I ~ 09:23 I Group II Stats I 10thersi ISrvicel ~
Hyperion Aladin Guide III - Tutorial
STARTING AND STOPPING
The 10 labels correspond to the 10 soft keys at the upper left of the Hyperion's keyboard. Striking one of these keys enters the command shown on the soft key label.
When you have defined other data bases, entering their
name(s) in response to the Enter Relational System name
prompt will cause Aladin to access them, and display them on the screen.
2.3 STOPPING AND EXITING FROM ALADIN
(RETURN TO DOS)
To exit from Aladin, you must "back out" from wherever you are within the relational system. At this point in the tutorial, you have just accessed the CAR relational system, so we will exit from here.
STEP
9) Press Fl (Done).
The screen clears, and the system prompts:
Enter Relational System name ( <Rtn> exits):
10) Press Fl (Cancel).
. .. continued
The Aladin program is ended, and you are returned to DOS.
The soft key Fl is always a "backing-up" key. Wherever you are within Aladin, pressing Fl returns you to the previous level: either by quitting the present level, or by ending a process.
Hyperion Aladin Guide
Section 3
PRESSING SOFT KEYS TO ENTER
ALADIN COMMANDS
STEP
III - Tutorial
SOFT KEYS
11) Repeat steps 1 to 8. The display in Fig. III-l should be redisplayed on your screen .
... continued
Each'relational data base, created using Aladin, can be divided into its own classifications and categories. As indicated
by Fig. III-I, the CAR relational system consists of the following
files:
a) SPECS file: A "filing cabinet" containing information about a car's specifications, i.e.,
- manufacturer,
- model,
- list price,
- maximum speed,
- fuel consumption,
- etc.
b) DEALER file: A "filing cabinet" containing informa-tion about the car dealers, i.e.,
- name,
- address,
- cars they sell,
- etc.
c) CUSTOMER file: A "filing cabinet" containing in-formation about the customer who bought the car, i.e.,
- name,
- age,
- sex,
III - Tutorial
SOFT KEYS Hyperion Aladin Guide
Table III-A
THE MAIN ALADIN MENU SELECTIONS
SELECTION FUNCTION
Done This command tells Aladin that you are finished,
for the time being, with the current relational data base; and exits you to the first screen from which you can select another data base.
Data This command lets you enter, change, find,
display or remove information within your re-lational data base.
Report This command lets you generate reports and
lists.
Query This command lets you select groups of records
from your data base that meet certain criteria.
Calc This command lets you set up calculations to be
performed on your data.
Group This command lets you organize your data into
groups for use with the STATISTICS module.
Stats This command lets you perform statistical
Hyperion Aladin Guide
These files are related to each other.
III -Tutorial
SOFT KEYS
The specifications (SPECS file) are related to the dealer (DEALER file) who sells that model of car and to the customer (CUSTOMER file) who buys that kind of car.
These types of relationships illustrate the basic building blocks of relational data bases in Aladin and the more complex relational system data bases you can generate in the future.
Currently, the soft key line at the bottom of your screen is
labelled ALADIN. Note that F8 is labelled Others.
STEP
12) Press F8 (Others).
. .. continued
Notice that the F6 label has changed from Group to
Word, and the F7 label from Stats to Info. The other keys have
retained the same labels.
The number of selections offered by the Main Aladin Menu exceed the number of soft key labels (10) that can be displayed
at one time on the screen. The Other key causes the soft key
line to change to display other possible commands available through the Main Aladin Menu.
Table III-A lists and describes the selections offered by the Main Aladin Menu.
F9 (Srvice) is not actually a command. Rather, it accesses a soft key line which allows you to set certain system
parameters. We will be covering Srvice in Section 9 of the
III -Tutorial SOFT KEYS
CAR.SPECS (CON,CON) (---)
Hyperion Aladin Guide
Data
IAladinl1 Enter IlchangellRemovel~ 11:49
c=Jc=J c=J
Isrvicel~Hyperion Aladin Guide III - Tutorial SOFT KEYS
STEP
13) Press F2 (Data)
... continued
Aladin will call up the DATA module. The Main DATA Menu and soft key line are displayed as in Fig. III-2.
At the top left-hand side of your computer screen is a prompt line. This is a "street sign" and indicates that you are in the CAR relational data base, in the SPECS file. This street sign tells you the status of your session with Aladin. The sign should read:
CAR.SPECS (CON:,CON:) (---)
where:
a) (CON:,CON:) tells you that you are using the keyboard for data input and the screen for data output, i.e., you are working with the console.
b) (---) is a status indicator: a minus sign (-) means OFF;
and a plus sign (
+ )
means ON.- the first dash "-" tells you whether or not the QUERY module of Aladin is OFF or ON for this data input.
- the second dash "-" tells you whether or not the
QUERY module is OFF or ON for data output.
- the third dash "-" tells you whether or not the CALCULATOR module is OFF or ON.
III - Tutorial
SOFT KEYS Hyperion Aladin Guide
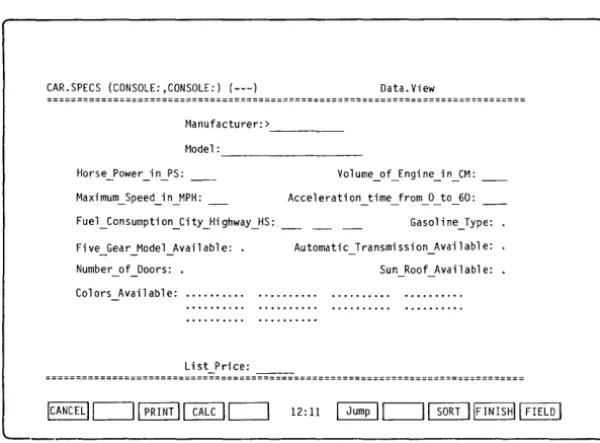
CAR.SPECS (CONSOLE:,CONSOLE:) (---) Data.View
Manufacturer: > _ _ _ _ _
Model: _ _ _ _ _ _ _ _
Vol ume_of _Engi ne_i n_CM:
Acce 1 erat; on _time_from _0 _ to _60:
Gasoline_Type:
Fi ve _Gear_Mode l-"vai 1 ab 1 e: Automat; c_Transm; ss; on-"vai 1 abl e: Number _of_Doors: • Sun_Roof _Ava; labl e:
[image:50.401.50.350.165.386.2]Colors_Ava; 1 abl e:
Hyperion Aladin Guide
Table III-B
III -Tutorial
SOFT KEYS
THE MAIN DATA MENU SELECTIONS
COMMAND DESCRIPTION
Aladin Leave the DATA module and return to the Main
Aladin Menu and soft key line.
Enter Enter a new record into the current data base
file.
Change Change an existing record.
Remove Remove an existing record from the data base
file.
View View the contents of an existing record in the
file.
STEP
14) Press F5 (View).
...continued
A blank screen form for the SPECS file is displayed (see Fig. III-3). This blank record shows how each record of that file is formatted. A record _ displayed in this manner is also called "screen form". A blank screen form is also called a "mask".
Notice that the street sign now has an additional element. The street sign reads:
CAR.SPECS (CON:,CON:) (---) Data.View
[image:51.396.43.348.58.285.2]III - Tutorial SOFT KEYS
Hyperion Aladin Guide
The cursor will now be resting on the first field in the form.
STEP
15) Press Rtn.
The first record from the SPECS file in sort order by Manufacturer is displayed.
16) Press Rtn five or six times In rapid
succession.
. .. continued
Aladin will display succeeding records in ascending order, i.e., A,B,C,D, ... , or 1,2,3,4, ... This exercise will show you how rapidly Aladin can recall data from the system.
Aladin displays records, sorted by the field in which the cursor is positioned. As the cursor was in the MANUF ACTUR-ER field, the records are displayed in ascending alphabetical
order by the Manufacturer's name. If the cursor were positioned
Hyperion Aladin Guide III - Tutorial
MOVING THE CURSOR
Section 4
MOVING THE CURSOR ABOUT
THE SCREEN FORM
In order to move to different fields within the SPECS screen, you will use the cursor control keys. These are located on the right-hand side of the Hyperion keyboard.
STEP
17) Press the right arrow key once.
The cursor should now be resting on the field labelled MODEL.
18) Press Rtn five or six times rapidly.
Notice how Aladin now searches for records in the CAR data base by model. Aladin displays a new record each time the Rtn key is pressed. These records now, however, are presented
in ascending order by model number rather than by
manufacturer.
STEP
19) Press the End key once.
The cursor moves to the last field in the record: LIST PRICE.
20) Press the Home key once.
The cursor is now at the MANUFACTURER field.
III - Tutorial Hyperion Aladin Guide
MOVING THE CURSOR
STEP
21) Move to the LIST PRICE field, then press Rtn several times.
NOTE: This fast access to data can only be made on any "underlined" field. Underlined fields are called key fields.
STEP
22) Move the cursor to the MANUF ACTURER field, by pressing the Home key once.
23) Type in: Mit?, then press Rtn.
This entry may be in upper or lower case letters. Don't be afraid to type over existing data. As you enter new data in the selected field, it will replace whatever was previously typed in that field.
The data record for MITSUBISHI will be displayed.
STEP
24) Enter de? in the MANUFACTURER field, then press Rtn.
Hyperion Aladin Guide III - Tutorial MOVING THE CURSOR
The first data record for cars costing between $15,000.00 and $15,999.99 will be displayed.
Look at the bottom left-hand side of your computer screen. You will see:
1: 3 -> List_Price: 15?
The number 1:3 means that there are 3 data records in the file which meet the criteria of "15?", and that the first record (1)
is being currently displayed.
STEP
26) Press Rtn.
The prompt at the bottom of the screen now displays:
2: 3 -> List Price: 15?
The second data record for cars costing more than $15,000 but less than $16,000.
27) Press Rtn.
The prompt at the bottom of the screen will now display:
3: 3 -> List Price: 15?
The third and final da ta record for cars costing $15,000 but less than $16,000 .
III - Tutorial JUMPING
CAR.DEALER(COtJ ,CON) (---)
Manufacturer:>FERRARI _ _ _
Name: THE TOY SHOP _ _ _ _
City: BEVERLY HI LLS. • • • •
Street: SUNSET BLVD • • • • •
State: CA Zip_Code: 9069
Telephone: (213) 265-1232.
Servi ce: Y
1: 3 -> Manufacturer: Fer? ICANCELIc=J1 PRINTI~c=J
Hyperion Aladin Guide
Data. Vi ew
[image:56.401.49.351.52.398.2]Hyperion Aladin Guide
Section 5
JUMPING TO DIFFERENT FILES
III - Tutorial JUMPING
As was mentioned in the introduction, the SPECS file is related to both the CUSTOMER and DEALER files. The record currently being displayed is from the SPECS file. By moving the cursor to fields that are common to both the SPECS file and to other files, you can ''jump'' from one file to another.
STEP
28) Move the cursor to the MANUFACTURER field.
29) Enter Fer?, then press Rtn.
The first Ferrari entry is displayed.
The Hyperion is currently displaying the DATA. View soft
key line, as in Fig. III-4. F6 is labelled Jump.
STEP
30) Press F6 (Jump).
The line above the soft key labels displays: Data File: 1: SPECS, 2: DEALER, 3: CUSTOMER
... continued
III - Tutorial JUMPING
Hyperion Aladin Guide
STEP
31) Enter the number 2.
Aladin will now access the DEALER file and place the record form for that file on the screen. BeGause you jumped from the MANUFACTURER field with Fer?,;> as the entry in that field, the DEALER file record displayea is that for the first
Ferrari dealer in the system. }:
NOTE: The "Street Sign" at the top of the screen now reads:
CAR.DEALER (CONSOLE:,CONSOLE:) (---) Data.View
STEP
32) Press Rtn four or five times in succession. As you can see, it does not matter what file you are in; access time to your data is very quick.
33) Enter roll?, then press Rtn.
The first Rolls Royce dealer in the DEALER file will be displayed.
34) Press F6 (Jump).
Hyperion Aladin Guide III - Tutorial JUMPING
STEP
35) Enter the number I.
Aladin will move us back into the SPECS file. The record displayed shows the specifications for the first Rolls Royce in the SPECS file.
36) Press F6 (Jump).
At the bottom of your screen you should now see the following:
Data_File: I:SPECS, 2:DEALER, 3:CUSTOMER
STEP
37) Enter 3.
Aladin will move us into the CUSTOMER file and we will see the record for the first customer who owns a Rolls Royce.
STEP
38) Move the cursor to the CUSTOMER NAME field, using the Home or left arrow key.
39) Type ?Carson? and press Rtn.
. .. continued
III -Tutorial JUMPING
Hyperion Aladin Guide
Section 6
USING HELP
III - Tutorial
USING HELP
Within Aladin, there is an on-line HELP feature, designed to provide information at all times when you are using the Aladin relational data base.
In keeping with the other Hyperion systems, the key FlO is reserved for HELP, and bears that label when HELP is available.
Your screen is currently displaying an entry for one of Johnny Carson's automobiles.
STEP
40) Press FI (CANCEL).
This moves you from the Data View soft key line to the Main DATA Menu soft key line.
41) Press FlO (HELP).
. .. continued
The screen now displays a screenful of information about the DATA module.
III - Tutorial
USING HELP
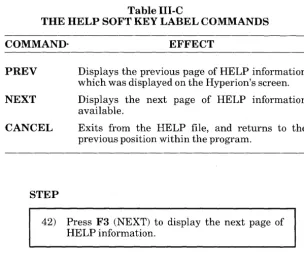
Table III-C
Hyperion Aladin Guide
THE HELP SOFT KEY LABEL COMMANDS
COMMAND- EFFECT
PREY Displays the previous page of HELP information
which was displayed on the Hyperion's screen.
NEXT Displays the next page of HELP information
available.
CANCEL Exits from the HELP file, and returns to the
previous position within the program.
STEP
42) Press F3 (NEXT) to display the next page of HELP information.
As per the prompt at the bottom of the page, you may also
use the spacebar to move to the next page of the current HELP
file.
STEP
[image:62.403.44.349.57.323.2]Hyperion Aladin Guide
Section 7
III - Tutorial
ENTERING DATA
ENTERING, CHANGING AND REMOVING DATA
Between sixty and seventy percent of your computer's time will be spent just entering and changing data in the relational data base.
Almost forty percent of all the information typed from one data entry record is the same (or with minor changes) as most other data entry records. Because there is so much repetition involved, it is important to know how to enter, change and remove data efficiently.
Redundant data entries cost time, money and may also increase the error rate.
If, for instance, you run a retail business that has a fairly regular clientele, you are constantly preparing records that reflect new purchases, credit limits, payments, etc.
In addition, there are changes in names, addresses and telephone numbers, as well as additions and deletions as new clients discover your store and former clients move out of town. The ability to add, substitute, or remove only selected items from your files reduces the chances for error.
7.1 ENTER DATA
STEP
44) Press Fl (CANCEL).
The Hyperion's screen should now be display-ing the Main DATA Menu soft key line (Fig.
III-2).
45) Press F2 (Enter).
III - Tutorial
ENTERING DATA Hyperion Aladin Guide
The "Street Sign" should now read:
CAR.CUSTOMER (CON:,CON:) (---) Data.Enter
STEP
46) Enter your name, then press Rtn.
NOTE: If you make an error when entering data, use the
Rub Out key to erase the mistake, or use the cursor control keys to edit the entry.
STEP
47) Type in the city where you live, then press Rtn.
48) Type in your two-letter state or province code.
49) Type in your age.
50) Type in your sex.
51) Type in the manufacturer of your car, then press Rtn.
Hyperion Aladin Guide III - Tutorial
ENTERING DATA
STEP
52) Press F8 (NO).
The cursor is positioned at the MANUF AC-TURER field.
You may now use the cursor control keys to move through the screen form, and make any changes you feel are necessary.
Changes are entered by pressing Rtn after you have made the corrections. You may skip over fields which are all right by using the cursor control keys.
When you have finished making changes, you nray exit the form by moving the cursor to the bottom field, which in this case is MANUFACTURER, and then pressing either the down arrow key, or F9 (FINISH) from anywhere in the system.
STEP
53) When you have finished making corrections, press F9 (FINISH), Aladin prompts:
Enter the record in this way?
54) As everything is correct, press F6 (YES) .
... continued
Aladin will now automatically save this record on the disk. This is an important safety feature of the ADI software, and is unequaled in most other types of computer software, from mainframe to micro.
III - Tutorial
ENTERING DATA
Hyperion Aladin Guide
Aladin has one of the most sophisticated, built-in auto-recovery systems offered on computer. In case of a power or hardware failure, Aladin will automatically scan all your records and files, make necessary reconstructions and ensure the total integrity of your data and the entire relational system.
7.2 USE ANOTHER RECORD TO ENTER DATA
The blank customer file record is currently displayed. The cursor is resting in the CUSTOMER NAME field again.
STEP
55) Press Rtn.
The first customer record in the CUSTOMER file is displayed. In the bottom right-hand side of your screen Aladin will prompt:
Use This Record?
As with the "Enter This Record" prompt, F6 is YES and F8 is NO.
STEP
Hyperion Aladin Guide III - Tutorial
ENTERING DATA
Aladin will display the customer record information for BO DEREK. The "counter" at the' bottom left-hand side of the screen keeps track of the "question" that was used and the number of data records that fit that pattern.
Again Aladin will prompt:
Use This Record?:
STEP
58) Press F6 (YES).
59) Move the cursor to the CUSTOMER NAME field, and enter John Derek, and press Rtn.
60) Using the right arrow key, move the cursor to the AGE field, and enter 47.
61) Aladin automatically positions the cursor at the SEX field. Enter M.
The cursor is automatically positioned at the MANUFACTURER field.
62) Press F9 (FINISH). Aladin will prompt:
Enter the Record in This Way?
63) Press F6 (YES).
...continued
III - Tutorial
ENTERING DATA
7.3 CHANGE AN EXISTING RECORD
Hyperion Aladin Guide
The CUSTOMER file record is on the screen again, and the cursor will rest on the CUSTOMER NAME field.
STEP
64) Press Fl (CANCEL).
The soft key line changes to display the Main DATA Menu soft key line.
65) Press F3 (Change).
The "Street Sign" will now read:
CAR.CUSTOMER (CON:,CON:) (---) Data.Change
STEP
66) Type: Jerry? and press Rtn.
. .. continued
The customer data record for former California governor Jerry Brown will be displayed. Aladin will prompt:
Hyperion Aladin Guide III -Tutorial
ENTERING DATA
STEP
67) Press F6 (YES).
68) Move the cursor to the CITY field.
69) Replace Sacramento, by typing Los Angeles,
and press Rtn.
70) Press F9 (FINISH).
Aladin will prompt:
Change the record in this way?
71) Press F6 (YES).
The CUSTOMER screen will appear and the cursor will rest on the CUSTOMER NAME field again.
STEP
72) Type: Deu?, then press Rtn.
The customer data record for California Gov-ernor George "Duke" Deukmejian will be displayed.
73) Press F6 (YES).
III -Tutorial
ENTERING DATA
Hyperion Aladin Guide
STEP
74) Use the right arrow key to move to the CITY
field.
75) Enter Sacramento, then press Rtn.
76) Press the F9 (FINISH). Aladin prompts:
Change the record in this way?
77) Press F6 (YES).
Changes or modifications to already existing data records within any relational system data base are made exactly the same way.
STEP
78) Press Fl (CANCEL).
You are turned to the Main DATA Menu and soft key line.
Hyperion Aladin Guide
7.4 REMOVE A RECORD
III - Tutorial
ENTERING DATA
Removing a record from a relational data base file is as easy as entry or modification of that record was.
STEP
79) Press F4 (Remove).
The "Street Sign" will now read:
CAR.CUSTOMER (CON:, CON:) (---) Data.Remove
STEP
80) Type Fon?, then press Rtn.
The customer data record for the late Henry Fonda will be displayed.
81) Press F9 (FINISH). Aladin prompts:
Remove record(s)?
III -Tutorial
ENTERING DATA
Hyperion Aladin Guide
STEP
82) Press F6 (YES).
The data record for Mr. Fonda is removed from the system.
83) Press F9 (FINISH).
This returns you to the Main DATA Menu and soft key line.
84) Press Fl (Aladin).
. .. continued
Hyperion Aladin Guide
SectionS
BUILDING A QUERY
III - Tutorial
BUILDING A QUERY
While using the DATA module of Aladin, we learned how to recall data records based on our requirements on an individual field. For example, when we typed "Mit?" in the MANUF ACTURER field, we were looking for any record that met the pattern "Mit" plus any other characters.
Our criteria for selecting records was limited to a single variable.
At that time we were unable to make multiple level selections in the DATA module. For example, we could not find cars that cost less than ten thousand dollars AND go faster than 120 miles per hour.
However, the QUERY module of Aladin is designed to make use of multilevel selections, not only within an individual file, but to other files as well.
For example: display all cars that are Mercedes-Benz (SPECS file) that are sold in California (DEALER file) and list all the female customers who purchased them (CUSTOMER file).
Each time you make a selection on a field, Aladin will prompt for the type of comparison you want to make. There is no software limit on the number of questions you ask the system in one query. Your computer hardware (disk space, etc.) which stores the query, will be the only limitation.
Unlike the DATA module, QUERY will not display the records immediately after you have finished defining your questionnaire. QUERY is designed to store your criteria to enable you to work with other Aladin modules before asking to see the records that meet the criteria in the query.
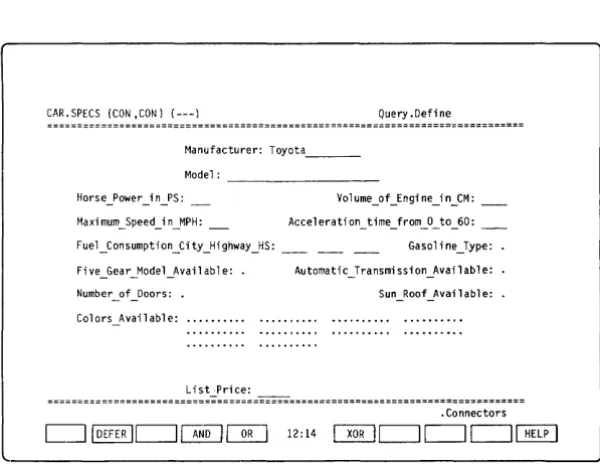
III -Tutorial
BUILDING A QUERY
CAR.SPECS (CON ,CON) (---)
Hyperion Aladin Guide
Query IAladin!IDefine!~IRecal1!1 View! 12:12 c=Jc=Jc=Jlsrvice!~
Hyperion Aladin Guide III - Tutorial
BUILDING A QUERY
In addition, QUERY works not only as a "filter" on data output, but also as a "net" in data entry, change or removal: those data records that do not meet your selection criteria can not be entered into the system. For example, you can set up the query as a protection against spelling errors, format errors for engineering part numbers, etc.
U sing QUERY, you can ensure that those data records which do not meet your selection criteria can not be changed or removed from the system either.
You can set up the query as protection against uninten-tional modifications or removals, ensuring that only data records for a particular range of dates or times are changed or deleted, etc.
Your screen should currently be displaying the Main Aladin Menu and soft key line:
STEP
85) Press F9 (Srvice). 86) Press F6 (Jump). 87) Press 1 for SPECS. 88) Press F4 (Query).
...continued