Understanding and controlling the ingress of driven rain
through exposed, solid wall masonry structures
LAYCOCK, Elizabeth <http://orcid.org/0000-0003-3758-6829> and WOOD, Christopher
Available from Sheffield Hallam University Research Archive (SHURA) at:
http://shura.shu.ac.uk/7508/
This document is the author deposited version. You are advised to consult the publisher's version if you wish to cite from it.
Published version
LAYCOCK, Elizabeth and WOOD, Christopher (2014). Understanding and controlling the ingress of driven rain through exposed, solid wall masonry structures. Geological Society special publication, 391, 175-191.
Copyright and re-use policy
See http://shura.shu.ac.uk/information.html
Understanding and controlling the ingress of driven rain through
exposed, solid wall masonry structures
Elizabeth A Laycock* (1) & Christopher Wood (2)
(1) Sheffield Hallam University, City Campus, Howard Street, Sheffield, S1 1WB *Corresponding author (e-mail: [email protected])
(2) English Heritage, 1 Waterhouse Square, 138-142 Holborn EC1N 2ST
ABSTRACT
Long term performance of historic buildings can be affected by many environmental factors, some of which become more apparent as the competence of the fabric deteriorates. Many tall historic buildings suffer from water ingress when exposed to driving rain conditions, particularly church towers in the south west of England. It is important to recognise that leakage can occur not only through flaws in the roof of a building but also through significant thicknesses of solid masonry. Identification of the most appropriate intervention requires an understanding of the way in which water might enter the structure and the assessment of potential repair options. While the full work schedule used an integrated assessment involving laboratory, field and archival work to assess the repairs which might be undertaken on these solid wall structures, this paper focuses on the laboratory work done to inform the writing of a Technical Advice Note on the effects of wind driven rain and moisture movement in historic structures (English Heritage, 2012). The laboratory work showed that grouting and rendering was effective at reducing water penetration without retarding drying rates, but that use of internal plastering also had a very beneficial effect.
A substantial proportion of church towers and similar tall structures suffer from internal dampness caused by driving rain. As Blocken & Carmeliet (2006) state "Wind-driven rain is one of the most important sources of moisture affecting the hygrothermal
performance and durabilty of building facades." This problem is particularly marked in the south west of England, although not exclusively seen here. Examples include Holy Trinity Church Callacombe, North Devon (Wood, 2004) or Our Lady, Star of the Sea on the Hebridean island of Barra (Harding, 2010). Water manifesting on the inside of such buildings poses major problems and may cause damage to decorative plastered or painted surfaces of historic significance. It can also mobilise salts which may later crystallise and cause damage. Additionally the increase of water levels within timber raises the
era as the external surfaces were scraped clear to expose the underlying stonework. At the same time an increase in the use of cements rather than lime mortars in the repair works became more prevalent. Historic buildings are generally of solid wall
construction, lacking an air space or vapour barrier between the internal and external skins and thus there is a strong hygrothermal interaction between the inside and the outside of the building via the heat and moisture transfer within the walls (Abuku et al, 2009). Many of the structures experiencing penetrating damp consist of impermeable material bonded with permeable lime mortar which may make up 50% of the exposed surface of the wall (Young, 2007). Rubble infill is very susceptible to damage from water penetration where rainwater penetrates to the core and percolates down, removing fine material and leading to consolidation at lower levels or causing fill to fall from its original position and cause large voids (Lilley & March, 1998).
Over the last ten to fifteen years a number of towers have been repaired and in some cases these interventions have not been successful. The reasons for the failures vary but common amongst them are; issues in determining the condition of the tower in particular the core of the wall, poor specification or workmanship and the use of inappropriate materials and techniques (Wood, 2010). There is great frustration when often costly remediation work not only fails to reduce to the problems, but in some cases may be seen to increase the penetrating damp issues within the structure (Harding, 2010). The remedy to penetrating damp is usually to repair failed weatherings and remove inappropriate earlier repairs (e.g. cement pointing). Depending on the perceived severity of the
problem repairs are then carried out which include either: repointing, rendering, grouting, selected stone repairs, plastering or combinations thereof. The difficulty for the
professional acting as the specifier for the repair of such a structure is the very fundamental one of analysing the extent of problems which are often unique to each building and then being able to propose, specify and supervise satisfactory remedial techniques which can be effectively monitored (Wood, 2010).
As so little testing had taken place on solid walled structures, English Heritage commissioned driving rain tests on masonry walls in an environmental chamber at Sheffield Hallam University (SHU). The purpose of this work was to establish the performance of walls of various construction and finish types and to establish the success of different specifications and finishes on rain penetration.
The research aimed to provide information on some key questions which included an assessment of how driven rain traveled through these solid wall structures as much recent work focuses on cavity brickwork. Wetting and drying rates were also monitored. The work is presented in two phases showing the initial pilot tests and the continuation work on substantial solid walls which examined the efficacy of grouting, rendering and plastering on water penetration and drying times.
Camuffo (1995) stated that driving rain will not enter a stone wall as easily as generally believed. When considering ingress to masonry the ‘Overcoat’ effect is often used to describe the ability of porous materials to resist the ingress of water. In this scenario the exterior façade becomes saturated to a certain depth such that little or no water can further penetrate beyond this wetted region (Hall & Djerbib, 2006), which may indeed be the case with rendered walls. Older solid wall structures can manifest water ingress even through walls of considerable thickness, thus allowing the penetrating damp which is estimated by Oliver et al (1997) to be the cause of the largest amount of unwanted moisture in the external building envelope.
Masonry is not homogenous, and during the construction process many trade operations, such as bricklaying and rendering, involve the movement of moisture between two materials (often dissimilar) that are in hydraulic contact with one another (Gummerson, Hall & Hoff, 1980). This creates interfaces which may be considered to be of three types (De Freitas et al. 1996) classified as follows:
(a) Hydraulic Continuity - when both layers of porous material interpenetrate one another such that hydraulic continuity is achieved between them,
(b) Natural Contact - when both materials are physically in contact with one another but where no interpenetration occurs between the two,
(c) Air space between layers - when an air pocket, typically a few millimetres wide, exists between the two materials.
Once rainwater has landed on the exterior surfaces of a building, it will be induced towards the ground due to the force of gravity. Water will always follow the route that uses the least energy, however where water is in contact with large capillaries, cracks or defective pointing it may tend to be pulled through any passages that lead downwards and inwards (Killip & Cheetham, 1984). This is apparent in the case of surface run-off, although the influence of gravity upon this water will always guide it along the route that conserves the largest amount of energy (i.e. the easiest route). Under the influence of gravity alone, the water will only penetrate and continue to move within the material if there is a defect with a downward gradient which offers a path of less resistance to flow than its current one. According to Killip & Cheetham (1984) there must be three
conditions for the movement of water into a wall; there must be water on the wall, a route for it to travel and a force to move it. The entry of moisture into the external envelope of a building can be caused by a number of different mechanisms primarily wind-driven rainfall, condensation (dew), infiltration & absorption from the surrounding ground, and from general building use (Walker & Standards Australia, 2002). Building materials are rarely saturated in use, and unsaturated flow in the main mode of mass transfer of water (Hall & Hoff, 2002). The rate of movement of moisture in walls is controlled by both the masonry and the jointing medium, as well as by discontinuities such as fracturing within the material (Laycock 1997). Water absorbed into porous building materials is seen by Bryan (1988) as the greatest threat to durability in the United Kingdom, with the uptake of moisture, subsequent movement and loss underlying a number of engineering
Moisture can move through the network of channels in porous building materials and this can be affected by a number of different climatic factors (Building Research Establishment (BRE Digest 269, 1983). According to De Freitas et al (1996) the mechanisms that control the transport of each phase of moisture in a wall are complex and can occur in the following forms:
(1) Vapour phase - diffusion and convection movements;
(2) Liquid phase - capillary action, gravity and the result of external pressure gradients.
The initial penetration of moisture and the subsequent migration of moisture can be caused by a number of different mechanisms. Some mechanisms are more dominant than others, in that their effects are significantly pronounced or represent the secondary effects of an event that is more common. Moisture may be transferred within a material as either vapour or liquid and both states may occur simultaneously within different parts of the material (PrEN 16322:2011). There exists a continuous phase exchange between the two forms as the processes of condensation and evaporation occur dependent on temperature, relative humidity and flow velocity of the ambient air (PrEN 16322:2011).
Water may be present within a building material even without incident rain. Relative humidity is the ratio (expressed as a percentage) of the pressure of the water vapour actually present to the saturation pressure at the same air temperature (Kaye & Laby, 1973). As humidity rises water condenses within the smallest micro-capillaries in the material, with capillary condensation progressively filling larger micro-capillaries as relative humidity rises. Mist conditions occur at high relative humidities and a wall in these conditions could develop significant leaks if exposed to a large pressure
differential, whereas a wall that is affected by a torrential downpour may not leak at all if there is little or no pressure differential. This is more likely to occur at higher altitudes (Oliver et al, 1997) where there is less shelter from surrounding buildings and thus greater wind velocity. Where a pressure differential is generated between the inside and outside of the structure, water will move in the direction of least pressure (usually the building interior) (Oliver et al, 1997).
The location of the building, for example, is highly significant because it determines the ambient weather conditions to which it is subjected. The macroclimate of a building site in the UK can vary greatly in terms of the degree of exposure, average annual rainfall, and even mean seasonal temperatures. Geographically the conditions between coast and inland sites, those at high or low altitudes and those located in a more northerly or southerly direction can be seen to be exposed to quite different conditions. Erkal, Ayala & Sequeria (2012) highlight the need to also consider the impact to cultural heritage of extreme weather events, which include heavy rainfall and strong winds or storms.
Several methods exist for the assessment of susceptibility of modern building components to wind driven rain. A recent standard for assessing water ingress is BS EN 12865:2001 which uses a controlled pressure differential which is pulsated within set limits of accuracy. Rates of application of water consists of two parts, run-off water, at 1.2 l/(m2·min), evenly distributed at the top of the test specimen; and driving rain, 1.5 l/(m2 min), evenly distributed over the external surface of the test specimen, with testing carried out at a temperature of (23 ± 5) °C . In comparison British Standard BS 4315-2: 1970 specifies methods of test for measuring the resistance to water penetration of permeable walling constructions without open joints under static air pressure. Three methods are given to record the penetration of water through the wall:
Method A. Recording, by time-lapse photography, the increase in area of dampness; Method B. Recording the change in weight of the specimen;
Method C. Collecting and recording the amount of leakage through the specimen.
Within this standard test methodology water is applied for one minute at half-hourly intervals at a rate of 0.5 L/min for each square metre of panel area, with a constant air pressure difference of 250 N/m2 (25 mmH2O) and is applied for a continuous period of 6 h/day over a number of consecutive days at a rate of 0.5 L/min for each square metre of panel area (BSI, 1970). The test conditions in BS EN 12865:2001, with pulsating air pressure difference, simulate in a simplified way the dynamic nature of rain and wind pressure against a wall, but it is noted that this method of testing compared to resistance to driving rain under static air pressure may lead to different results (BS EN 12865:2001).
penetration on testing. Work on renders is largely focussed on prevention of rain penetration by application of cementitious render systems by monitoring of water
penetration to the internal leaf (for example Kvane & Waldum, 2002) and not in terms of impact on water content of the wall.
The literature review indicated that no current test allowed the collection of data to the level which is required in order to progress the knowledge of water penetration through solid masonry walls of this particular type of historic construction, as most tests seek only to define either the pressure at which modern, relatively thin walls begin to allow significant water penetration, or to chart the ingress of water through the external skin of a cavity wall.
The testing facilities and overview of the experimental work
Review from the literature had highlighted the following which formed the basis of the experimental testing. There was little work quantifying the existence of the 'overcoat' effect' on walls of this type, and whether this form of construction offered an initial resistance to rain penetration. In addition the nature of the flow of water through a wall is controlled not only by the properties of the block and mortar but also by the bedding material and the contacts between them, however the way in which this is manifested on walls of this construction needed to be investigated. The literature provided little data on the comparative performance of various conservation repairs or interventions particularly on whether these had slowed water ingress or improved drying of the wall, and there was no work to demonstrate whether the application of render, plaster or repointing to walls had a measureable positive effect.
Pilot work
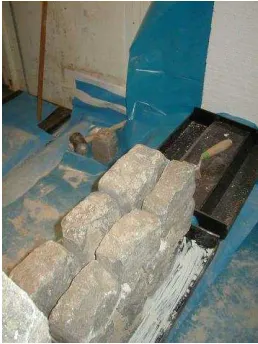
Given that the intention was to monitor water ingress as a whole and as it developed over time rather than to monitor the pressure at which the first water intrusion occurs, it was decided that a static pressure would be adopted with monitoring of the pilot work by visual logging and photography and monitoring of run off and leakage water. The laboratory work was carried out in SHU's climatic simulator which consisted of two chambers each 4m long, 3m wide and 2.6m in height and designed to allow a wide range of simulated external and internal conditions (Taylor-Firth & Flatt, 1991) previously used extensively for frost durability testing (Laycock, 2002).
existence. These walls were built with diorite setts (Jefferson 2002) of varied size, selected, washed and cleaned, having an average dimension of approximately 100 x 100 x 150mm and mortared with St. Astier NHL 3.5 (Naturally Hydraulic Lime) and well-graded aggregate (Warmwell sand) in a 1:3 by volume mix. The walls were ½m wide and 1m in height and were constructed on polypropylene bases which provided a front and rear trough to allow collection and monitoring of the water flows onto and through the walls (Figure 2). The types of construction model used were those with a greater area of joints which are normally found on ashlar granite, but probably less than other more schist-like rubble, also commonly found in the South-west region. A moderately hydraulic lime was chosen which is commonly used today but the main reason for its selection was because it cured relatively quickly and effectively. Smaller blocks of diorite were used for the core which contained a higher proportion of mortar. It is difficult to be precise about what should best be used to simulate historic core material, as usually it was discarded rubble which was inferior to that of the elevations but sometimes it was constructed in the same stone as the main wall. The latter practice was followed in the construction of these test walls. A simple electrically driven mixer was used to prepare the mortar. The amount of water was kept to the minimum in order to reduce shrinkage and speed curing. Different finishes were applied to the walls as may be found in practice, these are outlined below:
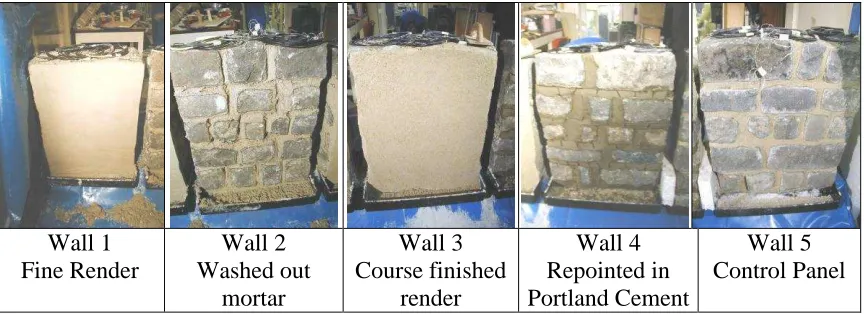
Panel 1: Lime render with a smooth finish. Harled and finished with a steel laying on trowel;
Panel 2: Eroded lime mortar joints. Joints raked out after initial set of 24hrs;
Panel 3: Lime render with an open textured finish. Harled & final stippled finish with a coarse brush after 24 hrs;
Panel 4: Defective joints with heavy remedial pointing;
Panel 5: Control with good lime mortar joints, built to best practice;
Temperature sensors (copper constantan type-t thermocouples) proprietary humidity sensors and trial water sensors were implanted during the build, and the resulting wallettes were isolated from each other by polystyrene and silicone sealant. The test panels were also sealed to top of the chamber using a false wall to prevent water ingress from above. See Figure 3
Continuation work
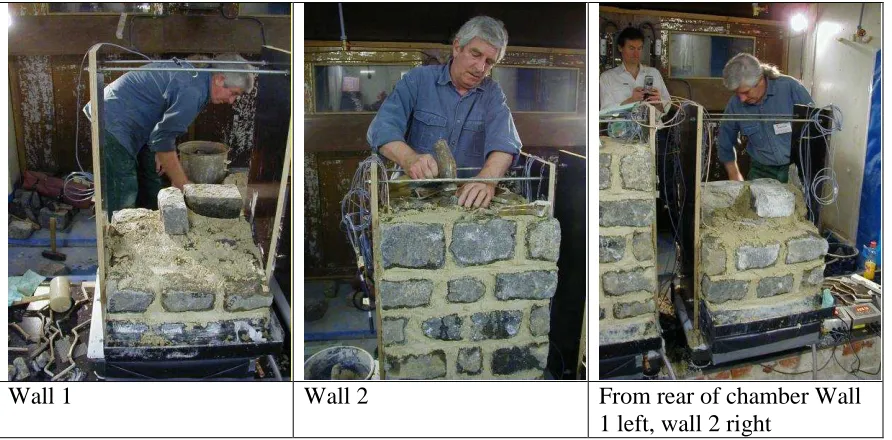
overview could be established of the components of the wall in terms of setts and mortar (Wood 2010). Embedded sensors for water, temperature and humidity were again used in addition to logging of mass changes registered on the platform scales (Figure 5). It was intended to allow curing of the walls to constant weight, but in practice this could not be achieved in an acceptable time frame and thus curing was for 109 days in total. Figure 6 shows the walls under construction.
The second phase of the continuation work would see construction of walls containing flaws usually seen in weathered walls and was overseen by Chris Wood. Walls 3 and 4 were built so as to incorporate voiding within the structure and two different methods were used. In wall 3 relatively large cavities were created by using temporary forms using an inner tube (to create a large continuous void, and modeling balloons to create discontinuous voids. The inner tube was withdrawn as building progressed and the deflated end of the balloon was left protruding from the back of the wall and was deflated and withdrawn after 48 hours. In wall 4 areas of gravel were used to mimic lime washout without significant cavity formation. In addition vertical pathways were created using straws which were withdrawn immediately prior to the construction of the subsequent course. Some perp-end joints were deliberately left dry or were damaged during building to encourage water flow (Figure 7). It was hoped that post testing work would be able to ascertain if these pathways were significant to water ingress and as such each course was photographed as it was constructed because this might help when the results were
analysed.
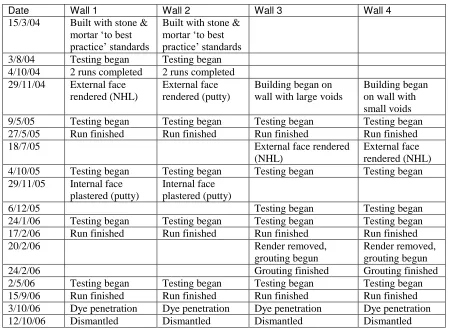
Various treatments were scheduled to be applied to the panels once a base line of performance was established and thus the efficacy of a variety of conservation interventions could be assessed. The outline schedule is given in Table 1.
Rendering was by two coat work, the lower coat being of 1:3 and the top coat at 1:2½ volume proportions. Wall 1 used NHL 3.5 (hydraulic lime) binder where Wall 2 used lime putty. In each case the base layer was applied by trowel, roughly levelled to 10mm then scratch combed to provide a key for the final finishing coat to the same depth. Walls were plastered using two coat work, the base coat at 1:3 and the top coat at 1:2½ by volume lime binder to sand mix, with each coat being approximately 10mm in depth. This is illustrated in Figure 8.
Figure 9 illustrates some of the methods used to introduce grout to the voids which was carried out according to practice as used on site. In this situation plans of the wall were used to assist in the location of the voids and joints were drilled to meet these with the aim of connecting all voids before flushing with water to remove debris and to
could be sealed to cause the grout to continue to fill to higher levels (Wood 2010). The grouting was carried out successfully, each wall taking some 8 – 10 hours to complete.
Results from the pilot work
Before each suite of rain tests were carried out, air leakage tests were carried out looking for increased air velocities at the rear of the panels. This was achieved by pressurising the chamber and using an air velocity meter (anemometer) at the back of the walls. Constant air pressure difference of 250 N/m2 (25 mmH2O) - or 20m/sec wind speed, - for a continuous period of 6 h/day over a number of consecutive days. Water would be applied at a rate of 0.5litre/m²/min as stated on (BS 4315-2(1970).
Flow anemometer readings indicated points of air leakage through to the rear of the walls when the chamber was pressurised, and prior to application of water. The position and the velocity of the air were identified but no remedial action was taken at this time. Wall 5 was particularly affected by this phenomenon (see Figure 10).
Photographic evidence and notes based on observations were used to monitor water penetration (Figure 11) and moisture contents were monitored from drillings at the rear of the panel to assess ingress destructively by gravimetric means. Observations indicated that Walls 1 & 3 evidenced least water penetration, with small daily fluctuations. Once water had reached the rear of walls 4 and 5 the daily rates remained constant. Embedded water sensors and humidity sensors indicated advancements of the water fronts and humidity levels through the wall at times which conformed to the order at which damp was first observed at the rear of each of the wall. Performance of the embedded humidity sensors to detect water were disappointing providing an indication of wetting but not of subsequent drying and the wall 4 sensor failed during curing time. The initial work was assessed at the end of the run period. The control wall which had shown significant air leakage during initial pressure testing was subject to larger volumes of water, some associated with the higher air flows previously identified. The drillings taken from the core of the control wall showed significantly lower overall moisture contents than the other walls. However the test had been able to give a ranking of performance for the other walls which was largely in accordance with empirical observations made in the field with the exception of the poor performance of the ‘best practice’ control wall (Table 2). The decision was taken to rebuild the control wall to give a wall with air flows comparable to the other test walls.
wall core. Dye penetration through this wall could be visually seen as most commonly associated with blocks which ran from the front to the back of the wall which were also associated with the points of air leakage identified prior to testing. However water penetration was not consistently related to high air penetration although there were some areas where internal voids appeared to be allowing conduction of significant quantities of water.
Findings based on visual/photographic monitoring show Wall 1 (smooth render) to perform very well, with little or no free water penetration to the rear of the wall. The performance of Wall 3 (rough render) is only slightly inferior, followed by Walls 2 (Badly Weathered joints) and Wall 4 (3:1 OPC & G sand repair). Discussions between the project team (E. Laycock S. Hetherington, C Burns and C Wood) postulated that the method of finishing the mortar or render appears to have a considerable effect on its efficacy of preventing water penetration or allowing evaporation from the surface. In addition the differences in pressure and technique between bed joints and perpend joints may lead to different mortar structures and different block and mortar interactions as the perpend joints are subjected to less pressure and shearing during building. Colin Burns postulated that the early washing out of mortar on Wall 2 may have marginally improved its performance unintentionally, by giving a similar finish to water washing of new built walls. The poor performance of Wall 5 was attributed to the points of high air leakage, which was rectified by rebuilding the defective wall. Subsequent work showed
considerable improvement in performance of wall 5, although the rendered walls were still seen to be most resistant to water penetration over the course of the testing cycle (Table 3).
Using the configuration outlined it was possible to ascertain the rate of water uptake and transfer but not the drying rates. Sensor performance was generally disappointing with some sensors failing to give readings after the build and others failing through the run. It was decided that the larger walls for the continuation work should be constructed on load cells to allow a greater level of monitoring of water uptake. The initial work concluded that moisture ingress was mainly concentrated at the interface of stone and mortar and that treatments such as render successfully reducing moisture ingress to the rear of the masonry with walls of this construction. However the team had doubts that walls of this reduced thickness accurately represented the structures found in practice, particularly with reference to the absence of a sizable central rubble filled core. The work was continued with a full rebuild of the walls to a configuration much more representative of the historic construction.
Results from the Main Work
considered separately (Figure 13). Following the trial wetting, dry back weights of both panels were recorded. The rate at which both walls dried is similar, but even after 6 days the total mass of water absorbed during trial wetting had not been completely released. It can be inferred that approximately 40% of moisture is retained within the wall after this drying period (NB: the drying period had to be curtailed to enable work to progress with preparation of the chamber for the main tests). Interrogation of the original drying curves, presented here as logarithmic plots (Figure 14) indicates that about 40% of water would be lost after 100 hrs. This trial confirmed that the scales were in good working order and that they were recording the masses of water accurately. After calibration the initial phases of testing were carried out, following which the third and fourth walls were constructed, details of which follow.
The results for all tests were analysed as each section of the work progressed and also after completion, to allow each treatment to be compared. While the overall performance in terms of mass water uptake and loss on drying is very similar for the two walls (Figure 15) the locations at which water penetrated were very different for the two walls. Wall 1 showed dampness initially towards the base of the panel, wall 2 toward the top of the wall. This underlines the complexity of water movements through complex wall types and the difficulty in producing models to predict behaviour of these systems at this stage. Water did not penetrate to the rear of the panel to the extent where free water was observed, which was the case very early on in the initial work. No water was collected in the internal trough which leads to the conclusion that the water is being held in the mortar. The slow drying rates lead to long term moisture build up within the structure. After drying back the second wetting run demonstrated repeatability of results. Changing the volume of rain water had no effect on increasing the weight gain.
Lime putty render takes on more water than the NHL render during rain testing. Drying results were inconclusive but suggested that the wall with lime putty render also dried marginally faster than that with no render which in turn dried faster than the wall with NHL render. Further work would be needed to confirm this result in the field. Plastering the rear surface was found to further diminish the volumes of water taken in by the panels. Grouting treatments were difficult to apply, even given that the locations of the voids were identified in the build documentation. Demolition revealed that while the majority of the large void spaces had been filled there were a significant number of smaller voids left without grout due to lack of connectivity with the main areas treated. Observations on testing showed that damp was tracking through the holes drilled to place the grout. Results showed that rendering and grouting dramatically reduce the uptake of water compared to their voided states, but does not eliminate it.
Point sensors introduced to the build were not able to provide a full picture of the movement of moisture within the walls and could not readily be retrofitted. The humidity sensors did indicate that the presence of liquid water is preceded by higher humidity levels, and balance weighing demonstrated that the lack of readings from humidity sensors was largely due to the wall never drying below the moisture content required. However despite the walls being 'damp', leakage of free water only occurred to a large extent in the voided walls or where easy paths for movement of water could be established from front to rear of the wall. The majority of water ingress through to the rear of the wall occurred within the first few days of rain, and the wall continued to take up water until an effective saturation was reached. This trend was followed by all walls regardless of treatment with the main difference being the total amount taken on and the time at which a minimal daily increase in weight occurred. On walls with large voids, grout appears to work extremely well. Render also had a positive effect, but is more susceptible to earlier re-wetting than grout.
On small and complex voided structures the render was seen to be beneficial and drastically reduced water uptake. Grout also significantly reduced water uptake, but again allowed slow re-wetting to occur. Where the grout was imperfect leakage
continued to occur where the voids were left unfilled, but in small and complex situations grouting fully may be difficult to achieve. On undamaged walls render reduced moisture ingress, plaster reduces it further still.
techniques in construction of bed and perp-end joints which leads to a greater vulnerability of the latter to water penetration.
The literature highlighted the view that the presence of defects was key to the penetration of water, however water will enter a walls of these types even where no specific 'defects' occur (as noted by Killip & Cheetham, 1984), at a slower rate through the mortar and at an increased rate along the block/mortar interface, largely confirming the findings of Edgell (1987) and Newman (1989) regarding the initiation of water penetration from the initial construction and except that in this type of construction, water penetration will occur on the bloc/mortar interfaces even when the workmanship is of high quality. This is concentrated around the perpend joints, probably as these are subjected to less pressure and shearing during building.
Conclusions
Driving rain penetration into solid masonry walls is complex and is controlled by the nature of the wall and influenced by the thickness of construction, joint condition and internal and external finish to the wall. While maximum saturation of the walls was estimated at 0.5% of the total wall mass this was largely in the mortar giving an estimated 8-9% water content of the mass of the mortar in the larger walls compared to 19%
content in the pilot walls. Free water may manifest at water contents significantly less than saturation.
Solid wall construction using low porosity diorite setts is not subject to the full protection
of the ‘shelter’ or ‘overcoat’ effect in which saturation of the outer part of the
construction acts to effectively retard water ingress. While the rate of absorption is slow and occurs over time with the very thick walls, water ingress is still significant
throughout the test until the wall reaches a point of effective ‘saturation’. Even if there is no free water visible at the rear of the panel, the wall may still be damp and the thick walls take a considerable length of time to dry after each rain event. Over time the development of voiding by dissolution of the mortar within the walls may further
exacerbate the situation by allowing ponding of water at a high level. The identification and treatment of these voids by grouting may be difficult to achieve and may lead to water ingress occurring particularly where fine channels have opened. Successful grouting treatments are highly beneficial in reducing water penetration. The use of lime based render and internal plaster has been seen to have a beneficial effect on slowing rates of water ingress to the structure.
Acknowledgements
REFERENCES
Abuku, M., Janssen, H. & Roels, S. 2009. Impact of wind-driven rain on historic brick wall buildings in a moderately cold and humid climate: Numercial analyses of mould growth risk, indoor climate and energy consumption. Energy and Buildings 41 [2009] pp.101-110
Blocken, B. & Carmeliet, J. 2006. On the accuracy of wind-driven rain measurements on buildings. Building and Environment 41[2006] pp.1796-1810
Blocken, B. Derome, D., & Carmeliet, J. 2012. Rainwater runoff rfom building facades: a review. Building and Environment. Accepted Manuscript doi: 10.1016 [2012]
Bowler, G.K, Jackson P.J & Monk, M.G 1996 The Role of Mortar Workability (Cohesivity) in the Rain Penetration of Masonry
Masonry International 10 [1], pp.24-25
Bowler, G.K & Sharp, R.H. 1998 Testing of Various Brick/Mortar Combinations for Mortar Durability, Efflorescence Potential and Resistance to Rain Penetration.
International Masonry Society Papers from Conference Proceedings 8, November 1998 p31-36
BRE 1983. Digest 269 The Selection of Natural Building Stone. Building Research Establishment, HMSO, London, pp.1-8
Bryan, A.J., 1988. Soil/Cement as a Walling Material - II: Some Measures of Durability
Building and Environment 23[4] pp.331-336
BS 4315-2: 1970. Methods of Test for Resistance to Air and Water Penetration: Part 2 – Permeable Walling Constructions (water penetration). British Standards Institute, London
BS 8104:1992. Code of practice for assessing exposure of walls to wind-driven rain.
British Standards Institute, London
BS EN 12865:2001. Hygrothermal performance of building components and building elements — Determination of the resistance of external wall systems to driving rain under pulsating air pressure British Standards Institute, London
Camuffo, D. 1995. Physical weathering of stones. Science of the Total Environment 167, Elsevier science, pp.1-14
De Freitas, V.P., Abrantes, V., & Crausse. P. 1996. Moisture Migration in Building Walls - Analysis of the Interface Phenomena. Building and Environment 31[2] pp.99-108
Masonry International 1 [1], pp.16-24
English Heritage 2012. TAN (Technical Advice Note) Damp and moisture movement in historic structures. Draft Document due for publication 2013
Erkal, A., D'Ayala, D. & Sequeria, L. 2012. Assessment of wind-driven rain impact, related surface erosion and surface strength reduction of historic building materials.
Building and Environment 57 [2012] pp.336-348
Gummerson, R.J., Hall, C. & Hoff, W.D., 1980. Water Movement in Porous Building Materials - II: Hydraulic Suction and Sorptivity of Brick and Other Masonry Materials.
Building and Environment 15 pp.101-108
Hall, M. & Djerbib, Y., 2006. Moisture Ingress in Rammed Earth: Part 2 – The Effect of soil particle-size distribution on the absorption of static pressure driven wate.r
Construction and Building Materials, 20 [2006] pp.374-383
Hall, M., 2002. Rammed Earth: Traditional Methods, Modern Techniques, Sustainable Future, Building Engineer, 77 [11] pp.22-24
Hall, C. 1977. Water Movement in Porous Building Materials - I: Unsaturated Flow Theory and its Applications Building and Environment 12 pp.117-125
Hall, C. and Hoff, W.D. 2002 Water Transport in Brick, Stone and Concrete. Spon, London
Harding, P. 2010 The limits of lime. Repointing a damp church tower in the Hebrides
Historic Churches. The Conservation and Repair of Ecclesiastical Buildings. [online from] http://www.buildingconservation.com/books/churches2010/index.html#/24/ Last accessed November 21 2012] p22-24
Jefferson 2002 Identification of Test stone used for Damp Towers work. Done by Jefferson Consulting Limited. Pers. Comm.
Kaye, G.W.C., & Laby, T.H., 1973 Tables of Physical and Chemical Constants. Longman
Killip, I.R. & Cheetham, D.W. 1984. The Prevention of Rain Penetration through External Walls and Joints by Means of Pressure Equalisation. Building and Environment 19[2] pp.81-91
Kvande, T. & Waldum, A.M. 2002 Rain Penetration Resistance of Renders.
International Masonry Society Papers from Conference Proceedings 9, November 2002
Laycock, E.A. 2002. Ten years of frost testing at Sheffield Hallam University
Construction & Building Materials, 16, pp. 195-205.
Laycock, E.A., Hetherington, S. & Hall, M., 2002. Damp Towers - Understanding and Controlling the Ingress of Driven Rain through Exposed, Solid Masonry Wall Structures
[confidential report] for English Heritage, 23 Saville Row, London
Lilley, D.M & March, A.V. 1998 Methods of Investigation and Repair in Old Random-rubble Filled Masonry Walls. International Masonry Society Papers from Conference Proceedings 8, November 1998 p31-36
Newman, A.J 1989. Workmanship, Rain Penetration, and Cavity Wall Insulation.
International Masonry Society Papers from Conference Proceedings 3, March 1989 p58-61
Oliver, A., Douglas, J. & Stirling, J.S. (eds), 1997. Dampness in Buildings – Second Edition, Blackwell Science, London
PrEN 16322:2011. Conservation of cultural property – Test Methods – Determination of drying properties (revised May 4)
Taylor-Firth, A. & Flatt, D.E. 2001. Climatic Simulation and Environmental Monitoring - A Facility for Realistic Assessment of Construction Materials In-Service Performance.
Construction & Building Materials, 5 [1], pp. 3-7.
Walker P & Standards Australia. 2002. HB195: The Australian Earthbuilding Handbook,
Standards Australia International, Sydney
Wood, C. 2004. Rain Damage to Masonry Wall cappings and towers. Science and the Historic Environment. Conservation bulletin Issue 45: Spring 2004 p38
Wood, C. 2010. Understanding and controlling the movement of moisture through solid stone masonry caused by driving rain. MSc by Research. Unpulished Document: The University of Oxford School of Geography and the Environment. March 2010
Young, M. 2007. dampness penetration problems in granite buildings in Aberdeen, UK: Causes and remedies. Construction & Building Materials, 21 [2007], pp. 1846-1859 ___________________
List of Figures
Figure 1 Diagram of test wall and trough configuration for pilot work
Figure 2 Walls for pilot work under construction. Photograph from rear face Figure 3 Finished walls. View from Climate Side of Chamber
Figure 4 Diagram of test wall and trough set up for continuation work
Figure 5 The weighing balance used in the continuation work showing the base with heavy duty gauze so that water discharging through the core can be collected in the trough. (Photograph from Wood, 2010)
Figure 6 Continuation work walls 1 and 2 under construction Figure 7 Building voided walls 3 and 4 for continuation work
Figure 8 View of walls 1 to 4 of the continuation work as seen from climate side of chamber. Figure 9 Grout application to voided walls 3 and 4
Figure 10 Flow anemometer readings -
Figure 11 Photographic record of the pilot panels after 6 hours rain Figure 12 Dye penetration test on Wall 5 after first pilot work. Figure 13 Mass changes associated with pressurisation Figure 14 Drying of test walls following calibration testing Figure 15 First wetting and drying run of walls 1 and 2
Figure 16 Graph to show performance of the same walls pre and post application of render
List of Tables
Table 1 Test schedule for Continuation work (modified after Wood 2010) Table 2 Rank of Performance Based on Water Penetration
Table 3 Water Penetration of Panels after second pilot run
Understanding and controlling the ingress of driven rain through
exposed, solid wall masonry structures
Elizabeth A Laycock* (1) & Christopher Wood (2)
(1) Sheffield Hallam University, City Campus, Howard Street, Sheffield, S1 1WB *Corresponding author (e-mail: [email protected])
(2) English Heritage, 1 Waterhouse Square, 138-142 Holborn EC1N 2ST
the number of words of text APPROX. 7,500
Number of words of references APPROX. 1000
Number of tables 3
Number of figures 22
Figures in COLOUR (3 max) Figure 3, Figure 11, Figure 13
abbreviated title "
Driven rain through solid wall masonry"
ABSTRACT
Long term performance of historic buildings can be affected by many
environmental factors, some of which become more apparent as the competence of the fabric deteriorates. Many tall historic buildings suffer from water ingress when exposed to driving rain conditions, particularly church towers in the south west of England. It is important to recognise that leakage can occur not only through flaws in the roof of a building but also through significant thicknesses of solid masonry. Identification of the most appropriate intervention requires an understanding of the way in which water might enter the structure and the assessment of potential repair options. While the full work schedule used an integrated assessment involving laboratory, field and archival work to assess the repairs which might be undertaken on these solid wall structures, this paper focuses on the laboratory work done to inform the writing of a Technical Advice Note on the effects of wind driven rain and moisture movement in historic structures (English Heritage, 2012). The laboratory work showed that grouting and rendering was effective at reducing water penetration without retarding drying rates, but that use of internal plastering also had a very beneficial effect.
A substantial proportion of church towers and similar tall structures suffer from internal dampness caused by driving rain. As Blocken & Carmeliet (2006) state "Wind-driven rain is one of the most important sources of moisture affecting the hygrothermal
buildings poses major problems and may cause damage to decorative plastered or painted surfaces of historic significance. It can also mobilise salts which may later crystallise and cause damage. Additionally the increase of water levels within timber raises the
likelihood of fungal (wet or dry rot) or insect damage. Disfiguring algae and other biofilms are also likely to flourish and in more extreme cases, damaging plants can become established. Historically many medieval church towers had some form of render on their external surface which may have been purely for protective purposes or to give an aesthetic finish to the random coursing. These were largely removed in the Victorian era as the external surfaces were scraped clear to expose the underlying stonework. At the same time an increase in the use of cements rather than lime mortars in the repair works became more prevalent. Historic buildings are generally of solid wall
construction, lacking an air space or vapour barrier between the internal and external skins and thus there is a strong hygrothermal interaction between the inside and the outside of the building via the heat and moisture transfer within the walls (Abuku et al, 2009). Many of the structures experiencing penetrating damp consist of impermeable material bonded with permeable lime mortar which may make up 50% of the exposed surface of the wall (Young, 2007). Rubble infill is very susceptible to damage from water penetration where rainwater penetrates to the core and percolates down, removing fine material and leading to consolidation at lower levels or causing fill to fall from its original position and cause large voids (Lilley & March, 1998).
Over the last ten to fifteen years a number of towers have been repaired and in some cases these interventions have not been successful. The reasons for the failures vary but common amongst them are; issues in determining the condition of the tower in particular the core of the wall, poor specification or workmanship and the use of inappropriate materials and techniques (Wood, 2010). There is great frustration when often costly remediation work not only fails to reduce to the problems, but in some cases may be seen to increase the penetrating damp issues within the structure (Harding, 2010). The remedy to penetrating damp is usually to repair failed weatherings and remove inappropriate earlier repairs (e.g. cement pointing). Depending on the perceived severity of the
problem repairs are then carried out which include either: repointing, rendering, grouting, selected stone repairs, plastering or combinations thereof. The difficulty for the
professional acting as the specifier for the repair of such a structure is the very fundamental one of analysing the extent of problems which are often unique to each building and then being able to propose, specify and supervise satisfactory remedial techniques which can be effectively monitored (Wood, 2010).
As so little testing had taken place on solid walled structures, English Heritage commissioned driving rain tests on masonry walls in an environmental chamber at Sheffield Hallam University (SHU). The purpose of this work was to establish the performance of walls of various construction and finish types and to establish the success of different specifications and finishes on rain penetration.
work focuses on cavity brickwork. Wetting and drying rates were also monitored. The work is presented in two phases showing the initial pilot tests and the continuation work on substantial solid walls which examined the efficacy of grouting, rendering and plastering on water penetration and drying times.
Previous work on water ingress
Camuffo (1995) stated that driving rain will not enter a stone wall as easily as generally believed. When considering ingress to masonry the ‘Overcoat’ effect is often used to describe the ability of porous materials to resist the ingress of water. In this scenario the exterior façade becomes saturated to a certain depth such that little or no water can further penetrate beyond this wetted region (Hall & Djerbib, 2006), which may indeed be the case with rendered walls. Older solid wall structures can manifest water ingress even through walls of considerable thickness, thus allowing the penetrating damp which is estimated by Oliver et al (1997) to be the cause of the largest amount of unwanted moisture in the external building envelope.
Masonry is not homogenous, and during the construction process many trade operations, such as bricklaying and rendering, involve the movement of moisture between two materials (often dissimilar) that are in hydraulic contact with one another (Gummerson, Hall & Hoff, 1980). This creates interfaces which may be considered to be of three types (De Freitas et al. 1996) classified as follows:
(a) Hydraulic Continuity - when both layers of porous material interpenetrate one another such that hydraulic continuity is achieved between them,
(b) Natural Contact - when both materials are physically in contact with one another but where no interpenetration occurs between the two,
(c) Air space between layers - when an air pocket, typically a few millimetres wide, exists between the two materials.
Once rainwater has landed on the exterior surfaces of a building, it will be induced towards the ground due to the force of gravity. Water will always follow the route that uses the least energy, however where water is in contact with large capillaries, cracks or defective pointing it may tend to be pulled through any passages that lead downwards and inwards (Killip & Cheetham, 1984). This is apparent in the case of surface run-off, although the influence of gravity upon this water will always guide it along the route that conserves the largest amount of energy (i.e. the easiest route). Under the influence of gravity alone, the water will only penetrate and continue to move within the material if there is a defect with a downward gradient which offers a path of less resistance to flow than its current one. According to Killip & Cheetham (1984) there must be three
(Hall & Hoff, 2002). The rate of movement of moisture in walls is controlled by both the masonry and the jointing medium, as well as by discontinuities such as fracturing within the material (Laycock 1997). Water absorbed into porous building materials is seen by Bryan (1988) as the greatest threat to durability in the United Kingdom, with the uptake of moisture, subsequent movement and loss underlying a number of engineering
problems in construction technology, including those identified by Hall (1977) of rain penetration, rising damp, wetting & drying cycles, and interstitial condensation.
Moisture can move through the network of channels in porous building materials and this can be affected by a number of different climatic factors (Building Research Establishment (BRE Digest 269, 1983). According to De Freitas et al (1996) the mechanisms that control the transport of each phase of moisture in a wall are complex and can occur in the following forms:
(3) Vapour phase - diffusion and convection movements;
(4) Liquid phase - capillary action, gravity and the result of external pressure gradients.
The initial penetration of moisture and the subsequent migration of moisture can be caused by a number of different mechanisms. Some mechanisms are more dominant than others, in that their effects are significantly pronounced or represent the secondary effects of an event that is more common. Moisture may be transferred within a material as either vapour or liquid and both states may occur simultaneously within different parts of the material (PrEN 16322:2011). There exists a continuous phase exchange between the two forms as the processes of condensation and evaporation occur dependent on temperature, relative humidity and flow velocity of the ambient air (PrEN 16322:2011).
Water may be present within a building material even without incident rain. Relative humidity is the ratio (expressed as a percentage) of the pressure of the water vapour actually present to the saturation pressure at the same air temperature (Kaye & Laby, 1973). As humidity rises water condenses within the smallest micro-capillaries in the material, with capillary condensation progressively filling larger micro-capillaries as relative humidity rises. Mist conditions occur at high relative humidities and a wall in these conditions could develop significant leaks if exposed to a large pressure
differential, whereas a wall that is affected by a torrential downpour may not leak at all if there is little or no pressure differential. This is more likely to occur at higher altitudes (Oliver et al, 1997) where there is less shelter from surrounding buildings and thus greater wind velocity. Where a pressure differential is generated between the inside and outside of the structure, water will move in the direction of least pressure (usually the building interior) (Oliver et al, 1997).
rainfall and high wind speeds. National standards define areas with different classes of driving rain severity which may be used to determine the protection for new build needed against driving rain (BS EN 12865:2001). BS 8104:1992 gives a methodology for assessment of exposure to driving rain for new buildings in which the orientation, topography, wall type and neighbouring buildings are taken into account as well as providing wind driven rain indices. The ways in which water may penetrate the external skin of a building can thus be summarized as being affected by the location, the macroclimate, the construction type, the age of the building, and its use and changes of use of the building over time and the maintenance history.
The location of the building, for example, is highly significant because it determines the ambient weather conditions to which it is subjected. The macroclimate of a building site in the UK can vary greatly in terms of the degree of exposure, average annual rainfall, and even mean seasonal temperatures. Geographically the conditions between coast and inland sites, those at high or low altitudes and those located in a more northerly or southerly direction can be seen to be exposed to quite different conditions. Erkal, Ayala & Sequeria (2012) highlight the need to also consider the impact to cultural heritage of extreme weather events, which include heavy rainfall and strong winds or storms.
Several methods exist for the assessment of susceptibility of modern building components to wind driven rain. A recent standard for assessing water ingress is BS EN 12865:2001 which uses a controlled pressure differential which is pulsated within set limits of accuracy. Rates of application of water consists of two parts, run-off water, at 1.2 l/(m2·min), evenly distributed at the top of the test specimen; and driving rain, 1.5 l/(m2 min), evenly distributed over the external surface of the test specimen, with testing carried out at a temperature of (23 ± 5) °C . In comparison British Standard BS 4315-2: 1970 specifies methods of test for measuring the resistance to water penetration of permeable walling constructions without open joints under static air pressure. Three methods are given to record the penetration of water through the wall:
Method A. Recording, by time-lapse photography, the increase in area of dampness; Method B. Recording the change in weight of the specimen;
Method C. Collecting and recording the amount of leakage through the specimen.
Within this standard test methodology water is applied for one minute at half-hourly intervals at a rate of 0.5 L/min for each square metre of panel area, with a constant air pressure difference of 250 N/m2 (25 mmH2O) and is applied for a continuous period of 6 h/day over a number of consecutive days at a rate of 0.5 L/min for each square metre of panel area (BSI, 1970). The test conditions in BS EN 12865:2001, with pulsating air pressure difference, simulate in a simplified way the dynamic nature of rain and wind pressure against a wall, but it is noted that this method of testing compared to resistance to driving rain under static air pressure may lead to different results (BS EN 12865:2001).
at the expense of tensile bond strength, particularly where low suction rate units are used, and this may be an indication that the problem of rain penetration is initiated as early as at the point of construction. Newman (1989) highlighted the importance of the brick mortar interface as a means of water penetration into walls, and the importance of workmanship with regard to filling of joints and careful pointing to reduce this. Bowler, Jackson & Monk (1996) found that water leakage through brick walls was faster where higher porosity units were used, but that the mortar and the brick/mortar interfaces seemed to exert a strong influence on water penetration rates. However Bowler and Sharp (1998) found that a hydrated lime mortar offered a high resistance to water penetration on testing. Work on renders is largely focussed on prevention of rain penetration by application of cementitious render systems by monitoring of water
penetration to the internal leaf (for example Kvane & Waldum, 2002) and not in terms of impact on water content of the wall.
The literature review indicated that no current test allowed the collection of data to the level which is required in order to progress the knowledge of water penetration through solid masonry walls of this particular type of historic construction, as most tests seek only to define either the pressure at which modern, relatively thin walls begin to allow significant water penetration, or to chart the ingress of water through the external skin of a cavity wall.
The testing facilities and overview of the experimental work
Review from the literature had highlighted the following which formed the basis of the experimental testing. There was little work quantifying the existence of the 'overcoat' effect' on walls of this type, and whether this form of construction offered an initial resistance to rain penetration. In addition the nature of the flow of water through a wall is controlled not only by the properties of the block and mortar but also by the bedding material and the contacts between them, however the way in which this is manifested on walls of this construction needed to be investigated. The literature provided little data on the comparative performance of various conservation repairs or interventions particularly on whether these had slowed water ingress or improved drying of the wall, and there was no work to demonstrate whether the application of render, plaster or repointing to walls had a measureable positive effect.
Pilot work
of simulated external and internal conditions (Taylor-Firth & Flatt, 1991) previously used extensively for frost durability testing (Laycock, 2002).
The work was carried out in two parts, an initial phase consisting of five walls which were seen as providing a ranking test and which acted as a prelude to the secondary phase of construction and testing of more complex walls of greater thickness which had the internal cores seen in church wall construction. A schematic of the test wall is provided in Figure 1. In the first phase, five different walls were constructed by the Master Mason Colin Burns to ensure that the structures match as closely as possible those already in existence. These walls were built with diorite setts (Jefferson 2002) of varied size, selected, washed and cleaned, having an average dimension of approximately 100 x 100 x 150mm and mortared with St. Astier NHL 3.5 (Naturally Hydraulic Lime) and well-graded aggregate (Warmwell sand) in a 1:3 by volume mix. The walls were ½m wide and 1m in height and were constructed on polypropylene bases which provided a front and rear trough to allow collection and monitoring of the water flows onto and through the walls (Figure 2). The types of construction model used were those with a greater area of joints which are normally found on ashlar granite, but probably less than other more schist-like rubble, also commonly found in the South-west region. A moderately hydraulic lime was chosen which is commonly used today but the main reason for its selection was because it cured relatively quickly and effectively. Smaller blocks of diorite were used for the core which contained a higher proportion of mortar. It is difficult to be precise about what should best be used to simulate historic core material, as usually it was discarded rubble which was inferior to that of the elevations but sometimes it was constructed in the same stone as the main wall. The latter practice was followed in the construction of these test walls. A simple electrically driven mixer was used to prepare the mortar. The amount of water was kept to the minimum in order to reduce shrinkage and speed curing. Different finishes were applied to the walls as may be found in practice, these are outlined below:
Panel 1: Lime render with a smooth finish. Harled and finished with a steel laying on trowel;
Panel 2: Eroded lime mortar joints. Joints raked out after initial set of 24hrs;
Panel 3: Lime render with an open textured finish. Harled & final stippled finish with a coarse brush after 24 hrs;
Panel 4: Defective joints with heavy remedial pointing;
test wall
rain simulation
face run off
= indicative water sensor position
150mm 150mm 150mm
[image:27.612.89.315.74.331.2]back run off
Figure 1 Diagram of test wall and trough configuration for pilot work
Temperature sensors (copper constantan type-t thermocouples) proprietary humidity sensors and trial water sensors were implanted during the build, and the resulting wallettes were isolated from each other by polystyrene and silicone sealant. The test panels were also sealed to top of the chamber using a false wall to prevent water ingress from above. See Figure 3
[image:27.612.89.218.468.640.2]
Wall 1 Fine Render
Wall 2 Washed out
mortar
Wall 3 Course finished
render
Wall 4 Repointed in Portland Cement
[image:28.612.92.524.71.228.2]Wall 5 Control Panel
Figure 3 Finished walls. View from Climate Side of Chamber
Continuation work
outer skin inner skin
rain simulation
face run off back run off
water from outer portion of wall fill
water from inner portion of wall fill
Load bearing plate
load beam load beam
[image:29.612.87.422.67.576.2]105mm 150mm 220mm 150mm 105mm
[image:29.612.90.384.328.569.2]Figure 4 Diagram of test wall and trough set up for continuation work
Wall 1 Wall 2 From rear of chamber Wall 1 left, wall 2 right
Figure 6 Continuation work walls 1 and 2 under construction
The second phase of the continuation work would see construction of walls containing flaws usually seen in weathered walls and was overseen by Chris Wood. Walls 3 and 4 were built so as to incorporate voiding within the structure and two different methods were used. In wall 3 relatively large cavities were created by using temporary forms using an inner tube (to create a large continuous void, and modeling balloons to create discontinuous voids. The inner tube was withdrawn as building progressed and the deflated end of the balloon was left protruding from the back of the wall and was deflated and withdrawn after 48 hours. In wall 4 areas of gravel were used to mimic lime washout without significant cavity formation. In addition vertical pathways were created using straws which were withdrawn immediately prior to the construction of the subsequent course. Some perp-end joints were deliberately left dry or were damaged during building to encourage water flow (Figure 7). It was hoped that post testing work would be able to ascertain if these pathways were significant to water ingress and as such each course was photographed as it was constructed because this might help when the results were
Date Wall 1 Wall 2 Wall 3 Wall 4
15/3/04 Built with stone &
mortar ‘to best practice’ standards
Built with stone & mortar ‘to best practice’ standards
3/8/04 Testing began Testing began
4/10/04 2 runs completed 2 runs completed
29/11/04 External face
rendered (NHL)
External face rendered (putty)
Building began on wall with large voids
Building began on wall with small voids
9/5/05 Testing began Testing began Testing began Testing began
27/5/05 Run finished Run finished Run finished Run finished
18/7/05 External face rendered
(NHL)
External face rendered (NHL)
4/10/05 Testing began Testing began Testing began Testing began
29/11/05 Internal face
plastered (putty)
Internal face plastered (putty)
6/12/05 Testing began Testing began
24/1/06 Testing began Testing began Testing began Testing began
17/2/06 Run finished Run finished Run finished Run finished
20/2/06 Render removed,
grouting begun
Render removed, grouting begun
24/2/06 Grouting finished Grouting finished
2/5/06 Testing began Testing began Testing began Testing began
15/9/06 Run finished Run finished Run finished Run finished
3/10/06 Dye penetration Dye penetration Dye penetration Dye penetration
[image:31.612.82.532.68.398.2]12/10/06 Dismantled Dismantled Dismantled Dismantled
Table 1 Test schedule for Continuation work (modified after Wood 2010)
Wall 3 – creating large voids during build using
removable material
Wall 4 creation of mortar wash out features and perpend voiding
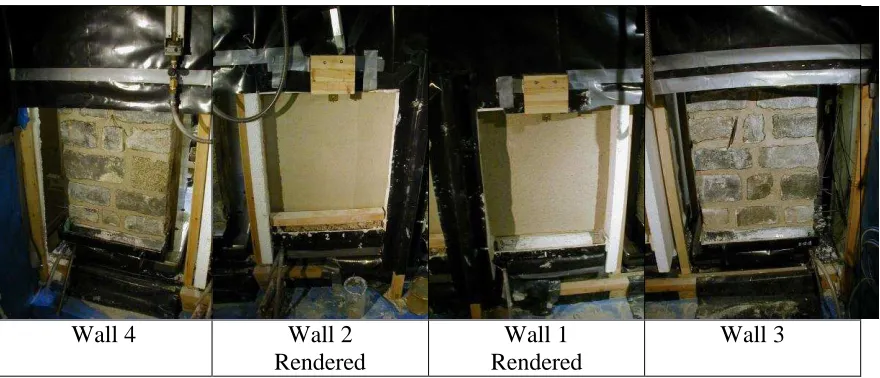
[image:31.612.86.425.445.678.2]Figure 8 View of walls 1 to 4 of the continuation work as seen from climate side of chamber.
Wall 4 Wall 2
Rendered
Wall 1 Rendered
Wall 3
Various treatments were scheduled to be applied to the panels once a base line of performance was established and thus the efficacy of a variety of conservation interventions could be assessed. The outline schedule is given in Table 1.
Rendering was by two coat work, the lower coat being of 1:3 and the top coat at 1:2½ volume proportions. Wall 1 used NHL 3.5 (hydraulic lime) binder where Wall 2 used lime putty. In each case the base layer was applied by trowel, roughly levelled to 10mm then scratch combed to provide a key for the final finishing coat to the same depth. Walls were plastered using two coat work, the base coat at 1:3 and the top coat at 1:2½ by volume lime binder to sand mix, with each coat being approximately 10mm in depth.
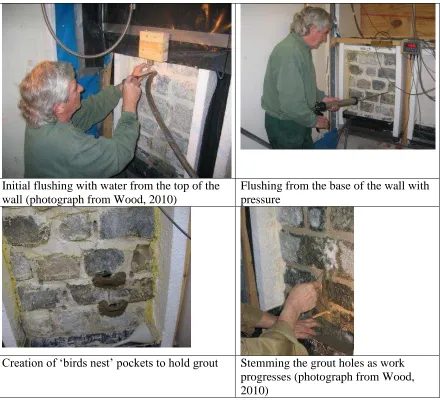
Figure 9 illustrates some of the methods used to introduce grout to the voids which was carried out according to practice as used on site. In this situation plans of the wall were used to assist in the location of the voids and joints were drilled to meet these with the aim of connecting all voids before flushing with water to remove debris and to
Initial flushing with water from the top of the wall (photograph from Wood, 2010)
Flushing from the base of the wall with pressure
Creation of ‘birds nest’ pockets to hold grout Stemming the grout holes as work
[image:33.612.88.528.69.469.2]progresses (photograph from Wood, 2010)
Figure 9 Grout application to voided walls 3 and 4
Result from the pilot work
Before each suite of rain tests were carried out, air leakage tests were carried out looking for increased air velocities at the rear of the panels. This was achieved by pressurising the chamber and using an air velocity meter (anemometer) at the back of the walls. Constant air pressure difference of 250 N/m2 (25 mmH2O) - or 20m/sec wind speed, - for a continuous period of 6 h/day over a number of consecutive days. Water would be applied at a rate of 0.5litre/m²/min as stated on (BS 4315-2(1970).
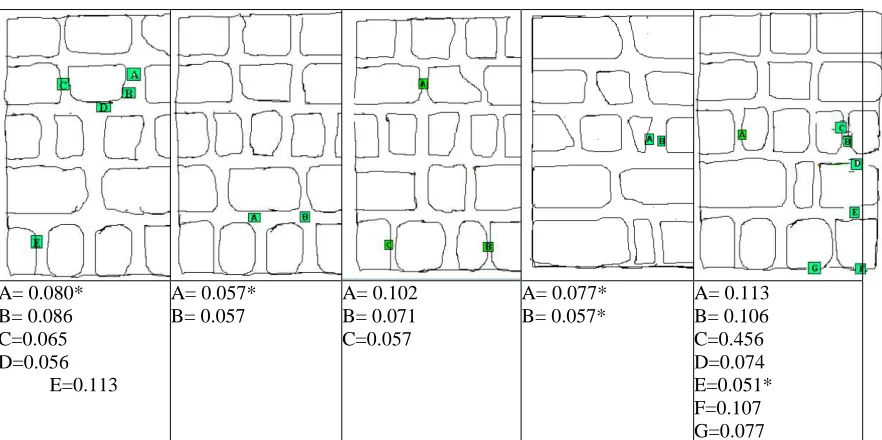
Figure 10 Flow anemometer readings -
A= 0.080* B= 0.086 C=0.065 D=0.056
E=0.113
A= 0.057* B= 0.057
A= 0.102 B= 0.071 C=0.057
A= 0.077* B= 0.057*
A= 0.113 B= 0.106 C=0.456 D=0.074 E=0.051* F=0.107 G=0.077
* - cable entry
Wall 1 Fine Render
Wall 2 Washed out
mortar
Wall 3 Course finished
render
Wall 4 Repointed in Portland Cement
[image:34.612.90.530.350.518.2]Wall 5 Control Panel
Figure 11 Photographic record of the pilot panels after 6 hours rain
associated with the higher air flows previously identified. The drillings taken from the core of the control wall showed significantly lower overall moisture contents than the other walls. However the test had been able to give a ranking of performance for the other walls which was largely in accordance with empirical observations made in the
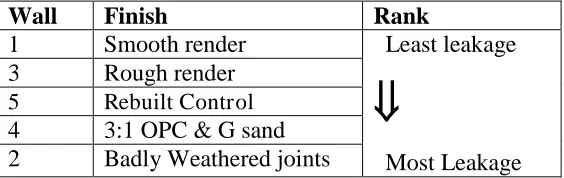
field with the exception of the poor performance of the ‘best practice’ control wall (Table 2). The decision was taken to rebuild the control wall to give a wall with air flows comparable to the other test walls.
Wall Finish Rank
1 Smooth render Least leakage
Most Leakage 3 Rough render
[image:35.612.85.370.189.278.2]4 3:1 OPC & G sand 2 Badly Weathered joints 5 No render – control
Table 2 Rank of Performance Based on Water Penetration