Decontamination
DISTRIBUTION RESTRICTION: Approved for public release; distribution is unlimited.
NBC
FM 3-5
MCWP 3-37.3
Headquarters,
Department
of the
Army
FOREWORD
This publication may be used by the US Army and US Marine Corps during training, exercises, and contingency operations.
JOHN N. ABRAMS J. E. RHODES
General, United States Army Lieutenant General, US Marine Corps
Commanding Commanding General
FM 3-5
MCWP 3-37.3
Change 1
C1
Field Manual
Headquarters
No. 3-5
Department of the Army
Marine Corps Warfighting Publication (MCWP)
Commandant
3-37.3
US Marine Corps
Washington, DC, 31 January 2002
NBC Decontamination Operations
1. Change FM 3-5, 28 July 2000 as follows:
Remove Old Pages
Insert New Pages
1-3 and 1-4
1-3 and 1-4
2-1 through 2-4
2-1 through 2-5
3-5 and 3-6
3-5 and 3-6
3-17 and 3-18
3-17 through 3-18
3-33 and 3-34
3-33 through 3-34
4-5 through 4-33
4-5 through 4-35
6-1 and 6-2
6-1 and 6-2
9-1 through 9-7
9-1 through 9-7
D-1 and D-2
D-1 and D-2
E-1 through E-17
E-1 through E-19
Glossary-3 through Glossary-6
Glossary-3 through Glossary-6
Bibliography-3 and Bibliography-4
Bibliography-3 and Bibliography-4
Index-1 and Index-2
Index-1 and Index-2
2. A bar (
y
) marks new or changed material.
3. File this transmittal in front of the publication.
2
By Order of the Secretary of the Army:
ERIC K. SHINSEKI
General, United States Army
Chief of Staff
Official:
JOEL B. HUDSON
Administrative Assistant to the
Secretary of the Army
0202403
DISTRIBUTION:
Active Army, USAR, and ARNG:
To be distributed in accordance with
the initial distribution number 110737, requirements for FM 3-5.
By Direction of the Commandant of the Marine Corps:
EDWARD HANLON, JR.
Lieutenant General, US Marine Corps
Commanding General
Marine Corps Combat Development Command
PCN: 14300008000
PIN #: 058193-001
This publication is available on the
General Dennis J. Reimer Training
*FM 3-5
*MCWP 3-37.3
Field Manual No. 3-5
Marine Corps Warfighting Publication (MCWP) 3-37.3
Washington, DC, 28 July 2000
NBC DECONTAMINATION
Contents
Page
PREFACE ... vi
Chapter 1 INTRODUCTION ... 1-1
Contamination Forms... 1-1 Contamination-Hazards Transmission... 1-1 Agent Classification ... 1-2 Decontaminants ... 1-2 Decon Concepts... 1-2 Decon Decisions ... 1-2 Decon Principles ... 1-3 Decon Levels ... 1-4 Immediate... 1-4 Operational ... 1-4 Thorough ... 1-4 Chemical-Agent-Resistant Coating (CARC) ... 1-5 Weather Effects ... 1-5 Temperature ... 1-5 Wind ... 1-5 Humidity and Rain ... 1-5 Sunlight... 1-5 Time... 1-5 Decon in Combat ... 1-5
Chapter 2 IMMEDIATE DECON ... 2-1
Skin Decon ... 2-1 Chemical... 2-1
DISTRIBUTION RESTRICTION: Approved for public release; distribution is unlimited.
* This publication supersedes Field Manual (FM) 305/Fleet Marine Force Manual (FMFM) 11-10, 17 November 1993.
Headquarters, Department of the Army
ii
Page FM 3-5/MCWP 3-37.3
iii Page FM 3-5/MCWP 3-37.3
iv
Page FM 3-5/MCWP 3-37.3
v Page FM 3-5/MCWP 3-37.3
Chapter 10 DECON PROCEDURES FOR INDIVIDUAL
AND CREW-SERVED WEAPONS ... 10-1 Operational-Decon Procedures Using the IEDK ... 10-1 M60 Machine Gun ... 10-1 M249 Squad Automatic Weapon ... 10-2 M203 Grenade Launcher... 10-2 M47 Dragon ... 10-2 Tow Missile (M220 Series) ... 10-3 AT4 Light Antitank Weapon ... 10-4 66-Millimeter Rocket Launcher ... 10-4 81-Millimeter Mortar... 10-4 60-Millimeter Mortar... 10-4 Javelin... 10-5 Thorough-Decon Procedures Using the HTH Solution ... 10-5 Materials ... 10-7 Procedures ... 10-8 Appendix A CONVERSIONS AND MEASUREMENTS ... A-1
Appendix B DECONTAMINANTS ... B-1
Appendix C DECON OF SPECIFIC SURFACES AND MATERIALS ... C-1
Appendix D DECON KITS, APPARATUSES, AND EQUIPMENT... D-1
Appendix E DTD STATION CHARTS FOR CHEMICAL UNIT LEADERS AND NBC NCOS ....E-1
GLOSSARY ...Glossary-1
BIBLIOGRAPHY... Bibliography-1
vi
Preface
FM 3-5 integrates the nuclear, biological, and chemical (NBC) fundamentals published in FM 3-100 and implements Standardized North Atlantic Treaty Organization Agreement (STANAG) 2426.
The extent and timing of decon depends on the tactical situation, the mission, the area of contamina-tion, and the decon resources available. Survivability and reducing the effect of any chemical threat are the ultimate goals of decon. This manual provides detailed guidance on conducting decon opera-tions performed by chemical and nonchemical personnel. Individual soldiers and leaders must be familiar with the basic procedures and concepts in this manual.
Appendix A contains an English to metric measurement conversion chart.
The proponent of this publication is Headquarters TRADOC. To submit changes for improving this publication use Department of the Army (DA) Form 2028 (Recommended Changes to Publications and Blank Forms) and forward to Commandant, US Army Chemical School, ATTN: ATSN-CMZ, Fort Leonard Wood, Missouri 65473-8926.
Introduction 1-1
Chapter 1
Introduction
The use of NBC weapons creates unique residual hazards that may
require decon. In addition to the deliberate use of these weapons, collateral
damage, natural disasters, and industrial emitters may require decon. The
presence of contamination generally reduces the effectiveness of our
combat power. Contamination forces us into protective equipment that
degrades our ability to perform individual and collective tasks.
CONTAMINATION FORMS
1-1. The following are the different forms of contamination:
•
Solids – radioactive particles, biological spores, or dusty agents that could appear as a fine dust.•
Liquids – liquid droplets that fall like rain. Droplets can range from thick and sticky to the consistency of water.•
Vapors or gases – created by bursting munitions or generators. These clouds are affected by the weather and can cover large areas.•
Aerosols – fine liquids or solid particles suspended in the air. They behave much like vapors.CONTAMINATION-HAZARDS TRANSMISSION
1-2. Contamination hazards can be transmitted in the following manner:
•
Transfer. Anything that touches a surface covered with liquid orsolid contamination will tend to pick up that contamination and move it from one surface to another.
•
Spread. Touching a surface covered with liquid chemical agent canspread contamination on the same surface, thereby, increasing the size of the contaminated area.
•
Vapor. Vapors can be carried through the air in the form of a dust,atomized liquids (aerosols), or true gases. Vapors in an open/outdoor area disperse rapidly, so there is no need to decon.
•
Desorption. Liquid-chemical contamination absorbs into poroussurfaces. Once absorbed, it begins to desorb or give off gas; that is, low levels of vapor pass out of the contaminated surface into the air and can be transferred to any surface that contacts it, including bare skin.
•
Radiation. Radiation is given off by radioactive dust or dirt, most of1-2 Introduction FM 3-5/MCWP 3-37.3
AGENT CLASSIFICATION
1-3. Depending on the length of time agents will be a hazard, they are classified as
•
Nonpersistent – an immediate threat that lasts a few minutes. They rarely require decon.•
Persistent – takes a longer time to act and may last for days. In a protected environment, these agents can last for long periods of time. All agents are affected to some extent by the weather. Even radiological particles can “rain out” of the air and form hot spots on the ground. Biological organisms are greatly affected by sunlight. Chemical agents can be decontaminated by the weather. The duration of a hazard is a complex estimation that is based on numerous factors which include the—Type of contamination.
Contamination density and droplet size. Temperature.
Wind speed. Sunlight.
Humidity and rain.
Composition of the contaminated surface. Type of soil and terrain.
DECONTAMINANTS
1-4. Decontaminants are described as follows:
•
Natural – weather (rain, wind, and humidity).•
Standard – supertropical bleach (STB) and decontaminating solution number 2 (DS2).•
Nonstandard – soaps and detergents.1-5. For more information on the types of decontaminants, see Appendix B.
DECON CONCEPTS
1-6. Whenever soldiers are unable to avoid contamination and have to use protective measures, decon is necessary to allow them to remove their protective gear and resume normal operations. Weathering is the most desirable means of decon; however, time and operational needs may not permit that option.
1-7. This chapter describes when, where, and how much to decon. Protective clothing (mission-oriented protective posture [MOPP] gear), protective equipment, and collective protective shelters (CPSs) offer only a temporary solution. Decon is the removal, destruction, or naturalization of contamination. If you become contaminated, some decon must occur as soon as possible.
DECON DECISIONS
Introduction 1-3 C1, FM 3-5/MCWP 3-37.3
consideration (METT-TC) and the resources available. Decon must be considered if the contamination levels exceed the negligible risk levels as follows:
•
Chemical and biological contamination causes mild incapacitation in 5 percent or less of unprotected soldiers operating for 12 continuous hours within 1 meter of contamination. For the chemical-agent monitor (CAM), this equates to a one-bar reading at a distance of 1 inch from the surface.•
Radiological contamination can cause mild incapacitation in 2.5 percent or less of unprotected, nonpreviously exposed soldiers. This equates to a reading of no more than 0.33 centigray per hour (cGy/hr). [image:13.612.90.565.347.571.2]1-9. MOPP-gear exchange provides excellent protection against field concentrations of agents; however, wearing the gear causes performance degradation. Decon is performed to restore the normal operating tempo, but the logistical support that is required to keep soldiers in MOPP gear impacts operations. Therefore, decon should be conducted as soon as practical. Table 1-1 provides comparison data for decon levels/techniques.
Table 1-1. Comparison Data for Decon Levels/Techniques
DECON PRINCIPLES
1-10. Decon immediately for a chemical agent on the skin. Perform higher levels of decon as a result of the risk assessment. Personnel should
Levels Techniques1 Best Start Time Performed by Advantages
Immediate Skin decon
Personal wipe down
Operator’s spray down/wipe down
Before 1 minute
Within 15 minutes
Individual
Individual or crew
Stops agent from penetrating.
Operational MOPP-gear exchange2
Vehicle washdown3
Within 6 hours Unit
Battalion crew or decon platoon (-)
Provides possible temporary relief from MOPP4. Limits liquid agent spread.
Thorough DED and DAD
DTD
When mission allows reconstitution
Decon platoon
Unit
Provides probable long-term MOPP reduction with mini-mum risk.
1The techniques become less effective the longer they are delayed.
2Performance degradation and risk assessment must be considered when exceeding 6 hours. See FM 3-4 for
battle-dress overgarment (BDO) risk assessment.
1-4 Introduction C1, FM 3-5/MCWP 3-37.3
•
Decon as soon as possible. The sooner the contamination is removed, the sooner MOPP levels can be reduced and combat power can be restored.•
Decon only what is necessary. Weathering is the least costly method of decon. Expend resources where they count.•
Decon as far forward as possible. While METT-TC dependent, performing decon as close to the point as possible reduces the spread of contamination and minimizes any transfer hazard.•
Decon by priority. The commander identifies which items are most critical to the mission. Restoring combat power and reestablishing operating tempo are key.DECON LEVELS
1-11. The three levels of decon operations are immediate, operational, and thorough (see Table 1-1, page 1-3).
IMMEDIATE
1-12. Skin decon is a soldier’s basic survival skill and should be performed within 1 minute of being contaminated using the skin decontaminating kit (SDK).
1-13. Personal wipe down should be performed within 15 minutes. This is done to remove contamination from individual equipment by using an individual equipment decon kit (IEDK). Use detector paper or a CAM to locate the agent. For radiological contamination, use a radiac set to locate it and then brush, wipe, or shake it off.
1-14. Operators’ spray down/wipe down should be done within 15 minutes. Operators use the M100 Sorbent Decontamination System (SDS) or the on-board M11/M13 decon apparatus to decon surfaces that they must touch or contact to operate the equipment. Radiological contamination in the form of dust particles may be wiped, scraped, or brushed off.
OPERATIONAL
1-15. A MOPP-gear exchange should be performed within 6 hours of being contaminated when thorough decon cannot be done. Soldiers will continue to wear MOPP gear and the operating tempo will be reduced.
1-16. Vehicle washdown should be performed within 6 hour of being contaminated when the mission does not permit a thorough decon. This process removes gross contamination and limits the spread of it.
THOROUGH
1-17. Detailed equipment decon (DED) and detailed aircraft decon (DAD) restore items so that they can be used without MOPP gear. Normally, the DED and the DAD are conducted as part of a reconstitution or during breaks in combat operations. These operations require support from a chemical decon unit.
Introduction 1-5 FM 3-5/MCWP 3-37.3
CHEMICAL-AGENT-RESISTANT COATING (CARC)
1-19. Army equipment is painted with CARC, which precludes the absorption of chemical agents and, thus, facilitates decon. By preventing penetration of an agent, contamination is easier to remove. Thickened agents are still a problem, but detergent and water should remove them.
1-20. The proper CARC paint colors should be used to paint bumper numbers, spot painting, and so forth. Do not use other paints in lieu of CARC.
WEATHER EFFECTS
1-21. If METT-TC allows, leaving the contamination alone is the easiest method of decon. However, marking, reporting, and periodically rechecking the contamination are required.
TEMPERATURE
1-22. The higher the temperature, the faster the rate of evaporation. Contamination persistency decreases as the temperature rises. It has no effect on radiological contamination.
WIND
1-23. Aeration aids in decon. Agents are dispersed by the wind, thus reducing the concentration.
HUMIDITY AND RAIN
1-24. Moisture tends to break down chemical agents but does so slowly. Heavy rain physically removes contamination; however, contaminated runoff may build up in drainage areas. Biological agents dehydrate (dry out) in low humidity, thus reducing their persistency. Rain may prevent the desorption of aerosols and leach contamination into the soil.
SUNLIGHT
1-25. Sunlight hastens the evaporation and decomposition of agents. Ultraviolet and infrared radiation in sunlight rapidly kills most biological agents.
TIME
1-26. Only time will neutralize and destroy radiological contamination. Other techniques merely shield or remove the problem.
DECON IN COMBAT
1-27. Combat effectiveness is degraded by MOPP. Decon can remove the contamination and restore combat power. The detection and warning network is vital to ensure that soldiers and equipment are protected when contamination is encountered. Considerations of decon in combat are
•
Immediate decon. It saves lives and permits the use of individual equipment and key systems.•
Operational decon. It reduces the spread and the level of contamination. In some cases, when combined with weathering, MOPP levels may be reduced without further decon.1-6 Introduction FM 3-5/MCWP 3-37.3
1-28. Figure 1-1 depicts the drop in effectiveness as the affected unit and soldiers react.
Figure 1-1. How Decon Affects Combat Effectiveness Immediate decon performed Operational decon performed Thorough decon performed
Temporary relief from MOPP4 Most
Least
Time
Most
Co
mb
a
t
p
o
we
Introduction 1-7 FM 3-5/MCWP 3-37.3
Decon-Operation Scenario
You are the commander of the 155-millimeter Self-Propelled Howitzer Battery. Your unit is hit by a persistent nerve agent. Soldiers react by taking cover and going to MOPP4. The warning system provided sufficient alert and only a few have to conduct skin decon; most contamination is on the outside of your howitzers and vehicles.
The ongoing fire mission continues with minimal disruption, and the enemy is being detected. Your well-trained soldiers complete a personal wipe down and an operator’s spray down as soon as possible. During this period, you are capable of providing fire support and moving, as necessary.
The temperature is 55°F, and humidity is low. While the work rate is strenuous, your troops drink water and suffer no heat casualties. However, after several hours, your response times to the fire mission are getting longer and soldiers have not eaten in more than 12 hours.
Upon making a decision to decon, you request support from your battalion. Coordination is made for an operational decon en route to an alternate position. You have 2 ½ hours to complete the movement and be in a firing position. The alternate position is 20 minutes away, with the decon site about halfway.
You send the advance party to meet the supporting power-driven decon-equipment (PDDE) crew and organize the site. The crew sets up and runs the vehicle washdown while the advance party, with battery supply personnel, prepares the MOPP-gear exchange.
The battalion chemical noncommissioned officer (NCO) directs the vehicle washdown as you rotate one platoon at a time through the site. The firing platoons go quickly as it is critical to have the artillery firing tables available. You complete the operation and are in position to fire at the prescribed time. Your soldiers are in MOPP4 because a vapor hazard still exists from the residual contamination. The advance party found the new area clear of contamination, and ammo resupply commences.
As sections begin improving their positions, gun crews one and two leave one soldier on each gun and move the rest of the soldiers 65 feet upwind. After a check on contamination proves negative, the battery NBC NCO directs unmasking procedures using two crew members. When no symptoms show up, the crews eat and get relief from the masks. The wind direction is monitored to ensure that the soldiers stay upwind of any vapors desorbing from their equipment.
Immediate Decon 2-1
Chapter 2
Immediate Decon
Once a soldier is aware of chemical or biological contamination on his bare
skin, he initiates immediate decon techniques, without command, by using
his personal SDK. He decontaminates his hood, mask, gloves, and weapon
using the IEDK or an additional SDK.
To remove radiological
contamination from equipment and personnel, brush it off and/or use soap
and water.
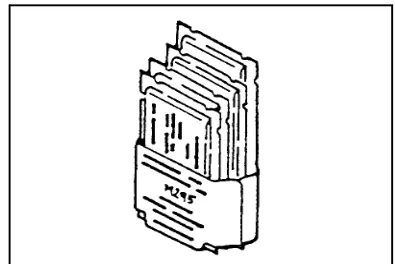
NOTE: Throughout this manual, SDK refers to the M291 kit
and
IEDK refers to the M295 kit.
SKIN DECON
2-1. Start the skin-decon techniques within 1 minute of becoming contaminated. Some toxic chemical agents, especially nerve agents, kill in minutes.
CHEMICAL
2-2. Use the SDKs within 1 minute of contamination (see Figure 2-1). Instructions for use are listed on the outside of the kit itself, on the individual packet within the kit, and in STP 21-1-SMCT.
Figure 2-1. M291 SDK
2-3. If an SDK is not available, chemical contamination may be pinch-blotted from the skin with a cloth and flushed with water from a canteen. Soap, if available, can also be used to wash the agent from the skin. Washing with soap and water (or hot water) is the next best method for toxic-agent decon if SDKs are not available, but this method is not as effective as using the decon kits.
Immediate Decon 2-2 C1, FM 3-5/MCWP 3-37.3
BIOLOGICAL
2-4. Washing with soap and water removes nearly all biological agents from the skin. A 0.5 percent chlorine (calcium hypochlorite [HTH] or household bleach) solution is an effective biological decontaminant. See Appendix B for details on how to make this solution.
RADIOLOGICAL
2-5. To remove radiological dust particles, brush, wash, or wipe them off.
PERSONAL WIPE DOWN
2-6. The personal wipe-down techniques are most effective when done within 15 minutes of being contaminated. The CAM and/or M8/M9 detector paper is used to detect and monitor equipment.
NOTE: Very high concentrations of DS2 can cause a CAM response in the G mode.
2-7. Wipe down your mask, hood, gloves, and other essential gear. Do not attempt to remove chemical contamination from your protective overgarment unless there are obvious clumps of the agent. In this case, scrape off the material. Brush off radiological or frozen chemical-agent contamination. See FM 3-4 for detailed information on your overgarment’s protective qualities.
CHEMICAL
2-8. Decon individual equipment using the IEDKs. Wearing your Kevlar® helmet protective cover will prevent or reduce the adsorption of any liquid chemical agent. Washing with soap and water and bleach solutions is partially effective (see Appendix B).
BIOLOGICAL
2-9. Wash with soap and water. If water is not available, use SDKs in the same manner as described for chemical-agent decon.
RADIOLOGICAL
2-10. Locate radiological contamination with monitoring equipment and remove by brushing and shaking it off. Wash exposed areas of your skin and pay particular attention to your hair and fingernails. Avoid breathing the dust particles you shake off by wearing your protective mask or a piece of cloth over your nose and mouth. If wet, conduct a MOPP-gear exchange as soon as possible because brushing or shaking will not remove the contamination. Wipe off your equipment with warm, soapy water using rags or damp paper towels.
OPERATOR’S SPRAY DOWN/WIPE DOWN
2-11. Decon other mission-essential portions of your equipment before continuing your mission. The CAM and/or M8/M9 detector paper is used to determine what surfaces require decon.
Immediate Decon 2-3 C1, FM 3-5/MCWP 3-37.3
CHEMICAL
2-13. Decon those surfaces that you must touch on the exterior of the vehicle or the equipment you must use to do your job with the M100 SDS (see Figure 2-2) or the on-board portable decon apparatus (such as the M11 or M13) (see Figure 2-3). If the M100 SDS is not available, use the IEDK to decon the equipment that the DS2 may cause damage to by corrosive action (see Figure 2-4, page 2-4).
Figure 2-3. Portable Decon Apparatuses Figure 2-2. Sorbent Decontamination System
M100
M11
Immediate Decon 2-4 C1, FM 3-5/MCWP 3-37.3
Figure 2-4. M295 IEDK
2-14. Scrub the DS2 into the exterior surface with brushes. Wait 30 minutes, then wash off. If a decon apparatus is not available, use the field-expedient resources that are available to apply DS2 or STB from bulk containers. If necessary, use the nonstandard decontaminants that are discussed in Appendix B.
BIOLOGICAL
2-15. Use a bleach solution for biological contamination; however, if bleach is not available, use hot, soapy water. Apply with brushes and scrub the surface well. Rinse the surface after scrubbing (no wait is required). DS2 and STB are also effective against most known biological contamination, but because of their caustic nature, they are not preferred. Other nonstandard biological decontaminants are described in Appendix B.
RADIOLOGICAL
2-16. If you are contaminated by fallout, rain out, neutron-induced contamination, or any type of radiological agent, use your monitoring equipment to help locate it and decon as required. If detection equipment is not available and you suspect that you are contaminated, decon. Radiological contamination can usually be removed by brushing or scraping. Water is effective for flushing away radiological contamination; however, the runoff should be controlled by using drainage ditches that flow into a sump.
WARNING
Immediate Decon 2-5 C1, FM 3-5/MCWP 3-37.3
Operational Decon 3-1
Chapter 3
Operational Decon
An operational decon limits the spread of contamination, allows temporary
relief from MOPP4, and facilitates additional decon requirements. By
speeding up the weathering process, the need for a thorough decon may be
eliminated. This process requires about a 120-square-yard area and,
depending on the number of contaminated vehicles, may not require a
nearby water source. An operational decon consists of a vehicle washdown
and a MOPP-gear exchange. The techniques that may be used to conduct
an operational decon are decentralized company control, centralized
battalion control, or centralized brigade control.
TECHNIQUES
3-1. Decentralized company control is provided by the unit commander. The commander requests PDDE support, selects the decon site, links up with the PDDE crew, and executes the operational decon.
3-2. Centralized battalion control is similar to the above except that the battalion chemical NCO controls the decon. The site is selected by the battalion commander, and the battalion chemical NCO directs site setup and security and provides command and control (C2). The battalion chemical NCO travels with the PDDE and communicates via the radio.
3-3. Centralized brigade control is done when decon assets within the brigade have been consolidated. In this technique, the brigade chemical NCO performs those functions described for the battalion chemical NCO. The advantages and disadvantages of operational-decon techniques are listed in Table 3-1, page 3-2.
PHASES
3-4. The three phases for an operational decon are preparation, execution, and site clearance.
PREPARATION
3-2 Operational Decon FM 3-5/MCWP 3-37.3
Table 3-1. Advantages and Disadvantages of Operational-Decon Techniques
3-6. Site selection is done by the controlling HQ. The site may have been designated in the operation order (OPORD) or selected based on the current METT-TC. For site characteristics, see Table 3-2.
3-7. Linkup at the designated point includes establishing security, positioning any necessary marshalling areas, camouflaging removal points, designating the direction of flow into and out of the site, and ensuring that unit supply has sufficient replacement MOPP gear.
3-8. Site setup requires the PDDE crew to position itself upwind from the entrance. Set up the MOPP-gear exchange about 164 feet upwind from the vehicle washdown at a 45° angle. Notify the contaminated unit when the site is ready.
EXECUTION
3-9. The execution phase starts with establishing positive control over the site and ends with processing the last contaminated vehicle and soldier through the site. Vehicles move from the predecon area to the site either on order or by watching the vehicle ahead. Contaminated soldiers leave the vehicle and proceed to the MOPP-gear-exchange point. The contaminated unit provides security.
3-10. Each vehicle receives a 2- to 3-minute washdown with hot, soapy water and moves to a point near the MOPP-gear exchange. Any remaining soldiers requiring MOPP-gear exchange will do so then. When the squad or crew has finished, it remounts its vehicles and moves into an after-decon assembly area (AA) to await further instructions or moves to its next battle position.
SITE CLEARANCE
3-11. The site-clearance phase includes cleanup, marking, and reporting. METT-TC will dictate the cleanup requirements. The PDDE crew buries or double bags and removes contaminated MOPP gear and other expendables. Standard NBC contamination markers are posted, and the PDDE crew submits an NBC 5 report.
Decentralized Company Control
Centralized Battalion Control
Centralized Brigade Control
Advantages Flexibility Dispersion
C2 Flexibility Dispersion Planning
Sustained operations
C2
Synchronized support assets
Rehearsal Time Planning
Sustained operations
Disadvantages C2
Synchronized support assets
Rehearsal Time Planning
Sustained operations
Synchronized support assets
Rehearsal Time
Operational Decon 3-3 FM 3-5/MCWP 3-37.3
Table 3-2. Operational-Decon Phases
VEHICLE WASHDOWN
3-12. A vehicle washdown may be conducted with or without PDDE and in either a one- or two-lane configuration. An unsupported washdown requires the contaminated unit to have washing equipment that can produce 60 to 120 pounds per square inch (psi) of water pressure. The capacity to heat water and inject soap increases effectiveness. A supported washdown requires PDDE organic to the unit or from a supporting chemical decon or dual-purpose company. A two-lane washdown is simply a one-lane washdown parallel with another (see Figure 3-1, page 3-4).
3-13. Other configurations are limited only by the constraints of the METT-TC. Figure 3-2, page 3-5, illustrates a dispersed operational-decon setup. Table 3-3, page 3-5, describes the vehicle-washdown process.
MOPP-GEAR EXCHANGE
3-14. A MOPP-gear exchange can be done with a buddy team, a triple buddy team, or an individual (emergency). For planning purposes, estimate about 60
Preparation
Decon assessment
Identify soldiers and equipment to be decontaminated.
Coordination Request PDDE support. The chemical section conducts coordination with the contaminated unit on the linkup point. Decon operations should be done between 1 and 6 hours after becoming contaminated.
Site selection Is selected by the controlling HQ.
Is off the main route but has easy access.
Is a large enough area (120 square yards per site for a squad-size element). Has good overhead concealment.
Has a good water source (plan for 100 gallons per vehicle). Has good drainage.
Linkup Ensure that the noncommissioned officer in charge (NCOIC) knows where to link up with the contaminated unit and the location for site setup. Radio communication is essential for operations.
Site setup Ensure that the PDDE is positioned properly and ready to dispense hot, soapy water. Ensure that the contaminated unit sets up and operates the MOPP-gear exchange at the
same time as the vehicle washdown. Consider contamination runoff when positioning the PDDE.
Execution
Site control and security
Ensure that the drivers of the contaminated vehicles know when to move into position at the washdown location.
Ensure that the contaminated unit has provided site security.
Processing Ensure that the decon site NCOIC is processing vehicles at a rate of 2 to 3 minutes per vehicle. Also, ensure that soldiers are going through the MOPP-gear exchange at the rate of 30 minutes per squad/crew.
Site Clearance
Cleanup Decon site NCOIC ensures that the MOPP-gear-exchange area is cleaned up.
Marking and reporting
3-4 Operational Decon FM 3-5/MCWP 3-37.3
minutes for a squad or a platoon to complete the exchange. Since individual performance is severely degraded after 6 hours at MOPP4, the MOPP-gear exchange should be scheduled before that time.
Figure 3-1. Two-Lane Washdown MOPP-gear exchange Step 1 - button
up vehicle & equipment
164 feet
Minimum of 164 feet
164 to 230 feet
Marshalling area
Step 1 - button up vehicle & equipment Control point
Step 2 - wash down vehicle and equipment
Step 2 - wash down vehicle and equipment
Step 3 - move to the AA
Move to the tactical AA
W
in
Operational Decon 3-5 FM 3-5/MCWP 3-37.3
Figure 3-2. Dispersed Operational-Decon Setup
Table 3-3. Vehicle-Washdown Process
Steps Equipment Procedures
1. Assemble vehicles. Unit is tactically dispersed. Personnel at the control point direct movement.
Watch Personnel at the control point
supervise preparing vehicles and directing movement out of the AA.
2. Prepare vehicles. None Individual/crew closes all
access doors, hatches, windows, and other openings. Remove camouflage and cover muzzles. If required, crews (less drivers) move to the MOPP-gear-exchange area. Move to the wash area on order.
3. Perform washdown. Delivery system (such as the M12 and M17, 65-gallon-per-minute [GPM] pump, fire-fighting equipment, and so forth) that delivers hot, soapy water at 60 to 120 psi. Also sufficient water, fuel, and detergent for vehicles.
Soldiers/personnel wash equipment from top to bottom. Decon crew wears a
toxicological apron, protective (TAP) or wet-weather gear over MOPP gear.
4. Move out to the next position.
None Vehicles move to the
MOPP-gear-exchange area (if required) or the next battle position.
219 to 547 yards to marshalling-area control point
Lan e1
La ne
2 La
ne 1
La ne
2
MOPP-gear
exchange Move to the tactical AA
Decon point 3 Decon point 2
Lake
Decon point 1
Win
3-6 Operational Decon C1, FM 3-5/MCWP 3-37.3
BUDDY-TEAM METHOD
3-15. This method uses pairs of soldiers under the supervision of their squad/ team leader to conduct the buddy-team MOPP-gear exchange. See Table 3-4, pages 3-7 through 3-17, for detailed step-by-step procedures for this method. See Table 3-4a, pages 3-17a through 3-17f, for the procedures for the buddy-team method MOPP-gear exchange with the joint lightweight integrated-suit technology (JSLIST). For units equipped with the combat vehicle crewman uniform system (CVCUS)/chemical protective undergarment (CPU), see Table 3-5, pages 3-18 through 3-21.
TRIPLE BUDDY-TEAM METHOD
3-16. This method is used by soldiers equipped with the M40A1, M42, or M43 mask with the quick-doff hood. A third soldier is needed to hold the filter canister and hose to prevent the transfer of contamination. See Table 3-6, pages 3-22 through 3-27, for detailed step-by-step procedures for this method. For units equipped with the CVCUS/CPU, see Table 3-7, pages 3-28 through 3-30.
INDIVIDUAL (EMERGENCY) METHOD
O p er ati onal D eco n 3 -7 FM 3 -5/M C WP 3 -37. 3 Steps Contamination Type
Required Equipment Procedures
1. Decon gear— removes gross contamination from individual gear
(weapons, helmet, load-bearing equipment, and mask carrier).
All
contamination
Four long-handled brushes
A large piece of plastic (poncho or
similar material)
The soldier mixes three parts earth to two parts STB.
Chemical/ biological
One 30-gallon container, STB dry mix, and one IEDK
The soldier removes and discards the chemical protective helmet cover if worn. He brushes or rubs STB onto his individual gear (helmet and mask carrier) and the hose of the M42 or M43 mask if worn. He gently shakes off any excess STB and sets aside his gear on an uncontaminated surface.
Radiological Hot, soapy water The soldier brushes or wipes radiological contamination from his individual gear. He washes it with hot, soapy water (if available) then sets it aside to dry on an uncontaminated surface (plastic, poncho, or similar material).
2. Prepare to decon— facilitates later removal of overgarment trousers and overboots.
All
contamination
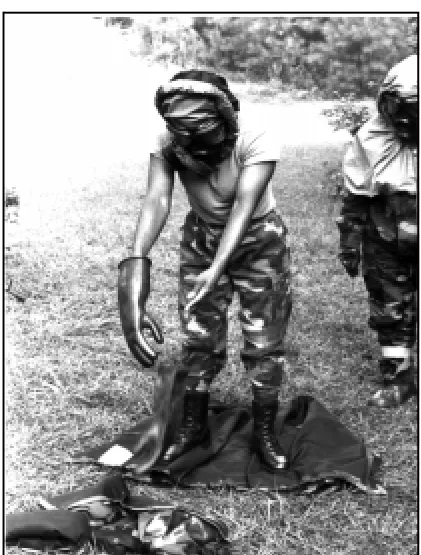
Cutting tool Buddy #1 unfastens the shoulder straps on Buddy #2’s hood and pulls them over his shoulder and reattaches them to the Velcro® fasteners. He loosens the drawcord on Buddy #2’s hood (see Figure 3-3, page 3-8). He removes the M9 detector paper from Buddy #2's overgarment. He unties the drawcords on the trouser legs of Buddy #2’s overgarment. He unzips Buddy #2's trouser legs and rolls a cuff in each trouser leg, ensuring that the cuffs do not come above the tops of his overboots (see Figure 3-4, page 3-8). He unfastens or cuts the fasteners on Buddy #2’s overboots. NOTE:
A soldier can do this step by himself or with the help of his buddy. When wearing overboots, unsnap both quick releases on the overboots. The M40 voice amplifier (M7) and the M42A2 detachable microphone cannot be decontaminated and will be disposed of as contaminated waste; however, ensure that these items are contaminated before disposing of them.
3. Decon mask and hood—removes gross contamination.
Chemical/ biological
Two IEDKs per person
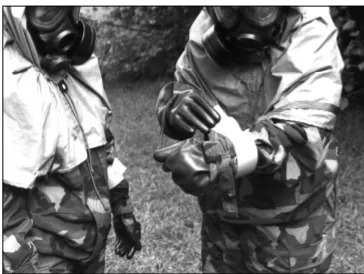
Buddy #1 uses an IEDK to wipe Buddy #2’s eye-lens outserts from the top down.
(NOTE: Do not press so hard that you break Buddy #2's face-mask seal.) He
[image:29.612.76.682.98.544.2]then wipes the rest of Buddy #2’s hood from the top of the head to the bottom of the hood (see Figure 3-5, page 3-9). After he has finished wiping Buddy #2’s mask, he must wipe his own gloves in preparation for rolling Buddy #2’s hood. He starts from the rear and rolls Buddy #2’s hood, using 2-inch tucks, until it reaches the center of his head (see Figure 3-6, page 3-9). He rolls the front of Buddy #2’s hood tightly under the outlet valve and filter. He ensures that the hood is off of Buddy #2's garment (see Figure 3-7, page 3-10).
3-8 Operational Decon FM 3-5/MCWP 3-37.3
Figure 3-3. Loosening the Drawcord on the Hood
[image:30.612.70.526.433.694.2]Operational Decon 3-9 FM 3-5/MCWP 3-37.3
3-10 Operational Decon FM 3-5/MCWP 3-37.3
Figure 3-6. Rolling the Hood to the Center of the Head
O pe ratio nal D e c on 3-1 1 FM 3 -5/M C WP 3 -37. 3 Steps Contamination Type
Required Equipment Procedures
3. Decon mask and hood (continued).
Radiological Three containers (about 3-gallon capacity) Two sponges Soapy water Rinse water
Paper towels or similar drying material
Buddy #1 wipes Buddy #2’s mask and hood with a sponge dipped in hot, soapy water and rinses them with a sponge dipped in clean water. He dries Buddy #2’s mask and hood with paper towels or rags. Buddy #2 wipes his own gloves. NOTE: Cool, soapy
water is not as effective for removing contamination, but it can be used if you scrub longer. If the water supply is limited, use drinking water from your canteen with a
wet sponge or cloth. If water is not available, brush and dust off the radioactive dust particles. Do not reverse roles. Only Buddy #2’s hood will be decontaminated and
rolled at this time. 4. Remove
overgarments and overboots—limits the spread of agents and helps prevent agents from penetrating through to the undergarments or the skin. All contamination Two discard containers (for example, plastic bags)
Buddy #1 grasps Buddy #2’s overgarment jacket, unsnaps the snaps individually, and unties the drawcord at the bottom of the jacket (see Figure 3-8, page 3-12). He unfastens the Velcro at the wrist of Buddy #2’s jacket and then refastens it. He unfastens the Velcro closure over the zippered front of Buddy #2’s jacket and unzips the jacket. He grasps Buddy #2’s jacket at the shoulders and instructs him to make a fist. He then pulls Buddy #2’s jacket down and away from him, ensuring that the black part of the jacket is not touched (see Figure 3-9, page 3-12). He lays Buddy #2’s overgarment jacket on the ground, black side up. (It will be used to stand on later.) He carefully unfastens and unzips Buddy #2’s trousers. NOTE: Do not loosen Buddy #2’s waist
tabs. He instructs Buddy #2 to loosen his overboots by alternately stepping on each
heel and pulling up on his foot (see Figure 3-10, page 3-13). He grasps Buddy #2’s trousers and pulls them down to his knees. He instructs Buddy #2 to walk out of his trousers/overboots simultaneously and step onto the black side of the jacket (see Figure 3-11, page 3-13). Buddy #2 should step onto the jacket wearing his mask, battle-dress uniform (BDU), combat boots, and gloves.
5. Remove gloves. All
contamination
Two discard
containers (from step 4)
The soldier holds the fingertips of his gloves and partially slides his hand out. When the fingers of both hands are free, he holds his arms away from his body and lets the gloves drop (see Figure 3-12, page 3-14).
3-12 Operational Decon FM 3-5/MCWP 3-37.3
Figure 3-8. Unsnapping the Trousers From the Jacket
Operational Decon 3-13 FM 3-5/MCWP 3-37.3
Figure 3-10. Loosening the Overboots
3-14 Operational Decon FM 3-5/MCWP 3-37.3
O
pe
ratio
nal
D
e
c
on
3-1
5
FM
3
-5/M
C
WP
3
-37.
3
Steps Contamination
Type Required Equipment Procedures
6. Put on overgarment.
All
contamination
One set of chemical protective
overgarments per person
Buddy #1 opens the package containing the new overgarment without touching the inside of the package. Buddy #2 pulls out the overgarment without touching the outside of the package. He puts on the overgarment and fastens it, leaving the trouser legs open (see Figure 3-13, page 3-16). Do not reverse roles. Only Buddy #2 will put on
the clean overgarment at this time. 7. Put on overboots
and gloves.
All
contamination
One set of chemical protective overboots per person
One set of chemical protective gloves per person (correct size) M9 detector paper
3-16 Operational Decon FM 3-5/MCWP 3-37.3
Figure 3-13. Putting on the New Overgarment
[image:38.612.132.496.421.695.2]O
p
er
ati
onal
D
eco
n
3
-7
FM
3
-5/M
C
WP
3
-37.
3
[image:39.612.228.517.254.466.2]Table 3-4. Steps for the Buddy-Team Method MOPP-Gear Exchange (Continued)
Figure 3-15. Securing the Hood
Steps Contamination Type
Required Equipment Procedures
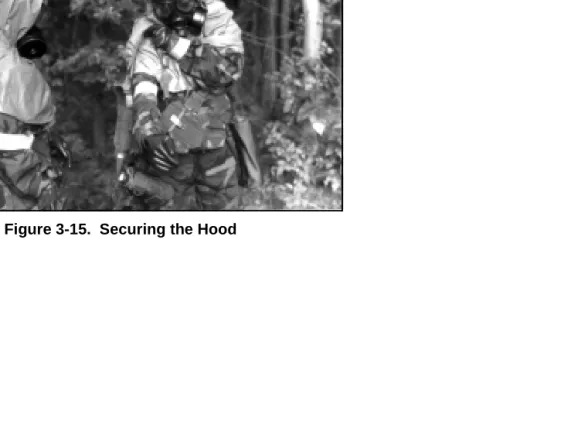
8. Secure hood. All contamination One IEDK Buddy #1 uses an IEDK to wipe Buddy #2's gloves. He unrolls Buddy #2's hood and attaches the straps and tightens the neck cord. Buddy #1 and Buddy #2 reverse roles and repeat steps 2 through 8.
9. Secure gear. All contamination One chemical protective helmet cover per person
The soldier secures his individual gear and puts it back on (see Figure 3-15). He puts on a new chemical protective helmet cover and moves to the AA. He uses the buddy system to check the fit of all secured gear.
Op
er
ati
onal
D
eco
n
3
3 -8 O pe ration al De con C1, F M 3 -5/M CWP 3 -37 .3
Table 3-4a. Steps for the Buddy-Team Method MOPP-Gear Exchange With the JSLIST Chemical Protective Ensemble
Steps Contamination Type
Required Equipment Procedures
1. Decon gear— removes gross contamination from individual gear
(weapons, helmet, load-bearing equipment, and mask carrier).
All
contamination
Four long-handled brushes
One large piece of plastic (poncho or similar material)
The soldier mixes three parts earth to two parts STB.
Chemical/ biological
One 30-gallon container, STB dry mix, and one IEDK
The soldier removes and discards the chemical protective helmet cover. He brushes or rubs STB onto his individual gear (helmet and mask carrier) and the hose of the M42 or M43 mask if worn. He gently shakes off excess STB and sets aside his gear on an uncontaminated surface (plastic, poncho, or similar material).
Radiological Hot, soapy water The soldier brushes or wipes radiological contamination from his individual gear. He washes it with hot, soapy water (if available), then sets it aside to dry on an uncontaminated surface (plastic, poncho, or similar material).
2. Prepare to decon— facilitates later removal of overgarment trousers and overboots.
All
contamination
Cutting tool Buddy #1 removes the M9 detector paper from Buddy #2’s overgarment. He unties the bow in Buddy #2’s coat retention cord if tied. He unfastens the webbing-strip snap at the bottom front of Buddy #2’s coat and releases the coat retention-cord loop at the waist. Buddy #1 then loosens the bottom of the coat by pulling the material away from Buddy #2’s body. NOTE: If wearing the M43 protective mask, tie the
microphone cord to the hose of the mask. He unfastens and loosely refastens
the hook-and-pile fastener tapes at Buddy #2’s wrists and ankles. He unfastens or cuts the fasteners on Buddy #2’s overboots. NOTE: The M40 voice amplifier (M7)
and the M42A2 detachable microphone cannot be decontaminated and will be disposed of as contaminated waste; however, ensure that these items are contaminated before disposing of them.
3. Decon the mask and hood—removes gross contamination.
Chemical/ biological
Two IEDKs per person Buddy #1 uses an IEDK to wipe Buddy #2’s eye-lens outserts from the top down.
(NOTE: Do not press so hard that you break Buddy #2’s face-mask seal.) He
then wipes the rest of Buddy #2’s hood from the top of the head to the bottom of the hood (see Figure 3-5, page 3-9). After he has finished wiping Buddy #2’s mask, he must wipe his own gloves in preparation for rolling Buddy #2’s hood. He starts from the rear and rolls Buddy #2’s hood, using 2-inch tucks, until it reaches the center of his head (see Figure 3-6, page 3-9). He rolls the front of Buddy #2’s hood tightly under the outlet valve and filter. He ensures that the hood is off of Buddy #2’s garment (see Figure 3-7, page 3-10).
Radiological Three containers (about 3-gallon capacity)
Buddy #1 wipes Buddy #2’s mask and hood with a sponge dipped in hot, soapy water and rinses them with a sponge dipped in clean water. He dries Buddy #2’s mask and hood with paper towels or rags. Buddy #2 wipes his own gloves.
O p er ati onal D eco n 3 -9 C1 , F M 3 -5 /M C W P 3 -3 7.3
Table 3-4a. Steps for the Buddy-Team Method MOPP-Gear Exchange With the JSLIST Chemical Protective Ensemble (continued)
Steps Contamination Type
Required Equipment Procedures
Two sponges Soapy water Rinse water Paper towels
NOTE: Cool, soapy water is not as effective for removing contamination, but it can be used if you scrub longer. If the water supply is limited, use drinking water
from your canteen with a wet sponge or cloth. If water is not available, brush and dust off the radioactive dust particles.
4. Remove the chemical protective coat—limits the spread of agents and helps prevent agents from penetrating through to the undergarments or the skin. All contamination Two discard containers (for example, plastic bags)
Buddy #2 feels for and locates the suspender snap couplers on the outside of his coat and releases them. Buddy #1 unties Buddy #2’s drawcord if tied, presses the barrel lock release, and unsnaps the barrel lock. (NOTE: If buddy #1 has difficulty
grasping the barrel lock, he should use the drawcord to pull the barrel lock away from the mask. This will allow him to grasp and unfasten the barrel lock without touching the interior of the hood.) Buddy #1 unfastens Buddy #2’s front
closure flap and pulls the slide fastener down from the chin to the bottom of the coat. Buddy #1 instructs Buddy #2 to turn around. Buddy #1 grasps Buddy #2’s hood, rolls it inside out, and pulls it off Buddy #2’s head. Buddy #1 grasps Buddy #2’s coat at the shoulders, instructs him to make a fist to prevent the chemical protective gloves from coming off, and pulls the coat down and away from him, ensuring that the black part of the coat is not touched. (NOTE: If there is difficulty removing the coat in
this manner, Buddy #2 should pull one arm out at a time.) Buddy #1 lays the
coat on the ground, black side up. (NOTE: Buddy #2 will use the coat later as an
uncontaminated surface to stand on when putting on his new overgarment.)
5. Remove the chemical protective trousers. All contamination Two discard containers (from step 4)
Buddy #1 unfastens Buddy #2’s hook-and-pile fastener tapes at the waistband, unfastens the two front closure snaps, and opens the fly slide fastener on the front of the trousers. Buddy #1 grasps Buddy #2’s trousers at the hips and pulls them down to his knees. Buddy #1 instructs Buddy #2 to lift one leg (with the foot pointed down) and bend slightly at the knee for stability. Buddy #1 grasps the trouser leg of Buddy #2’s elevated foot and with a hand on each side of the trouser leg, pulls the trouser leg in an alternating motion until Buddy #2 can step out of it. Repeat the process for the other leg. Buddy #1 discards the trousers.
CAUTION
Buddy #1 and Buddy #2 must take care to avoid contaminating the inside surface of Buddy #2’s coat.
CAUTION
Buddy #1 and Buddy #2 must take care to avoid contaminating Buddy #2’s clothing and skin.
3 -10 Op er atio nal D eco n C1, F M 3 -5/M CWP 3 -37 .3
Table 3-4a. Steps for the Buddy-Team Method MOPP-Gear Exchange With the JSLIST Chemical Protective Ensemble (continued)
Steps Contamination Type
Required Equipment Procedures
6. Remove the chemical protective overboots. All contamination Two discard containers (from step 4)
Buddy #1 instructs Buddy #2 to loosen his overboots by alternately stepping on each heel and pulling up on his foot (see Figure 3-10, page 3-13). Buddy #1 pulls off Buddy #2’s overboots (one overboot at a time) and Buddy #2 steps directly onto the coat spread on the ground as each foot is withdrawn from the overboot. NOTE:
Buddy #2 may put his hands on Buddy #1 for balance but must then decontam-inate his gloves. Buddy #1 discards the overboots.
7. Remove the chemical protective gloves/liners. All contamination Two discard containers (from step 4)
Buddy #2 holds the fingertips of his gloves and partially slides his hands out. When both hands are free, he holds his arms away from his body and lets the gloves drop off, away from the black side of the coat. Buddy #2 removes the protective glove inserts. Buddy #1 discards the chemical protective gloves and inserts.
8. Put on the chemical protective trousers.
All
contamination
One JSLIST chemical protective ensemble per person
Buddy #1 opens the package containing the new trousers without touching the inside of the package. Buddy #2 removes the trousers without touching the outside of the package. While standing on an uncontaminated surface, Buddy #2 puts on his trou-sers, closes the slide fastener, and fastens the two fly opening snaps. He pulls his suspenders over his shoulders and fastens the snap couplers. He adjusts the length of the suspenders to ensure a comfortable fit. He adjusts the hook-and-pile fastener tape at the waistband for a snug fit.
9. Put on the chemical protective coat.
All
contamination
One JSLIST chemical protective ensemble per person
Buddy #1 opens the package containing the new coat without touching the inside of the package. Buddy #2 removes the coat without touching the outside of the package. He puts on the coat, pulls the slide fastener up as far as the chest, and secures the front closure hook-and-pile fastener tape on the front flap up as far as the chest. He pulls the bottom of the coat down over his trousers. He grasps the loop on the back of the overgarment, pulls the loop out and away from the coat, and brings the loop forward between his legs, pulling on it so that the bottom of the coat fits snugly over the trousers. He places the loop over the webbing-strip snap and fastens it. He adjusts the coat retention cord if necessary and ties the excessive cord in a bow.
CAUTION
Buddy #1 and Buddy #2 must take care to avoid letting their gloves come in contact with the coat spread on the ground.
CAUTION
O pe ratio nal D e c on 3-1 1 C1 , F M 3 -5 /M C W P 3 -3 7.3 WARNING
[image:43.612.72.672.105.524.2]The barrel lock release button must face away from the user when worn to avoid the barrel lock from unfastening and possi-bly exposing the user to contamination.
Table 3-4a. Steps for the Buddy-Team Method MOPP-Gear Exchange With the JSLIST Chemical Protective Ensemble (continued)
Steps Contamination Type
Required Equipment Procedures
10. Put on the chemical protective overboots.
All
contamination
One set of chemical protective overboots per person
Buddy #1 opens the package containing the new overboots without touching the inside of the package. Buddy #2 removes the overboots without touching the outside of the package. He puts the overboots on over his combat boots and adjusts/secures the fasteners. He pulls his trouser legs over the overboots and secures the two hook-and-pile fastener tapes on each ankle so they fit snugly around the overboot.
11. Put on the chemical protective hood.
All
contamination
One JSLIST chemical protective ensemble per person
Buddy #2 puts the hood on his head. He completely closes the front slide fastener on the coat and secures the hook-and-pile fastener tape on the front flap as far as the top of the slide fastener. He places the edge of the hood around the edge of the mask and secures the hook-and-pile fastener tape on the hood.
He pulls the drawcord tight around the edge of the mask, snaps the ends of the barrel lock together, squeezes both ends of the barrel lock while pulling the drawcord, and slides the barrel lock up under his chin to keep the cord in place. Without touching Buddy #2, Buddy #1 inspects the hood and mask to make sure that the hood is positioned properly and the skin is not exposed. Buddy #2 adjusts the hood and mask as directed. If Buddy #1’s assistance is required for proper adjustment, Buddy #2 will decontaminate Buddy #1’s gloves before he touches the hood and mask.
12. Put on the chemical protective gloves/liners.
All
contamination
One set of chemical protective gloves with liners per person (correct size)
Buddy #1 opens the package containing the new chemical protective gloves and liners without touching the inside of the package. Buddy #2 removes the gloves and liners without touching the outside of the package. He puts on the liners and gloves, pulls the cuffs of the coat over the chemical protective gloves, and fastens the hook-and-pile fastener tapes on each sleeve of the coat. He puts on the M9 detector paper as required by the SOP.
13. Reverse roles. All
contamination
One JSLIST chemical protective ensem-ble per person. One set of chemical pro-tective boots per person
One set of chemical protective gloves with liners per person (correct size)
Buddy #1 and Buddy #2 reverse roles and repeat steps 3 through 13.
3
-12
Op
er
atio
nal
D
eco
n
C1,
F
M
3
-5/M
CWP
3
-37
.3
Table 3-4a. Steps for the Buddy-Team Method MOPP-Gear Exchange With the JSLIST Chemical Protective Ensemble (continued)
Steps Contamination Type
Required Equipment Procedures
14. Secure the gear. All
contamination
One chemical protective helmet cover per person
Buddy #1 places the new chemical protective helmet cover on the personnel armor system ground troop (PASGT) helmet if used. He uses the buddy system to check the fit of all secured gear.
3-17
e
O
p
e
ra
tio
n
al
D
e
Operational Decon 3-13 C1, FM 3-5/MCWP 3-37.3
3 -14 Op er atio nal D eco n FM 3-5 /MC W P 3-3 7. 3 Steps Contamination Type
Required Equipment Procedures
1. Decon gear— removes gross contamination from individual gear (weapons, helmet, load-bearing equipment, and mask carrier). All contamination Four long-handled brushes
A large piece of plastic (poncho or similar material)
The soldier mixes three parts earth to two parts STB.
Chemical/ biological
One 30-gallon container, STB dry mix, and one IEDK
The soldier removes and discards the chemical protective helmet cover if worn. He brushes or rubs the STB onto his individual gear and the hose of the M42 mask if worn. He gently shakes off any excess STB and sets aside his gear on an uncontaminated surface.
Radiological Hot, soapy water The soldier brushes or wipes radiological contamination from his individual gear. He washes it with hot, soapy water (if available) then sets it aside to dry on an uncontaminated surface (plastic, poncho, or similar material).
2. Prepare for decon—
facilitates MOPP-gear removal.
All
contamination
Cutting tool Buddy #1 unfastens the shoulder straps on Buddy #2’s hood and pulls them over his shoulder and reattaches them to the Velcro fastener. He loosens the drawcord on Buddy #2’s hood. He removes the M9 detector paper from Buddy #2's CVCUS. He unzips the ankles on both legs of Buddy #2’s CVCUS. He unfastens or cuts the fasteners on Buddy #2’s overboots. NOTE: A soldier can do this step by himself
or with the help of his buddy.
3. Decon mask and hood—removes gross contamination.
Chemical/ biological
Two IEDKs per person Buddy #1 uses an IEDK to wipe Buddy #2’s eye-lens outserts from the top down.
(NOTE: Do not press so hard that you break Buddy #2's face-mask seal.) He
[image:46.612.76.681.82.465.2]then wipes the rest of Buddy #2’s hood from the top of the head to the bottom of the hood (see Figure 3-5, page 3-9). After he has finished wiping Buddy #2’s mask, he must wipe his own gloves in preparation for rolling Buddy #2’s hood. He starts from the rear and rolls Buddy #2’s hood, using 2-inch tucks, until it reaches the center of his head (see Figure 3-6, page 3-9). He rolls the front of Buddy #2’s hood tightly under the outlet valve and filter. He ensures that the hood is off of Buddy #2's gar-ment (see Figure 3-7, page 3-10).
Table 3-5. Steps for the CVCUS/CPU (Buddy-Team Method) MOPP-Gear Exchange
O
pe
ratio
nal
D
e
c
on
3-1
9
FM
3
-5/M
C
WP
3
-37.
3
Steps Contamination
Type Required Equipment Procedures
3. Decon mask and hood (continued).
Radiological Three containers (about 3-gallon capacity) Two sponges Soapy water Rinse water
Paper towels or similar drying material
Buddy #1 wipes Buddy #2’s mask and hood with a sponge dipped in hot, soapy water and rinses them with a sponge dipped in clean water. He dries Buddy #2’s mask and hood with paper towels or rags. Buddy #2 wipes down his own gloves. NOTE: Cool,
soapy water is not as effective for removing contamination, but it can be used if you scrub longer. If the water supply is limited, use drinking water from your canteen with a wet sponge or cloth. Only Buddy #2’s mask and hood will be decontaminated and rolled at this time.
4. Remove CVCUS/ overboots—limits the spread of contamination.
All
contamination
Two discard containers (for example, plastic bags)
Buddy #1 opens all the zippers on Buddy #2’s CVCUS in the following order: wrist, ankles, and front. While standing behind Buddy #2 and adjacent to the clean area, Buddy #1 grasps the shoulders of Buddy #2’s CVCUS and instructs him to make a fist to ensure that his gloves do not come off. He then pulls Buddy #2's CVCUS down below his knees, turning it inside out. He has Buddy #2 to partially remove his overboots by alternately stepping on each heel and pulling up on his foot. While kneeling, Buddy #1 grasps one leg of Buddy #2’s CVCUS and his overboot and instructs him to remove his leg and foot simultaneously (see Figure 3-16, page 3-20). As Buddy #2 removes each leg and foot, he steps directly onto the clean area. 5. Remove CPU
jacket/gloves.
All
contamination
Two discard containers Buddy #2 holds the fingertips of his gloves and partially slides his hand out. When the fingers of both hands are free, he holds his arms away from his body and lets the gloves drop. Buddy #1 unzips and removes Buddy #2’s CPU jacket by grasping it at the shoulders and pulling down, turning it inside out (see Figure 3-17, page 3-20). He places it on the clean area with the clean side up. He removes Buddy #2’s protective glove inserts.
3-20 Operational Decon FM 3-5/MCWP 3-37.3
[image:48.612.148.446.115.363.2]Figure 3-16. Removing Leg and Foot From the Garment
O
pe
ratio
nal
D
e
c
on
3-2
1
FM
3
-5/M
C
WP
3
-37.
3
Steps Contamination Type
Required Equipment Procedures
6. Remove combat boots/ CPU pants.
All
contamination
Two discard containers Buddy #1 instructs Buddy #2 to stand on the clean area (but not on the CPU jacket) and unlace his combat boots. Buddy #2 partially removes his boots by alternately stepping on each heel and pulling up on his foot. Buddy #1 grasps one of Buddy #2's boots and instructs him to remove his foot. As Buddy #2 removes his foot, he will step directly onto the clean side of the CPU jacket. Repeat the procedure for the other foot. Next, Buddy #1 removes Buddy #2’s CPU drawers by pulling down on the sides and turning them inside out. Buddy #2 is now stripped to his underwear and mask and is ready to put on new clothing. NOTE: If Buddy #2’s feet come in contact with the contaminated
pants of the CPU, decon them.
7. Put on CPU/ CVCUS.
All
contamination
One CPU/CVCUS per soldier
Buddy #1 opens the package containing the new undergarment without touching the inside of the package. Buddy #2 pulls out the undergarment without touching the outside of the package. He puts on the new clothing in the following order: CPU drawers, CPU jacket, combat boots, and CVCUS (over the CPU drawers).
8. Put on overboots and gloves.
All
contamination
One set of chemical protective overboots per soldier
One set of chemical protective gloves per soldier
M9 detector paper
Buddy #1 opens the package of clean overboots without touching the inside of the package. Buddy #2 removes the overboots without touching the outside of the package and puts them on. Buddy #1 opens the package of clean gloves without touching the inside. Buddy #2 removes the gloves without touching the outside of the package and puts them on. Buddy #2 puts on the M9 detector paper (see Figure 3-18, page 3-23).
9. Secure hood. Chemical/ biological
One IEDK Buddy #1 wipes his rubber gloves with an IEDK. He unrolls Buddy #2’s hood and attaches the straps and tightens the neck cord. Buddy #1 and Buddy #2 reverse rolls and repeat steps 2 through 9.
10. Secure gear. All
contamination
One chemical protective helmet cover per person
The soldier secures his individual gear and puts it back on. He puts on a new chemical protective helmet cover and moves to the AA. He uses the buddy system to check the fit of all secured gear.
3
-22
Op
er
atio
nal
D
eco
n
FM
3-5
/MC
W
P
3-3
7.
3
Steps Contamination Type
Required Equipment Procedures
1. Decon gear— removes gross contamination from individual gear (weapons, helmet, load-bearing equip-ment, and mask car-rier).
All
contamination
Four long-handled brushes
A large piece of plastic (poncho or similar material)
The soldier mixes three parts earth to two parts STB.
Chemical/ biological
One 30-gallon container, STB dry mix, and one IEDK
The soldier removes and discards the chemical protective helmet cover if worn. He brushes or rubs STB onto his individual gear (helmet and mask carrier) and the hose of the M42 or M43 mask if worn. He gently shakes off any excess STB and sets aside his gear on an uncontaminated surface.
Radiological Hot, soapy water The soldier brushes or wipes radiological contamination from his individual gear. He washes it with hot, soapy water (if available) then sets it aside to dry on an uncontaminated surface (plastic, poncho, or similar material).
2. Prepare to decon— facilitates later removal of overgarment trousers and overboots.
All
contamination
Cutting tool Buddy #1 unfastens the shoulder straps on Buddy #2’s hood and pulls them over his shoulder and reattaches them to the Velcro fastener. He loosens the drawcord on Buddy #2’s hood and ties off the microphone cord to the hose of his mask (see Figure 3-19). He removes the M9 detector paper from Buddy #2's overgarment. He unzips Buddy #2's trouser legs and rolls a cuff in each trouser leg, ensuring that the cuffs do not come above the tops of his overboots. He unfastens or cuts the fasteners on Buddy #2’s overboots. NOTE: A soldier can do this step by himself
[image:50.612.76.684.88.406.2]or with the help of his buddy.
Operational Decon 3-23 FM 3-5/MCWP 3-37.3
[image:51.612.124.510.353.639.2]3 -24 Op er atio nal D eco n FM 3-5 /MC W P 3-3 7. 3 Steps Contamination Type
Required Equipment Procedures
3. Decon mask and hood— removes gross contamination.
Chemical/ biological
Two IEDKs per person Buddy #1 uses an IEDK to wipe Buddy #2’s eye-lens outserts from the top down.
(NOTE: Do not press so hard that you break Buddy #2's face-mask seal.) He
then wipes the rest of Buddy #2’s hood from the top of the head to the bottom of the hood (see Figure 3-5, page 3-9). After he has finished wiping Buddy #2’s mask, he must wipe his own gloves in preparation for rolling Buddy #2’s hood. He starts from the rear and rolls Buddy #2’s hood, using 2-inch tucks, until it reaches the center of his head (see Figure 3-6, page 3-9). He rolls the front of Buddy #2’s hood tightly under the outlet valve and filter. He ensures that the hood is off of Buddy #2's garment (see Figure 3-7, page 3-10).
Radiological Three containers (about 3-gallon capacity) Two sponges Soapy water Rinse water
Paper towels or similar drying material
Buddy #1 wipes Buddy #2’s mask and hood with a sponge dipped in hot, soapy water and rinses them with a sponge dipped in clean water. He dries Buddy #2’s mask and hood with paper towels or rags. Buddy #2 wipes down his own gloves.
NOTE: Cool, soapy water is not as effective for removing contamination, but it can be used if you scrub longer. If the water supply is limited, use drinking
water from your canteen with a wet sponge or cloth. Only Buddy #2’s mask and hood will be decontaminated and rolled at this time.
4. Remove overgarment overboots limits the spread of agents and helps prevent agents from penetrating through to the undergarments or the skin.
All
contamination
Two discard containers (for example, plastic bags)
Buddy #1 grasps Buddy #2’s outside overgarment jacket, unsnaps the snaps individually, and unties the drawcord at the bottom of the jacket. He unfastens the Velcro at the wrist of Buddy #2's jacket and then refastens it. He unfastens the Velcro closure over the zippered front of Buddy #2's jacket and unzips the jacket. Buddy #1 grasps Buddy #2's jacket by the shoulders and instructs him to make a fist. He then pulls the jacket do