IBM Security QRadar Risk Manager
Version 7.2.1
Adapter Configuration Guide
Note
Before using this information and the product that it supports, read the information in “Notices” on page 27.
Contents
Introduction to configuring adapters for QRadar Risk Manager . . . v
Chapter 1. Adapters overview . . . 1
Types of adapters . . . 1
Chapter 2. Installing an adapter
. . . 3
Uninstalling an adapter. . . 3
Chapter 3. Methods for adding network devices
. . . 5
Adding a network device . . . 5
Adding devices managed by a Juniper Networks NSM console . . . 7
Adding devices managed by a CPSMS console . . . 8
Chapter 4. Supported adapters . . . 11
Check Point SecurePlatform Appliances . . . 11
Check Point Security Management Server adapter . . . 12
Cisco CatOS . . . 13
Cisco IOS . . . 15
Cisco Nexus . . . 18
Methods for adding VDCs for Cisco Nexus devices . . . 20
Adding VDCs as subdevices of your Cisco Nexus device . . . 20
Adding VDCs as individual devices . . . 20
Cisco Security Appliances . . . 21
Juniper Networks JUNOS . . . 23
Juniper Networks NSM . . . 24
Juniper Networks ScreenOS . . . 25
Notices
. . . 27
Trademarks . . . 28
Privacy policy considerations . . . 29
Index . . . 31
Introduction to configuring adapters for QRadar Risk Manager
IBM®Security QRadar®Risk Manager is an appliance that is used to monitor device configurations, simulate changes to your network environment, and prioritize risks and vulnerabilities.
Intended audience
Network administrators who are responsible for installing and configuring adapters must be familiar with network security concepts and device configurations.
Technical documentation
For information about how to access more technical documentation, technical notes, and release notes, see Accessing IBM Security Documentation Technical Note (www.ibm.com/support/docview.wss?rs=0&uid=swg21614644).
Contacting customer support
For information about contacting customer support, see the Support and Download Technical Note (http://www.ibm.com/support/docview.wss?rs=0 &uid=swg21612861).
Statement of good security practices
IT system security involves protecting systems and information through prevention, detection and response to improper access from within and outside your enterprise. Improper access can result in information being altered, destroyed, misappropriated or misused or can result in damage to or misuse of your systems, including for use in attacks on others. No IT system or product should be
considered completely secure and no single product, service or security measure can be completely effective in preventing improper use or access. IBM systems, products and services are designed to be part of a comprehensive security approach, which will necessarily involve additional operational procedures, and may require other systems, products or services to be most effective. IBM DOES NOT WARRANT THAT ANY SYSTEMS, PRODUCTS OR SERVICES ARE IMMUNE FROM, OR WILL MAKE YOUR ENTERPRISE IMMUNE FROM, THE MALICIOUS OR ILLEGAL CONDUCT OF ANY PARTY.
Chapter 1. Adapters overview
Use adapters to integrate IBM Security QRadar Risk Manager with your network devices. By configuring adapters, QRadar Risk Manager can interrogate and import the configuration parameters of network devices, such as firewalls, routers, and switches.
Network topology and configuration
QRadar Risk Manager uses adapters to collect network configurations. The adapters turn the configuration information into a format that is unified for all supported device models, manufacturers, and types.QRadar Risk Manager uses the data to understand your network topology and configuration of your network devices.
To connect external devices in the network, QRadar Risk Manager must be able to access the devices.QRadar Risk Manager uses configured user credentials to access the device and download configurations.
Process for integrating network devices
To integrate network devices with QRadar Risk Manager, follow these steps: 1. Configure your network device with appropriate access to QRadar Risk
Manager.
2. Install the appropriate adapter for your network device on your QRadar Risk Manager appliance.
3. Use Configuration Source Management to add your network devices to QRadar Risk Manager.
4. Define the communication method (protocol) required for communication to your network devices.
For more information, see theIBM Security QRadar Risk Manager User Guide. If QRadar Risk Manager and your network devices cannot communicate, see the disconnected configuration toolkit information in theIBM Security QRadar Risk Manager User Guide.
Types of adapters
IBM Security QRadar Risk Manager supports several types of adapters. The following adapters are supported:
v Check Point SecurePlatform Appliances v Cisco Internet Operating System (IOS) v Cisco Catalyst (CatOS)
v Cisco Security Appliances v Juniper Networks ScreenOS v Juniper Networks JUNOS v Juniper Networks NSM
Chapter 2. Installing an adapter
You must download an adapter to your IBM Security QRadar SIEM Console, and then copy the adapter files to IBM Security QRadar Risk Manager.
Before you begin
You access and download adapters from Fix Central (www.ibm.com/support/ fixcentral/). The RPM files are included in the download.
After you establish the initial connection, QRadar SIEM Console is the only device that can communicate directly to QRadar Risk Manager.
Procedure
1. Using SSH, log in to your QRadar SIEM Console as the root user.
2. Download the adapter file from the IBM support web site (www.ibm.com/ support) to your QRadar SIEM Console.
3. To copy the adapter file from your QRadar SIEM Console to QRadar Risk Manager, type the following command:
scp adapter.rpm root@IP address
TheIP addressis the IP address or host name of QRadar Risk Manager. Example: scp adapters.cisco.ios-2011_05-205181.noarch.rpm
4. On your QRadar Risk Manager appliance, type the password for the root user. 5. Using SSH from your QRadar SIEM Console, log in to your QRadar Risk
Manager appliance as the root user.
6. From the root directory that contains the adapter file, type the following command to install the adapter:
rpm -Uvh RPM_filename
Example: rpm -Uvh adapters.cisco.ios-2011_05-205181.noarch.rpm
7. To restart the services for the ziptie server and complete the installation, type the following command:
service ziptie-server restart
Important: Restarting the services for the ziptie server interrupts any device backups that are in progress from Configuration Source Management.
Uninstalling an adapter
Use therpm command to remove an adapter from IBM Security QRadar Risk Manager.
Procedure
1. Using SSH, log in to the IBM Security QRadar SIEM Console as the root user. 2. To uninstall an adapter, type the following command:
rpm -e adapter file
Chapter 3. Methods for adding network devices
Use Configuration Source Management to add network devices to IBM Security QRadar Risk Manager.
The following table describes the methods that you can use to add a network device.
Table 1. Methods for adding a network device to QRadar Risk Manager
Method Description
Add Device Add one device.
Discover Devices Add multiple devices.
Discover NSM Add devices that are managed by a Juniper Networks NSM console.
Discover CPSMS Add devices that are managed by a Check Point Security Manager Server (CPSMS).
Adding a network device
To add a network device to IBM Security QRadar Risk Manager, use Configuration Source Management.
Before you begin
Review the supported software versions, credentials, and required commands for your network devices. For more information, see Chapter 4, “Supported adapters,” on page 11.
Procedure
1. Click theAdmin tab.
2. On the Adminnavigation menu, clickPlug-ins
3. On the Risk Manager pane, click Configuration Source Management. 4. On the navigation menu, click Credentials.
5. On the Network Groups pane, clickAdd a new network group. a. Type a name for the network group, and clickOK.
b. Type the IP address of your device, and clickAdd.
You can type an IP address, a range of IP addresses, a CIDR subnet, or a wildcard. Use a wildcard type10.1.*.*or to use a CIDR, type
10.2.1.0/24.
Restriction: Do not replicate device addresses that exist in other network groups in Configuration Source Management.
c. Ensure that the addresses that you add are displayed in theNetwork address box beside theAdd addressbox.
d. Repeat the previous two steps for each IP address that you want to add. 6. On the Credentials pane, click Add a new credential set.
a. Type a name for the credential set, and click OK.
b. Select the name of the credential set that you created and enter values for the parameters.
The following table describes the parameters.
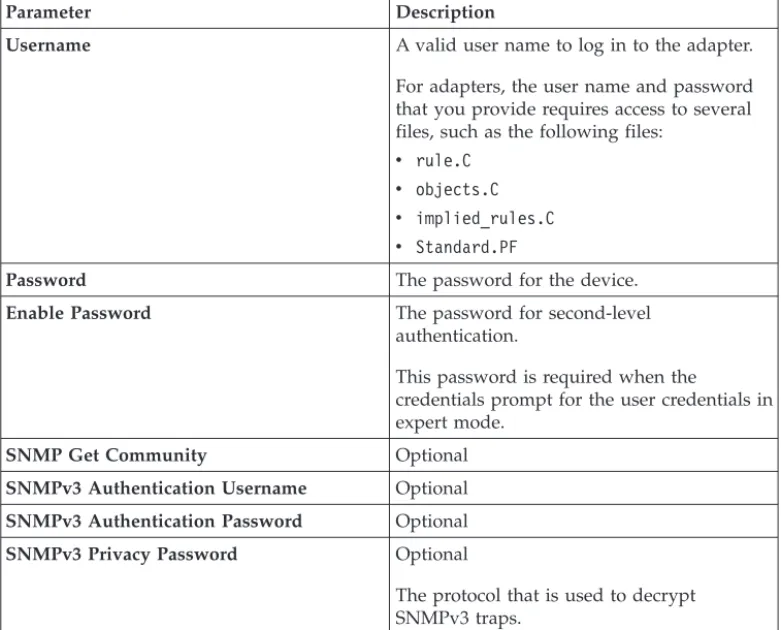
Table 2. Parameter options for credentials
Parameter Description
Username A valid user name to log in to the adapter. For adapters, the user name and password that you provide requires access to several files, such as the following files:
v rule.C
v objects.C
v implied_rules.C
v Standard.PF
Password The password for the device.
Enable Password The password for second-level authentication.
This password is required when the
credentials prompt for the user credentials in expert mode.
SNMP Get Community Optional
SNMPv3 Authentication Username Optional
SNMPv3 Authentication Password Optional
SNMPv3 Privacy Password Optional
The protocol that is used to decrypt SNMPv3 traps.
Restriction: If your network device meets one of the following conditions, you must configure protocols in Configuration Source Management: v Your device uses a non-standard port for the communication protocol. v You want to configure the protocol that IBM Security QRadar Risk
Manager uses to communicate with specific IP addresses.
For more information about configuring sources in theIBM Security QRadar Risk Manager User Guide.
7. On the navigation menu, add a device.
v To add one network device, clickAdd Device.
v To add multiple IP addresses for network devices, selectDiscover Devices. 8. Enter the IP address for the device and select the adapter type, and then click
Add.
A blue question mark is displayed in the device list for devices that are not backed up.
9. Select the device that you added to the device list, and click Backup. 10. Repeat these steps for each type of network device that you want to add.
What to do next
After you add all of the required devices, you can configure protocols. For more information, see the IBM Security QRadar Risk Manager User Guide.
Adding devices managed by a Juniper Networks NSM console
Use Configuration Source Management to add all devices from a Juniper Networks NSM console to IBM Security QRadar Risk Manager.
Before you begin
Review the supported software versions, credentials, and required commands for your network devices. For more information, see Chapter 4, “Supported adapters,” on page 11.
Procedure
1. In IBM Security QRadar SIEM, click theAdmintab. 2. On theAdmin navigation menu, clickPlug-ins
3. On the Risk Manager pane, clickConfiguration Source Management. 4. On the navigation menu, clickCredentials.
5. On the Network Groups pane, clickAdd a new network group. a. Type a name for the network group, and clickOK.
b. Type the IP address of your device, and clickAdd.
You can type an IP address, a range of IP addresses, a CIDR subnet, or a wildcard. Use a wildcard type10.1.*.*or to use a CIDR, type10.2.1.0/24.
Restriction: Do not replicate device addresses that exist in other network groups in Configuration Source Management.
c. Ensure that the addresses that you add are displayed in theNetwork addressbox beside the Add addressbox.
d. Repeat the previous two steps for each IP address that you want to add. 6. On the Credentials pane, click Add a new credential set.
a. Type a name for the credential set, and clickOK.
b. Select the name of the credential set that you created and enter values for the parameters.
The following table describes the parameters.
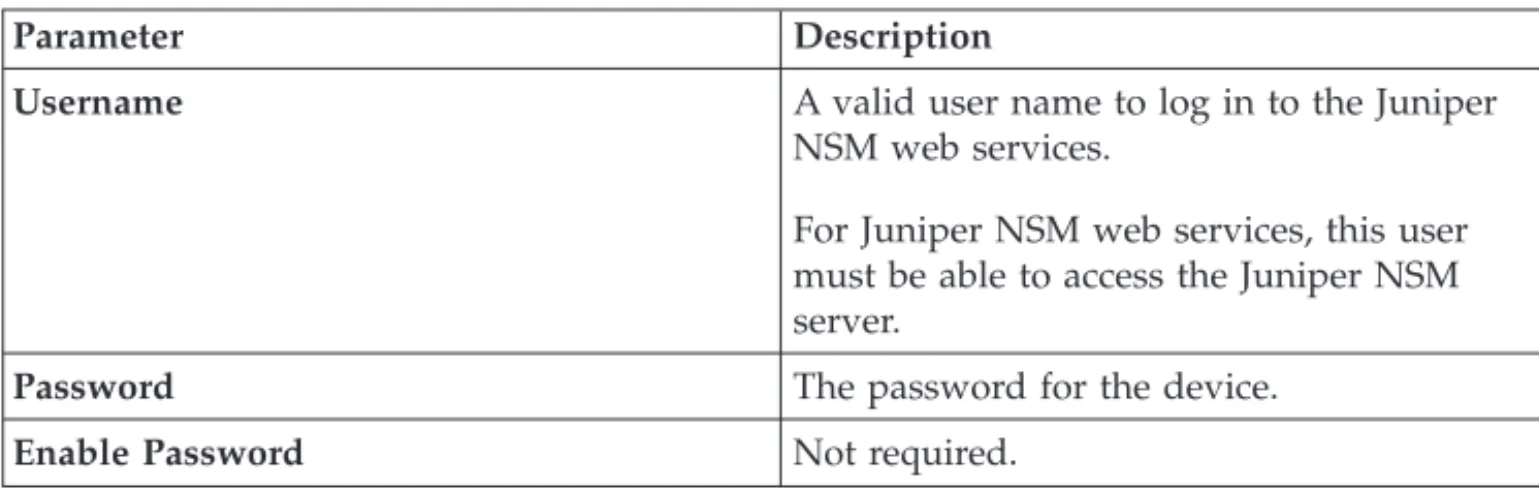
Table 3. Parameter options for Juniper NSM web services credentials
Parameter Description
Username A valid user name to log in to the Juniper
NSM web services.
For Juniper NSM web services, this user must be able to access the Juniper NSM server.
Password The password for the device.
Enable Password Not required.
Restriction: Juniper Networks NSM does not support SNMP. 7. On the navigation menu,Discover from NSM.
8. Enter values for the IP address and user credentials, clickOKand then click GO.
9. Select the device that you added to the device list, and clickBackupand then clickYes.
What to do next
After you add all of the required devices, you can configure protocols. For more information, see the IBM Security QRadar Risk Manager User Guide.
Adding devices managed by a CPSMS console
Use Configuration Source Management to add all devices from a Check Point Security Manager Server (CPSMS) to IBM Security QRadar Risk Manager.
Before you begin
Review the supported software versions, credentials, and required commands for your network devices. For more information, see Chapter 4, “Supported adapters,” on page 11.
You must obtain the OPSEC Entity SIC name, OPSEC Application Object SIC name, and the one-time password for the Pull Certificate password before you begin this procedure. For more information, see your CPSMS documentation. Note: The Device Import feature is not compatible with CPSMS adapters.
About this task
You need to repeat this procedure for each CPSMS that you want to contact to initiate discovery of its managed firewalls.
Procedure
1. Click the Admintab.
2. On the Adminnavigation menu, clickPlug-ins
3. On the Risk Manager pane, click Configuration Source Management. 4. On the navigation menu, click Credentials.
5. On the Network Groups pane, clickAdd a new network group. a. Type a name for the network group, and clickOK.
b. Type the IP address of your CPSMS device, and click Add.
Restriction: Do not replicate device addresses that exist in other network groups in Configuration Source Management.
c. Ensure that the addresses that you add are displayed in theNetwork address box beside theAdd addressbox.
6. On the Credentials pane, click Add a new credential set. a. Type a name for the credential set, and click OK.
b. Select the name of the credential set that you created and type a valid user name and password for the device.
7. Type the OPSEC Entity SIC name of the CPSMS that manages the firewall devices that will be discovered. For example: CN=cp_mgmt_vm230-cpsms2-gw3,O=vm226-CPSMS..bs7ocx
8. Type the OPSEC Application Object SIC name that was created, using the Check Point SmartDashboard application, on the CPSM. For example:
CN=cpsms230,O=vm226-CPSMS..bs7ocx
9. Obtain the OPSEC SSL Certificate: a. ClickGet Certificate.
b. In the Certificate Authority IPfield, type the IP address.
c. In the Pull Certificate Passwordfield, type the one-time password for the OPSEC Application.
d. ClickOK. 10. Click OK.
11. Click Discover From Check Point SMS, and then enter the CPSMS IP address.
12. Click OK.
13. Repeat these steps for each CPSMS device that you want to add.
What to do next
After you add all the required devices you can backup your devices and then view them in the topology.
Chapter 4. Supported adapters
IBM Security QRadar Risk Manager integrates with many manufacturers and vendors of security products.
The list of supported adapters and documentation for them is constantly growing. If an adapter for your network device is not listed, contact your IBM sales
representative.
The following information is provided for each supported adapter: Supported versions
Specifies the product name and version supported. Supports neighbor data
Specifies whether neighbor data is supported for this adapter. If your device supports neighbor data, then you get neighbor data from a device by using Simple Network Management Protocol (SNMP) and a
command-line interface (CLI). SNMP discovery
Specifies whether the device allows discovery by using SNMP.
Generic SNMP devices do not have routes and therefore, do not transmit traffic.
Required credential parameters
Specifies the necessary access requirements for QRadar Risk Manager and the device to connect.
You can use Configuration Source Management to configure device credentials. Ensure that the device credentials configured in QRadar Risk Manager and in the device are the same.
If a parameter is not required, you can leave that field blank. Connection protocols
Specifies the supported protocols for the network device. Required commands
Specifies the list of commands that the adapter requires to log in and collect data.
To run the listed commands on the adapter, the credentials that are provided in QRadar Risk Manager must have the appropriate privileges. Files collected
Specifies the list of files that the adapter must be able to access. To access these files, the appropriate credentials must be configured for the adapter.
Check Point SecurePlatform Appliances
IBM Security QRadar Risk Manager supports the Check Point SecurePlatform Appliances adapter.
The following table describes the integration requirements for the Check Point SecurePlatform Appliances adapter.
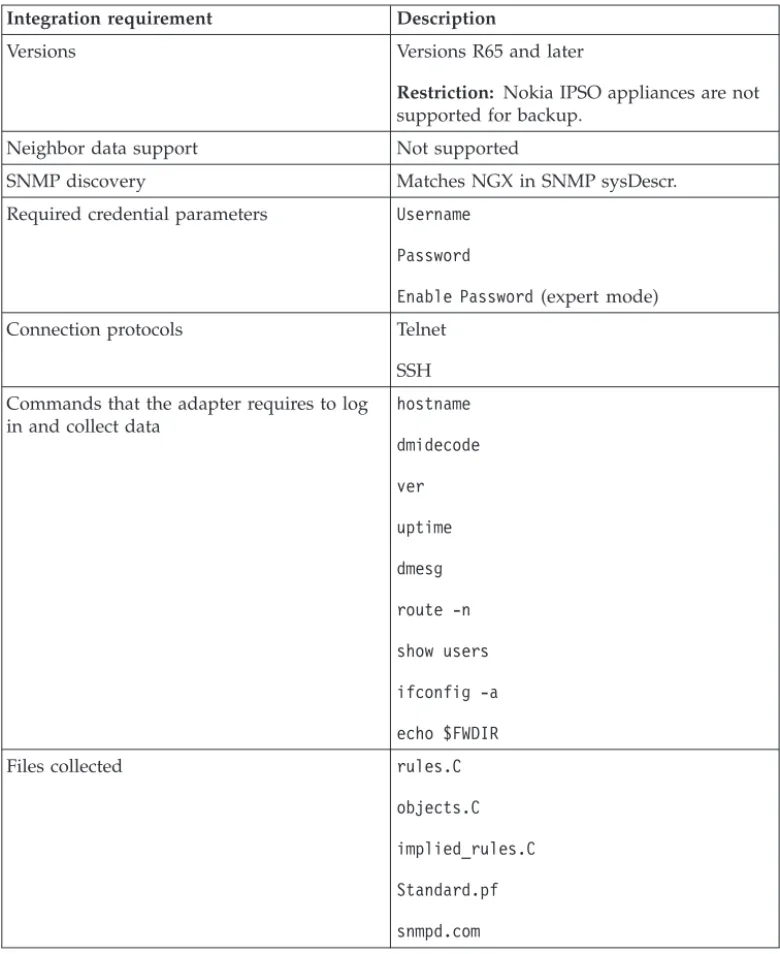
Table 4. Integration requirements for the Check Point SecurePlatform Appliances adapter
Integration requirement Description
Versions Versions R65 and later
Restriction: Nokia IPSO appliances are not supported for backup.
Neighbor data support Not supported
SNMP discovery Matches NGX in SNMP sysDescr. Required credential parameters Username
Password
Enable Password(expert mode) Connection protocols Telnet
SSH Commands that the adapter requires to log in and collect data
hostname dmidecode ver uptime dmesg route -n show users ifconfig -a echo $FWDIR
Files collected rules.C
objects.C implied_rules.C Standard.pf snmpd.com
Check Point Security Management Server adapter
You use the Check Point Security Management Server (CPSMS) adapter to discover and backup end nodes that are managed by the CPSMS. These end nodes are used to run the CheckPoint FireWall-1 and the VPN-1 product family.
Forward compatibility for CPMI connections
CPMI connections are compatible with later versions. For example, a CPMI application that uses an NG FP3 OPSEC SDK can communicate with VPN-1 NGX R60.
Backward compatibility for CPMI connections
CPMI connections are not compatible with an earlier version. For example, a CPMI application that uses OPSEC SDK 6.0 cannot communicate with any version of VPN-1 before NGX R60.
Configuration requirements for CPSMS
Two configuration requirements must be available for CPSMS. These requirements are available by default when CPSMS is installed; however, you must ensure that these requirements are retained.
The CPSMS client application, cpsms_client, is in the CPSMS adapter. The
cpsms_client application establishes an asymmetric authentication method through a Secure Internal Communication (SIC) channel with CPSMS. The asymmetric method is also known as the OPSEC_SSLCA method.
The asymmetric authentication method is translated into configuration
requirements. You must configure and enable the Secure Internal Communication (SIC) on the firewall management server to allow the cpsms_client application to communicate with CPSMS.
The following ports must be open on CPSMS:
v Port 18190 for the Check Point Management Interface service (or CPMI) v Port 18210 for the Check Point Internal CA Pull Certificate Service (or
FW1_ica_pull)
If you cannot use 18190 as a listening port for CPMI, then the CPSMS adapter port number must be similar to the value listed in the $FWDIR/conf/fwopsec.conffile for CPMI on CPSMS. For example, cpmi_server auth_port 18190.
To allow the cpsms_client to communicate with Check Point Management Server, the$CPDIR/conf/sic_policy.confon CPSMS must use the following line, at minimum:
# OPSEC applications default
ANY ; SAM_clients ; ANY ; sam ; sslca, local, sslca_comp # sam proxy
ANY ; Modules, DN_Mgmt ; ANY; sam ; sslca
ANY ; ELA_clients ; ANY ; ela ; sslca, local, sslca_comp ANY ; LEA_clients ; ANY ; lea ; sslca, local, sslca_comp ANY ; CPMI_clients; ANY ; cpmi ; sslca, local, sslca_comp
Cisco CatOS
IBM Security QRadar Risk Manager supports the Cisco Catalyst (CatOS)adapter. The Cisco CatOS adapter collects device configurations by backing up CatOS network devices that are viewable by QRadar Risk Manager.
The following table describes the integration requirements for the Cisco CatOS adapter.
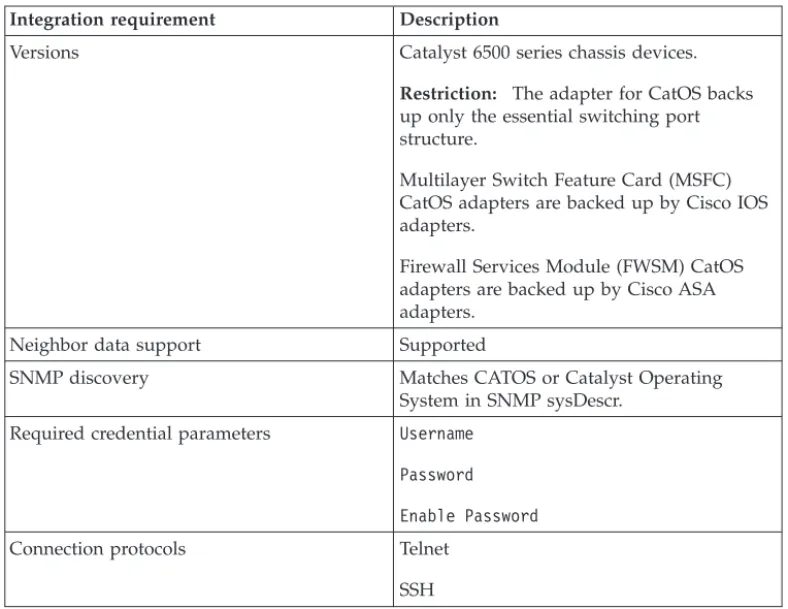
Table 5. Integration requirements for the Cisco CatOS adapter
Integration requirement Description
Versions Catalyst 6500 series chassis devices.
Restriction: The adapter for CatOS backs up only the essential switching port structure.
Multilayer Switch Feature Card (MSFC) CatOS adapters are backed up by Cisco IOS adapters.
Firewall Services Module (FWSM) CatOS adapters are backed up by Cisco ASA adapters.
Neighbor data support Supported
SNMP discovery Matches CATOS or Catalyst Operating System in SNMP sysDescr.
Required credential parameters Username Password Enable Password
Connection protocols Telnet SSH
Table 5. Integration requirements for the Cisco CatOS adapter (continued)
Integration requirement Description
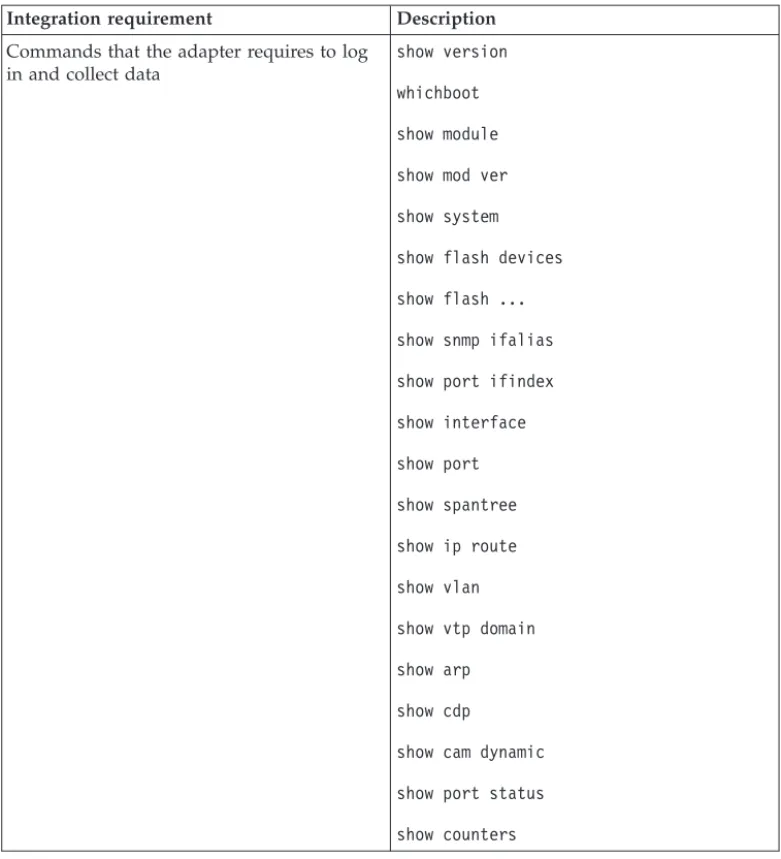
Commands that the adapter requires to log in and collect data
show version whichboot show module show mod ver show system show flash devices show flash ... show snmp ifalias show port ifindex show interface show port show spantree show ip route show vlan show vtp domain show arp show cdp
show cam dynamic show port status show counters
Cisco IOS
IBM Security QRadar Risk Manager supports the Cisco Internet Operating System (IOS) adapter.
The Cisco IOS adapter collects device configurations by backing up IOS-based network switches and routers.
The following table describes the integration requirements for Cisco IOS.
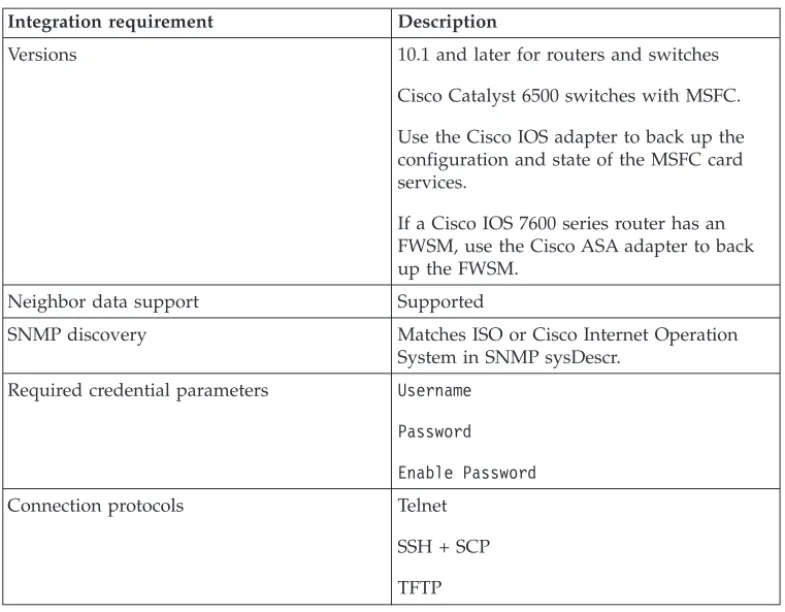
Table 6. integration requirements for Cisco IOS
Integration requirement Description
Versions 10.1 and later for routers and switches Cisco Catalyst 6500 switches with MSFC. Use the Cisco IOS adapter to back up the configuration and state of the MSFC card services.
If a Cisco IOS 7600 series router has an FWSM, use the Cisco ASA adapter to back up the FWSM.
Neighbor data support Supported
SNMP discovery Matches ISO or Cisco Internet Operation System in SNMP sysDescr.
Required credential parameters Username Password Enable Password
Connection protocols Telnet SSH + SCP TFTP
Commands that the adapter requires to log in and collect data
show version show running-config show snmp
show install running show file systems show module show power show inventory show mod version show diagbus show diag
show startup-config show access lists show interfaces show ip ospf interface show ip eigrp interface show ip eigrp neighbors show ip route eigrp show object-group show standby show vrrp show glbp show ip ospf show ip protocols show ip eigrp topology show spanning-tree show vlan
show vtp status show ip arp
show cdp neighbors detail show ipv6 neighbors
show mac-address-table dynamic show ip ospf neighbor
show eigrp neighbors show ip bgp neighbors set terminal length
Cisco Nexus
To integrate IBM Security QRadar Risk Manager with your network devices, ensure that you review the requirements for the Cisco Nexus adapter.
The following table describes the integration requirements for the Cisco Nexus adapter.
Table 7. Integration requirements for the Cisco Nexus adapter
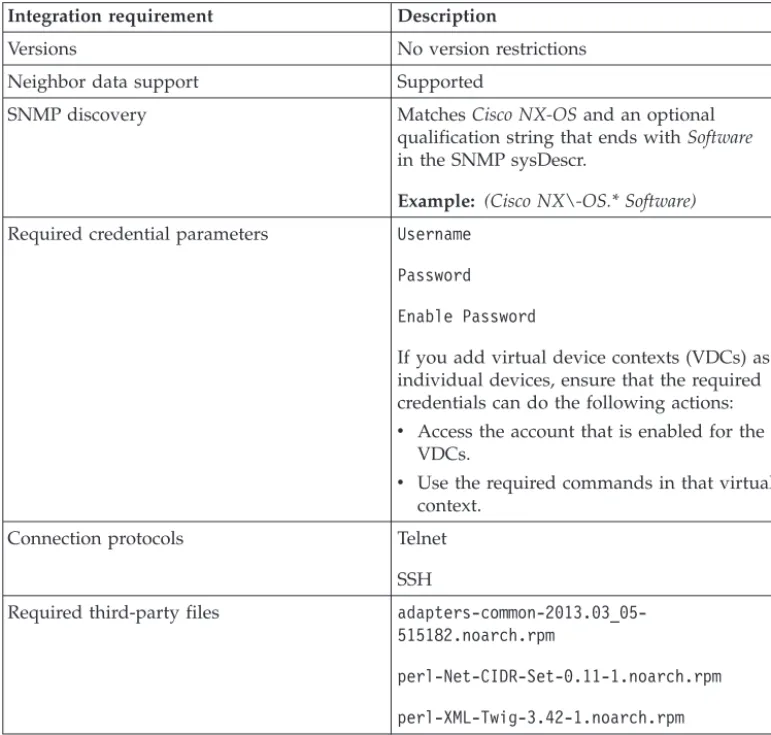
Integration requirement Description
Versions No version restrictions Neighbor data support Supported
SNMP discovery MatchesCisco NX-OSand an optional qualification string that ends withSoftware
in the SNMP sysDescr.
Example: (Cisco NX\-OS.* Software)
Required credential parameters Username Password Enable Password
If you add virtual device contexts (VDCs) as individual devices, ensure that the required credentials can do the following actions:
v Access the account that is enabled for the
VDCs.
v Use the required commands in that virtual
context. Connection protocols Telnet
SSH
Required third-party files adapters-common-2013.03_05-515182.noarch.rpm
perl-Net-CIDR-Set-0.11-1.noarch.rpm perl-XML-Twig-3.42-1.noarch.rpm
Table 7. Integration requirements for the Cisco Nexus adapter (continued)
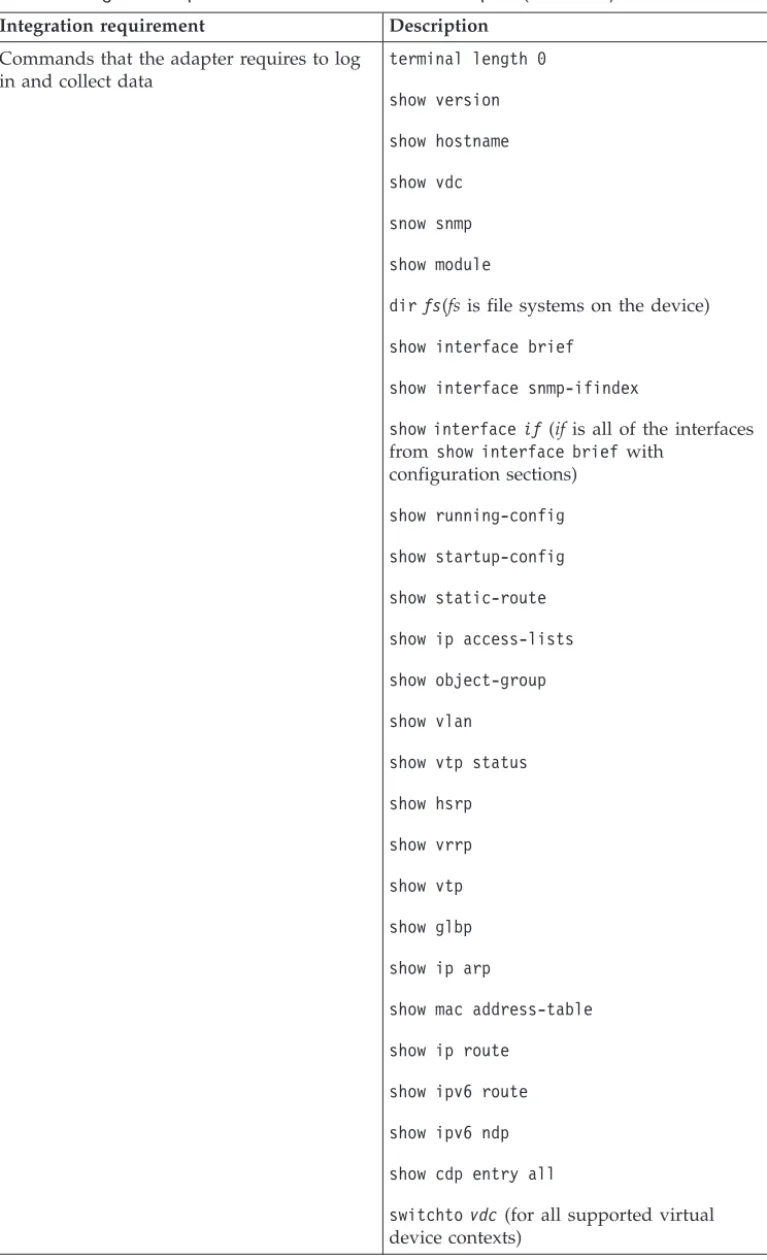
Integration requirement Description
Commands that the adapter requires to log in and collect data
terminal length 0 show version show hostname show vdc snow snmp show module
dirfs(fsis file systems on the device)
show interface brief show interface snmp-ifindex
show interfaceif (if is all of the interfaces
fromshow interface brief with configuration sections)
show running-config show startup-config show static-route show ip access-lists show object-group show vlan
show vtp status show hsrp show vrrp show vtp show glbp show ip arp
show mac address-table show ip route
show ipv6 route show ipv6 ndp show cdp entry all
switchtovdc(for all supported virtual device contexts)
Methods for adding VDCs for Cisco Nexus devices
Use Configuration Source Management to add Nexus network devices and Virtual Device Contexts (VDC) to IBM Security QRadar SIEM. There are two ways to add multiple VDCs to IBM Security QRadar Risk Manager.
You can add VDCs as subdevices of the Nexus device or as individual devices.
View Virtual Device Contexts
If VDCs are added as individual devices, then each VDC is displayed as a device in the topology.
If VDCs are added as a subdevice, they are not displayed in the topology. Instead, you can view the VDCs in Configuration Monitor.
Adding VDCs as subdevices of your Cisco Nexus device
Use Configuration Source Manager to add VDCs as subdevices of your Cisco Nexus device.Procedure
1. Use Configuration Source Manager to add the admin IP address of each VDC. For more information, see “Adding a network device” on page 5.
2. Use Configuration Source Manager to obtain the configuration information for your Nexus device.
For information about getting device configuration, see theIBM Security QRadar Risk Manager User Guide.
3. Enable the following commands for the user that is specified in the credentials: v show vdc (at admin context)
v switchto vdc x, where x is the VDCs that are supported.
In Configuration Monitor, you can view the Nexus device in the topology and the VDC subdevices. For information about viewing devices, see theIBM Security QRadar Risk Manager User Guide.
Adding VDCs as individual devices
Use Configuration Source Manager to add each VDC as a separate device. When you use this method, the Nexus device and the VDCs are displayed in the topology
When you view your Cisco Nexus device and VDCs in the topology, the chassis containment is represented separately.
Procedure
1. Use Configuration Source Manager to add the admin IP address of each VDC. For more information, see “Adding a network device” on page 5.
2. Use Configuration Source Manager to obtain the configuration information for your VDCs.
3. On the Cisco Nexus device, use the Cisco Nexus CLI to disable the switchto vdc command for the user name that is associated with the adapter.
Example: If the user name for a Cisco Nexus device isqrmuser, type the following commands:
NexusDevice(config)# role name qrmuser
NexusDevice(config-role)# rule 1 deny command switchto vdc NexusDevice(config-role)# rule 2 permit command show NexusDevice(config-role)# rule 2 permit command terminal NexusDevice(config-role)# rule 2 permit command dir
Cisco Security Appliances
To integrate IBM Security QRadar Risk Manager with your network devices, ensure that you review the requirements for the Cisco Security Appliances adapter. The Cisco Security Appliances adapter collects device configurations by backing up Cisco family devices. The following list describes examples of the Cisco firewalls that the adapter for the Cisco Security Appliances supports:
v Stand-alone Adaptive Security Appliance v Firewall Service Module (FWSM)
v A module in a Catalyst chassis
v Established Private Internet Exchange (PIX) device.
The following table describes the integration requirements for theCisco Security Appliances adapter.
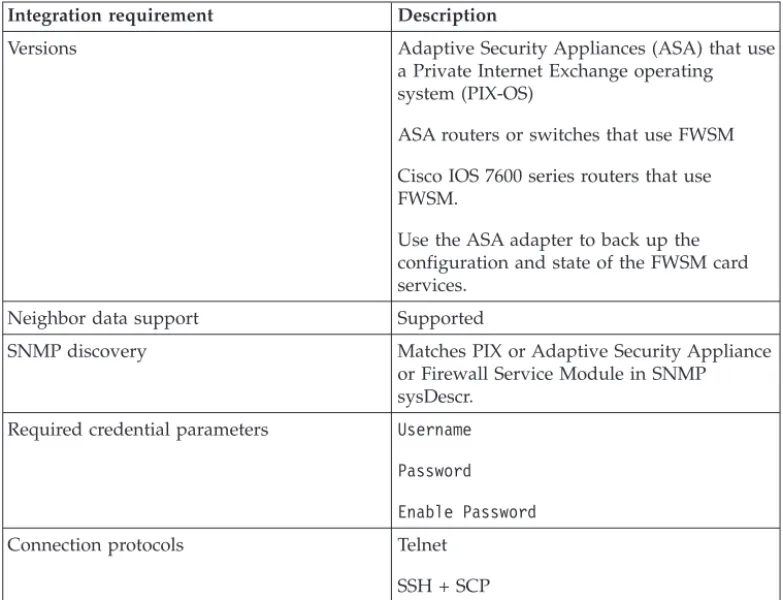
Table 8. Integration requirements for the Cisco Security Appliances adapter
Integration requirement Description
Versions Adaptive Security Appliances (ASA) that use a Private Internet Exchange operating system (PIX-OS)
ASA routers or switches that use FWSM Cisco IOS 7600 series routers that use FWSM.
Use the ASA adapter to back up the configuration and state of the FWSM card services.
Neighbor data support Supported
SNMP discovery Matches PIX or Adaptive Security Appliance or Firewall Service Module in SNMP sysDescr.
Required credential parameters Username Password Enable Password
Connection protocols Telnet SSH + SCP
Table 8. Integration requirements for the Cisco Security Appliances adapter (continued)
Integration requirement Description
Commands that the adapter requires to log in and collect data
change context
change context admin-context
change context context
change system get startup-config show arp
show context show interface show interface detail show ipv6 interface show ipv6 neighbor show mac-address-table show names
show ospf neighbor show pager
show route
show running-config show shun
show version terminal pager 0 terminal pager 24
Where:
Theshow pager command must be enabled to access accounts that use QRadar Risk Manager.
The changecontext context command is used for each context on the ASA device. Thechange systemcommand detects whether the system has multi-context configurations and determines the admin-context.
Thechange context command is required if thechange systemcommand has a
multi-context configuration or admin configuration context.
Theterminal pager commands are used to
Juniper Networks JUNOS
To integrate IBM Security QRadar Risk Manager with your network devices, ensure that you review the requirements for the Juniper Networks JUNOS adapter. The following table describes the integration requirements for theJuniper Networks JUNOS adapter.
Table 9. Integration requirements for theJuniper Networks JUNOS adapter
Integration requirement Description
Versions Versions 9 and later. Neighbor data support Supported
SNMP discovery Matches SNMP sysOID: 1.3.6.1.4.1.2636 Required credential parameters Username
Password
Connection protocols Telnet SSH + SCP
Table 9. Integration requirements for theJuniper Networks JUNOS adapter (continued)
Integration requirement Description
Commands that the adapter requires to log in and collect data
show version show system uptime show chassis hardware show chassis firmware show chassis mac-address show chassis routing-engine show configuration snmp
show snmp mib walk system configure show configuration firewall
show configuration firewall family inet6 show configuration security
show configuration security zones show interfaces
show interfaces filters show ospf interface detail show bgp neighbor
show configuration routing-option show arp no-resolve
show ospf neighbor show rip neighbor show bgp neighbor show ipv6 neighbors
Juniper Networks NSM
IBM Security QRadar Risk Manager adapter supports Juniper Networks NSM. You can use the QRadar Risk Manager to back up a single Juniper Networks device or obtain device information from a Juniper Networks NSM console. The Juniper Networks NSM console contains the configuration and device information for Juniper Networks routers and switches that are managed by the Juniper Networks NSM console.
The following table describes the supported environments for Juniper Networks NSM.
Table 10. QRadar Risk Manager adapter supported environments for Juniper Networks NSM
Supported environment Description
Versions IDP appliances that are managed by NSM Neighbor data support Not supported
SNMP discovery Not supported Required credential parameters v Username
v Password
Connection protocols v SOAP
v HTTP
Juniper Networks ScreenOS
To integrate IBM Security QRadar Risk Manager with your network devices, ensure that you review the requirements for the Juniper Networks ScreenOS adapter.
The following table describes the integration requirements for theJuniper Networks ScreenOS adapter.
Table 11. integration requirements for theJuniper Networks ScreenOS adapter
Integration requirement Description
Versions Firewalls that use a ScreenOS operating system
Neighbor data support Supported
SNMP discovery Matches netscreen or SSG in SNMP sysDescr.
Required credential parameters Username Password
Connection protocols Telnet SSH
Table 11. integration requirements for theJuniper Networks ScreenOS adapter (continued)
Integration requirement Description
Commands that the adapter requires to log in and collect data
set console page 0 get system
get config get snmp get memory get file info get file get service
get group addresszonegroup
get address get service group
get service group variable
get interface
get interfacevariable
get policy all get policy idvariable
get admin user get route get arp get mac-learn
get counter statistics interface
variable
Where:
zoneis the zone data that is returned from theget configcommand.
groupis the group data that is returned from theget configcommand.
variableis a list of returned data from aget service group, get interface, or get policy id command.
Notices
This information was developed for products and services offered in the U.S.A. IBM may not offer the products, services, or features discussed in this document in other countries. Consult your local IBM representative for information on the products and services currently available in your area. Any reference to an IBM product, program, or service is not intended to state or imply that only that IBM product, program, or service may be used. Any functionally equivalent product, program, or service that does not infringe any IBM intellectual property right may be used instead. However, it is the user's responsibility to evaluate and verify the operation of any non-IBM product, program, or service.
IBM may have patents or pending patent applications covering subject matter described in this document. The furnishing of this document does not grant you any license to these patents. You can send license inquiries, in writing, to: IBM Director of Licensing
IBM Corporation North Castle Drive
Armonk, NY 10504-1785 U.S.A.
For license inquiries regarding double-byte character set (DBCS) information, contact the IBM Intellectual Property Department in your country or send inquiries, in writing, to:
Intellectual Property Licensing Legal and Intellectual Property Law IBM Japan Ltd.
19-21, Nihonbashi-Hakozakicho, Chuo-ku Tokyo 103-8510, Japan
The following paragraph does not apply to the United Kingdom or any other country where such provisions are inconsistent with local law:
INTERNATIONAL BUSINESS MACHINES CORPORATION PROVIDES THIS PUBLICATION "AS IS" WITHOUT WARRANTY OF ANY KIND, EITHER EXPRESS OR IMPLIED, INCLUDING, BUT NOT LIMITED TO, THE IMPLIED WARRANTIES OF NON-INFRINGEMENT, MERCHANTABILITY OR FITNESS FOR A PARTICULAR PURPOSE. Some states do not allow disclaimer of express or implied warranties in certain transactions, therefore, this statement may not apply to you.
This information could include technical inaccuracies or typographical errors. Changes are periodically made to the information herein; these changes will be incorporated in new editions of the publication. IBM may make improvements and/or changes in the product(s) and/or the program(s) described in this publication at any time without notice.
Any references in this information to non-IBM Web sites are provided for
convenience only and do not in any manner serve as an endorsement of those Web sites. The materials at those Web sites are not part of the materials for this IBM product and use of those Web sites is at your own risk.
IBM may use or distribute any of the information you supply in any way it believes appropriate without incurring any obligation to you.
Licensees of this program who wish to have information about it for the purpose of enabling: (i) the exchange of information between independently created programs and other programs (including this one) and (ii) the mutual use of the information which has been exchanged, should contact:
IBM Corporation 170 Tracer Lane,
Waltham MA 02451, USA
Such information may be available, subject to appropriate terms and conditions, including in some cases, payment of a fee.
The licensed program described in this document and all licensed material
available for it are provided by IBM under terms of the IBM Customer Agreement, IBM International Program License Agreement or any equivalent agreement between us.
Any performance data contained herein was determined in a controlled
environment. Therefore, the results obtained in other operating environments may vary significantly. Some measurements may have been made on development-level systems and there is no guarantee that these measurements will be the same on generally available systems. Furthermore, some measurements may have been estimated through extrapolation. Actual results may vary. Users of this document should verify the applicable data for their specific environment.
Information concerning non-IBM products was obtained from the suppliers of those products, their published announcements or other publicly available sources. IBM has not tested those products and cannot confirm the accuracy of
performance, compatibility or any other claims related to non-IBM products. Questions on the capabilities of non-IBM products should be addressed to the suppliers of those products.
All statements regarding IBM's future direction or intent are subject to change or withdrawal without notice, and represent goals and objectives only.
All IBM prices shown are IBM's suggested retail prices, are current and are subject to change without notice. Dealer prices may vary.
This information contains examples of data and reports used in daily business operations. To illustrate them as completely as possible, the examples include the names of individuals, companies, brands, and products. All of these names are fictitious and any similarity to the names and addresses used by an actual business enterprise is entirely coincidental.
If you are viewing this information softcopy, the photographs and color illustrations may not appear.
Trademarks
IBM, the IBM logo, and ibm.com® are trademarks or registered trademarks of
International Business Machines Corporation in the United States, other countries, or both. If these and other IBM trademarked terms are marked on their first occurrence in this information with a trademark symbol (® or™), these symbols
indicate U.S. registered or common law trademarks owned by IBM at the time this information was published. Such trademarks may also be registered or common law trademarks in other countries. A current list of IBM trademarks is available on the Web at Copyright and trademark information (www.ibm.com/legal/
copytrade.shtml).
The following terms are trademarks or registered trademarks of other companies: Microsoft, Windows, Windows NT, and the Windows logo are trademarks of Microsoft Corporation in the United States, other countries, or both.
Other company, product, and service names may be trademarks or service marks of others.
Privacy policy considerations
IBM Software products, including software as a service solutions, (“Software Offerings”) may use cookies or other technologies to collect product usage information, to help improve the end user experience, to tailor interactions with the end user or for other purposes. In many cases no personally identifiable information is collected by the Software Offerings. Some of our Software Offerings can help enable you to collect personally identifiable information. If this Software Offering uses cookies to collect personally identifiable information, specific information about this offering’s use of cookies is set forth below.
Depending upon the configurations deployed, this Software Offering may use session cookies that collect each user’s session id for purposes of session
management and authentication. These cookies can be disabled, but disabling them will also eliminate the functionality they enable.
If the configurations deployed for this Software Offering provide you as customer the ability to collect personally identifiable information from end users via cookies and other technologies, you should seek your own legal advice about any laws applicable to such data collection, including any requirements for notice and consent.
For more information about the use of various technologies, including cookies, for these purposes, See IBM’s Privacy Policy at http://www.ibm.com/privacy and IBM’s Online Privacy Statement at http://www.ibm.com/privacy/details the section entitled “Cookies, Web Beacons and Other Technologies” and the “IBM Software Products and Software-as-a-Service Privacy Statement” at
http://www.ibm.com/software/info/product-privacy.
Index
A
adapters 11
configuration overview 1 types 1
adaptersinstalling on QRadar Risk Manager 3
C
Check Point SecurePlatform 1 Check Point SecurePlatform Appliances
integration requirements 12 Check Point Security Management
Server 12 Cisco Catalyst 1 Cisco CatOS
supported environments 13 Cisco Internet Operating System 1 Cisco IOS
integration requirements 15 Cisco Nexus
adding VDCs 20
integration requirements 18 Cisco Security Appliance 1 Cisco security appliances
integration requirements 21 Configuration Source Management
adding network devices 5
adding network devices managed by Juniper Networks 7
connection protocols adapters support 11 CPSMS 12
customer support contact information v
D
documentation v
F
files collected
adapters support 11
I
installing adapters 3
J
Juniper Networks JunOS 1 Juniper Networks JUNOS
integration requirements 23 Juniper Networks NSM 1
supported environments 24 Juniper Networks ScreenOS 1
integration requirements 25
N
neighbor data definition 11 network administrator description v network devicesadding and configuring 5 adding devices managed by Juniper
networks to Risk Manager 7 adding to Risk Manager 5 Nexus device
adding VDCs as subdevices 20
Nexus devices
adding VDC as individual devices 20
R
required commands adapters support 11 required credentials adapters 11
S
SNMP discovery adapters 11 supported adapters overview 11T
technical library v
U
uninstalling adapters 3
V
VDC
methods for adding to Cisco Nexus devices 20
Virtual Device Contexts
SeeVDC