User Guide
CTERA Portal
Datacenter Edition
September 2011
Version 3.0
Copyright © 2009-2011 CTERA Networks Ltd.
All rights reserved. No part of this document may be reproduced in any form or by any means without written permission from CTERA Networks Ltd.
Information in this document is subject to change without notice and does not represent a commitment on part of CTERA Networks Ltd.
CTERA, C200, C400, C800, P1200, CloudPlug, NEXT3, Cloud Attached Storage, and Virtual Cloud Drive are trademarks, service marks, or registered trademarks of CTERA Networks Ltd. All other product names mentioned herein are trademarks or registered trademarks of their respective owners.
The products described in this document are protected by U.S. patents, foreign patents, or pending applications.
Tip
For legal information and for the end user license agreement, refer to Legal Information (on page 291) in this guide.
i
Contents
Introduction --- 1
About the CTERA Portal --- 1
The CTERA Portal Datacenter Edition --- 2
CTERA Portal Interfaces and Users --- 4
About Cloud Attached Storage --- 6
Understanding CTERA Provisioning --- 6
About This Guide --- 9
Contacting Technical Support --- 9
Setting Up the CTERA Portal --- 11
Introduction--- 12
Requirements --- 12
Workflow --- 13
Importing the CTERA Portal OVF File --- 14
Logging In to the CTERA Portal Server --- 17
Changing the Server Root Password --- 18
Setting Up Network Settings --- 18
Performing Initial CTERA Portal Setup --- 19
Installing a Certificate --- 23
Creating DNS Records --- 25
Starting and Stopping the CTERA Portal --- 26
Upgrading the CTERA Portal --- 26
Initializing the SSD Acceleration --- 27
Managing Storage Pools --- 28
Verifying That CTERA Portal Services Are Running --- 31
Setting a Server to "Secondary" Mode --- 31
Configuring CTERA Portal Replication --- 32
Getting Started --- 35
Browser Requirements --- 35
Logging in to the CTERA Portal --- 36
Using the CTERA Portal--- 41
The Navigation Pane --- 41
The Main Frame --- 42
Contents
Navigating between Virtual Portals --- 45
Accessing the Global Administration View --- 45
Accessing Online Help --- 45
Logging Out --- 45
Configuring Global Virtual Portal Settings --- 47
Configuring CTERA Portal General Settings --- 47
Managing the CTERA Portal License --- 52
Configuring Global DNS Settings --- 57
Configuring Global Billing Settings --- 58
Configuring Global Mail Server Settings --- 59
Installing an SSL Certificate --- 61
Configuring Virtual Portals --- 63
Overriding Global Portal Settings --- 63
Branding the CTERA Portal --- 65
Managing User Accounts --- 69
Accessing the User Account Manager --- 70
Adding and Editing User Accounts --- 71
Viewing User Accounts --- 73
Provisioning User Accounts in Reseller Portals--- 75
Setting Storage Quotas for Team Members --- 81
Managing Devices for User Accounts --- 82
Managing Folders for User Accounts --- 83
Managing Folder Groups for User Accounts --- 84
Configuring User Alerts --- 85
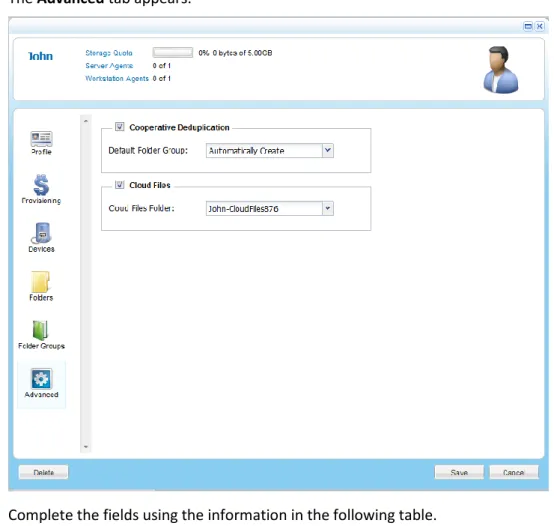
Configuring User Accounts' Advanced Settings --- 86
Enabling/Disabling User Accounts --- 88
Using Active Directory --- 89
Exporting User Accounts to Excel--- 95
Applying Provisioning Changes --- 96
Deleting User Accounts --- 97
Managing Administrators --- 99
Accessing the Staff Administrator Manager --- 100
Adding and Editing Staff Administrators --- 101
Configuring Staff Administrator Alerts --- 102
Viewing Staff Administrators --- 104
Exporting Staff Administrators to Excel --- 104
Contents
Accessing the Global Administrator Manager --- 105
Adding and Editing Global Administrators --- 106
Configuring Global Administrator Alerts --- 107
Viewing Global Administrators --- 108
Deleting Global Administrators --- 108
Configuring an IP-Based Access Control List --- 108
Managing Device Configuration Templates --- 111
Accessing the Configuration Template Manager --- 112
Adding and Editing Device Configuration Templates --- 113
Viewing Device Configuration Templates --- 114
Working with Backup Sets --- 114
Selecting Applications for Backup --- 125
Scheduling Automatic Cloud Backup --- 127
Restricting Throughput --- 128
Marking a Firmware Image as the Current Firmware Image --- 130
Configuring the Automatic Template Assignment Policy --- 131
Setting the Default Device Configuration Template --- 133
Deleting Device Configuration Templates --- 134
Managing Devices --- 135
Accessing the Device Manager --- 136
Editing Device Settings --- 137
Viewing Devices --- 140
Remotely Managing Devices and Their Files --- 146
Exporting Devices to Excel --- 147
Deleting Devices --- 147
Managing Folders and Folder Groups --- 149
Accessing the Folder Manager --- 150
Adding and Editing Folders --- 152
Viewing Folders --- 153
Managing Folder Contents --- 155
Changing Passphrases for Accessing Folder Contents --- 164
Exporting Folders to Excel --- 165
Deleting Folders--- 165
Accessing the Folder Group Manager --- 166
Adding and Editing Folder Groups --- 167
Viewing Folder Groups --- 170
Managing Folders for Folder Groups --- 170
Contents
Exporting Folder Groups to Excel --- 172
Deleting Folder Groups --- 172
Managing Subscription Plans --- 173
Adding and Editing Subscription Plans --- 174
Understanding Snapshot Retention Policies --- 181
Viewing Subscription Plans --- 183
Setting/Removing the Default Subscription Plan --- 184
Exporting Subscription Plans to Excel --- 184
Applying Provisioning Changes --- 184
Deleting Subscription Plans --- 185
Managing Add-on Packages --- 187
Adding and Editing Add-on Packages --- 187
Viewing Add-on Packages --- 193
Exporting Add-on Packages to Excel --- 193
Applying Provisioning Changes --- 194
Deleting Add-on Packages --- 194
Managing Vouchers --- 195
Adding Vouchers --- 195
Viewing Vouchers --- 198
Sending Vouchers by Email --- 198
Exporting Vouchers to Excel --- 199
Deleting Vouchers --- 199
Managing Invoices --- 201
Editing Invoice Properties --- 202
Viewing Invoices --- 203
Processing Invoices Manually --- 205
Exporting Invoices to Excel --- 205
Canceling Invoices --- 205
Customizing the Invoice Template --- 206
Managing Email Invitations --- 207
Configuring Email Invitation Settings --- 207
Viewing Active Email Invitations --- 209
Deleting Active Email Invitations --- 209
Managing Virtual Portals --- 211
Contents
Adding and Editing Virtual Portals--- 213
Viewing Virtual Portals --- 214
Assigning Virtual Portals to Global Plans --- 215
Adding Global Add-on Packages to Virtual Portals --- 216
Exporting Virtual Portals to Excel --- 218
Deleting Virtual Portals --- 218
Managing Servers --- 219
Accessing the Server Manager --- 219
Editing Server General Settings --- 221
Editing Server SMTP Settings --- 222
Viewing Servers' Statuses --- 223
Viewing Connected Devices --- 224
Monitoring Server Activity --- 225
Viewing Server Tasks --- 227
Managing Device Firmware Images --- 229
Uploading Firmware Images --- 229
Viewing Firmware Images --- 231
Marking a Firmware Image as the Current Firmware Image --- 231
Deleting Firmware Images --- 232
Viewing Devices that Use a Specific Firmware Image --- 232
Managing Storage Nodes --- 233
Adding and Editing Storage Nodes --- 233
Viewing Storage Nodes --- 242
Deleting Storage Nodes --- 243
Importing and Exporting Folders (Seeding) --- 245
Importing Folders--- 245
Exporting Folders --- 246
Monitoring the CTERA Portal --- 249
Viewing the Status Dashboard --- 249
Viewing Reports --- 252
Configuring Log Settings --- 265
Viewing Logs --- 266
Clearing Logs --- 280
Using CTERA Portal Email Notifications --- 280
Contents
Legal Information --- 291
CTERA End User License Agreement --- 291
GNU GENERAL PUBLIC LICENSE --- 294
Apache License --- 297
Additional Credits --- 299
Index --- 301
CTERA Portal Datacenter Edition User Guide 1 This chapter introduces the CTERA Portal and this guide.
In This Chapter
About the CTERA Portal --- 1
The CTERA Portal Datacenter Edition --- 2
CTERA Portal Interfaces and Users --- 4
About Cloud Attached Storage --- 6
Understanding CTERA Provisioning --- 6
About This Guide --- 9
Contacting Technical Support --- 9
About the CTERA Portal
The CTERA Portal is a scalable cloud-based service delivery platform that allows you to offer cloud storage and data protection to CTERA Cloud Attached Storage® device owners, with minimal operational overhead.
With the CTERA Portal, you control all aspects of Cloud Attached Storage, including: Service Provisioning
Create customer subscription plans that include cloud storage volume, pricing, number of devices per account, user self-provisioning, and time limits. Add-on packages can be used to supplement existing accounts with additional services, and vouchers allow the creation of one-off promotions and pre-paid subscription plans.
User Management
Manage anywhere from tens to tens of thousands of subscribers. Control user access, subscription plans, and add-on packages per user account, and view real-time storage usage and account status.
Remote Device Management
CTERA appliances and CTERA Agents can be set to allow remote management. This enables you to view the appliance status in detail, including logged events, network status, storage volumes, and recent backups, as well as to set firmware upgrades, associated backup folders, and more.
1
1
Introduction2 CTERA Portal Datacenter Edition User Guide
Device Monitoring
Monitor in real-time all CTERA appliances and CTERA Agents associated with user
accounts. View the firmware version, account owner, connection status, and most recent backup operation.
Real-Time Event Monitoring
Centrally monitor and audit all events pertaining to the cloud service. Reporting
Run and export detailed reports on a variety of usage parameters, including storage usage, bad files, snapshot status, and more. Generate user reports that are automatically emailed as PDF attachments.
Private Branding
Brand all aspects of the end-user experience, customizing it to your own corporate identity. This includes the CTERA Portal user interface and all automated email notifications.
The CTERA Portal Datacenter Edition
Installed at the CTERA Portal owner’s datacenter, the CTERA Portal Datacenter Edition allows a CTERA Portal owner to create one or more virtual CTERA Portals on a single set of physical servers.
The following types of virtual portal are supported: Reseller portal
Designed for the needs of a reseller, this type of portal includes support for
reseller-oriented features such as add-ons, plans, vouchers, invoice generation, self registration, and credit card billing. The end users in the portal are the reseller's subscribers.
Reseller portals are managed by staff administrators in the Staff Control Panel. For information on the Staff Control Panel, see CTERA Portal Interfaces and Users (on page 4).
By default, each user uses a private folder group, enabling cooperative de-duplication between all devices owned by the user. Furthermore, when the cloud drive feature is used, each user receives a private cloud drive that is not accessible to other users.
Introduction
1
CTERA Portal Datacenter Edition User Guide 3
When multiple reseller portals are created, the CTERA Portal owner can rent each portal to a different reseller, as part of a multi-tenant or hierarchical business model. Each reseller can log in to their own virtual portal, manage their subscribers, and define subscription plans, branding, and pricing models. In contrast, the CTERA Portal owner can access and manage the contents of any reseller portal, as well as manage global settings across all virtual portals.
Team portal
This type of portal is designed for the needs of a company or team with multiple
members, and as such do not include support for reseller-oriented features. The users in the portal are the team members.
Team portals are managed by team administrators, who are team members with the "Administrator” role. These users can manage their team portal via the Administration tab in their End User Portal. For information on the End User Portal, see CTERA Portal Interfaces and Users (on page 4).
All users in the team portal share a single folder group, enabling cooperative
de-duplication between all members of the group. Furthermore, when the cloud drive feature is used, each user receives a private cloud drive, as well as a team cloud drive that is visible to all the users in the portal.
When multiple team portals are created, the CTERA Portal owner can assign each team portal to a different organizational unit within the company or team. Each organizational unit can log in to their own virtual portal and manage their settings. In contrast, the CTERA Portal owner can access and manage the contents of any team portal, as well as manage global settings across all virtual portals.
Both reseller portals and team portals can be defined within a single CTERA Portal installation.
Tip
All virtual portals created prior to CTERA Portal v3.0 are reseller portals.
Tip
The CTERA Portal is also available in the SaaS Edition. Run by CTERA as a cloud service, the SaaS Edition allows CTERA Portal owners to offer managed cloud services, with no upfront investment. For further information, visit us online (http://www.ctera.com).
1
Introduction4 CTERA Portal Datacenter Edition User Guide
CTERA Portal Interfaces and Users
The CTERA Portal Datacenter Edition includes the following interfaces: The End User Portal
This interface is used by end users to manage their devices, backup files, and access cloud-stored files. End User Portal users are called end users.
When accessed by team administrators, the End User Portal also includes an
Introduction
1
CTERA Portal Datacenter Edition User Guide 5
The Staff Control Panel (available in reseller portals only)
This interface is used by a virtual portal owner's staff to manage the contents and settings of the reseller portal. Staff Control Panel users are called staff administrators.
Only reseller portals have staff administrators and the Staff Control Panel.
The Administration Control Panel
This interface is used by a CTERA Portal owner's staff to manage the contents and settings of all virtual portals in the system, as well as global settings shared by all the defined virtual portals. Administration Control Panel users are called global administrators.
1
Introduction6 CTERA Portal Datacenter Edition User Guide
It is possible to limit a user or administrator's permissions, so that they cannot modify some or all of the settings in the relevant interface.
About Cloud Attached Storage
Cloud Attached Storage® combines a Network Attached Storage appliance or agent with online cloud services. File sharing is performed on the local network where the appliance is located, while cloud storage services are used for off-site backup and disaster recovery. Automated differential backup and restore functions include block-level de-duplication, compression, and encryption technologies, ensuring secure and efficient synchronization between the cloud storage service and the CTERA appliance.
CTERA appliances use CTERA Transport Protocol (CTTP) to communicate with the CTERA Portal. CTTP is secured by SSL and runs over TCP port 995.
Understanding CTERA Provisioning
Provisioning is the process of assigning services and quotas to users or tenants.
CTERA includes two levels of provisioning:
End-user provisioning (available in reseller portals only)
The virtual portal owner provisions end users with services and/or quotas, such as storage space, number of agents, and more.
In reseller portals, end-user provisioning is performed by staff administrators in the Staff Control Panel. In addition, end-user provisioning can be performed by global
administrators in the Administration Control Panel.
End-user provisioning is not supported for team portals. However, it is possible to define a storage quota per team member, as described in Setting Storage Quotas for Team Members (on page 81).
Portal-level provisioning
The CTERA Portal owner provisions each virtual portal owner with services and/or quotas. For example, it is possible to limit a virtual portal to use a total of up to 100GB of storage space and 50 workstation agents.
Portal-level provisioning is performed by global administrators in the Global Administration View.
Introduction
1
CTERA Portal Datacenter Edition User Guide 7
End-user Provisioning
The following provisioning methods are available end-user provisioning in reseller portals
only:
Subscription plans
In order to obtain services, end users must subscribe to a subscription plan.
Tip
Each user can be subscribed to exactly one plan.
End users obtain services for an open-ended period of time with automatically recurring payments, by subscribing to a subscription plan, which defines the set of services that subscribed users will receive. Further, the subscription plan can specify a snapshot retention policy for the user's folders (see Understanding Snapshot Retention Policies (on page 181)) and the subscription plan pricing and payment method.
When creating a subscription plan for end users, administrators can include only those services to which the portal itself is subscribed in the context of a global plan. See Portal-level Provisioning (on page 8).
Add-on packages
End users can subscribe to add-on services, in addition to their basic subscription plan. Each add-on package defines a set of services that subscribed users will receive in addition to the services specified in the subscription plan, for a specified period of time. For example, an add-on package may include an additional 10 GB of storage space for the number of devices specified in the subscription plan.
When creating an add-on package for end users, administrators can include only those services to which the portal itself is subscribed in the context of a global plan or a global
add-on package. See Portal-level Provisioning (on page 8).
Unlike subscription plans, which are open-ended, add-on packages are only valid for a certain time period. Furthermore, while end users are limited to one subscription plan, add-on packages can be stacked as desired. For example, a user may have a subscription plan for 100 GB of storage, as well as two add-on packages for 10GB of storage and one add-on package for 5GB of storage. While the add-on packages are valid, the user will be entitled to 125GB of cloud storage.
Vouchers
A reseller portal allows creating vouchers, which are prepaid coupons that encapsulate specific add-ons and plans. When a device owner redeems a voucher encoding an add-on, the add-on is added to the user’s account. When a device owner redeems a voucher encoding a plan, they are assigned to the subscription plan.
1
Introduction8 CTERA Portal Datacenter Edition User Guide
Tip
The assigned subscription plan can be a hidden plan that is not exposed to end users.
The CTERA Portal allows you to mix and match these provisioning methods in order to obtain the combination that best suits your company's business model and your customer's needs.
Portal-level Provisioning
The following provisioning methods are available for portal-level provisioning: Global subscription plans
In order to obtain services, virtual portal owners may subscribe to a global subscription plan. Each virtual portal can be subscribed to a single plan. The plan defines a set of services that subscribed portals will receive, and which will subsequently be used by the portal's end users. Further, the subscription plan can specify a maximum snapshot retention policy for the portal (see Understanding Snapshot Retention Policies (on page 181)).
When a reseller portal is subscribed to a global plan, end users obtain services via end-user provisioning. See End-user Provisioning (on page 7). In contrast, when a team portal is subscribed to a global plan, all end users obtain services for an open-ended period of time without payment.
Tip
For reseller portals, the global subscription plan limits the total amount of storage space (and other resources, such as server agents and workstation agents) allocated to a reseller portal's end users. That is, if a virtual portal owner provisions a 10GB storage quota to an end user, then 10GB of the virtual portal's storage space quota is consumed, regardless of whether the end user actually uses the entire 10GB of storage space.
For team portals, the global subscription plan limits the total amount of resources used by end users.
Global add-on packages
Virtual portal owners can subscribe to add-on services, in addition to their basic subscription plan. Each global add-on package defines a set of services that portals will receive in addition to the services specified in the global subscription plan, for a specified period of time. For example, an add-on package may include an additional 10 GB of storage space for the number of devices specified in the global subscription plan. When a reseller portal is subscribed to a global add-on package, end users obtain services via end-user provisioning. See End-user Provisioning (on page 7). In contrast, when a team portal is subscribed to a global add-on package, all end users in the team portal will obtain additional services for a specified period of time.
Introduction
1
CTERA Portal Datacenter Edition User Guide 9
Unlike subscription plans, which are open-ended, add-on packages are only valid for a certain time period. Furthermore, while virtual portals are limited to one subscription plan, add-on packages can be stacked as desired. For example, a portal may have a subscription plan for 100 GB of storage, as well as two add-on packages for 10GB of storage and one add-on package for 5GB of storage. While the add-on packages are valid, the portal will be entitled to allocate up to 125GB of cloud storage to end users.
About This Guide
This guide explains how to use the CTERA Portal Datacenter Edition. The procedures it contains are intended for both staff and global administrators, except where otherwise noted.
Contacting Technical Support
If you require assistance in configuring or using your CTERA Portal, contact technical support (http://www.ctera.com/support).
CTERA Portal Datacenter Edition User Guide 11 This chapter explains how to set up the CTERA Portal for initial use.
In This Chapter
Introduction --- 12
Requirements --- 12
Workflow --- 13
Importing the CTERA Portal OVF File --- 14
Logging In to the CTERA Portal Server --- 17
Changing the Server Root Password --- 18
Setting Up Network Settings --- 18
Performing Initial CTERA Portal Setup --- 19
Installing a Certificate --- 23
Creating DNS Records --- 25
Starting and Stopping the CTERA Portal --- 26
Upgrading the CTERA Portal --- 26
Initializing the SSD Acceleration --- 27
Managing Storage Pools --- 28
Verifying That CTERA Portal Services Are Running --- 31
Setting a Server to "Secondary" Mode --- 31
Configuring CTERA Portal Replication --- 32
2
2
Setting Up the CTERA Portal12 CTERA Portal Datacenter Edition User Guide
Introduction
The CTERA Portal Datacenter Edition is available on the following platforms: VMWare Virtual Appliance
The CTERA Portal virtual appliance encapsulates CTERA Portal and all required operating system files in a pre-integrated, self-contained virtual machine OVF (Open Virtualizaton Format) file for ease of deployment.
The CTERA P1200 Appliance
The CTERA P1200 is a 12-bay appliance that is preinstalled with CTERA Portal Datacenter Edition software, and which supports up to 36TB raw storage capacity. It is ideal for mid-sized businesses and service providers managing up to 500 CTERA Cloud Attached Storage appliances or CTERA Agents.
The setup procedure provided in this chapter is relevant for both platforms.
Requirements
Requirements for the VMWare Virtual Appliance platform:
The CTERA Portal must be installed on a machine that meets the following requirements: VMware ESXi Server 4.1 operating system
64-bit virtual machine with minimum 4GB RAM and 100GB local hard disk drive
Access from the virtual machine to iSCSI Storage Area network or directly attached hard drives
Requirements for administrator PC: Web browser
SSH and SCP clients (for example, the freeware PuTTY)
Requirements for both the CTERA P1200 and VMWare Virtual Appliance platforms: Prepare the following:
A public DNS name for the CTERA Portal A mail server for sending notifications Open the following ports on the firewall:
CTTP: TCP 995 (inbound) HTTP: TCP 80 (inbound) HTTPS: TCP 443 (inbound) DNS: UDP 53 (inbound ) SSH: TCP 25 (outbound)
Setting Up the CTERA Portal
2
CTERA Portal Datacenter Edition User Guide 13
TCP port 22 (inbound, from CTERA’s support IP address 81.218.153.66); required for SSH remote assistance by CTERA support personnel
Workflow
To set up the primary CTERA Portal Server
1 If running the VMWare Virtual Appliance platform, import the CTERA Portal OVF file to the EXSi server.
See Importing the CTERA Portal OVF File (page 14). 2 Change the server root password.
See Changing the Server Root Password (page 18). 3 Set up an IP address for the CTERA Portal Server.
See Setting Up Network Settings (page 18). 4 On P1200 only, initialize the SSD acceleration.
See Initializing the SSD Acceleration (page 27). 5 Initialize the storage pool.
See Initializing the Storage Pool (page 28). 6 Perform initial setup on the CTERA Portal.
See Performing Initial CTERA Portal Setup (page 19). 7 Install an SSL certificate on the CTERA Portal.
See Installing a Certificate (page 23). 8 Configure DNS records.
See Creating DNS Records (page 25).
9 Verify that the CTERA Portal services are running.
See Verifying That CTERA Portal Services Are Running (page 31). 10 Once you have purchased a license, install the license key.
2
Setting Up the CTERA Portal14 CTERA Portal Datacenter Edition User Guide
Once you have installed a primary server according to the procedure above, you can optionally install a secondary server.
To set up a secondary CTERA Portal Server
1 If running the VMWare Virtual Appliance platform, import the CTERA Portal OVF file to the EXSi server.
See Importing the CTERA Portal OVF File (page 14). 2 Change the server root password.
See Changing the Server Root Password (page 18). 3 Set up an IP address for the CTERA Portal Server.
See Setting Up Network Settings (page 18). 4 Set the server to "secondary" mode.
See Setting a Server to "Secondary" Mode (page 31). 5 On P1200 only, initialize the SSD acceleration.
See Initializing the SSD Acceleration (page 27). 6 Initialize the storage pool.
See Initializing the Storage Pool (page 28). 7 Verify that the CTERA Portal services are running.
See Verifying That CTERA Portal Services Are Running (page 31).
Importing the CTERA Portal OVF File
This procedure is applicable to the virtual appliance platform only.
To install the CTERA Portal Server as a virtual appliance on VMWare vSphere 1 Open the vSphere Client.
Setting Up the CTERA Portal
2
CTERA Portal Datacenter Edition User Guide 15
The Deploy OVF Template window opens displaying the Source dialog box.
3 Click Browse, and browse to the CTERA Portal OVF file. 4 Click Next.
The OVF Template Details dialog box appear with the CTERA Portal OVF file's details.
2
Setting Up the CTERA Portal16 CTERA Portal Datacenter Edition User Guide
The Name and Location dialog box appear.
6 In the Name field, type name for the portal instance. The name can be up to 80 characters long.
7 Click Next.
The Disk Format dialog box appear.
8 Choose Thick provisioned format. 9 Click Next.
Setting Up the CTERA Portal
2
CTERA Portal Datacenter Edition User Guide 17
The Ready to Complete dialog box appear.
10 Click Finish.
A progress bar appears, and the CTERA Portal is installed as a virtual appliance. When installation is complete, a success message appears.
11 Click Close.
12 Start the CTERA Portal virtual machine.
13 Proceed with the procedure Changing the Server Root Password (page 18).
Logging In to the CTERA Portal Server
To log in
Log in as root, using SSH or through the console. The default password is "password".
2
Setting Up the CTERA Portal18 CTERA Portal Datacenter Edition User Guide
Changing the Server Root Password
This procedure explains how to change the server root password.
Warning
The default root password for new servers is "password". You must change this initial password for security purposes.
To change the server root password
1 Log in as root, as described in Logging In to the CTERA Portal Server (page 17). The default password is "password".
2 In the command line, enter the following command: passwd
You can now configure a new password for the root user.
Tip
Take note of the password you set. If you forget the root user's password, there is no way to retrieve it.
Setting Up Network Settings
To use a static IP address, set up a static IP address and network settings for the CTERA Portal Server, by using the ctera-network-util.sh script.
To set up network settings
1 Log in as root, as described in Logging In to the CTERA Portal Server (page 17). 2 In the command line, enter the following command:
ctera-network-util.sh set_static interface ip mask gw dns[dns2] Where:
interface is the name of the machine's interface. To view the interface's name, run the command: ifconfig –a
ip is the IP address for this server.
mask is the netmask of your network. For example: 255.255.255.0.
gw is your network's default gateway.
dns is the IP address of the primary DNS server. dns2 is the IP address of the secondary DNS server.
Setting Up the CTERA Portal
2
CTERA Portal Datacenter Edition User Guide 19
For example, to configure the interface e1000g0, server IP address 192.168.90.50, netmask 255.255.255.0, default gateway 192.168.90.1, primary DNS server 192.168.90.2, and alternate DNS server 192.168.90.3, enter the following command:
ctera-network-util.sh set_static e1000g0 192.168.90.50 255.255.255.0 192.168.90.1 192.168.90.2 192.168.90.3
The CTERA Portal is assigned the specified static IP address and network settings.
Tip
You can revert to using a dynamic IP address for the CTERA Portal, by enabling DHCP. This is done by entering the following command:
ctera-network-util.sh set_dhcp interface
For example:
ctera-network-util.sh set_dhcp e1000g0
Performing Initial CTERA Portal Setup
This procedure is performed only on the primary server only, and not on secondary servers. To perform initial CTERA Portal setup
1 Using a Web browser, browse to the CTERA Portal machine's IP address. The Setup Wizard opens displaying the Welcome screen.
2 Complete the fields using the relevant information in the following table. 3 Click Next.
2
Setting Up the CTERA Portal20 CTERA Portal Datacenter Edition User Guide
The Email Settings dialog box appears.
4 Complete the fields using the relevant information in the following table. 5 Click Next.
The DNS Domain dialog box appears.
6 In the DNS Suffix field, type the DNS suffix that should be appended to each virtual portal's name, in order to create the virtual portal's DNS name.
For example, if a virtual portal's name is "myportal", and the DNS suffix is "acme.com", then the virtual portal's DNS name will be "myportal.acme.com".
Setting Up the CTERA Portal
2
CTERA Portal Datacenter Edition User Guide 21
The Completing the Setup Wizard dialog box appears.
8 Click Finish.
A success message appears. 9 Click OK.
The CTERA Portal opens displaying the Administrator Login page.
10 In the fields provided, type the user name and password you specified in the Setup Wizard.
2
Setting Up the CTERA Portal22 CTERA Portal Datacenter Edition User Guide
The Global Administration View appears displaying the Main > Dashboard page.
By default, the CTERA Portal creates a reseller portal called "portal". You can rename, view and edit this portal, or create additional reseller or team portals using the information in Adding and Editing Virtual Portals.
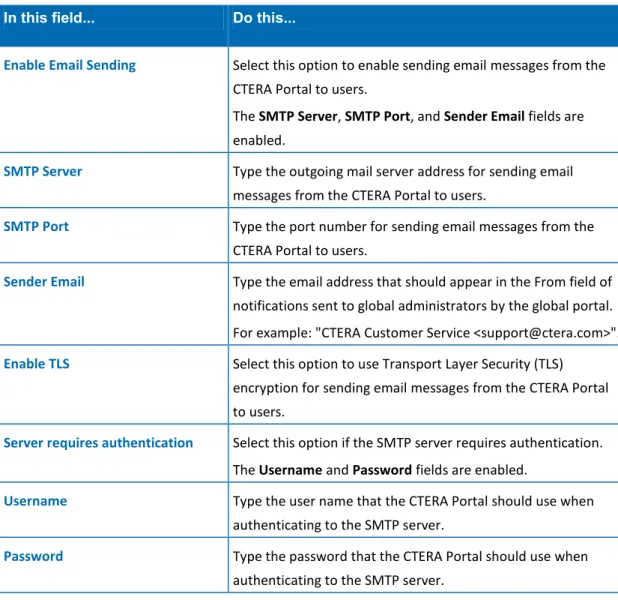
Table 1: Setup Wizard Fields
In this field... Do this...
Username Type a user name for your CTERA Portal administrator account.
First Name Type your first name.
Last Name Type your last name.
Email Address Type your email address.
Password / Retype Password Type a password for your CTERA Portal administrator account.
SMTP Server Type the outgoing mail server address for sending email messages from the CTERA Portal to users.
SMTP Port Type the port number for sending email messages from the CTERA Portal to users.
Sender Email Type the email address that should appear in the From field of notifications.
Setting Up the CTERA Portal
2
CTERA Portal Datacenter Edition User Guide 23
Enable TLS Select this option to use Transport Layer Security (TLS) encryption for sending email messages from the CTERA Portal to users.
Server requires authentication Select this option if the SMTP server requires authentication.
Username Type the user name that the CTERA Portal should use when authenticating to the SMTP server.
Password Type the password that the CTERA Portal should use when authenticating to the SMTP server.
Installing a Certificate
This procedure needs to be performed only once, for the primary server.
You must install an SSL certificate on the CTERA Portal, in order to enable devices to connect to the CTERA Portal, and to prevent a security warning from being displayed when users attempt to access the CTERA Portal via HTTPS. You can obtain an SSL certificate from any public SSL certificate authority, such as Godaddy (recommended), Verisign, or Thawte. If multiple virtual portals are configured, each virtual portal has its own DNS name. In this case, the SSL certificate should be a wildcard certificate, that is, the DNS name embedded in the certificate should start with "*". For example, if the CTERA Portal's DNS name is
myportal.com, and there are two virtual portals, portal1.myportal.com and portal2.myportal.com, you should buy a wildcard certificate for *.myportal.com.
If you have only one portal, and do not intended to configure multiple virtual portals, then it is sufficient to purchase a regular SSL certificate (not a wildcard certificate). For example, if your portal's DNS name is portal1.myportal.com, then you can buy a certificate for
portal1.myportal.com.
The certificate should be in *.zip format and contain certificate files in *.pem format. To request a certificate
1 Log in as root.
2 In the command line, enter the following commands: mkdir /root/certs
telnet localhost
3 Log in to the CTERA Portal CLI, by doing the following: a Enter the following command:
login portalnameadmin username
Where:
2
Setting Up the CTERA Portal24 CTERA Portal Datacenter Edition User Guide
username is your CTERA Portal user name.
You are prompted for your password. b Enter your password.
4 Generate the certificate request, by entering the following command: certificate request /root/certs *.domainSuffix
Where domainSuffix is your domain suffix.
As explained earlier, the asterisk creates a wildcard certificate and is not mandatory. For example, to request a wildcard certificate for the domain acme.com, enter:
certificate request /root/certs *.acme.com
To create a certificate for a single domain, portal.acme.com, enter:
certificate request /root/certs portal.acme.com Tip
You must create a wildcard certificate, if you are planning to define more than one virtual portal.
5 Log out of the CTERA Portal CLI, by entering the following command: quit
6 Using SCP, copy the file /root/certs/certificate.req from the CTERA Portal Server to your computer.
To generate the SSL certificate
Obtain an SSL certificate, by doing one of the following:
Purchase an SSL certificate from any public SSL certificate authority, such as Godaddy (recommended), Verisign, or Thawte.
Use the certificate request file which you just created above.
Select "Tomcat" as the server type. The resulting file should be a ZIP file, "tomcat.zip". Request a test certificate from CTERA.
To do so, send CTERA an email with the certificate request created in the previous procedure, and CTERA will generate a certificate for you.
This option is for testing purposes only, not for production. To install the SSL certificate
Setting Up the CTERA Portal
2
CTERA Portal Datacenter Edition User Guide 25
Creating DNS Records
The CTERA Portal includes a built-in DNS server. This server automatically resolves the domain names of all the defined virtual portals, as well as names of devices using the remote access service. In order for this DNS server to work, you must register it using an NS (Name Server) record on your DNS server.
The procedure used for configuring the DNS for remote access depends on the whether you have purchased a dedicated domain (i.e. the DNS suffix includes only records for the CTERA Portal) or not (i.e. the DNS suffix includes records that are unrelated to the CTERA Portal). If you have a dedicated domain
If you you have a dedicated domain for the CTERA Portal, (i.e. a dedicated zone with no other servers other than the CTERA Portal), then the NS record can be created just once, in that zone.
For this example, assume that you have a dedicated DNS domain for the CTERA Portal,
.myacme.com, and the portal servers are 192.168.0.3 (primary) and 192.168.0.4 (secondary). Create a new A record for each CTERA Portal Servers. For example:
A srv1.myacme.com 192.168.0.3 A srv2.myacme.com 192.168.0.4
Next, create an NS record for one or more CTERA Portal Servers to the zone acme.com:
NS srv1.myexample.com NS srv2.myexample.com
If you do not have a dedicated domain
If you do not have a dedicated domain, (i.e. the CTERA Portal shares the same zone with other servers), then you are required to define a separate DNS NS record for each virtual portal.
For this example, assume that the portal DNS suffix is .acme.com, and the portal servers are 192.168.0.3 (primary) and 192.168.0.4 (secondary). Furthermore, assume that you have two virtual portals: portal1 and portal2. In the zone acme.com, create a new A record for each of the CTERA Portal Servers. For example:
A srv1.acme.com 192.168.0.3 A srv2.acme.com 192.168.0.4
Next, create an NS record for the zone portal1.acme.com:
NS srv1.acme.com NS srv2.acme.com
2
Setting Up the CTERA Portal26 CTERA Portal Datacenter Edition User Guide
Finally, create another NS record for the zone portal2.acme.com:
NS srv1.acme.com NS srv2.acme.com
Starting and Stopping the CTERA Portal
To stop the CTERA Portal1 Log in as root.
2 Run the following command: ctera-portal-manag.sh stop To start the CTERA Portal 3 Log in as root.
4 Run the following command: ctera-portal-manag.sh start
Upgrading the CTERA Portal
To upgrade an existing CTERA Portal installation 1 Stop ALL the CTERA Portal Servers.
See Starting and Stopping the CTERA Portal (page 26).
2 On each server, start the upgrade, by running the following command: ctera-portal-manag.sh upgradefolder
Where folder is the folder containing the new CTERA Portal version. For example:
ctera-portal-manag.sh upgrade /root/3.0.17/
Setting Up the CTERA Portal
2
CTERA Portal Datacenter Edition User Guide 27
Initializing the SSD Acceleration
This procedure is relevant to the CTERA P1200 only. To initialize the SSD acceleration1 In the command line, enter the following command: format
A list of all installed disks appears.
Tip
You can identify the SSD as follows: Display a list of disks, by running the format command. Then display information for each disk where the path starts with "/pci".
To display information for the initial disk, you can simply enter the disk's number. For subsequent disks, enter the command diskdiskNum, where
diskNum is the disk's number.
The PCI disk that is not part of the system pool is the SSD. 2 Configure the SSD, by doing the following:
Tip
It is recommended to create two partitions as follows: Partition 1: 20% of the SSD, used for a log device Partition 2: 80% of the SSD, used for a cache device a Enter the number of the SSD.
b Enter the following command: fdisk
c Delete a partition from the SSD, by entering 3. d Enter the number of the partition to delete.
The partition is deleted.
e Create a partition on the SSD, by entering 1.
f Specify the Solaris2 as the new partition's type, by entering 1. g Enter the percentage of the SSD to use for the new partition.
A new Solaris2 partition is created over the specified percentage of the SSD. h Update the configuration and exit, by entering 6.
3 Write down the disk name.
2
Setting Up the CTERA Portal28 CTERA Portal Datacenter Edition User Guide
Managing Storage Pools
Initializing the Storage Pool
To create a new storage pool 1 Log in as root.
2 In the command line, enter the following command: format
A list of all installed disks appears.
Tip
You can identify the SSD as follows: Display a list of disks, by running the format command. Then display information for each disk where the path starts with "/pci".
To display information for the initial disk, you can simply enter the disk's number. For subsequent disks, enter the command diskdiskNum, where
diskNum is the disk's number.
The PCI disk that is not part of the system pool is the SSD.
3 Configure the SSD, as described in Initializing the SSD Acceleration (page 27), step 2. 4 Create the CTERA storage pool, by doing the following:
a Enter the following command:
ctera-storage-util.sh create_storage [raidType] disk0 disk2... disk11 [log SSDpart1] [cache SSDpart2] [spare sparedisk1 sparedisk2 …]
For information on the command's parameters, see Storage Utility Parameters (page 29).
For example:
ctera-storage-util.sh create_storage raidz2 c1t2d0 c1t3d0 c1t4d0 c1t5d0 log c1t7d0p1 cache c1t7d0p2 spare c1t8d0
b View the disks that are used by the CTERA Portal, by entering the following command: ctera-storage-util.sh status
The pool called "cterapool" should include all of the disks you specified in the previous step.
Setting Up the CTERA Portal
2
CTERA Portal Datacenter Edition User Guide 29
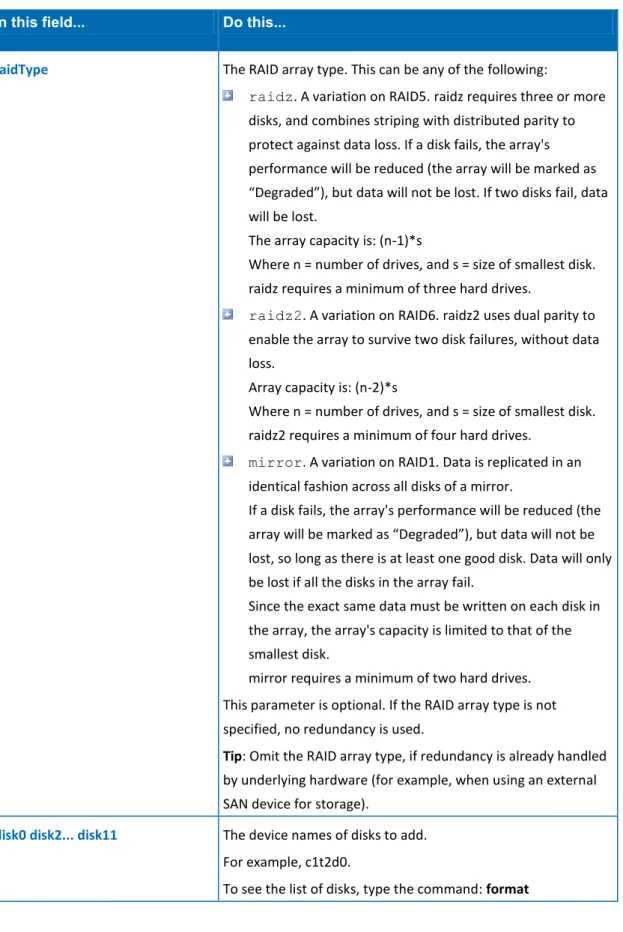
Table 2: Storage Utility Parameters
In this field... Do this...
raidType The RAID array type. This can be any of the following:
raidz. A variation on RAID5. raidz requires three or more disks, and combines striping with distributed parity to protect against data loss. If a disk fails, the array's performance will be reduced (the array will be marked as “Degraded”), but data will not be lost. If two disks fail, data will be lost.
The array capacity is: (n-1)*s
Where n = number of drives, and s = size of smallest disk. raidz requires a minimum of three hard drives.
raidz2. A variation on RAID6. raidz2 uses dual parity to enable the array to survive two disk failures, without data loss.
Array capacity is: (n-2)*s
Where n = number of drives, and s = size of smallest disk. raidz2 requires a minimum of four hard drives.
mirror. A variation on RAID1. Data is replicated in an identical fashion across all disks of a mirror.
If a disk fails, the array's performance will be reduced (the array will be marked as “Degraded”), but data will not be lost, so long as there is at least one good disk. Data will only be lost if all the disks in the array fail.
Since the exact same data must be written on each disk in the array, the array's capacity is limited to that of the smallest disk.
mirror requires a minimum of two hard drives. This parameter is optional. If the RAID array type is not specified, no redundancy is used.
Tip: Omit the RAID array type, if redundancy is already handled by underlying hardware (for example, when using an external SAN device for storage).
disk0 disk2... disk11 The device names of disks to add. For example, c1t2d0.
2
Setting Up the CTERA Portal30 CTERA Portal Datacenter Edition User Guide
SSDpart1 and SSDpart2 The cache and log partitions on the SSD, in the format
<diskName><partitionNumber>.
For example, if the disk name is c1t7d0 and the partition is p2, then type c1t7d0p2.
These parameters are optional and relevant for the P1200 only.
sparedisk1 sparedisk2… Spare disks track of available hot spares for a pool. These disks are not actively used in the pool, but when an active device fails, it is automatically replaced by a hot spare. These parameters are optional.
Enlarging an Existing Storage Pool
You can increase the amount of storage space, by adding disks to the storage pool. To add disks to a storage pool
1 Install one or more new disks. 2 Log in as root.
3 In the command line, enter the following command: format
A list of all installed disks appears.
4 Write down the name of the new disks you installed.
5 View the disks that are used by the CTERA Portal, by entering the following command: ctera-storage-util.sh status
The pool called "cterapool" includes all disks used by the CTERA Portal. 6 Add the new disk, by entering the following command:
ctera-storage-util.sh add [raidType] disk0 disk2... disk11 [log SSDpart1] [cache SSDpart2]
[spare sparedisk1 sparedisk2 …]
For information on the command's parameters, see Storage Utility Parameters (page 29). If multiple disks are added, they are treated as a new RAID array, with the raid type specified by the optional parameter raidType.
7 Verify that the disks were added to "cterapool", by entering the following command: ctera-storage-util.sh status
Setting Up the CTERA Portal
2
CTERA Portal Datacenter Edition User Guide 31
Verifying That CTERA Portal Services Are Running
To verify that CTERA Portal services are running1 Log in as root.
2 In the command line, enter the following command: ctera-portal-manag.sh status
The statuses of the PostgreSQL, Tomcat, and Memcachedb services are displayed. On the primary server, all three services should have the status "running". On secondary servers, only Tomcat should be running.
Setting a Server to "Secondary" Mode
Once you have installed a primary server, you can optionally install a secondary server. There are two possibilities for installing a secondary server:
Secondary server without replication – A secondary server that runs the CTERA Portal application, but does not replicate the CTERA Portal database from the primary server. This option is useful for load balancing. To configure this option, perform the following procedure.
Secondary server with replication – A secondary server that runs the CTERA Portal application and replicates the CTERA Portal database from the primary server. This option is useful for load balancing, as well as failover in the event that the master server fails. To configure this option, perform the procedure Configuring CTERA Portal Replication (page 32).
This procedure is performed only on secondary servers, and not on the primary server. To set a server to "secondary" mode
1 Log in to the secondary server, as described in Logging In to the CTERA Portal Server (page 17).
2 Edit the file /etc/ctera/portal.cfg.
3 Change the value of CTERA_STORAGE_MODE from "Master" to "Slave".
4 Change the value of CTERA_STORAGE_ADDR from "localhost" to the IP address of the master server.
2
Setting Up the CTERA Portal32 CTERA Portal Datacenter Edition User Guide
Configuring CTERA Portal Replication
It is possible to replicate the CTERA Portal's data to a secondary server. If the primary server (also called the master server) fails, you can then perform a manual failover to the secondary server.
Tip
Another option for achieving High Availability without the use of replication is to use a SAN (Storage Area Network) to store the CTERA Storage Pool and/or virtual machine images. For information, contact technical support
(http://www.ctera.com/support).
Replicating the CTERA Portal Master Server
When replication is enabled, the secondary server stores a copy of the latest snapshot of the master server every 15 minutes. Upon failure of the master server, it is possible to failover to the secondary server.
Tip
Database replication performed via SSH; therefore, if there is a firewall between the master server and the secondary server, the SSH port must be open for incoming and outgoing connections. By default, the SSH port is TCP port 22. To replicate the CTERA Portal master server to a secondary server
1 Configure SSH trust between the master server and the secondary server, by doing the following:
a Log in to the master server with your SSH client as the root user. b Run the following command:
ssh-keygen –t dsa
The following prompts appear:
c Press Enter to accept the default file in which to save the key. d Press Enter to specify no passphrase.
Setting Up the CTERA Portal
2
CTERA Portal Datacenter Edition User Guide 33
f Run the following commands:
mv /root/.ssh/id_dsa.pub /root/.ssh/authorized_keys
scp –r /root/.ssh/id_dsa root@<Secondary Server IP address> :/root/.ssh/rep.pem 2 Set the secondary server to "secondary" mode, as described in Setting a Server to
"Secondary" Mode (page 31).
3 Restart the master and secondary servers, by entering the following command on each machine:
ctera-portal-manag.sh restart
Modifying the Storage Pool Snapshot Retention Policy
By default, the snapshot retention policy specifies that 96 snapshots will be retained for the storage pool. You can change this default using the following procedure.
Tip
The interval between taking snapshots on the master server (30 minutes) and retrieving snapshots on the secondary server (15 minutes) is hard-coded and cannot be modified.
To modify the maximum number of snapshots stored on a machine 1 Log in to the desired database machine with your SSH client as the root user. 2 Edit the file /etc/ctera/portal.cfg.
3 Change the value of CTERA_STORAGE_MAX_SNAPSHOTS to the number of snapshots you would like the machine to maintain.
The default value is 96. It is not recommended to set a higher number. 4 Save your changes.
5 Restart the machine, by entering the following command: ctera-portal-manag.sh restart
2
Setting Up the CTERA Portal34 CTERA Portal Datacenter Edition User Guide
Performing Manual Failover to a Secondary Server
Failover is performed by changing the secondary server from secondary mode to master mode.
To change the secondary server to master mode
1 Log in to the secondary server with your SSH client as the root user. 2 Edit the file /etc/ctera/portal.cfg.
3 Change the value of CTERA_STORAGE_MODE from "Slave" to "Master".
4 Change the value of CTERA_STORAGE_ADDR from the IP address of the master server to "localhost".
5 To enable running Apache Tomcat, change the value of CTERA_APPS from "Storage" to "Storage, Tomcat".
6 Save your changes.
7 Restart the secondary server, by entering the following command: ctera-portal-manag.sh restart
CTERA Portal Datacenter Edition User Guide 35 This chapter contains all the information you need in order to get started using the CTERA
Portal.
In This Chapter
Browser Requirements --- 35 Logging in to the CTERA Portal --- 36 Using the CTERA Portal --- 41 The Navigation Pane --- 41 The Main Frame --- 42 The Status Bar --- 44 Navigating between Virtual Portals --- 45 Accessing the Global Administration View --- 45 Accessing Online Help --- 45 Logging Out --- 45
Browser Requirements
In order to use the CTERA Portal, you will need the following:
Either Microsoft Internet Explorer 7.0 or later, Mozilla Firefox 3.0 or later, or Google Chrome 5.0 or later
Adobe Flash Player
3
3
Getting Started36 CTERA Portal Datacenter Edition User Guide
Logging in to the CTERA Portal
Staff administrators are defined within the scope of a single reseller portal, and thus have access to that portal only. These administrators must log in to the relevant reseller portal via the Staff Control Panel. See Logging in to the Staff Control Panel (on page 36).
Team administrators are both users and administrators of a single team portal. In the End User Portal, they can access their personal settings in the My Account tab, as well as administrative settings in the Administration tab. See Logging in to the End User Portal (on page 37).
In contrast, global administrators have access to all virtual portals. These administrators may log in to any virtual portal via the Administration Control Panel. Once logged in, they can navigate to any other portal. See Logging in to the Administration Control Panel (on page 39).
Logging in to the Staff Control Panel
This task is relevant for reseller portals only.
To log in to the Staff Control Panel
1 Using a Web browser, open http://<PortalDNS>/staff.
Where <PortalDNS> is your CTERA Portal's DNS name. For example, if your portal's DNS name is "myportal.acme.com", you must open http://myportal.acme.com/staff. The CTERA Portal opens displaying the Staff Login page.
Getting Started
3
CTERA Portal Datacenter Edition User Guide 37
2 In the fields provided, type your user name and password. 3 Click Log In.
The Staff Control Panel opens displaying your portal's Main > Dashboard page.
Logging in to the End User Portal
This task is relevant for team portals only.
To log in to the End User Panel
1 Using a Web browser, open http://<PortalDNS>/ServicesPortal.
Where <PortalDNS> is your CTERA Portal's DNS name. For example, if your portal's DNS name is "myportal.acme.com", you must open
3
Getting Started38 CTERA Portal Datacenter Edition User Guide
The CTERA Portal opens displaying the Login page.
2 In the fields provided, type your user name and password. 3 Click Log In.
The End User Portal opens displaying the My Account tab.
Getting Started
3
CTERA Portal Datacenter Edition User Guide 39
The Administration tab appears.
Logging in to the Administration Control Panel
To log in to the Administration Control Panel
1 Using a Web browser, open http://<PortalAddress>/admin.
Where <PortalAddress> is the IP address or DNS name of the virtual portal to which
you want to connect.
If <PortalAddress> is the DNS name of a defined virtual portal, then upon login, the specified virtual portal will open. For example, to connect to a virtual portal whose DNS name is "myportal.acme.com", you must open http://myportal.acme.com/admin. If <PortalAddress> is not the DNS name of a defined virtual portal, then the Global Administration View will open.
After connecting, you can switch to any other portal as described in Navigating between Virtual Portals (on page 45), or to the Global Administration View as described in
3
Getting Started40 CTERA Portal Datacenter Edition User Guide
The CTERA Portal opens displaying the Administrator Login page.
2 In the fields provided, type your user name and password. 3 Click Log In.
Getting Started
3
CTERA Portal Datacenter Edition User Guide 41
Using the CTERA Portal
CTERA Portal interfaces consist of the following elements
Navigation pane. Used for navigating between pages in the CTERA Portal.
Main frame. Displays the CTERA Portal pages, each of which contains controls and information.
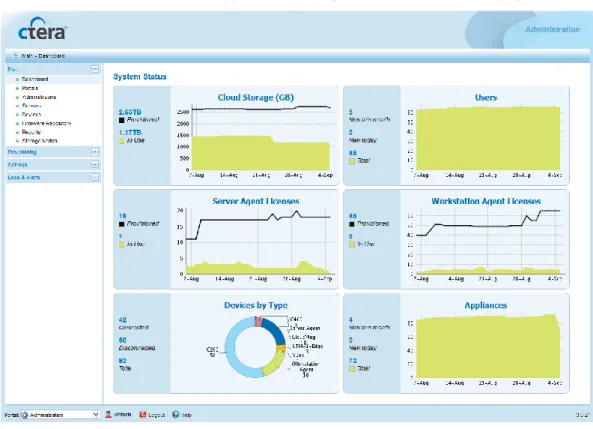
Status bar. Displays general and session-specific controls and information. The following figure displays these elements in the Staff Control Panel:
The Navigation Pane
The navigation pane includes several menu sections, each of which can be opened to reveal its contents.
If desired, the navigation pane can be hidden, in order to expand the main frame.
Opening Menu Sections
In order to view the contents of a menu section in the navigation pane, you must open it. To open a menu section
Do one of the following: Click on the section's name.
Next to the section's name, click . The section opens, revealing its contents.
3
Getting Started42 CTERA Portal Datacenter Edition User Guide
The Main Frame
The main frame displays information and controls for the menu section you selected. When information is displayed in tables, you can sort the table according to a specific column and choose which columns should appear in the table. In addition, the main frame includes controls for refreshing its contents and quickly accessing the Home page.
Sorting Tables
You can sort a table according to a specific column, in ascending or descending order. To sort a table according to a column
1 Click on the desired column's heading.
The table is sorted according to the column. An arrow in the column's heading indicates that the table is sorted according to the column. The arrow's direction indicates the sort order.
In this example, the table is sorted according to the Date column, in ascending order. 2 To reverse the column's sort order, click on the column's heading again.
The sort order is reversed.
3 To select the desired sort order from a list, do the following: a Mouse-over the column's heading.
Getting Started
3
CTERA Portal Datacenter Edition User Guide 43
An arrow appears in the right side of the column heading.
b Click on the arrow, then click on the desired sort order in the drop-down list. The column is sorted accordingly.
Navigating between Table Pages
When a table contains multiple pages of data, you can navigate between the pages by using the controls at the bottom of the screen.
To navigate between pages Do any of the following:
To navigate to the next page, click . To navigate to the previous page, click . To navigate to page 1, click .
To navigate to a specific page, in the Page field, type the desired page number.
Searching Tables
If a search box appears above a table, you can search for specific items in the table. To search for items in a table
1 In the search box at the top-right corner of the main frame, type a string according to which you want to search.
The CTERA Portal will look in all table columns for items that contain the specified string. The search is case-insensitive.
For example, searching for "th" in the Users table could return the following results: JohnSmith, ThomasB, and MatthewJones.
2 If the Search drop-down list appears next to the search box, you can specify the scope of the search, by doing any of the following:
3
Getting Started44 CTERA Portal Datacenter Edition User Guide
To limit the search to specific parameters only, click the Search drop-down list, then select thecheck boxes next to the desired parameters and clear all other check boxes. To expand the search to all parameters, click the Search drop-down list, then select
the Select All check box. 3 Click .
The search results are displayed.
Refreshing Page Contents
Some of the pages in the main frame contain a button that allows you to refresh the page's contents.
To refresh a page's contents
At the bottom of the main frame, click . The page's contents are refreshed.
Accessing the Home Page
The main frame contains a shortcut that enables you to quickly access the Home page from any other page in the CTERA Portal.
To quickly access the Home page
In the top-left corner of the main frame, click . The Home page appears.
The Status Bar
The status bar includes the following elements: Your user name
A button for logging out of the CTERA Portal See Logging Out (on page 45).
A button for accessing online help The firmware version
A drop-down list for navigating between virtual portals (Administration Control Panel only)
Getting Started
3
CTERA Portal Datacenter Edition User Guide 45
Navigating between Virtual Portals
Global administrators can navigate between virtual portals as needed.
This task can be performed in the Administration Control Panel only.
To navigate between virtual portals
In the status bar, in the Portal drop-down list, select the virtual portal you want to access. The desired virtual portal's Main > Dashboard page appears.
Accessing the Global Administration View
Global administrators can access to the Global Administration View.This task can be performed in the Administration Control Panel only.
To access the Global Administration View
In the status bar, in the Portal drop-down list, select Administration.
The Global Administration View appears displaying the Main > Dashboard page.
Accessing Online Help
To access online help In the status bar, click Help.
Logging Out
To log out of the CTERA Portal In the status bar, click Logout.
You are logged out of the CTERA Portal.
Tip
CTERA Portal Datacenter Edition User Guide 47 This chapter explains how to configure global CTERA Portal settings. These settings are shared across all virtual portals.
The tasks in this chapter can be performed in the Global Administration View only.
In This Chapter
Configuring CTERA Portal General Settings --- 47 Managing the CTERA Portal License --- 52 Configuring Global DNS Settings --- 57 Configuring Global Billing Settings --- 58 Configuring Global Mail Server Settings --- 59 Installing an SSL Certificate --- 61
Configuring CTERA Portal General Settings
You can globally configure virtual portal settings, such as:Whether end users in reseller portals can open a CTERA Portal account on their own, and the requirements for doing so
Whether vouchers can be used by end users in reseller portals
Whether the folders of users who have no quota should be automatically deleted after a period of time
These settings will be inherited by all virtual portals and can be optionally overridden per virtual portal. For information on overriding these settings on a per-virtual portal basis, see Overriding Global Portal Settings (on page 63).
This task can be performed in the Global Administration View only.
To configure global virtual portal settings
1 In the navigation pane, click Settings > Virtual Portal Settings.