Agent 6.71 for VMware ESX Server
User Guide
May 2010
Contents
1
Agent for VMware ESX Server
... 6
1.1 Overview... 6
1.2 Features... 7
1.2.1Agent 6.71... 7
1.2.2Agent 6.70... 8
1.3 Limitations... 9
1.4 Release Notes and Help... 10
1.5 Windows and Web Agent Consoles... 11
2
Installing the Agent
... 12
2.1 Installing... 13
2.1.1System Requirements... 13
2.1.2Installation Procedures... 13
2.1.2.1 Running the Installation Kit... 14
2.2 Upgrading... 15
2.2.1Meeting System and Software Requirements... 15
2.2.2Preparing the Computer... 16
2.2.3Upgrading Program Files and Configuration Files... 17
2.2.4Upgrade Steps... 17
2.3 Uninstalling... 18
3
Backing Up
... 19
3.1 Table for Backup Information... 19
3.2 Overview of Backup Steps (Web Agent Console)... 20
3.3 Back Up a VM... 21
3.4 Using Windows Agent Console to Create the Job... 29
4
Restoring
... 33
4.1 Overview of Restore Steps... 33
4.2 Restoring a VM... 34
4.3 Restore From Another Computer - Web Agent Console... 38
4.4 Restore From Another Computer - Windows Agent Console... 38
5.3 Space Requirements... 40
5.4 Protecting vCenter Installations... 40
5.5 VMware VSS Snapshots Instead of SYNC Drivers... 40
5.5.1Preventing Database Corruption... 41
6
Appendix
... 42
6.1 Backups and Reseeding... 42
6.2 Incomplete VM Backups... 42
6.3 Manual Registration of a VM... 44
6.4 Log File Messages... 46
6.4.1Error Messages... 46
Figures
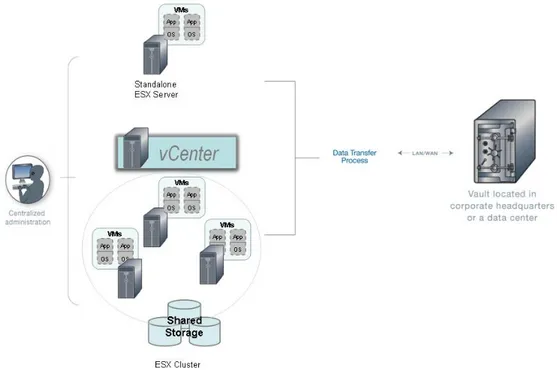
Figure 1. Data Transfer Process...7
Figure 2. Web Agent Console Screen...11
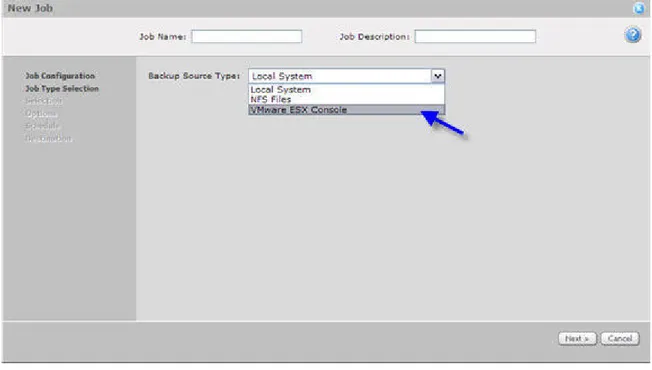
Figure 3. Configuration – Job Type Selection...21
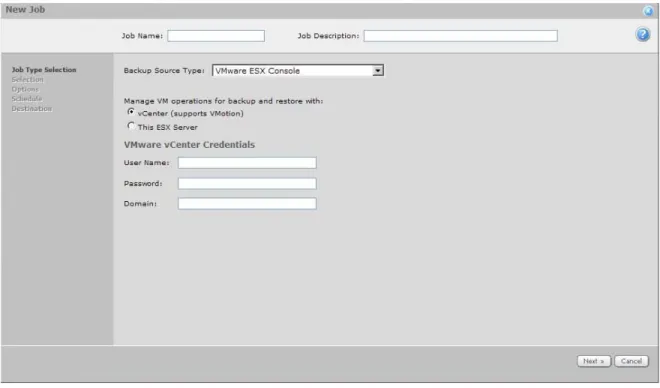
Figure 4. Configuration – Manage with vCenter...22
Figure 5. Configuration – Manage with Local ESX Server...22
Figure 6. Configuration – Selection...23
Figure 7. Configuration – Include Options...24
Figure 8. Configuration – Options...25
Figure 9. Configuration – Advanced Options...26
Figure 10. Configuration – Schedule...27
Figure 11. Configuration – Destination...28
Figure 12. Windows Agent Console – Backup Source Type...29
Figure 13. Windows Agent Console – Manage with vCenter...30
Figure 14. Windows Agent Console – Manage with Local ESX Server...30
Figure 15. Windows Agent Console – VM Selection...31
Figure 16. Windows Agent Console – VMware Backup Options...32
Figure 17. Restore – Source...34
Figure 18. Restore – Data Selection...35
Figure 19. Restore – Options...36
Figure 20. Restore – Advanced Options...37
Figure 21. Disabling the Snapshot Virtual Machine Memory option...39
Figure 22. Incomplete Backup Icons...43
Revision: This manual has been updated for Version 6.7. Software Version: 6.71 (May 2010)
© 1997-2010
The software manufacturer makes no representations or warranties with respect to the contents hereof and specifically disclaims any implied warranties of merchantability or fitness for any particular purpose.
Furthermore, the software manufacturer reserves the right to revise this publication and to make changes from time to time in the content hereof without obligation of the software manufacturer to notify any person of such revision of changes. All companies, names and data used in examples herein are fictitious unless otherwise noted.
No part of this document may be reproduced, transmitted, transcribed, stored in a retrieval system or
translated into any language including computer language, in any form or by any means electronic, mechanic, magnetic, optical, chemical or otherwise without prior written permission.
All products and company names mentioned in this document are trademarks or registered trademarks of their respective owners.
Acknowledgements: Two encryption methods, DES and TripleDES, include cryptographic software written by Eric Young. The Windows versions of these algorithms also include software written by Tim Hudson. Bruce Schneier designed Blowfish encryption.
“Part of the software embedded in this product is gSOAP software. Portions created by gSOAP are Copyright 2001-2006 Robert A. van Engelen, Genivia Inc. All Rights Reserved. THE SOFTWARE IN THIS PRODUCT WAS IN PART PROVIDED BY GENIVIA INC AND ANY EXPRESS OR IMPLIED WARRANTIES,
INCLUDING, BUT NOT LIMITED TO, THE IMPLIED WARRANTIES OF MERCHANTABILITY AND FITNESS FOR A PARTICULAR PURPOSE ARE DISCLAIMED. IN NO EVENT SHALL THE AUTHOR BE LIABLE FOR ANY DIRECT, INDIRECT, INCIDENTAL, SPECIAL, EXEMPLARY, OR CONSEQUENTIAL DAMAGES (INCLUDING, BUT NOT LIMITED TO, PROCUREMENT OF SUBSTITUTE GOODS OR SERVICES; LOSS OF USE, DATA, OR PROFITS; OR BUSINESS INTERRUPTION) HOWEVER CAUSED AND ON ANY THEORY OF LIABILITY, WHETHER IN CONTRACT, STRICT LIABILITY, OR TORT (INCLUDING
NEGLIGENCE OR OTHERWISE) ARISING IN ANY WAY OUT OF THE USE OF THIS SOFTWARE, EVEN IF ADVISED OF THE POSSIBILITY OF SUCH DAMAGE.”
The Agent, Agent Console, and Vault applications provide encryption options for 128/256-bit AES (Advanced Encryption Standard). Advanced Encryption Standard algorithm (named Rijndael, pronounced “Rain Doll”) was developed by cryptographers Dr. Joan Daemen and Dr. Vincent Rijmen. This algorithm has been chosen by the National Institute of Standards and Technology (NIST) of the U.S. Department of Commerce to be the Federal Information Processing Standard (FIPS).
1
Agent for VMware ESX Server
1.1
Overview
This version of the Agent for VMware ESX Server can perform backups and restores of Virtual Machines (VMs) on VMware ESX Consoles (versions 3, 3.5, and 4). VMs hosted on ESXi 3.5 and ESXi 4 can also be backed up, provided that there is at least one ESX Server with an Agent installed there.
In general, this manual uses these terms interchangeably: ESX Server Console
ESX Server ESX Console
The VMware ESX Server Console installs directly on the server hardware, or “bare metal”, and inserts a virtualization layer between the hardware and the operating system. The ESX Console partitions a physical server into multiple secure and portable VMs that can run side by side on the same physical server.
Each VM on an ESX Console represents a complete system, with processors, memory, networking, storage and BIOS. So Windows, Linux, Solaris, and NetWare operating systems can run in those virtual environments.
VMs see their own private virtual disk files. Outside a VM, however, the virtual disks are simply large files that can be moved, copied and backed up.
The Agent can then:
• Take snapshots of a running VM (optionally capturing active memory and quiescing the virtual disks)
• Back up the VM and supporting files to a secure, remote Vault • Remove the backup snapshots
Figure 1. Data Transfer Process
1.2
Features
1.2.1
Agent 6.71
For vault versions 6.21 and above, the VMware Agent will claim two or three licenses, depending on the configuration and use of the Agent:
• A Linux Server Agent license will always be claimed. • A VMware Plug-In license will always be claimed.
• For a vCenter connection, a VMware ESX Cluster license (called “ESXFarm”) will be claimed for the number of ESX or ESXi servers that the vCenter manages.
Log files now indicate whether you are connected to an ESX Host or a vCenter: "Connected to VMware VirtualCenter ... at <address>"
1.2.2
Agent 6.70
• Integrated with VMware ESX – provides “hot backups” of virtual machines. There is little or no disruption to the VMs during backup.
• The Agent supports VMotion by connecting to vCenter. Using vCenter, you can perform VM backups without reseeding when you use VMotion to migrate VMs from one ESX server to another. This applies even if a VM is moved using VMotion during a backup Job.
• Centralized control (administration) using Web Agent Console or Windows Agent Console.
• You can select one or more virtual machines for backups and restores. Wildcards can be used in name filters.
• The Agent shows the name of the VM as it appears in the Virtual Infrastructure console. When you work with a Job in Web Agent Console, the most recent version of the VM name displays.
• You can restore a VM to its original location, or an alternate datastore location, as a complete VM. During the process, you can optionally register the VM.
• You can restore a VM as its component files to an alternate directory on disk. This allows you to recover individual VM disk files and attach them to other VMs. • VMs backed up from one ESX Server Console can be restored to another ESX
Server Console with the Restore from another Computer workflow. This can also work on a different vCenter cluster.
Alternatively, you can restore and use VMotion to migrate the machine. This is useful if you wish to place the machine on an ESX Server away from the Agent. • Agent Console Job logs report the status of individual VMs. This allows you to
quickly identify machines that require attention. Also, each log provides a list of VMs that were not accessible to the Job.
• An option to exclude specific VMs from backup Jobs is available. • You can protect ESXi servers in mixed ESX/ESXi environments.
• You can back up and restore VMware templates. Note that the templates are only visible when you use vCenter authentication.
1.3
Limitations
The Agent comes in an installation package (a “tar” file). You can only install it on a VMware ESX console.
Any snapshots of a VM, except those created by the Agent, will be included in the Agent's backup of a VM as part of the VM's data files. If one of the Agent's snapshots is deleted while the backup is running, the backup will fail. Errors will be reported for the VM if a non-Agent snapshot is removed during backup.
The Agent does not back up removable storage devices, such as floppy disks and CD-ROMs, on the virtual machine. Typically these are exposed to the VM as files on the ESX Server (such as an ISO). You can use the Agent to create a local file/folder task to back up these image files. This is simpler than putting an Agent on each VM.
Independent-persistent disks cannot be backed up when the VM is powered on. When snapshots are created, any independent-persistent disks are skipped. They are locked by VMware, so the Agent cannot access them for the backup.
You cannot browse an NFS mount when you attempt to restore an NFS backup to an alternate location.
VMs created on later versions of ESX may not run on earlier versions of ESX due to VMware hardware version differences. We recommend restoring to the same version of ESX, or a more recent version.
During a VMware restore, the Administrator must ensure that the same VM is not running on another ESX Console in a VI3 environment.
1.4
Release Notes and Help
Note: This manual applies to both Windows Agent Console and Web Agent Console in terms of managing the Agent for VMware ESX Server. That is, the behavior of the Agent is the same whether it is controlled from the Windows or Web-based Agent Console. The information about Agent Console functionality mainly concerns the different screens. The screens in Windows Agent Console and Web Agent Console do not look the same, but they perform the same functions. So backups and restores with Windows Agent Console and Web Agent Console require the same steps (workflows), but the screens look different.
You can also view Agent Console information and descriptions in the online help.
Release Notes
Release notes contain “up to the minute” information about the released product, an overview of new features, any known defect (bug) fixes incorporated since the last release, a description of known issues, and a section about product support. Release notes are available from your service provider.
Online Help
The Agent Console applications provide online help. Portions of the help information are similar to the contents of this manual.
To access the online help:
In Web Agent Console, click the (Help) button
1.5
Windows and Web Agent Consoles
Agent Consoles (for Windows and Web) provide centralized points of control for managing all computers running the Agent software on a computer network. Within an organization, the configuration and scheduling of Jobs is done through the computer that runs the Agent Console software.
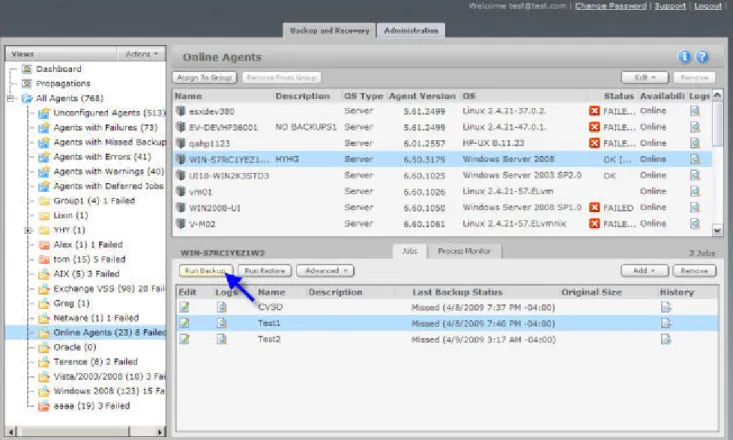
Figure 2. Web Agent Console Screen
The Agent Console software connects to an organization’s computers running the Agent software, activating that computer’s backup Job.
The Windows Agent Console Operations Guide and the Windows/Web Agent Console
online help provide documentation for the customer/user responsible for installing, configuring and using all Agents and the Agent Console software (plus any applicable Plug-Ins).
The Agent for VMware ESX Server has its own installation kit. There is a different installation kit that installs regular Linux Agents.
2
Installing the Agent
The Agent for VMware ESX Server integrates into the existing architecture, allowing you to back up VMware ESX VMs to a Vault. The Agent also performs restores, and the data thus restored may be used to recover a VMware ESX VM.
In addition, the Agent performs local console backups and restores of files. This allows you, for example, to back up ISOs and configuration settings.
If your Agent Console application is older than 6.12 (for Windows Agent Console) or 6.21 (for Web Agent Console), you must upgrade to these versions (at least) before you install the Agent.
The Vault must be version 5.53 or 6.04 (or above).
The Agent for VMware ESX Server typically comes from your service provider in a tar file called:
Agent-VMware-ESX-Server-6.71.<version-info>.tar.gz
Your Service Provider may have renamed this file, or it may have a different version number.
Note: For information about functions such as creating a new Agent, creating a backup Job, scheduling backups, and disaster recovery, refer to the Operations Guides and User Guides.
2.1
Installing
You will require an Agent for VMware ESX Server installation kit.
2.1.1
System Requirements
HardwareChoose hardware according to the VMware Compatibility Guide, and provide at least 2 GB of space on the disk where you install the Agent.
Software
You can use VMware ESX 3/3.5/4 consoles. You can also protect ESXi servers in mixed ESX/ESXi environments.
Privilege Requirements
Installation: To extract the installation files for the Agent, no special privileges are required. However, to run the installation script, you must have root privileges.
Functional: To communicate with an Agent system remotely, the user specified must have full root privileges.
2.1.2
Installation Procedures
Before beginning the installation, make sure that you have: • An Agent for VMware ESX Server installation kit
• A target system running a supported version of the ESX Server • Service Console administrative (i.e., root) privileges
• Sufficient disk space for the new installation and subsequent Job activities. Note that if the available disk space is not sufficient for a complete installation, the installation directory will roll back to its original state.
The Agent kit consists of three programs (VV, VVAgent, and buagent), plus
vmwarePlugin.so.
VVAgent and buagent are Agent (daemon) components. VV is a command-line program used to perform tasks such as backups, restores, and synchs.
2.1.2.1 Running the Installation Kit
Depending on your service provider, you may have options to download the file from the Web, or from a CD.
To install the Agent, download and copy the
Agent-VMware-ESX-Server-6.71.<version-info>.tar.gz package onto the target ESX Server.
Note: You must perform the following steps locally on the target ESX Server. 1. Extract the files from the package. To do so, use this command (in which
“PACKAGENAME” could be “Agent-VMware-ESX-Server-6.71”):
tar xvfz PACKAGENAME.tar.gz
2. Go to the directory where you extracted the package. 3. Run the installation script:
# ./install.sh
Note: The installation script will interactively prompt you for configuration information such as web registration (address, port number and authentication) and log file name.
When the installation finishes, a completion message will appear, and the Agent daemon will be running.
The Install.log will be in the installation directory if the installation has succeeded. For example:
/opt/BUAgent/Install.log
If the installation fails and rolls back, the installation log will be in the <Installation Failure directory>.
If it fails and does not roll back, the installation log will be in the <Installation Kit directory>.
2.2
Upgrading
Upgrades from versions 5.61, 5.62 and 6.70 of this application are supported. Console-based VM backups on the same ESX server do not require reseeding.
The default directory for new installations of VMware/ESX Plugin has been changed from "/usr/local/BUAgent" to "/opt/BUAgent".
If you are performing an upgrade from a previous Agent, the installer will keep the default used during an upgrade.
Upgrading to version 6.7 includes the following tasks: 1. Verifying system and software requirements 2. Preparing the computer
3. Upgrading program files and configuration files 4. Following the upgrade steps
Note: During the upgrade, you may be prompted to stop the Agent (if it is running) before performing the new installation.
When you run the installation kit, the Agent upgrades to version 6.7, and the following tasks are automatically performed:
• Backup copies of the old Global.vvc, Job vvc and delta files are saved in a subdirectory of the Agent installation directory.
• The new BuildVersion and VVCVersion are created in Global.vvc and Job vvc files:
BuildVersion = 6.7X.XXXX
VVCVersion = XXX
• Job vvc files and server profiles in Global.vvc will be updated. • All delta files will be upgraded to Version 6.7 format.
• A log file will be created in the Agent installation directory.
• All executables and documents will be replaced with new versions.
2.2.1
Meeting System and Software Requirements
To upgrade the Agent, your system must meet the minimum requirements mentioned earlier in this document.
Note: Available free space in the volume on which the Agent is installed should be greater than the size of all delta files + size of the largest delta file + a reasonable cushion (at least 100 MB).
2.2.2
Preparing the Computer
To prepare your existing machine for an Agent upgrade, complete these tasks: a. Back up the previous Agent files
We strongly recommend that you make at least one backup of your previous Agent files, including all files and subdirectories under the Agent installation directory. Do not attempt an upgrade without a backup.
b. Clean up Server Profiles in Global.vvc
From the Agent Console, open the configuration of the Agent that you want to upgrade. Go to the Vaults section, check for a server configuration that is no longer in use, and delete it. Also, highlight each server configuration and click Edit to double-check that the information in the server profile is valid. Then click OK to save your changes.
c. Clean up Jobs
After the Global.vvc has been cleaned up, check all backup Jobs to see if there are any Jobs that back up to a Vault that has been deleted from the Agent Configuration settings. Delete such Jobs, or assign them to a different Vault. If you have Jobs that back up to tape drive or Directory on Disk, they are local Jobs. Leave them unchanged. During an upgrade, they will be registered to the first Vault indicated in Agent Configuration.
d. Synchronize all backup Jobs
After cleaning up the Jobs, check the backup logs of each Job to see if any errors show “Validation failed“. If so, you need to verify the validation information with your Vault operator to make sure it is valid. If the latest backup log shows no errors, do a Synchronize with the Vault, and check the Synch log.
e. Verify eligible Vault version
For every Vault to which you back up, make sure that its Vault version is 5.53 at least. Otherwise, you will need to upgrade the Vault before you can upgrade the Agent.
2.2.3
Upgrading Program Files and Configuration Files
Recommendation: Start the installation when the Vaults that appear in Agent Configuration are not busy with other Jobs.
When you launch the installation kit, it detects the previously installed version of the Agent, and starts to upgrade it.
IMPORTANT: When the upgrade process starts, wait until it finishes. Do not run more than one upgrade process at a time.
2.2.4
Upgrade Steps
Note: To upgrade the Agent properly, you must select the same installation directory that was used for the previous Agent. Otherwise, the upgrade will proceed as if it were a new installation.
1. Log onto the target system. 2. Go to the installation kit directory. 3. Download and copy the
Agent-VMware-ESX-Server-6.71.<version-info>.tar.gz
package onto the target ESX Server.
Note: You must perform the following steps locally on the target ESX Server. 4. Extract the files from the package. To do so, use this command (in which
“PACKAGENAME” could be “Agent-VMware-ESX-Server-6.71”):
tar xvfz PACKAGENAME.tar.gz
5. Go to the directory where you extracted the package. 6. Run the installation script:
# ./install.sh
and shut down the Agent. The script will provide an option for you to do this.
Always check the log files after an upgrade process. They can help if you encounter problems.
If an upgrade fails, the Global.vvc, Job vvc and delta files will roll back to their old versions. The Global, Job and delta files will not work with new executables, but an upgrade failure will roll back the executables as well.
You may try to run the upgrade program again. If it continues to fail, contact your service provider for support. To completely roll back to the old version, you need to manually copy back the previous backups.
Do at least one backup for each Job after upgrading successfully. This allows the Agent to upload new configuration files to the Vault.
2.3
Uninstalling
Running the installation kit again will simply reinstall or upgrade the Agent. To properly uninstall the Agent, you must run the uninstall.sh script.
To uninstall the Agent for VMware ESX Server: 1. Log onto the target system.
2. Go to the installation directory (by default /opt/BUAgent/).
3. Run the uninstall.sh script. A message will appear, asking whether or not you want to stop the Agent (i.e., VVAgent and buagent services). Note: You can run
<Agent_Installation_Directory>/uninstall.sh directly.
If you choose not to stop the Agent, the uninstallation process will terminate. 4. If you choose to continue, you will be asked whether or not you want to
remove the Agent.
Select Yes to completely remove the Agent, including all Job files and settings.
Select No to remove the vvagent service entry, executables and scripts. This choice leaves your directory, Job files and settings intact for future use. If you choose to completely uninstall the Agent, a confirmation prompt will appear. The log will be in the /tmp/Agent-Uninstall-<timestamp>.log file.
3
Backing Up
The Agent for VMware ESX Server creates a snapshot of the system when it attempts to quiesce the system before a backup. The Agent needs a complete picture of the system at the start of the backup. Any changes made to the VM disk after quiescence are applied to the snapshot file. After the backup, the snapshot is integrated back to the VM.
So any changes (transactions) after the snapshot are not reflected in the backup. Also, a restore is complete only until the time of the snapshot.
Using the VMware Snapshot Manager, you can optionally see when the backup finishes. The Agent snapshot is deleted at that time.
Typically, the Agent for VMware ESX Server snapshot is called
“$DO_NOT_REMOVE$VM30$1”. The numeral at the end of the name increases (1, 2, 3, etc.) for each version (layer) of snapshot.
For more information about snapshot layers, see page 27.
3.1
Table for Backup Information
Before performing the backup/restore process, make sure that you have all of the information such as names, locations, passwords, etc., that the Wizard will request. Use the following table for design considerations, as well as a record for future reference.
System Requirement Customer/User supplied value Comments
New Job name Name = Name of Job to communicate
with the Agent for VMware ESX Server
Backup Source Type VMware ESX Console Choose from the dropdown menu
Management of VM backup and restore operations
Choose between:
o vCenter (supports VMotion)
o This ESX Server
As appropriate, supply vCenter or ESX Console credentials
VMs to back up VM names = Select names of VMs to back
up
Encryption type Type = Password = Password Hint =
If you select a type, you must supply a password
Logging options Create log file = Y/N Log detail level = Keep or purge log files = Number of logs to keep =
Quiescence and snapshots Quiesce guest file system = Y/N Snapshot VM Memory = Y/N
Machine availability impact during snapshot integration =
Move the sliding pointer (“slider”) to control the impact of snapshot integration on backup speed
Schedule Immediate =
Schedule =
Can use the Scheduling Wizard
Destination Vault Vault Name = Network Address =
Choose from the list of Vaults
3.2
Overview of Backup Steps (Web Agent Console)
You will need an Agent that has already been configured. See the Agent Console documentation for more information.
Steps and options:
1. From the Agent Console, create a backup Job, and select VMware ESX Console for the Backup Source Type.
2. Choose how to manage your VM operations (vCenter or This ESX Server). You must also provide VMware ESX credentials (for the vCenter, or local console, depending how you want to back up the VMs).
3. Browse down to the virtual machines.
4. If you start by including all VMs, you can provide a filter for the virtual machines that you want. If you select a specific virtual machine, you will not get the filter option.
5. Go to the Advanced Options screen to specify the VMware ESX Console options. There is a “Machine availability impact” slider that you can move between Faster Backups/Higher Impact and Slower Backups/Lower Impact.
6. Optionally specify a schedule. 7. Select a Vault for the backup. 8. Start the backup.
Note: These steps apply to Windows Agent Console as well as Web Agent Console. The diagrams that follow come from Web Agent Console.
3.3
Back Up a VM
1. In the Agent Console, create a backup Job, and select VMware ESX Console as the Backup Source Type.
Note that you will not see VMware ESX Console in the Backup Source Type box unless you have the Agent for VMware ESX Server installed and licensed.
Figure 3. Configuration – Job Type Selection 2. Choose how to manage your VM operations:
vCenter (supports VMotion) – Enabled (“On”) by default. This option makes it possible for you to use VMotion to migrate VMs between servers without causing reseeds, even if the VMs are partway through backup Jobs.
vCenter displays all of the virtual machines. VMs that are not accessible to the Agent are grayed out.
You can back up machines running on any ESX server in the vCenter, provided that their storage is accessible from the host running the Agent (i.e., storage is on a SAN). You cannot back up VMs that are only in local storage of other ESX servers.
This ESX Server – This option does not support VMotion. If you migrate a VM between servers, reseeding will result.
Enter your credentials, and then click Next.
If the credentials are wrong in Web Agent Console, you will see an error message: “Failed to connect to the VMware Server”.
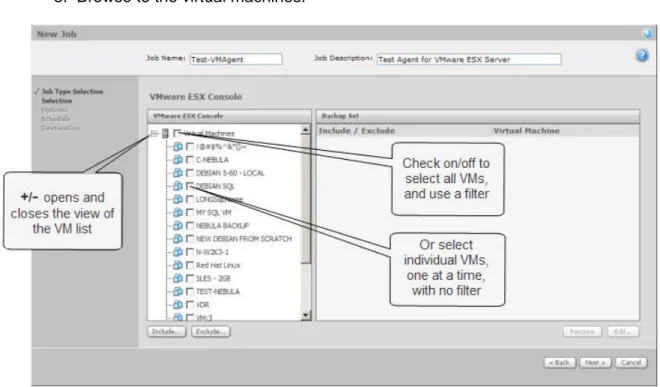
3. Browse to the virtual machines.
Figure 6. Configuration – Selection
You must already have a valid connection (with proper credentials) to the VMware ESX Server here.
If you enable the Virtual Machines option, you will include all VMs on the server. This will also include new VMs that may be added to this list later. You can also use a filter to include all or some VMs (see the next screen).
If you select all of the available VMs individually, that list will not automatically include new VMs. You will not see the filter.
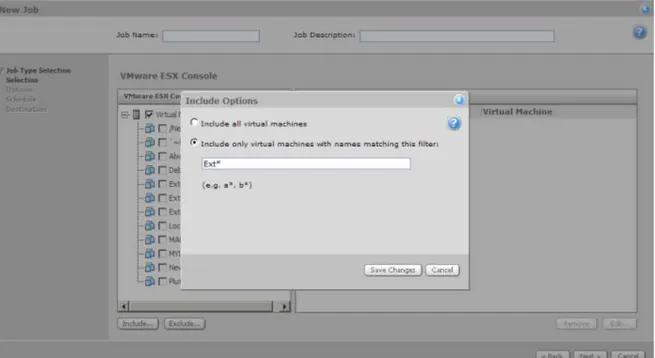
4. If you choose to include an ESX node (through the Include button), you can provide a filter to control which VMs you actually use. If you select a specific virtual machine, you will not see the filtering dialog.
Figure 7. Configuration – Include Options
Include Options
Agent 6.7 for VMware ESX Server does not support multiple wildcard selections on the same line. For example, a*,b* will include a VM named alpha,beta rather than two VMs named alpha and beta.
Older versions (i.e., VMware Plug-In versions) still support multiple filters with special character validation.
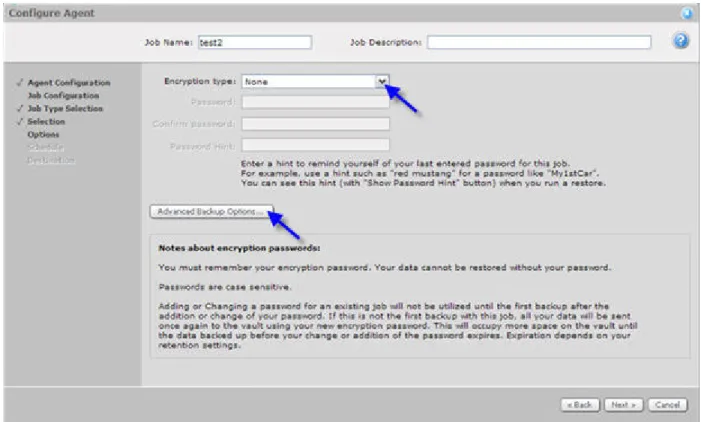
5. You may optionally encrypt your backup data. Your encryption password will not be stored anywhere on the system. You must remember it.
The encryption types range from None to AES 256 bit (the strongest).
Figure 8. Configuration – Options
Click Next to proceed to scheduling. Alternatively, you can click Advanced Backup Options first.
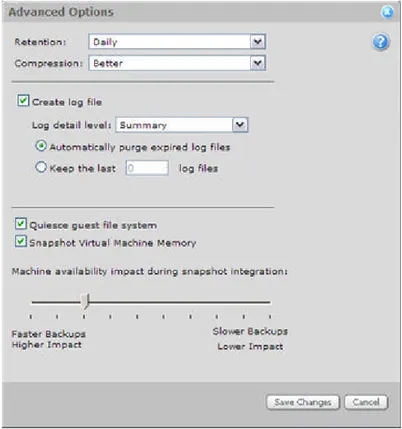
6. Optionally, you can use the Advanced Options page to choose retention and logging options. You can also use it to specify the impact of snapshot integration (“Machine availability impact”), ranging from Faster Backups/Higher Impact to Slower Backups/Lower Impact.
Retention and log files are described in the Agent Console documentation.
Figure 9. Configuration – Advanced Options
Quiesce guest file system – Enabled (“On”) by default. This allows the Agent to make a backup of the VM file system (virtual disks) with no delayed writes pending. Once the system is quiesced, and ready for backing up, any further transactions (i.e., writes) go to the snapshot file until the backup finishes.
For information about the benefits of Windows Volume Shadow Copy Service (VSS), see
VMware VSS Snapshots Instead of SYNC Drivers.
Note: If VMware Tools software has been installed, it ensures that there are no pending writes when the snapshot is taken. Otherwise, the write buffers may not be empty.
Note: If a VM in your Job uses independent disks, do not use the memory snapshots. Put VMs that use independent disks into separate Jobs.
Machine availability impact during snapshot integration – After the backup of the VM virtual disks is captured, the snapshot changes must be re-applied to the VM to make it current again. While the backup collects data from the VM file system, all changes on the guest OS are made to the snapshot file. If this file is large, it will take time and system resources to apply it (while other tasks compete for the same resources).
This sliding pointer (“slider”) controls the ability of the Agent to make layered “snapshots of the snapshots” as the backup occurs. This will take longer to integrate, but the
snapshot changes are only being applied to the previous snapshots, so users are not “shut out” from the VM while the integration proceeds. When the final (much smaller) snapshot is integrated, there is less impact than if there were one large one.
So you are trading faster backups (with more impact on users) against slower backups (with less impact on users).
Click Save Changes or Cancel to continue.
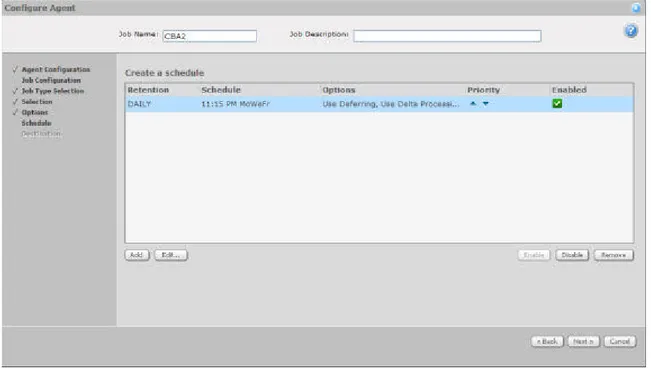
7. Optionally, you can create a schedule.
Figure 10. Configuration – Schedule
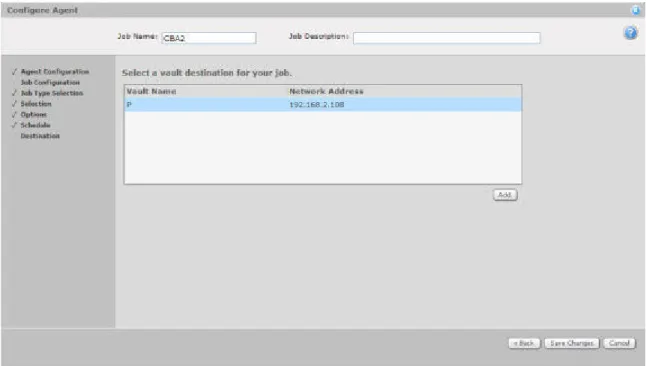
8. Specify a Vault destination for your Job.
Figure 11. Configuration – Destination
See the Agent Console documentation for more information about configuring a Vault.
3.4
Using Windows Agent Console to Create the Job
You can control Agents from Web Agent Console or Windows Agent Console.
It is assumed here that you have an Agent for VMware ESX Server already installed and configured. See the Windows Agent Console documentation for more information.
1. From Windows Agent Console, create a backup Job, and select VMware ESX Console as the Backup source type.
Figure 12. Windows Agent Console – Backup Source Type
3. Choose between vCenter and the local ESX server. Next, provide vCenter or ESX Console credentials.
4. Select and add one, more, or all VMs.
5. Choose your backup options.
Figure 16. Windows Agent Console – VMware Backup Options
The options here include Quiesce guest file system, Snapshot Memory, and a “Machine availability impact during snapshot integration” slider. You can move this slider between Faster Backup, Higher Impact and Slower Backup, Lower Impact.
6. Continue with the remaining steps/options for creating your Job.
Note: These steps are similar for Web Agent Console. See the section on Web Agent Console for more details about the steps and screens. The Web Agent Console help provides similar information.
The backup will check the machine state of each VM. If it is inactive (off) or suspended, it will back up without creating a snapshot. If the VM is active, it will quiesce the system and create a snapshot before backing up.
4
Restoring
A restore Job may be needed to recover all or part of a VM file system (a directory or file). Or it may be needed for a “bare metal” restore if the VM needs to be totally recovered. See the Agent Console documentation for more information about restoring.
In Disaster Recovery (DR) mode, the VM and non-RDM disks are restored. The VM is optionally registered on the VMware ESX Console.
If a VM will be reregistered, it must not exist in Virtual Center.
There must be sufficient disk space available on the VMware ESX Server. Otherwise, the restore Job will be forced to fail.
4.1
Overview of Restore Steps
1. Select the safeset from which to restore. Only a single safeset selection is allowed here. You can browse into the safeset to view the systems and virtual machines that have been backed up.
2. Select one or more virtual machines from the list under VMware ESX Console to add to the restore list.
3. You can restore VMs to their original locations (i.e., live restores) or alternate datastores. Also, you can restore a VM as its component files to an alternate location.
4. You can select VM restore options through the Advanced Restore Options page. If you have chosen to restore VM files to an alternate location, the Register Virtual Machine after Restore option will be disabled and unchecked.
Note: These steps apply to Windows Agent Console, as well as Web Agent Console. The diagrams that follow are from Web Agent Console.
Restore VM files to an alternate location allows you to restore the VM file system to an alternate location as a file. You can then choose files and directories from there, and copy them to the real (live) VM.
4.2
Restoring a VM
1. Select the safeset from which to restore. Only a single safeset selection is allowed here. You can browse into the safeset to view the systems and virtual machines that have been backed up.
Figure 17. Restore – Source Notes
If you restore to a VM that already exists, upon reregistering you will see an error
message in the restore log (such as “VMWR-E-0003 The specified key, name or identifier already exists”).
You will not see this message if the VM exists on the datastore. (This happens when VM files are present on the datastore, and are added to the inventory of an ESX Server.) You must revert to the last memory snapshot if you want the state of the VM to be the same as before the backup. (There can be only a single memory snapshot. When another backup is taken, the memory is cleaned up, and a “new” snapshot is created.)
2. Select one or more virtual machines (from the list under VMware ESX Console) to add to your restore.
3. You can restore VMs to their original locations (i.e., live restores) or alternate datastores. Also, you can restore a VM as its component files to an alternate location. VMs with multiple disks on multiple datastores will consolidate to a single datastore. You can restore component files to an alternate location on disk, and then register them manually. VM component files will be restored to directories whose names include the names of the datastores where the files originally resided.
You cannot restore to the original location if a VM is already running there, or if a VM is in suspended mode. You can restore if the VM is off — this will overwrite the old (existing) VM.
4. If you wish, specify advanced options through the Advanced Restore Options page. Note: Before restoring a VM, you must remove it entirely from the ESX server. Otherwise, orphaned snapshot files could result.
If you have chosen to restore files to an alternate location, the option for registering the VM will be disabled and unchecked.
Figure 20. Restore – Advanced Options
Log Options
If you enable Create log file, you can also select the amount of detail (verboseness) that you want in the log. The levels are None, Files, Directories, and Summary.
VMware ESX Console Option
Enable Register Virtual Machine after Restore to reregister the VM to the ESX Console. This will allow you to use the VM immediately after restoring.
4.3
Restore From Another Computer - Web Agent Console
The Restore from another Computer workflow allows you to effectively restore a registered VM from one ESX Console to a different one. The VM must then be registered there.
It reregisters where the configuration file originally pointed so that the restore Job can be directed to another location. It does this by obtaining, authenticating, and copying
configuration information (Vault name, computer name, and Job name) from the original configuration, and adding it to your location. The restore can then run there.
The workflow provides a Wizard that requires you to: • Select an existing Vault
• Select the computer that has backed up the Job from which you want to restore • Select the Job from which you want to restore
The Wizard can then copy the Job to your local workspace. If one already exists with that name, it will be overwritten.
From here, the restore proceeds normally. Refer to the Web Agent Console online help for more information about restoring.
4.4
Restore From Another Computer - Windows Agent Console
Windows Agent Console handles restores from other computers slightly differently. The Job credentials do not move to the new computer when you try to restore to a new machine. This could present a security risk (i.e., sending the passwords). Also, the new VMware ESX Server Console might have different credentials.In Windows Agent Console, the Wizard does not prompt you for the credentials. You must manually enter them.
To restore a Job from another computer, follow these steps: 1. Start the Restore from another Computer Wizard. 2. Select the Vault from which the Job to be restored resides. 3. Select the computer on the Vault where the Job resides. 4. Select the Job that you want to restore.
5
Best Practices
This section suggests best practices regarding the Agent for VMware ESX Server.
5.1
Snapshot Management
5.1.1
Performance
If you have a VM that does not need to return to an ON state after a restore, disable the Snapshot Virtual Machine Memory option when you back it up. This will help to reduce your backup time, and improve the overall performance of backups that affect the VM. Disabling this option can also help to prevent VM failures under load.
Figure 21. Disabling the Snapshot Virtual Machine Memory option
5.1.2
Independent Disks
If a Job includes a VM with independent disks, disable the memory snapshots. Also, put VMs that have independent disks into separate Jobs.
5.1.3
Snapshots from Restore Operations
To prevent snapshot interference, remove or rename Agent-created memory snapshots before you run the next backup after a restore operation.
5.2
Registering with Web Agent Console
After initial installation, run the registration script to register the Agent with Web Agent Console. The script will also restart the BUAgent.
1. Run the registration script. 2. Restart the vvagent service.
5.3
Space Requirements
Install the Agent on the service console system, rather than a VMFS (Virtual Machine File System) volume. The default service console space should be sufficient.
Note: Do not put VM disks onto the service console system volume. This can cause a shortage of space.
Make sure that there is sufficient storage for delta files, catalogs, and log files. This will depend on the numbers and sizes of the VMs that you need to back up.
The space that you require for backup processes relates to how large the VM disks are, and how active the VMs are during the backup period. VMware uses sparse disk
techniques to make the snapshots as small as possible, but this is controlled by VMware, rather than the Agent.
5.4
Protecting vCenter Installations
The Agent for VMware ESX only protects VMs. Because vCenter runs on Windows, you must also install a Windows Agent and the SQL Server Plug-In for vCenter protection.
5.5
VMware VSS Snapshots Instead of SYNC Drivers
ESX 3.5 updates 2 and above allow quiescing of guest file systems through Windows Volume Shadow Copy Service (VSS) drivers. VSS is available in Windows Server 2003,
If you use SYNC drivers for quiescing operations, your backups might not provide enough consistency for database servers. Use VSS along with image-level backups of VMs for application-consistent backups and restores.
5.5.1
Preventing Database Corruption
Database corruption in VMs with SQL, Exchange or Active Directory can occur when the SYNC driver quiesces. This can result from I/O delays (sometimes 5 to 15 minutes long) for snapshot creation.
Workaround: Install the VSS driver manually. If your VMware tools were installed with ESX 3.0 or ESX 3.5 (Update 1, 2, or 3), the SYNC driver was installed by default.
The SYNC driver will still be used if the VMware tools installed were initially ESX 3.0 tools, and then upgraded to ESX 3.5 tools.
6
Appendix
6.1
Backups and Reseeding
If you back up a virtual machine without the memory snapshot, you will lose any work that you have not saved. Only the data that is actually on disk will be backed up in this case. If you do include the memory snapshot, a restore Job will allow the VM to resume where it left off when you backed it up.
If the VM is “ON” during the backup, the OS will behave as if it were improperly shut down. To return the machine to where it left off, revert to the snapshot that the Agent created.
If you recreate a VM (rather than restoring it, and using either the VMware UI (Snapshot Manager) or a line command to register the VM), it will cause a reseed on the next backup because it appears to be a new machine (different UUID).
But if you restore it with the Register Virtual Machine after Restore option, it will not reseed because the Agent knows that the VM is the same machine.
6.2
Incomplete VM Backups
An incomplete backup results from a backup that has been completed, and committed, but with error situations.
Raw Disk Mapping: If a VM includes Raw Disk Mapping (RDM), the backup log will include an error for the RDM, and the VM will be marked “incomplete” in the backup log and catalog.
Deferring: If a VM is deferred during a backup, the backup log will indicate deferring as usual, and the VM will be marked as “incomplete” in the backup log and the catalog. At the next backup, if the deferred backup completes, the “incomplete” status will be gone, and the backup can be used to restore to a VM. Templates: VMware does not recommend the creation of templates from VMs that are currently turned on. If you try to back up such a template, an incomplete VM backup will result.
An incomplete backup cannot be used in a restore to a VM, but it can be used in a restore to an alternate location (i.e., a partial restore) to enable the recovery of individual files.
Example of an “incomplete backup” icon
Figure 22. Incomplete Backup Icons
You will also see a warning message regarding the incomplete VMs selected for restore:
“The following selected Virtual Machines are in an
incomplete state. Restoring them to the ESX Console may
cause the Virtual Machine to be unusable.”
You will see a similar message if you try to restore an incomplete VM to its original location. You do not cause an error if you restore the incomplete VM to an alternate location.
Note also that the Agent does not back up “independent persistent” disks that are powered on.
6.3
Manual Registration of a VM
Typically, during a restore operation, you can register the VM so that the VMware ESX Console recognizes the VM as the “original” one, rather than a new one. A new one will cause a reseed on the next backup.
If registration fails, you can register the VM yourself. Here are some indications of registration failure:
• The log reports a failure
• Files of the VM have been restored, but the VM does not appear in the GUI Also, if you have restored the VM to an alternate location, the Agent will not register the VM for you.
If you need to manually register a VM, you can do it from the command line. Using the VMware vSphere client (or the Infrastructure client):
1. Browse the datastores to locate the VMX file of the restored VM. (You must have restored the VM to an accessible datastore.)
2. Right-click on the VMX file, and then select Add to inventory.
Log in to an ESX server that has the command-line tools. The ESX server on which the Agent is installed should be suitable. The vmware-cmd command must be available. Use this command to verify its presence:
vmware-cmd -l
If you see "Command not found", it means that vmware-cmd is not available, and needs to be installed. Otherwise, it will list the registered VMX files.
To register the VM, issue the vmware-cmd command through the VMware command-line interface:
vmware-cmd -s register
/vmfs/volumes/DATASTORE-NAME/RESTORED-PATH/VM-NAME.vmx
The path is the full name of the VMX file.
You might need to register a VM to a different ESX host, or an ESX host that does not have access to the restored VMX file. If so, see the VMware documentation for detailed information about the syntax of vmware-cmd, or use the GUI.
GUI example of restoring a memory snapshot after registration:
Figure 23. Registering a VM
6.4
Log File Messages
Job logs now report the status of individual VMs. This allows you to quickly identify machines that require attention.
6.4.1
Error Messages
The following are descriptions of error messages that you might see in the log files. VM already exists
If you restore to a VM that is already there when you reregister, you will see an error message in the log (such as VMWR-E-0003 The specified key, name or identifier already exists).
API has timed out
If you see an error message (such as VMWR-E-0003 Permission to perform this operation was denied…), the API has probably timed out, and the Agent has tried to manipulate the VM during backup or restore.
The Agent should reconnect automatically, and you should see an informational message in the log (such as VMWR-I-0001 Reconnecting to Virtual Infrastructure).
Restore from another Computer fails using Windows Agent Console
If you try to run the entire Restore from another Computer Wizard without editing the Job at some point, the restore will fail with these messages:
May28 16:49 PARS-W-0002 Due to a computer registration,
configuration file is missing the following information:
May28 16:49 PARS-W-0002 VMware.Password (VMware user
password)
May28 16:49 PARS-W-0002 VMware.Username (VMware user
username)
May28 16:49 PARS-W-0002 please use the Agent Console to
re-enter the missing information
May28 16:49 REST-F-0475 Detected missing configuration
7. Index
Agentdaemon ... 14
Agent Console Operations Guide ... 11
Web ... 8
Windows... 8
API has timed out... 46
Backup information for the Wizard ... 19
log... 16
Source Type ... 29
BuildVersion ... 15
configuration file ... 38
creating a log file ... 37
Databases Preventing corruption ... 41
Delta files upgraded ... 15
Directory on Disk local jobs ... 16
Disaster Recovery mode ... 33
protection of VMware ... 8
disk space for installation ... 13
encryption password ... 25
type... 19
ESX Server overview ... 6
ESXi support ... 6
Failed to connect to VMware ESX Server ... 22
free space ... 15
Global.vvc ... 15
hot backups ... 8
incomplete backups error situations ... 42
icons ... 43
Installation directory ... 17, 18 Interfering snapshots ... 40
Job vvc ... 15
Machine availability impact slider control ... 27
Managing VMs with local ESX Server ... 21
with vCenter... 21
memory snapshot ... 42
Name of VM... 8
NFS backup ... 9
non-RDM disks ... 33
original configuration ... 38
point of recovery ... 26
quiescing before a backup ... 19
guest file system ... 26, 32 virtual disks ... 19
with VSS ... 40
Raw Disk Mapping (RDM) incomplete ... 42
Reconnecting to Virtual Infrastructure . 46 recreating a VM ... 42
registering a VM ... 42
Requirements Space... 40
reregistering a VM ... 37
Restore from another Computer workflow... 8
restoring error messages... 34, 46 from another computer ... 38
log... 34
to original location ... 36
Retention levels... 26
revert to last memory snapshot ... 34
rollback upgrade failure ... 17
root privileges installation ... 13
Scheduling Wizard ... 20
Server Profiles... 16
sliding pointer (slider) Machine availability impact during snapshot integration ... 20, 27 Snapshot Integration impact... 27
Manager ... 42
Memory ... 26, 32 Preventing interference ... 40
Space requirements ... 40
Sparse disk techniques ... 40
SYNC and database corruption... 41
Compared to VSS ... 41
Synchronize Jobs... 16
System requirements Space ... 40
Tape drive Jobs... 16
Template support ... 8
Templates, new Incomplete VM backups ... 42
Uninstalling... 18
Upgrading... 15
vCenter requirements ... 40
virtual disk files ... 6
disks... 26
Infrastructure Console ... 8
machines, definition ... 6
virtualization layer ... 6
VM active/inactive ... 20, 32 deferred ... 42
machine state ... 20, 32 memory contents ... 26
name... 8
server connection ... 23
settings ... 26
virtual disks ... 26
VMotion Requirements ... 40
Support ... 21
VMware ESX Agent tar file... 12
Console credentials ... 21
Server Console ... 6
Templates ... 8
Volume Shadow Copy Service (VSS) . 40 VSS (Windows Volume Shadow Copy Service) Compared to SYNC ... 41
For preventing database corruption. 41 VVCVersion ... 15
warning message incomplete ... 43
Web Agent Console... 8
wildcards in VM names... 8