NSCC SUMMER LEARNING SESSIONS
MICROSOFT OFFICE SESSION
Welcome!
Microsoft Outlook webmail is the official email package at NSCC. It is used to communicate and coordinate your time with other students and your instructors.
It is the email package that will be used for sending you NSCC information and information about what you need to know about your classes.
You can still use your personal email package but unless you also use Outlook, you risk missing important information from the college and your instructors.
Outlook webmail can be used from any browser. This means you can access outlook email from home, the NSCC Computer Labs , the Learning Commons or almost any computer.
Outlook webmail can be accessed using the browser on your smart phone but it is not always easy to send email.
The Microsoft Office session has six modules. This is module number 3.
Contents
Welcome! ... 2
LEARNING OUTCOMES – What will I learn? ... 4
ONLINE RESOURCES ... 5
OUTLOOK – STUDY GUIDE ... 6
TAKE A VIDEO TOUR OF OUTLOOK ... 7
Key Areas ... 7
The Ribbon ... 7
PRACTICE ORGANIZING EMAILS BY CREATING FOLDERS ... 9
Create Folders in Outlook ... 9
Move the emails in your inbox to the appropriate folder. ... 10
PRACTICE CREATING AND MANAGING CONTACTS ... 12
About Contacts ... 12
About creating Contacts ... 13
Creating a contact by adding information manually... 13
Create a contact based on the sender of an email message that you receive ... 14
Look up someone in the NSCC Outlook address book ... 15
PRACTICE CREATING AND USING AN EMAIL SIGNATURE ... 17
Create a signature... 17
PRACTICE SENDING AN EMAIL WITH AN ATTACHMENT ... 19
FINAL STEPS: Finishing up the module ... 20
LEARNING OUTCOMES – What will I learn?
In this module you will learn and practice…
• Opening Outlook and organizing in-box using folders(sample emails will be in the student’s in-box)
• Creating and managing contacts
- Create contacts from emails received
- Add a new contact(email addresses of co-learners in the session and student’s personal email)
- Create a class contact group list - Search address book
• Creating and using an email signature
• Sending an email to instructor with attachment
By the end of the module you will be able to:
Organize emails in Folders.
Manage Contacts and Contact Groups Attach files to emails
This is an important part of working towards the session learning objectives:
Use Outlook to communicate and share documents with students and instructors in your program.
Note: you will need your student id and password to access your Outlook account for practice sessions
ONLINE RESOURCES
These resources may help you develop your skills in using Microsoft Outlook.
Video Tour of Outlook
http://office.microsoft.com/en-001/outlook-help/video-take-a-tour-of-outlook-2010-VA102057878.aspx
Basic Tasks in Outlook
OUTLOOK – STUDY GUIDE
Use this guide to keep track of your progress during the module. Record when you complete a skill, how you did it, and what trouble spots you encountered.
I Have Learned To:
Skill Complete How I did it (in my own words) Trouble Spots
Create emails and read received emails.
Organize emails in folders
Manage contacts and contact groups
TAKE A VIDEO TOUR OF OUTLOOK
http://office.microsoft.com/en-001/outlook-help/video-take-a-tour-of-outlook-2010-VA102057878.aspx
Key Areas
The Ribbon
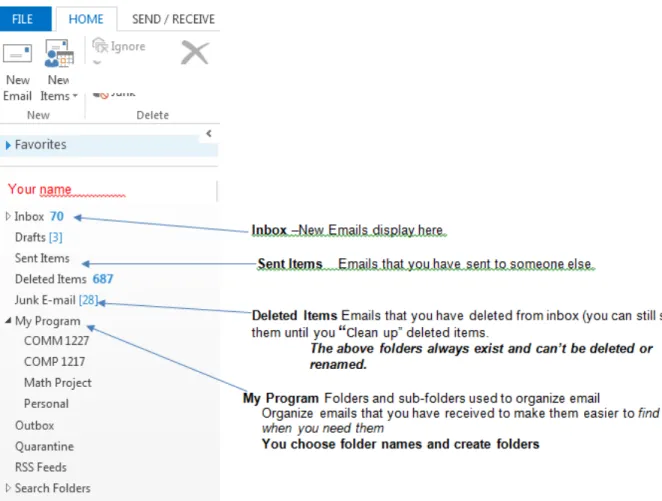
contains the most often used outlook commands. You can see this at the top of the Outlook screen. See Figure 1 for a screen shot.The Navigation pane helps you see various groups or collections of emails. Refer to Figure 2 for a screen shot.
Figure 2 - screen shot of the Navigation pane highlighting Inbox, Sent Items, Deleted Items, and Folders
There are other functions in Outlook that you will see in the video tour such as Tasks and Calendar. These functions are not covered in this module.
PRACTICE ORGANIZING EMAILS BY CREATING FOLDERS
Watch the video linked below on using Outlook Folders to organize your emails so that you can find them easily in the future.
http://office.microsoft.com/en-001/outlook-help/create-folders-on-your-server-5-37-RZ102685240.aspx?CTT=1§ion=2
Create Folders in Outlook
1. Open Outlook and view the messages in your inbox (These are sample messages to use for practice)
2. Click on one or more messages to read the contents.
3. Practice creating folders as shown in the Navigator pane above: o Comp
o COMM o Math Project o Personal
4. Right Click on your name in the navigation pane-this will locate your folders on the main level.
5. Choose “Create New Folder”- name the Folder “My Program” and click anywhere outside the name box to save.
6. Now right click on the My program Folder and create each of the COMM 1227, COMP 1217 and Math Project folders. These folders are all associated with the My program Folder. 7. Again right click on your name and create your “Personal” folder.
M ove the emails in your inbox to the appropriate folder.
To move your emails, practice these steps.
1. Right Click on the email with Subject “COMP”
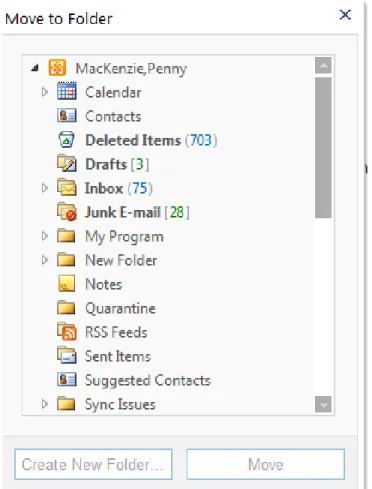
2. Select “Move to Folder” then a list of folders displays. See Figure 3.
3. Click on the arrow left of My Program to expand it to show the subfolders within it. Notice that the arrow is now black.
4. Click on the appropriate folder and then click on the Move button at the bottom of the Move to Folder box. See Figure 4.
5. You’ve now moved your email to another folder.
PRACTICE CREATING AND MANAGING CONTACTS
Here are some links to step-by-step articles that you may find helpful: Create a contact
http://office.microsoft.com/en-ca/outlook-help/basic-tasks-in-outlook-2010-HA101829999.aspx#_Toc260824059
How to Create and manage Contact groups in Outlook
http://www.howtogeek.com/howto/18339/how-to-create-and-manage-contact-groups-in-outlook-2010/
About Contacts
The Contacts folder in Outlook is where you can organize and save information about the people and organizations that you communicate with. Contacts can be as basic as a name and email address, or include additional detailed information such as street address, multiple phone numbers, a picture, birthdays, and any other information that relates to the contact.
You may want to add fellow students and your instructor to you contacts in order to make sending emails to them easy and fast. If you work regularly with a group, you may want to create a contact group of those specific contacts.
About creating Contacts
You can create contacts in several ways:
• From the sender information on an email you receive
• Searching all NSCC email users in the global address book
• Adding information manually
Figure 5 - Screen shot showing the icon for "New Contact"
Creating a contact by adding information manually
1. In Contacts, on the Home tab, in the New group, click New Contact.
2. Enter a name and any other information that you want to include for the contact. 3. Do one of the following:
• To finish entering contacts On the Contact tab, in the Actions group, click Save & Close.
• To save this contact and start another Click Save & New
Explore this website for Step by Step
Instructions on How to Make a New Contact
Create a contact based on the sender of an email message that you receive
You can quickly create an Outlook contact for someone who has sent you an email message.
1. Open or preview the email message that contains the name that you want to add to your contact list. 2. Right-click the name of the person that you want, then click Add to Contacts.
3. You can then complete any additional information -or just click save and close.
Look up someone in the NSCC Outlook address book
Outlook's default search of the GAL will search the full name of the entry (person or resource) from left to right. When searching for a person, this can lead to some unexpected order in the listing (for example, you may be searching for John Doe, but the person in question is listed as John T. Doe so a search for "John Doe" fails).
You can avoid some of this confusion by using Advanced Find to search by last name: 1. Open a new email or meeting request.
2. On the Home tab, click New E-mail. 3. Click the To button.
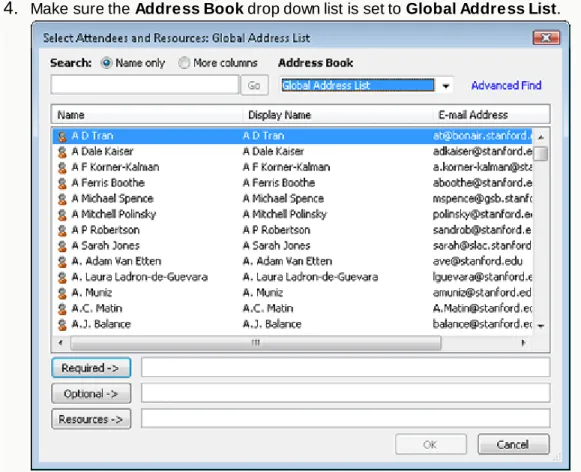
4. Make sure the Address Book drop down list is set to Global Address List.
Figure 8 - screen shot of the NSCC address book. You can find emails for NSCC students and staff.
5. Click Advanced Find and Search for your own name using last name or first name in advanced find
6. Select the person you want from the list and click the Required (for a meeting)or To button (for an email) to add them to the email
PRACTICE CREATING AND USING AN EMAIL SIGNATURE
An email signature allows you to provide more information than just your email address. For example, you may want to share your phone number, student id number, program section or other information.
Your signature can automatically be added to outgoing messages, or you can manually add the signature to only the messages that you choose.
Create a signature
1. Open a new message. On the Message tab, in the Include group, click Signature, and then click
Signatures.
2. On the E-mail Signature tab, click New.
3. Type a name for the signature, and then click OK.
PRACTICE SENDING AN EMAIL WITH AN ATTACHMENT
You will often be asked to send a completed activity to your instructor as an email attachment. These practice steps include creating a study-guide (using the blank template provided) and sending it, as an email attachment, to yourself using both your NSCC outlook email address and your personal email address if you have one.
Open and Complete details in the Attached Email Study Guide Template (Double click on icon below-fill it in and save to your desktop (computer/desktop) where you can find it again.
Email_Refresher Attachment.rtf
1. Create a message, to yourself(using NSCC outlook email address and personal email address if you have one)
2. In the message window, on the Message tab, in the Include group, click Attach File. 3. Browse to and click the file that you created and saved above, and then click Insert. 4. Send the email.
FINAL STEPS: Finishing up the module
Well done! You’ve made it to the end of this module. In this module you’ve:
o opened Outlook and organized in-box using folders(sample emails will be in the student’s in-box)
o creating and managing contacts in a variety of ways o created and used an email signature
This is an important part of your work towards these session learning objectives:
Use Outlook to communicate and share documents with students and instructors in your program.