Teradata SQL Assistant for Microsoft
Windows
User Guide
Release 12.00.00 B035-2430-067A July 2007The product or products described in this book are licensed products of Teradata Corporation or its affiliates.
Teradata, BYNET, DBC/1012, DecisionCast, DecisionFlow, DecisionPoint, Eye logo design, InfoWise, Meta Warehouse, MyCommerce, SeeChain, SeeCommerce, SeeRisk, Teradata Decision Experts, Teradata Source Experts, WebAnalyst, and You’ve Never Seen Your Business Like This Before are trademarks or registered trademarks of Teradata Corporation or its affiliates.
Adaptec and SCSISelect are trademarks or registered trademarks of Adaptec, Inc. AMD Opteron and Opteron are trademarks of Advanced Micro Devices, Inc.
BakBone and NetVault are trademarks or registered trademarks of BakBone Software, Inc. EMC, PowerPath, SRDF, and Symmetrix are registered trademarks of EMC Corporation. GoldenGate is a trademark of GoldenGate Software, Inc.
Hewlett-Packard and HP are registered trademarks of Hewlett-Packard Company. Intel, Pentium, and XEON are registered trademarks of Intel Corporation.
IBM, CICS, DB2, MVS, RACF, Tivoli, and VM are registered trademarks of International Business Machines Corporation. Linux is a registered trademark of Linus Torvalds.
LSI and Engenio are registered trademarks of LSI Corporation.
Microsoft, Active Directory, Windows, Windows NT, and Windows Server are registered trademarks of Microsoft Corporation in the United States and other countries.
Novell and SUSE are registered trademarks of Novell, Inc., in the United States and other countries. QLogic and SANbox trademarks or registered trademarks of QLogic Corporation.
SAS and SAS/C are trademarks or registered trademarks of SAS Institute Inc. SPARC is a registered trademarks of SPARC International, Inc.
Sun Microsystems, Solaris, Sun, and Sun Java are trademarks or registered trademarks of Sun Microsystems, Inc., in the United States and other countries.
Symantec, NetBackup, and VERITAS are trademarks or registered trademarks of Symantec Corporation or its affiliates in the United States and other countries.
Unicode is a collective membership mark and a service mark of Unicode, Inc.
UNIX is a registered trademark of The Open Group in the United States and other countries.
Other product and company names mentioned herein may be the trademarks of their respective owners.
THE INFORMATION CONTAINED IN THIS DOCUMENT IS PROVIDED ON AN “AS-IS” BASIS, WITHOUT WARRANTY OF ANY KIND, EITHER EXPRESS OR IMPLIED, INCLUDING THE IMPLIED WARRANTIES OF MERCHANTABILITY, FITNESS FOR A PARTICULAR PURPOSE, OR NON-INFRINGEMENT. SOME JURISDICTIONS DO NOT ALLOW THE EXCLUSION OF IMPLIED WARRANTIES, SO THE ABOVE EXCLUSION MAY NOT APPLY TO YOU. IN NO EVENT WILL TERADATA CORPORATION BE LIABLE FOR ANY INDIRECT, DIRECT, SPECIAL, INCIDENTAL, OR CONSEQUENTIAL DAMAGES, INCLUDING LOST PROFITS OR LOST SAVINGS, EVEN IF EXPRESSLY ADVISED OF THE POSSIBILITY OF SUCH DAMAGES.
The information contained in this document may contain references or cross-references to features, functions, products, or services that are not announced or available in your country. Such references do not imply that Teradata Corporation intends to announce such features, functions, products, or services in your country. Please consult your local Teradata Corporation representative for those features, functions, products, or services available in your country.
Information contained in this document may contain technical inaccuracies or typographical errors. Information may be changed or updated without notice. Teradata Corporation may also make improvements or changes in the products or services described in this information at any time without notice.
To maintain the quality of our products and services, we would like your comments on the accuracy, clarity, organization, and value of this document. Please e-mail: [email protected]
Any comments or materials (collectively referred to as “Feedback”) sent to Teradata Corporation will be deemed non-confidential. Teradata Corporation will have no obligation of any kind with respect to Feedback and will be free to use, reproduce, disclose, exhibit, display, transform, create derivative works of, and distribute the Feedback and derivative works thereof without limitation on a royalty-free basis. Further, Teradata Corporation will be free to use any ideas, concepts, know-how, or techniques contained in such Feedback for any purpose whatsoever, including developing, manufacturing, or marketing products or services incorporating Feedback.
Preface
Purpose
This book provides information about Teradata® SQL Assistant for Microsoft® Windows® which is a Teradata® Tools and Utilities product. Teradata Tools and Utilities is a group of products designed to work with the Teradata Database.
Teradata SQL Assistant is a Windows-based information discovery tool designed to retrieve, manipulate, and store data from ODBC-compliant database servers.
Audience
This book is intended for use by:
• SQL proficient users who know how to formulate queries for processing on the Teradata Database or other ODBC-compliant relational database management systems (RDBMS) • Relational Database developers
Supported Releases
This book supports the following releases: • Teradata Database 12.0
• Teradata Tools and Utilities 12.00.00 • Teradata SQL Assistant 12.00.00
Note: See “To display information about SQL Assistant” on page 30 to verify the Teradata SQL Assistant version number
To locate detailed supported release information: 1 Go to www.info.teradata.com.
2 Navigate to General Search > Publication Product ID. 3 Enter 3119.
4 Open the version of the Teradata Tools and Utilities ##.##.## Supported Versions spreadsheet associated with this release.
The spreadsheet includes supported Teradata Database versions, platforms, and product release numbers.
Preface Prerequisites
Prerequisites
The following prerequisite knowledge is required for this product: • An ODBC-compliant RDBMS and the SQL used by that RDBMS • Teradata Database
• Relational Database Management Systems • Microsoft Windows operating system • ODBC connectivity software
In addition, the following may be helpful to review prior to using Teradata SQL Assistant:
Changes to this Book
The following changes were made to this book in support of the current release. Changes are marked with change bars. For a complete list of changes to the product, see the Release Definition associated with this release.
This document... contains this information...
qmantest.txt Description of the Teradata SQL Assistant test database.
For further information on the test database, see “Teradata SQL Assistant Test Database” on page 22.
Windows Help file Online help, accessible from the Teradata SQL Assistant main window by clicking on the Tool Bar.
Preface Additional Information
Additional Information
Additional information that supports this product and Teradata Tools and Utilities is available at the web sites listed in the table that follows. In the table, mmyx represents the publication date of a manual, where mm is the month, y is the last digit of the year, and x is an internal publication code. Match the mmy of a related publication to the date on the cover of this book. This ensures that the publication selected supports the same release.
Table i: Changes to this Book
Date Description
July 2007 12.00.00
Added HTML export option for the Answerset. See “To export results” on page 92
Changed Teradata Dynamic Query Manager to Teradata Query Scheduler. See “Tool Bar Button Descriptions” on page 124
Added right-to-left button. See “Tool Bar Button Descriptions” on page 124
Added new query formatting options. See “Setting Formatting Options” on page 64
Added new query toolbar buttons. See “Table 24: Tool Bar Button Descriptions” on page 124
Update query toolbar screen capture.
Added indent query line button. See “Indenting Lines in a Query” on page 52
Added the Show Whitespace button. See “Showing Whitespace” on page 52
Added the Delete Blank Line button. See “Deleting Blank Lines from a Query” on page 53
Add tab to spaces button information. See “Converting Tabs to Spaces” on page 52
Added note about the disabled paste function while entering password information. See “Changing the Database Password” on page 27
Added Honor the New Answerset option. See “Setting Export/Import Options” on page 94
Preface
Additional Information
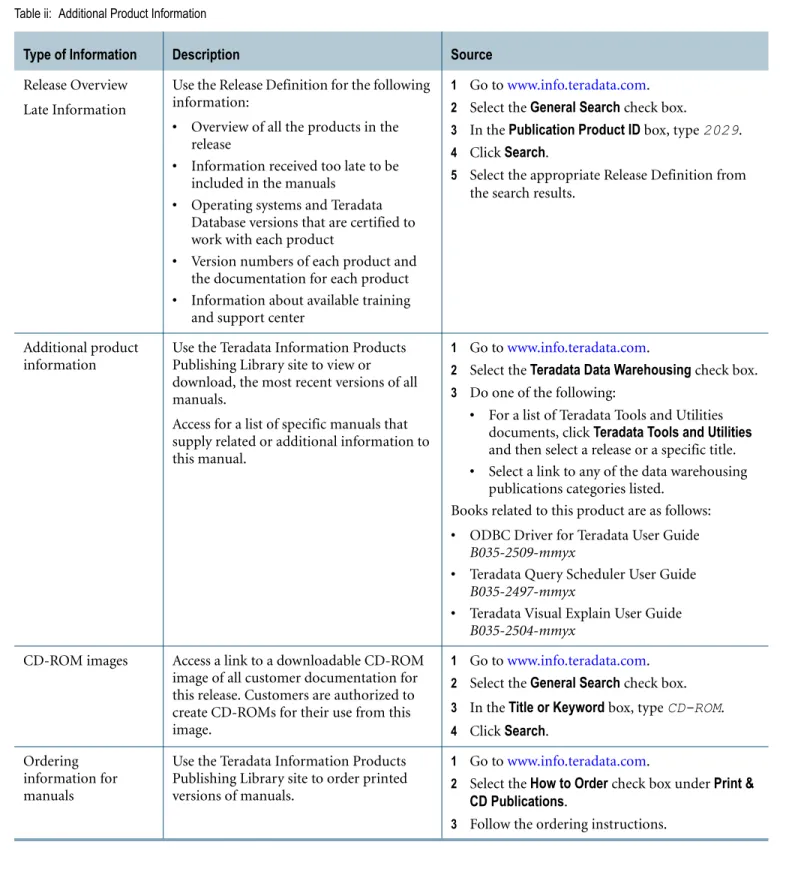
Table ii: Additional Product Information
Type of Information Description Source
Release Overview Late Information
Use the Release Definition for the following information:
• Overview of all the products in the release
• Information received too late to be included in the manuals
• Operating systems and Teradata Database versions that are certified to work with each product
• Version numbers of each product and the documentation for each product
• Information about available training and support center
1 Go to www.info.teradata.com.
2 Select the General Search check box.
3 In the Publication Product ID box, type 2029.
4 Click Search.
5 Select the appropriate Release Definition from the search results.
Additional product information
Use the Teradata Information Products Publishing Library site to view or download, the most recent versions of all manuals.
Access for a list of specific manuals that supply related or additional information to this manual.
1 Go to www.info.teradata.com.
2 Select the Teradata Data Warehousing check box.
3 Do one of the following:
• For a list of Teradata Tools and Utilities documents, click Teradata Tools and Utilities and then select a release or a specific title.
• Select a link to any of the data warehousing publications categories listed.
Books related to this product are as follows:
• ODBC Driver for Teradata User Guide
B035-2509-mmyx
• Teradata Query Scheduler User Guide
B035-2497-mmyx
• Teradata Visual Explain User Guide
B035-2504-mmyx
CD-ROM images Access a link to a downloadable CD-ROM image of all customer documentation for this release. Customers are authorized to create CD-ROMs for their use from this image.
1 Go to www.info.teradata.com.
2 Select the General Search check box.
3 In the Title or Keyword box, type CD-ROM.
4 Click Search. Ordering
information for manuals
Use the Teradata Information Products Publishing Library site to order printed versions of manuals.
1 Go to www.info.teradata.com.
2 Select the How to Order check box under Print &
CD Publications.
Preface Additional Information
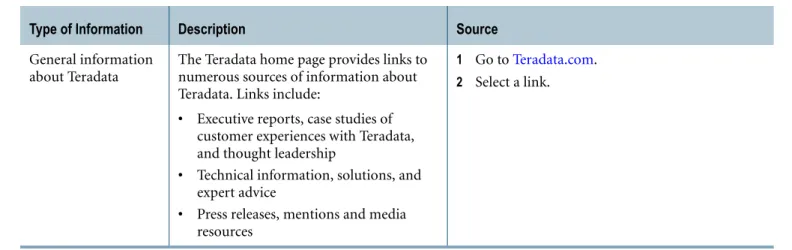
General information about Teradata
The Teradata home page provides links to numerous sources of information about Teradata. Links include:
• Executive reports, case studies of customer experiences with Teradata, and thought leadership
• Technical information, solutions, and expert advice
• Press releases, mentions and media resources
1 Go to Teradata.com.
2 Select a link.
Table ii: Additional Product Information (continued)
Preface
Table of Contents
Preface
. . . .3 Purpose . . . .3 Audience . . . .3 Supported Releases . . . .3 Prerequisites . . . .4Changes to this Book . . . .4
Additional Information . . . .5
Chapter 1:
Getting Started
. . . 21Introduction . . . 21
What is Teradata SQL Assistant? . . . 21
How Teradata SQL Assistant Works . . . 21
Teradata SQL Assistant’s Key Features . . . 22
Teradata SQL Assistant Test Database . . . 22
How to Define a Data Source. . . 22
ODBC Driver . . . 22
Starting Teradata SQL Assistant . . . 23
Defining an ODBC Data Source . . . 23
Connecting to and Disconnecting from a Data Source. . . 26
Changing the Database Password . . . 27
Main Window . . . 27 Overview . . . 27 Menu Bar . . . 27 Tool Bars . . . 28 Information Bar . . . 28 Status Bar . . . 28 Cascading Windows. . . 28 Tiling Windows . . . 29 Arranging Windows. . . 29
Table of Contents
Database Explorer Tree Overview . . . .30
Using the Database Explorer Tree . . . .31
Viewing Object Types . . . .31
Opening and Closing the Database Explorer Tree . . . .32
Navigating to the Database Explorer Tree . . . .32
Changing the Width of the Tree Area . . . .32
Dragging Object Names to the Query Pane. . . .32
Adding Object Types . . . .32
Displaying Object Definitions. . . .33
Copying a List of All Columns From a Table or View Into the Query Window . . . .33
Adding Databases. . . .34
Removing Databases . . . .34
Refreshing the Database Explorer Tree . . . .34
Pasting Object Names to Query Window . . . .35
Database Explorer Tree Window Shortcut Menu . . . .35
Listing All Tables or Views In a Database . . . .36
Listing All Columns In a Table or View . . . .37
Setting General Program Preferences . . . .37
Support for Unicode and UTF-8 . . . .38
Displaying Unicode Data . . . .38
Exporting Unicode data . . . .39
Importing Unicode data . . . .39
Chapter 2:
The Query Window
. . . .41Introduction to the Query Window . . . .41
Using the Query Window . . . .42
Before Starting . . . .42
Entering and Executing Queries . . . .44
Entering a Query . . . .44
Executing a Query . . . .45
Submitting Multiple Statements in Parallel. . . .45
Submitting Part of a Query . . . .45
Aborting a Query in Progress . . . .46
Executing a Query Saved To a File . . . .46
Automatically Minimizing the Teradata SQL Assistant Window . . . .47
Naming a Query Tab . . . .47
Deleting a Query Tab. . . .47
Table of Contents
Copying SQL from Previous History Record to the Query Window . . . 47
Copying SQL from Next History Record to the Query Window . . . 48
Preventing Queries from Being Saved in the History Window . . . 48
Undoing or Redoing Query Window Changes . . . 48
Recording and Executing Query Window Macros . . . 49
Saving a Query . . . 49
Opening a Query from a File . . . 50
Copying a Query to Notepad . . . 50
Printing a Query. . . 51
Adding Comments to Queries . . . 51
Showing Whitespace . . . 52
Converting Tabs to Spaces . . . 52
Indenting Lines in a Query . . . 52
Using the Right-to-Left Editor for Queries . . . 52
Deleting Blank Lines from a Query . . . 53
Finding a Text String in the Query Window . . . 53
Replacing a Text String in the Query Window. . . 54
Displaying an Explain Plan of Your Query. . . 54
Displaying a Visual EXPLAIN Plan . . . 54
Displaying a Textual EXPLAIN Plan . . . 55
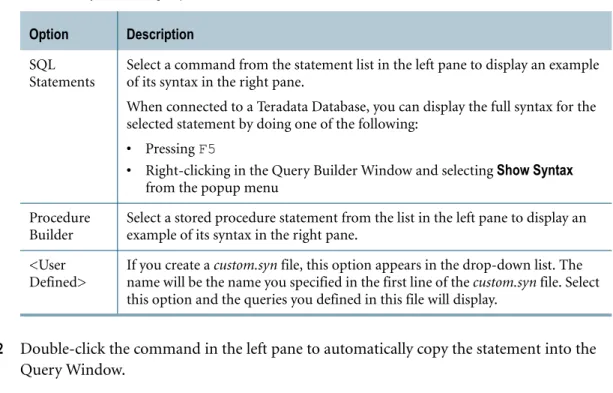
Query Builder Overview. . . 56
Using Query Builder . . . 57
Opening Query Builder . . . 57
Choosing Query Builder Options. . . 57
Resizing the Query Builder Window . . . 58
Description of the Options . . . 58
Creating a Custom Syntax File . . . 59
Inserting a Statement or Procedure into the Query Window . . . 60
Using Query Builder in the Future. . . 60
Supported Database . . . 60
Setting Query Options . . . 61
Disconnecting From the Data Source After Running a Query . . . 61
Running Queries Asynchronously . . . 62
Using Manual Commit Mode for ANSI Sessions . . . 62
Getting Notified When a Query Ends . . . 62
Minimizing Teradata SQL Assistant While a Query is Running . . . 63
Being Prompted for Notes Before Running Your Query . . . 63
Handling SQL Errors . . . 63
Submitting Part of the Query . . . 63
Allowing the Use of Named Parameters . . . 63
Table of Contents
Setting Formatting Options . . . .64
Formatting a Query . . . .66
Indentation . . . .66
Language Definition Files . . . .67
Importing Data . . . .68
Before You Begin . . . .68
Importing Data from a File . . . .68
Exiting from Import Mode . . . .69
Types of Import Operations . . . .69
Setting Buffer Sizes for Imported Data . . . .70
Generating Multiple Reports From a Single Query . . . .70
Import Rules. . . .71
Defining the Null Value for an Import Operation . . . .72
The Query Window Shortcut Menu . . . .72
Chapter 3:
The Answerset Window
. . . .75Introduction to the Answerset Window . . . .75
Using the Answerset Window . . . .76
Viewing Your Results. . . .76
Adjusting Row Height . . . .76
Adjusting Column Width . . . .76
Re-arranging Column Order . . . .77
Keeping Selected Columns From Scrolling Out of View . . . .77
Viewing Long Strings of Text Within Cells . . . .77
Closing Answerset Windows Before Submitting a New Query . . . .78
Select All Answerset Rows . . . .78
Merging Cells in the Answerset . . . .78
Displaying the SQL That Generated an Answerset . . . .79
Hide Columns / Show All Columns . . . .79
Closing All Answersets. . . .79
Hiding Column Headers . . . .79
Hiding Row Headers . . . .80
Displaying Totals for Numeric Columns. . . .80
Displaying Aggregate Values . . . .80
Large Object Support . . . .81
Sorting an Answerset Locally . . . .82
Finding a Text String in the Results Grid . . . .83
Naming Answersets and Answerset Tabs . . . .83
Table of Contents
Naming an Answerset Tab . . . 83
Deleting an Answerset Tab . . . 84
Opening, Printing and Saving Answersets . . . 84
Opening a Saved Answerset . . . 84
Saving an Answerset to a File . . . 84
Copying an Answerset to Notepad . . . 86
Printing an Answerset . . . 86
Cancelling Print Jobs . . . 86
Formatting an Answerset . . . 86
Displaying Commas to Mark Thousand Separators. . . 87
Displaying Decimal Places. . . 87
Formatting a Block of Cells . . . 87
Formatting a Single Cell . . . 88
Formatting a Single Row or Column . . . 88
Formatting Multiple Rows or Columns. . . 88
Formatting the Entire Spreadsheet. . . 88
Changing the Font for the Entire Window . . . 89
Setting Answerset Options . . . 89
Displaying Alternate Answerset Rows In Color . . . 89
Opening New Answersets in Move Columns Mode. . . 90
Displaying Gridlines in Answerset Windows . . . 90
Displaying Separators in Numeric Columns . . . 90
Displaying Negative Numbers in Red . . . 90
Displaying Column Titles Rather than Column Names . . . 91
Displaying Full Accuracy for BigInt and Decimal (16) and Above . . . 91
Changing the Maximum Number of Answerset Rows Displayed . . . 91
Number of Decimal Places Displayed for Float Columns . . . 91
Handle Binary/Byte Columns as BLOBs if Size > n . . . 92
Exporting an Answerset . . . 92
Exporting Results . . . 92
Single-Clicking to Display the Export File. . . 93
Saving Multiple Answersets. . . 93
Exporting to Access - Formats and Data Types. . . 93
Setting Export/Import Options . . . 94
The Answerset Window Shortcut Menu. . . 96
Chapter 4:
The History Window
. . . 99Table of Contents
Using the History Window . . . .101
Opening the History Window . . . .101
Closing the History Window . . . .101
Viewing the Result Message . . . .101
Viewing DBS Error Messages . . . .102
Viewing the History Rows. . . .102
Copying SQL from Previous History Record to the Query Window . . . .102
Copying SQL from Next History Record to the Query Window . . . .102
Selecting All History Rows . . . .102
Sorting the History Records . . . .103
Finding a Text String in the History Table . . . .104
Editing History Records . . . .104
Displaying and Navigating the Edit History Dialog . . . .104
Editing a History Record . . . .105
Deleting History Rows. . . .105
Compacting History . . . .105
Adding or Change a Note in a History Record . . . .106
Saving, Copying and Printing History . . . .106
Saving History Rows . . . .106
Copying Rows to the Clipboard . . . .107
Copying Rows to Notepad . . . .107
Printing the Contents of the History Window . . . .108
Cancelling Print Jobs . . . .108
Windows 95/98 Print Drivers . . . .108
Setting History Window Options . . . .108
Continually Updating the History Window and Table . . . .109
Inserting Connect or Disconnect Rows into History . . . .109
Recording Only Queries that Run Successfully. . . .109
Using Separate History Databases by Data Source . . . .110
Not Saving Duplicate Queries in History . . . .110
Recording the File Name/Location for Save Query Actions . . . .110
Changing the Number of History Rows Displayed. . . .110
Storing History Files . . . .111
Changing the Location of History Files . . . .111
The History Window Shortcut Menu . . . .112
Appendix A:
Startup Parameters and Default Preferences
. . . .115Startup Parameters . . . .115
Table of Contents
Miscellaneous and General Default Preference Settings. . . 116
Query Default Preference Settings . . . 117
Formatting Default Preference Settings . . . 118
Answerset Default Preference Settings . . . 118
Export/Import Default Preference Settings . . . 119
History and Directory Default Preference Settings. . . 120
Appendix B:
Advanced Features
. . . 121Importing a File Larger Than 10MB Into a BLOB or CLOB Column . . . 121
Keeping Your Session Alive When Teradata Restarts . . . 122
Appendix C:
Menus, Tool Bars and Shortcuts
. . . 123Program Tool Bars . . . 123
The Main Tool Bar. . . 123
The Answerset Tool Bar . . . 123
The Query Tool Bar . . . 123
Tool Bar Button Descriptions . . . 124
Customizing Menus and Tool Bars . . . 128
Adding a Command to a Menu or Tool Bar . . . 129
Menu Commands Only. . . 129
Removing a Command from a Menu or Tool Bar . . . 130
Moving a Command . . . 130
Adding or Removing a Break Between Commands . . . 131
Changing the Name for a Command . . . 131
Changing Menu Behavior . . . 131
Showing Recently Used Commands First . . . 131
Resetting the Default Menu Bar . . . 132
Hiding the Tool Bars . . . 132
Showing or Hiding Tool Bar Screen Tips . . . 132
Adding, Removing, Renaming or Resetting a Tool Bar . . . 133
Command Shortcut Keys . . . 133
Table of Contents
Glossary/Acronyms
. . . .137List of Figures
Figure 1: The Default Main Tool Bar . . . 123 Figure 2: The Default Answerset Tool Bar . . . 123 Figure 3: The Default Query Tool Bar. . . 124
List of Tables
Table 1: ODBC Data Source Types . . . 24
Table 2: ODBC Driver Setup for Teradata Database Dialog: Field Descriptions . . . 24
Table 3: Sub folders Created When Objects are Added. . . 33
Table 4: Explorer Tree Shortcut Menu Commands. . . 35
Table 5: Query Builder Usage Options . . . 56
Table 6: Query Builder Usage Options . . . 58
Table 7: The Query Window Shortcut Menu Commands and Descriptions . . . 72
Table 8: Clipboard Support - Edit Commands . . . 74
Table 9: Aggregate Value Display Options . . . 81
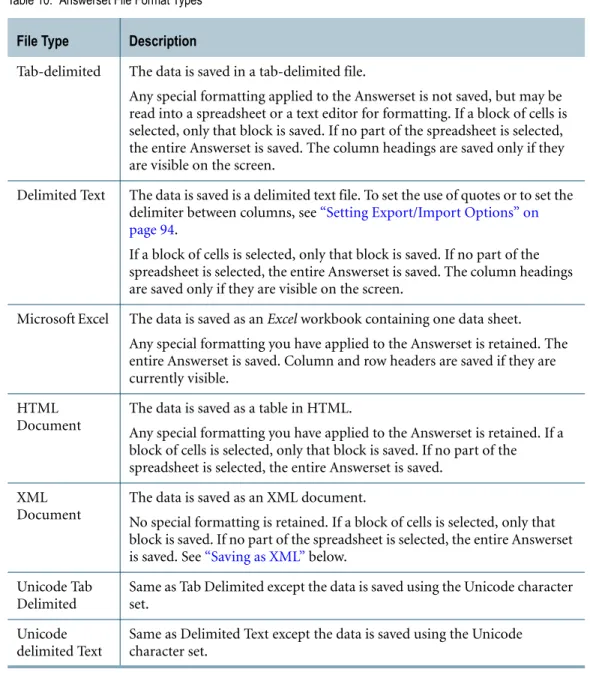
Table 10: Answerset File Format Types. . . 85
Table 11: BLOB Size Parameters . . . 92
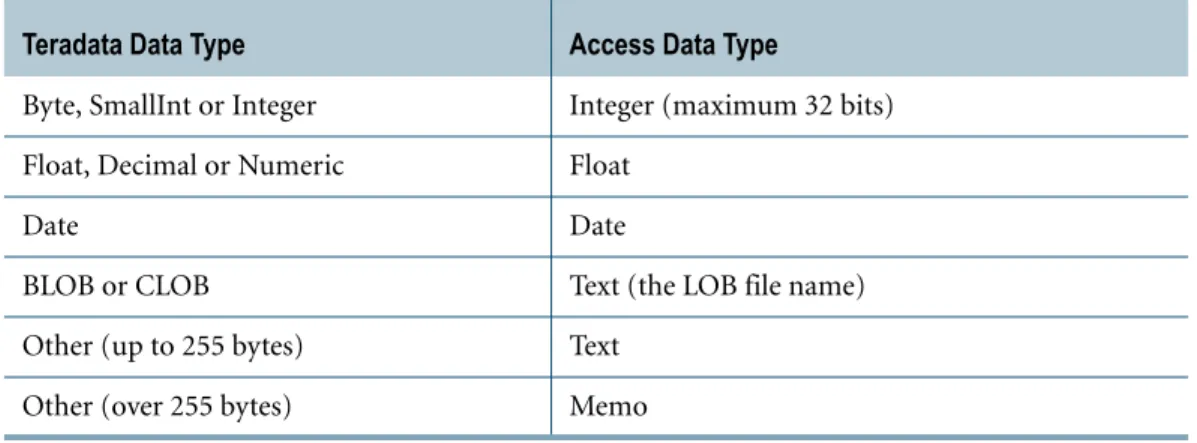
Table 12: How SQL Assistant Maps Teradata Data Types to Access Data Types . . . 94
Table 13: The Answerset Window Shortcut Menu Commands and Descriptions . . . 96
Table 14: The History Window Column Descriptions . . . 100
Table 15: History File Format Types . . . 107
Table 16: The History Window Shortcut Menu Commands and Descriptions . . . 112
Table 17: Startup Parameters . . . 115
Table 18: Miscellaneous and General Default Preferences and Descriptions . . . 116
Table 19: Query Default Preferences and Descriptions . . . 117
Table 20: Formatting Tab Default Preferences and Descriptions. . . 118
Table 21: Answerset Tab Default Preferences and Descriptions. . . 118
Table 22: Export/Import Tab Default Preferences and Descriptions. . . 119
Table 23: History and Directory Tab Default Preferences and Descriptions . . . 120
Table 24: Tool Bar Button Descriptions . . . 124
Table 25: Adding, Deleting, Renaming and Resetting a Tool Bar . . . 133
Table 26: Shortcut Keys . . . 133
CHAPTER 1
Getting Started
Getting Started describes background information needed to use Teradata SQL Assistant. This section contains the following information:
• Introduction
• How to Define a Data Source
• Connecting to and Disconnecting from a Data Source • Changing the Database Password
• Main Window
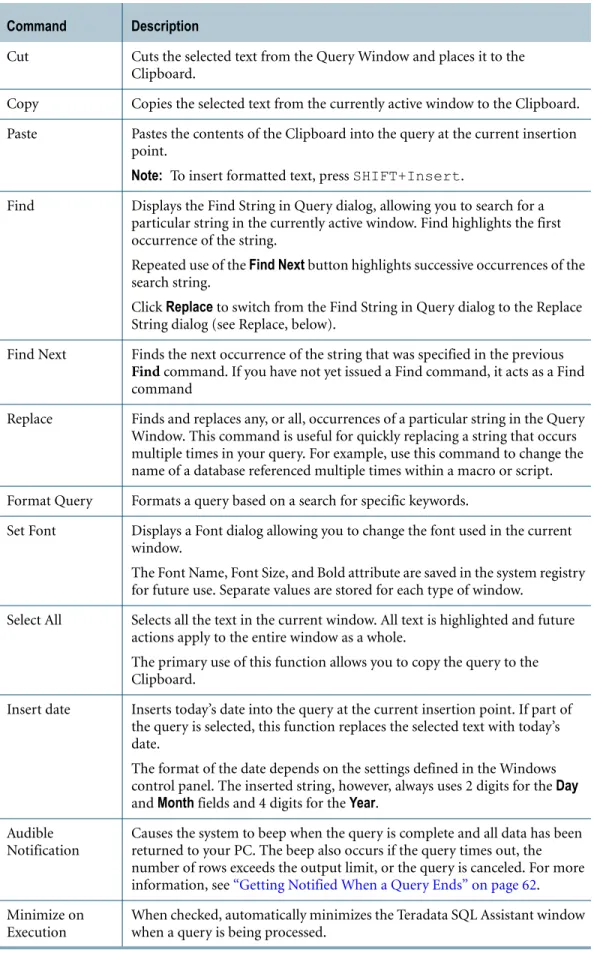
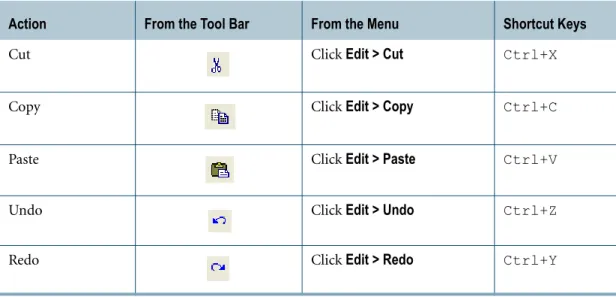
• Shortcut Menus and Commands • Database Explorer Tree Overview • Using the Database Explorer Tree
• Database Explorer Tree Window Shortcut Menu • Setting General Program Preferences
• Support for Unicode and UTF-8
Note: This document uses the term “database” as the term for “table qualifier” (the object that contains data tables). This term varies depending on the database vendor, and may be referred to as “owner”, “schema” or “catalog” in the vendor's own documentation.
Introduction
This introduction describes Teradata SQL Assistant and provides a brief overview of its features.
What is Teradata SQL Assistant?
Teradata SQL Assistant is an information discovery tool designed for Windows XP and Windows 2000. Teradata SQL Assistant retrieves data from any ODBC-compliant database server. The data can then be manipulated and stored on the desktop PC.
How Teradata SQL Assistant Works
Teradata SQL Assistant combines the data retrieved from ODBC databases with desktop applications such as Excel to create consolidated reports, or to analyze the merged data. Teradata SQL Assistant records all SQL activity, complete with source identification, timings,
Chapter 1: Getting Started How to Define a Data Source
row counts and notes. This is especially useful in data mining because the historical record can be used to build scripts from the SQL that produced positive results.
Teradata SQL Assistant’s Key Features
The key features of Teradata SQL Assistant are:
• Create reports from any RDBMS that provides an ODBC interface • Export data from the database to a file on a PC
• Import data from a PC file directly to the database
• Use an import file to create many similar reports (query results or Answersets). For example, display the DDL (SQL) that was used to create a list of tables. For more information, see “Generating Multiple Reports From a Single Query” on page 70. • Send queries to any ODBC database or the same query to many different databases • Create a historical record of the submitted SQL with timings and status information such
as success or failure
• Use SQL syntax examples to tailor statements
• Use the Database Explorer Tree to easily view database objects
• Use a procedure builder that provides a list of valid statements for building the logic of a stored procedure
• Limit data returned to prevent runaway queries
Teradata SQL Assistant Test Database
During the installation process, the options screen provides a choice to install a test database (Microsoft Access) on a PC. The following is required for a test database:
• 200KB of additional disk space
• ODBC desktop driver for Microsoft Access
• ODBC Administrator program to define a data source for it
For further instructions, refer to the qmantest.txt file that accompanies the installation kit.
How to Define a Data Source
This section explains how to start Teradata SQL Assistant and define a data source.
ODBC Driver
Before using Teradata SQL Assistant to access the data in the RDBMS, first install an ODBC driver on the PC. Each RDBMS requires a driver that is designed specifically for that database system. Obtain the appropriate driver from an RDBMS vendor or from a third-party supplier.
Chapter 1: Getting Started How to Define a Data Source
Compatibility
Teradata SQL Assistant is certified to run with any Level 2 compliant 32-bit ODBC driver. The product also works with Level 1 compliant drivers, but may not provide full functionality. Consult the ODBC driver documentation to determine the driver’s conformance level. Most commercially available ODBC drivers conform to Level 2.
Starting Teradata SQL Assistant
After installing Teradata SQL Assistant and the ODBC driver, then start Teradata SQL Assistant before defining an ODBC data source.
To start Teradata SQL Assistant
✔ From the Windows desktop, select Start > Programs > Teradata SQL Assistant.
The Teradata SQL Assistant main window appears with a blank Query Window on the top and a History window on the bottom.
Defining an ODBC Data Source
Defining a Data Source Using the ODBC Data Source Administrator Program
An ODBC-based application like Teradata SQL Assistant accesses the data in an RDBMS through an ODBC data source.
After installing Teradata SQL Assistant on a workstation, start Teradata SQL Assistant (see section above). Next, define a data source for each RDBMS.
The Microsoft ODBC Data Source Administrator maintains ODBC data sources and drivers and can be used to add, modify, or remove ODBC drivers and configure data sources. An About Box for each installed ODBC driver provides author, version number, module size, and release date.
Use the Microsoft ODBC Data Source Administrator program installed on the workstation to define a data source in one of two ways.
To define a data source
1 Do one of the following:
• From the Windows desktop, select Start > Control Panel > Administrative Tools > Data Sources (ODBC).
• From the Windows desktop, select Start > Programs > Teradata SQL Assistant 7.1. After Teradata SQL Assistant launches, select Tools > Define Data Source.
Chapter 1: Getting Started How to Define a Data Source
3 After selecting the DSN type, click Add.
For example: In the ODBC Data Source Administrator dialog, click the System DSN tab to bring to the front. Click Add, then click OK.
4 In the Create New Data Source dialog, select the appropriate driver and click Finish. For example: Locate the Teradata driver under the column Name. Click to select the driver and click Finish.
5 A dialog appears for the selected RDBMS. This dialog requests information that defines the location of the RDBMS and the user name to use when connecting.
Table 1: ODBC Data Source Types
Data Source
Description Explanation
User DSN An ODBC user data source stores information about how to connect to the indicated data provider.
System DSN An ODBC system data source stores information about how to connect to the indicated data provider. A system data source is visible to all users on this machine, including NT services.
File DSN . An ODBC file data source connects to a data provider. File DSNs can be shared by users who have the same drivers installed.
Table 2: ODBC Driver Setup for Teradata Database Dialog: Field Descriptions
Select This Field... To...
Name Enter a name that identifies this data source.
For example, in some cases there is more than one Teradata machine to connect to, or a user may have more than one logon depending on the function they are performing.
Note: To automatically launch Teradata SQL Assistant from Teradata Manager without entering data source information, enter the same name as used in the hosts file, without the copn suffix. Description Enter a description. This is solely a comment field to describe the
data source name used.
Name(s) or IP address(es) Enter the name(s) or IP address(es) of the Teradata Server of the Teradata system.
Identify the host by either name (alias) or IP address. The setup routine automatically searches for other systems that have similar name aliases. Multiple server names may be entered by pulling the entries on separate lines within this box. A search is performed to resolve all names, although the edit control limits may be reached before all names have been resolved. If the Teradata Server information needed for this box is unknown, contact the Teradata administrator.
Chapter 1: Getting Started How to Define a Data Source
6 Click OK twice to close the open dialogs. Teradata SQL Assistant is ready to use.
For more information about using ODBC Data Source Administrator, refer to the ODBC Data Source Administrator’s Help system.
Do not resolve alias name to IP address
When this option is checked, setup routine does not attempt to resolve alias names entered into the "Name(s) and IP address(es)" box at setup time.
Instead it will be resolved at connect time. When unchecked, the setup routine automatically appends COPn (where n = 1, 2, 3, ..., 128) for each alias name entered.
This will cause other IP addresses associated with this server to be located, until a break in the sequence is detected.
Use Integrated Security Select this option if will be logging on using integrated security measures.
Mechanism Select from the list of mechanisms that automatically appear in this box.
Each Teradata site implements its own security measures. If a list of mechanisms do not appear and log in is not possible, consult a DBA or the person responsible for the security of Teradata Database. Parameter The authentication parameter is a password required for the
selected mechanism. Username Enter a user name.
If the Default Database is not entered, the Username is used as the default. All tables, views, and macros are assumed to be in this default database unless they are explicitly prefixed by a database name in the query.
Password Enter a password to be used for the connection if using Teradata SQL Assistant in an unattended (batch) mode.
Entering a password here is not secure. Default Database
(optional)
Enter the default database name.
Account String (optional) Enter one of the accounts that the DBA assigned to the Username when it was created.
Session Character Set Use the drop down menu to choose the character set. The default is ASCII.
Table 2: ODBC Driver Setup for Teradata Database Dialog: Field Descriptions (continued)
Chapter 1: Getting Started
Connecting to and Disconnecting from a Data Source
Connecting to and Disconnecting from a Data
Source
Connecting to a Data Source
After defining the data source, connect to it.
Note: Teradata SQL Assistant only runs in direct connect mode and will not run from outside a firewall. Even if Teradata Manager is running in client/server mode and Teradata SQL Assistant is launched from Teradata Manager, Teradata SQL Assistant will not run from outside a firewall.
To connect to a data source
1 Do one of the following: • Select Tools >Connect. • On the Tool Bar click .
The prompt asks for the name of the data source. 2 Select a data source and click OK.
3 In the Teradata Database Connect dialog box: a Do one of the following:
• Select Use Integrated Security • Enter the Mechanism and Parameter • Enter the Userid and Password.
b Optionally, enter a Default Database or an Account String. c Click OK.
When the connection is complete, the Connect icon is disabled and the Disconnect icon, to its right, is enabled.
For more information on the fields in this dialog, refer to the ODBC Driver for Teradata User Guide.
Disconnecting from a Data Source
To disconnect from a data source
✔ Do one of the following: • Select Tools >Disconnect. • On the Tool Bar, click .
The status bar, appearing across the bottom of the main window, confirms the disconnect: Disconnect successful.
Chapter 1: Getting Started Changing the Database Password
Changing the Database Password
Changing the password in the Database itself for Teradata, Oracle, MySQL and SQL Server databases; however, it may not be able to do so on all database systems, e.g., Microsoft Access. Changing the password in the Database does not change a password that is stored in the ODBC data source definition itself. Storing a password in the ODBC data source is not secure and is not recommended.
To change the database password
1 Select Tools > Change Password.
2 In the Change Database Password dialog box, enter the current password. 3 Enter the new password.
4 Re-enter the same new password to confirm it. 5 Click OK.
Note: The OK button is not enabled until the current password has been entered and the two new password fields contain the same value.
Note: When entering information in these fields, the paste function, arrow keys, and mouse are disabled for security reasons.
Main Window
Overview
The Query Window is used to enter and execute a query. The results from queries are placed into one or more Answerset windows. See “Introduction to the Query Window” on page 41. The Answerset window is a table Teradata SQL Assistant uses to display the output of a query. See “Introduction to the Answerset Window” on page 75.
The History window is a table that displays past queries and related processing attributes. The past queries and processing attributes are stored locally in a Microsoft Access database. This provides flexibility to work with previous SQL statements in the future. See “Introduction to the History Window” on page 99.
In addition to the three main windows, the Database Explorer Tree shows that database objects. For more information on this feature, see “Database Explorer Tree Overview” on page 30.
Menu Bar
The Teradata SQL Assistant main window has a menu bar containing menus that display a list of commands. The available commands apply to the active window.
Chapter 1: Getting Started Main Window
For information on customizing menus, see “Customizing Menus and Tool Bars” on page 128.
Tool Bars
The Tool Bars contain tool buttons used to perform the functions of the more commonly used menu commands.
For information on customizing Tool Bars, see “Customizing Menus and Tool Bars” on page 128.
To hide the Tool Bars
✔ Select View >Tool Bars. and then choose the Tool Bar to hide.
Information Bar
The information bar near the top of the screen, below the Tool Bar, displays information about the current connection.
To hide the information bar
✔ Select View >Information Bar.
Status Bar
The status bar appears across the bottom of the main window and displays status information such as:
• The status of an action.
For example, after connecting to an ODBC data source, the status bar states: Connect successful, proceed with queries...
• The line number of the cursor position.
The line number is useful for locating syntax errors in stored procedures.
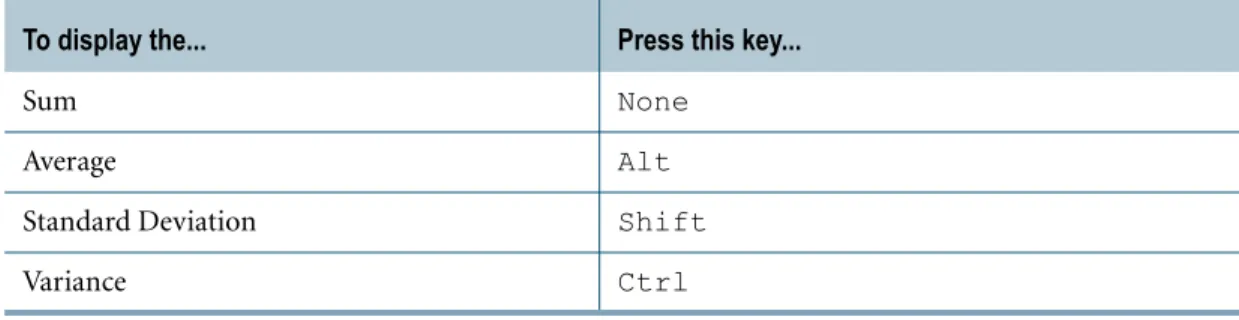
• Sums, averages, variance, and standard deviation for highlighted blocks of cells in Answerset windows.
To display this information, see “Displaying Aggregate Values” on page 80.
To hide the Status Bar
✔ select View >Status Bar.
Cascading Windows
To display all the open windows, use the cascade function. The following procedure explains how.
Chapter 1: Getting Started Main Window
To cascade windows
✔ Do one of the following:
• From the Tool Bar, click . • Select Window >Cascade. • Press Shift+F5.
Tiling Windows
To display all the open windows so they fill the entire Teradata SQL Assistant Teradata SQL Assistant window, use the tiling function. The following procedure explains how.
To tile windows
✔ Do one of the following:
• From the Tool Bar, click . • Select Window >Tile.
• Press Shift+F4
Arranging Windows
To arrange all minimized windows in a row across the bottom of the Teradata SQL Assistant window, use the following procedure.
To arrange icons
✔ Do one of the following:
• Select Window > Arrange Icons. • Press Shift+F3.
Using Online Help
The following explains how to use the help menu items.
To display help menu items
✔ Do one of the following: • Select Help >Help Topics. • From the Tool Bar, click .
Chapter 1: Getting Started Shortcut Menus and Commands
Teradata SQL Assistant displays the Help topics for windows or dialogs in the Help window.
To display information about SQL Assistant
The About screen provides useful information about SQL Assistant and the current session, including the software version of SQL Assistant, the type and version of the connected server, and information about the ODBC driver.
✔ Select Help >About SQL Assistant.
Shortcut Menus and Commands
To find information on menu items, refer to the Index under the menu name. Information on the shortcut menus for each window may be found as follows:
• “The Query Window Shortcut Menu” on page 72 • “The Answerset Window Shortcut Menu” on page 96 • “The History Window Shortcut Menu” on page 112
• “Database Explorer Tree Window Shortcut Menu” on page 35
Customizing Shortcut Menus
Shortcut menus can be customized. For more information, see “Customizing Menus and Tool Bars” on page 128.
The next three sections describe the query, Answerset, and history windows in greater detail.
Database Explorer Tree Overview
The Database Explorer Tree displays the main Teradata SQL Assistant window in the left-hand pane. This pane shows an alphabetical listing of databases and objects in the connected RDBMS server. Click on a database name to expand the tree display for that database. Use the Database Explorer Tree to reduce the time required to build a query and help reduce errors in object names.
Initially, the following databases load into the Database Explorer Tree: • The user's default database
• The User ID that was used to connect to the database (if applicable) • The database "DBC" (for Teradata data sources only)
• The database "SYSCAT" (for DB2 data sources only) Below each database name the following folders display:
Chapter 1: Getting Started Using the Database Explorer Tree • Tables
• Views
• System Tables (not for Teradata) • Macros (for Teradata data sources only) • Functions
• Procedures
Using the Database Explorer Tree
Viewing Object Types
The Database Explorer Tree shows the objects in the various databases shown. The following sections explain how the Explorer Tree works.
To expand the explorer tree to show all the objects
✔ Do one of the following:
• Double-click the database name or folder.
• Click the plus sign (+) next to the database name or folder.
• Highlight the database name or folder, and press Enter or the right arrow key. • Right-click on the database name or folder, then select Expand/Collapse on the
shortcut menu. Note:
• Expanding the Tables, Views or System Tables folder will load all these object types. • Expanding the Macros, Functions or Procedures folder loads all these object types. If no
objects exist for a given object type, that folder is automatically removed.
• When an index node is expanded under a Table directory, the approximate row count is appended after the Table name.
• When expanding the Tables node of a database any Global Temp Tables in that database will be listed in blue.
To collapse the explorer tree to hide all of the objects
✔ Do one of the following:
• Double-click the database name or folder.
• Click the minus sign (-) next to the database name or folder.
• Highlight the database name or folder, and press Enter or the left arrow key. • Right-click on the database name or folder, then select Expand/Collapse on the
Chapter 1: Getting Started Using the Database Explorer Tree
Opening and Closing the Database Explorer Tree
To open or close the database explorer tree
✔ Do one of the following:
• From the Tool Bar, click . • Select View > Explorer Tree.
The check mark displays the status by toggling on or off.
Navigating to the Database Explorer Tree
Use the following procedure to go to the previous database used in the Database Explorer Tree.
To navigate to the database explorer tree
✔ Do one of the following:
• Select View > Go To Explorer. • Press Ctrl+G.
Changing the Width of the Tree Area
To change the width of the tree area
✔ Click on the right edge of the display and drag it to a new position.
Dragging Object Names to the Query Pane
Click and drag the object from the Explorer tree to the Query pane. The name of the object appears in the Query Window.
Hold down the Shift key while clicking the object to add the name of the parent object to the object name.
For example, dragging the object “MyColumn” while holding the Shift key adds the parent object “MyTable”, and appears as “MyTable.MyColumn” in the Query pane.
Use the Ctrl key to add a comma after the object name when it is dragged to the Query pane. The Ctrl key can be used either with or without the Shift key.
The status bar at the bottom of the screen displays the name of the object being dragged.
Adding Object Types
When creating a new object, it will not appear in the Database Explorer Tree until the parent folder opens. If the parent folder is already open or has been opened during the current session, the new object does not appear until after the Refresh Database command is used, or
Chapter 1: Getting Started Using the Database Explorer Tree disconnect and reconnect to the database. The same holds true when deleting an object. For more information, see “Refreshing the Database Explorer Tree” on page 34.
Displaying Object Definitions
Use the following procedure to display the text (the DDL or data definition language) used to create a table, view, macro or stored procedure in the Database Explorer Tree. The resulting text is displayed in the Query Window.
To display the text used to create an object
✔ Right-click on the object, then select Show Definition.
Abort the data retrieval process at any time by clicking the Abort icon on the toolbar. Definitions are available as follows:
• Tables - Teradata Database only
• Views, Macros, Procedures and Functions - Teradata, Oracle, SQL Server and Sybase Note: The definition for a Function or Procedure may not always be available. Do not attempt retrieval of interval columns from Oracle as this will cause problems with the Oracle ODBC driver.
Copying a List of All Columns From a Table or View Into the Query Window
Copy a list of all the columns from the selected Table or View into the Query Window, as part of a simple select statement, using the Browse command. For example:Select col1, col2, col3, col4 From MyTable
This is faster than dragging individual column names to build a select statement that contains many columns of a table.
To copy a list of all the columns from the selected table or view into the Query Window
✔ Right-click on the object, then select Browse.
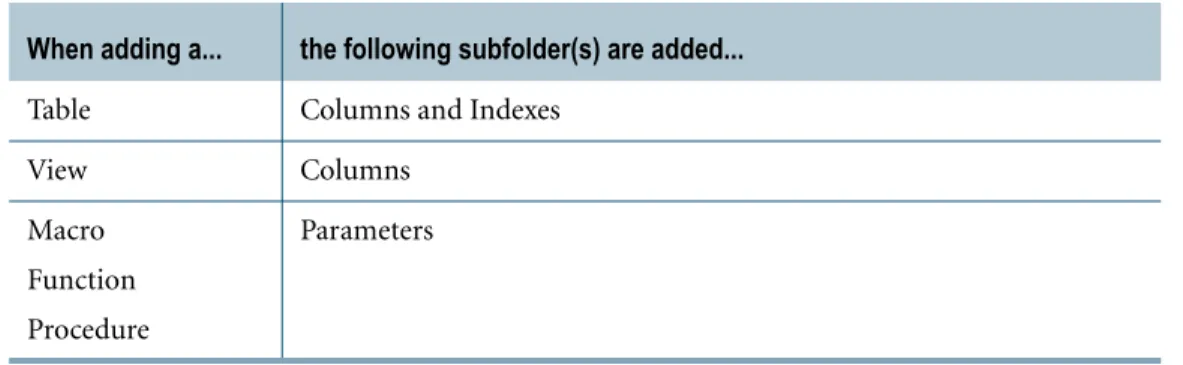
Table 3: Sub folders Created When Objects are Added
When adding a... the following subfolder(s) are added...
Table Columns and Indexes
View Columns
Macro Function Procedure
Chapter 1: Getting Started Using the Database Explorer Tree
Adding Databases
The following steps explain how to add additional databases to the Database Explorer Tree.
To add additional databases
1 Do one of the following:
• With the Database Explorer Tree active, press Insert.
• Right-click anywhere in the Database Explorer Tree, then select Add Database. 2 Type the database name to be added.
3 Clear the check box to have the database loaded only for the current session . By default, the check box is selected so the database appears in the Database Explorer Tree in future sessions.
The maximum size for this saved database list is 1023 bytes.
Removing Databases
To remove databases from the Database Explorer Tree, use the following steps. If a database is removed by mistake, it can be added again. See “Adding Databases” on page 34.
To remove a database
✔ Do one of the following:
• Click on the database name and press Delete.
• From the Database Explorer Tree, right-click on the database name and click Remove Database.
Note: The default database can not be removed from the Database Explorer Tree.
Refreshing the Database Explorer Tree
The following steps explain how to refresh the objects shown below a database in the Database Explorer Tree.
To refresh the objects shown below a database
1 From the Database Explorer Tree, right-click the database. 2 Select Refresh Database.
Chapter 1: Getting Started Database Explorer Tree Window Shortcut Menu
Pasting Object Names to Query Window
The following steps explain how to paste object names into the Query window.
To paste object names to the Query Window
1 Place the cursor in the Query Window at the chosen location for the object name. 2 From the Database Explorer Tree window, right-click on the object name.
3 Select Quick Paste.
The name is automatically inserted at the current insertion point in the Query Window.
Database Explorer Tree Window Shortcut Menu
The shortcut menu provides a quick way to access commands specific to the Database Explorer Tree window.
Displaying the Shortcut Menu
There are several ways to bring up additional menu options. Table 4 on page 35 describes all of the commands.
To display commands for the Database Explorer Tree Window
✔ Do one of the following:
• Right-click an object, select and menu item. • Press Shift+F10.
• Press Context Menu on the keyboard.
Table 4: Explorer Tree Shortcut Menu Commands
Command Description
Browse Copies a list of all the columns from the selected Table or View into the Query Window, as part of a simple select statement.
The statement format is:
Select <a, b, c, ...> From <name>
where '<a, b, c, ...>' is the list of columns in that table/view and <name> is the Table or View name.
Quick Paste Pastes the current object name into the Query Window. The name is inserted at the current insertion point. To insert the name at a different point, drag and drop it within the query text. Show Definition Displays the text used to create an object in the Database Explorer Tree. The DDL (data definition
Chapter 1: Getting Started
Listing All Tables or Views In a Database
Listing All Tables or Views In a Database
To list the tables or views of any database
1 Select Tools > List Tables.
2 In the Database Name field, type the name of the database (or owner, if using Oracle) containing the tables.
Enter the following wildcard characters in this field: • "_" Matches any single character
• "%" Matches zero or more characters.
Also note that if the name is specified as a single percent sign ("%") this has special meaning to some ODBC drivers. It requests a list of all databases on the system, rather than all Tables within all Databases. To display all tables in all databases it is therefore safer to specify either "%%" or "_%".
Note: This field does not apply to Microsoft Access databases. 3 At least one of the following must be checked:
• Show Tables lists the tables in the selected database. • Show Views lists the views in the selected database.
• Show System Tables lists the System Tables in the selected database. 4 Click OK.
The resulting list of tables, views and/or system tables is displayed in an Answerset window. This window does not automatically close when new queries are submitted.
Expand/Collapse Expands or collapses the display for the selected object. If the selected object has not been previously opened, the child data (for example, the list of tables) will be fetched from the RDBMS. If the selected object has no children, it will be removed from the tree.
Add Database Adds additional databases to the Database Explorer Tree.
Refresh Database Refreshes the objects shown below a database in the tree. Right-click the database to refresh, then choose this command.
Note: Only object types previously expanded are refreshed. Remove Database Removes a database from the Database Explorer Tree.
Set Font Displays a Font dialog. The font used in the current window can be changed in this dialog. The Font Name, Font Size, and Bold attribute are saved in the system registry for future use. Separate values are stored for each type of window.
Table 4: Explorer Tree Shortcut Menu Commands (continued) (continued)
Chapter 1: Getting Started Listing All Columns In a Table or View
Listing All Columns In a Table or View
To list the columns in a table or view
1 Select Tools > List Columns.
2 In Database Name field, type the name of the database (or owner, if using Oracle) containing the table or view. This field does not apply to Microsoft Access databases. 3 In Table or View Name, type the name of the table or view.
4 Click OK.
The resulting list of columns are displayed in an Answerset window. This window does not automatically close when new queries are submitted.
Setting General Program Preferences
The following steps explain how to control basic program behavior by setting the General options.
To set general program preferences
1 Select Tools > Options. 2 Click the General tab.
3 Choose from the following options:
Chapter 1: Getting Started Support for Unicode and UTF-8
• Allow multiple Queries - allows multiple Query Windows open simultaneously. With this option selected, the New Query command opens a new tab in the Query Window. The default for this setting is unchecked.
• Close Answerset windows before submitting a new query - closes all open answer windows before the new query is submitted. The default for this setting is checked. • Display this string for Null data fields - enter the string to be displayed in place of Null
data fields in the reports and imported/exported files. The default for this setting is “?”. • Display dates in this format - use the pull-down to select from the following formats:
• Local - specifies that the display should follow the date format defined in the “Regional and Language options” of the Windows Control Panel.
• YYYY-MM-DD - is the default ODBC date display format. This is the only format that will display dates having a year less than 100.
• The remaining formats simply control date order and Month number/name display. The delimiter character used between the date parts is the one defined in the current locale - not necessarily the '/' shown in the format.
• Use a separate Answer window for
• Each Resultset - opens a new Answer window for each new result set
• Each Query - opens a new Answer window for each new query, but uses tabs within this window if the query returns multiple result sets. This is the default setting. • Never - directs all query results to display in a single tabbed Answer window • Create Microsoft Access databases using
• Access 95 - creates databases compatible with Microsoft Access 95, storing all strings in ASCII format. This is the default setting.
• Access 2000 - creates databases compatible with Microsoft Access 2000, storing all strings in Unicode format.
4 Click OK to close the Options dialog box and save the settings.
Support for Unicode and UTF-8
The Teradata ODBC Data Source must be defined to use either a UTF8 or UTF16 session character set in order to successfully submit or retrieve Unicode data.
If using UTF8, ensure that the ODBC option 'Use native LOB support' is checked.
If this option is not checked, or if working with Teradata Database V2R5.0 or lower, all fixed length character data may be returned with additional blank padding up to a length of double the actual column size. (This limitation is caused by insufficient descriptive information returned to the driver from older Teradata Database releases.)
Displaying Unicode Data
Unicode object names will not display correctly in the Database tree. However, a font that is able to display Unicode data (such as Arial Unicode MS) should be selected.
Chapter 1: Getting Started Support for Unicode and UTF-8 To display languages such as Arabic or Hebrew, which are normally displayed from right to left, use the Regional Settings option of Windows Control Panel to install the required language support files.
Exporting Unicode data
If the session character set is UTF8 or UTF16, the export file defaults to Unicode text. An alternative is to select ‘UTF8 Text.’
If ‘Delimited Text’ is selected, any data that is not a part of the code page will be corrupted. If ‘MS Access Table’ is selected, ensure that Access 2000 is selected on the General tab of the options screen, since Access 95 does not support Unicode data.
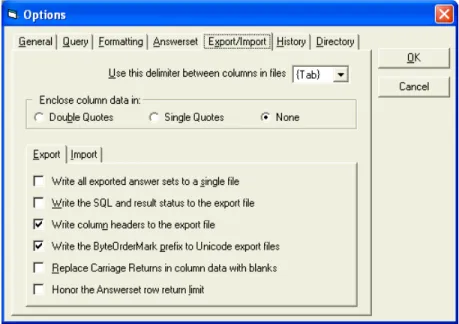
There is an option on the Export tab to specify whether or not the Byte Order Mark (BOM) file prefix is written to the file (Unicode / UTF8 files only).
The BOM is required by many Windows applications, or if you plan to import this file at a later date.
Importing Unicode data
Import files can be in ASCII, Unicode or UTF8 format. (If Unicode or UTF8 the file MUST contain the appropriate Byte Order Mark prefix.)
When Importing CLOB data, the data files referenced in the Import file can be in ASCII or Unicode format (but not UTF8). All files destined for a specific column should however be of the same type.
Chapter 1: Getting Started Support for Unicode and UTF-8
CHAPTER 2
The Query Window
The purpose of this section is to explain how to use the Query Window and its features and functions, as well as how to import data. This section contains the following information:
• Introduction to the Query Window • Using the Query Window
• Entering and Executing Queries
• Working With SQL Text in the Query Window • Replacing a Text String in the Query Window • Displaying an Explain Plan of Your Query • Query Builder Overview
• Using Query Builder • Setting Query Options
• Scheduling Queries for Later Execution • Setting Formatting Options
• Importing Data
• The Query Window Shortcut Menu
Introduction to the Query Window
The Query Window is a fully functional editing environment that can be used to edit and execute queries. Some of the features the editor supports are:
• Drag-and-drop editing.
• Automatic syntax coloring and brace matching. See “Setting Formatting Options” on page 64.
• Converting of selected text to either upper or lower case. See “The Query Tool Bar” on page 123.
• Inserting or deleting bookmarks. See “Selecting Text and Inserting Bookmarks Using the Query Window Margin” on page 43.
• Making white space characters visible. See “The Query Tool Bar” on page 123
• Recording and playing back of keystroke macros. See “Recording and Executing Query Window Macros” on page 49.
Chapter 2: The Query Window Using the Query Window
• A full compliment of command and cursor control shortcut keys. See “Command Shortcut Keys” on page 133 and “Cursor Movement/Text Highlighting Shortcut Keys” on page 135.
The results from the query are placed into one or more Answerset windows. Alternatively, the results may be written directly to a file.
Queries may consist of one or more statements, and may return zero or more Answersets. Enter SQL, DDL, or DML into the Query Window.
Comments may be added to queries. These comments are stored in the history database as part of the query.
When the Query Window is active, the menus, commands, and tools available pertain only to that window.
Using the Query Window
Before Starting
Before entering a query, read the following:
SQL, DDL, and DML statements
The SQL, DDL, and DML statements should conform to the syntax defined with the ODBC data source.
Displaying the Query Window Toolbar
Follow this procedure to display or hide the Query Window toolbar.
To display the Query Window toolbar
✔ Do one of the following:
• Select View > Toolbars > Query.
• Right-click anywhere in the Menubar or tool bar, then on the popup menu select Query.
Allowing Multiple Queries
To have more than one query open at a time, follow this procedure.
To allow multiple queries
1 Select Tools > Options. 2 Select the General tab.
Chapter 2: The Query Window Using the Query Window Once this option is selected, open additional tabs by clicking the New Query icon. Each tab, shown below the Query Window, can contain a separate query, and any of these queries can be executed. However only one query can be executed at a time.
Splitting the Query Window Into Two Windows
Split the query window into two independent scrolling windows to view two different parts of the query at once.
To split the Query Window into two scrolling windows
✔ On the right side of the Query Window, drag the bar at the top of the vertical scroll bar downwards.
Selecting Text and Inserting Bookmarks Using the Query Window Margin
Another shortcut is to use the margin at the left of the Query Window. Use the margin to select text, and insert or delete bookmarks.
To select text and insert or delete bookmarks using the margin of the Query Window
✔ Click in the margin to highlight the corresponding line.
✔ Click and drag in the margin to highlight multiple lines.
✔ Double-click in the margin, press Ctrl+B, or click to toggle a bookmark on or off for that line.
Creating statements (single and multi)
Queries may be created that consist of one or more statements.
A semicolon is not required when one statement at a time is entered. However, a semicolon between the statements is required for two or more statements.
Each statement in the query is submitted separately to the database, therefore, the query may return more than one Answerset.
Parameterized queries
Queries may contain Named Parameters, which makes it easy to reuse a query because all that changes are the data values (for example, in a Where clause).
Named Parameters function like variables. Enter the value for a named parameter once. If it is used in multiple places within the query that same value will be used in all places.
Note: The values entered for named parameters will be saved to the Notes column of History for future reference.
Named Parameters are indicated by a “?” immediately followed by a name. The name can consist of alphanumeric characters plus the “_” symbol.
Chapter 2: The Query Window Entering and Executing Queries
When an parameterized query is executed, a prompt appears for each parameter before the query is submitted.
For example, if the following query is submitted:
Select * From PhoneBook Where LastName Like '?NameStart' A prompt appears to enter a value for NameStart.
Parameter values are directly inserted into the query. This means that they may need to be enclosed in quotes. Although quotes may be used when prompted for the data value, it is generally recommended that quotes be included in the query itself, as in the example above. See “Allowing the Use of Named Parameters” on page 63 for more information.
To switch off parameter substitution
1 Select Tools > Options. 2 Select the Query tab.
3 Uncheck the option Allow use of Named Parameters in queries.
Note: If an empty string is entered, or the Cancel button used, the query is left unchanged. This allows for those rare cases where SQL Assistant incorrectly identifies a regular part of the query as being a parameter name.
Entering and Executing Queries
Entering a Query
After establishing a connection to a data source (refer to “Connecting to and Disconnecting from a Data Source” on page 26), Teradata SQL is ready to be used to enter and execute a queries.
To enter a query
✔ Do one of the following:
• Click within the Query Window and enter a statement. • From the Tool Bar, click , and enter a statement. • Select Tools >File, click New Query and enter a statement. • Press Ctrl+N and enter a statement.
• From the History window, select any statement from the SQL statement column. The Execute command submits the query currently in the Query Window to the database. Each statement in the query is submitted separately to the database. By default, queries are submitted asynchronously and can be aborted while it is executing.