Visual Concert DC User Guide
© 2001 Polycom Inc. All rights reserved.
No part of this document may be reproduced or transmitted in any form or by any means, electronic or mechanical, for any purpose, without the express written permission of Polycom, Inc. Under the law, reproducing includes translating into another language or format.
As between the parties, Polycom, Inc. retains title to, and ownership of, all proprietary rights with respect to the software contained within its products. The software is protected by United States copyright laws and international treaty provision. Therefore, you must treat the software like any other copyrighted material (e.g. a book or sound recording).
Every effort has been made to ensure that the information in this manual is accurate. Polycom, Inc. is not responsible for printing or clerical errors. Information in this document is subject to change without notice.
Other Restrictions
You shall not and shall not allow any third party to 1) decompile, disassemble, or otherwise
reverse-engineer or attempt to reconstruct or discover any source code or underlying ideas or algorithms of the software by any means whatsoever or 2) remove any product.
Trademark Information
Polycom®, ShowStation®, and the Polycom logo design are registered trademarks, and Visual Concert™ and ViewStation™ are trademarks of Polycom, Inc. in the United States and various other countries. ADTRAN® is a registered trademark and Expert ISDN™ is a trademark of ADTRAN, Inc. All other trademarks are the property of their respective owners. Every effort has been made to ensure that the information in this manual is accurate. Polycom, Inc. is not responsible for printing or clerical errors. Information in this document is subject to change without notice.
Patent Information
The accompanying product is protected by one or more U.S. and foreign patents and patents pending held by Polycom, Inc.
Warranty
Polycom, Inc. warrants its products to be free of defects in materials and factory workmanship for a period of twelve (12) months from date of purchase. This warranty does not apply to damage to products resulting from accident, misuse, service or modification by anyone other than a Polycom, Inc. authorized service facility/dealer. The warranty is limited to the original purchaser and is not transferable. Any liability of Polycom, Inc. or its suppliers with respect to the product or the performance thereof under any warranty, negligence, strict liability or other theory will be limited exclusively to product repair or replacement as provided above. Except for the foregoing, the product is provided “as is” without warranty of any kind including without limitation, any warranty of merchantability or fitness for a particular purpose. The entire risk of the quality and performance of the software programs contained in the system is with you.
Limitation of Remedies and Damages
Polycom, Inc., its agents, employees, suppliers, dealers and other authorized representatives shall not be responsible or liable with respect to the product or any other subject matter related thereto under any contract, negligence, strict liability or other theory for any indirect, incidental, or consequential damages, including, but not limited to loss of information, business, or profits.
The law of certain states or nations does not permit limitation or exclusion of implied warranties and consequential damages, so the above limitations, disclaimers, or exclusion may not apply to you. This warranty gives you special legal rights. You may also have other rights that vary by state and nation.
Federal Communications Commission (FCC) Radio Frequency Interference Statement
be determined by turning the equipment off and on, the user is encouraged to try to correct the interference by one or more of the following measures:
• Reorient or relocate the receiving antenna
• Increase the separation between the equipment and receiver
• Connect the equipment into an outlet on a circuit different from that to which the receiver is connected • Consult the dealer or an experienced radio/TV technician for help.
Modifications
The FCC requires the user to be notified that any changes or modifications made to this device that are not expressly approved by Polycom, Inc. may void the user’s authority to operate the equipment.
Notice for Customers in Canada
CAUTION
This Class B digital apparatus meets all requirements of the Canadian Interference Causing Equipment Regulations.
ATTENTION
Cet appareil numérique de la classe B respecte toutes les exigences du Règlement sur le matérial brouilleur du Canada.
Notice for Customers in European Countries
ACHTUNG
Dieses Gerät entspricht den Bestimmungen der EG-Direktive 87/308/EEC zur Störungsunterdrückung. Lärmemission kleiner 70 dBA.
EC Declaration
The Visual Concert DC is in conformity with the following directive and standards:
Low Voltage Directive 73/23/EEC and 93/68/EEC
Safety standards: EN60950/1992 +A1+A2/1993 +A3/1995 +A4+A11/1997
EMC Directive 89/336/EEC, 92/31/EEC and 93/68/EEC EMC standards: EN55022/1998Class B
EN55024/1998
EN61000-3-2/1995 +A1+A2/1998 EN61000-3-3/1995
Introduction
Ways to Use the Visual Concert DC ... 2
Use the Visual Concert DC as a Stand-alone Device ... 2
Use the Visual Concert DC with a ViewStation... 4
Use the Visual Concert DC with a ViewStation FX or VS4000 ... 5
What’s in the Box 6 Requirements and Setup 8 ViewStation Requirements... 8
Use an (S)XGA Device ... 8
Optional Remote Control Interfaces... 10
Visual Concert DC Control Panels ... 11
Set up the Visual Concert DC
Connect the Cables to the Visual Concert DC ... 16Unfold the Visual Concert DC ... 20
Attach the Fluorescent Lamps ... 26
Connect the Power Cable to the Electrical Outlet ... 27
Define the Visual Concert DC Setup Values ... 29
Fold the Visual Concert DC... 33
Cautions and Considerations for Using the Visual Concert DC ... 33
Use the Visual Concert DC
Display a Document on the Visual Concert DC ... 35Visual Concert DC Menu ... 43
Adjust the Visual Concert DC Settings ... 45
Turn on and Switch the Lights... 45
Adjust the Gain... 46
Set the White Balance... 47
Adjust the Tone ... 49
Reverse the Image... 50
Adjust the Color Balance... 52
Adjust the Sharpness ... 54
Select Automatic or Manual Iris Adjustments... 55
Select the Area of the Image to Display (XGA Mode Only) ... 57
Change the Pointer ... 58
Set the Output Mode to XGA or SXGA ... 59
Set the Video Standard to NTSC or PAL ... 59
Define Power On Settings ... 61
Define Additional Settings ... 70
Use a PCMCIA Card ... 73
General Considerations for PCMCIA Cards... 73
Insert, Eject, and Remove a PCMCIA Card ... 75
Display an Image Stored on a PCMCIA Card ... 77
Store an Image on a PCMCIA Card ... 80
Delete an Image File from a PC Card ... 81
Save an Image to the Server... 82
Draw on the Visual Concert DC Screen ... 83
Presentations ... 85
Maintain the Visual Concert DC
Replace the Fluorescent Lamps... 89Clean the Mouse Ball ... 91
Visual Concert DC Web Interface
Control the Visual Concert DC and Change Settings... 95View Visual Concert DC Images ... 97
1
Introduction
Thank you for purchasing the Visual Concert™ DC. The Visual Concert DC lets you send high-quality, high-resolution pictures from Polycom ViewStation, ViewStation SP, ViewStation FX, and VS4000 models. The images are displayed on the television monitor and any connected XGA or SXGA [(S)XGA] device at the near site. You can focus and adjust the image and then send it to the far sites for viewing.
The ViewStation and ViewStation SP models support
high-resolution images of 704 x 576 (ANNEX D). The ViewStation FX and VS4000 support higher resolution images of 1280 x 1024.
Visual Concert DC features include:
• High-resolution images
The 1,300,000 pixel CCD camera captures images and separates them into red, green, and blue (RGB) signals for output. This provides better and more detailed images, which make fine characters more legible than conventional document cameras.
• Easy network connection.
An Ethernet interface (10Base-T) lets you connect the Visual Concert DC to either the Internet or a local area network (LAN).
• Full-sized input of U.S. letter-sized sheets.
You can easily display a U.S. letter-sized sheet of paper (8 &1/2 by 11 inches) in either a vertical or horizontal position.
• Ability to write images to and read images from a PCMCIA card. You can display an image on the Visual Concert DC and store that image in a JPEG or bitmap (BMP) file on a PCMCIA card. You can also display images that are stored in JPEG or bitmap (BMP) files on a PCMCIA card.
• Image transmission.
The Visual Concert DC captures 15 frames per second when transmitting images.
Features include white balance, auto focus, color compensation, gamma compensation, image inversion, and an electronic zoom up to 4X. In combination with the optical 6X zoom, you can obtain a maximum of 24X zoom.
• Display of transparent and opaque materials.
The Visual Concert DC lighting supports the capture of images from both transparent and opaque originals.
• Easy, menu-based mouse operation.
You have easy, mouse-based access to the Visual Concert DC menu. From the menu, you select the features to use. The menu is displayed on the ViewStation’s television monitor.
• Use of NTSC or PAL on the ViewStation’s television monitor.
Ways to Use the Visual Concert DC
The Visual Concert DC is a high-quality, high-resolution document camera that you can use in numerous ways. This section highlights some of the different ways you can use the Visual Concert DC either stand-alone, with a ViewStation or ViewStation SP, or with a ViewStation FX or VS4000.
Use the Visual Concert DC as a Stand-alone Device
Although the Visual Concert DC can be used with Polycom
ViewStations, you can also use the Visual Concert DC stand-alone for different tasks.
• Conduct a Microsoft PowerPoint presentation both locally and remotely.
Save the PowerPoint presentation as a series of JPEG images on a PCMCIA card. Then, use the PCMCIA card in the Visual Concert DC PC card slot to locally display the presentation on a projector that is attached to the Visual Concert DC.
The presentation can also be viewed both locally and remotely using the Visual Concert DC web interface. The presentation is composed as snapshots, not live images.
• Present high-resolution images locally. For example, you can connect a:
– Projector, and display the Visual Concert DC images on a wall
– (S)XGA monitor, and view the images on the monitor.
The Visual Concert DC offers the following connection options:
Good: Composite output
Better: S-video connection
Best: RGB connector
• Conduct a Visual Concert DC web conference.
Using the Visual Concert DC web interface, you can conduct a web conference by having participants join an audio conference. You can have up to 12 conference participants enter the IP address of the Visual Concert DC in their web browser to view the Visual Concert DC presentation in their browser window. For example, a product manager might be on a telephone (audio) call talking to an industrial design company, which is designing a prototype. The design company could use the Visual Concert DC to display the prototype and discuss it. The product manager could view the prototype using the web interface and decide whether changes had to be made. The high-resolution image lets you clearly see the details of the image. The prototype can be moved around in order to see different angles.
Because the Visual Concert DC provides such a high-quality, high-resolution image, you can view a variety of items, including:
• 3-dimensional objects
• X-ray film
• Circuit boards
• Graphics
• Documents.
Use the Visual Concert DC with a ViewStation
You can use the Visual Concert DC with any ViewStation model. On ViewStation and ViewStation SP models, the ViewStation supports high-resolution images at four times a full CIF resolution, which is 704 x 576 (ANNEX D).
Video Conference: Using the Visual Concert DC while in a video conference lets you display multiple images of an object, including 3-dimensional objects, circuit boards, and prototypes.
You can easily move the object and show its different sides and angles. For documents such as specifications or blueprints, you can easily highlight sizes and dimensions and discuss any changes.
Web Interface: Attach the Visual Concert DC to the
ViewStation using an IP connection. Press the PREVIEW/SNAPSHOT button on the front of the Visual Concert DC once to preview the image before sending it out. Press the button again to send the image to the web interface.
Up to twelve people can log into the Visual Concert DC web interface and view the images.
Use the Visual Concert DC with a ViewStation FX or VS4000
You can use the Visual Concert DC with a ViewStation FX or VS4000 and provide high-quality, high-resolution images (1280 x 1024).
With the ViewStation FX or VS4000, you can perform the same tasks as you can with the other ViewStation models. For more information, see “Use the Visual Concert DC with a ViewStation” on page 4.
In addition, you can connect the Visual Concert DC to the Visual Concert FX using the VGA cable. This provides dual stream mode and live graphics.
Using the image capabilities of the ViewStation FX or VS4000, you can transmit live motion images on the stage (glass) of the Visual Concert DC. To do so, use the slide button on the ViewStation FX remote or the PLAY button on the VCFX. Do not use the
What’s in the Box
The Visual Concert DC box contains the following items. If an item is missing, contact your dealer.
• 1 Visual Concert DC
• 3 power cables. The shape of the power cables might vary, depending on the country in which you purchased the Visual Concert DC.
• 1 two-button mouse
• 1 6-foot S-video cable
• 1 6-foot D-sub 15-pin cable
• 2 packages containing fluorescent lamps (FPL13EX-N)
• 1 dust cover
Requirements and Setup
This section describes:
• The ViewStation requirements for using the Visual Concert DC
• An overview of connecting the Visual Concert DC to a ViewStation
• Considerations for using an (S)XGA device compared to using the television monitor attached to the ViewStation
• Information about optional remote control interfaces.
ViewStation Requirements
To use the Visual Concert DC, you must have the following software installed:
• ViewStation FX and VS4000: Version 4.0 or higher - supports 1280 x 1024
• ViewStation and ViewStation SP models: Version 7.0 or higher - supports 704 x 576 (ANNEX D).
Use an (S)XGA Device
There are several items to consider when attaching an (S)XGA device to the Visual Concert DC. XGA resolution is 1024 x 768. SXGA resolution is 1280 x 1024.
You can attach an (S)XGA projector to the Visual Concert DC and display the image to a large room of people.
By default, the Visual Concert DC displays a menu on the ViewStation monitor. If you use an (S)XGA device, you can also display a menu on the (S)XGA device. The (S)XGA menu and television monitor menu are different. The television monitor menu has the following items that are not available on the (S)XGA menu:
• Video out - lets you choose between NTSC or PAL
Note Although the Video out and Menu on items are not on the (S)XGA device menu, you can change the settings using the (S)XGA device. To change the settings, select Setup on the (S)XGA menu. The Power On Settings screen is displayed. Make your changes on the screen, click Save, and then click Exit.
The (S)XGA menu has a Setup icon that is not available on the television monitor menu. Setup lets you access three screens:
• Power On Settings
• Network Settings
• Additional Settings.
These three screens are described in more detail in the following sections.
If a specific setting is available on both the television monitor menu and (S)XGA device menu, and you change the setting from one menu, the change is reflected on the other menu also.
Note When you set up the Visual Concert DC, it is recommended that you use the menu on the television monitor, regardless of whether you have an (S)XGA device connected. You can use the menu on the (S)XGA device at any other time to change various settings, such as light settings, gain, white balance, color, and so on.
Power On Settings Screen
The Power On Settings screen lets you define the values for many options, such as the lights setting, gain, and white balance, and then save the settings as defaults for the next power on. You can also define and save the same values using the television monitor menu, except for the JPEG quality setting.
To set the JPEG quality, you must use the Power On Settings screen. Access the screen using the Setup icon on the (S)XGA device menu. The JPEG quality values can be:
• Normal (1/8), which is the default
• Basic (1/16)
To adjust the JPEG quality for video communications, you must connect an (S)XGA device to the Visual Concert DC.
Network Settings Screen
The Network Settings screen lets you define various network properties, including TCP, ViewStation, and web properties. You can also define most of the same values using the television monitor menu. The exceptions are the following check boxes on the Network Settings screen:
• Enable Network
• Read Only (FTP, WEB: disable Write/Control)
• Enable FTP Client.
To change any of these three settings, you must connect an (S)XGA device to the Visual Concert DC. If you do not attach an (S)XGA device, the Visual Concert DC uses the default settings for these check boxes.
Additional Settings Screen
The Additional Settings screen lets you change the following settings:
• Date and time
• Power save timer
• Slide interval timer
• File type and size
• Popup 3rd button.
To change any of these settings, you must connect an (S)XGA device to the Visual Concert DC.
Visual Concert DC Control Panels
Figure 1-1. shows the Visual Concert DC and points out the two control panels. The front control panel is shown in Figure 1-2. The back control panel is shown in Figure 1-3.
Figure 1-1. Visual Concert DC Main Unit
Front Panel
Figure 1-2. Visual Concert DC Front Panel
Figure 1-3. Visual Concert DC Back Panel AF
PREVIEW/SNAPSHOT
FOCUS ZOOM
MENU CARD MENU
W T
POWER MENU REVERSE BRIGHTNESS
E-ZOOM TONE LIGHTS
NEGA BLUE
2
Set up the Visual Concert DC
This chapter describes how to set up the Visual Concert DC. The following highlights the setup tasks.
• Connect the Cables to the Visual Concert DC (page 16):
– Connect the mouse and power cable to the Visual Concert DC
– Connect the network connection cables
– Connect the S-video cable from the Visual Concert DC to the ViewStation
– Optionally, connect an (S)XGA device to the Visual Concert DC
– Optionally, use the REMOTE connector on the back of the Visual Concert DC to connect optional remote control interfaces.
• Unfold the Visual Concert DC (page 20)
• Attach the fluorescent lamps (page 26)
• Plug the power cable into an electrical outlet (page 27)
• Define Visual Concert DC setup values (page 29)
• Fold the Visual Concert DC (page 33).
The Visual Concert DC QuickStart describes how to set up and configure the Visual Concert DC.
Connect the Cables to the Visual Concert DC
This section describes required and optional cable connections. The required connections are the minimum ones you need in order to use the Visual Concert DC with the ViewStation FX, VS4000, ViewStation, or ViewStation SP.
All of the connectors on the back of the Visual Concert DC are shown in Figure 2-1.
Figure 2-1. Connectors on the Back of the Visual Concert DC To connect the cables to the back of the Visual Concert DC:
1. Remove the Visual Concert DC from the box. Do not remove the packaging foam or unfold the Visual Concert DC until you have connected the proper cables.
2. Place the Visual Concert DC on a flat surface.
4. Connect the mouse to the back of the Visual Concert DC with the arrow mark of the mouse cable facing upward. See Figure 2-2.
Figure 2-2. Connect the Mouse to the Visual Concert DC 5. Connect the power cable to the AC input connector on the back
of the Visual Concert DC, as shown in Figure 2-3.
Do not connect the power cable to the electrical outlet until you have completed all of the other steps.
Figure 2-3. Connect the Power Cable to the Visual Concert DC 6. Connect the appropriate cables to set up a network connection.
You can connect the RJ-45 cable from the back of the Visual Concert DC to:
– An Ethernet LAN port
– The blue RJ-45 port on the back of the ViewStation. This configuration is not available for the ViewStation SP.
RJ-45 cables are not provided with the Visual Concert DC. RJ-45 cables are shipped with the ViewStation.
and VS4000 support 100Base-T connections, and ViewStations support 10Base-T connections.
For more information about network connections, see the appropriate User Guide for your ViewStation model.
7. Connect the S-video cable from the Visual Concert DC to the ViewStation. Use the S-video cable that comes in the box with the Visual Concert DC.
a. Power off the ViewStation
b. Connect one end of the S-video cable to the S-Video connector on the back of the Visual Concert DC
c. Plug the other end of the S-video cable into your ViewStation:
– On the back of the ViewStation FX, plug the other end of the cable into port 3, which is the port for a document camera
– On the back of the ViewStation, ViewStation SP, and VS4000, plug the other end of the cable into port 2.
For more information about connections, see the appropriate
QuickStart for your ViewStation model.
Connecting the S-video cable lets you preview the image the Visual Concert DC will send to the far sites on the ViewStation television monitor. This lets you easily focus and zoom the image and adjust various settings. If you connect an XGA or SXGA device to the Visual Concert DC, you can also use that device to focus, zoom, and adjust the image. However, the ViewStation television monitor displays the actual image the far sites will see.
8. Optionally, connect an XGA or SXGA device (monitor or projector) to the Visual Concert DC.
Figure 2-4. Connect an XGA/SXGA Device to the Visual Concert DC Although an XGA or SXGA device is not required, you might want to use one for video communications. For example, using a projector lets you display the information from the Visual Concert DC to a large room of people. Connecting a monitor lets you preview the image and make adjustments before displaying the image on the local ViewStation television monitor and sending to the far sites.
Using a monitor also lets you specify additional settings that are not available from the television monitor menu. Some settings include JPEG quality, network connection values, date and time, and the power save timer and slide interval timer.
9. Optionally, you can use the REMOTE connector on the back of the Visual Concert DC to connect optional remote control interfaces.
10. Remove the packaging foam from the Visual Concert DC.
Unfold the Visual Concert DC
To unfold the Visual Concert DC:
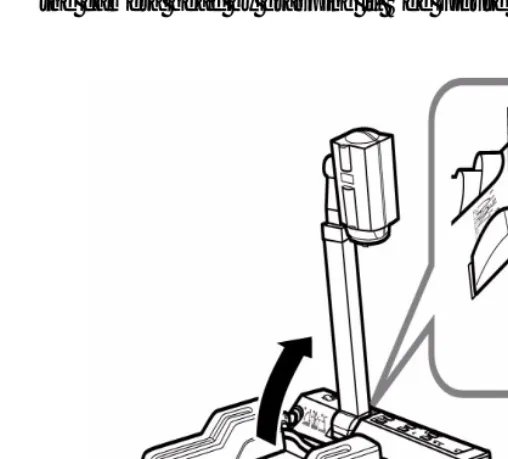
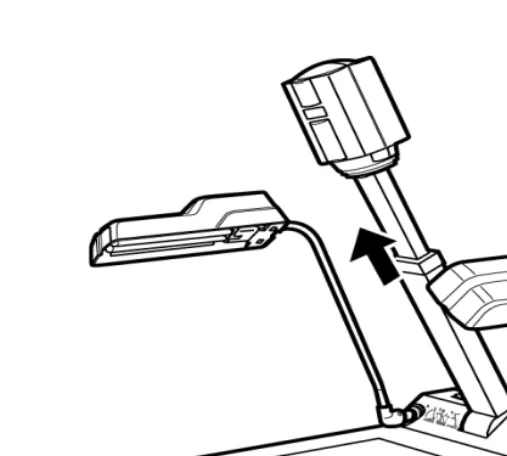
1. While holding down the stopper, raise the camera head until it is vertical.
Grip the camera arm while raising the camera head. Do not raise the camera head by grasping it. See Figure 2-5.
Figure 2-5. Raise the Camera Head
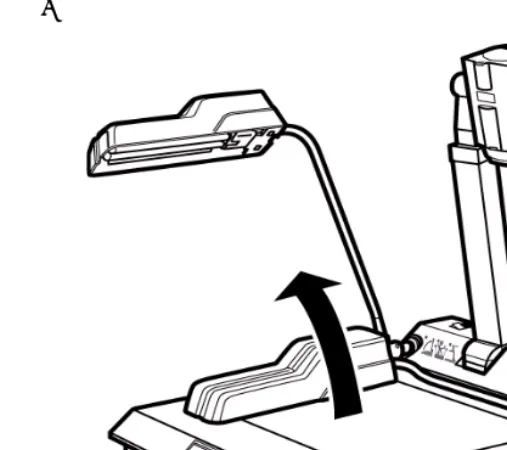
2. Raise the light arms and direct the fluorescent lamps toward the document stage, as shown in Figure 2-6. and Figure 2-7. Raise the left arm first and then raise the right arm. Do not forcibly rotate the arms beyond their limits.
.
Figure 2-6. Raise the Left Light Arm
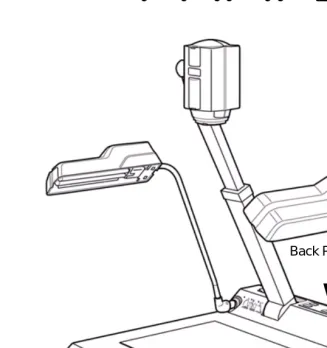
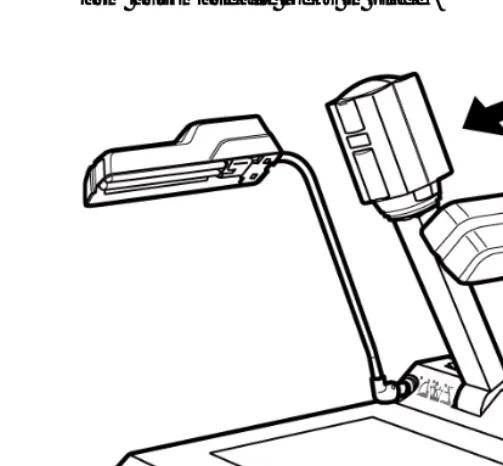
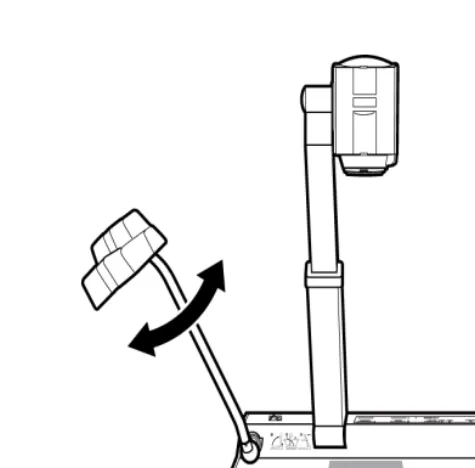
3. Adjust the position and angle of the camera head.
a. Move the camera arm to the shooting position, as shown in Figure 2-8. Do not press the stopper. Grip the camera arm and move it towards the document stage.
When the camera arm reaches the shooting position, the arm automatically locks in place.
b. Extend the camera arm, as shown in Figure 2-9.
When you fully extend the camera arm, the arm locks in place. Once you hear a clicking sound, do not extend the camera arm beyond the first click.
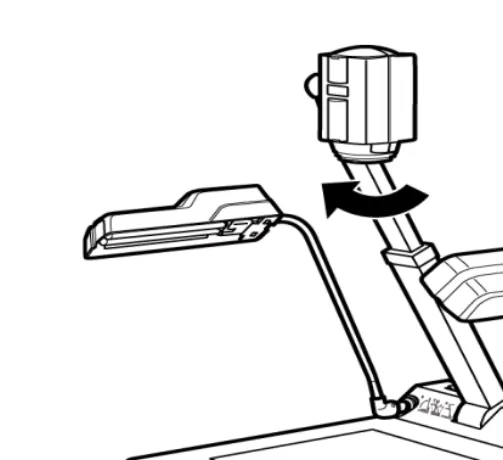
c. Turn the camera head towards the document stage, as shown in Figure 2-10.
4. Remove the cap from the camera, as shown in Figure 2-11.
Figure 2-11. Remove the Cap From the Camera
Attach the Fluorescent Lamps
Attach the supplied fluorescent lamps to the lamp holders on the light arms. Check that the POWER switch is in the OFF position and the power plug is disconnected from the AC outlet.
To attach the lamps:
1. Insert the fluorescent lamp into the socket of the light stand, as shown in Figure 2-12.
Figure 2-12. Insert a Fluorescent Lamp into the Socket
2. While pressing the lamp towards the socket, fit the lamp in the holder, as shown in Figure 2-13.
You should hear a clicking sound.
3. If you do not hear a clicking sound, press the holder with your fingers as shown in Figure 2-14.
Figure 2-14. Press the Holder With Your Fingers
Be careful that the fluorescent lamp is not damaged by the holder. Ensure the lamp is firmly secured in the socket and holder.
Caution To avoid injury, do not apply excessive force when handling a fluorescent lamp.
If you are setting up the Visual Concert DC, continue with “Connect the Power Cable to the Electrical Outlet”.
Connect the Power Cable to the Electrical Outlet
After you complete all of the other connections, connect the power cable to the electrical outlet.
When you connected the cables to the back of the Visual Concert DC, one of the steps was to connect the power cable to the AC input connector on the back of the Visual Concert DC. You can now connect the power cable to the electrical outlet.
1. Ensure the power cable is connected to the AC input connector of the Visual Concert DC.
3. Connect the cable to an electrical outlet, as shown in Figure 2-15.
Figure 2-15. Connect the Power Cable
Define the Visual Concert DC Setup Values
To define the Visual Concert DC setup values, use the mouse and the menu on the television monitor, instead of the buttons on the control panels of the Visual Concert DC. The mouse is shipped in the box with the Visual Concert DC. The television monitor should already be connected to the ViewStation.
Note If you have an XGA or SXGA device attached to the Visual Concert DC, you can use the menu icons on the device to define setup values. However, it is recommended that you use the menu on the television monitor instead because that menu is customized for Polycom settings, which makes setup easier to complete.
To define the Visual Concert DC setup values:
1. Power on the ViewStation and the television monitor.
3. Using the mouse attached to the Visual Concert DC, move the pointer to the upper 1/5 of the television monitor screen. Click the right mouse button. The television monitor menu is displayed, as shown in Figure 2-16.
4. From the television monitor menu, click Network Setup. The Network Setup dialog is displayed, as shown in Figure 2-17.
Figure 2-17. Network Setup Dialog 5. The default values are shown in Figure 2-17.
To change any values, use the mouse to select the field you want to change. To enter letters or numbers, use the keyboard on the dialog screen and click on the letter or number you want. By default, an asterisk (*) is displayed in the Use DHCP check box. In this case, an IP address and subnet mask for the Visual Concert DC are automatically assigned and displayed in the IP Address and Subnet Mask fields.
To use a static (permanent) IP address, your LAN administrator must assign an address and subnet mask to the Visual Concert DC. On the Network Setup dialog, make sure the Use DHCP: check box is blank and enter the IP address and subnet mask of the Visual Concert DC.
By default, the user ID and password are:
– User ID - anonymous
If a user ID and password is required to log into your network, you must enter those values in the User ID and Password fields.
6. To save the changes, click Save. To reset all of the values to their default settings, click Reset.
7. To exit the dialog and return to the television monitor menu, move the mouse pointer to the upper 1/5 of the television monitor screen. Click the right mouse button.
8. From the television monitor menu, click Polycom Setup. The Polycom Setup dialog is displayed, as shown in Figure 2-18.
Figure 2-18. Polycom Setup Dialog
12. If there is no ViewStation meeting password defined, you must use none in the Meeting Password field. Otherwise, enter the actual ViewStation meeting password.
13. When you complete the screen, click the right mouse button on the lower part of the screen.
Fold the Visual Concert DC
When you are done using the Visual Concert DC, fold the Visual Concert DC to return the camera head and light arms to their original position.
1. Align the camera head with the camera arm.
2. Press and hold the stopper. Grip the camera arm and raise the camera head.
3. Turn the light arms with the fluorescent lamps facing the document stage. Fold the right arm down first and then fold the left arm down.
4. Press the stopper and push the camera arm down toward the document stage.
Cautions and Considerations for Using the Visual Concert DC
To prevent personal injury and damage to the Visual Concert DC:
• Do not apply excessive force to the camera head, camera arm, and light arms
• When moving the camera head, camera arm, and light arms to raise or fold them, be careful that your hands and clothing are not caught by moving sections
• Check that the camera arm and camera head are locked in the shooting position before you use the Visual Concert DC
• Do not lift the Visual Concert DC by grasping the camera arm
• The base of the Visual Concert DC might become hot during use
• Do not block the ventilation holes on the right side and bottom of the Visual Concert DC. The temperature inside the unit might become extraordinarily high, which could cause a fire.
3
Use the Visual Concert DC
This chapter describes different ways to use the Visual Concert DC.
Display a Document on the Visual Concert DC
With the Visual Concert DC, you can use both opaque and transparent materials. Opaque materials are shot with overhead lighting. Transparent materials are shot with base lighting. For example, films are transparent material.
To display a document:
1. Power on the equipment in this order:
a. Television monitor
b. ViewStation
c. Visual Concert DC
d. (S)XGA device
e. Additional equipment.
2. On the ViewStation, select the document camera as the video source. Using the ViewStation remote control, press the NEAR button twice to display the video source icons. Make sure the document camera icon is selected. For more information, see the appropriate User Guide for your ViewStation model. Selecting a document camera as the video source lets you access and use the Visual Concert DC online menu. The menu is displayed on the ViewStation television monitor or on the (S)XGA device, if a device is connected to the Visual Concert DC.
Figure 3-1. POWER Switch - Turn the Power On and Off
4. Press the LIGHTS button.
Figure 3-2. LIGHTS Button - Turn the Lamps On and Off Each time you press the LIGHTS button, the light setting changes as follows:
For opaque material, use overhead lighting.
For transparent material, use base lighting.
Upper Lights On
Bottom Lights On
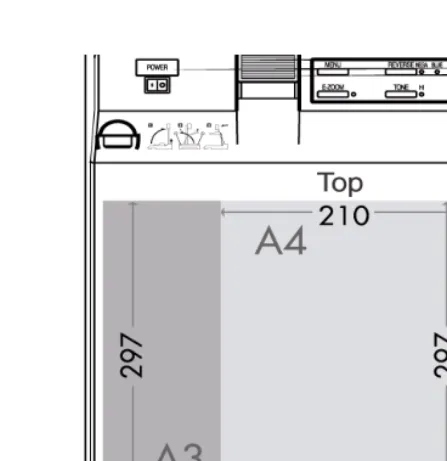
5. Place the material on the document stage, as shown in Figure 3-3.
Figure 3-3. Document Stage
For opaque material, the maximum size is 297 mm (height) and approximately 420 mm (width), which is approximately 11.7 inches high and 16.5 inches wide.
6. For opaque material:
Adjust the direction of the lighting, as shown in Figure 3-4.
7. To adjust the image size, press the ZOOM W or T button, as shown in Figure 3-5.
Figure 3-5. ZOOM W and T Buttons - Adjust Image Size
When you hold the ZOOM W or ZOOM T button, the image size changes continuously.
8. To adjust the focus, press the FOCUS and FOCUS buttons simultaneously, as shown in Figure 3-6. Hold both buttons for 1-2 seconds. The focus is automatically adjusted.
For fine adjustment, use the FOCUS or the FOCUS button. Each time you press one of the FOCUS buttons, a fine
adjustment is performed. Repeat until you attain the correct focus.
9. To adjust the brightness, press the BRIGHTNESS or button, as shown in Figure 3-7.
You can also use an online menu to adjust the brightness. For more information, see “Turn on and Switch the Lights” on page 45.
Figure 3-7. BRIGHTNESS or Button - Adjust the Brightness 10. For a clear image, press the TONE button. The contrast of the
image is emphasized, which makes the image clearer.
11. On the Visual Concert DC, press the PREVIEW/SNAPSHOT button once to preview the image on the ViewStation television monitor or the (S)XGA device. Once the image looks clear and all of the adjustments are complete, press the
Visual Concert DC Menu
A menu-driven interface is provided with the Visual Concert DC. The interface lets you easily control the Visual Concert DC using the mouse attached to the Visual Concert DC.
By default, the television monitor menu is displayed on the television monitor attached to the ViewStation, as shown in Figure 3-8. To display the menu, right click the mouse pointer in the upper 1/5 of the television monitor or press the Menu button on the Visual Concert DC.
Figure 3-8. Television Monitor Menu
If you connect an XGA or SXGA device to the Visual Concert DC, you can display the (S)XGA device menuon the (S)XGA device, as shown in Figure 3-9.
Figure 3-9. (S)XGA Device Menu To display the menu on the (S)XGA device:
2. The setting toggles between <TV> and <(S)XGA>. Select (S)XGA.
3. Right click the mouse pointer in the upper 1/5 of the (S)XGA device screen.
The television monitor menu is slightly different than the (S)XGA device menu. For more information, see “Use an (S)XGA Device” on page 8.
If the (S)XGA device menu is displayed and you want to switch and display the television monitor menu instead:
1. Click Setup on the (S)XGA device menu.
2. The Power On Settings screen is displayed. Click the Menu (TV/(S)XGA) button to switch to the television monitor menu. The setting to the right of the button should display On TV.
3. Click the Save button.
4. Click the Exit button.
Adjust the Visual Concert DC Settings
When you adjust the different Visual Concert DC settings, there are usually three ways you can make the adjustment. You can use the:
• Television monitor menu
• Buttons on the Visual Concert DC
• (S)XGA device, if you have this type of device connected to the Visual Concert DC.
The following sections explain how to adjust the Visual Concert DC settings.
Turn on and Switch the Lights
To turn on a light and switch between overhead and base lighting on the Visual Concert DC:
If you are using the... Do this...
Television Monitor
OR
(S)XGA Device
1. Display the menu by right clicking the mouse pointer in the upper 1/5 of the screen.
2. Click Lights. Each time you click Lights, the light setting changes as follows:
When the lights are set the way you want, right click the mouse pointer in the lower part of the screen.
Upper Lights On
Bottom Lights On
Adjust the Gain
You can adjust the light sensitivity of the image you are displaying on the Visual Concert DC. You can increase the gain to enhance the brightness of the picture, making the picture lighter. When an image becomes brighter, you might see more noise or graininess. If the picture is too grainy, you can decrease the gain to reduce the graininess of the image.
To adjust the gain: Visual Concert DC
Buttons
Press the LIGHTS button on the Visual Concert DC. Each time you press LIGHTS, the light setting changes as follows:
If you are using the... Do this...
Television Monitor 1. Display the menu by right clicking the mouse pointer in the upper 1/5 of the monitor screen.
2. Click Gain. A window displays the current gain value and a DOWN and UP button.
3. To decrease the gain, click DOWN. To increase the gain, click UP.
The possible gain values are 20 - 260
If you are using the... Do this...
Upper Lights On
Bottom Lights On
Set the White Balance
The Visual Concert DC lets you set the white balance to correct possible problems the Visual Concert DC might have with accurately displaying the colors in the image because of various lighting conditions. By setting the white balance, the Visual Concert DC displays a more accurate representation of the colors. The concept of setting the white balance is that under regular conditions, if the Visual Concert DC can display a white object or image as white, the colors the Visual Concert DC displays are accurate for the current lighting conditions.
How often you set the white balance depends on several things. You usually set the white balance once each time you power on the Visual Concert DC Buttons To decrease the gain, press the
BRIGHTNESS button on the Visual Concert DC. To increase the gain, press the BRIGHTNESS button.
The current gain value is not displayed. As you change the gain, you can preview the image on the television monitor to determine the brightness you want.
(S)XGA Device 1. Display the menu by right clicking the mouse pointer in the upper 1/5 of the screen.
2. Click Gain. An adjustment bar is displayed.
3. To decrease the gain, click the left button at the left end of the adjustment bar. To increase the gain, click the right button at the right end of the adjustment bar.
The current value is displayed below the adjustment bar. The range of gain values is 20 - 260 and the default is 100.
4. When the gain is set, right click the mouse pointer in the lower part of the screen.
Visual Concert DC. However, you might want to set it more often, depending on the image you are showing. You might also want to reset the white balance if you are using the Visual Concert DC in a specific conference room or if you display different material or subject matter on the Visual Concert DC compared to what you usually display.
To set the white balance:
1. Adjust the Iris setting and set the Iris to 0. For information about the Iris setting and making this adjustment, see “Select
Automatic or Manual Iris Adjustments” on page 55.
2. Place a white sheet of paper on the document stage of the Visual Concert DC. Make sure the upper lights are lit on the Visual Concert DC.
If you are using
the... Do this...
Television Monitor
1.Display the menu by right clicking the mouse pointer in the upper 1/5 of the monitor screen.
2.Click White Balance. The white balance is automatically adjusted.
3.Right click the mouse pointer in the lower part of the monitor screen.
Visual Concert DC Buttons
You cannot use the Visual Concert DC itself to set the white balance. You must use the menu on the television monitor or the (S)XGA device.
(S)XGA Device 1.Display the menu by right clicking the mouse pointer in the upper 1/5 of the screen.
When you set the white balance, the Visual Concert DC resets the Gain and Color settings to the default values. If you adjusted the Gain or Color settings, you must adjust them again.
Adjust the Tone
You can adjust the tone or gamma to obtain an image that has a balanced, even distribution of the shadows, mid-colors, and highlights in the image. In adjusting the tone, you can reduce glare, reveal parts of the image that are hidden in shadow, and make items in the image look brighter or duller. Often, if there is no tonal adjustment, an image appears too dark and any details that are in shadow would not be seen.
To adjust the tone (gamma) setting:
If you are using
the... Do this...
Television Monitor
OR
(S)XGA Device
1.Display the menu by right clicking the mouse pointer in the upper 1/5 of the screen.
2.Click Tone. Each time you click Tone, the tone setting changes as follows:
For more information about each setting, see Table 3-1, “Tone Settings,” on page 50.
3.When you select the Tone setting you want, right click the mouse pointer in the lower part of the screen.
Natural
Linear1
Linear2
Document
Table 3-1, “Tone Settings,” on page 50 explains the various tone settings.
Reverse the Image
Table 3-2, “Reverse Settings,” on page 50 shows the three settings you can use for displaying an image on the Visual Concert DC. Visual Concert
DC Buttons
To toggle between the Natural and Document tone settings only, press the TONE button.
For more information about the two settings, see Table 3-1, “Tone Settings,” on page 50. To set additional tones, use the menu on the television monitor or the (S)XGA device.
Table 3-1. Tone Settings
Tone Setting Description
Natural For regular documents
Linear1 The Visual Concert DC displays the image “as is”, without any compensation
Document For documents that have fine characters
Linear2 For glossy documents. This setting decreases the brightness.
Picture For photos and color-printed materials
Table 3-2. Reverse Settings
Reverse If you are using
To reverse the image:
If you are using
the... Do this...
Television Monitor
OR
(S)XGA Device
1.Display the menu by right clicking the mouse pointer in the upper 1/5 of the screen.
2.Click Reverse. Each time you click Reverse, the setting changes as follows:
For more information about each setting, see Table 3-2, “Reverse Settings,” on page 50.
3.When you select the Reverse setting you want, right click the mouse pointer in the lower part of the screen.
Visual Concert DC Buttons
To switch between the Normal, Nega, and BlueBack settings, press the REVERSE button. Each time you press the button, the setting changes as follows:
Adjust the Color Balance
You can independently adjust the red (R), green (G), and blue (B) color in the image that the Visual Concert DC displays. To adjust the color:
If you are using
the... Do this...
Television Monitor
1.Display the menu by right clicking the mouse pointer in the upper 1/5 of the screen.
2.Click Color Balance. A window displays the current red (R), green (G), and blue (B) color values and a DOWN and UP button for each color.
3.To decrease the value for a specific color, click DOWN for that color. To increase the value, click UP for that color.
Each time you click UP or DOWN, the color value increases or decreases by 5.
You can independently adjust each color. The range of color values is 50 - 150 and the default is 100.
4. When the color is set, right click the mouse pointer in the lower part of the screen.
Visual Concert DC Buttons
(S)XGA Device 1.Display the menu by right clicking the mouse pointer in the upper 1/5 of the screen.
2.Click Color. An adjustment bar is displayed for the color red. Beneath the adjustment bar, the current values for red (R), green (G), and blue (B) are displayed.
3.To change the green or blue values, click the green or blue color bar, respectively. The adjustment bar is displayed for that color. If you want to change the red values, the adjustment bar is already displayed.
4.To decrease the color, click the left button at the left end of the adjustment bar. To increase the color, click the right button at the right end of the adjustment bar.
Each time you click the left or right button, the color decreases or
increases by a value of 5. The current value is displayed below the adjustment bar.
You can independently adjust each color. The range of color values is 50 - 150 and the default is 100.
5. When the color is set, right click the mouse pointer in the lower part of the screen.
If you are using
Adjust the Sharpness
You can adjust the sharpness of the image that the Visual Concert DC displays. To adjust the sharpness:
If you are using
the... Do this...
Television Monitor
1.Display the menu by right clicking the mouse pointer in the upper 1/5 of the screen.
2.Click Sharpness. A window displays the current sharpness value and a DOWN and UP button.
3.To decrease the sharpness, click DOWN. To increase the sharpness, click UP.
Each time you click UP or DOWN, the sharpness value increases or
decreases by 1. The possible sharpness values are 0 - 5 and the default is 5.
4.When the sharpness is set, right click the mouse pointer in the lower part of the screen.
Visual Concert DC Buttons
Select Automatic or Manual Iris Adjustments
You can alternately select either automatic or manual iris
adjustments. Normally, you will use the automatic setting, which lets you make iris adjustments in the range of -3 to +3 steps. However, if there is any reflection from an object and the reflection negatively affects the correct image, select the manual iris setting and adjust the brightness. If you press the BRIGHTNESS button on the Visual Concert DC, the lens aperture becomes wider for a brighter picture. If you press the BRIGHTNESS button on the Visual Concert DC, the lens aperture becomes narrower for a darker picture.
For information about changing the brightness, see Figure 3-7. (S)XGA Device 1.Display the menu by right clicking the
mouse pointer in the upper 1/5 of the screen.
2.Click Sharpness. An adjustment bar is displayed.
3.To decrease the sharpness, click the left button at the left end of the adjustment bar. To increase the sharpness, click the right button at the right end of the adjustment bar.
Each time you click the left or right button, the sharpness value decreases or increases by 1. The possible sharpness values are 0 - 5 and the default is 5.
4. When the sharpness is set, right click the mouse pointer in the lower part of the screen.
If you are using
To select the iris adjustment:
If you are using
the... Do this...
Television Monitor
1.Display the menu by right clicking the mouse pointer in the upper 1/5 of the screen.
2.Click Iris, which toggles the iris setting between auto and manual. In auto, use the BRIGHTNESS button on the Visual Concert DC to make -3 to +3
adjustments.
3.When the iris is set, right click the mouse pointer in the lower part of the screen.
Visual Concert DC Buttons
You cannot use the Visual Concert DC itself to select the iris adjustment. You must use the menu on the television monitor or the (S)XGA device.
(S)XGA Device 1.Display the menu by right clicking the mouse pointer in the upper 1/5 of the screen.
2.Click Iris A/M, which toggles the iris setting between auto and manual. In auto, use the BRIGHTNESS button on the Visual Concert DC to make -3 to +3 adjustments.
Select the Area of the Image to Display (XGA Mode Only)
When you display an image from an XGA file on the Visual Concert DC, you can select the area of the image that you want displayed. You select the area using the Fit/Over menu icon.
The Fit/Over setting only works in XGA mode, not in SXGA mode.
To select the area you want to display: Table 3-3. Fit/Over Settings
Fit/Over Setting Description
Fit Displays the full screen, which is 1280 x 960 pixels
Over Displays the center area of the image, which is 1024 x 768 pixels
If you are using
the... Do this...
Television Monitor
OR
(S)XGA Device
1.Display the menu by right clicking the mouse pointer in the upper 1/5 of the screen.
2.Click Fit/Over, which toggles between Fit and Over.
3.When you select the setting you want to use, right click the mouse pointer in the lower part of the screen.
Visual Concert DC Buttons
Change the Pointer
You can easily change the form and color of the pointer. To change the pointer:
If you are using
the... Do this...
Television Monitor
1.Display the menu by right clicking the mouse pointer in the upper 1/5 of the screen.
2.Click Change Pointer. The pointer changes color and shape each time you click Change Pointer. Pointers include an arrow, plus sign, and a horizontal bar, all in three different colors. The default pointer is a yellow arrow outlined in red.
3.When the pointer you want to use is displayed, right click the mouse pointer in the lower part of the screen.
Visual Concert DC Buttons
You cannot use the Visual Concert DC itself to change the pointer. You must use the menu on the television monitor or the (S)XGA device.
(S)XGA Device 1.Display the menu by right clicking the mouse pointer in the upper 1/5 of the screen.
Set the Output Mode to XGA or SXGA
You can switch the output mode for the XGA or SXGA device that is connected to the Visual Concert DC, if you have connected such a device.
SXGA resolution is better than XGA resolution. If you have an SXGA device, you can set the output mode to either XGA or SXGA, although SXGA mode is recommended. XGA resolution is 1024 x 768. SXGA resolution is 1280 x 1024.
To switch the output mode:
Set the Video Standard to NTSC or PAL
NTSC and PAL are the two major video standards. The differences between the two standards involve the number of lines displayed on the screen and the use of 50 vs. 60 Hz. NTSC is the standard used in North America and Japan. PAL is the standard used in Europe and Australia.
With the Visual Concert DC, you can select either the NTSC or PAL standard. You can adjust the Visual Concert DC’s color format of video signals to match the format of the connected television monitor or (S)XGA device. Set the standard to the display standard used in your location.
If you are using
the... Do this...
Television Monitor
OR
(S)XGA Device
1.Display the menu by right clicking the mouse pointer in the upper 1/5 of the screen.
2.Click SXGA/XGA, which toggles between the SXGA and XGA modes.
3.When the output mode is changed, right click the mouse pointer in the lower part of the screen.
Visual Concert DC Buttons
Although it is possible to turn off the video signal, you should leave it on. Having the video signal on, without a television connected, does not affect the operation of the Visual Concert DC.
To select NTSC or PAL:
If you are using
the... Do this...
Television Monitor
1.Display the menu by right clicking the mouse pointer in the upper 1/5 of the screen.
2.Click Video Out, which toggles between the NTSC and PAL video standards.
3.When the video standard is set, right click the mouse pointer in the lower part of the screen.
Visual Concert DC Buttons
You cannot use the Visual Concert DC itself to select the video standard. You must use the menu on the television monitor or the (S)XGA device.
(S)XGA Device 1.Display the menu by right clicking the mouse pointer in the upper 1/5 of the screen.
2.Click Setup. The Power On Settings screen is displayed.
3.Click the TV out button until the correct setting, NTSC or PAL, is displayed to the right of the button.
4.To save the setting, click Save.
5.To exit the Power On Settings screen, click Exit.
Define Power On Settings
While you are using the Visual Concert DC, you can temporarily change certain Visual Concert DC settings using the television monitor menu or the (S)XGA device menu. These changes are temporary and are in effect until you power off the Visual Concert DC and power it back on again.
You can define several default settings that the Visual Concert DC uses whenever you power it on. To change the default power on settings, you must:
• Have an (S)XGA device attached to the Visual Concert DC
• Use the menu that is displayed on the (S)XGA device
• Access the Power On Settings screen.
Note If someone is uploading an image using the Visual Concert DC web interface at the same time the Power On settings are being changed, the Power On settings might not be changed correctly.
To define power on settings:
1. Display the (S)XGA device menu. For more information, see “Visual Concert DC Menu” on page 43.
Figure 3-10. Power On Settings Screen You can define power on defaults for the following settings:
• Lights: Click the Lights button. Each time you click Lights, the light setting changes as follows:
• Gain: The gain setting lets you adjust the light sensitivity of the image you are displaying on the Visual Concert DC. For more information, see “Adjust the Gain” on page 46.
Upper Lights On
Bottom Lights On
information, see “Set the White Balance” on page 47. To set the default white balance the Visual Concert DC uses when you power it on:
a. First, adjust the Iris setting and set the Iris to 0. For more information, see “Select Automatic or Manual Iris
Adjustments” on page 55.
b. Place a white sheet of paper on the document stage of the Visual Concert DC. Make sure the upper lights on the Visual Concert DC are lit.
c. Click the White Balance button.
d. The white balance is automatically adjusted and is saved as the default for the next time you power on the Visual Concert DC.
• Tone: You can set a default tone or gamma to obtain an image display that has a balanced, even distribution of the shadows, mid-colors, and highlights.
To select the default tone for the Visual Concert DC, click the Tone button. Each time you click the button, the tone setting changes as follows:
For more information about each setting, see Table 3-1, “Tone Settings,” on page 50.
• Color Balance: You can independently adjust the red (R_GAIN), green (G_GAIN), and blue (B_GAIN) color in the images that the Visual Concert DC displays. On the Power On Settings screen, the Color Balance shows these three settings. To decrease the value for a specific color, click the left button for that color. To increase the value, click the right button for that color.
Each time you click the left or right button, the color value
Natural
Linear1
Linear2
Document
decreases or increases by 5. The current value for each color is displayed to the right of the buttons.
You can independently adjust each color. The range of color values is 50 - 150 and the default is 100.
• Sharpness: You can define the default sharpness of the image that the Visual Concert DC displays. To decrease the
sharpness, click the left button. To increase the sharpness, click the right button.
Each time you click the left or right button, the sharpness decreases or increases by 1. The current value for sharpness is displayed to the right of the buttons. The possible sharpness values are 0 - 5 and the default is 5.
• Auto Exposure (AE) and Compensation: You can select either automatic or manual exposure. Usually, you will use the automatic setting, which lets you make iris compensation adjustments in the range of -3 to +3 steps using the
BRIGHTNESS button on the Visual Concert DC. If the image is too light, you can compensate for the lightness by lowering the compensation amount, which reduces brightness. If the image is too dark, you can compensate for the darkness by raising the compensation amount, which increases brightness. For more information, see “Select Automatic or Manual Iris Adjustments” on page 55.
On the Power On Settings screen, click the large button to the right of Auto Exposure. The button toggles between automatic (Automatic On) and manual (Automatic Off).
If you select automatic exposure, you can also adjust the iris compensation. To decrease the compensation, click the left compensation button. To increase the compensation, click the right button. Each time you click the left or right button, the iris compensation value decreases or increases by 1. The current compensation value is displayed to the right of the buttons. The possible values are -3 to +3 and the default is 0.
• SXGA/XGA: You can define the output mode for the XGA or SXGA device that is connected to the Visual Concert DC, if connected.
Standard to NTSC or PAL” on page 59.
With the Visual Concert DC, you can display images using either the NTSC or PAL standard. Click the TV Out button to toggle between NTSC and PAL.
Although it is possible to turn off the video signal, you should leave it on. Having the video out on without a television does not affect the operation of the Visual Concert DC.
• JPEG Quality: You can display a document and store its image on an FTP server. For more information, see “Save an Image to the Server” on page 82.
When you store an image on a server, you can save the image as a JPEG file. On the Power On Settings screen, use the JPEG Quality setting to define the default quality of the image when you save it to the FTP server. The possible settings are shown below. The value in parentheses after the setting indicates the approximate size of the JPEG file after it is compressed.
– Fine (1/4)
– Normal (1/8)
– Basic (1/16)
– Draft (1/32)
The default is Normal (1/8).
• Menu (TV/(S)XGA): By default, the Visual Concert DC’s menu-driven interface is displayed on the television monitor attached to the ViewStation. If you have an XGA or SXGA device attached to the Visual Concert DC, you can display a menu interface on the (S)XGA device also. The two menus differ slightly. For more information, see “Use an (S)XGA Device” on page 8.
Define Network Settings
You can define network settings using either the television monitor menu or the (S)XGA device menu. The two ways of defining network settings are basically the same. However, if you define network settings using the (S)XGA menu, the screen has the following check boxes, which are not available from the Network Setup option on the television monitor menu:
• Enable Network
• Read Only (FTP, WEB: disable Write/Control)
• Enable FTP Client.
These three check boxes provide more flexibility in defining network options, for example, for enabling or disabling network access and using FTP. For more information, see “Use an (S)XGA Device” on page 8.
Although you can define network settings using either the television monitor menu or the (S)XGA device menu, it is recommended that you use the menu on the television monitor because that menu is customized for Polycom settings, which makes it easier to define the settings.
Each way of defining the network settings is described in this section.
Define Network Settings Using the Television Monitor Menu
To define network settings from the television monitor menu:
1. Display the television monitor menu. For more information, see “Visual Concert DC Menu” on page 43.
Figure 3-11. Network Setup Dialog 3. The default values are shown in Figure 3-11.
To change values, use the mouse to select the field you want to change. To enter letters or numbers, use the keyboard on the dialog screen and click on the letter or number you want. By default, an asterisk (*) is displayed in the Use DHCP: check box. In this case, an IP address and subnet mask for the Visual Concert DC are automatically assigned and displayed on the dialog screen.
To use a static (permanent) IP address, your LAN administrator must assign an IP address and subnet mask to the Visual Concert DC. On the Network Setup dialog, make sure the Use DHCP: check box is blank and enter the IP address and subnet mask values.
By default, the user ID and password are:
– User ID - anonymous
– Password - none
If a user ID and password is required to log into your network, you must enter those values in the User ID and Password fields.
4. To save the changes, click Save. To reset all of the values to their default settings, click Reset.
Define Network Settings Using the (S)XGA Device Menu
To define network settings from the (S)XGA device menu:
1. Display the (S)XGA device menu. For more information, see “Visual Concert DC Menu” on page 43.
2. Click Setup. The Power On Settings screen is displayed.
3. Click the Network Settings button. The Network Settings screen is displayed, as shown in Figure 3-12.
Figure 3-12. Network Settings Screen
4. To change values, use the mouse to select the field you want to change. To enter letters or numbers, use the keyboard on the Network Settings screen and click on the letter or number you want.
Use DHCP: check box is blank and enter the IP address and subnet mask of the Visual Concert DC.
You can define the following network values:
• Enable Network: Check this box with an asterisk (*) to enable the network. To disable network functions, unmark the check box.
• Read Only: Check this box with an asterisk (*) to disable write control for FTP and the web interface.
• Internal Server: The fields in the Internal Server part of the screen pertain to the Visual Concert DC. The fields are:
– DHCP: Check this box with an asterisk (*) to enable DHCP and to automatically have the IP address and subnet mask of the Visual Concert DC filled in the Internal Server fields.
– IP Address: IP address of the Visual Concert DC. If you check the DHCP box, the IP address is automatically filled in.
– Subnet Mask: Subnet mask of the Visual Concert DC. If you check the DHCP box, the subnet mask is automatically filled in.
– User ID: By default, set as anonymous
– Password: By default, set as none
If a user ID and password is required to log into your network, you must enter those values in the User ID and Password fields.
• Enable FTP Client: Check this box with an asterisk (*) to enable the FTP client. You must check this box to ensure the connection of the ViewStation and Visual Concert DC.
• Connect to ViewStation (Polycom): Check this box with an asterisk (*) to ensure the connection of the ViewStation and Visual Concert DC.
• External Server: The fields in the External Server part of the screen pertain to the ViewStation to which the Visual Concert DC is connected. The fields are:
– IP Address: IP address of the ViewStation
– User ID: Set to ***
applies if you log the Visual Concert DC into a remote image server. If you change the field value, click Reset and then click Exit to reset the field to its default value.
– Password: Set to none.
If there is no ViewStation meeting password defined, you must use none in the Password field. Otherwise, enter the actual ViewStation meeting password.
5. To save the changes, click Save. To reset all of the values to their default settings, click Reset.
6. To exit the Network Settings screen, click the Exit button.
Define Additional Settings
You can only define additional settings if you have an (S)XGA device attached to the Visual Concert DC. Additional settings are
accessible only through the (S)XGA device menu, not the television monitor menu.
Additional settings include:
• Date and time
• Length of time before the Visual Concert DC goes into power save mode, where the Visual Concert DC is darkened
• Time interval between when the current image is replaced by the next image in a presentation or slide show
• Format the Visual Concert DC uses (JPEG or BMP) when you save an image file on a PCMCIA card or server
• File size (resolution) the Visual Concert DC uses when you save an image file on a PCMCIA card or server
• Definition of what the third button from the left on the PCMCIA card menu should be. You can use the button during
presentations as a slide show button, or you can use the button as a Delete File button to delete files from the PCMCIA card.
Figure 3-13. Additional Settings Screen
4. To change any values, use the mouse to select the field you want to change. To enter letters or numbers, use the keyboard on the Additional Settings screen and click on the letter or number you want.
You can define the following settings:
– Date: Specify the current date, in the format year, month, and day.
– Time: Specify the current time, in hours and minutes.
When the Visual Concert DC is not used for a long time, the backup function for the built-in clock might not work accurately and the clock might stop. If you have not used the Visual Concert DC in a long time, reset the clock. The backup function for the built-in clock is restored when the Visual Concert DC is powered on.