CentreVu
Supervisor
Version 8
Reports
585-210-929
Comcode 108502188
Issue 1
Printed in U.S.A.
Notice
Every effort was made to ensure that the information in this book was complete and accurate at the time of printing. However, information is subject to change.
Your Responsibility for Your System’s Security
Toll fraud is the unauthorized use of your telecommunications system by an unauthorized party, for example, persons other than your company’s employees, agents, subcontractors, or persons working on your company’s behalf. Note that there may be a risk of toll fraud associated with your telecommunications system and, if toll fraud occurs, it can result in sub-stantial additional charges for your telecommunications services.
You and your system manager are responsible for the security of your sys-tem, such as programming and configuring your equipment to prevent unauthorized use. The system manager is also responsible for reading all installation, instruction, and system administration documents provided with this product in order to fully understand the features that can intro-duce risk of toll fraud and the steps that can be taken to reintro-duce that risk. Lucent Technologies does not warrant that this product is immune from or will prevent unauthorized use of common-carrier telecommunication ser-vices or facilities accessed through or connected to it. Lucent Technolo-gies will not be responsible for any charges that result from such unauthorized use.
Lucent Technologies Fraud Intervention
If you suspect that you are being victimized by toll fraud and you need technical support or assistance, call Technical Service Center Toll Fraud Intervention Hotline at 1-800-643-2353.
Federal Communications Commission Statement
Part 15: Class A Statement. This equipment has been tested and found to
comply with the limits for a Class A digital device, pursuant to Part 15 of the FCC Rules. These limits are designed to provide reasonable protection against harmful interference when the equipment is operated in a commer-cial environment. This equipment generates, uses, and can radiate radio frequency energy and, if not installed and used in accordance with the instruction manual, may cause harmful interference to radio communica-tions. Operation of this equipment in a residential area is likely to cause harmful interference, in which case the user will be required to correct the interference at his own expense.
Part 15: Class B Statement. This equipment has been tested and found to
comply with the limits for a Class B digital device, pursuant to Part 15 of the FCC Rules. These limits are designed to provide reasonable protection against harmful interference in a residential installation. This equipment generates, uses, and can radiate radio-frequency energy and, if not installed and used in accordance with the instructions, may cause harmful interference to radio communications. However, there is no guarantee that interference will not occur in a particular installation. If this equipment does cause harmful interference to radio or television reception, which can be determined by turning the equipment off and on, the user is encouraged to try to correct the interference by one or more of the following measures: • Reorient the receiving television or radio antenna where this
may be done safely.
• To the extent possible, relocate the receiver with respect to the telephone equipment.
• Where the telephone equipment requires ac power, plug the telephone into a different ac outlet so that the telephone equip-ment and receiver are on different branch circuits.
Subpart J of Part 15 of FCC Rules. Only peripherals (computing input/ output devices, terminals, printers, etc.) certified to comply with the Class B limits may be attached to this computer. Operation with noncertified peripherals is likely to result in interference to radio and television recep-tion.
Part 68: Answer-Supervision Signaling. Allowing this equipment to be
operated in a manner that does not provide proper answer-supervision sig-naling is in violation of Part 68 rules. This equipment returns answer-supervision signals to the public switched network when:
• Answered by the called station • Answered by the attendant
• Routed to a recorded announcement that can be administered by the CPE user
This equipment returns answer-supervision signals on all DID calls for-warded back to the public switched telephone network. Permissible exceptions are:
• A call is unanswered • A busy tone is received • A reorder tone is received
Canadian Department of Communications (DOC) Interference Information
This digital apparatus does not exceed the Class A limits for radio noise emissions set out in the radio interference regulations of the Canadian Department of Communications.
Le Présent Appareil Nomérique n’émet pas de bruits radioélectriques dépassant les limites applicables aux appareils numériques de la class A préscrites dans le reglement sur le brouillage radioélectrique édicté par le ministére des Communications du Canada.
Trademarks
●
DEFINITY is a registered trademark of Lucent Technologies. ●
CentreVu is a registered trademark of Lucent Technologies. ●
CONVERSANT is a registered trademark of Lucent Technologies. ●
Informix is a registered trademark of Informix Software, Inc. ●
Intel is a registered trademark of Intel. ●
Microsoft, MS, MS-DOS, Windows, Windows 95, Windows NT, and Access are registered trademarks of Microsoft Corporation. ●
OpenLink is a trademark of OpenLink Software. ●
Crystal Reports is a trademark of SeaGate Software. ●
Solaris is a trademark of Sun Microsystems, Inc. ●
SPARC trademarks, including the SCD compliant logo, are trademarks or registered trademarks of SPARC International, Inc. SPARCstation, SPARCserver, SPARCengine, SPARCworks, and SPARCompiler are licensed exclusively to Sun Microsystems, Inc. Products bearing SPARC trademarks are based upon an architecture developed by Sun Microsystems, Inc.
●
Sun and Sun Microsystems are trademarks or registered trademarks of Sun Microsystems, Inc.
●
Ultra Enterprise 3000 and Ultra 5 are trademarks of Sun Microsystems, Inc.
●
UNIX is a registered trademark in the United States and other countries, licensed exclusively through X/Open Company Limited. ●
Voice: 1-800-457-1235
International Voice: 317-322-6416 Fax: 1-800-457-1764
International Fax: 317-322-6699
Write: Lucent Technologies BCS Publications Center 2855 N. Franklin Road
Indianapolis, IN 46219
Order: Document No. 585-210-929 Comcode 108502188
Issue 1, December 1999
You can be placed on a Standing Order list for this and other documents you may need. Standing Order will enable you to automatically receive updated versions of individual documents or document sets, billed to account information that you provide. For more information on Standing Orders, or to be put on a list to receive future issues of this document, please contact the Lucent Technologies Publications Center.
Warranty
Lucent Technologies provides a limited warranty on this product. Refer to the “Limited use Software License Agreement” card provided with your package.
European Union Declaration of Conformity
Lucent Technologies Business Communications Systems declares that XXX equipment specified in this document conforms to the referenced European Union (EU) Directives and Harmonized Standards listed below: EMC Directive 89/336/EEC
Low Voltage Directive 73/23/EEC
The “CE” mark affixed to the equipment means that it conforms to the above Directives.
Heritage Statement
Lucent Technologies—formed as a result of AT&T’s planned restructur-ing—designs, builds, and delivers a wide range of public and private net-works, communication systems and software, consumer and business telephone systems, and microelectronics components. The world-renowned Bell Laboratories is the research and development arm for the company.
Comments
To comment on this document, return the comment card at the front of the document.
Acknowledgment
Table of Contents
CentreVu
®Supervisor Version 8
Reports
iii
...
Preface P-1
Conventions used P-1
Report examples P-2
...
1 Introduction 1-1
Overview 1-1
About CentreVu CMS and Supervisor 1-1 Interactions with switch features 1-5 How CentreVu CMS tracks ACD data 1-5
Things to Know About the System 1-6
Overview 1-6
Organization 1-6
Terminology 1-7
Terms 1-7
Prerequisite System Administration 1-9
Dictionary 1-9
Call Center Administration 1-9
User Permissions 1-9
System Setup 1-9
Relationships to Other Subsystems 1-10
Timetable 1-10
CMS 1-10
Dictionary 1-10
Exceptions 1-10
Scripting 1-10
User Permissions 1-11
Things to Know About CentreVu Supervisor Reports 1-12
Overview 1-12
Organization 1-12
iv
Agent states 1-13
Trunk states 1-15
Refresh Rate for Real-Time and Integrated Reports 1-16 Fastest allowable refresh rate 1-16
Default refresh rate 1-16
Shortest refresh rate 1-16
Historical Data in Integrated Reports 1-16
...
2 Using CentreVu Supervisor Reports 2-1
Overview 2-1
How to access reports 2-1
How this chapter is organized 2-1
Selecting and Running Reports 2-2
Overview 2-2
Report Designer 2-2
Using the Scripting feature 2-3
CentreVu Supervisor Controller toolbar 2-3
Report Selector 2-3
Report output window 2-3
Script buttons 2-3
Selecting a Report 2-4
Running a Report 2-6
Types of input 2-6
Selecting Report Run Dates 2-8
Selecting Dates 2-8
Browse Date 2-8
Browse Dates 2-9
Browse Month 2-9
Browse Months 2-10
Selecting Report Run Times 2-11
Selecting times 2-11
Browse Time 2-11
Exiting and Restarting Reports 2-12
How to exit a report 2-12
How to restart a report 2-12
Report Menu Bar 2-13
Overview 2-13
Report 2-14
Report menu 2-14
v
Save as HTML 2-17
Browsers 2-17
Selecting Save as HTML location 2-17
Output files 2-19
Templates 2-19
Not using templates 2-19
Using existing templates 2-20
Save as HTML template tags 2-20
Fonts 2-20
Print Preview 2-21
Access Print Preview 2-21
Print Preview dialog box 2-21
Print Preview fields 2-22
Edit 2-24
Edit menu 2-24
Menu item functions 2-24
Format 2-26
Format menu 2-26
Menu item functions 2-26
Tools 2-27
Tools menu 2-27
Menu item functions 2-27
Options 2-28
Options menu 2-28
Menu item functions 2-28
Editing and Viewing Reports 2-29
Overview 2-29
Organization 2-29
Report Layouts 2-30
Report types 2-30
What constitutes a report? 2-30
Tables 2-30
Charts 2-31
Formatting Table Reports 2-32
Accessing the Table Format Options window 2-32
General tab 2-32
General tab parameters 2-33
Sort tab 2-33
Using the Sort tab 2-34
Formatting Chart Reports 2-35
Accessing the Chart Format Options window 2-35
General tab 2-36
vi
3D Effects tab 2-37
3D Effects tab input fields 2-38
Axis tab 2-39
Axis tab input fields 2-39
Type tab 2-40
Type tab input fields 2-40
Title tab 2-41
Title tab input fields 2-41
Legend tab 2-42
Legend tab input fields 2-42
Data Labels tab 2-43
Data Labels tab input fields 2-43 Minimizing Report Output Windows 2-45 Icons associated with minimized report windows 2-45 Icons associated with minimized report thresholds 2-46 Right mouse button pop-up menus 2-47
Menus displayed 2-47
Rotating a 3D chart 2-49
Exporting Report Data 2-50
Defaults 2-50
Report format 2-50
Copying Chart Reports 2-53
Resizing Report Windows and Columns 2-54
Resizing a window 2-54
Standard Supervisor report window 2-54
Graphical report window 2-54
Changing a column width 2-54
Selecting a Printer 2-55
Print setup options 2-55
Setting Up a Page 2-57
Page setup options 2-57
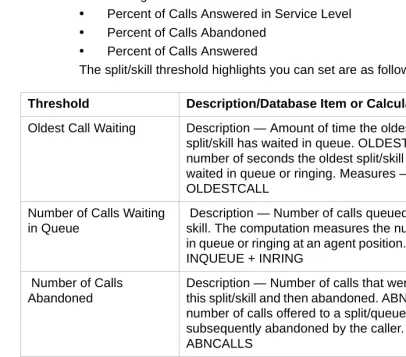
Setting Report Threshold Highlights 2-59
Reports 2-59
Entities 2-59
Turn highlights on and off 2-59
Example 2-59
Set Report Threshold Highlights 2-60
Before you start 2-60
Tips for Setting Report Threshold Highlights 2-63 Tips for setting report threshold highlights 2-63 Available Agent Threshold Settings 2-65
Agent threshold settings 2-65
vii
Available VDN Threshold Settings 2-71
VDN threshold settings 2-71
Report Options 2-73
Functions 2-73
Options General Tab 2-74
Options general tab 2-74
Options Report Colors Tab 2-76
Options report colors tab 2-76
Options Threshold Colors Tab 2-78 Options threshold colors tab 2-78
Options Name Format Tab 2-79
Options name format tab 2-79
Create a New Report Color Scheme 2-81
Procedure 2-81
Create a New Threshold Color Scheme 2-84
Procedure 2-84
Create a New Name Format 2-87
Procedure 2-87
...
3 Real-Time Reports 3-1
Overview 3-1
Introduction 3-1
Organization of Real-Time Reports 3-1
Presentation 3-2
Diagram of Real-Time reporting system 3-2
Agent reports 3-4
Overview 3-4
Organization 3-4
General Information About Agent Reports 3-5 What an Agent report contains 3-5 Organization of Agent reports 3-5 Agent report selector window 3-5
Agent Report Input Windows 3-6
Agent report input fields 3-6
3-6
Agent Group Report 3-7
Things to know about this report 3-7
Agent Group report example 3-7
Agent Group report input fields 3-7 Agent Group report description 3-8
viii
Things to know about this report 3-10
Agent report example 3-10
Agent report input fields 3-10
Agent report description 3-11
Agent Information Report 3-13
Things to know about this report 3-13 Agent Information report example 3-14 Agent Information report description 3-14 Graphical Information Report 3-17 Things to know about this report 3-17 Graphical Information report example 3-18 Graphical Information report description 3-18
Other Reports 3-22
Overview 3-22
Organization of this section 3-22 General Information About Other Reports 3-23 What Other reports contain 3-23 Organization of Other reports 3-23 Other report selector window 3-23
Event Count Summary Report 3-24
Things to know about this report 3-24 Relationships to other subsystems 3-24 Event Count Summary input window 3-24 Event Count Summary input fields 3-25 Event Count Summary report example 3-25 Event Count Summary report description 3-26
Multi-ACD Report 3-27
Things to know about this report 3-27 Multi-ACD report input window 3-28 Multi-ACD report Input Fields 3-29
Multi-ACD report example 3-30
Multi-ACD report description 3-30
Multi-ACD Top Agent Report 3-35
Things to know about this report 3-35 Multi-ACD Top Agent report input window 3-36 Multi-ACD Top Agent report Input Fields 3-36 Multi-ACD Top Agent report example 3-37 Multi-ACD Top Agent report description 3-38
Queue/Agent Reports 3-41
Overview 3-41
ix
What Queue/Agent reports contain 3-42 Organization of Queue/Agent reports 3-42 Queue/Agent Report Selector Window and Input Fields 3-43 Queue/Agent report selector window 3-43 Queue/Agent report input fields 3-44 Queue/Top Agent Status Report 3-45 Things to know about this report 3-45 Queue/Top Agent Status report example 3-45 Queue/Top Agent Status report description 3-46
Queue/Agent Status Report 3-50
Things to know about this report 3-50 Queue/Agent Status report example 3-50 Queue/Agent Status report description 3-51
Queue/Agent Summary Report 3-55
Things to know about this report 3-55 Queue/Agent Summary report example 3-55 Queue/Agent Summary report description 3-56
Split/Skill Reports 3-58
Overview 3-58
Organization of this section 3-58 General Information About Split/Skill Reports 3-59 Organization of split/skill reports 3-59 Split/Skill Report Selector Window and Input Fields 3-60 Split/Skill report selector window 3-60 Split/skill report input fields 3-60 Split/Skill Call Profile Report 3-62 Things to know about this report 3-62 Split/Skill Call Profile report example 3-62 Split/Skill Call Profile report description 3-63 Real-Time Graphical Active Agents Report 3-65 Things to know about this report 3-65 Graphical Active Agents report example 3-66 Graphical Active Agents report description 3-66 Real-Time Graphical Allocated Agents Report 3-69 Things to know about this report 3-69 Graphical Allocated Agents report example 3-70 Graphical Allocated Agents report description 3-71 Split/Skill Graphical AUX Agents Report 3-73 Things to know about this report 3-73
Report formats 3-73
x
Things to know about this report 3-76 Split/Skill Graphical AUX Top Agents report example 3-77 Split/Skill Graphical AUX Top Agents report description 3-77 Split/Skill Graphical Call Profile Report 3-79 Things to know about this report 3-79 Split/Skill Graphical Call Profile report example 3-80 Split/Skill Graphical Call Profile report description 3-80 Split/Skill Graphical EWT Report 3-83 Things to know about this report 3-83 Split/Skill Graphical EWT report example 3-84 Split/Skill Graphical EWT report description 3-84 Split/Skill Graphical Queue Report 3-86 Things to know about this report 3-86 Split/Skill Graphical Queue report example 3-87 Split/Skill Graphical Queue report description 3-87 Split/Skill Graphical Skill Overload Report 3-89 Things to know about this report 3-89 Split/Skill Graphical Skill Overload report example 3-90 Split/Skill Graphical Skill Overload report description 3-90 Split/Skill Graphical Staffing Profile Report 3-91 Things to know about this report 3-91 Split/Skill Graphical Staffing Profile report example 3-92 Split/Skill Graphical Staffing Profile report description 3-92 Split/Skill Graphical Status Report 3-95 Things to know about this report 3-95 Split/Skill Graphical Status report example 3-96 Split/Skill Graphical Status report description 3-96 Split/Skill Graphical Top Skill Status Report 3-99 Things to know about this report 3-99 Split/Skill Graphical Top Skill Status report example 3-100 Split/Skill Graphical Top Skill Status report description 3-101
Reserve1 AUX Agents Report 3-104
Things to know about this report 3-104 Reserve1 AUX Agents report example 3-105 Reserve1 AUX Agents report description 3-105
Reserve2 AUX Agents Report 3-108
Things to know about this report 3-108 Reserve2 AUX Agents report example 3-109 Reserve2 AUX Agents report description 3-109
Skill AUX Report 3-112
Things to know about this report 3-112
Skill AUX report example 3-112
Skill AUX report description 3-113
xi
Things to know about this reports 3-114 Skill Status report example 3-116 Skill Status report description 3-116
Skill Top Agent Report 3-120
Things to know about this report 3-120 Skill Top Agent report example 3-120 Skill Top Agent report description 3-121
Split Status Report 3-125
Things to know about this report 3-125 Split Status report example 3-127 Split Status report description 3-127
Split/Skill Report 3-130
Things to know about this report 3-130 Split/Skill report example 3-131 Split/Skill report description 3-131 Split/Skill by Location Report 3-134 Things to know about this report 3-134 Split/Skill by Location report example 3-134 Split/Skill by Location report description 3-135 Split/Skill Top Agent Status Report 3-136 Things to know about this report 3-136 Split/Skill Top Agent Status report example 3-136 Split/Skill Top Agent Status report description 3-137 Split/Skill Agent Status by Location Report 3-140 Things to know about this report 3-140 Split/Skill Agent Status by Location report example 3-141 Split/Skill Agent Status by Location report description 3-141
Trunk Group Report 3-144
Overview 3-144
Organization of this section 3-144 Trunk Group Report Selector Window and Input Fields 3-145 Trunk Group report selector window 3-145 Trunk Group report input fields 3-145
Trunk Group Report 3-146
Things to know about this report 3-146 Trunk Group report example 3-146 Trunk Group report description 3-146
VDN Reports 3-148
Overview 3-148
xii
VDN Report Selector Window and Input Fields 3-150 VDN report selector window 3-150
VDN report input fields 3-150
VDN Call Profile Report 3-152
Things to know about this report 3-152 Prerequisite System Administration 3-152 VDN Call Profile report example 3-153 VDN Call Profile report description 3-153 VDN Graphical Call Profile Report 3-156 Things to know about this report 3-156 VDN Graphical Call Profile report example 3-157 VDN Graphical Call Profile report description 3-157 VDN Skill Preference Report 3-159 Things to know about this report 3-159 VDN Skill Preference report example 3-159 VDN Skill Preference report description 3-160
VDN Report 3-161
Things to know about this report 3-161
VDN report example 3-161
VDN report description 3-162
Vector Report 3-164
Overview 3-164
Organization of this section 3-164 Vector Selector Window and Input Fields 3-165 Vector report selector window 3-165 Vector report input fields 3-165
Vector Report 3-166
Things to know about this report 3-166
Vector report example 3-166
Vector report description 3-166
Drill-Down Reports 3-168
Overview 3-168
Organization of this section 3-168 General Information About Drill-Down Reports 3-169
Drill-down report access 3-169
Location ID as a report field 3-169 Finding drill-down information 3-169
Drill-Down report types 3-169
Modifying drill-down reports 3-169 Drill-Down Top Agent Work State Report 3-170
Accessing the report 3-170
xiii
Report use 3-170
Database items 3-170
Drill-down Top Agent Work State report example 3-171 Drill-down Top Agent Work State report description 3-172 Drill-Down Work State Report 3-174
Accessing the report 3-174
Report contents 3-174
Report Use 3-174
Database Items 3-174
Drill-down Work State report example 3-175 Drill-down Work State report description 3-176
...
4 Historical Reports 4-1
Overview 4-1
Introduction 4-1
Organization of Historical Reports 4-1
Presentation 4-1
Diagram of historical reporting system 4-2 Presentation of report information 4-3 How long does CMS store data? 4-3
Agent Reports 4-4
Overview 4-4
Organization 4-4
General Information About Agent Reports 4-5 What an Agent report contains 4-5 Organization of Agent reports 4-5 Agent Report selector window 4-6
Agent Report Input Fields 4-7
Agent report input fields 4-7
Agent AUX Report 4-9
Things to know about this report 4-9
Agent AUX report example 4-9
Agent AUX report description 4-10
Agent Attendance Report 4-11
Things to know about this report 4-11 Agent Attendance report example 4-11 Agent Attendance report description 4-12
Agent Event Count Report 4-14
xiv
Things to know about this report 4-16 Agent Graphical Time Spent Daily report example 4-17 Agent Graphical Time Spent Daily report description 4-17 Agent Group Attendance Report 4-20 Things to know about this report 4-20 Agent Group Attendance report example 4-20 Agent Group Attendance report description 4-21
Agent Group AUX Report 4-23
Things to know about this report 4-23 Agent Group AUX report example 4-23 Agent Group AUX report description 4-24
Agent Group Summary Report 4-25
Things to know about this report 4-25 Agent Group Summary report example 4-25 Agent Group Summary report description 4-26 Agent Inbound/Outbound Report 4-29 Things to know about this report 4-29 Agent Inbound/Outbound report example 4-29 Agent Inbound/Outbound report description 4-30 Agent Login/Logout (Skill) Report 4-33 Things to know about this report 4-33 Agent Login/Logout (Skill) report example 4-34 Agent Login/Logout (Skill) report description 4-34 Agent Login/Logout (Split) Report 4-35 Things to know about this report 4-35 Agent Login/Logout (Split) report example 4-35 Agent Login/Logout (Split) report description 4-36
Agent Split/Skill Report 4-37
Things to know about this report 4-37 Agent Split/Skill report example 4-37 Agent Split/Skill report description 4-38
Agent Summary Report 4-40
Things to know about this report 4-40 Agent Summary report example 4-40 Agent Summary report description 4-40 Agent Trace by Location Report 4-44 Things to know about this report 4-44 Agent Trace by Location report example 4-44 Agent Trace by Location report description 4-44
Other Reports 4-47
Overview 4-47
Organization 4-47
xv
What an Other Report contains 4-48 Organization of Other reports 4-48 Other report selector window 4-48
Call Records Report 4-49
Things to know about this report 4-49 Call Records report input fields 4-50 Call Records report example 4-50 Call Records report description 4-51
Call Work Code Report 4-54
Things to know about this report 4-54 Prerequisite system administration 4-54 Call Work Code report input fields 4-55 Call Work Code report example 4-55 Call Work Code report description 4-56
Split/Skill Reports 4-57
Overview 4-57
Organization 4-57
xvi
Split/Skill Graphical Multi-ACD Service Level Report 4-73 Things to know about this report 4-73 Split/Skill Graphical Multi-ACD Service Level report input window 4-73 Split/Skill Graphical Multi-ACD Service Level report input fields 4-74 Split/Skill Graphical Multi-ACD Service Level report example 4-75 Split/Skill Graphical Multi-ACD Service Level report description 4-75 Split/Skill Graphical Service Level Report 4-76 Things to know about this report 4-76 Split/Skill Graphical Service Level report example 4-76 Split/Skill Graphical Service Level report description 4-77 Split/Skill Graphical Skill Overload Report 4-78 Things to know about this report 4-78 Split/Skill Graphical Skill Overload report example 4-78 Split/Skill Graphical Skill Overload report description 4-79 Split/Skill Graphical Time Spent Report 4-80 Things to know about this report 4-80 Split/Skill Graphical Time Spent report example 4-81 Split/Skill Graphical Skill Time Spent report description 4-81
Split/Skill Outbound Report 4-83
Things to know about this report 4-83 Split/Skill Outbound report example 4-83 Split/Skill Outbound Report Description 4-84
Split/Skill Report 4-86
Things to know about this report 4-86 Split/Skill report example 4-86 Split/Skill report description 4-87 Split/Skill by Location Report 4-90 Things to know about this report 4-90 Split/Skill by Location report example 4-90 Split/Skill report description 4-91
Split/Skill Summary Report 4-95
Things to know about this report 4-95 Split/Skill Summary report example 4-96 Split/Skill Summary report description 4-96
System Reports 4-101
Overview 4-101
Organization 4-101
xvii
Graphical Maximum Delay report input window 4-103 System report input fields 4-104 System Graphical Maximum Delay report example 4-105 System Graphical Maximum Delay report description 4-105 System Multi-ACD by Split/Skill Report 4-107 Things to know about this report 4-107 Multi-ACD by Split/Skill report input window 4-108 Multi-ACD by Split/Skill report input fields 4-109 System Multi-ACD by Split/Skill report example 4-110 System Multi-ACD by Split/Skill report description 4-110
System Multi-ACD Report 4-113
Things to know about this report 4-113 Multi-ACD report input window 4-113 Multi-ACD report input fields 4-114 System Multi-ACD report example 4-115 System Multi-ACD report description 4-115
System Report 4-118
Things to know about this report 4-118 System report input window 4-118 System report input fields 4-119
System report example 4-120
System report description 4-120
Trunk/Trunk Group Reports 4-124
Overview 4-124
Organization 4-124
General Information About Trunk/Trunk Group Reports 4-125 What a Trunk/Trunk Group report contains 4-125 Organization of Trunk/Trunk Group reports 4-125 Trunk/Trunk Group report selector window 4-125 Trunk/Trunk Group Report Input Fields 4-126 Trunk Group report input fields 4-126 Trunk/Trunk Group Busy Hour Report 4-128 Things to know about this report 4-128 Trunk/Trunk Group Busy Hour report example 4-129 Trunk/Trunk Group Busy Hour report description 4-129
Trunk Report 4-131
Things to know about this report 4-131
Trunk report example 4-132
Trunk report description 4-132
Trunk Group Report 4-134
xviii
Trunk Group Summary Report 4-137 Things to know about this report 4-137 Trunk Group Summary report example 4-138 Trunk Group Summary report description 4-138
VDN Reports 4-141
Overview 4-141
Organization 4-141
General Information About VDN Reports 4-142 What a VDN Report contains 4-142 Organization of VDN reports 4-142 VDN report selector window 4-143
VDN Report Input Fields 4-144
VDN report input fields 4-144
VDN Busy Hour Report 4-145
Things to know about this report 4-145 VDN Busy Hour report example 4-145 VDN Busy Hour report description 4-146
VDN Call Profile Report 4-147
Things to know about this report 4-147 Prerequisite system administration 4-147 VDN Call Profile report example 4-148 VDN Call Profile report description 4-148 VDN Graphical Busy/Abandon/Disconnect Comparison Report 4-151 Things to know about this report 4-151 VDN Graphical Busy/Abandon/Disconnect
Comparison report example 4-152 VDN Graphical Call Profile report description 4-153 VDN Graphical Call Profile Report 4-154 Things to know about this report 4-154 VDN Graphical Call Profile report example 4-155 VDN Graphical Call Profile report description 4-155 VDN Graphical Service Level Report 4-158 Things to know about this report 4-158 VDN Graphical Service Level report example 4-159 VDN Graphical Service Level report description 4-159
VDN Multi-ACD Flow Report 4-161
Things to know about this report 4-161 VDN Multi-ACD Flow report example 4-161 VDN Multi-ACD Flow report description 4-162
VDN Report 4-164
Things to know about this report 4-164
VDN Report example 4-164
xix
VDN Skill Preference Report 4-168 Things to know about this report 4-168 VDN Skill Preference report example 4-168 VDN Skill Preference report description 4-169
Vector Report 4-172
Overview 4-172
Organization 4-172
General Information About the Vector Report 4-173 Organization of the Vector Report 4-173 Vector Report selector window 4-173
Vector Report Input Fields 4-174
Vector report input fields 4-174
Vector Report 4-175
Things to know about this report 4-175
Vector report example 4-175
Vector report description 4-176
...
5 Integrated Reports 5-1
Overview 5-1
Introduction 5-1
Definition of integrated reports 5-1 How this chapter is organized 5-1 Diagram of integrated reporting system 5-1 Presentation of report information 5-1 Presentation of report information 5-2 Historical Data in Integrated Reports 5-2
Agent Reports 5-3
Overview 5-3
Organization of this section 5-3 General Information About Agent Reports 5-4 Organization of Agent reports 5-4 Agent Report Selector Window and Input Fields 5-5 Agent report selector window 5-5
Agent report input fields 5-6
Agent Graphical Information Report 5-7 Things to know about this report 5-7 DEFINITY ECS R5 and later information 5-8 Agent Graphical Information report example 5-8 Agent Graphical Information report description 5-8
xx
Things to know about this report 5-13 Agent Information report example 5-14 Agent Information report description 5-14
Split/Skill Reports 5-17
Overview 5-17
General Information About Split/Skill Reports 5-18 Organization of this section 5-18 Organization of Split/Skill reports 5-18 Split/Skill Reports Selector Window and Input Fields 5-19 Split/Skill reports selector window 5-19 Split/Skill report input fields 5-19 Split/Skill Comparison Report 5-21 Things to know about this report 5-21 Split/Skill Comparison report example 5-21 Split/Skill Comparison report description 5-22 Graphical Skill Overload Report 5-24 Things to know about this report 5-24 Graphical Skill Overload report example 5-24 Graphical Skill Overload report description 5-25 Graphical Split/Skill View Report 5-26 Things to know about this report 5-26 Graphical Split/Skill View report example 5-26 Graphical Split/Skill View report description 5-27
VDN Report 5-30
Overview 5-30
Organization of this section 5-30 General Information About the VDN Report 5-31 VDN Report selector window 5-31
VDN Report input fields 5-32
VDN Graphical Call Handling Report 5-33 Things to know about this report 5-33 VDN Graphical Call Handling report example 5-34 VDN Graphical Call Handling report description 5-34
...
Appendix A:Database Items and Calculations A-1
xxi
...
GL Glossary GL-1
...
P-1
Preface
Purpose This book describes the Call Center reports that are generated through the CentreVu Supervisor software.
The book includes:
•
A description of each CentreVu Supervisor report•
An example of each CentreVu Supervisor report•
Definitions of all report fields•
Tips for customizing specific CentreVu Supervisor reports.Reason for reissue This document is being reissued to comply with CentreVu Call Management System (CMS) Release 3 Version 8 (R3V8) and CentreVu Supervisor Release 8 (R8).
Safety labels The following icon signifies a caution, warning, or danger condition.
Intended-Audience The CentreVu Supervisor Version 8 Reports (585-210-929) document is written for users who analyze the available reports and use them to efficiently run their call centers.
How to use this document
The following list describes the contents of each chapter and appendix in this document:
•
Chapter 1, Introduction•
Chapter 2, Using CentreVu Supervisor reports•
Chapter 3, Real-time reports: show snapshots of call center activity throughout the day•
Chapter 4, Historical reports: compile call center information in 15-, 30-, or 60-minute intervals. The interval information is then converted into daily, weekly, and monthly summary data.•
Chapter 5, Integrated reports: compile call center information from a specified start time in the past 24 hours up to and including the current interval.•
Appendix A, Database items and calculationsConventions used The following conventions are used throughout this document:
•
A Book Title is italicized.•
An Informix table name is in monospaced type.P-2
•
A File name is in monospaced type.•
A Subsystem Reference is always in initial capital letters.•
A Window Title is always in initial capital letters.Related documentation The following documents can help you use the CentreVu CMS software to its maximum capability. Those most closely related to this document are the Administration and Report Designer documents.
•
CentreVu Call Management System Release 3 Version 8 Administration (585-210-910)•
CentreVu Advocate User Guide (585-210-927)•
CentreVu CMS R3V5 Custom Reports (585-215-822, Issue 2)•
CentreVu CMS R3V8 External Call History Interface (585-210-912)•
CentreVu CMS R3V8 Upgrades and Migrations (585-210-913)•
CentreVu CMS R3V6 Sun Microsystems, Inc. Sun SunMicrosystems, Inc.Enterprise Computers Hardware Installation and Setup (585-215-873, Issue 2)
•
CentreVu CMS R3V6 Sun Enterprise Computers Connectivity Diagram (585-215-877, Issue 2)•
CentreVu Supervisor Version 8 Installation and Getting Started (585-210-928)•
Lucent Call Center Change Description (585-210-925)•
CentreVu CMS R3V8 Database Items and Calculations (585-210-939)•
CentreVu Report Designer Version 8 User Guide (585-210-930)•
CentreVu CMS R3V8 Documentation CD-ROM (585-210-926)Overview 1-1
1
Introduction
...
Overview
Purpose This chapter is written for any CentreVu Supervisor Release 8 user who accesses the Real-Time, Historical, and Integrated reports subsystems. It outlines how reporting works and the reports that are available.
About CentreVu CMS and Supervisor
Call Center reports are generated through the CentreVu Supervisor software. The CentreVu Supervisor software monitors the operations of and collects data from the switch. This data is then organized into reports that help you manage Call Center facilities and personnel. These reports may be displayed in real time, printed immediately, stored in a file, or scheduled for printing at a later time.
The data tracked includes caller identification, service parameters, internal call transfers, outgoing calls, and agent sales. Real-time reports can be updated as often as every three seconds and summarized as often as every 15 minutes. Historical reports are available in intervals of 15, 30, or 60 minutes; daily; weekly; and monthly summaries. Integrated reports include data for a specified start time in the past 24 hours up to and including the moment the report is generated.
One CentreVu CMS can manage up to 10,000 agent/split/skill or agent/skill pairs in up to eight switches Automatic Call Directories (ACDs) at different locations. This permits you to add agents in new locations while maintaining centralized supervision to control costs.
You can use CentreVu reports to do the following:
•
Determine how many agents are needed•
Manage call volume fluctuations•
Configure the software to make changes automatically and to meet unexpected demands•
Change agent skill assignments•
Move agents between skills and/or initiate agent audit trails.Overview 1-2
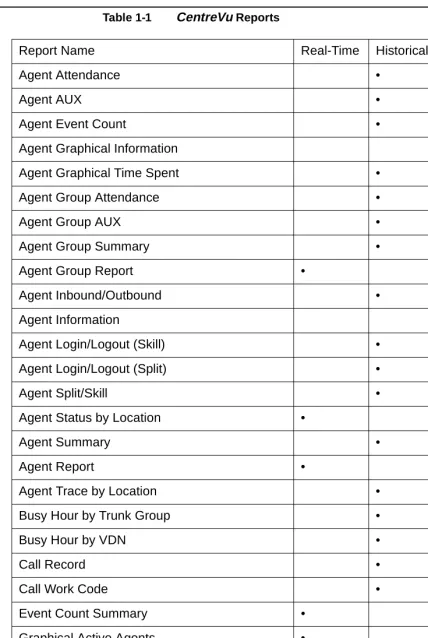
Table 1-1 CentreVu Reports
Report Name Real-Time Historical Integrated
Agent Attendance •
Agent AUX •
Agent Event Count •
Agent Graphical Information •
Agent Graphical Time Spent •
Agent Group Attendance •
Agent Group AUX •
Agent Group Summary •
Agent Group Report •
Agent Inbound/Outbound •
Agent Information •
Agent Login/Logout (Skill) •
Agent Login/Logout (Split) •
Agent Split/Skill •
Agent Status by Location •
Agent Summary •
Agent Report •
Agent Trace by Location •
Busy Hour by Trunk Group •
Busy Hour by VDN •
Call Record •
Call Work Code •
Event Count Summary •
Graphical Active Agents •
Graphical Allocated Agents •
Graphical AUX Reserve1 Agents •
Graphical AUX Reserve2 Agents •
Overview 1-3
Graphical Busy/Abandon/ Disconnect •
Graphical Maximum Delay •
Graphical Multi-ACD Service Level Daily •
Graphical Queue •
Graphical Split/Skill Call Profile •
Graphical Staffing Profile •
Graphical VDN Call Profile •
VDN Call Handling •
Graphical Skill Overload •
Graphical Split/Skill View •
Multi-ACD • •
Multi-ACD by Split/Skill •
Multi-ACD Call Flow by VDN •
Multi-ACD Top Agent •
Outbound Split/Skill •
Queue/Agent Status •
Queue/Top Agent Status •
Queue/Agent Summary •
Reserve1 AUX Agents •
Reserve2 AUX Agents •
Skill AUX Report •
Skill Status •
Skill Top Agent Report •
Split Status •
Split/Skill Report • •
Split/Skill Average Speed of Answer •
Split/Skill by Location •
Split/Skill Call Profile • •
Split/Skill Comparison •
Overview 1-4
Split/Skill Graphical AUX Agents •
Split/Skill Graphical AUX Top Agents •
Split/Skill Graphical Call Profile • •
Split/Skill Graphical EWT •
Split/Skill Graphical Service Level •
Split/Skill Graphical Status •
Split/Skill Graphical Time Spent •
Split/Skill Graphical Top Skill Status •
Split/Skill Outbound •
Split/Skill Queue •
Split/Skill Service Level •
Split/Skill Status •
Split/Skill Summary •
System •
System Multi-ACD •
System Multi-ACD by Split/Skill •
Top Agent Status •
Trunk •
Trunk Group • •
Graphical Split/Skill •
Trunk Group Summary •
VDN Multi-ACD Flow •
VDN Report • •
VDN Call Profile • •
VDN Service Level •
VDN Skill Preference • •
Vector • •
Work State Report for Reserve1 Agents •
Work State Report for Reserve2 Agents •
Overview 1-5 Interactions with switch
features
See the CentreVu® Call Management System R3V8 Database Items and Calculations (585-210-939) document or the CentreVu Call Management System R3V8 Administration (585-210-910) document for the
interactions with switch features.
How CentreVu CMS tracks ACD data
Things to Know About the System 1-6
Things to Know About the System
...
Overview
Purpose This section introduces concepts and requirements that are relevant to reports.
Organization This section contains the following information:
•
Terminology•
Prerequisite system administrationTerminology 1-7
...
Terminology
Overview The following terms are used throughout this book. For additional CentreVu CMS terms, see the Glossary.
Terms Current Interval
The current intrahour interval which can be 15, 30,
or 60 minutes. The current interval is part of the real-time
database.
Custom Reports
See the
CentreVuCMS R3V5 Custom Reports
document, Lucent Technologies (585-215-822), Issue 2, for more
information.
Designer Reports
Real-time or historical reports that have been
customized from existing reports or designed according to your
needs from Report Wizard or Report Designer. See the
CentreVuVersion 8 Report Designer (585-210-930) document for more
information.
Daily Data
Interval data that have been converted to a 1-day
summary.
Exception Reports
Display occurrences of unusual call-handling
events.
Historical Database
Contains intrahour records for up to 62 days in
the past, daily records for up to 5 years in the past, and weekly or
monthly records for up to 10 years for each
CentreVuCMS-measured agent, split/skill, trunk, trunk group, vector, and Vector
Directory Number (VDN).
Historical Reports
Display past Automatic Call Distribution (ACD)
data for various agent, split/skill, trunk, trunk group, vector, or VDN
activities.
Terminology 1-8 Monthly Data
Daily data that have been converted to a monthly
summary.
Multiuser Mode
Any administered
CentreVuCMS user can log into
CentreVu CMS. Data continues to be collected if data collection is
“on.”
Previous Interval
One intrahour interval. At the end of each
intrahour interval, the contents of the current intrahour interval are
copied to the previous intrahour interval portion of the real-time
database.
Real-Time Database
Current and previous intrahour data on each
CentreVuCMS-measured agent, split/skill, trunk, trunk group,
vector, and VDN.
Real-Time Reports
Display current ACD call activity on agents,
splits/skills, trunks, trunk groups, vectors, and VDNs.
Single-User Mode
Only one person can log into
CentreVuCMS.
Data continues to be collected if data collection is “on.” This mode
is required to change some
CentreVuCMS administration.
Subsystem
Each
CentreVuSupervisor Controller selection. For
example, Reports is referred to as a subsystem.
Prerequisite System Administration 1-9
...
Prerequisite System Administration
Overview The following system administration must be performed before you can fully use the real-time and historical reports subsystem.
Dictionary If you want names to appear on split/skill, trunk group, agent group, ACD, call work code, VDN, and vector reports, the names must first be entered in the Dictionary subsystem. If names are not assigned in the Dictionary subsystem, numbers appear as the default.
Call Center Administration
To get Split/Skill Call Profile or VDN Call Profile reports, you must first define your acceptable service level and service level increments for the split(s)/skill(s) and VDN(s) in the Split/Skill Call Profile Setup and VDN Call Profile Setup window in the Call Center Administration subsystem. To get an Agent Trace report, you must first start collecting agent trace data.
See the “Call Center Administration” chapter of the CentreVu® CMS R3V8 Administration (585-210-910) document for more information on setting call profiles and activating agent traces.
User Permissions For a report to display data, you must have read permission for the split/ skill, trunk group, ACD, vector, or VDN. For example, if you have read permission for Splits 1, 2, and 4, and try to run a report on Splits 1, 4, and 5, you receive data for Splits 1 and 4 but not for Split 5, because you do not have read permission for that split.
For more information, see the “User Permissions” chapter of the CentreVu® CMS R3V8 Administration (585-210-910) document.
System Setup You need to specify how much of the data to save for later use by historical reports.
Relationships to Other Subsystems 1-10
...
Relationships to Other Subsystems
Overview Real-Time reports have the following relationships to other CentreVu CMS subsystems.
Timetable You cannot put a real-time report on a timetable. You can use shortcuts to display real-time reports. Scripting is used in R3V8 Supervisor. You must use the CMS terminal to use Timetable.
See Appendix D, “Timetable,” in the CentreVu® CMS R3V8 Administration (585-210-910) document.
CMS If you cancel a report in CentreVu Supervisor, the data requests for the report do not cancel in CMS. Therefore, the report continues to run on the CMS side, even though it is canceled in CentreVu Supervisor. Until the data requests clear, CentreVu Supervisor and CMS may slow down as a result.
Dictionary For split/skill, VDN, vector, and ACD names to appear on reports, names must be defined and entered in the Dictionary subsystem.
See Chapter 6, “Dictionary,” in the CentreVu® CMS R3V8 Administration (585-210-910) document.
Exceptions When an exception occurs, CentreVu CMS notifies you in three ways:
•
The terminal beeps unless you have disabled the beep through the Supervisor Controller.•
You can see information about exception conditions by looking at appropriate Real-Time reports.•
The Commands: Exceptions menu item in CentreVu Supervisor allows you to view a running count of exceptions for Real-Time, Agents, Splits/Skills, VDNs, Vectors, and Trunk Groups. To be notified of these exceptions, you must have exception permission turned on for the specific split/skill, trunk group, ACD, VDN, and vector. Exception permissions are assigned through the CentreVu Supervisor Tools: User Permissions menu item.•
The exception is entered in the real-time exceptions log. For more information, see the “Exceptions” and “User Permissions” chapters of the CentreVu® CMS R3V8 Administration (585-210-910) document.Scripting The Scripting feature lets you create a script to run a specified report or run a report and export the data on schedule. The scripts require a customer-provided scheduler to be run at a later time.
Relationships to Other Subsystems 1-11 User Permissions The default real-time and integrated reports refresh rate is determined by
your CMS System Administrator. The administrator then assigns each user a minimum refresh rate through the CentreVu Supervisor User Permissions menu item. If you enter a refresh rate that is less than your administrator-assigned refresh rate, an error message displays.
Things to Know About CentreVu Supervisor Reports 1-12
Things to Know About CentreVu
Supervisor Reports
...
Overview
Purpose This section describes things to know about all CentreVu Supervisor reports.
Organization This section contains the following topics:
•
Agent and Trunk States•
Refresh Rate for Real-Time and Integrated Reports•
Current Interval•
Service Level Increments for Call Profile ReportsAgent and Trunk States 1-13
...
Agent and Trunk States
Overview Status changes of all ACD data (for splits/skills, trunk groups, vectors, VDNs, agents, and trunks) are sent from the switch. As a result, the states of agent extensions and trunks are what all other data are based on. Agent states appear on real-time reports as CentreVu CMS records the current status of the ACD, and trunk states appear on the CentreVu CMS real-time trunk report. The following list of agent states includes the default agent states. The names can be changed in the Dictionary.
Agent states ACD
The agent logged into this extension is on a split/skill or direct
agent call. For Generic 2.1 switches (not supported with R3V5,
R3V6, or R3V8 CMS), the agent state is also ACD when a call is
waiting on hold.
Available (AVAIL)
The extension is able to accept an ACD call. An
extension is AVAIL in AUTO-IN (AI) or MANUAL-IN (MI) work
modes any time a station does not have a call active or on hold.
After Call Work (ACW)The agent is engaged in bookkeeping, data
entry, or other work related to the previous call, and is not available
to receive another call. The extension enters ACW after an ACD
call in the MANUAL-IN mode completes. On the Enterprise
Agent and Trunk States 1-14 Auxiliary Work (AUX)
The agent is engaged in non-ACD work, is
on break, in a meeting, at lunch, and so on. The agent presses the
AUX WORK key when the agent wants
CentreVuCMS to recognize
the extension as staffed, but does not want the ACD to distribute
calls to the voice terminal. An agent’s time in AUX includes time an
agent is on incoming or outgoing calls while in AUX, as well as time
in AUX when the agent is not connected to any calls. Agents also
accrue AUX time when they make or receive extension calls from
AUTO-IN or MANUAL-IN mode. Reason codes describe the
reasons you are in the AUX work mode (for example, you are on
break).
Direct Agent ACD (DACD)
The agent is on a direct agent ACD call.
Direct Agent ACW (DACW)The agent is in the after call work state
for a direct agent ACD call.
OTHER
The agent is doing other work. This may represent that an
agent is in multiple splits or with multiple skills and is doing work for
a split or skill other than this one, or that the agent has put a call on
hold, or that the agent is dialing to place a call or activate a feature.
UNKNOWN CentreVuCMS does not recognize the current state.
UNKNOWN remains until the condition is cleared (corrected) and/
or the agent completes the current ACD call and any associated
ACW, or a current agent state message is sent to
CentreVuCMS
from the switch.
UNSTAF Unstaffed
The agent is not logged in and is not being
tracked by
CentreVuCMS.
Agent and Trunk States 1-15 Trunk states IDLE
The trunk is waiting for a call.
CONN
The caller and agent are connected on a call.
QUEUED
An ACD call has seized a trunk and is queued to a split
or skill waiting for an agent to answer.
SEIZED
A call is using the trunk, either incoming or outgoing.
MBUSYThe trunk is maintenance busy, or out of service for
maintenance purposes.
HOLD
The agent has put the caller on this trunk on hold.
UNKNOWN CentreVuCMS does not recognize the state of the
trunk.
DABN
The caller abandoned the call. The trunk quickly goes to
idle.
FBUSY
Forced busy. The caller receives forced busy signal if you
have an ECS or Generic 2 switch with Call Vectoring. For the ECS,
you can receive busy calls if there is no call in queue for the split
and no agents are available.
FDISC
The caller receives a forced disconnect. This appears only
if you have the Vectoring feature.
Refresh Rate for Real-Time and Integrated Reports 1-16
...
Refresh Rate for Real-Time and Integrated Reports
Overview When you order a real-time or integrated report, you must specify a refresh rate for the report. This rate determines how often the report is updated to display new data.
Fastest allowable refresh rate
Your fastest allowable refresh rate is defined in the User Permissions— User Data window as minimum refresh rate; see “User Permissions” in the CentreVu® CMS R3V8 Administration (585-210-910) document. For any user, the fastest rate that may be defined is every 3 seconds. However, the actual speed at which a report refreshes may be slower than the defined speed, since the number of active terminals, the number of active windows, and the number of real-time reports can have an impact on refresh rates.
Default refresh rate The default refresh rate when you bring up the report input window is your minimum refresh rate (defined by the CMS System Administrator) plus 15 seconds. You can change the refresh rate from the default at any time, with the minimum allowable refresh rate being three seconds. The minimum default refresh rate when a report is run as a script is user-defined.
Shortest refresh rate If you want to calculate the shortest refresh rates you can get in CentreVu CMS real-time reports for your configuration, go to the cmsadm Menu. The Real-Time Refresh program calculates the best (shortest) refresh rates you can get in CentreVu CMS reports.
Historical Data in Integrated Reports
Overview 2-1
2
Using CentreVu Supervisor Reports
...
Overview
Purpose This chapter gives you general information about how to use CentreVu Supervisor reports. CentreVu Supervisor reports display, report, and summarize the performance of any measured subset of the Automatic Call Directory (ACD), including agents, splits/skills, trunks/trunk groups, Vector Directory Numbers (VDNs), and vectors.
How to access reports
No matter where you run a report from, the way you select, run, edit, and view a report is the same.
You will find reports available under the following menus and tabs:
•
Commands | Reports | Real-Time, Historical, or Integrated tab•
Commands | Dictionary | Reports tab•
Commands | Exceptions | Reports tab•
Commands | Agent Administration | Reports tab•
Commands | Call Center Administration | Reports tab•
Tools | Maintenance | Reports tab.More information
Procedures that apply to reports that are located in a specific Command or Tool are located in the appropriate chapter in the CentreVu® CMS R3V8
Administration (585-210-910) guide.
How this chapter is organized
The chapter is divided into the following sections:
•
Selecting and running reports•
Report menu barSelecting and Running Reports 2-2
Selecting and Running Reports
...
Overview
Purpose This section describes how to select and run reports through CentreVu Supervisor.
Report Designer If you have Report Designer and want to easily generate a new customized report, select the Report Wizard button in the Controller toolbar.
More information
Using the Scripting feature 2-3
...
Using the Scripting feature
Overview The Scripting feature lets you create a script to run a specified report or run a report and export the data on schedule. The report can run in the current CentreVu Supervisor session and be displayed on the PC, or it can run in the background.
More information
For more information on the Scripting feature, see Chapter 3, “Scripting,” in the CentreVu® CMS R3V8 Administration (585-210-910) document.
CentreVu Supervisor Controller toolbar
The CentreVu Supervisor Controller toolbar lets you set options for scripting and organizing your scripts, as follows:
•
Options/Scripting — selecting the Scripting tab in the Optionswindow lets you set script execution as minimum, normal, or maximum. This window also lets you specify a name for the log file and view the contents of the log file.
•
Scripts/Organize Scripts — selecting the Organize Scripts optionfrom the Scripts drop-down menu displays the Organize Scripts window. This window displays all the logged-in user's scripts and script folders. Using these lists, you can add a new folder, move a script, delete a script, or rename a script.
Report Selector The Report Selector window lets you create a new script, as follows: Save as Script button—selecting this button in the Report Selector window displays the Save as Script dialog box, which enables you to create a new script for the selected report, but does not run the report. The script type is set to interactive and cannot be changed.
Report output window The Report Output Window menu bar lets you create a new script, as follows:
Report/Script—selecting the Script option from the Report drop-down menu displays the Save as Script window (only in run mode), which enables you to create a new script for the selected report and run the report. The script can be interactive or automatic.
Script buttons The Script button on the Data Export window displays the Save as Script dialog box, which lets you create a script, export the data from the report, and then exit the report.
Selecting a Report 2-4
...
Selecting a Report
Displaying the Report selector window
To display the Report Selector window, do the following:
...
1
In the Controller toolbar, select Commands to display the Commands drop-down menu....
2
Select one of the following windows:•
Commands | Reports | Real-Time, Historical, or Integrated tab•
Commands | Dictionary | Reports tab•
Commands | Exceptions | Reports tab•
Commands | Agent Administration | Reports tab•
Commands | Call Center Administration | Reports tab•
Tools | Maintenance | Reports tab.EN D O F S T E P S
...
Result:
A window displays from which you can select a report.
Making selections In the Select a Report window, do the following:
...
1
Select a category from the Category box....
Selecting a Report 2-5 ...
3
Select the ACD for which you want to run the report from the Run Report for ACD box....
4
Select OK , or double-click on the report you want to run.Result: A report input window displays.
...
5
Go to Completing the Report Input Window.EN D O F S T E P S
Running a Report 2-6
...
Running a Report
Types of input The following example shows possible types of input that might be required to run a report. The inputs required will vary, depending on which report you are running.
Completing the report input window
Follow these steps in completing an input window:
...
1
Verify that the correct ACD is selected. The current ACD (selected on the selector window) is displayed at the bottom-right of the input window.If the wrong ACD is displayed, press the Cancel button and then return to
Displaying the Report selector window (2-4) to begin the report selection procedure again to select the correct ACD.
...
2
Fill in the input fields. For the Split/Skill Outbound Interval report input window, the input fields are: Split/Skill, Date, and Times.To fill in an input field, do any of the following:
•
Type in the name or number of the input requested•
Use the history list (pull-down menu)Running a Report 2-7 ...
3
For all reports other than Commands | Reports Real-Time and Integrated tabs, select the report destination. Reports can be viewed on screen or printed on any printer to which your PC is connected.To select the report destination, do one of the following:
•
Select the View Report on Screen destination.•
Select the Print Report on: destination and choose a printer (if you want to print on a printer other than the one displayed)....
4
Press the OK button.Result: The report runs.
EN D O F S T E P S
Selecting Report Run Dates 2-8
...
Selecting Report Run Dates
Selecting Dates When you run historical reports, you need to select the date or dates for which to run the report.
To do this, you can do any of the following:
•
Type the date or date range in the Date(s): input field.•
Type a relative date (for example, -2 for two days ago).•
Select the date(s) from the history list of previously used date(s) for this report.•
Select the Browse button. .Browse Date If you press the Browse button and the input needed is a single date, the Browse Date window displays.
To select a specific date, use your mouse to point at a day and click. The day is highlighted.
Selecting Report Run Dates 2-9 Browse Dates If the input needed is for more than one date, the Browse Dates window
displays.
To select specific dates, use your mouse to point at a day and click. The day highlights. You can select as many days as you want.
To select a range of dates, select the Range button, point- and-click on the first day of the desired range, then point- and-click on the last day of the desired range. The dates selected highlight. You can select as many ranges as you want to, but you must select the Range button in order to define each range.
If you want to choose a date that is not currently displayed, use the arrow keys at the bottom of the window to scroll through the months.
To clear your current selections, select Clear.
Browse Month If the input needed is for one month, the Browse Month window displays.
Selecting Report Run Dates 2-10 Browse Months If the input needed is for more than one month, the Browse Months
window displays.
This window is available in monthly reports where the data is for one or more months. The report runs, beginning with the month entered in the First Month: field and going through as many months as are specified in the Number of Months: field.
Selecting Report Run Times 2-11
...
Selecting Report Run Times
Selecting times When you run interval historical reports, you need to select the time period for which to run the report.
To do this, do any of the following:
•
Type the time range in the Times: input field.•
Select the times from the history list of previously used times for this report.•
Select the Browse button next to the Times input field.Browse Time If you select the Browse button, the Browse Time window displays.
Complete the following fields:
•
Starting Interval: select the time you want the report to begin with from the drop-down list. The report data will begin with the interval that begins immediately after the time you enter.Exiting and Restarting Reports 2-12
...
Exiting and Restarting Reports
How to exit a report To exit a report (return to the Controller), do one of the following:
•
Double click the System button.•
Select Close from the System button menu.•
Select Exit from the Report menu.If the system shuts down due to an error, any changes you have made to the report(s) you are running are saved.
How to restart a report To restart a report (return to the report input window), do the following:
•
Select Restart from the Report menu.Report Menu Bar 2-13
Report Menu Bar
...
Overview
Purpose When you run a report, the menu bar at the top of the window has the following options:
•
Report•
Edit•
Format•
Tools•
Options•
HelpReport 2-14
...
Report
Report 2-15 Menu item functions This table describes the action that each menu item performs:
Menu Item Action
Restart Closes the current report output window and displays the input window for the current report. This allows you to run the same report,
changing inputs as needed. This is disabled for Drill-Down reports and if the report is an
unsaved report created using the Report Wizard (this item is reenabled when the report is saved).
Page Setup Displays the Page Setup window. See the
Setting Up a Page (2-57) in this chapter for more information on Page Setup.
Print Displays the Print window. See Selecting a Printer (2-55) for more information on the Print window. When you select Print from the Report menu, the report that is active will be printed according to the options you choose in the Print window. If the report is a real-time report, only one refresh of the report will be printed.
Print Preview Displays the report so that you can see it before printing. See Print Preview (2-21) for more information on the Print Preview window. Once you have selected Print Preview, you may print the report.
Design If you have purchased the Report Designer software and your CentreVu CMS User ID is authorized to use the Report Designer, you can access the Report Designer Design Mode window from any report using this menu item. When you select Design from the Report menu, the report that is currently running remains visible, but you are placed in the Design Mode, where you can edit the report. For more
information on the Design Mode, see the CentreVu Report Designer Version 8 User Guide (585-210-930). The Design menu item will be grayed out if you are currently running a drill-down report.
Save Saves the report that you edited.
Report 2-16
Save as HTML Displays the Save as HTML window, which lets you save a snapshot of the report output as an HTML file. Selecting the Script button in this window displays the Save as Script dialog box, which lets you create a script to run the
specified report and save the output as an HTML file.
Script Displays the Save as Script dialog box, which enables you to create a script to run a specified report on schedule and display it on your computer. The script can be interactive or automatic.
Exit Closes the active report output window. The location of the report output window is saved when the report is exited, and that is where the report will display the next time you run it.