UOW High Performance Computing
Cluster User’s Guide
Information Management & Technology Services
University of Wollongong
Contents
1. Overview 6 1.1. Specification . . . 6 1.2. Access . . . 7 1.3. File System . . . 7 2. Quick Start 9 2.1. Access the HPC Cluster . . . 92.1.1. From within the UOW campus . . . 9
2.1.2. From the outside of UOW campus . . . 9
2.2. Work at the HPC Cluster . . . 10
2.2.1. Being familiar with the environment . . . 10
2.2.2. Setup the working space . . . 11
2.2.3. Initialize the computational task . . . 11
2.2.4. Submit your job and check the results . . . 14
3. Software 17 3.1. Software Installation . . . 17 3.2. Software Environment . . . 17 3.3. Software List . . . 19 4. Queue System 22 4.1. Queue Structure . . . 22 4.1.1. Normal queue. . . 22 4.1.2. Special queues . . . 23 4.1.3. Schedule policy . . . 23 4.2. Job Management . . . 23 4.2.1. PBS options. . . 23
4.2.2. Submit a batch job . . . 25
4.2.3. Check the job/queue status . . . 27
4.2.4. Submit an interactive job . . . 29
4.2.5. Submit workflow jobs . . . 30
4.2.6. Delete jobs . . . 31 5. Utilization Agreement 32 5.1. Policy . . . 32 5.2. Acknowledgements . . . 32 5.3. Contact Information . . . 33 Appendices 35
A. Access the HPC cluster from Windows clients 35
A.1. Putty . . . 35
A.2. Configure ‘Putty’ with UOW proxy . . . 36
A.3. SSH Secure Shell Client . . . 38
B. Enable Linux GUI applications using Xming 41 B.1. Install Xming . . . 41
B.2. Configure ‘Putty’ with ‘Xming’ . . . 42
B.3. Configure ‘SSH Secure Shell Client’ with ‘Xming’ . . . 44
C. Transfer data between the Windows client and the HPC cluster 46 C.1. WinSCP . . . 46
C.2. SSH Secure File Transfer Client . . . 48
D. Transfer data at home (off the Campus) 49 D.1. Windows OS . . . 49
D.2. Linux or Mac OS . . . 49
D.2.1. Transfer data from your home computer to the HPC cluster . . . . 49
D.2.2. Transfer data from the HPC cluster to your home computer . . . . 50
E. Selected Linux Commands 51 F. Software Guide 53 F.1. Parallel Programming Libraries/Tools . . . 53
F.1.1. Intel MPI . . . 53
F.1.2. MPICH . . . 53
F.1.3. OpenMPI . . . 54
F.2. Compilers & Building Tools . . . 55
F.2.1. CMake . . . 55
F.2.2. GNU Compiler Collection (GCC) . . . 56
F.2.3. Intel C, C++&Fortran Compiler . . . 56
F.2.4. Open64 . . . 57
F.2.5. PGI Fortran/C/C++ Compiler . . . 57
F.3. Scripting Languages . . . 58
F.3.1. IPython . . . 58
F.3.2. Java . . . 59
F.3.3. Perl . . . 59
F.3.4. Python . . . 59
F.4. Code Development Utilities. . . 60
F.4.1. Eclipse for Parallel Application Developers . . . 60
F.5. Math Libraries . . . 60
F.5.1. AMD Core Math Library (ACML) . . . 60
F.5.2. Automatically Tuned Linear Algebra Software (ATLAS) . . . 61
F.5.3. Basic Linear Algebra Communication Subprograms (BLACS) . . 62
F.5.4. Basic Linear Algebra Subroutines (BLAS) . . . 62
F.5.5. Boost . . . 63
F.5.6. FFTW. . . 64
F.5.7. The GNU Multiple Precision Arithmetic Library (GMP) . . . 65
F.5.9. Intel Math Kernel Library (IMKL) . . . 67
F.5.10. Linear Algebra PACKage (LAPACK) . . . 67
F.5.11. Multiple-Precision Floating-point with correct Rounding(MPFR) 68 F.5.12. NumPy . . . 68
F.5.13. Scalable LAPACK (ScaLAPACK) . . . 69
F.5.14. SciPy . . . 70
F.6. Debuggers, Profilers and Simulators . . . 71
F.6.1. HPCToolkit . . . 71 F.6.2. TAU . . . 71 F.6.3. Valgrind. . . 72 F.7. Visualization . . . 72 F.7.1. GNUPlot . . . 72 F.7.2. IDL . . . 73 F.7.3. matplotlib . . . 73
F.7.4. The NCAR Command Language (NCL) . . . 74
F.7.5. Ncview . . . 75
F.7.6. OpenCV . . . 75
F.8. Statistics and Mathematics Environments . . . 76
F.8.1. R . . . 76
F.9. Computational Physics and Chemistry . . . 78
F.9.1. ABINIT . . . 78
F.9.2. Atomic Simulation Environment (ASE) . . . 80
F.9.3. Atomistix ToolKit (ATK). . . 81
F.9.4. AutoDock and AutoDock Vina. . . 81
F.9.5. CP2K . . . 82 F.9.6. CPMD . . . 84 F.9.7. DOCK . . . 85 F.9.8. GAMESS . . . 87 F.9.9. GATE . . . 88 F.9.10. GAUSSIAN . . . 91 F.9.11. Geant . . . 92 F.9.12. GPAW . . . 93 F.9.13. GROMACS . . . 94 F.9.14. MGLTools . . . 95 F.9.15. MOLDEN . . . 96 F.9.16. NAMD . . . 97 F.9.17. NWChem . . . 98 F.9.18. OpenBabel . . . 99 F.9.19. ORCA . . . 100 F.9.20. Q-Chem . . . 101 F.9.21. Quantum ESPRESSO . . . 102 F.9.22. SIESTA . . . 104 F.9.23. VMD . . . 106 F.9.24. WIEN2K . . . 106 F.9.25. XCrySDen . . . 107 F.10. Informatics . . . 107 F.10.1. Caffe . . . 107 F.10.2. netCDF . . . 108
F.10.3. netCDF Operator (NCO) . . . 109
F.10.4. RepastHPC . . . 110
F.10.5. SUMO(Simulation of Urban Mobility) . . . 110
F.11. Engineering . . . 111
F.11.1. MATLAB . . . 111
F.11.2. ANSYS,FLUENT,LSDYNA,ANSYS Electromagnetics Suite . . 113
F.11.3. ABAQUS . . . 114 F.11.4. LAMMPS. . . 114 F.11.5. Materials Studio . . . 115 F.12. Biology . . . 115 F.12.1. ATSAS . . . 115 F.12.2. MrBayes . . . 116 F.12.3. PartitionFinder . . . 117 F.12.4. QIIME . . . 118
1. Overview
The UOW HPC cluster aims to provide computing services for the UOW academic staffs and postgraduate students in their research work at the University of Wollongong. The maintenance of the UOW HPC cluster is held by the Information Management & Technology Services (IMTS), UOW.
1.1. Specification
The UOW HPC cluster consists of 3 components:
• Login node (i.e. hpc.its.uow.edu.au) is used for users to login the HPC cluster. Users could use the login node to prepare jobs, develop and build codes, transfer data to and from their local storage locations. The login node isNOTused for job execution. UsersMUSTsubmit their jobs to the queue system rather than running the job at the login node directly.
• Compute nodesare the major computing infrastructures for executing jobs submitted by users. Users are not allowed to login any of the compute nodes directly.
• Storage serversprovide major storage pool for users’ home directory, job scratch directory and large data set storage. The whole storage pool is divided into different file systems with each for a specific purpose.
Table1.1shows the system details of each component.
Cluster Name hpc.its.uow.edu.au Compute Node Model Dell PowerEdge C6145
Processor Model Sixteen-Core 2.3 GHz AMD Opteron 6376
Processors per Node 4
Cores per Node 64
Memory per Node 256GB
Number of Nodes 22
Total Cores 1408
Total Memory 5,632GB
Network Connection 10 GbE Operating System CentOS 6.3
Queue System Torque
Job Scheduler Maui
Storage Capacity 120TB
Release Time November 2013
A list of software packages have been deployed at the HPC cluster spanning chemistry, physics, engineering, informatics, biology etc. Users can access these system-wide packages easily via software environment module package. For program development there are several compilers available such as Portland Group Workstation (PGI), GNU Compiler Collection (GCC), Open64 and Intel Cluster Studio XE. Several MPI libraries including OpenMPI, MPICH and Intel MPI are deployed to support parallel computing.
1.2. Access
UOW staffs are eligible to request their account at the HPC cluster. Students must get their supervisor to request an account at the HPC cluster. Contact HPC adminto apply for the account.
Once the account is enabled, users may use their normal IMTS supplied username and password to access the login node of the UOW HPC cluster via Secure Shell(SSH). Users who are working within the campus can access the cluster by typing the following command in a Linux or Unix client:
or by using the SSH tools such as Cygwin, Putty or SSH Secure Shell Client in a Windows desktop.
If working from the outside of UOW campus, users should firstly login the UOW gateway serverwumpus.uow.edu.auand thensshto the HPC cluster from there. UOW staff can login in the HPC cluster directly from the outside of UOW viaVPN. Please note, the home directory on the HPC cluster isNOTthe same as on other IMTS machines such as
wumpus.
Note: The login node is ONLY for the job creation but not the job execution. User’s job running at the login node may be terminated by the system automatically. Users MUST submit their jobs to the queue system by using theqsubcommand to run jobs at one or more compute nodes.
1.3. File System
• /home/usernameThis is user’s home directory. Most of user’s activities should stay within it. It is globally accessible NFS from all nodes within the cluster. The quota of each user’s home space is strictly set as 100GB. The current usage of the home directory can be viewed from the file∼/.usage. If you need more storage space to run jobs, please contact the HPC administrator to request the extended storage space.
• /extd/usernameThis directory is used to run jobs requesting more space than user’s home directory. After sending the request to the HPC administrator and as soon as the request is approved, the requesters can access their extended space with the allocated quota. The current usage and quota of the extended space can also be viewed from the file ∼/.usage. Please note, the extended space will be periodically cleaned up and all it’s files untouched for over 3 months will be
automatically removed. It is user’s responsibility to move the useful results and data to the long-term storage space such as the home directory etc.
• /hpc/softwareUsed for installing system-wide software packages accessible by multiple users. User needs to obtain permission from IMTS to deploy software here.
• /tmp This is the local directory attached to each node to store the intermediate files from various system commands and programs. Since it has very limited space, please do NOTset TMPDIRenvironment variable of user’s applications to /tmp
or put scratch data in it.
• /hpc/tmpThis is the directory for users to exchange files.
• /export/scratch/commonThis is the directory where the running jobs should store all scratch or temporary data. Users should create the sub-directory named with the job id, copy the input and auxiliary files to it, execute the application, copy all results back to user’s working directory after the job termination and finally remove the sub-directory. Please refer to the job script template at the HPC cluster as below when preparing your own job script to do all above
/hpc/tmp/examples/common/runjob local.sh
• /hpc/dataReserved for special requirements of data storage.
Note: The HPC storage space is protected via RAID (so loss of a single disk does not lose data) but is NOT backed up in any way. It is the user’s responsibility to ensure that any important data is backed up elsewhere. Contact IMTS if you need special storage requirements.
To effectively manage the storage of the cluster, the following file system policies are applied:
• Email Notifications
The system will send the notification email to the user whose home or extended space usage nearly approaches the quota. The user’s running jobs will also be suspended to avoid the unexpected job termination. The user should take action immediately to reduce the storage usage at the corresponding space to the lower level. The system will automatically resume those suspended jobs after the user’s free space is recovered to the normal size. If there is no response made by the user in a fixed time, all suspended jobs will be deleted to release the resources for executing other users’ jobs. Check the file .usageunder the home directory to view the current storage usage, i.e. ‘more ∼/.usage’.
• Extended Space
If the home space is not large enough to host a user’s running jobs, the user could apply for the additional storage space. After the request is approved, the user will be allocated the extended space under the /extd?partition of the cluster. Please note, there is NObackup on user’s extended space. Such extended space will be cleaned periodically and all data untouched over 3 months will be automatically deleted. It is user’s responsibility to move the useful data from the extended space to either the home directory or other long-term storage locations.
2. Quick Start
2.1. Access the HPC Cluster
The hostname of the UOW HPC cluster login node is ‘hpc.its.uow.edu.au’. To access it, you will need an account at the HPC cluster which can be created by sending e-mail toHPC admin.
There are several ways to access the HPC cluster depending on which operating system of your client computer and the location where you are trying to login the cluster.
2.1.1. From within the UOW campus
• Linux or Mac OS clientYou can easily log into the HPC cluster by typing the following command ssh [email protected]
Note:USERNAMEin this document always means your own username.
If you have intention to execute the GUI (Graphical User Interface) applications at the HPC cluster, please add the-Xflag to login the cluster, i.e.
ssh -X [email protected] • Windows client
– ‘Putty’ or ‘SSH Secure Shell Client’
Both are the GUI SSH clients to access the remote Linux server. If you want to execute the GUI applications at the HPC cluster, please install a X-Windows terminal emulator (X Server) at your Windows desktop computer, such as ‘Xming’. Please refer to AppendixAfor instructions on configuring and using ‘Putty’, ‘SSH Secure Shell’ and ‘Xming’.
– Cygwin
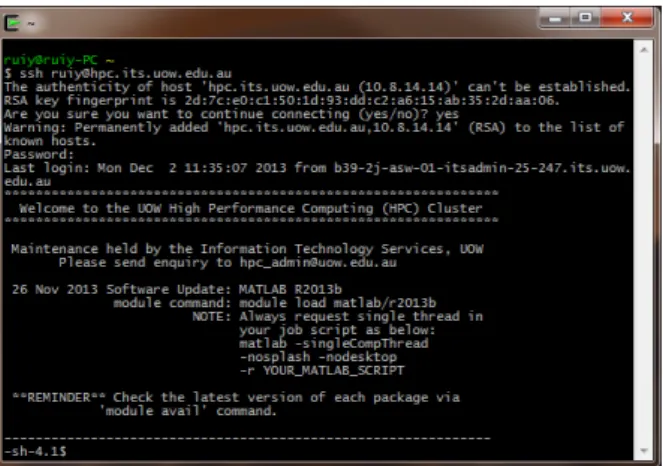
Cygwin is a collection of tools which could provide a Linux look and feel environment for Windows. Get the ‘Cygwin’ installed at your Windows client. Open a Cygwin-terminal and then use ‘ssh’ command to log into the HPC cluster as shown in Fig.2.1, i.e.
You need to installCygwin/Xand then login the HPC cluster with the-Xflag to run the GUI applications at the HPC cluster.
2.1.2. From the outside of UOW campus
The UOW HPC cluster is only visible to the UOW intranet. UOW staffs can access the HPC cluster directly from the outside of the campus viaUOW VPN.
Figure 2.1.: Use ‘Cygwin’ to login the HPC cluster. Username ‘ruiy’ is shown as an example.
Other users who are working from the outside of UOW need to login thewumpusgateway server firstly and then access the HPC cluster from there, i.e. type
ssh [email protected] from your home client and then type ssh [email protected] at thewumpusserver.
2.2. Work at the HPC Cluster
As soon as you connect to the HPC cluster, you are entering the Linux OS. Linux has different commands from MS Windows or DOS and different ways of doing things. You will almost exclusively be presented with a text-based command line prompt at which you are expected to type commands - no point and click. Thus you need to be familiar with the Linux Command Line and you need to know what commands to type at the prompt. We will go through a basic set of Linux commands in this document which will allow you to start using the Linux operating system and conduct your HPC computations (summarized in AppendixE). Please refer to the advanced reference book for more detail usage of Linux commands. All the Linux commands are fully documented in an online manual, often referred to as the ‘man pages’. The manual can be invoked from the command line by typing ‘man cmd’, where ‘cmd’ is the command you wish to see the documentation for.
2.2.1. Being familiar with the environment
First log into the HPC cluster by using the methods mentioned in the preceding section. To view your current working directory, type ‘pwd’ in the command line. You will be placed at your home directory, i.e. /home/USERNAME after each login. Every user has his/her own home directory which is inaccessible by other users. In most circumstances, users should keep the work within their own home directory.
To view a list of files in a directory, use the ‘ls’ command. The ‘ls’ command has many options and these options will dictate what output can be extracted. Please view the output from the command ‘man ls’ to learn the details on these options.
2.2.2. Setup the working space
If you need to create different directories for each specific research topic, use the ‘mkdir’ command to create a directory named, for example, ‘task’, i.e.
mkdir task
To make sure the directory has been created, use the ‘ls’ command to list all directories and files under the present directory.
Now access your ‘task’ directory by typing: cd task
‘cd’ command is used to enter a target directory. Type ‘pwd’ command to check whether you have moved to the ‘task’ directory.
2.2.3. Initialize the computational task
Generally, to start your computational task, you will need at least two files, i.e. the input file for the scientific program and the job script file to be submitted to the queue system. Create input file for the scientific program
Normally a scientific program needs input files to run. For example, if you run a quantum chemistry computation, using Gaussian, NAMD, GAMESS etc, you have to prepare an input file containing information spanning the method, basis set, molecular geometry information and so on. There are two choices on preparing such input file: create the input file at the HPC cluster by using a Linux text editor, or create the input file at your desktop computer and then transfer it to the cluster.
1. Create the input file at the HPC cluster
There are many popular Linux based text editors ready for use such as ‘gedit’, ‘vi’, ‘emacs’, ‘nano’ etc. (For some GUI text editors like ‘gedit’, you need to have a X-server installed at your client machine. Refer to Appendix B.1 for instructions on installing the X-server, ‘Xming’). You could pick anyone up as your favorite editor. Let’s consider a simple case to clarify the whole process.
Supposing you are going to calculate the multiplication between the matrix A and B by using MATLAB package. You then need to create an input file which contains the definition of A and B, and the matrix operation command to calculate their multiplication.
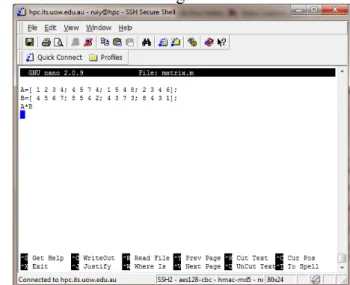
• If you have no X server installed on your desktop, you can use text-mode editors to create the input file. For example, you can use program ‘nano’ to create your input file. Type the following commands:
cd ˜/task nano matrix.m
The character ‘∼/’ represents the user’s home directory and ‘∼/task’ means the ‘task’ directory under the user’s home directory at the HPC cluster. The above commands will first bring you to the ‘task’ directory and then open a file named ‘matrix.m’ in the ‘nano’ editor. Type the following contents in
the editor’s window as shown in Fig.2.2:
Figure 2.2.: Usenanoto create your input file.
Type ‘Ctrl’+‘X’ to exit ‘nano’. Note that operation keys are displayed at the bottom of ‘nano’ as shown in Fig.2.2and ‘ˆ’ means ‘Ctrl’ in your keyboard. • If you have logged into the cluster with X server support then you can use
program ‘gedit’ to create such an input file named matrix.m under the directory ‘∼/task’:
cd ˜/task gedit matrix.m
Figure 2.3.: Usegeditto create your input file.
Type the same content as above in the ‘gedit’ window as shown in Fig. 2.3 and then Save & Quit. The first two lines specify two random 4×4 matrix’s, A and B, and the third line is to calculate their matrix multiplication.
2. Transfer the input file to the cluster
If you have created the above input file at your desktop computer then you could use the methods mentioned in AppendixCto copy it to the ‘task’ directory of the HPC cluster. For example, in the same directory containing the input file at your Linux/Mac client computer, type
scp matrix.m [email protected]:˜/task
NOTEYou can also solve the above jobs by using the GUI window of MATLAB. However, users should try to avoid interactively working in the GUI mode of any scientific program at the HPC cluster. This is because the HPC cluster is used for computation purposes only and not for developing or debugging work. Users should always submit their jobs to the queuing system in the batch mode. If you really need to work interactively, please submit an interactive jobs to the queue system (See Sec. 4.2.4).
Create job script file for the queue system
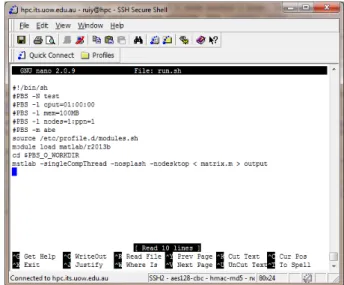
Now you can create the job script file by using the text editors as mentioned above. For example, we could run ‘nano run.sh’ to open a new file named ‘run.sh’ and type in the following contents:
Figure 2.4.: Usenanoto create your job script file.
The information contains several job control flags starting with ‘#PBS’ and several lines to execute the program. Each line is explained as below:
• #!/bin/sh
The shell environment in use, don’t change. • #PBS -N test
Use ‘-N’ flag to specify job name, change ‘test’ to your preferred job name. • #PBS -m abe
Specify the email notification when the job aborts(a), begins(b) and/or finishes(e). Delete this line if you don’t want to receive email notification.
• #PBS -l cput=01:00:00
Use ‘-l’ flag to request resources such as executing time, memory, cpu numbers etc. Here, requests executing time as 1 cpu hour in the ‘hh:mm:ss’ format. The
maximum cpu time you can request is 1000 hours, i.e. ‘1000:00:00’. NOTE: The default cpu time is 48 hours if no ‘cput’ is defined. • #PBS -l mem=100MB
Request 100MB memory here. Other units of ‘mem’ could be ‘GB’. • #PBS -l nodes=1:ppn=1
This example job requests 1 core within 1 node. Use ‘#PBS -l nodes=1:ppn=N’ to requestN(≤32) cores within a single node if you are running parallelized program. • source /etc/profile.d/modules.sh
Invoke the module environment, always keep this line before loading any other application module.
• module load matlab/r2013b
Load the module of ‘MATLAB’ application in version R2013b. This will set the appropriate environment to run the program.
• cd $PBS O WORKDIR
This changes the current working directory to the directory from which the script was submitted.
• matlab -singleCompThread -nosplash -nodesktop < matrix.m > output
This line will execute the program in the command line mode. The flag varies along with different application in use. Use ‘<’ to get the matlab read the input file ‘matrix.m’ and use ‘>’ to pipe the results into the file ‘output’. Please always use ‘-singleCompThread -nosplash -nodesktop’ flag to run a MATLAB batch job.
Please note, the job script should not execute directly at the command line, but must be submitted by following the ‘qsub’ command. Please refer to the Sec. 4.2.1for detailed usage on the PBS control flags. Applications installed at the HPC cluster can be loaded by using the ‘module load’ command as shown in the above script file. To check those avaiable software packages, type ‘module avail’ in the command line. Please refer to AppendixFfor detailed information on how to use each software packages installed on the cluster. You can find job script examples for a variety of software under the directory ‘/hpc/tmp/examples’.
2.2.4. Submit your job and check the results
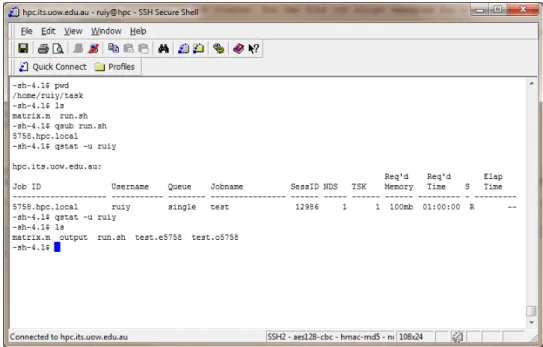
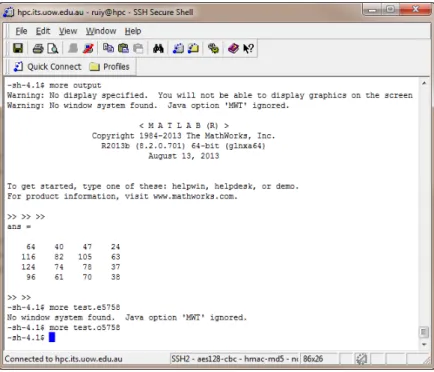
Now you are ready to submit your job script to the queue system. Please follow the procedure as below (Each step corresponds to a ‘-sh-4.1$’ prompt line in Fig. 2.5.)
1. First make sure you are working under the ‘/USERHOME/task’ directory by typing ‘pwd’. You can type “cd’ to return to your home directory wherever your are.
2. Next make sure you have the two initialization files ‘matrix.m’ and ‘run.sh’ within this directory by typing ‘ls’.
3. Now submit the job script ‘run.sh’ to the queue system by typing ‘qsub run.sh’ and you will be returned a job id (5785 in this example) by the queue system. 4. Check whether the job has been completed by using the ‘qstat’ command, i.e.
Figure 2.5.: Submit your job.
qstat -u YOUR_USERNAME
Alternatively you could just type ‘qstat -a’ as users are only allowed to view their own jobs. If there is something printed on the screen as shown in Fig. 2.5, the job is either queuing(Q) or running(R). This command tells you the job id, the user who submitted it, the name of queue running it, job name, session ID, how many nodes in use, how many cores are in use, the requested memory, the requested CPU time, the status of the job and the elapsed time so far.
NOTEIf you realise there is something wrong while the job is running, you could use the command ‘qdelJobID’ to delete your own job, i.e. ‘qdel 5758’ and fix the problem.
5. Check the job status from time to time by repeating the command ‘qstat -a JOBID’. If there is no messages printed any more, your job completes. You will also receive a notification email about the job completion if ‘#PBS -m abe’ was set in the job script.
6. Three new files will be generated when you run the job, ‘output’ is created by the program MATLAB which contains the calculation results, ‘test.e5758’ and ‘test.o5758’ are created by the queue system which contains the standard error and output message respectively.
7. You could chose a text editor such as ‘nano’, ‘gedit’, ‘vi’ or ‘emacs’ etc. to check the contents of these 3 files. An alternative and prompt way to view a ‘text’ file is to use a Linux intrinsic command ‘more’. Type ‘more output’ in the command line to check the content of the file ‘output’. As shown in the Fig.2.6, the matrix multiplication between A and B was printed in addition to some ‘MATLAB’ program messages.
8. Although the job finished normally, the warning message may printed in the standard error message file i.e. ‘test.e5758’ created by the queue system. Also because we
Figure 2.6.: Check the results.
redirect the result to the ‘output’ file by using ‘>’, there are no results sent to the standard I/O message file, i.e. ‘test.o5758’.
At this point, you have successfully completed a computational task at the HPC cluster. Please note, the information introduced in this document is limited just to run a simple task. Please refer to the Chapter4for general job submissions and check AppendixFto prepare the job script of a specific package. Please also read other chapters of this manual for further information on how to work smoothly at the HPC cluster.
3. Software
3.1. Software Installation
There are many software packages have been deployed at the HPC cluster and will be kept upgrading by the system administrator. If user requires a software that is not installed at the HPC cluster please send your request to the HPC admin. Users can also install the software under their own home directory which is solely accessed by the user.
NoteAs there is no central budget for software licenses, any costs incurred for the requested software must be covered by the department of the university that the user is employed by or the user’s research groups. Please check Sec. 3.3for the available packages at the HPC cluster.
3.2. Software Environment
The package Environment Modules is deployed at the HPC cluster to allow easy customization of user’s shell environment to the requirements of whatever software you wish to use. Themodulecommand syntax is the same no matter which command shell you are using as listed in the following:
• module availwill show you a list of the software environments which can be loaded via ‘module load package’ command. Example:
-sh-4.1$ module avail
--- /usr/share/Modules/modulefiles ---dot module-info null rocks-openmpi_ib
module-cvs modules rocks-openmpi use.own
--- /etc/modulefiles ---R/3.0.2 mpich/3.0.4_gcc ambertools/13_gcc mpich/3.0.4_itl atsas/2.5.1-1 mpich/3.0.4_open64 autodock_vina/1.1.2_bin mpich/3.0.4_pgi autodocksuite/4.2.5.1 mrbayes/3.2.2 byacc/20130925 namd/2.9_bin(default) cdo/1.6.1 ncl/6.1.2 cmake/2.8.12 nco/4.3.7 cp2k/2.4_gcc nose/1.3.0 cp2k/2.4_gcc_acml numpy/1.8.0 cpmd/3.17.1_pgi open64/5.0 dock/6.5 openmpi/1.4.4_gcc dock/6.5_mpi openmpi/1.4.4_pgi eclipse_pad/kepler_sr1 openmpi/1.6.5_dbg fftw/2.1.5_itl openmpi/1.6.5_gcc fftw/3.3.3_gcc openmpi/1.6.5_itl fftw/3.3.3_gcc_4.8.2 openmpi/1.6.5_open64 fftw/3.3.3_itl openmpi/1.6.5_pgi fftw/3.3.3_pgi orca/2.9.1 gamess/May_2013_R1 orca/2.9.1_pgi gaussian/g09a02(default) orca/3.0.0 gaussian/g09c01 orca/3.0.0_dbg
gcc/4.7.1 orca/3.0.0_pgi gcc/4.8.2 orca/3.0.1_pgi geant/4.9.5p02 pdb2pqr/1.8 geant/4.9.6p01 pgi/13.9 geant/4.9.6p02 propka/3.1 gnuplot/4.6.4 pyqt/4.10.3 idl/8.2_sp3 qchem/4.1.0 intel_ics/2013_sp1 qiime/1.7.0 intel_mkl/11.1 quantum_espresso/5.0.3_openmpi_pgi intel_mpi/2013_sp1 repasthpc/2.0 ipython/1.1.0 root/5.34.05 matlab/r2011a rosetta/3.5 matlab/r2013a scipy/0.13.0 matlab/r2013b sumo/0.18.0 matplotlib/1.3.1 vmd/1.9.1 mgltools/1.5.6 wien2k/12.1_itl_mkl mpich/3.0.4_dbg
• module load packagewill load the software environments for you. Example: -sh-4.1$ module load R/3.0.2
• module help package should give you a little information about what the ‘module load package’ will achieve for you. Example:
-sh-4.1$ module help R/3.0.2
--- Module Specific Help for ’R/3.0.2’
---This modulefile provides R (3.0.2, x86-64)
More information about R can be found at: http://www.r-project.org/
-sh-4.1$
• module show packagewill detail the command in the module file. Example: -sh-4.1$ module show R/3.0.2
---/etc/modulefiles/R/3.0.2:
module-whatis Sets the environment for R (3.0.2, x86-64) conflict R
append-path PATH /hpc/software/package/R/3.0.2/bin
append-path MANPATH /hpc/software/package/R/3.0.2/share/man
---sh-4.1$
• module listprints out those loaded modules. Example: -sh-4.1$ module list
Currently Loaded Modulefiles: 1) R/3.0.2
• module unload packagewill unload those loaded modules. Example: -sh-4.1$ module unload R/3.0.2
-sh-4.1$ module list
No Modulefiles Currently Loaded. -sh-4.1$
NOTE:The available software packages are subject to change and keep upgrading from time to time. Please check the latest version of all available packages by using ‘module avail’ command.
3.3. Software List
Some packages installed at the UOW HPC cluster are licensed and paid for by various departments and research groups on campus. The ‘*’ under the ‘Prerequisite’ column indicates software that requires some discussion with theHPC adminto be able to access. NOTE:All installed software packages have passed the standard test suite (if existing). However, it is user’s responsibility to check the correctness and the validity of the software deployed at the cluster prior to publishing any result by using them.
NOTE: Please add ‘source /etc/profile.d/modules.sh’ before any module command in your job script when submit it to the queue system.
Table 3.1.: List of Software Packages
Name Version Prerequisite
Parallel Programming Libraries/Tools (F.1) Intel MPI 2013 sp1 2015 2015 sp2
MPICH 1.5 3.0.4
OpenMPI 1.4.4 1.6.5
Compilers & Building Tools (F.2)
CMake 2.8.12 GCC 4.4.7 4.7.1 4.8.2 4.9.2 Intel Compiler 2013 sp1 2015 2015 sp2 Open64 5.0 PGI Compiler 13.9 14.7 15.3 Scripting Languages (F.3) iPython 1.1.0 Java 1.7.0 13 Perl 5.10.1 5.20.2 Python 2.6.6 2.7.6
Code Development Utilities (F.4) Eclipse for Parallel Application
Developers kepler SR1 kepler SR2 Math Libraries (F.5) ACML 5.3.1 6.1.0 ATLAS 3.11.17 BLACS — BLAS,CBLAS 3.5.0 Boost 1.55.0 FFTW 2.1.5 3.3.3 3.3.4 GMP 4.3.2 5.1.3
Table 3.1 – continued from previous page
Name Version Prerequisite
GNU Scientific Library 1.16
Intel MKL 11.1 11.2 LAPACK 3.4.2 3.5.0 MPFR 2.4.2 3.1.2 NumPy 1.8.0 1.8.1 1.8.1 py27 1.9.1 SCALAPACK 2.0.2 Scipy 0.13.0 0.14.0 py27 0.15.1 Debuggers,Profilers and Simulators (F.6)
HPCToolkit 3.5.2 TAU 2.24 Valgrind 3.9.0 3.10.0 Visualization (F.7) GNUPlot 4.6.4 IDL 8.2 sp3 8.3 * Matplotlib 1.3.1 1.4.2 Ncar Command Language 6.1.2
Ncview 2.1.4
OpenCV 2.4.8
Statistics and Mathematics Environments (F.8)
R 3.0.2 3.1.1 Computational Physics&Chemistry (F.9) ABINIT 7.8.2 7.10.2 ASE 3.8.1 Atomistix ToolKit(ATK) 13.8.1 * AutoDock 4.2.5.1 AutoDock Vina 1.1.2 CP2K 2.4 2.5.1 2.6.0 CPMD 3.17.1 * DOCK 6.5 * GAMESS May 2013 R1 * GATE 6.2 7.0 GAUSSIAN g09a02 g09c01 * Geant 4.9.5p02 4.9.6p01 4.9.6p02 4.9.6p03 4.9.6p04 4.10.0 4.10.0p01 4.10.0p02 4.10.0p03 4.10.1 GPAW 0.10.0
Table 3.1 – continued from previous page
Name Version Prerequisite
GROMACS 4.6.5 MGLTools 1.5.6 Molden 5.1.0 NAMD 2.9 2.10 * NWChem 6.3 R2 OpenBabel 2.3.2 ORCA 3.0.1 3.0.2 3.0.3 Q-Chem 4.0.0.1 4.2.0 * Quantum Espresso 5.0.3 5.1.0 5.1.1 5.1.2 Siesta 3.2 p4 3.2 p5 VMD 1.9.1 1.9.2 * Wien2K 12.1 * XCrySDen 1.5.53 Informatics (F.10) Caffe 20140616 20150216 netCDF C library 4.3.0 netCDF C++ Library 4.2.1 netCDF Fortran Library 4.2 netCDF Operator 4.3.7
RepastHPC 2.0
SUMO 0.18.0
Engineering (F.11)
ANSYS 14.5 *
ANSYS Electromagnetics Suite 16.0 *
ABAQUS 6.9-1 6.12-1 *
LAMMPS 5Nov10 1Dec13 30Oct14
Materials Studio 7.0 *
MATLAB R2011a R2013a R2013b
R2014a R2014b Biology (F.12) ATSAS 2.5.1-1 MrBayes 3.2.2 PartitionFinder 1.1.1 QIIME 1.7.0 1.8.0
4. Queue System
4.1. Queue Structure
The computing resources of the HPC cluster are under the management of the Torque resource manager (also known as PBS) and are scheduled by the Maui scheduler. All computational jobs should be executed via the queue system. Users submit jobs to a queue by specifying the number of CPUs, the amount of memory, and the length of time needed (and, possibly, other resources). The ‘Maui’ scheduler then run the job according to its priority when the resources are available, subject to constraints on maximum resource usage. ‘Maui’ is capable of very sophisticated scheduling and will be tuned over time to meet the requirements of the user community while maximizing overall throughput.
4.1.1. Normal queue
The default queue is a routine queue called ‘normal’ which the queue system uses to look at your job and figure out into which execution queue it should actually go. At the time of this writing, your job’s cpu number request determines this. Users do not need to specify the execution queue as the system will figure it out. There are 5 execution queues can be arrived by the default ‘normal’ queue:
Table 4.1.: Queue structure
Queue CPU Core
Limit CPU Time Default CPU Time Limit Wall Time Limit single 1 48:00:00 1000:00:00 1000:00:00 para 4 2∼4 48:00:00 1000:00:00 256:00:00 para 8 8 48:00:00 1000:00:00 128:00:00 para 16 16 48:00:00 1000:00:00 64:00:00 para 32 32 48:00:00 1000:00:00 32:00:00
All above execution queues allow jobs running up to 1000 hours cpu time (i.e. the accumulated cpu running time) or the corresponding wall time limit. As each compute node contains 64 cores, please always request CPU resources within a single node. NOTE: The default cpu time is 48 hours for all above normal queues. Please specify ‘cput’ in your job script to request the longer cpu time.
4.1.2. Special queues
In addition to the default ‘normal’ queue, there are 2 more execution queues for running jobs with special requests:
• shortallows interactive or batch jobs requesting 1 core to run up to 48 hour; • longallows batch jobs running with the wall time over 2000 hours;
The above two queues are not included in the ‘normal’ queue. Users should manually specify either of the above queues in their job script to submit a job to them. The ‘short’ is the only queue enabling users to run single-core interactive jobs at the cluster with up to 48 hours. Please remember to type ‘exit’ to quit the interactively job upon finishing the work. The ‘long’ queue is used for users running long-term jobs which may exceed 1000 CPU hours. This is useful for running applications which can not restart the work from the checkpoint files. Please note each users can only utilize a very limited CPU cores in the ‘long’ queue and the ‘long’ queue has the lower priority to get resources than other execution queues.
4.1.3. Schedule policy
The basic scheduling policy is FIFO (first in first out) within each queue, i.e. queuing jobs in the order that they arrive. However, the less resources (walltime, cput, mem, nodes etc.) requested in the job, the higher priority that the job to be put into run. The job priority also depends on several fairness share factors, such as the user’s recent utilization, job queuing time and the queue priority etc. Since the job is allocated based on the resources requested and available, please make reasonable requests to help your job beginning sooner.
4.2. Job Management
4.2.1. PBS options
To run a job at the HPC cluster, users must write their own job script and submit it to the queue system. The job script is an ascii file containing the PBS directives and the shell script to run commands and programs. The first primary task of the job script is to request the computing resource via PBS directives at its head. The PBS directives are all starting with ‘#PBS’ and are all at the beginning of the script, that there are no blank lines between them, and there are no other non-PBS commands until after all PBS directives. #!/bin/sh #PBS -N test job #PBS -l nodes=1:ppn=1 #PBS -l cput=03:00:10 #PBS -l mem=400MB #PBS -q normal #PBS -o test.out #PBS -e test.err #PBS -m abe #PBS -V
Explanations on the above PBS directives are listed below: • #!/bin/sh
• #PBS -N test job
Use-Nflag to specify name of the job. • #PBS -l nodes=1:ppn=1
Use -lflag to request resources. This example job requests 1 core (ppn) within a single node (nodes). Use‘#PBS -l nodes=1:ppn=N’to request N (≤32) cores within the same node if you are running parallelized program.
• #PBS -l cput=03:00:10
Request 3 hours cpu time in the format of hh:mm:ss. Users can also request Walltime time withwalltime.
• #PBS -l mem=400MB
Request 400MB memory for the job. Users can also request memory in the following formats
– vmemtotal virtual memory for the job; – pvmemvirtual memory per core; – pmemmemory per core;
The units of the memory requests could beMBandGB.
NOTE: Make sure to request enough memory in the job. If the job uses more memory than the request, it will be firstly suspended and then deleted. If you are not clear how much memory the job will consume, just remove any memory request in the job script- the system will assign the maximum allowed memory for the job. The maximum allowed memory is normally 4GB per core but may vary on special queues.
• #PBS -q normal
Use -qflag to specify the destination queue of the job. This line can be omitted when the job is submitted to the ‘normal’ queue. You have to specify the queue name when submit jobs to either ‘short’ or ‘long’ queues, i.e.
#PBS -q short or
#PBS -q long
• #PBS -o test.out
Use-oflag to specify the name and path of the standard output file. • #PBS -e test.err
Use-eflag to specify the name and path of the standard error file. • #PBS -m abe
Use -m flag to specify the email notification when the job aborts, begins and/or finishes.
• #PBS -V
Export user’s environment variables to the job. Other PBS flags are listed as below:
• #PBS -j [eo|oe] Merge STDOUT and STDERR. If ‘eo’ merge as standard error; if ‘oe’ merge as standard output.
Type ‘man qsub’ for more details on using ‘qsub’ command.
When a batch job starts execution, a number of environment variables are predefined, which include:
• variables defined on the execution host.
• variables exported from the submission host with ‘-v’ (selected variables) and ‘-V’ (all variables).
• variables defined by PBS.
The following variables reflect the environment where the user ranqsub: • PBS O HOSTThe host where you ran the qsub command.
• PBS O LOGNAMEYour user ID where you ran qsub. • PBS O HOMEYour home directory where you ran qsub. • PBS O WORKDIRThe working directory where you ran qsub. These variables reflect the environment where the job is executing:
• PBS ENVIRONMENT Set toPBS BATCH to indicate the job is a batch job, or to
PBS INTERACTIVEto indicate the job is a PBS interactive job. • PBS O QUEUEThe original queue you submitted to.
• PBS QUEUEThe queue the job is executing from. • PBS JOBIDThe job’s PBS identifier.
• PBS JOBNAMEThe job’s name.
4.2.2. Submit a batch job
Another primary task of the job script is to run the program properly which can be accomplished by a batch of shell scripts. Please note user’s home directory and the extended space are mounted at the remote network file system (NFS). Running jobs directly under these directories may produce heavy traffic over the network and make the storage server overloaded. To reduce the load at the storage server and enhance the job performance, users should always run their jobs by using the local scratch disks located at each compute node especially when the job frequently reads/writes a large volume of scratch files.
A job script template of using the local scratch disks is shown as below:
1 #!/bin/sh 2 #PBS -N job 3 #PBS -l cput=01:00:00 4 #PBS -l pvmem=4GB 5 #PBS -j eo 6 #PBS -e job.std.out 7 #PBS -m abe 8 #PBS -l nodes=1:ppn=1 9 10 #======================================================# 11 # USER CONFIG 12 #======================================================# 13 INPUT_FILE="****" 14 OUTPUT_FILE="****" 15 MODULE_NAME="****" 16 PROGRAM_NAME="****"
17 # Set as true if you need those scratch files.
18 COPY_SCRATCH_BACK=true
19
21 # MODULE is loaded
22 #======================================================#
23 NP=‘wc -l < $PBS_NODEFILE‘
24 source /etc/profile.d/modules.sh
25 module load $MODULE_NAME
26 cat $PBS_NODEFILE
27
28 #======================================================#
29 # SCRATCH directory is created at the local disks
30 #======================================================# 31 SCRDIR=/export/scratch/common/$PBS_JOBID 32 if [ ! -d "$SCRDIR" ]; then 33 mkdir $SCRDIR 34 fi 35 36 #======================================================#
37 # TRANSFER input files to the scratch directory
38 #======================================================#
39 # just copy input file
40 cp $PBS_O_WORKDIR/$INPUT_FILE $SCRDIR
41 # copy everything (Option)
42 #cp $PBS O WORKDIR/* $SCRDIR
43
44 #======================================================#
45 # PROGRAM is executed with the output or log file
46 # direct to the working directory
47 #======================================================#
48 echo "START TO RUN WORK"
49 cd $SCRDIR
50
51 # Run a system wide sequential program
52 $PROGRAM_NAME < $INPUT_FILE >& $PBS_O_WORKDIR/$OUTPUT_FILE
53 # Run a MPI program (Option)
54 # mpirun -np $NP $PROGRAM NAME < $INPUT FILE >& $OUTPUT FILE
55 # Run a OpenMP program(Option)
56 # export OMP NUM THREADS=$NP
57 # $PROGRAM NAME < $INPUT FILE >& $OUTPUT FILE
58
59 #======================================================#
60 # RESULTS are migrated back to the working directory
61 #======================================================#
62 if [[ "$COPY_SCRATCH_BACK" == *true* ]]
63 then
64 echo "COPYING SCRACH FILES TO " $PBS_O_WORKDIR/$PBS_JOBID
65 cp -rp $SCRDIR/* $PBS_O_WORKDIR
66 if [ $? != 0 ]; then
67 {
68 echo "Sync ERROR: problem copying files from $tdir to $PBS_O_WORKDIR;"
69 echo "Contact HPC admin for a solution."
70 exit 1 71 } 72 fi 73 fi 74 75 #======================================================#
76 # DELETING the local scratch directory
77 #======================================================#
78 cd $PBS_O_WORKDIR
79 if [[ "$SCRDIR" == *scratch* ]]
80 then
81 echo "DELETING SCRATCH DIRECTORY" $SCRDIR
82 rm -rf $SCRDIR
83 echo "ALL DONE!"
84 fi
85 #======================================================#
86 # ALL DONE
87 #======================================================# There are 8 portions in the above job script:
• Lines 1∼8: Request the computing resources (see detail in Sec. 4.2.1).
parameters. Users should replace the ‘****’ characters with appropriate values, such as the input file name forINPUT FILE, output file name forOUTPUT FILE, the module name to be loaded forMODULE NAMEand the actual program name for
PROGRAM NAME. There are two kinds of programs:
– The system wide program as listed in the ‘module avail’ command: specify the module name and the program name&flags to both MODULE NAME and
PROGRAM NAMErespectively.
– The customized program built by the user: give the full path of the program name&flags toPROGRAM NAME.
As default, the system will copy all scratch files back to the working directory after the job termination. Set COPY SCRATCH BACK as ‘false’ if you do not want the scratch files being copied back.
• Lines 20∼26: ‘MODULE’ portion loads the necessary module for the job. • Lines 28∼34: ‘SCRATCH’ portion setup the scratch directory at the local disks. • Lines 36∼42: ‘TRANSFER’ portion transfers input files to the scratch directory.
Users can also copy all files under the working directory to the local scratch directory by removing ‘#’ at the beginning of the Line 42.
• Lines 44∼54: ‘PROGRAM’ portion runs the program according to the users’ settings at the ‘USER CONFIG’. There are several scenarios to run the program:
– The sequential program using a single core: use the line 52 and comment line 53-57 (put ”#” at the beginning of each line).
– The parallelized program using MPI: enable the line 54 by removing its beginning ”#” and comment line 51-53 and 55-57.
– The parallelized program using OpenMP: enable line 56 and 57 by removing their ”#” characters and comment line 51-55.
Make sure there is only one of the line 52, 54 and 56 is enabled.
• Lines 56∼63: ‘RESULTS’ portion copy scratch files back to the user’s working directory if the ‘COPY SCRATCH BACK’ at the ‘USER CONFIG’ is set astrue. • Lines 65∼74: ‘DELETING’ portion delete the local scratch directory.
Usually the user just revises the PBS directives and the contents of ‘USER CONFIG’ without touching other portions. However, in some special circumstances users need to revise the whole script to match the job request.
After producing the job script, run theqsubcommand to submit it to the queue system, i.e.
-sh-3.2$ qsub jobscript
A job identifier (Job ID) will be given after the job being suuccessfuly submitted.
4.2.3. Check the job/queue status
Job progress can be monitored using command ‘qstat -a’. It will give the following information: job identifier, job name, username, elapsed CPU time, job status and the queue in which the job resides. Status can be one of the following:
• E- job is exiting after having run • H- job is held
• Q- job is queued, eligible to be run or routed • R- job is running
• T- job is being moved to new location
• W- job is waiting for its execution time to be reached • S- job is suspended
-sh-4.1$ qstat -a
hpc.its.uow.edu.au:
Req’d Req’d Elap Job ID Username Queue Jobname SessID NDS TSK Memory Time S Time --- --- --- --- --- ---- ---- --- --- - ---1094.hpc.local ruiy para_8 test_job 8703 1 8 -- 60:00:00 R 00:00:15
Otherqstatflags:
• qstat -u usernameDisplay all jobs belong to a specific user.
For example ‘qstat -u ruiy’ will check the status of jobs belong to user ‘ruiy’. This flag can be omitted at the HPC cluster as normal users can only view their own jobs.
• qstat -f jobidFull display of a job with a specific jobid.
For jobs running in the parallel mode, users could check the job efficiency by comparing the values of
resources_used.cput and
resources_used.walltime
from the output. Generally, the value of theresources used.cputshould be around
50∼99%×(resources used.walltime × requested CPU)
Otherwise, there might be unmatched CPU cores between the input file and the job script. In this case, check both the input file and the job script file to make the requested CPU cores consistent with those in use.
• qstat -QDisplay the queue status. -sh-4.1$ qstat -Q
Queue Max Tot Ena Str Que Run Hld Wat Trn Ext T Cpt --- --- ---- -- -- --- --- --- --- --- --- -
---batch 0 0 no yes 0 0 0 0 0 0 E 0
short 16 0 yes yes 0 0 0 0 0 0 E 0
para_16 24 26 yes yes 1 14 11 0 0 0 E 0 normal 512 0 yes yes 0 0 0 0 0 0 R 0
para_64 0 0 no yes 0 0 0 0 0 0 E 0
long 48 38 yes yes 14 24 0 0 0 0 E 0
para_m 10 0 yes yes 0 0 0 0 0 0 E 0
single 360 291 yes yes 45 246 0 0 0 0 E 0 para_8 48 155 yes yes 0 8 147 0 0 0 E 0 para_32 12 0 yes yes 0 0 0 0 0 0 E 0
para_4 48 0 yes yes 0 0 0 0 0 0 E 0
The following information of all available queues are displayed: – Queuethe queue name
– Maxthe maximum amount of nodes that a job in the queue may request – Totnumber of jobs currently in the queue
– Enaqueue is enabled (yes) or disabled (no) – Quenumber of ‘queued ’jobs
– Runnumber of ‘running’ jobs – Hldnumber of ‘held’ jobs
Users could request appropriate resources to reduce the job queueing time based on the above queue utilization information. Please note, some queues are disabled as they are only for testing purpose.
Type ‘man qstat’ for more details on using ‘qstat’ command.
4.2.4. Submit an interactive job
Interactive batch jobs are likely to be used for debugging large or parallel programs and especially for running time-consuming, memory consuming and I/O consuming commands. It uses the CPU and memory of a computer node which can largely reduce the work load on the login node. An example on working with the interactive job is shown below: Suppose userruiyis working at the login node, i.e.
-sh-4.1$ hostname hpc.its.uow.edu.au
Submit an interactive job to the ‘short’ queue -sh-4.1\$ qsub -I -q short
qsub: waiting for job 54718.hpc.local to start qsub: job 54718.hpc.local ready
-sh-4.1$
An interactive shell being started out at one of the compute node once the job starts -sh-4.1$ hostname
hpcn01.local
and initially login the user’s home directory -sh-4.1$ pwd
/home/ruiy
Check the job status -sh-4.1$ qstat
hpc.its.uow.edu.au:
Req’d Req’d Elap Job ID Username Queue Jobname SessID NDS TSK Memory Time S Time --- --- --- --- ---- --- --- --- - ---54718.hpc.local ruiy short STDIN 11701 1 1 429496 48:00 R
--Terminate the job -sh-3.2$ exit logout
qsub: job 54718.hpc.local completed Return to the login node
-sh-4.1$ hostname hpc.its.uow.edu.au
A submission script cannot be used in this mode - the user must provide allqsuboptions on the command line for the interactive job. The submitted interactive jobs are subject to all the same constraints and management as any other job in the same queue. Don’t forget to complete the interactive batch session by typing ‘exit’ to avoid leaving cpus idle on the machine.
To submit an interactive job which enables the GUI package, add the ‘-X’ flag as below -sh-4.1$ qsub -I -X -q short
Please note, the user also needs to login in the cluster by specifying ‘-X’ flag in ‘ssh’ command when using Linux desktop or enable X-server at the Windows desktop.
NoteUsers can only submit their interactive jobs to the ‘short’ queue.
4.2.5. Submit workflow jobs
In some cases a single simulation requires multiple long runs which must be processed in sequence. For this purpose, uses can use the ‘qsub -W depend=...’ options to create dependencies between jobs.
qsub -W depend=afterok:<Job-ID> <QSUB SCRIPT>
Here, the batch script<QSUB SCRIPT>will be submitted after the Job<Job-ID>was successfully completed. Useful options to ‘depend=...’ are
• afterok:<Job-ID>Job is scheduled if the Job<Job-ID>exits without errors or is successfully completed.
• afternotok:<Job-ID> Job is scheduled if the Job <Job-ID> exited with errors.
• afterany:<Job-ID> Job is scheduled if the Job <Job-ID> exits with or without errors.
By using the command, we can tell the queue system how our jobs depend on other jobs, so that the queue system will wait for the first job to finish before releasing the second job. Then the queue system will wait for the second job to finish, before the third job gets released, and so on.
-sh-4.1$ qsub run1.sh 5977.hpc.local
-sh-4.1$ qsub -W depend=afterok:5977.hpc.local run2.sh 5978.hpc.local
-sh-4.1$ qsub -W depend=afterok:5978.hpc.local run3.sh 5979.hpc.local
-sh-4.1$ qstat -a
hpc.its.uow.edu.au:
Req’d Req’d Elap Job ID Username Queue Jobname SessID NDS TSK Memory Time S Time --- --- --- --- --- ---- ---- --- --- - ---5977.hpc.local ruiy single run1.sh 61829 1 1 -- 48:00:00 R 00:00:00 5978.hpc.local ruiy single run2.sh -- 1 1 -- 48:00:00 H --5979.hpc.local ruiy single run3.sh -- 1 1 -- 48:00:00 H
--Viewing these jobs in the queue will show the first submitted job state (S column) as ‘R’ for running. The succeeding ones will have a job state of ‘H’ for held, because they are dependent on the first job.
4.2.6. Delete jobs
To delete a specific batch job, type ‘qdel jobid’ in the command line where jobid is the job’s identifier, produced by the qsubcommand. However, the command has no effect on an interactive job and the user needs to type ‘exit’ to quit it.
Type ‘man qdel’ for more details on using ‘qdel’ command. To delete all jobs belong to a user, use the following shell commands: qselect -u $USER | xargs qdel
qselect prints out a job list based on specific criterions, xargs takes multiple line input and run the command you give to it repeatedly until it has consumed the input list.
$USER is your own user name and you can safely use your own user name to replace
$USERin the above command. A user can not delete jobs belong to other users. Delete all running jobs of a user:
qselect -u $USER -s R | xargs qdel
Delete all queued jobs of a user:
5. Utilization Agreement
5.1. Policy
Users must be mindful that the HPC cluster is a shared resource. In particular, users must NOT use excessive resources on the HPC cluster that locks out others for large amounts of time. The following guidelines must be observed:
• USAGE All jobs are managed by the job scheduler which aims to keep both the fairness over all users and the efficiency of the cluster. If user has special requirements on the computing resources, contact IMTS. IMTS may allow a user or group of users to have sole access to the HPC cluster for a short time in special circumstances. • JOB Users must be mindful of other resources which must be shared with other users, such as storage and memory. The set of processes running on a node should not consume more than the amount of average physical memory/core on that node. Users should make the consistent request on the CPU resources with what the job really uses.
• LICENSING Users must not use software which is licensed by another user or group without prior approval of the user or group which has paid for the licenses. • COMMUNITYUsers agree to be on thehpc usersmailing list and to read all
emails sent to the above list. IMTS will communicate information via this list and will convene regular user group meetings. Users should attend such meetings where possible.
• REPORTINGIf a user has problems with the operation of the cluster or notices any failures of the hardware or software, please report any such problems to IMTS as soon as possible. IMTS appreciate any effort on detecting and reporting the problem.
• LOGIN NODE Users must submit all large jobs to the queue system from the login node and should avoid signing onto compute nodes. Small test jobs (less than a few minutes) may be run 1 at a time on the login node. The time-consuming or memory-consuming commands and programs must run as either batch or interactive jobs.
• ADMINISTRATIONIf cluster admins observe unreasonable user behavior, they will first contact the user by email, but if there is no response within an appropriate time, they may take all possible actions to stop the problem, such as deleting user jobs, deleting files, limiting job submission and executions etc.
5.2. Acknowledgements
When users publish their research work based on the UOW HPC Cluster, we would appreciate being mentioned in theacknowledgmentsection. Here is an example:
We would like to thank the University of Wollongong Information Management & Technology Services (IMTS) for computing time on the UOW High Performance Computing Cluster.
5.3. Contact Information
If you have any problems with or comments on the above document please contact IMTS. The following email addresses may be used.
• hpc [email protected]: a mailing list comprising the HPC users. May be moderated. • hpc [email protected]: the HPC administrators. Use the address for account
A. Access the HPC cluster from
Windows clients
If you want to access the HPC cluster from a Windows client, there are several tools such as ‘putty’ or ‘SSH Secure Shell Client’ you can use for this purpose.
A.1. Putty
Download‘Putty’and double click the downloaded file ‘putty.exe’ to start.
Figure A.1.: Start by selecting theSessiontab and enter ‘hpc.its.uow.edu.au’ as theHost Namewith SSH protocol selected. Fill in ‘UOW HPC’ in theSaved Sessions (or any other name you like) and clickSaveto save it. ClickOpento open a login Window as shown below.
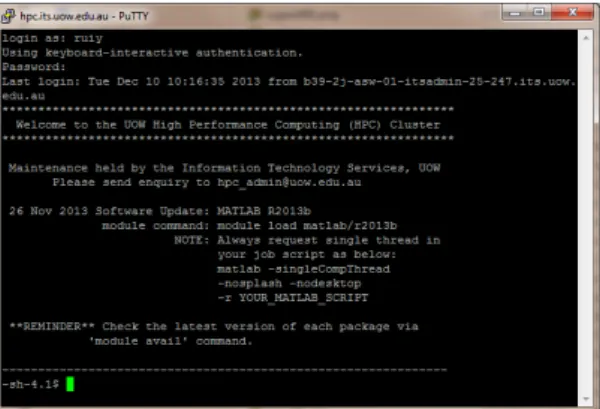
Figure A.2.: Type in your username (‘ruiy’ herein as an example) and your password. Then you will see theWelcome and Notificationmessage which means you have successfully logged in the UOW HPC cluster.
A.2. Configure ‘Putty’ with UOW proxy
If you cannot access the HPC cluster within the UOW, please consider to setup the proxy as below:
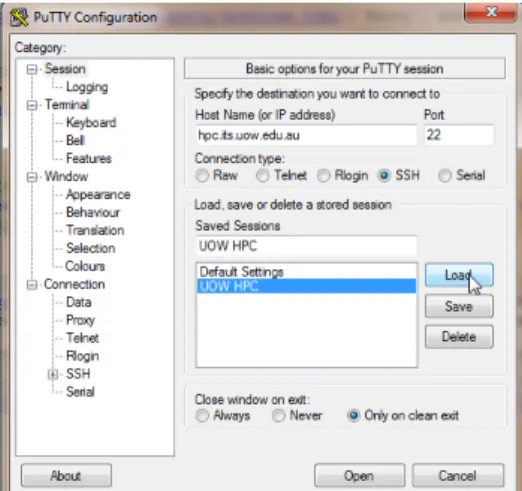
Figure A.3.: Select the Session of ‘hpc.its.upow.edu.au’ and clickLoadbutton.
Figure A.4.: Click the Proxy tab in the left panel and fill in the ‘proxy.uow.edu.au’ as Proxy hostname, ‘8080’ as Port, your UOW account asUsernameand your UOW password as Password. Go back the the Session page to save it and clickOpenbutton to start login.
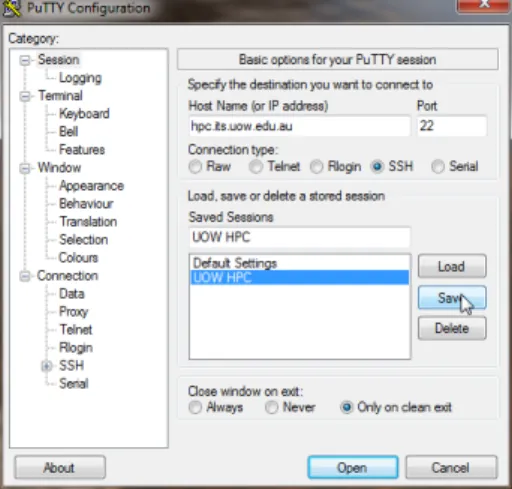
Figure A.5.: Go back to the Session page and save the proxy configuration by clicking Savebutton. ClickOpenbutton to start login.
A.3. SSH Secure Shell Client
Download ‘SSH Secure Shell’ and save it to an easily accessible place (your Windows desktop is a good choice). Start the installation by double-clicking the downloaded exe file in Windows Explorer. When the installation is complete, double click on the Desktop Icon to start the program.
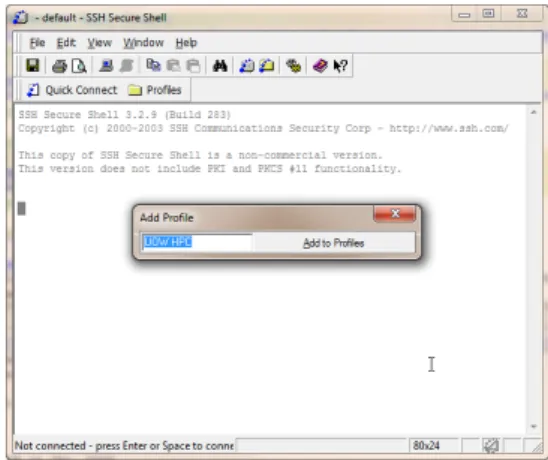
Figure A.6.: After installation, double click ‘SSH Secure Shell Client’ and click Profiles⇒Add Profileto add a profile ‘UOW HPC’.
Figure A.8.: Click Profiles⇒Edit Profiles and select ‘UOW HPC’ from the Profiles session (Or any other name you like). Type in ‘hpc.its.uow.edu.au’ as the Host nameand your username asUser name. ClickOK.
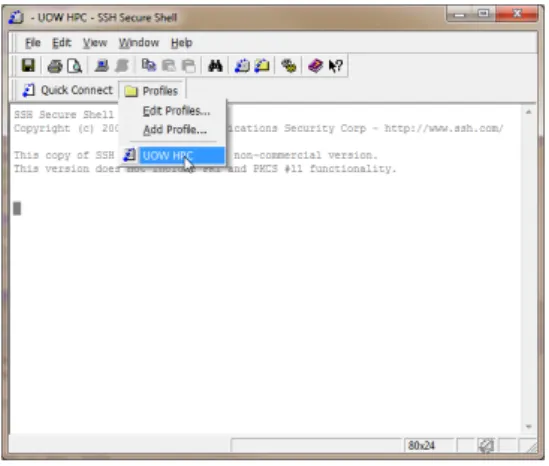
Figure A.9.: ClickProfilesand selectUOW HPCto log in the cluster.
B. Enable Linux GUI applications
using Xming
The X Window System is a system that allows graphical applications to be used on Unix-like operating systems instead of text-only applications. It is the foundation for Linux and Unix GUIs (Graphical User Interfaces). X (current version, X11) is defined by standards and contains standardized protocols. The X server is a process that runs on a computer with a bitmapped display, a keyboard, and a mouse. X clients are programs that send commands to open windows and draw in those windows. You can use either ‘putty’ or ‘SSH Secure Shell’ as the X client in conjunction with the X server ‘Xming’.
B.1. Install Xming
1. Download‘Xming’
2. Double-click the Xming setup icon. The Xming Setup Wizard will start and the Setup Xming window will appear.
3. In the Setup Xming window, clickNEXTto continue the installation.
4. When prompted for the installation location, choose the default path and Click NEXT.
5. When prompted for which components to install, accept the defaults. ClickNEXT. 6. When prompted for the location for the shortcut, accept the default. ClickNEXT. 7. When prompted for additional icons, select both theXmingandXlaunchicons, if
desired. ClickNEXT.
8. Review the settings that you have selected. If no changes, clickInstall. 9. When the installation is complete, clickFinish.
10. If the Windows Security Alert appears, your firewall is blocking all incoming traffic to your PC. To display on your screen, you need to select theUnblockoption. This will add the necessary port to allow you to run X applications.
11. When Xming is running, you will see the XmingXsymbol in your system tray on your Desktop.
12. To close Xming or to get more information about Xming, right-click on the Xming Xsymbol and choose from the drop down menu.
13. Xlaunch is a wizard that can be configured to start Xming sessions. Or you can simply start the Xming Server by clickXmingicon.
14. You may also need to install Xming fonts to display characters correctly. Download ‘Xming-fonts’and install it with default settings.
Next step, we need to configure the SSH clients such as ‘Putty’ or ‘SSH Secure Shell Client’ to run the X application.
Figure B.1.: As soon as you see it, the X-server is running.
B.2. Configure ‘Putty’ with ‘Xming’
Figure B.2.: Open ‘putty’, select the ‘UOW HPC’ session and clickLoad.
Figure B.4.: Go back toSessionpage and clickSaveto save the changes.
Figure B.5.: SelectUOW HPCsession to open the login window.
Figure B.6.: Select UOW HPC session to open the login window and type in your username (’ruiy’ herein as an example) and password. After logging into the cluster, type ‘xclock’ in the command line. If you see a clock displayed on your desktop, you are able to run other Linux X applications.
B.3. Configure ‘SSH Secure Shell Client’ with
‘Xming’
Figure B.7.: Start ‘SSH Secure Shell Client’, clickProfilesand thenEdit Profiles.
Figure B.8.: Enter ‘UOW HPC’ profile and the Tunneling tag, check Tunnel X11 connectionsandOK.
Figure B.9.: Select UOW HPCprofile to log into the cluster and type ‘xclock’ to test. If you see a clock displayed on your screen, you are successfully working in the X-Windows mode.
C. Transfer data between the
Windows client and the HPC
cluster
C.1. WinSCP
Download‘WinSCP’and install it using the default options. You will be asked to setup a connection.
Figure C.1.: Type ‘hpc.its.uow.edu.au’ as the Host name and your USERNAME as the User name (‘ruiy’ herein as an example). You could choose to input your password here. Select ‘Save’ to continue.
Figure C.2.: Save session. You could check Save password if you want the computer to remember your password.
Figure C.3.: Select session ‘hpc.its.uow.edu.au’ and pressLoginto continue.
Figure C.4.: Enter your password here if you didn’t let WinSCP save it in the preceding step.
Figure C.5.: Now you have logged into the HPC cluster successfully and you can drag and drop files to transfer data between the cluster and your desktop.
C.2. SSH Secure File Transfer Client
Figure C.6.: Open an SSH windows and connect to the UOW HPC cluster. Click the button under the mouse to open a ‘SSH Secure File Transfer’ windows as below.
Figure C.7.: The file transfer interface opened with your local disk in the left column and the remote file system at the cluster in the right column. Now you can transfer files by ‘drag and drop’ to either column.
D. Transfer data at home (off the
Campus)
As the UOW HPC cluster is located behind the university firewall, users can not transfer data directly between the HPC cluster and the client computer at home or off the campus. UOW staffs need to connect the UOW VPN firstly and then transfer the data by using the methods described inC. For users who can not access VPN, ssh tunnel via the UOW gateway server ‘wumpus.uow.edu.au’ can be used to transfer data at home.
D.1. Windows OS
For client computer with Windows OS, first installWinSCPand then follow steps below: 1. Create a new session connecting to ‘hpc.its.uow.edu.au’.
2. Edit the session and select the Tunnel from the left panel, clickConnect through SSH tunnel, and fill in ‘wumpus.uow.edu.au’ as thehostnameand your UOW username as theusername.
3. Save above and connect it.
Now you should be able to transfer data between your home computer and the HPC cluster.
D.2. Linux or Mac OS
On a computer with Linux or Mac OS, there is no need to install additional packages. The OS implementedscpcommand can be used to transfer data between the home computer and the HPC cluster.
D.2.1. Transfer data from your home computer to the HPC
cluster
1. From your home computer, open a command line terminal and set the forwarding port with any valid number (i.e. 1234 for example) as below:
$ ssh -L 1234:hpc.its.uow.edu.au:22 [email protected]
After typing in your password, leave the above terminal open. 2. Open another command line terminal and type:
scp -P 1234 -r SOURCE_DIRECTORY [email protected]:TARGET_DIRECTORY
This command will copy the whole SOURCE DIRECTORY at your home computer to the TARGET DIRECTORY (absolute path) at the HPC cluster.
D.2.2. Transfer data from the HPC cluster to your home
computer
1. From your home computer, open a command line terminal and set the forwarding port with any valid number (i.e. 1234 for example) as below:
$ ssh -L 1234:hpc.its.uow.edu.au:22 [email protected]
After typing in your password, leave the above terminal open. 2. Open another command line terminal and type:
scp -P 1234 -r [email protected]:SOURCE_DIRECTORY TARGET_DIRECTORY
This command will copy the whole SOURCE DIRECTORY (absolute path) at the HPC cluster to the TARGET DIRECTORY at your home computer.
E. Selected Linux Commands
Table E.1.: Selected Linux commands descriptionCommands Description
System information
uname -a Show kernel version and system architecture
hostname Show host server name
hostname -i Show host server IP address
file searching
ls; ls -l; ls -lr; ls -lrt
List files; with more information; by filename; by date
which cmd Show full path name of commandcmd
find . -name arg Search the file namedargunder the current directory
File management
cp file1 file2 copy filefile1tofile2
cp -r dir1 dir2 copy directorydir1todir2
rm file1 remove(delete) filefile1
rm -r dir1 remove(delete) directorydir1
mv file1 dir2/file2 move and/or rename filefile1todir2/file2
Directory navigation
pwd Show current directory
mkdir dir Create a directory ‘dir’
cd; cd -; cd dir Goto $HOME directory; previous directory; directorydir
Disk space
ls -lSrh Show files by size, biggest last with human friendly unit
df -h Show free space on mounted filesystems
du -sh * Show size of files and subdirectories of the current directory
Manipulating files
tail -f file Monitor messages in a log file (Ctrl+C to exit)
more file Displays the contents of the file one screen at a time, use ‘space’ for next page
cat file Lists all contents of files to the screen
grep args file Search argumentargsinfile
Archives and compression
tar -cvf dir.tar dir Make archive ofdirasdir.tar
tar -xvf dir.tar Extract files from the archive ofdir.tar
gzip file Compressfilein a filefile.gz
gunzip file.gz Extractfile.gz to filefile
On-line help
Table E.1 – continued from previous page
Commands Description
apropos subject Displays a list of all topics in the man pages that are related to the subject of a query, i.e. subject. It is particularly useful when searching for commands without knowing their exact names.