Samsung Galaxy S III
Contents
Product Information ... 11 Specifications ... 11 Call Management ... 11 Camera ... 12 Connectivity ... 12 Messaging ... 12Personalization & Fun ... 12
Call Basics ... 13
Answer call ... 13
Reject current call ... 13
Block calls ... 13
Reject call with message ... 13
Add contact to reject list ... 13
Add numbers to Auto reject list ... 13
Temporarily remove numbers from Auto reject list ... 13
Permanently remove numbers from Auto reject list ... 14
Dial ... 14
End call ... 14
Hold call ... 15
Mute and unmute call ... 15
Mute incoming ring ... 15
Use speakerphone ... 15
Caller ID ... 15
Incoming ID - Turn on/off ... 15
Outgoing ID – Enable / Restrict ... 15
Picture ID - Set ... 15
Ringer ID - Set ... 16
Call Forwarding ... 16
Cancel call forwarding ... 16
Forward all calls (unconditional forwarding) ... 16
Forward some calls (conditional forwarding) ... 16
Forward calls voicemail (conditional forwarding) ... 17
Call Settings ... 17
DTMF tones - Not available ... 17
Fixed dialing ... 17
Phone line selection - Not available ... 17
Volume... 17
Ring volume ... 17
Call Timer / Call Log ... 17
Reset call log ... 17
Call timer - Not available ... 18
Call Waiting ... 18
Turn on/off ... 18
Use ... 18
Conference Calling ... 18
Have private conversation ... 18
Start conference call ... 19
Voice Commands ... 19
Assign a voice name to a contact ... 19
Dial using voice name ... 19
Setup S Voice ... 19
Voicemail ... 19
Call voicemail ... 19
View voicemail number ... 20
AllShare / AllShare Cast ... 20
AllShare - Download to your computer (Windows) ... 20
AllShare Play – Log in ... 20
AllShare Play – Set up web storage (Required) ... 20
AllShare Play – Log out ... 21
AllShare Play – Access your media files ... 21
AllShare Play – Share a media file with another device via streaming ... 21
AllShare Play – Broadcast a Screen Cast via group sharing... 21
AllShare Cast – Turn On / Off ... 22
AllShare Cast – Scan for other devices ... 22
AllShare - PC / DLNA TV ... 22
Bluetooth®/Infrared ... 22
Bluetooth - Transfer files ... 22
Bluetooth - Turn off and disconnect ... 23
Bluetooth - Turn on and pair ... 23
Bluetooth - Unpair from a connected device ... 23
Data Synchronization ... 23
Disable/Enable mobile data connection ... 23
Check data usage ... 24
Set a data usage warning ... 24
Set a data usage limit ... 24
Edit application sync settings ... 24
Data synchronization (automatic) ... 24
Data synchronization (manual) ... 25
Turn on/off GPS ... 25
Google Maps... 25
Find your location ... 25
Get directions ... 26
Search for location ... 26
Select map mode ... 26
Internet and Browser ... 26
Access Internet/Enter URL ... 26
Add browser bookmark ... 27
Browser settings (clear cache, view history) ... 27
Clear Cache ... 27
Delete Cookies ... 27
View history ... 27
Copy and paste text ... 27
Go forward/back a page ... 28
Go forward ... 28
Go back ... 28
Javascript enable or disable ... 28
Search within a page ... 28
Open new window ... 28
Zoom in/out ... 28
Zoom in ... 28
Zoom out ... 28
Near Field Communication ... 29
Near Field Communication (NFC) Explanation ... 29
NFC - Turn on/off ... 29
NFC - Read tag ... 29
NFC - Change settings ... 29
NFC - Share media and contacts using S Beam... 29
NFC - Write tag - Not available ... 30
Virtual Private Network (VPN) ... 30
Add new network... 30
Connect to network ... 30
Voice Search ... 31
Voice Search - Use ... 31
Use Location - Turn on/off ... 31
Turn on ... 31
Turn off ... 31
SafeSearch - Not supported ... 31
Wi-Fi ... 31
Wi-Fi - Turn on/off ... 31
Tethering and Wi-Fi sharing ... 32
Set up mobile hotspot ... 32
Turn on / off mobile hotspot ... 32
Tethering via USB ... 32
Customize (keys, name) ... 33
Greeting/name tag - Not available ... 33
Program name and number... 33
Blocking Mode ... 33
Blocking mode on/off ... 33
Blocking mode - Adjust settings ... 33
Home Screen ... 33
Add widget, shortcut, or folder ... 33
Move widget, shortcut, or folder ... 34
Remove widget, shortcut, or folder... 34
Ringtones ... 34
Change ring style ... 34
Create a vibration style ... 34
Change ringtone ... 34
Add a new ringtone with My files application ... 34
Add a new ringtone with Music player application ... 35
Delete ringtone ... 35
Download via computer - Not available ... 35
Themes/Wallpaper ... 35
Screen saver - Not available ... 35
Themes - Not available ... 35
Wallpaper - Delete ... 35
Wallpaper - Download via Computer - Not available ... 36
Wallpaper - Set ... 36
Lock screen Wallpaper - Set ... 36
Wallpaper and lock screen wallpaper - Set ... 36
Battery/SIM Card ... 36
Battery - Charge ... 37
Battery - Insert/remove ... 37
Insert ... 37
Remove ... 38
Battery Manager - Access ... 39
Battery Manager - Change battery profile ... 39
Battery Manager - Set battery profile options ... 39
SIM card ... 39
Insert ... 39
Remove ... 41
Button functions ... 42
Display screen icons ... 43
Status bar icons ... 44
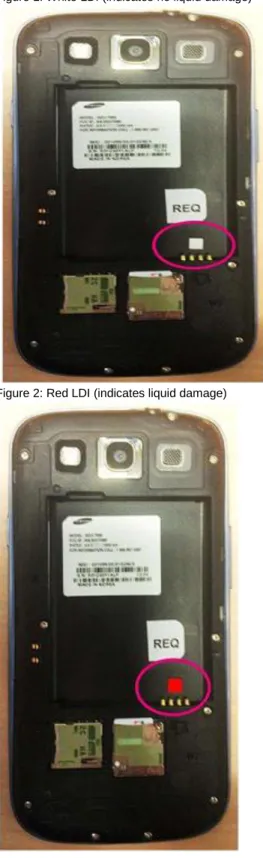
Liquid damage indicator (LDI) ... 51
Status light indicators ... 52
Memory ... 53
Set default memory collection - Not available ... 53
Camera and Camcorder ... 53
Voice recorder ... 53
Internet browser ... 53
Task Manager ... 53
Access ... 53
End Applications ... 53
View available device memory - Phone book ... 54
View device memory - Phone book on SIM card - Not available ... 54
View device memory - Pictures, videos ... 54
Memory Card & Transfer ... 54
Access files - On card using computer ... 54
Access files - On card using device ... 54
Delete files - On card using computer ... 54
Delete files - On card using device... 54
Insert/remove card ... 55
Move files - Card to computer ... 57
Move files - Card to device ... 58
Move files - Computer to card ... 58
Move files - Device to card ... 58
View available memory ... 58
USB settings ... 58
Google Play Store ... 59
Access Play Store ... 59
Download and install free application ... 59
Download and install paid application ... 59
Uninstall application ... 59
Emergency Alerts ... 59
Emergency Alerts Explanation ... 59
Emergency Alerts - Access ... 60
Emergency Alerts - Settings ... 60
Album ... 60
Send picture to Album ... 60
Camera ... 60
Edit the on-screen settings icons ... 60
Flash ... 61 Zoom ... 61 Front/rear camera ... 61 Shooting mode ... 61 Camera/camcorder mode ... 62 Effects mode ... 62 Pictures - Access ... 62 Pictures - Delete ... 62 Phone Memory ... 62
External Memory Card ... 63
Pictures - Take/Capture ... 63
Music ... 63
Access music player ... 63
FM radio - Not available ... 63
Move music - From computer to memory card ... 63
Playlist - Add files ... 63
Playlist - Create ... 64
Playlist - Delete files ... 64
Playlist - Delete playlist ... 64
Playlist - Play ... 64
Supported music files ... 64
Screen Shot ... 65
Turn on ... 65
Capture screen shots ... 65
Video ... 65
Access YouTube ... 65
Search for videos ... 65
View video categories ... 65
Upload video ... 66
Watch video ... 66
Email ... 66
Account - Add new POP3 or IMAP account ... 66
Account - Add new Exchange email account ... 66
Account - Change settings ... 67
Edit email account ... 67
Delete Email account ... 67
Switch between accounts ... 68
Set incoming alert ... 68
Add attachment ... 68
Delete Email Messages ... 68
Forward email message ... 68
Reply to email message ... 69
Send email message ... 69
Switch between email folders ... 69
Refresh email inbox ... 69
Gmail ... 70
Account - Add new Gmail account ... 70
Edit Gmail account ... 70
Delete Gmail account ... 70
Switch between Gmail accounts ... 71
Add attachment to Gmail ... 71
Set incoming alert ... 71
Delete a Gmail Message... 71
Forward email message... 71
Read email message ... 72
Reply to email message... 72
Send email message ... 72
Switch between email folders... 72
Refresh email inbox ... 72
Instant Messaging ... 73
AOL Instant Messenger (AIM) - Not supported ... 73
Google Talk - Add contact ... 73
Google Talk - Block contact... 73
Google Talk - Unblock contact ... 73
Google Talk - Delete contact ... 73
Google Talk - Log in/log out ... 73
Google Talk - Send message to contact ... 74
Google Talk - Send message to unlisted contact - Not available ... 74
Google Talk - Set away status ... 74
Windows Live Messenger - Not supported ... 74
Yahoo Messenger - Not supported ... 74
MMS (picture/video messaging) ... 74
Delete message ... 74
Read message ... 74
Save received picture ... 75
Send picture - Saved ... 75
Send picture - Take new ... 75
Send video - Saved ... 75
Send video - Take new... 75
Voice Notes - Delete ... 76
Voice Notes - Record/Save ... 76
Voice Notes - Send ... 76
Record and new file and send... 76
SMS (text messaging) ... 77
View service center number ... 77
Delete message ... 77
Read message ... 77
Send message ... 77
WAP push messages ... 77
Spam list ... 77
Access messages from Spam list ... 78
Add number to Spam list ... 78
Remove number from Spam list ... 78
Social Networking ... 78
Flipboard explanation ... 78
Flipboard - Add a widget ... 78
Flipboard widget ... 79
Flipboard - Add accounts ... 79
Flipboard - Delete accounts ... 79
Facebook - Not supported ... 80
MySpace - Not supported ... 80
Twitter - Not supported ... 80
Text Entry ... 80
Text entry modes ... 80
Entering text using T9 Trace mode ... 80
Entering text using Multi-tap mode ... 80
Entering text using Traditional mode ... 81
Entering text using Swype mode ... 81
Entering text using Draw Text mode ... 81
Copy, cut, and paste ... 81
Delete text ... 81
Enter symbols and numbers ... 81
Qwerty keyboard ... 81
3x4 keyboard ... 82
Swype ... 82
On-screen keyboard settings ... 82
Text to Speech ... 82
Settings ... 82
Set up and turn on ... 83
Caller Groups ... 83
Add contact to caller group ... 83
Create a caller group ... 83
Picture ID - Set to caller group - Not available ... 83
Phone Book ... 84
Access ... 84
Add contact to phone book ... 84
Add contact to SIM ... 84
Assign speed dial to contact ... 84
Change contact display options ... 85
Copy contact - Import/export from SIM card ... 85
Copy contact - Import/export from SD card ... 85
Delete contact ... 86
Backlight ... 86
Brightness ... 86
Duration ... 86
Smart stay on/off ... 86
Data Usage ... 87
Packet data - Turn on/off ... 87
Set mobile data limit ... 87
Restrict background data usage ... 87
Display Wi-Fi usage ... 87
Device Information ... 87
Help ... 87
IMEI ... 87
Software version ... 88
Device Login ... 88
Create and log in to new Google account ... 88
Log in/out of existing Google account ... 88
Create and log in to new Gmail account ... 88
Log in/out of existing Gmail account ... 89
Gestures ... 89 Motion settings ... 89 Language ... 90 Device language ... 90 Drive mode ... 90 Network ... 90
Turn on/off Carrier IQ ... 90
Turn on/off Airplane mode ... 90
Turn on/off Browser message (WAP Push) ... 91
Change band ... 91
Change network setup mode ... 91
Perform manual network selection ... 91
Reset ... 91
Back up device files to computer before master reset... 91
Master reset using hardware keys ... 92
Soft reset ... 92
Wipe cache partition to clear system memory ... 92
Clear application cache ... 93
Security ... 93
Change SIM PIN code... 93
Change Security code - Not available ... 93
Lock - Application lock - Not available ... 93
Lock - Keypad lock ... 93
Manually lock ... 93
Automatically lock ... 93
Lock - Encrypt device ... 94
Lock device ... 94
Unlock device ... 94
To unlock - pattern ... 94
To unlock – PIN ... 95
To unlock – password ... 95
Lock SIM card ... 95
Unblock - PIN (PUK Code) ... 95
Unblock - SIM (SIM subsidy unlock) ... 95
Time and Date ... 96
Alarm clock - Set ... 96
Auto-update (NITZ) ... 97
Product Information
Color of Device Gray
Kit Contents User Guide / Getting Started Guide, battery and charger, headset, USB cable, Samsung Galaxy S III
Specifications
Adobe Flash Yes, Flash Player 11
Battery life
Usage time: 8 hours (3G)* Standby time: up to 15 days*
*Talk and standby times and other specifications are provided by the manufacturer and are approximate. Actual performance varies based upon features or services used, network configuration, signal strength, operating temperature, customer use, and other factors.
Dimensions of
handset 5.37" x 2.77" x 0.33" Main display 4.8" 1280 X 720 sAMOLED
Memory 2GB internal RAM
32GB Internal ROM Frequency
bands
900 MHz; 1800 MHz;1900 MHz; UMTS: Band I (2100); Band II (1900), UMTS: Band IV (1700/2100/AWS), Band V (850)
GSM/3G Phone style Bar Operating
system
Shipped with Android 4.0 (Ice Cream Sandwich) Upgradable to Android 4.1.2 (Jelly Bean)
Note: To upgrade to Jelly Bean visit http://m.samsung.com/us/kies/.
Weight 4.7 oz
Call Management
Picture caller ID Yes External CLI Yes Ringer caller ID Yes Speed dial/OneTouch Dial Yes
Speakerphone Yes Vibrate Yes Voice dialing No Speaker Independent Voice Recognition (SIVR) No
Camera
Modes Single shot Burst shot Face detection HDR Share shot Buddy photo share Beauty Smile shot Low light Beauty Panorama CartoonMulti shot Yes
Resolution 8MP (rear facing), 1.9MP (front facing) Video capture 1080p (1920x1080) MPEG4
Zoom 4x digital zoom
Flash Yes (rear camera only)
Connectivity
Bluetooth 4.0, Power Class 2, A2DP (stereo Bluetooth), OPP (Object Push Profile), HFP, AVRCP, PBAP Browser Type: (Linux; U; Android 4.1.1; en-us; SGH-T999 Build/Jelly Bean) Version/4.0 Mobile Safari/533.1
Supports: HTML 5.0 (Partial), XHTML 1.2MP Near Field Communication (NFC) Yes Location Base
Services (LBS) Google Maps USB support USB 2.0, Micro USB Wi-Fi
Wi-Fi 802.11 a/b/g/n Wi-Fi Web browsing Wi-Fi Sharing
Messaging
Email client POP3, IMAP, Exchange, Gmail Voice Notes Yes
Instant messaging client
Samsung Social Hub, Google Talk Picture
messaging Yes
Video
messaging Yes
Text messaging Yes
Personalization & Fun
FM Radio No
Games Downloadable (Via Play Store) Music player Yes
Ringtones Preloaded and downloadable
Themes No
Wallpaper Preloaded and downloadable
Call Basics
Answer call
To answer a call, follow these steps:
Touch and drag the green Phone icon to the right.
Reject current call
To reject an incoming call, touch and drag the red Phone icon to the left.
Block calls
To block a call, follow these steps: Reject call with message
1. During an incoming call, touch and drag up Reject call with message. 2. Tap Send for the corresponding reject message or tap Create new message 3. Enter a custom message and tap the Send message icon.
Add contact to reject list
1. From any Home screen, tap the Apps icon. 2. Tap Contacts.
3. Tap the contact to be blocked. 4. Tap the Menu key.
5. Tap Add to reject list. A blue icon appears next to the contact number. Remove contact from the reject list
1. From any Home screen, tap the Apps icon. 2. Tap Contacts.
3. Tap the contact to be removed from the blocked call list. 4. Tap the Menu key.
5. Tap Delete from reject list. The blue icon next to contact number disappears. Add numbers to Auto reject list
To add numbers to the Auto reject list, follow these steps: 1. From any Home screen, tap the Phone icon. 2. Tap Menu key.
3. Tap Call settings. 4. Tap Call rejection. 5. Tap Auto reject mode.
6. Tap Auto reject numbers to enable. 7. Tap Auto reject list.
8. Tap Add.
9. Enter the number you want to reject.
Note: You can also tap the Contacts icon to select contacts in your logs or contact list. 10. Tap Match criteria.
11. Tap one of the following options:
o
Exactly the same aso
Start witho
Ends witho
Includes 12. Tap Save.13. If desired, tap to select the Unknown check box to block unknown callers. Note: You will receive a message notifying you when a call has been rejected. Temporarily remove numbers from Auto reject list
To temporarily remove numbers from the auto reject list, follow these steps: 1. From any Home screen, tap the Phone icon.
2. Tap Menu key. 3. Tap Call settings. 4. Tap Call rejection. 5. Tap Auto reject list.
6. Tap to clear the check box next to the number you want to remove from auto reject. Permanently remove numbers from Auto reject list
To permanently remove numbers from the auto reject list, follow these steps: 1. From any Home screen, tap the Phone icon.
2. Tap Menu key. 3. Tap Call settings. 4. Tap Call rejection. 5. Tap Auto reject list.
6. Touch and hold the number you want to delete from the auto reject list. 7. Tap Delete.
8. Tap OK.
Dial
Use the keyboard
To make a call using the keyboard, follow these steps: 1. From any Home screen, tap the Phone icon. 2. If necessary, tap the Keypad tab.
3. Enter the phone number using the keypad. 4. Tap the green Phone icon.
Use the phone book
To make a call from the phone book, follow these steps: 1. From any Home screen, tap the Phone icon. 2. Tap the Contacts tab.
3. From the contacts list, swipe from left to right across desired contact listing to place a call.
Note: You can also access your contacts list by tapping the Apps icon from any Home screen, then tapping Contacts. Use speed dial
To make a call using speed dial, follow these steps: 1. From any Home screen, tap the Phone icon. 2. If necessary, tap the Keypad tab.
3. Touch and hold the desired speed dial number on the keypad to place the call. Assign contact to speed dial number
To assign a speed dial number to a contact, follow these steps: 1. From any Home screen, tap the Phone icon. 2. If necessary, tap the Keypad tab.
3. Tap the Menu key. 4. Tap Speed dial setting.
5. Tap the desired number where the speed dial will be assigned.
6. Note: To assign a number to the keypad speed dial, choose from numbers 2-9. 7. Tap the desired contact to assign to the speed dial number.
End call
Hold call
To put a call on hold, follow these steps: Hold
To put a call on hold, tap the Hold icon. Resume
To resume a call, tap the Unhold icon
Mute and unmute call
To turn on mute during a call, follow these steps: Mute
Tap Mute. A green indicator light will turn on. Un-mute
Tap Mute. The green indicator light will turn off.
Mute incoming ring
To mute an incoming call's ring, follow these steps: Press the Volume key up or down.
Use speakerphone
To turn the speakerphone on or off, follow these steps: Turn on
Tap Speaker. A green indicator light will turn on. Turn off
Tap Speaker. The green indicator light will turn off.
Caller ID
Incoming ID - Turn on/off
Incoming caller ID shows information about incoming calls on the display screen. It automatically shows the caller's name and phone number if the contact is in the phone book. When the information is not in the phone book, it only displays the caller's number.
Outgoing ID – Enable / Restrict
To enable / restrict outgoing caller ID, follow these steps: 1. From any Home screen, tap the Phone icon. 2. If necessary, tap the Keypad tab.
3. Tap the Menu key. 4. Tap Call settings. 5. Tap Additional settings. 6. Tap Caller ID.
7. Tap Show number to enable or Hide number to restrict. Picture ID - Set
You can assign picture ID to contacts stored in the phone book, but not to those stored on the SIM card. To assign a picture to a contact, follow these steps:
1. From any Home screen, tap the Phone icon. 2. Tap the Contacts tab.
3. Scroll to and tap the desired contact. 4. Tap the Edit icon (pencil).
5. Tap the Picture icon. 6. Tap one of the following:
o
Image1. Locate and tap the desired image.
2. If desired, touch and drag the crop box to adjust image area and size. 3. Tap Done.
4. When done, tap Save.
o
Take picture2. Tap the silver Shutter icon to take the photo. 3. Tap Save.
4. If desired, touch and drag the crop box to adjust image area and size 5. Tap Done.
6. When done, tap Save. Ringer ID - Set
You can assign a ringer ID to contacts stored in the phone book, but not to those stored on the SIM card. To assign a ringer to a contact, follow these steps:
1. From any Home screen, tap the Phone icon. 2. Tap the Contacts tab.
3. Scroll to and tap the desired contact. 4. Under Ringtones, tap the current ringtone. 5. Tap one of the following options.
o
Defaulto
Ringtones1. Tap the desired ringtone. 2. Tap OK.
o
Go to my files1. Navigate to the folder of the desired ringtone.
Note: The sdcard folder is your phone’s internal memory and the extSdCard folder is your SD card (external memory).
2. Tap the Circle next to the desired ringtone. The circle fills with green. 3. Tap Done.
Call Forwarding
Cancel call forwardingTo turn off or cancel all call forwarding (including voicemail forwarding), follow these steps: 1. From any Home screen, tap the Phone icon.
2. If necessary, tap the Keypad tab. 3. Tap the Menu key.
4. Tap Call Settings. 5. Tap Call Forwarding. 6. Tap Voice call. 7. Tap Always Forward. 8. Tap Disable.
Forward all calls (unconditional forwarding)
Call Forwarding Unconditional (CFU) immediately forwards all calls to another phone number without allowing the device to ring. To activate unconditional call forwarding, follow these steps:
1. From any Home screen, tap the Phone icon. 2. If necessary, tap the Keypad tab.
3. Tap the Menu key. 4. Tap Call Settings. 5. Tap Call Forwarding. 6. Tap Voice call. 7. Tap Always Forward.
8. Enter the number you want to use for call forwarding. 9. Tap Enable.
Forward some calls (conditional forwarding)
Call Forwarding Conditional (CFC) forwards incoming calls to another phone number if you do not or cannot answer them (no reply, busy, unavailable).
To activate conditional call forwarding, follow these steps: 1. From any Home screen, tap the Phone icon. 2. If necessary, tap the Keypad tab.
3. Tap the Menu key. 4. Tap Call Settings. 5. Tap Call forwarding.
6. Tap Voice call.
7. Tap one of the following options:
o
Forward when busyo
Forward when unansweredo
Forward when unreachable8. Enter the number you would like to use for call forwarding. 9. Tap Update.
Forward calls voicemail (conditional forwarding)
Voicemail forwarding forwards incoming calls to your voicemail so that callers can leave a message. To turn on voicemail forwarding, follow these steps:
1. From any Home screen, tap the Phone icon. 2. If necessary, tap the Keypad tab.
3. Tap the Menu key. 4. Tap Call Settings. 5. Tap Call forwarding. 6. Tap Voice call.
7. Tap one of the following options:
o
Forward when busyo
Forward when unansweredo
Forward when unreachable8. Enter +18056377249 to use Forward calls to voicemail. 9. Tap Update.
Call Settings
DTMF tones - Not available
This feature is not available.Fixed dialing
Fixed dialing is not supported by brightspot.
To disable fixed dialing if you have enabled it, follow these steps: 1. From any Home screen, tap the Phone icon.
2. If necessary, tap the Keypad tab. 3. Tap the Menu key.
4. Tap Call settings. 5. Tap Additional settings. 6. Tap Fixed dialing numbers. 7. Tap Disable FDN.
8. Enter the PIN. The default PIN is 5678. 9. Tap OK.
Phone line selection - Not available
This feature is not available.Volume
Call volumeTo raise or lower the volume of the earpiece, follow these steps:
While on a call, press the Volume key up or down to raise or lower the in-call volume. Ring volume
To raise or lower the ringtone volume, follow these steps:
Press the Volume key up or down to raise or lower the Ringer volume. Note: Press the Volume key all the way down to activate Vibrate mode.
Call Timer / Call Log
Reset call log
1. From any Home screen, tap the Phone icon. 2. Tap the Logs tab.
3. Tap the Menu key. 4. Tap Delete.
5. Tap Select all to select the check box and select all call log entrees. 6. Tap Delete.
7. Tap OK. To reset individual call logs:
1. From any Home screen, tap the Phone icon. 2. Tap the Logs tab.
3. Tap the Menu key. 4. Tap Delete.
5. Tap each call log to be deleted. 6. Tap Delete.
7. Tap OK. Call timer - Not available
This feature is not available.
Call Waiting
Turn on/offTo turn on call waiting, follow these steps:
1. From any Home screen, tap the Phone icon. 2. If necessary, tap the Keypad tab.
3. Tap the Menu key. 4. Tap Call Settings. 5. Tap Additional settings.
6. Tap Call waiting to select the check box and enable. To turn off call waiting, follow these steps:
1. From any Home screen, tap the Phone icon. 2. If necessary, tap the Keypad tab.
3. Tap the Menu key. 4. Tap Call Settings. 5. Tap Additional settings.
6. Tap Call waiting to clear the check box and disable. Use
To use call waiting when you hear the tone alerting you to a new incoming call, follow these steps: 1. While already on a call, touch and drag the green phone icon to the right to answer the new call. 2. To put original caller on hold, tap Putting [Caller name] on hold.
Note: If desired, tap End call with [Caller name] to end the call with the original caller. 3. To end the call with the new caller, tap End call.
4. To switch between calls, tap Swap. 5. Tap Merge to begin a conference call.
Conference Calling
Have private conversationTo speak privately with one caller in a conference call and put the other callers on hold, follow these steps: 1. While on a conference call, tap the Menu key.
2. Tap Manage.
3. Tap the Split icon to the left of the caller you want to have the private conversation with. 4. Tap Swap to have a private conversation with the other caller.
5. Tap Merge to resume the conference call. Start conference call
To add callers to the conference call, follow these steps: 1. While on a call, tap Add call.
2. Use the keypad to enter the phone number. 3. Tap the green Phone icon to place the call. 4. Tap Merge to start the conference call.
Voice Commands
Assign a voice name to a contact This feature is not available.
Dial using voice name
To use voice-activated dialing to call a contact, follow these steps: 1. From any Home screen, tap the Apps icon.
2. Tap S Voice. 3. Tap confirm 4. Tap I agree.
5. Tap Skip to skip the tutorial. Note: Tap Next to view the tutorial.
6. If necessary, tap the Microphone icon or speak ‘Hi Galaxy.’ 7. Speak Call + [name of contact].
8. If necessary, tap the contact from the drop-down list. Setup S Voice
To setup S Voice, follow these steps:
1. From any Home screen, tap the Apps icon. 2. Tap S Voice.
3. Read the Samsung Disclaimer. 4. Tap Confirm.
5. Read the S Voice Terms of Services. 6. Tap Agree.
7. Tap Next on the About S Voice screen. 8. Tap Next on the Say what you want screen.
9. Review the information on the Wake up S Voice screen. 10. Tap Change now to change your wake up S Voice phrase. 11. Tap Next once your phrase is setup correctly.
12. Review the information on the Help screen. 13. Touch Finish.
Voicemail
Call voicemailTo retrieve voicemail messages using the keyboard, follow these steps: 1. From any Home screen, tap the Phone icon.
2. Touch and hold 1, or dial 123 and tap the green Phone icon, or tap the Voicemail icon at bottom-left to call voicemail. To retrieve voicemail messages via the device menu, follow these steps:
1. From any Home screen, tap the Apps icon. 2. Tap Visual voicemail.
3. Tap the Menu key. 4. Tap Call voicemail.
View voicemail number
To set the voicemail server number on your device, follow these steps: 1. From any Home screen, tap the Phone icon.
2. If necessary, tap the Keypad tab. 3. Tap the Menu key.
4. Tap Call Settings. 5. Tap Voicemail settings.
AllShare / AllShare Cast
With AllShare Play, you can share different media including video, photos, and music files as well as search for these media files. AllShare allows you to share media between devices that support AllShare such as televisions, mobile phones, digital cameras, and computers. Share these media types wirelessly or through a cable.
With AllShare Cast, you can share your device’s screen with another device. Note:
To share media, each device must be connected to the same Wi-Fi network.
To share media, each device must be logged into an active/registered Samsung account. For more information about AllShare, visit the following link: http://www.samsung.com/global/allshare/pcsw/.AllShare - Download to your computer (Windows)
To download the software to your computer, follow these steps:Note: At this time, AllShare Play only supports the Windows operating system. To view the most current operating systems that support AllShare, click on the link below and view the OS section at the bottom of the web page.
1. Access the following link in the computer's web browser: http://www.samsung.com/global/allshare/pcsw/. 2. Click on AllShare PC S/W Download.
3. Follow the prompts to download and install the software.
AllShare Play – Log in
To log in to the AllShare Play application, follow these steps: 1. From any Home Screen, tap the Apps icon. 2. Tap AllShare Play.
3. If prompted, read the Notification message and tap Connect to continue. Otherwise, tap Cancel. 4. Tap Sign in.
5. Tap Sign in again to log in to your Samsung account.
o
Note: If you do not have a Samsung account, tap Create a new account to open a new Samsung account. Follow the prompts.6. Enter your email address.
7. Tap the Enter password field and enter your password. 8. Tap Sign in.
9. If prompted, tap Terms and conditions and read these items and then tap OK. 10. Tap I accept all the terms above to select the check box.
11. Tap Agree.
12. If necessary, enter any additional personal information such as name or zip code in order to brighten ‘Save.’ 13. Tap Save.
AllShare Play – Set up web storage (Required)
To use AllShare Play, you must first set up web storage.Note: If you are already using a different web storage service, log into that account before using AllShare Play. To set up web storage for AllShare Play, follow these steps:
1. From any Home Screen, tap the Apps icon. 2. Tap AllShare Play.
4. Tap Sign up to create a SugarSync account with 5 GB of storage space and share you files on the “Cloud.” 5. Tap SugarSync Sign up.
6. Enter your email address.
7. Tap the Required field and enter your password.
8. Tap the second Required field and re-enter your password to confirm.
9. Tap I have read and agree to the Terms & conditions to select the check box and enable. 10. Tap Sign up.
11. Follow any additional prompts.
AllShare Play – Log out
To log out of the AllShare Play application, follow these steps: 1. From any Home Screen, tap the Apps icon. 2. Tap AllShare Play.
3. If prompted, read the Notification message and tap OK to continue. Otherwise, tap Cancel. 4. Tap the Menu key.
5. Tap My account. 6. Tap Remove account.
Note: Logging out of AllShare will also log you out of your Samsung account and any other associated applications such as Contacts, Calendar, Internet, and S Memo.
7. Tap Remove account again to confirm.
AllShare Play – Access your media files
To access your media files using AllShare Play, follow these steps: 1. From any Home Screen, tap the Apps icon.
2. Tap AllShare Play. 3. If necessary, log in.
4. Under ‘Registered Devices,’ tap your device name (the default name is Galaxy S III). 5. Tap from the following options:
o
Pictures icono
Music icono
Videos icono
Saved content iconNote: Tap the Menu key and then tap Device information to access storage information and edit settings.
AllShare Play – Share a media file with another device via streaming
To share a media file by streaming it to another device using AllShare Play, follow these steps: 1. From any Home screen, tap the Apps icon.
2. Tap AllShare Play.
3. Under ‘Registered devices’ tap your device name (the default name is Galaxy S III). 4. Tap from the following options:
o
Pictures icono
Music icono
Videos icono
Saved content icon5. Tap to select the desired file and enter a green check mark. 6. Tap the Stream to another device icon.
Note: You must be connected to a Wi-Fi network to stream the media. If necessary, connect to a Wi-Fi network when prompted.
7. Tap to select the device that will receive the streaming media. 8. On the receiving device, tap Allow.
AllShare Play – Broadcast a Screen Cast via group sharing
To share media via with a group via a Screen Cast, follow these steps:1. Connect all participating devices to the same Wi-Fi network.
2. From any Home screen, navigate to the desired file (such as an image in the Gallery). 3. Tap the Share icon, or else touch and hold on the file and tap Share or Share via. 4. If necessary, tap See all.
6. If necessary, read the Notification message and tap OK.
7. Enter a PIN that others must use to connect to the broadcast and tap Done.
Note: At this point, other participants should open the AllShare Play application, tap the Menu key, and tap Join Group Cast.
8. Tap OK.
9. If your device is secured with a PIN, enter the PIN now and tap OK.
10. If desired, use your finger or a stylus to draw on the screen. Participants will see these actions on their screen. Note: To save your updated image with any drawing or markup, you must take a screen capture of the updated image. See: Media > Screen shot.
AllShare Cast – Turn On / Off
To turn AllShare Cast on for sharing your device’s screen with another screen, or to turn off, follow these steps: 1. From any Home screen, tap the Menu key.
2. Tap Settings. 3. Tap More settings. 4. Tap AllShare Cast.
5. To turn on, tap the AllShare Cast Slider to turn on AllShare Cast. Slider moves right and turns green. 6. To turn off, tap the AllShare Cast Slider to turn off AllShare Cast. Slider moves left and turns grey.
AllShare Cast – Scan for other devices
To scan for other available devices, follow these steps: 1. From any Home screen, tap the Menu key. 2. Tap Settings.
3. Tap More settings. 4. Tap AllShare Cast.
5. If necessary, tap the AllShare Cast Slider to turn on AllShare Cast. Slider moves right and turns green. 6. Tap Scan.
AllShare - PC / DLNA TV
Note: You can also view videos available on other DLNA devices by touching the AllShare tab. To connect to a PC / DLNA TV using AllShare, follow these steps:
1. Connect all devices to the same Wi-Fi network. 2. From the Home screen, press the Menu key. 3. Tap on Settings.
4. Tap on More settings. 5. Tap on Nearby devices.
6. Check the File sharing checkbox to enable.
7. Nearby devices appears at the top of the screen in the status bar. 8. Tap OK on the Nearby devices prompt.
9. Tap on the following settings to change them:
o
Shared contents to select the media you wish to share.
Tap OK when finished.o
Device name to enter the desired name that will show on other devices.
Tap Save when finished.o
Allowed devices list to select the devices you wish to allow access to.o
Not-allowed devices list to select the devices you wish to deny access to.o
Download to to select the destination of any downloaded content.
USB Storage (phone memory)
SD Cardo
Upload from other devices to select the actions you'll take when other devices upload content to you.
Always accept
Always ask
Always reject 10. Play the desired video on your device.11. Tap the icon to share video with DLNA enabled devices.
Bluetooth®/Infrared
To transfer files using Bluetooth®, follow these steps:
Note: Bluetooth must be turned on and paired with another device. If necessary, see the Bluetooth – turn on and pair procedure. 1. Find and tap (or touch and hold on) the file you want to transfer (for example, an image in the gallery).
2. Tap the Share icon.
o
If necessary, tap the Menu key and then tap the Share icon.o
For music files in the Music player app, touch and hold on the file and then tap Share Music via. 3. If necessary, tap See all.4. From the list, tap Bluetooth. Otherwise, tap the Bluetooth icon at the top of the screen. 5. Tap the already-connected device you want to transfer the file to.
6. On the other phone, accept the file.
Bluetooth - Turn off and disconnect
To turn off Bluetooth® connectivity, follow these steps:1. From any Home screen, tap the Menu key. 2. Tap Settings.
3. Tap the Bluetooth Slider to turn off. Slider moves left and turns grey. OR
1. From any Home screen, touch and drag the Status bar down. 2. Tap Bluetooth to turn off. The green indicator light turns off.
Bluetooth - Turn on and pair
To turn on Bluetooth and pair with another device, follow these steps: 1. From any Home screen, tap the Menu key.
2. Tap Settings.
3. Tap the Bluetooth Slider to turn on. Slider moves right and turns green. 4. Tap Bluetooth.
5. On the other device, turn on Bluetooth and make it discoverable. 6. Under Available devices, tap the other device for pairing. 7. Note: Tap Scan if other device is unavailable.
8. If prompted, enter the passkey and tap OK. 9. Otherwise, tap OK to confirm passkey. 10. On the other device, accept the pairing.
11. The other device is now listed under Paired devices.
Bluetooth - Unpair from a connected device
To unpair from another Bluetooth device you are connected to, follow these steps: 1. From any Home screen, tap the Menu key.
2. Tap Settings.
3. If necessary, tap the Bluetooth Slider to turn on. Slider moves right and turns green. 4. Tap Bluetooth.
5. Under ‘Paired devices,’ tap the Settings icon to the right of the connected Bluetooth device. 6. Tap Unpair.
Data Synchronization
Disable/Enable mobile data connection
To disable your mobile data connection, follow these steps:1. From any Home screen, tap the Menu key. 2. Tap Settings.
3. Tap Data Usage.
4. Tap Mobile data to clear the check box and disable.
Note: To turn the mobile data connection back on, tap Mobile data to select the check box and enable. 5. Tap OK. Slider moves left and turns grey.
Check data usage
You can check your phone’s data usage for a desired time period. Also, you can observe the data used by each of your phone’s applications during this period.
To check your data usage, follow these steps: 1. From any Home screen, tap the Menu key. 2. Tap Settings.
3. Tap Data Usage.
4. If desired, tap Data usage cycle to select a different one-month usage period.
5. From the graph, touch and drag the vertical white bars to set a beginning and end of a time period for which to check your data usage.
6. Note: Below the graph, the dates selected will change when the bars are adjusted. 7. Below the graph, view the about [xx] used data usage value.
8. Swipe up to view a list of all of your phone’s applications and their data usage with largest usage at top to smallest usage at bottom for the time period.
Set a data usage warning
You can set a warning that notifies you when you have exceeded a data usage amount. To set a data usage warning, follow these steps:
1. From any Home screen, tap the Menu key. 2. Tap Settings.
3. Tap Data Usage.
4. From the graph, touch and drag the horizontal orange bar up or down to adjust the data value that will trigger a warning for the given time period. As you drag, the data warning value will change.
5. The data usage warning is now set.
Note: If you exceed your set data value, you will receive a notice in your Status bar.
Set a data usage limit
You can set a limit for your phone’s data usage. If this limit is reached, your phone’s mobile data connection will be disabled. To set a data usage limit, follow these steps:
1. From any Home screen, tap the Menu 2. Tap Settings.
3. Tap Data Usage.
4. Tap Set mobile data limit to select and enable. 5. Read the message and tap OK.
6. Once enabled, a new horizontal red bar enters the graph.
7. Touch and drag the horizontal red bar up or down to set your data usage limit. As you drag, the data limit value will change.
Edit application sync settings
To edit application sync settings, follow these steps: 1. From any Home screen, tap the Menu key. 2. Tap Settings.
3. From under the ‘Accounts’ section, tap the desired account (for example, MobileLife Contacts).
o
Tap Google to access Gmail accountso
Tap Microsoft Exchange ActiveSync to access Microsoft accounts--even if you logged into your account using the ‘Email’ application from the ‘Add Account’ menu.o
Tap Email for all other email accounts.4. If necessary, from the top of the screen, tap your logged in account name or tap Sync options. 5. Tap to change the sync options as desired.
Data synchronization (automatic)
To automatically synchronize data, follow these steps:1. From any Home screen, tap the Menu key. 2. Tap Settings.
o
Tap Google to access Gmail accountso
Tap Microsoft Exchange ActiveSync to access Microsoft accounts--even if you logged into your account using the ‘Email’ application from the ‘Add Account’ menu.o
Tap Email for all other email accounts.4. From the top of the screen, tap to select your logged in account name.
5. For each desired synchronization setting (for example, Sync Calendar), tap to select the check box and enable auto synchronization.
Note:
o
The auto synchronization options available will vary depending on which account you choose.o
Changes are automatically saved.Data synchronization (manual)
To manually synchronize data, follow these steps:1. From any Home screen, tap the Menu key. 2. Tap Settings.
3. From under the ‘Accounts’ section, tap the desired account (for example, MobileLife Contacts).
o
Tap Google to access Gmail accountso
Tap Microsoft Exchange ActiveSync to access Microsoft accounts--even if you logged into your account using the ‘Email’ application from the ‘Add Account’ menu.o
Tap Email for all other email accounts. 4. Perform one of the following choices:o
To automatically sync all accounts (for example, if you are logged into two Gmail accounts), tap Sync all.o
To automatically sync an individual account, from the top of the screen, tap your logged in account name, tapSync now.
Global Positioning System (GPS)
Turn on/off GPS
To turn on GPS, follow these steps:
1. From any Home screen, touch and drag the Status bar down. 2. Tap GPS. A green indicator light turns on.
OR
1. From any Home screen, tap the Menu key. 2. Tap Settings.
3. Tap Location services.
4. Tap to select the Use GPS satellites check box to enable. To turn off GPS, follow these steps:
1. From any Home screen, touch and drag the Status bar down. 2. Tap GPS. The green indicator light turns off.
OR
1. From any Home screen, tap the Menu key. 2. Tap Settings.
3. Tap Location services.
4. Tap to clear the Use GPS satellites check box and disable.
Google Maps
Find your location1. From any Home screen, tap the Apps icon. 2. Tap Maps.
3. The blue arrow shows your location. Get directions
To look up driving directions with Google Maps, follow these steps: 1. From any Home screen, tap the Apps icon.
2. Tap Maps.
3. Tap the Directions icon (road sign).
4. Tap My Location if you wish to change your current location. You can choose to:
o
Enter the desired text and tap Next or tap a selection in the drop-down list.o
Tap the My location Drop-Down Arrow and tap from the following choices:
My current location
Contacts
Point on map
My Places5. Tap End point and set your final destination. You can choose to
1. Enter the desired end point and tap Go on the keyboard or tap a selection from the drop-down list. 2. Tap the End point Drop-Down Arrow and tap one of the following:
c. Contacts d. Point on map e. My Places
6. Tap the appropriate icon for your mode of transportation: a. Driving
b. Transit c. Bicycling d. Walking 7. Tap Get directions.
Note: You can also tap Navigation to launch turn-by-turn navigation. Search for location
To search for a location with Google Maps, follow these steps: 1. From any Home screen, tap the Apps icon. 2. Tap Maps.
3. Tap the Search icon
4. Enter the desired text and tap a selection in the drop-down list or tap the keyboard Search icon. Select map mode
To select map mode with Google Maps, follow these steps: 1. From any Home screen, tap Application. 2. Tap Maps.
3. Tap the Layers icon.
4. Tap one of the following options:
o
Traffico
Satelliteo
Terraino
Transit lineso
Latitudeo
My Mapso
Bicyclingo
WikipediaInternet and Browser
Access Internet/Enter URL
To access the Internet or enter a URL on the mobile browser, follow these steps: 1. From any Home screen, tap the Apps icon.
2. Tap Internet. 3. Tap the URL field. 4. Enter the desired URL.
5. Tap a selection from the drop-down list or tap Go on the keyboard.
Add browser bookmark
To add a browser bookmark, follow these steps: 1. From any Home screen, tap the Apps icon. 2. Tap Internet.
3. Tap the URL field. 4. Enter the desired URL.
5. Tap a selection from the drop-down list or tap Go on the keyboard. 6. Tap the Menu key.
7. Tap Add bookmark.
8. If desired, change the name of the bookmark. 9. Tap Save.
Browser settings (clear cache, view history)
To clear the mobile browser cache, cookies, or history, follow these steps: Clear Cache
1. From any Home screen, tap the Apps icon. 2. Tap Internet.
3. Tap the Menu key. 4. Tap Settings.
5. Tap Privacy and security. 6. Tap Clear cache. 7. Tap OK. Delete Cookies
1. From any Home screen, tap the Apps icon. 2. Tap Internet.
3. Tap the Menu key. 4. Tap Settings.
5. Tap Privacy and security. 6. Tap Clear all cookie data. 7. Tap OK.
View history
1. From any Home screen, tap the Apps icon. 2. Tap Internet.
3. Tap the Bookmarks icon. 4. Tap the History tab. Delete History
1. From any Home screen, tap the Apps icon. 2. Tap Internet.
3. Tap the Menu key. 4. Tap Settings.
5. Tap Privacy and security. 6. Tap Clear history. 7. Tap OK.
Copy and paste text
To copy and paste text within the Web browser, follow these steps: 1. On any Web page, touch and hold on the text area.
2. A magnification box appears.
3. Drag your finger to the general area where the text will be copied. 4. Release your finger. Two highlight arrows appear.
5. Touch and drag each highlight arrow to highlight the text you want to copy. 6. At top of screen, tap the Copy icon.
7. Touch and hold a text field to paste the text. 8. Tap Paste.
Go forward/back a page
To go forward and back a page from the Web browser, follow these steps: Go forward
1. On any Web page, tap the Menu key. 2. Tap Forward.
Go back
On any Web page, tap the Back key.
Javascript enable or disable
To turn on the JavaScript setting, follow these steps: 1. From any Home screen, tap the Apps icon. 2. Tap Internet.
3. Tap the Menu key. 4. Tap Settings. 5. Tap Advanced.
6. Tap Enable JavaScript to select check box and enable.
Search within a page
To search for text within a Web page, follow these steps: 1. From any Web page, tap the Menu key. 2. Tap Find on page.
3. Enter the search text.
4. Tap the arrows to scan the document’s matches. 5. When finished, tap the check mark.
Open new window
To open a new Web browser window, follow these steps: 1. From any Web page, tap the Menu key. 2. Tap New window.
3. To navigate through the windows, tap the Windows icon at top-right. 4. Swipe left or right to the desired window.
5. Tap the window to access.
Zoom in/out
To zoom in and out on a Web page, follow these steps: Zoom in
Touch two fingers close together on the screen and spread the fingers apart to zoom in. OR
Double-tap the screen. Zoom out
Touch to fingers apart on the screen and bring together in a pinching motion to zoom out. OR
Double-tap the screen.
Near Field Communication
Near Field Communication (NFC) Explanation
Near Field Communication (NFC) is a short-range communication technology that allows you to exchange text (also known as NFC tags), share digital content such as photos and videos, and connect electronic devices with just a touch. NFC tags can include text, phone numbers, virtual business card or contact info, and website URLs. Your phone contains the NFC technology that allows you to use certain services and features that require NFC capability.
NFC - Turn on/off
To read tags or pair with an NFC-enabled Bluetooth headset, NFC must be turned on. To turn NFC on or off, follow these steps:
1. From any Home screen, tap the Menu key. 2. Tap Settings.
3. Tap More settings.
4. To turn on, tap the NFC Slider. Slider moves right and turns green. 5. To turn off, tap the NFC Slider. Slider moves left and turns grey.
NFC - Read tag
To read NFC tag information from another NFC-enabled device or from a printed tag, follow these steps: Note: NFC must be turned on. Also, tag sharing must be enabled on the other device.
1. Gently place the back of your phone against the NFC antenna location of the other device, or against the printed tag. 2. When your phone has successfully read the tag, it will play a notification sound.
3. The following tag categories can be received by your phone:
o
Pictures and videoo
Music files
After the file transfer is complete, tap one of the following options:
Play Music
Sound PlayerNote: Tap Use by default for this action to auto-select your choice for future music file transfers.
o
URL tags
URL tags will automatically open the web address they contain in your internet browsero
Contact tags
When received, tap the desired account where the contact will be stored:
MobileLife Contacts
Phone
Google4. The contact is now saved.
5. If desired, tap the Edit icon (pencil) and update the contact’s information.
NFC - Change settings
To change NFC settings follow these steps:
1. From any Home screen, tap the Menu key. 2. Tap Settings.
3. Tap More settings.
4. To enable S Beam, tap the S Beam Slider. Slider moves right and turns green. 5. To disable S Beam, tap the S Beam Slider. Slider moves left and turns grey. 6. Tap NFC.
7. If necessary, tap the NFC Slider. Slider moves right and turns green. 8. Adjust the following NFC setting:
9. Tap the Android beam Slider to enable (moves right and turns green) or disable (moves left and turns grey).
NFC - Share media and contacts using S Beam
With NFC, you can use your phone to quickly share pictures and other media.
Note: S Beam is only compatible with other S Beam compatible devices. Therefore, media sharing may fail with devices that do not support S Beam.
The following media files are available for sharing:
Contacts
Music files (using Music player app)Note: If necessary, add a music or sound file to the Music player application to make it sharable).
Pictures
Videos
Web pagesTo share media using NFC and S Beam, follow these steps: 1. On the receiving device, make sure NFC is enabled. 2. From any Home screen, tap the Menu key. 3. Tap Settings.
4. Tap More settings.
5. Tap the NFC Slider to enable NFC. Slider moves right and turns green. 6. Tap NFC.
7. If necessary, tap Android Beam then tap the Android Beam Slider to turn on. Slider moves right and turns green. 8. Tap the Back key to navigate back to the More settings menu.
9. Tap S Beam.
10. If necessary, tap the S Beam Slider to enable. The slider moves right and turns green. 11. Press the Home key.
12. Navigate to the desired media file (For example, a picture in the Gallery application).
13. Gently place the back of your phone against the NFC antenna location of the other device. For most phones, place each phone back-to-back and upright.
Note: For best results, navigate the receiving phone to its Home screen before transfer.
14. On your screen, when the “Touch to Beam” message appears, touch the file thumbnail and hold until you see the thumbnail disappears or you see following message: “Ready to send files via S Beam. Separate devices” 15. Move phones slightly away from each other.
Note:
If a contact is sent, on the other device, tap to select an account storage location for the contact.
If a music file is sent on the other device, tap an application to open the file with.NFC - Write tag - Not available
This feature is not available.Virtual Private Network (VPN)
Add new network
To add a new VPN network, follow these steps: 1. From any Home screen, tap the Menu key. 2. Tap Settings.
3. Tap More settings. 4. Tap VPN.
5. If prompted, create a password, PIN, or unlock pattern. 6. Tap Add VPN network.
7. Enter the required settings. 8. Tap Save.
Connect to network
1. From any Home screen, tap the Menu key. 2. Tap Settings.
3. Tap More settings. 4. Tap VPN.
5. Tap the desired network.
6. Enter your username and password. 7. Tap Connect.
Voice Search
Voice Search - Use
To use Google Voice Search on the Internet, follow these steps: 1. From any Home screen, tap the Apps icon.
2. Tap Google.
3. Tap the Microphone icon. 4. If necessary, tap Speak now. 5. Speak your search term.
6. If desired, at the bottom of the screen, swipe left or right to view search filter options. 7. If desired, tap a search filter option (for example, Places).
8. Tap the desired search result.
9. Note: Tap the Microphone icon at top to perform a voice search again.
Use Location - Turn on/off
‘Use Location’ allows Google to use your physical location to improve your search results and other services. To turn on or turn off ‘Use Location,’ follow these steps:
Turn on
1. From any Home screen, tap the Menu key. 2. Tap Settings.
3. Tap Location services.
4. Tap to select the Location and Google search check box and enable. Turn off
1. From any Home screen, tap the Menu key. 2. Tap Settings.
3. Tap Location services.
4. Tap to clear the Location and Google search check box and disable.
SafeSearch - Not supported
This feature is not supported.
Wi-Fi
Wi-Fi - Turn on/off
To turn on Wi-Fi, follow these steps:
1. From any Home screen, touch and drag the Status bar down. 2. Tap the Wi-Fi icon to enable. A green indicator light turns on. OR
2. Tap Settings.
3. Tap the Wi-Fi Slider to turn on Wi-Fi. Slider moves right and turns green. To turn off Wi-Fi, follow these steps:
1. From any Home screen, touch and drag the Status bar down. 2. Tap the Wi-Fi icon to disable. The blue indicator light turns off. OR
1. From any Home screen, tap the Menu key. 2. Tap Settings.
3. Tap the Wi-Fi Slider to turn off Wi-Fi. Slider moves left and turns grey.
Wi-Fi calling - Not supported
This feature is not supported.
Tethering and Wi-Fi sharing
Set up mobile hotspot1. To set up or configure a mobile hotspot over Wi-Fi, follow these steps: 2. From any Home screen, tap the Menu key.
3. Tap Settings. 4. Tap More settings.
5. Tap Tethering and Mobile HotSpot. 6. Tap Mobile HotSpot.
7. Tap Configure.
Note: Tap Show advanced options to show all the setting options. 8. Tap to adjust the following settings:
Network SSID
Broadcast network name (SSID) (on/off)
Security Password Broadcast channel Maximum connections 9. Tap Save.
Turn on / off mobile hotspot
To turn on or turn off a mobile hotspot over Wi-Fi, follow these steps:
1. From any Home screen, tap the Menu key. 2. Tap Settings.
3. Tap More settings.
4. Tap Tethering and Mobile HotSpot.
5. To turn off, tap the Mobile Hotspot Switch to Off. The Switch moves left and turns grey. 6. To turn on, tap the Mobile HotSpot Switch to On. The Switch moves right and turns green. First time use
Note: If you are turning on the HotSpot for the first time, you must create a password before using the Mobile HotSpot. When you turn on the HotSpot, you will be prompted to create a Wi-Fi password. When the pop-up window appears (pictured below), tap the Password field and enter the password (passwords must be at least eight characters) and then tap Save.
Tethering via USB
To share you mobile data connection with a computer over a USB cable, follow these steps: 1. Connect your phone to your USB cable.
2. Connect the other end of the USB cable to your computer. 3. From any Home screen, tap the Menu key.
4. Tap Settings. 5. Tap More settings.
6. Tap Tethering and Mobile HotSpot.
7. To share your connection, tap USB tethering to select the check box. Tap OK if you would like to learn more about tethering.
8. When finished sharing your connection, tap USB tethering to clear the check box. 9. Disconnect the USB cable.
Customize (keys, name)
Greeting/name tag - Not available
This feature is not available.Program name and number
This feature offers a storage location for your name and contact information. Although you can add phone numbers using this procedure, your T-Mobile phone number is not affected.
To program your name and number, follow these steps: 1. From any Home screen, tap the Phone icon. 2. Tap the Contacts tab.
3. Under ME, tap your profile at top of Contact list. 4. Tap Edit icon (pencil).
5. If desired, change your profile name. 6. If desired, tap Add another field.
7. Tap to add profile information from the Add another field list. Repeat as desired. 8. When finished, tap Save.
Blocking Mode
Blocking mode on/offWith blocking mode, you can customize which features provide you with notifications. To turn blocking mode on or off, follow these steps:
1. From any Home screen, tap the Menu key. 2. Tap Settings.
3. To turn on, tap the Blocking mode Slider. Slider moves right and turns green. 4. To turn off, tap the Blocking mode Slider. Slider moves left and turns grey. Blocking mode - Adjust settings
With blocking mode, you can customize which features provide you with notifications. To adjust your Blocking mode settings, follow these steps:
1. From any Home screen, tap the Menu key. 2. Tap Settings.
3. Blocking mode must be enabled to adjust settings. If necessary, tap the Blocking mode Slider to enable. Slider moves right and turns green.
4. Tap to adjust the following settings:
o
Disable incoming calls (on/off)o
Disable notifications (on/off)o
Disable alarm and timer (on/off)o
Disable LED indicator (on/off)o
Set timeo
Allowed contactso
Allowed contacts listHome Screen
Add widget, shortcut, or folder
To add a widget, shortcut, or folder to the Home screen, follow these steps: 1. Navigate to the Home screen where you want to add the item.