White Eco-SOL™ INK for the Roland
SOLJET® SC-545EX Printer/Cutter
Setup/Workflow Document
Requirements:
• SC-545
• Roland VersaWorks 1.3.1 or higher
• BENES Online Dryer (recommended)
The purpose of this document is to explain the printer configuration and setup procedures involved when using the new Eco-Sol White Ink system with the Roland SC-545EX printer/cutter.
Note: These steps cover setup of new SC-545 printer/cutters. Printers that
have been previously inked can not be used as a white ink device.
Printer Settings
1. Prior to filling ink on a new SC-545, power up the printer in Service Mode and, while in the Service Menu, change the following system switch:
Page 7 – Change bit number eight (8) from the default, zero (0) to one (1).
Note: Bit numbers are counted from right to left so bit number eight (8) will be the first bit position from the left.
2. Using the sub-power button, cycle power to the printer. The printer should start up in the user mode.
3. Select the menu option for CMYKWW and fill ink as prompted. 4. Perform a TEST PRINT to check nozzles.
5. Perform a bi-directional adjustment as necessary. 6. Set PREFEED to ENABLED.
7. Set FEED FOR DRY to ENABLED. 8. Set EDGE DETECTION to DISABLE RIP settings:
Install the Latest version of Roland VersaWorks™.
The newest version of Roland VersaWorks, (version 1.3.1 or higher) contains quality settings specifically developed for white ink printing. File Creation
You will be creating two files for the use of white ink. Figure A
Color File – This will be like any other file created for inkjet printing.
White File – This will contain the areas you would like to print white. This area should be 100% black in the design program you are working in. If different levels of white are desired, use
Figure B different values of just black.
Roland VersaWorks Workflow
To describe this part of the workflow, let’s first examine the different settings available in the newest version of Roland VersaWorks.
Navigate to Edit > Queue A Setting > Select the Quality button > Under Media Type, select ESP-CL : Clear PET Film. Once selected, you will have access to the Mode section. Figure B.
CMYK [v]
This mode is for printing color on the Clear PET when no white ink will be used in the project.
CMYK [v] onWhite
This mode is used for printing the color file when white has printed first.
CMYK [v] underWhite
This is used when the color is printed first and then the white file is printed over the color. This is used for “view through” applications.
CMYK [v] OnWhite W-Pass and CMYK [v] UnderWhite W-Pass
These are used for the same purpose as above, but with double the amount of printing passes for higher quality printing.
White [v] W-Pass
This mode will be used when printing the white file only.
These mode settings are available in both ECL : Clear PET Film and SP-CLT : PET Clear Film, Adhesive
Now that you are familiar with the different modes used in the white ink workflow, here are the steps that need to be taken when processing files for these types of projects.
Printer Settngs
1. Set the printer’s [PREFEED] to Enabled.
On the printer, press the menu button. Navigate to [PREFEED] > select [ENABLED] and press enter to save the setting.
This will prefeed the media before printing. This is done to eliminate the weight of the roll on media from causing
White File Color File
registration inaccuracies.
2. Set the printer’s [FEED FOR DRY] to Enabled.
On the printer, press the menu button. Navigate to [FEED FOR DRY] > select [ENABLED] and press enter to save the setting.
This will feed the final part of the print over the recommended Benes online Dryer, giving all printed material equal amount of time over the dryer.
3. Set the printer’s [EDGE DETECTION] to disabled.
On the printer, press the menu button. Navigate to [EDGE DETECTION] > select [DISABLED] and press enter to save the setting.
This disables the sensor that detects the front edge of the media. Because we are using clear media, if enabled, the sensor would not be able to detect the edge of the material.
VersaWorks Settings and Procedures (white ink printed first) White File
1. Add White file to one of the Queues in VersaWorks.
2. Double click on the White file to access the Job Properties
window.
3. Navigate to the Quality section. Select either ESP-CL : Clear
PET Film or SP-CLT : PET Clear Film Adhesive.
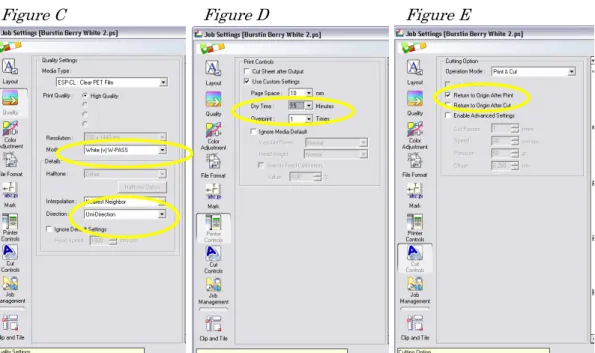
4. Select White [v] W-Pass as the mode. Figure C.
5. Select Uni-Direction next to direction. Figure C.
6. Navigate to the Printer Control section and check Use
Custom Settings. Change the dry time to 15 minutes. Figure D
7. Navigate to the Cut Controls section and check Return to
Origin After Print. Figure E.
Figure E Figure D
8. Select OK to save the changes you have made to the Job Settings.
9. Print the White File.
The printer will prefeed the amount of media needed, print the white ink, feed the media over the dryer, and after 15 minutes, return to the original media position in preparation for printing the Color file. DO NOT remove the media at this time, if media is unloaded and reloaded, correct registration between the two files will be shifted.
Color File
10.Add Color File to one of the Queues in VersaWorks.
11.Double click on the Color File to access the job properties
window.
12.Navigate to the Quality section, select the same media as
you did for the White file. ECL : Clear PET Film or SP-CLT : PET Clear Film Adhesive
13.Select CMYK [v] OnWhite or CMYK [v] OnWhite W-Pass as
the mode.
14.Select Uni-Direction next to direction.
15.Select OK to save the changes you have made to the Job
Settings.
16.Print the Color File.
VersaWorks Settings and Procedures (white ink printed last) view through applications.
Color File
1. Add Color file to one of the Queues in VersaWorks.
2. Double click on the Color file to access the Job Properties
window.
3. Navigate to the Layout section and check the Mirror
selection.
4. Navigate to the Quality section. Select either ESP-CL : Clear
PET Film or SP-CLT : PET Clear Film Adhesive.
5. Select CMYK [v] UnderWhite or CMYK [v] UnderWhite
W-Pass as the mode.
6. Select Uni-Direction next to direction.
7. Navigate to the Printer Control section and check Use
Custom Settings. Change the dry time to 15 minutes.
8. Navigate to the Cut Controls section and check Return to
9. Select OK to save the changes you have made to the Job Settings.
10.Print the Color File.
The printer will prefeed the amount of media needed, print the Color File, feed the media over the dryer, and after 15minutes, it will return to the original media position in preparation for printing the White File. DO NOT remove the media at this time, if media is unloaded and reloaded, correct registration between the two files will shifted.
White File
11.Add White File to one of the Queues in VersaWorks.
12.Double click on the White File to access the job properties
window.
13.Navigate to the Layout section and check the Mirror
selection.
14.Navigate to the Quality section, select the same media as
you did for the Color file. ECL : Clear PET Film or SP-CLT : PET Clear Film Adhesive
15.Select White [v] W-Pass as the mode.
16.Select Uni-Direction next to direction.
17.Navigate to the Printer Control section and check Use
Custom Settings. Change the dry time to 15 minutes.
18.Select OK to save the changes you have made to the Job
Settings.
19.Print the White File.
Contour Cutting
If the project requires a contour cut, follow the steps above and add the cut data to the last file you will be printing. For example, if you are printing color OnWhite, you would add your cut contour information to the color file because it is printed last. If you are using color UnderWhite, the cut contour information would be with the white file.