An Introduction to
Graphics Programming
with
Tutorial and Reference Manual
Toby Howard
School of Computer ScienceUniversity of Manchester
Contents
1 About this manual 1
1.1 How to read this manual . . . 1
1.2 Join the Bug Club . . . 1
1.3 Acknowledgements . . . 1
PART I OpenGL Tutorial 3 2 Introduction to OpenGL 5 2.1 What is OpenGL? . . . 5
2.2 A whirlwind tour of OpenGL . . . 5
2.3 What is Mesa? . . . 7
2.4 Using OpenGL away from the School . . . 8
2.5 Resources and further reading . . . 8
2.6 About the notation used in this manual . . . 9
2.7 What next? . . . 10
3 Getting started with OpenGL 11 3.1 Compiling usingcogl . . . 11
3.2 Try some other examples . . . 12
3.3 Yet more examples . . . 12
3.4 What next? . . . 12
4 Beginning OpenGL programming 13 4.1 The OpenGL model . . . 13
4.2 Platform- and device-independence . . . 13
4.3 Example 1: a bare-bones program . . . 14
4.4 Callback functions . . . 15 i
4.5 The main event loop . . . 17
4.6 Example 2: a keyboard event callback . . . 17
4.7 Example 3: customizing the window . . . 19
4.8 What next? . . . 20
5 2D and 3D graphics 21 5.1 Example 4: drawing a 2D triangle . . . 21
5.2 Viewing using the camera . . . 22
5.3 The window reshape function . . . 24
5.4 Example 5: a 3D cube with perspective projection . . . 25
5.5 What next? . . . 26
6 Animated graphics 27 6.1 Example 6: a rotating cube . . . 27
6.2 Double-buffering and animation . . . 29
6.3 Exercise: smooth the cube . . . 30
6.4 Example 7: rotating objects following the mouse . . . 31
6.5 What next? . . . 31
PART II OpenGL Reference Manual 33 7 Graphics primitives 35 7.1 Coordinate systems . . . 35
7.2 Defining a vertex . . . 36
7.3 OpenGL function flavours . . . 36
7.4 Defining shapes: primitives . . . 36
7.5 Drawing points . . . 37 7.6 Drawing lines . . . 37 7.7 Drawing triangles . . . 39 7.8 Drawing quadrilaterals . . . 40 7.9 Drawing polygons . . . 40 7.10 GLUT’s primitives . . . 42
8 Modelling using transformations 45 8.1 Vectors and matrices . . . 45
CONTENTS iii
8.3 Selecting the current matrix . . . 46
8.4 Setting the current matrix . . . 46
8.5 Operating on the current matrix . . . 48
8.6 Using the matrix stacks . . . 49
8.7 Creating arbitrary matrices . . . 50
9 Viewing 53 9.1 Controlling the camera . . . 53
9.2 Projections . . . 55
9.3 Setting the viewport . . . 57
9.4 Using multiple windows . . . 58
9.5 Reversing the viewing pipeline . . . 58
10 Drawing pixels and images 61 10.1 Using object coordinates as pixel coordinates . . . 61
10.2 Setting the pixel drawing position . . . 62
10.3 Drawing pixels . . . 62
11 Displaying text 65 11.1 GLUT’s bitmap fonts . . . 65
11.2 Drawing a single character . . . 66
11.3 Drawing a text string . . . 66
12 Interaction 67 12.1 Keyboard events . . . 67
12.2 Mouse events . . . 68
12.3 Controlling the mouse cursor . . . 68
12.4 Menu events . . . 69
13 Colour 73 13.1 RGB colour in OpenGL . . . 73
14 Retained data 75 14.1 Immediate mode vs retained mode . . . 75
14.2 Retained mode . . . 76
14.3 Using display lists . . . 76
15 State 79
15.1 State enquiries . . . 79
15.2 Enquiring the viewing state . . . 80
16 Lighting 81 16.1 The OpenGL lighting model . . . 81
16.2 Hidden surface removal . . . 82
16.3 Defining lights . . . 84
16.4 Defining the shading model . . . 86
16.5 Defining materials . . . 86
16.6 Defining lights . . . 87
16.7 The lighting equation . . . 88
A The cogl script 91 B Using a makefile 93 C Advanced matrix operations 95 C.1 How an OpenGL matrix is stored . . . 95
Chapter 1
About this manual
This manual is in two parts: the first (Chapters 2 to 6) is a hands-on Tutorial, which uses a series of example programs to illustrate some of the main features of OpenGL. The second part (Chapter 7 onwards) is a Reference Manual, which describes some OpenGL functions in detail.
1.1
How to read this manual
If you’re a newcomer to OpenGL, we recommend that you first read the tutorial chapters, in order, and experiment with the example programs on-line. These chapters introduce the basic concepts of OpenGL, and cover the details of how to compile and run OpenGL C programs using our local GNU/Linux installation.
The reference chapters are intended to support the lecture material and the laboratory programming exercises.
1.2
Join the Bug Club
In the highly unlikely event that you find a bug in this manual, please email us the details. Suc-cessful correspondents will receive honorary membership of the Bug Club. Send bug reports to
1.3
Acknowledgements
It’s a pleasure to thank Alan Murta and Julien Cartigny for helping with parts of this manual. And thank you to all the people who have made their excellent GNU/Linux software freely available: Mesa (which includes GLU) was written by Brian Paul (www.mesa3d.org). GLUT was originally written by Mark J. Kilgard, who kindly provided additional help, although we now use the freeglut implementation (freeglut.sourceforge.net).
Part I
OpenGL Tutorial
Chapter 2
Introduction to OpenGL
In recent years OpenGL has become a worldwide standard for 3D computer graphics programming. It’s very widely used: in industry, in research laboratories, in computer games – and for teaching computer graphics.
OpenGL is a powerful, professional-level system, and it would take a manual much thicker than this one to describe all its facilities completely. We have selected a subset of OpenGL – a portion of OpenGL’s functionality which is relevant to the COMP20072 Interactive Graphics course, and sufficient to support its programming labs.
2.1
What is OpenGL?
OpenGL has it origins in the earlier GL (“Graphics Library”) system which was invented by Silicon Graphics Inc. as the means for programming their high-performance specialised graphics worksta-tions. As time went on, people became interested in porting GL to other kinds of machine, and in 1992 a variation of GL – called OpenGL – was announced. Unlike GL, OpenGL was specifically designed to be platform-independent, so it would work across a whole range of computer hardware – not just Silicon Graphics machines. The combination of OpenGL’s power and portability led to its rapid acceptance as a standard for computer graphics programming.
OpenGL itself isn’t a programming language, or a software library. It’s the specification of an Appli-cation Programming Interface (API) for computer graphics programming. In other words, OpenGL defines a set of functions for doing computer graphics.
What you actually use to do your graphics is an implementation of OpenGL. We use a free software system called Mesa, which we’ll describe in Section 2.3.
2.2
A whirlwind tour of OpenGL
What exactly can OpenGL do? Here are some of its main features:
• It provides 3D geometric objects, such as lines, polygons, triangle meshes, spheres, cubes, quadric surfaces, NURBS curves and surfaces;
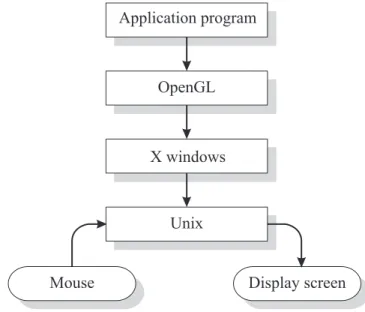
Figure 2.1: Where OpenGL fits in – a high-level view.
• It provides 3D modelling transformations, and viewing functions to create views of 3D scenes using the idea of a virtual camera;
• It supports high-quality rendering of scenes, including hidden-surface removal, multiple light sources, material types, transparency, textures, blending, fog;
• It provides display lists for creating graphics caches and hierarchical models. It also supports the interactive “picking” of objects;
• It supports the manipulation of images as pixels, enabling frame-buffer effects such as anti-aliasing, motion blur, depth of field and soft shadows.
Figure 2.1 shows the relationship between an application and OpenGL in our local GNU/Linux envi-ronment. An application programmer sees OpenGL as a single library providing a set of functions for graphical input and output. In fact, it’s slightly more complicated than that.
2.2.1 The support libraries: GLU and GLUT
A key feature of the design of OpenGL is the separation of interaction (input and windowing func-tions) from rendering. OpenGL itself is concerned only with graphics rendering. You can always identify an OpenGL function: all OpenGL function names start with “gl”.
Over time, two utility libraries have been developed which greatly extend the low-level (but very efficient) functionality of OpenGL. The first is the “OpenGL Utility Library”, or GLU. The second is the “OpenGL Utility Toolkit”, or GLUT:
• GLU provides functions for drawing more complex primitives than those of OpenGL, such as
curves and surfaces, and also functions to help specify 3D views of scenes. All GLU function names start with “glu”.
2.3. WHAT IS MESA? 7
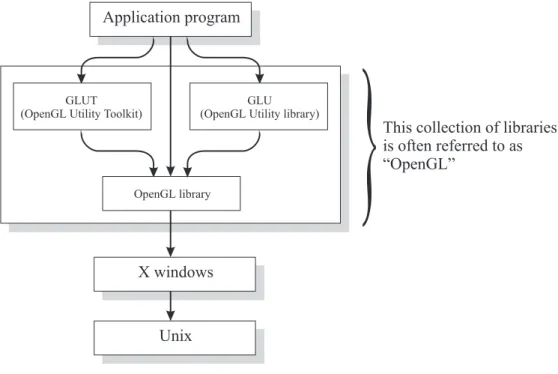
Figure 2.2: What is commonly called “OpenGL” is actually a set of three libraries: OpenGL itself, and the supporting libraries GLU and GLUT.
• GLUT provides the facilities for interaction that OpenGL lacks. It provides functions for
man-aging windows on the display screen, and handling input events from the mouse and keyboard. It provides some rudimentary tools for creating Graphical User Interfaces (GUIs). It also in-cludes functions for conveniently drawing 3D objects like the platonic solids, and a teapot. All GLUT function names start with “glut”.
Figure 2.2 shows the relationships between OpenGL, GLU, and GLUT. As you can see, it’s helpful to think of “layers” of software, where each layer calls upon the facilities of software in a lower layer. However, somewhat confusingly, when most people say “OpenGL”, what they really mean is “OpenGL plus GLU plus GLUT”. It’s a slightly lazy terminology, but we’ll use it too.
2.3
What is Mesa?
Mesa is a C implementation of a graphics system that looks extremely similar to the official OpenGL specification. (We can’t actually say “Mesa is an implementation of OpenGL” for legal reasons. But, for all intents and purposes, it is really.)
Whereas OpenGL is intended to run on machines which have graphics support in hardware, Mesa doesn’t require the presence of any special 3D graphics acceleration hardware – although it can cer-tainly take advantage of it if it’s there. Of course, the performance of the graphics will be better with hardware acceleration, but it’s still remarkably good without it on a reasonably fast PC.
2.4
Using OpenGL away from the School
Mesa has been ported to many different platforms, including GNU/Linux, SunOS, DOS, Windows, and OS/2. In the School, however, we currently support Mesa only on GNU/Linux.
If you wish to run Mesa on GNU/Linux away from the School, refer to our local OpenGL Web pages (see Section 2.5.1), which explain where to get the software, and give some installation guidelines. For any other platform – specifically Windows – see the next section for pointers to resources.
2.5
Resources and further reading
Here are some useful resources, and suggestions for further reading, should you wish to find out more.
2.5.1 On-line resources
• The Moodle Graphics Programmers’ forum at
moodle.cs.man.ac.uk/mod/forum/view.php?id=579
is for the place to go for graphics queries and chat. Post your OpenGL programming queries here, and help others with theirs.
• Please don’t use the local newsgroup man.cs.graphics – it’s deprecated. Use Moodle instead. • Our local OpenGL Web pages: www.cs.man.ac.uk/applhax/OpenGL. Check here for
up-to-date details of the local installation.
• Local example programs: we have a number on-line, in /opt/info/courses/OpenGL/examples.
• The official home of OpenGL on the Web: www.opengl.org. Lots of pointers to on-line infor-mation, tutorials, example programs, and downloadable software.
• The USENET OpenGL newsgroup: comp.graphics.api.opengl. This can be a great source of help and information, for newcomers and experts alike. However, note that it is highly
inadvisable to post pages of source code saying “my program doesn’t work”. As with all
newsgroups, lurk for a while and get a feel of the etiquette before posting.
2.5.2 Books
• Interactive Computer Graphics: A Top-Down Approach with OpenGL by Edward Angel.
Addison-Wesley, ISBN 0-201-85571-2. General introduction to computer graphics for people new to the subject. This is a recommended textbook for the COMP20072 course.
• OpenGL Programming Guide, Fifth Edition: The Official Guide to Learning OpenGL, Version 1.2 by Mason Woo et al. Addison-Wesley, 0321335732. Also known as “The Red
Book”, provides complete coverage of OpenGL from simple to advanced, with many code examples. Assumes familiarity with C, some maths, geometry. The coverage of this book far exceeds the material taught in COMP20072. Earlier editions of this book are available free online – see http://www.opengl.org/documentation/red book/.
2.6. ABOUT THE NOTATION USED IN THIS MANUAL 9
2.5.3 Technical documentation
• You can find detailed technical OpenGL specification documents at www.opengl.org/documentation/.
2.6
About the notation used in this manual
Experienced C programmers might wish to skip this section.
In this manual, when we introduce a new OpenGL function, we’ll give its definition, followed imme-diately by a description of what it does.
To take an example at random, here’s the definition of the GLUT function which draws a sphere, which you’ll meet on page 42:
void glutWireSphere ( GLdouble radius, GLint slices, GLint stacks );
What this notation means is the following:
• The name of the function is glutWireSphere();
• The result type of the function isvoid;
• The function has three arguments:
– radius, of typeGLdouble
– slices, of typeGLint
– stacks, of typeGLint
To actually use this function in your program, you would do something like this:
GLdouble rad= 1.0; GLint sl= 15; GLint st= 20;
glutWireSphere (rad, sl, st);
Or, you could set the arguments directly, without declaring variables:
glutWireSphere (1.0, 15, 20);
Note that OpenGL defines its own names for data types, all of which begin withGL. Examples are:
GLdouble,GLint,GLfloat. The reason it’s done like this is to make the specification of OpenGL language-independent. In most cases, it’ll be obvious what the data type means –GLint, for example, is GL’s name for an integer, or anintin C. Where it isn’t obvious, we’ll tell you.
glutWireSphere() draws a sphere, of radiusradius, centred on(0,0,0)in object co-ordinates. slicesis the number of subdivisions around theZ axis (like lines of lon-gitude);stacksis the number of subdivisions along theZ axis (like lines of latitude). Solid version: glutSolidSphere().
2.7
What next?
Chapter 3
Getting started with OpenGL
This chapter explains how to compile and link C programs with OpenGL using our local installation. There are two different ways to do this:
• Using the command cogl – this is handy for compiling single standalone OpenGL
pro-grams, and is the recommended way for compiling programs in the COMP20072 lab;
(coglis a Perl script and lives in/opt/common/bin).
• Using a makefile – this is a more flexible approach, necessary for larger projects which use more than one source file. Use of a makefile is not recommended for the COMP20072 lab. See Appendix B for a sample makefile.
3.1
Compiling using
cogl
coglis a command we’ve written locally to make compiling single programs with OpenGL as simple as possible. (The Perl source code of cogl is listed in Appendix A).
We’ll use the example programthegears.cto illustrate the use ofcogl.
First, make sure you are running X Windows. Then, select an appropriate directory to work in, and take your own private copy of the programthegears.c, as follows (the stringpunter$stands for whatever command prompt your shell window displays):
punter$ cp /opt/info/courses/OpenGL/examples/thegears.c .
(Don’t forget that dot (.) as the second argument tocp.) You compile and link the program as follows:
punter$ cogl thegears.c
This will produce an executable program calledthegears, which you run as follows:
punter$ thegears
You should see a square OpenGL window appear on your display, with something interesting happen-ing within it. Move your mouse into the OpenGL window, and presshon the keyboard to bring up the help screen. Experiment with the program as it suggests.
3.2
Try some other examples
There are a number of other example programs in/opt/info/courses/OpenGL/examples/, which we’d encourage you to copy, compile and play with. Here are some we recommend.
• tori: some doughnuts. Move the mouse slowly;
• teapots: draws our teapot collection;
• morph3d: might remind you of a certain screensaver;
• reflect: reflective texture mapping. Try the arrow keys;
• pointblast: a simple particle system. Try the mouse buttons;
• star: moving starfield. Hittto warp;
• lorenz: chaos. Have aspirins handy.
3.3
Yet more examples
Here are some other examples to try, again in /opt/info/courses/OpenGL/examples/. These are part of thexscreensavercollection, and are already compiled for you, so justcdto that directory, and run the programs. You’ll have to type control-c in your shell to stop them running:
• moebius: ants crawl inexplicably around a moebius strip;
• sproingies: multi-coloured bouncy things tumble down an infinite staircase, and occasion-ally explode;
• superquadrics: 3D shapes morph into each other, based on the “superquadric” objects developed by American graphics researcher Alan Barr;
• cage: be amazed as OpenGL draws an impossible object.
3.4
What next?
Chapter 4
Beginning OpenGL programming
In this and the next two chapters, we introduce the basic ideas of OpenGL in a tutorial fashion, using a series of example programs.
4.1
The OpenGL model
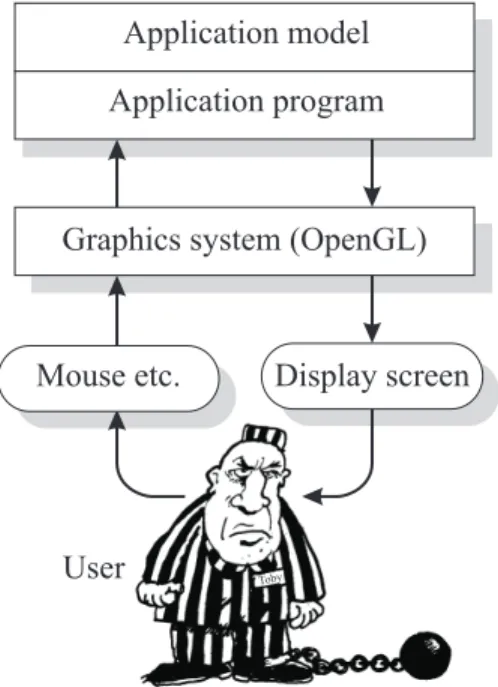
Figure 4.1 shows the relationships between an application program, the graphics system, input and output devices, and the user.
The application program has its own internal model of what it’s doing – its own interpretation of what the graphics it’s manipulating actually means. It draws the graphics using the facilities of the
graphics system – in our case, OpenGL. The user views the graphics, and uses input devices, such as
a mouse, to interact. Information about the user’s interactions are sent back to the application, which decides what action to take. Typically, it will make changes to its internal model, which will cause the graphics to be updated, and so another loop in the interaction cycle begins.
4.2
Platform- and device-independence
As we saw in Chapter 2, OpenGL is designed to be platform-independent and device-independent, so it isn’t concerned with the exact makes and models of graphics display and interaction hardware it uses. Instead, OpenGL functions refer to windows and events:
• An OpenGL window is a rectangular area on a physical display screen into which OpenGL draws graphics. Usually, an OpenGL window corresponds exactly to a window managed by the “window manager”, such as X. (It’s also possible to have multiple OpenGL windows simulta-neously active on a single display – see Section 9.4.)
• An OpenGL event occurs when the user operates an input device. In order to respond to the input event, the application must provide a C function – known as a callback function – to handle the event; OpenGL automatically calls the application’s function, passing it the event data.
Figure 4.1: The graphical interaction loop.
In fact, OpenGL doesn’t draw its graphics directly to the window. It actually draws into a data structure (an array of pixels) inside OpenGL called the frame-buffer, often just called the buffer. Periodically, OpenGL copies the pixels in the frame buffer into the window. More on this in Section 6.2.
4.3
Example 1: a bare-bones program
We’ll begin with the simplest possible OpenGL program. It’sex1.c in theexamplesdirectory. Take a copy of this program, and compile it withcogl:
punter$ cp /opt/info/courses/OpenGL/examples/ex1.c . punter$ cogl ex1.c
When you runex1, you should see an OpenGL window appear. To stop the program running, place your mouse inside the shell window from which you ran the program, and hitcontrol-c.
Here’s the code forex1.c:
/* ex1.c */
#include <GL/glut.h> void display (void) {
/* Called when OpenGL needs to update the display */ glClear (GL_COLOR_BUFFER_BIT); /* Clear the window */
glFlush(); /* Force update of screen */ }
4.4. CALLBACK FUNCTIONS 15
int main (int argc, char **argv) {
glutInit (&argc, argv); /* Initialise OpenGL */ glutCreateWindow ("ex1"); /* Create the window */
glutDisplayFunc (display); /* Register the "display" function */ glutMainLoop (); /* Enter the OpenGL main loop */ return 0;
}
/* end of ex1.c */
The program begins with
#include <GL/glut.h>
All OpenGL programs must start with this line, which accesses all the OpenGL include files: it pulls in all the function prototypes and other definitions used by OpenGL. Miss it out, andcoglwill flatly refuse to compile your program.
ex1.ccontains two functions: display(), andmain(). The execution of all C programs starts atmain(), so we’ll start there too.
We first call the glutInit() function:
void glutInit ( int *argc, char **argv );
glutInit() initializes the GLUT library, and it must be called before any other GLUT function.argc
andargv should be the arguments of the application’s main() – glutInit() understands several command-line options, which are beyond the scope of this manual (see the GLUT manual for details). Next, we call glutCreateWindow():
int glutCreateWindow ( char *name );
glutCreateWindow() creates an OpenGL window for rendering and interaction, withnamedisplayed in its titlebar. GLUT assigns this window an integer identifier, returned as the result of the function. The window identifier is used when writing OpenGL programs which use multiple windows (de-scribed in Section 9.4). By default, the window has a size of(300,300)pixels, and its position is up to the window manager to choose. If the functions glutInitWindowSize() or
glutInitWindowPosi-tion() (page 19) have already been called, their arguments will control the size and position of the
window.
Next comes a call to glutDisplayFunc(), and this is a bit more interesting. It’s an example of one of the cornerstones of OpenGL programming, which we’ll need to look at in detail – the use of callback
functions.
4.4
Callback functions
A callback function, more often just called a callback, is a C function, written by the application pro-grammer. In programex1.c,display()is the only callback function we define. But there’s one
important difference between a callback function and an ordinary C function: the application never calls the callback function directly. Instead, the callback function is called by OpenGL, whenever OpenGL decides it needs to be called.
Inex1.c, we use the most basic callback of all – a function that draws the graphics that we want OpenGL to display. We use glutDisplayFunc() to tell OpenGL which application function it should call whenever it needs to refresh the window to draw graphics:
void glutDisplayFunc ( void (*func)(void) );
glutDisplayFunc() registers the name of the callback function to be invoked when OpenGL needs to
redisplay (or display for the first time) the contents of the window. The application must register a display function – it isn’t optional.
The argument of glutDisplayFunc() is rather cryptic, and worth a closer look:
void (*func)(void)
This says thatfunc() must be a function which returns void, and has no arguments. In other words, a function likedisplay():
void display (void) {
/* Called when OpenGL needs to update the display */ glClear (GL_COLOR_BUFFER_BIT); /* Clear the window */
glFlush(); /* Force update of screen */ }
So to summarise, in our example the line:
glutDisplayFunc (display); /* Register the "display" function */
tells OpenGL to call the application’s functiondisplay()function whenever it needs to redraw the graphics.
It’s up to the application to define what thedisplay()function does – who else could know? In
ex1.c, thedisplay()function doesn’t do much: it simply calls glClear():
void glClear ( GLbitfield mask );
glClear() clears one or more of OpenGL’s buffers, specified bymask. In this manual, we’ll only be concerned with one buffer, the frame buffer, which holds the pixels which will be copied to the window. This has the special nameGL COLOR BUFFER BIT. When glClear() is called, each pixel in the buffer is set to the current clear colour, which is set to black by default. You set the current clear colour using the function glClearColor() (see page 74).
Now we have a call to glFlush():
void glFlush ( void );
The purpose of this function is to instruct OpenGL to make sure the screen is up to date – it causes the contents of any internal OpenGL buffers are “flushed” to the screen. Note that you only ever
4.5. THE MAIN EVENT LOOP 17 need to call glFlush() when you’re not using double-buffering (which we’ll meet in Chapter 6). In practice, most OpenGL programs will use double-buffering – to stop screen flicker – but for now in these simple examples we’re not using it just yet.
What would happen if we didn’t call glFlush() at the end ofdisplay()? Then, we couldn’t guar-antee that the screen will show the up-to-date picture. And that’s clearly not desirable for a real-time interactive graphics program!
4.5
The main event loop
glutMainLoop() starts the GLUT “event processing” loop: void glutMainLoop ( void );
Once started, this loop will carry on for as long as the program is running. Each time around the loop, GLUT checks to see if anything has changed since last time, and calls the appropriate callback functions.
In pseudocode, the action of glutMainLoop() is this:
while (1) { /* loop forever */
if (the application has changed the graphics) { call the DISPLAY callback function;
}
if (the window has been moved or resized) { call the RESHAPE callback function; }
if (any keyboard and/or mouse events have happened) { call the KEYBOARD and/or MOUSE callback function; }
call the IDLE callback function; } /* while */
We’ll ignore thereshape()function for now, returning to it in Section 5.3. And we’ll look at the
idle()function in Section 6.1.
4.6
Example 2: a keyboard event callback
As we saw above, quittingex1.cmust be done from the command-line, which isn’t very nice from a user-interface point of view. Here’s how we can do it better, using a callback, in programex2.c:
/* ex2.c */
#include <GL/glut.h> #include <stdio.h>
void display (void) {
/* Called when OpenGL needs to update the display */ glClear (GL_COLOR_BUFFER_BIT); /* Clear the window */
glFlush(); /* Force update of screen */ }
void keyboard (unsigned char key, int x, int y) { /* Called when a key is pressed */
if (key == 27) exit (0); /* 27 is the Escape key */ else printf ("You pressed %c\n", key);
}
int main(int argc, char **argv) {
glutInit (&argc, argv); /* Initialise OpenGL */ glutCreateWindow ("ex2"); /* Create the window */
glutDisplayFunc (display); /* Register the "display" function */ glutKeyboardFunc (keyboard); /* Register the "keyboard" function */ glutMainLoop (); /* Enter the OpenGL main loop */
return 0; }
/*end of ex2.c */
Tryex2.cout.
The addition we’ve made is to tell OpenGL what to do when it detects a keyboard event. We tell it to call the functionkeyboard()using glutKeyboardFunc():
void glutKeyboardFunc ( void (*func)(unsigned char key, int x, int y) );
glutKeyboardFunc() registers the application function to call when OpenGL detects a key press
generating an ASCII character. This can only occur when the mouse focus is inside the OpenGL window.
Again, the specification of the argument type is a bit cryptic. It says that it expects a functionfunc()
which returnsvoid, and has the three argumentskey,xandy. So, it’s a function like this:
void keyboard (unsigned char key, int x, int y) { /* Called when a key is pressed */
}
Three values are passed to the callback function:keyis the ASCII code of the key pressed;xandy
give the pixel position of the mouse at the time.
Back toex2.c – inside thekeyboard() callback, we look at the value ofkey. If it’s27 (the ASCII code for theescapekey – surely you knew that!) we call the standard C functionexit()
to terminate the program cleanly; otherwise, we print (in the shell window) a message saying which key was pressed. Note thatex2.cneeds an extra#includeline:
4.7. EXAMPLE 3: CUSTOMIZING THE WINDOW 19 because we’re using theprintf()function.
Note: glutKeyboardFunc() only responds to pressed keys which have single ASCII codes. For other keys, such as the arrow or function keys, use the glutSpecialFunc() function (page 67).
4.7
Example 3: customizing the window
Inex3.cwe add a few new functions to give us better control over the drawing window:
/* ex3.c */
#include <GL/glut.h> void display (void) {
/* Called when OpenGL needs to update the display */ glClearColor (1.0,1.0,1.0,0.0);
glClear (GL_COLOR_BUFFER_BIT); /* Clear the window */
glFlush(); /* Force update of screen */ }
void keyboard (unsigned char key, int x, int y) { /* Called when a key is pressed */
if (key == 27) exit (0); /* 27 is the Escape key */ }
int main(int argc, char **argv) {
glutInit (&argc, argv); /* Initialise OpenGL */
glutInitWindowSize (500, 500); /* Set the window size */ glutInitWindowPosition (100, 100); /* Set the window position */ glutCreateWindow ("ex3"); /* Create the window */
glutDisplayFunc (display); /* Register the "display" function */ glutKeyboardFunc (keyboard); /* Register the "keyboard" function */ glutMainLoop (); /* Enter the OpenGL main loop */
return 0; }
/* end of ex3.c */
Tryex3.cout.
First, we specify a size and position for the window using glutInitWindowSize():
void glutInitWindowSize ( int width, int height );
glutInitWindowSize() sets the value of GLUT’s initial window size to the size specified bywidth
Similarly, glutInitWindowPosition() sets the value of GLUT’s initial window position:
void glutInitWindowPosition ( int x, int y );
xandygive the position of the top left corner of the window measured in pixels from the top left
corner of the X display.
4.8
What next?
Chapter 5
2D and 3D graphics
In this chapter we start doing some graphics. We’ll begin by extendingex3.cto do some 2D drawing – just a triangle, but it’ll serve to illustrate how drawing works in OpenGL.
5.1
Example 4: drawing a 2D triangle
ex4.cdraws a triangle, using the coordinates shown in Figure 5.1.
Figure 5.1: The triangle from exampleex4.c. It’s defined on theZ = 0plane. TheZ axis comes out of the page towards you.
Here’s the code:
/* ex4.c */
#include <GL/glut.h> void display (void) {
/* Called when OpenGL needs to update the display */ glClear (GL_COLOR_BUFFER_BIT); /* Clear the window */ glLoadIdentity ();
gluLookAt (0.0, 0.0, 0.5, 0.0, 0.0, 0.0, 0.0, 1.0, 0.0);
glBegin (GL_LINE_LOOP); /* Draw a triangle */ glVertex3f(-0.3, -0.3, 0.0);
glVertex3f(0.0, 0.3, 0.0); glVertex3f(0.3, -0.3, 0.0); glEnd();
glFlush(); /* Force update of screen */ }
void keyboard (unsigned char key, int x, int y) { /* Called when a key is pressed */
if (key == 27) exit (0); /* 27 is the Escape key */ }
void reshape (int width, int height)
{ /* Called when the window is created, moved or resized */ glViewport (0, 0, (GLsizei) width, (GLsizei) height);
glMatrixMode (GL_PROJECTION); /* Select the projection matrix */ glLoadIdentity (); /* Initialise it */
glOrtho(-1.0,1.0, -1.0,1.0, -1.0,1.0); /* The unit cube */ glMatrixMode (GL_MODELVIEW); /* Select the modelview matrix */ }
int main(int argc, char **argv) {
glutInit (&argc, argv); /* Initialise OpenGL */
glutInitWindowSize (500, 500); /* Set the window size */ glutInitWindowPosition (100, 100); /* Set the window position */ glutCreateWindow ("ex4"); /* Create the window */
glutDisplayFunc (display); /* Register the "display" function */ glutReshapeFunc (reshape); /* Register the "reshape" function */ glutKeyboardFunc (keyboard); /* Register the "keyboard" function */ glutMainLoop (); /* Enter the OpenGL main loop */
return 0; }
/* end of ex4.c */
Tryex4.cout. You should see a white triangle on a black background.
Although this is a simple example, it illustrates one of the most crucial aspects of OpenGL– viewing. OpenGL is a system for drawing 3D graphics. But display screens are 2D – they’re flat. Figure 5.2 shows the situation.
In exampleeg4.c, we draw the triangle on theZ = 0plane. But this is still 3D graphics!
5.2
Viewing using the camera
The idea of creating a 2D view of a 3D scene is simple: we “take a picture” of the scene using a
camera, and display the camera’s picture in the window on the display screen. For convenience,
OpenGL splits the process into three separate steps:
glu-5.2. VIEWING USING THE CAMERA 23
Figure 5.2: OpenGL’s 3D “world”, and the 2D display screen.
LookAt();
• Step two: Second, we decide what kind of projection we’d like the camera to create. We can
choose an orthographic projection (also known as a parallel projection) using the function
glOrtho() (page 56); or a perspective projection using the function gluPerspective() (page 56);
• Step three: Finally, we specify the size and shape of the camera’s image we wish to see in
the window, using glViewport() (page 58). This last step is optional – by default the camera’s image is displayed using the whole window.
In OpenGL, the camera model described above is always active – you can’t switch it off. It’s imple-mented using transformation matrices, and we describe this in detail in Chapter 9. For now, here’s a brief description of the process.
OpenGL keeps two transformation matrices: the modelview matrix,M; and the projection matrix,
P. The modelview matrix holds a transformation which composes the scene in world coordinates, and then takes a view of the scene using the camera (step one, above). The projection matrix applies the camera projection (step two, above).
Whenever the application program specifies a coordinatecfor drawing, OpenGL transforms the co-ordinate in two stages, as follows, to give a new coco-ordinatec′. First it transforms the coordinatecby
the matrixM, and then by the matrixP, as follows:
c′ =P ·M·c
When an OpenGL application starts up,P andM are unit matrices – they apply the identity
trans-formation to coordinates, which has no effect on the coordinates. It’s entirely up to the application
to ensure that theM andP matrices always have suitable values. Normally, an application will setM
5.3
The window reshape function
After creating the window, and registering the display and keyboard callbacks, we now register a new function, thereshape()callback:
void glutReshapeFunc ( void (*func)(int width, int height) );
glutReshapeFunc() registers the application callback to call when the window is first created, and also
if the window manager subsequently informs OpenGL that the user has reshaped the window. The new height and width of the window, in pixels, are passed to the callback. Typically, the callback will use these values to define the way that OpenGL’s virtual camera projects its image onto the window, as we see in the next section.
5.3.1 Specifying the projection
We usually specify the projection in thereshape() callback function, because the projection will often need to be adjusted if the user changes the shape of the window. In exampleex4.cwe use an orthographic (also known as “parallel”) projection:
void reshape (int width, int height)
{ /* Called when the window is created, moved or resized */ glViewport (0, 0, (GLsizei) width, (GLsizei) height);
glMatrixMode (GL_PROJECTION); /* Select the projection matrix */ glLoadIdentity ();
glOrtho(-1.0,1.0, -1.0,1.0, -1.0,1.0); /* The unit cube */ glMatrixMode (GL_MODELVIEW); /* Select the modelview matrix */ }
We begin by setting the viewport using glViewport(), which specifies a rectangular portion of the window in which to display the camera’s image. As in this example, it’s common to use the the whole of the window, so we set the viewport to be a rectangle of equal dimensions to the window. We’ll look at glViewport() in detail in Section 9.3.
Next, we set up an orthographic projection. glMatrixMode() (page 47) selects which matrix subse-quent functions will affect – in this case we select the projection matrix (P). Then we initialise it to the unit transformation with glLoadIdentity() (page 48). This is very important, as we shall see in a moment. Then, we select the orthographic projection using glOrtho() (page 56). The projection we’ve chosen maps a unit cube, centred on the origin, onto the viewport.
glOrtho() actually does two things: first it creates a new temporary matrix (let’s call itT) to implement the projection, and then it multipliesP withT, as follows:
P =P·T
That’s why we need to make sureP is initialised to the unit transformation first.
Note that thereshape()function ends with another call to glMatrixMode(), which this time se-lects the modelview matrix (M) for subsequent modification, for when we position the camera in the
5.4. EXAMPLE 5: A 3D CUBE WITH PERSPECTIVE PROJECTION 25
5.3.2 Positioning the camera
This is usually done in the application’sdisplay()function, using the function gluLookAt(). We’ll describe this function in detail in Section 9.1. In ex4.c, we use it to position the camera on theZ
axis at(0.0,0.0,0.5), looking towards the origin:
glLoadIdentity (); /* start with a unit modelview matrix */ gluLookAt (0.0, 0.0, 0.5, /* position of camera */
0.0, 0.0, 0.0, /* point at which camera looks */ 0.0, 1.0, 0.0); /* "up" direction of camera */
Again, because gluLookAt() creates a new transformation and multiplies it into the current matrix (M in this case), we need to ensure thatM is first initialised using glLoadIdentity().
5.4
Example 5: a 3D cube with perspective projection
We now turn to 3D drawing, andex5.cdraws a cube, centred on the origin:
/* ex5.c */
#include <GL/glut.h> void display (void) {
/* Called when OpenGL needs to update the display */ glClear (GL_COLOR_BUFFER_BIT); /* Clear the window */ glLoadIdentity ();
gluLookAt (0.0, 0.0, 5.0, 0.0, 0.0, 0.0, 0.0, 1.0, 0.0); glutWireCube(2.0);
glFlush(); /* Force update of screen */ }
void keyboard (unsigned char key, int x, int y) { /* Called when a key is pressed */
if (key == 27) exit (0); /* 27 is the Escape key */ }
void reshape (int w, int h) {
/* Called if the window is moved or resized */ glViewport (0, 0, (GLsizei)w, (GLsizei)h); glMatrixMode (GL_PROJECTION);
glLoadIdentity ();
gluPerspective (60, (GLfloat)w / (GLfloat)h, 1.0, 100.0); glMatrixMode (GL_MODELVIEW);
}
int main(int argc, char **argv) {
glutInit (&argc, argv); /* Initialise OpenGL */ glutInitWindowSize (500, 500); /* Set the window size */ glutInitWindowPosition (100, 100); /* Set the window position */ glutCreateWindow ("ex5"); /* Create the window */
glutKeyboardFunc (keyboard); /* Register the "keyboard" function */ glutReshapeFunc (reshape); /* Register the "reshape" function */ glutMainLoop (); /* Enter the OpenGL main loop */ return 0;
}
/* end of ex5.c */
Tryex5.cout.
Indisplay(), we call glutWireCube(), which draws a wire-frame cube (see page 42). This time, however, we view it using a perspective projection as specified in ourreshape()function:
gluPerspective (60, /* field of view in degrees */
(GLfloat)w / (GLfloat)h, /* aspect ratio of view */ 1.0, 100.0); /* near and far clipping planes */
gluPerspective() sets a perspective projection, so we see the kind of view a camera would normally
give, where lines further away from the viewer appear smaller. Here, we specify a field of view of 60 degrees, and an aspect (width-to-height) ratio for the view which exactly matches the aspect ratio of the window. We’ll explain the use of clipping planes in Chapter 9.
5.5
What next?
Chapter 6
Animated graphics
Computer graphics really comes to life when we draw images that move.
6.1
Example 6: a rotating cube
In this next example –ex6.c– we’ll make OpenGL spin the cube about its centre. Have a look at the code, then take a copy of the program, and compile and run it:
/* ex6.c */
#include <GL/glut.h> GLfloat angle= 0.0; void spin (void) {
angle+= 1.0; glutPostRedisplay(); } void display(void) { glClear (GL_COLOR_BUFFER_BIT); glLoadIdentity (); gluLookAt (0.0, 0.0, 5.0, 0.0, 0.0, 0.0, 0.0, 1.0, 0.0); glRotatef(angle, 1, 0, 0); glRotatef(angle, 0, 1, 0); glRotatef(angle, 0, 0, 1); glutWireCube(2.0);
glFlush(); /* Force update of screen */ }
void reshape (int w, int h) {
glViewport (0, 0, (GLsizei)w, (GLsizei)h); glMatrixMode (GL_PROJECTION);
glLoadIdentity ();
gluPerspective (60, (GLfloat) w / (GLfloat) h, 1.0, 100.0); glMatrixMode (GL_MODELVIEW);
}
void keyboard(unsigned char key, int x, int y) {
if (key == 27) exit (0); /* escape key */ }
int main(int argc, char **argv) { glutInit(&argc, argv);
glutInitWindowSize (500, 500); glutInitWindowPosition (100, 100);
glutCreateWindow ("ex6: A rotating cube."); glutDisplayFunc(display);
glutReshapeFunc(reshape); glutKeyboardFunc(keyboard);
glutIdleFunc(spin); /* Register the "idle" function */ glutMainLoop();
return 0; }
/* end of ex6.c */
You should see the cube rotating, but in a rather broken-up sort of way. We’ll come back to that in a moment.
The engine behind the animation is the event loop. Using glutIdleFunc(), we register an application callback function that gets called each time around the glutMainLoop():
void glutIdleFunc ( void (*func)(void) );
glutIdleFunc() registers a callback which will be automatically be called by OpenGL in each cycle
of the event loop, after OpenGL has checked for any events and called the relevant callbacks. Inex6.c, the idle function we’ve registered is calledspin():
void spin (void) { angle+= 1.0;
glutPostRedisplay(); }
Firstspin()increments the global variableangle. Then, it calls glutPostRedisplay(), which tells OpenGL that the window needs redrawing:
void glutPostRedisplay ( void );
glutPostRedisplay() tells OpenGL that the application is asking for the display to be refreshed.
OpenGL will call the application’sdisplay()callback at the next opportunity, which will be during the next cycle of the event loop.
Note: While OpenGL is processing a single cycle of the event loop, several callbacks may call glut-PostRedisplay(). Nevertheless, OpenGL won’t actually call the display callback until all outstanding
events have been dealt with. And, within one cycle of the event loop, a succession of outstanding calls to glutPostRedisplay() will be treated as a single call to glutPostRedisplay(), so display callbacks will only be executed once – which is probably what you want.
6.2. DOUBLE-BUFFERING AND ANIMATION 29
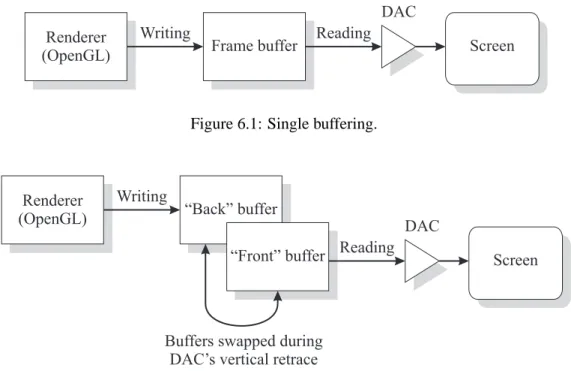
Figure 6.1: Single buffering.
Figure 6.2: Double buffering.
6.2
Double-buffering and animation
As we saw, the rotating cube looks horrible. Why?
The problem is that OpenGL is operating asynchronously with the refreshing of the display. OpenGL is pumping out frames too fast: it’s writing (into the frame-buffer) a new image of the cube in a slightly rotated position, before the previous image has been completely displayed.
Recall the architecture of raster displays: as shown in Figure 6.1, the pixel data is stored in the frame buffer, which is repeatedly read (typically at 60 Hz) by the digital-to-analogue converter (DAC) to control the intensity of the electron beam as it sweeps across the screen, one scan-line at a time. With a single frame-buffer, the renderer (OpenGL) is writing pixel information into the buffer at the same
time the DAC is reading the information out. If the writer and the reader are out of sync, the reader can
never be guaranteed to read and display a complete frame – so the viewer always sees images which comprise part of one frame and part of another. This is very disturbing to the eye – and destroys any possibility of seeing smooth animation.
One solution is to use an additional buffer, as shown in Figure 6.2. The idea here is that one buffer, called the “back buffer” is only ever written to by the renderer. The other buffer – the “front buffer” – is only ever read by the DAC. The renderer writes its new frame into the back buffer, and when that’s done, it then requests that the back and front buffers be swapped over. The trick is to perform the swapping while the DAC is performing its vertical retrace, which is when it’s finished a complete sweep of its buffer, and is resetting to begin again. There’s enough slack time here to swap the contents of the two buffers over. This method will ensure that the DAC only ever reads and displays a complete frame.
ex6.c. But we can tell OpenGL to use double-buffering, using glutInitDisplayMode():
void glutInitDisplayMode ( unsigned int mode );
glutInitDisplayMode() sets the current display mode, which which will be used for a window
cre-ated using glutCreateWindow().modeis:
• GLUT SINGLE: selects a single-buffered window – which is the default if
glutInitDisplay-Mode isn’t called;
• GLUT DOUBLE: selects a double-buffered window;
(There are more display modes, beyond the scope of this manual. For a full description, see the GLUT manual or the Red Book.)
For example, to select a double-buffered window you would call:
glutInitDisplayMode (GLUT_DOUBLE); glutCreateWindow ("my window");
Once we’re using double-buffering, we can tell OpenGL that a frame is complete, and that the buffers should be swapped using glutSwapBuffers():
void glutSwapBuffers ( void );
glutSwapBuffers() swaps the back buffer with the front buffer, at the next opportunity, which is
normally the next vertical retrace of the monitor. The contents of the new back buffer (which was the old front buffer) are undefined.
Note: Swapping the buffers doesn’t have the side effect of clearing any buffers. Clearing a buffer
must be done explicitly by the application, by calling glClear(). Note again that now we’re using double-buffering, it’s no longer necessary to use glFlush().
6.3
Exercise: smooth the cube
Edit your copy ofex6.cas follows:
• In main(), after the call to glutInit(), insert a call to glutInitDisplayMode() to select a double-buffered window;
• Indisplay(), after the call to glutWireCube(), insert a call to glutSwapBuffers().
• Also, remove the call to glFlush(). We don’t need that anymore, since it gets called internally by
glutSwapBuffers(). And if we leave glFlush() in the code, not only will its effect be redundant,
but it’ll also slow the program down. See the difference? Smooth animation!
6.4. EXAMPLE 7: ROTATING OBJECTS FOLLOWING THE MOUSE 31
6.4
Example 7: rotating objects following the mouse
Finally, we now extendex6.cto display a few different objects, and to follow the mouse around. We won’t describe the code here – have a look atex7.con-line for yourself. And try running it. Cycle between the various objects by pressing thespacekey.
The main new functions we use are glutPassiveMotionFunc() (page 68) and gluUnProject() (page 59).
6.5
What next?
This is the end of the Tutorial section of the manual. The remaining chapters form the OpenGL Reference Manual.
Part II
OpenGL Reference Manual
Chapter 7
Graphics primitives
In this chapter we describe the coordinate system OpenGL uses, and some of the OpenGL graphics primitives.
7.1
Coordinate systems
OpenGL uses right-handed Cartesian coordinate systems, as shown in Figure 7.1.
Figure 7.1: A right-handed coordinate system. The positiveZaxis comes out of the page.
By convention, we draw the positiveXaxis heading rightwards, the positiveY axis heading vertically, with the positiveZaxis heading out of the page towards you.
All the OpenGL functions which create graphical primitives such as lines and polygons work in object
coordinates. OpenGL automatically transforms object coordinates, first by the modelview matrix
(M) and then by the projection matrix (P). We describe the modelview matrix and the projection matrix in Chapters 8 and 9.
7.2
Defining a vertex
The basic building block for creating graphics with OpenGL is a point in 3D space. To describe a shape, you specify the set of points that together make up the shape. In OpenGL terminology, a point in 3D space is called a vertex.
You define a single vertex using the function glVertex3f():
void glVertex3f ( GLfloat x, GLfloat y, GLfloat z );
Here, the “3f” part of the function name means that the function takes three arguments, each of which is aGLfloat. As we described in Section 2.6, GL uses its own data types. GLfloatis equivalent to the C typefloat.
So, for example, to define the vertex at (10,8,5), shown in Figure 7.1, you would call:
glVertex3f (10.0, 8.0, 5.0);
7.3
OpenGL function flavours
Many OpenGL functions come in several flavours. For example, suppose you only ever want to do 2D drawing, so you’re only concerned with specifying vertices in theXY plane, and all vertices will have aZ coordinate of 0. To make life easier, OpenGL offers a variant form of the glVertex3f() function, called glVertex2f():
void glVertex2f ( GLfloat x, GLfloat y );
Internally, this function still creates a 3D vertex, but it sets itsZcoordinate to0.0for you, to save you the bother. But in this manual, we will always use the 3D form of functions – the less functions we have to remember, the better!
7.4
Defining shapes: primitives
A vertex on its own isn’t very interesting. Now we look at how to group vertices together into vertex
lists, which define geometrical shapes. The grouping of vertices is done with the glBegin() and glEnd() functions:
void glBegin ( GLenum mode );
glBegin() defines the start of a vertex list. modedetermines the kind of shape the vertices describe, which can be:
7.5. DRAWING POINTS 37
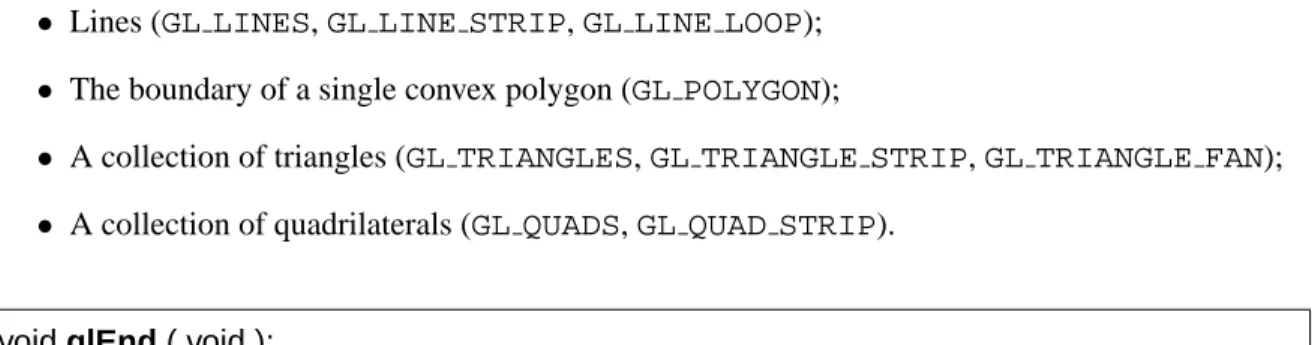
• Lines (GL LINES,GL LINE STRIP,GL LINE LOOP);
• The boundary of a single convex polygon (GL POLYGON);
• A collection of triangles (GL TRIANGLES,GL TRIANGLE STRIP,GL TRIANGLE FAN);
• A collection of quadrilaterals (GL QUADS,GL QUAD STRIP).
void glEnd ( void );
glEnd() defines the end of a vertex list.
7.5
Drawing points
We use the followingmodein glBegin() to draw points:
• GL POINTS: each vertex represents a point.
glBegin (GL_POINTS); glVertex3f (0.0, 6.0, 4.0); glVertex3f (0.0, 8.0, 0.0); glVertex3f (8.0, 6.0, 0.0); glVertex3f (8.0, 3.0, 0.0); glVertex3f (6.0, 0.0, 5.0); glVertex3f (2.0, 0.0, 5.0); glEnd ();
7.6
Drawing lines
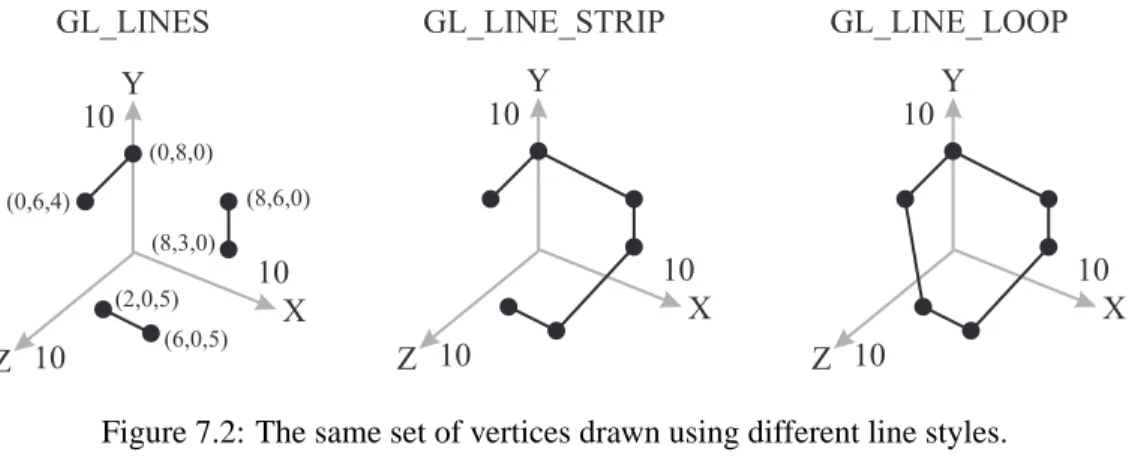
In the function glBegin(), the values ofmodewhich interpret vertices as points to connect with lines are:
• GL LINES: each pair of vertices is drawn as a separate line.
• GL LINE STRIP: all the vertices are joined up with lines.
• GL LINE LOOP: all the vertices are joined up with lines, and an extra line is drawn from the last vertex to the first.
Figure 7.2 illustrates how the same set of vertices can be drawn as lines in different ways according tomode:
glBegin (GL_LINES); /* or GL_LINE_STRIP or GL_LINE_LOOP */ glVertex3f (0.0, 6.0, 4.0);
glVertex3f (0.0, 8.0, 0.0); glVertex3f (8.0, 6.0, 0.0);
glVertex3f (8.0, 3.0, 0.0); glVertex3f (6.0, 0.0, 5.0); glVertex3f (2.0, 0.0, 5.0); glEnd ();
Figure 7.2: The same set of vertices drawn using different line styles.
As well as geometry, primitives also have attributes, which control ther visual style.
7.6.1 Line attributes
void glLineWidth ( GLfloat width );
glLineWidth() sets the curent line width, measured in pixels. The default value is 1.0. void glLineStipple ( GLint factor,
GLushort pattern );
glLineStipple() sets the stippling pattern for lines, which enables lines to be drawn in a flexible variety
of dot/dash patterns. By default, stippling is switched off (see Section 7.6.2), and must be enabled by calling:
glEnable(GL_LINE_STIPPLE);
Line stippling works on a pixel-by-pixel basis, as the line is rendered into the frame buffer.pattern
is a 16-bit series of 0s and 1s. When OpenGL renders a line, for each pixel it is about to write, it first consults the next bit inpattern, starting at the low-order bit, If this bit is a 1, the pixel is written, in the current drawing colour. If the bit is a 0, the pixel is not written.
For example, suppose the pattern specified was (to choose a random example) 0x3E1F. In binary this is:
0011 1110 0001 1111
So, when drawing a line, OpenGL would draw the first 5 pixels on, the next 4 off, then one on, the next five on, and the next 2 off. For the next pixel, OpenGL would return to the low-order bit of the pattern, and repeat.
7.7. DRAWING TRIANGLES 39
factoris a way of elongating the pattern – it multiplies each sub-sequence of consecutive 0s and 1s. For example, if factor=3, then if the bit series 0110 appeared in the pattern, it would be “stretched” to be 01111110.
Handy values ofpattern, withfactorset to 1.0, are:
Pattern Rough idea of what the line looks like 0x1111 . . . .
0x3333 .. .. .. .. .. .. .. 0x0F0F .... .... .... .... 0xAAAA . . . . 0xFFFF ...
7.6.2 Enabling OpenGL capabilities
void glEnable ( GLenum capability );
void glDisable ( GLenum capability );
OpenGL has a number of capabilities which by default are not active – for reasons of efficiency. These include lighting, texturing, hidden surface removal and line stippling. To use one of these capabilities, it must be explicitly “enabled” by the application, using glEnable(). The capability may be subsequently disabled using glDisable(). Some of the valid values ofcapabilityare:
• GL LINE STIPPLE
• GL LIGHTING
• GL FOG
• GL DEPTH TEST
7.7
Drawing triangles
The different values ofmodein glBegin() to create triangles are:
• GL TRIANGLES: each triplet of points is drawn as a separate triangle. If the number of vertices is not an exact multiple of 3, the final one or two vertices are ignored.
• GL TRIANGLE STRIP: constructs a set of triangles with the vertices v0, v1, v2 then v2, v1, v3 then v2, v3, v4 and so on. The ordering is to ensure that the triangles are all drawn correctly form part of surface.
• GL TRIANGLE FAN: draws a set of triangles with the vertices v0, v1, v2 then v0, v2, v3 then v0, v3, v4 and so on. glBegin (GL_TRIANGLES); glVertex3f (0.0, 6.0, 4.0); glVertex3f (0.0, 8.0, 0.0); glVertex3f (8.0, 6.0, 0.0); glVertex3f (8.0, 3.0, 0.0); glVertex3f (6.0, 0.0, 5.0); glVertex3f (2.0, 0.0, 5.0); glEnd ();
7.8
Drawing quadrilaterals
We can use two values formodein glBegin() to create quadrilaterals.
• GL QUADS: each set of four vertices is drawn as a separate quadrilaterals. If the number of vertices is not an exact multiple of 4, the final one, two or three vertices are ignored.
• GL QUAD STRIP: constructs a set of quadrilaterals with the vertices v0, v1, v3, v2 then v2, v3, v5, v4 then v4, v5, v7, v6 and so on.
glBegin (GL_QUADS); /* or GL_QUAD_STRIP */ glVertex3f (0.0, 6.0, 4.0); glVertex3f (0.0, 8.0, 0.0); glVertex3f (8.0, 6.0, 0.0); glVertex3f (8.0, 3.0, 0.0); glVertex3f (6.0, 0.0, 5.0); glVertex3f (2.0, 0.0, 5.0); glEnd ();
7.9
Drawing polygons
We draw a polygon using the followingmodein glBegin():
• GL POLYGON: the vertices define the boundary of a single convex polygon.
The polygon specified must not intersect itself and must be convex. Figure 7.3 shows a polygon with 5 vertices, drawn with the following code:
glBegin (GL_POLYGON) glVertex3f (0.0, 6.0, 0.0); glVertex3f (0.0, 6.0, 6.0); glVertex3f (6.0, 6.0, 6.0); glVertex3f (9.0, 6.0, 2.0); glVertex3f (9.0, 6.0, 0.0); glEnd ();
7.9. DRAWING POLYGONS 41
Figure 7.3: A simple polygon with 5 vertices.
For efficiency and simplicity, OpenGL only guarantees to draw a polygon correctly if it’s convex. A polygon is convex if, taking any pair of points inside the polygon and drawing a straight line between them, all points along the line are also inside the polygon. Figure 7.4 shows a few examples of convex polygons (on the left) and non-convex polygons (on the right).
Note: to draw a non-convex polgyon in OpenGL, it must first be broken into a set of convex polygons,
each of which is then drawn separately. This process is called tesselation, and non-convex polygons can be broken down this way. GLU provides a set of functions for doing this – see the Red Book, Chapter 11.
Polygons must also be planar (completely flat) if they are to be rendered correctly.
Figure 7.4: Convex polygons (left) and non-convex polygons (right).
7.9.1 Polygon attributes
void glPolygonMode ( GLenum face, GLenum mode );
facecan beGL FRONT,GL BACKorGL FRONT AND BACK.modecan beGL FILL, orGL LINE.
7.10
GLUT’s primitives
GLUT provides a number of functions for easily drawing more complicated objects. Each comes in two versions: wire and solid. The wire forms are drawn using lines (GL LINEorGL LINE LOOP); the solid forms use polygons (with surface normals, suitable for creating lit, shaded images). Note that these objects do not use display lists (see Chapter 14).
7.10.1 Cube
void glutWireCube ( GLdouble size );
glutWireCube() draws a cube, with edge lengthsize, centred on(0,0,0)in object coordinates. Solid version: glutSolidCube().
7.10.2 Sphere
void glutWireSphere ( GLdouble radius, GLint slices, GLint stacks );
glutWireSphere() draws a sphere, of radius radius, centred on (0,0,0) in object coordinates.
slicesis the number of subdivisions around theZ axis (like lines of longitude); stacks is the number of subdivisions along theZ axis (like lines of latitude). Solid version: glutSolidSphere().
7.10.3 Cone
void glutWireCone ( GLdouble base, GLdouble height, GLint slices, GLint stacks );
glutWireCone() draws a cone, with base radiusradius, and heightheight. The cone is oriented along theZ axis, with the base placed atZ = 0, and the apex atZ =height. slicesis the number of subdivisions around theZ axis; stacksis the number of subdivisions along the Z axis. Solid
7.10. GLUT’S PRIMITIVES 43 version: glutSolidCone().
void glutWireTorus ( GLdouble innerRadius, GLdouble outerRadius, GLint nsides,
GLint rings );
glutWireTorus() draws a torus centred on(0,0,0) in object coordinates. The axis of the torus is aligned with theZ axis. innerRadiusandouterRadiusgive the inner and outer radii of the torus respectively; nsidesis the number of sides in each radial section, andringsis the number of radial sections. Solid version: glutSolidTorus().
7.10.4 Platonic solids
void glutWireTetrahedron ( void );
glutWireTetrahedron() draws a tetrahedron (4-sided regular object) of radius√3centred on(0,0,0)
in object coordinates. Solid version: glutSolidTetrahedron().
void glutWireOctahedron ( void );
glutWireOctahedron() draws an octahedron (8-sided regular object) of radius1centred on(0,0,0)
in object coordinates. Solid version: glutSolidOctahedron().
void glutWireDodecahedron ( void );
glutWireDodecahedron() draws a dodecahedron (12-sided regular object) of radius√3centred on
(0,0,0)in object coordinates. Solid version: glutSolidDodecahedron().
void glutWireIcosahedron ( void );
glutWireIcosahedron() draws an icosahedron (20-sided regular object) of radius1centred on(0,0,0)
in object coordinates. Solid version: glutSolidIcosahedron().
7.10.5 Teapot
void glutWireTeapot ( GLdouble scale );
Chapter 8
Modelling using transformations
This chapter is about modelling: we explain how to use transformations to assemble 3D scenes. Chapter 9 explains how to create a view of the scene using the camera model.
8.1
Vectors and matrices
We saw in Section 7.1 that a 3D vertex – a point in space – is represented asx, y, z, mathematically, we write a 3D point as a column vector: If we have a pointp, we write it as:
p← x y z 1
You’ll notice the extra ‘1’ at the bottom of the vector – this is known as a homogeneous representation. To cut a long story short, the use of such vector representations is a mathematical trick which allows all common transformation types to be expressed in a consistent manner using4×4matrices.
Warning: beware that some Computer Graphics textbooks represent coordinates as row vectors.
Using row vectors doesn’t change the basic methods used for matrix transformations, but the order in which matrices appear, and their rows and columns, are reversed. Trying to think in terms of both column and row vectors is a recipe for disaster. Stick to column vectors always.
In OpenGL all coordinate transformations are specified using4×4matrices. If we transform a point
pwith a matrixM (for example, a scale bysx, sy, sz), we get a transformed pointp′, as follows:
x′ y′ z′ 1 ← sx 0 0 0 0 sy 0 0 0 0 sz 0 0 0 0 1 · x y z 1
or, more succinctly:
p′ ←M·p
If we subsequently transformp′by another matrixN, to givep′′, we have:
p′′←N ·p′
so expressing the entire transformation we have:
p′′←N ·M·p
8.2
A note about matrix ordering
Notice that the order in which the matrices are written, reading from left to right, is the reverse of the order in which their transformations are applied. In the above example, the first transformation applied topisM, and the transformed point is then subsequently transformed byN.
In general, matrix multiplication is not commutative. So, with two matricesM andN,
M·N 6=N ·M
In other words, the order in which transformation matrices are applied is crucial.
One of the most common problems in computer graphics, blank screen syndrome (BSS), is often due to incorrectly ordered matrix transformations. Your image has been lovingly computed, but it is being displayed several miles to the West of your display screen; or that tiny blob in the left-hand corner of your screen is your image, compressed into a few pixels.
8.3
Selecting the current matrix
OpenGL maintains two separate4×4transformation matrices:
• the modelview matrix; this is used to accumulate modelling transformations, and also to specify the position and orientation of the camera;
• the projection matrix; this is used to specify how the 3D OpenGL world is transformed into a 2D camera image for subsequent display. The projection matrix performs either a perspective or othographic (parallel) projection.
At any time, one or the other of these matrices is selected for use, and is called the current matrix, or sometimes C for short. Most of the OpenGL functions for managing transformations affect the contents ofC.
8.4
Setting the current matrix
If our first transformation M represents a scale by(sx, sy, sz), and the second transformationN a translation by(tx, ty, tz), we would code this in OpenGL as follows:
8.4. SETTING THE CURRENT MATRIX 47
Figure 8.1: An OpenGL modelview matrix stack. The top element of the selected stack is often referred to as the “current matrix”C.
glMatrixMode (GL_MODELVIEW); /* Select the modelview matrix */
glLoadIdentity (); /* Set the current matrix to identity */ glTranslatef (tx, ty, tz); /* Post-multiply by (tx,ty,tz) */
glScalef (sx, sy, sz); /* Post-multiply by (sx,sy,sz) */ glVertex3f(x, y, z); /* Define the vertex */
Note that all the OpenGL functions which affect the current matrixCdo so by post-multiplication. This means that we write the sequence of OpenGL transformation functions in the reverse order to the effect they actually have on vertices. This can take a bit of getting used to.
In fact, the modelview matrix isn’t a single matrix stored somewhere inside OpenGL – it’s actually the top matrix on a stack of modelview matrices. This is shown in Figure 8.1. Similarly, the projection matrix is the top matrix on a stack of projection matrices. We’ll see later why OpenGL uses stacks of matrices.
Figure 8.2 shows how the modelview and projection matrices on the top of their respective stacks affect a vertex specified by the application.
void glMatrixMode ( GLenum mode );
glMatrixMode() selects the matrix stack, and makes the top matrix on the stack the “current matrix”
(C).modeselects the matrix stack, as follows:
• GL MODELVIEW: selects the modelview matrix stack;
• GL PROJECTION: selects the projection matrix stack.
Once a current matrix has been selected using glMatrixMode(), all subsequent matrix functions (such as glRotatef(), etc.) affect the current matrix. For example, to load a translation by(x, y, z)into the modelview matrix, the code would be:
Figure 8.2: The OpenGL viewing pipeline, showing the sequence of transformations and operations applied to a 3D vertex.
glLoadIdentity (); glTranslatef (x, y, z);
Subsequent matrix operations will continue to affect the current modelview matrix, until
glMatrix-Mode() is called again to select a different matrix.
8.5
Operating on the current matrix
There are a number of utility functions for changing the current matrix.
8.5.1 Setting to identity
void glLoadIdentity ( void );
glLoadIdentity() sets the current matrixCto be the identity matrixI:
C←I where I = 1 0 0 0 0 1 0 0 0 0 1 0 0 0 0 1
8.6. USING THE MATRIX STACKS 49
8.5.2 Translation
void glTranslatef ( GLfloat x, GLfloat y, GLfloat z );
glTranslatef() creates a matrixMwhich performs a translation by(x, y, z), and then post-multiplies the current matrix byM as follows:
C←C·M
8.5.3 Scaling
void glScalef ( GLfloat x, GLfloat y, GLfloat z );
glScalef() creates a matrixMwhich performs a scale by(x, y, z), and then post-multiplies the current matrix byM as follows:
C←C·M
8.5.4 Rotation
void glRotatef ( GLfloat angle, GLfloat x, GLfloat y, GLfloat z );
glR