CaptionMaker/MacCaption 6.0 Quick Start Guide October 2013
languages without the written permission of Telestream. Information and specifications in this document are subject to change without notice and do not represent a commitment on the part of Telestream.
Telestream. Telestream, Episode, Flip4Mac, FlipFactory, Flip Player, Lightspeed, ScreenFlow, Vantage, Wirecast, GraphicsFactory, MetaFlip, MotionResolve, and Split-and-Stitch are registered trademarks and Pipeline, Launch, and Videocue are
trademarks of Telestream, Inc. All other trademarks are the property of their respective owners.
Apple. QuickTime, MacOS X, and Safari are trademarks of Apple, Inc. Bonjour, the Bonjour logo, and the Bonjour symbol are trademarks of Apple, Inc.
MainConcept. MainConcept is a registered trademark of MainConcept LLC and MainConcept AG. Copyright 2004 MainConcept Multimedia Technologies.
Microsoft. Microsoft, Windows NT|2000|XP|XP Professional|Server 2003|Server 2008 |Server 2012, Windows 7, Windows 8, Media Player, Media Encoder, .Net, Internet Explorer, SQL Server 2005|2008|Server 2012, and Windows Media Technologies are trademarks of Microsoft Corporation.
Manzanita. Manzanita is a registered trademark of Manzanita Systems, Inc.
Adobe. Adobe® HTTP Dynamic Streaming Copyright © 2014 of Adobe Systems All right reserved.
Avid. Portions of this product Copyright 2012 Avid Technology, Inc.
VoiceAge. This product is manufactured by Telestream under license from VoiceAge Corporation.
x.264 LLC. The product is manufactured by Telestream under license from x.264 LLC. Dolby. Dolby and the double-D symbol are registered trademarks of Dolby
Laboratories.
Google. VP6 and VP8 Copyright Google Inc. 2014 All rights Reserved.
Fraunhofer IIS and Thomson Multimedia. MPEG Layer-3 audio coding technology licensed from Fraunhofer IIS and Thomson Multimedia.
SharpSSH2. SharpSSH2 Copyright (c) 2008, Ryan Faircloth. All rights reserved. Redistribution and use in source and binary forms, with or without modification, are permitted provided that the following conditions are met:
Redistributions of source code must retain the above copyright notice, this list of conditions and the following disclaimer.
Redistributions in binary form must reproduce the above copyright notice, this list of conditions and the following disclaimer in the documentation and/or other materials provided with the distribution.
CaptionMaker/MacCaption 6.0 Quick Start Guide
Neither the name of Diversified Sales and Service, Inc. nor the names of its contributors may be used to endorse or promote products derived from this software without specific prior written permission.
THIS SOFTWARE IS PROVIDED BY THE COPYRIGHT HOLDERS AND CONTRIBUTORS “AS IS” AND ANY EXPRESS OR IMPLIED WARRANTIES, INCLUDING, BUT NOT LIMITED TO, THE IMPLIED WARRANTIES OF MERCHANTABILITY AND FITNESS FOR A PARTICULAR
PURPOSE ARE DISCLAIMED. IN NO EVENT SHALL THE COPYRIGHT OWNER OR CONTRIBUTORS BE LIABLE FOR ANY DIRECT, INDIRECT, INCIDENTAL, SPECIAL, EXEMPLARY, OR CONSEQUENTIAL DAMAGES (INCLUDING, BUT NOT LIMITED TO, PROCUREMENT OF SUBSTITUTE GOODS OR SERVICES; LOSS OF USE, DATA, OR PROFITS; OR BUSINESS INTERRUPTION) HOWEVER CAUSED AND ON ANY THEORY OF LIABILITY, WHETHER IN CONTRACT, STRICT LIABILITY, OR TORT (INCLUDING NEGLIGENCE OR OTHERWISE) ARISING IN ANY WAY OUT OF THE USE OF THIS SOFTWARE, EVEN IF ADVISED OF THE POSSIBILITY OF SUCH DAMAGE.
Telerik. RadControls for ASP.NET AJAX copyright Telerik All rights reserved.
Xceed. The Software is Copyright ©1994-2012 Xceed Software Inc., all rights reserved. MediaInfo. Copyright © 2002-2013 MediaArea.net SARL. All rights reserved.
THIS SOFTWARE IS PROVIDED BY THE COPYRIGHT HOLDERS AND CONTRIBUTORS AS IS AND ANY EXPRESS OR IMPLIED WARRANTIES, INCLUDING, BUT NOT LIMITED TO, THE IMPLIED WARRANTIES OF MERCHANTABILITY AND FITNESS FOR A PARTICULAR PURPOSE ARE DISCLAIMED. IN NO EVENT SHALL THE COPYRIGHT HOLDER OR CONTRIBUTORS BE LIABLE FOR ANY DIRECT, INDIRECT, INCIDENTAL, SPECIAL, EXEMPLARY, OR CONSEQUENTIAL DAMAGES (INCLUDING, BUT NOT LIMITED TO, PROCUREMENT OF SUBSTITUTE GOODS OR SERVICES; LOSS OF USE, DATA, OR PROFITS; OR BUSINESS INTERRUPTION) HOWEVER CAUSED AND ON ANY THEORY OF LIABILITY, WHETHER IN CONTRACT, STRICT LIABILITY, OR TORT (INCLUDING NEGLIGENCE OR OTHERWISE) ARISING IN ANY WAY OUT OF THE USE OF THIS SOFTWARE, EVEN IF ADVISED OF THE POSSIBILITY OF SUCH DAMAGE.
ZLIB. Copyright (C) 1995-2013 Jean-loup Gailly and Mark Adler.
Other brands, product names, and company names are trademarks of their respective holders, and are used for identification purpose only.
116707
MPEG Disclaimers
MPEGLA MPEG2 Patent
ANY USE OF THIS PRODUCT IN ANY MANNER OTHER THAN PERSONAL USE THAT COMPLIES WITH THE MPEG-2 STANDARD FOR ENCODING VIDEO INFORMATION FOR PACKAGED MEDIA IS EXPRESSLY PROHIBITED WITHOUT A LICENSE UNDER APPLICABLE PATENTS IN THE MPEG-2 PATENT PORTFOLIO, WHICH LICENSE IS AVAILABLE FROM MPEG LA, LLC, 4600 S. Ulster Street, Suite 400, Denver, Colorado 80237 U.S.A.
MPEGLA MPEG4 VISUAL
THIS PRODUCT IS LICENSED UNDER THE MPEG-4 VISUAL PATENT PORTFOLIO LICENSE FOR THE PERSONAL AND NON-COMMERCIAL USE OF A CONSUMER FOR (i) ENCODING VIDEO IN COMPLIANCE WITH THE MPEG-4 VISUAL STANDARD (“MPEG-4 VIDEO”) AND/ OR (ii) DECODING MPEG-4 VIDEO THAT WAS ENCODED BY A CONSUMER ENGAGED IN A PERSONAL AND NON-COMMERCIAL ACTIVITY AND/OR WAS OBTAINED FROM A VIDEO PROVIDER LICENSE IS GRANTED OR SHALL BE IMPLIED FOR ANY OTHER USE.
ADDITIONAL INFORMATION INCLUDING THAT RELATING TO PROMOTIONAL, INTERNAL AND COMMERCIAL USES AND LICENSING MAY BE OBTAINED FROM MPEG LA, LLC. SEE HTTP://WWW.MPEGLA.COM.
MPEGLA AVC
THIS PRODUCT IS LICENSED UNDER THE AVC PATENT PORTFOLIO LICENSE FOR THE PERSONAL USE OF A CONSUMER OR OTHER USES IN WHICH IT DOES NOT RECEIVE REMUNERATION TO (i) ENCODE VIDEO IN COMPLIANCE WITH THE AVC STANDARD (“AVC VIDEO”) AND/OR (ii) DECODE AVC VIDEO THAT WAS ENCODED BY A CONSUMER ENGAGED IN A PERSONAL ACTIVITY AND/OR WAS OBTAINED FROM A VIDEO PROVIDER LICENSED TO PROVIDE AVC VIDEO. NO LICENSE IS GRANTED OR SHALL BE IMPLIED FOR ANY OTHER USE. ADDITIONAL INFORMATION MAY BE OBTAINED FROM MPEG LA, L.L.C. SEE HTTP://WWW.MPEGLA.COM.
MPEG4 SYSTEMS
THIS PRODUCT IS LICENSED UNDER THE MPEG-4 SYSTEMS PATENT PORTFOLIO LICENSE FOR ENCODING IN COMPLIANCE WITH THE MPEG-4 SYSTEMS STANDARD, EXCEPT THAT AN ADDITIONAL LICENSE AND PAYMENT OF ROYALTIES ARE NECESSARY FOR
ENCODING IN CONNECTION WITH (i) DATA STORED OR REPLICATED IN PHYSICAL MEDIA WHICH IS PAID FOR ON A TITLE BY TITLE BASIS AND/OR (ii) DATA WHICH IS PAID FOR ON A TITLE BY TITLE BASIS AND IS TRANSMITTED TO AN END USER FOR PERMANENT STORAGE AND/OR USE. SUCH ADDITIONAL LICENSE MAY BE OBTAINED FROM MPEG LA, LLC. SEE HTTP://WWW.MPEGLA.COM FOR ADDITIONAL DETAILS.
CaptionMaker/MacCaption 6.0 Quick Start Guide
Limited Warranty and Disclaimers
Telestream, Inc. (the Company) warrants to the original registered end user that the product will perform as stated below for a period of one (1) year from the date of shipment from factory:
Hardware and Media—The Product hardware components, if any, including equipment supplied but not manufactured by the Company but NOT including any third party equipment that has been substituted by the Distributor for such equipment (the “Hardware”), will be free from defects in materials and workmanship under normal operating conditions and use.
Software—If software is supplied as part of the product, the Company does not warrant that the software will operate uninterrupted or error-free, will meet your requirements, or that software errors will be corrected.
Warranty Remedies
Your sole remedies under this limited warranty are as follows:
Hardware and Media—The Company will either repair or replace (at its option) any defective Hardware component or part, or Software Media, with new or like new Hardware components or Software Media. Components may not be necessarily the same, but will be of equivalent operation and quality.
Software Updates
Except as may be provided in a separate agreement between Telestream and You, if any, Telestream is under no obligation to maintain or support the Software and Telestream has no obligation to furnish you with any further assistance, technical support, documentation, software, update, upgrades, or information of any nature or kind.
Restrictions and Conditions of Limited Warranty
This Limited Warranty will be void and of no force and effect if (i) Product Hardware or Software Media, or any part thereof, is damaged due to abuse, misuse, alteration, neglect, or shipping, or as a result of service or modification by a party other than the Company, or (ii) Software is modified without the written consent of the Company.
Limitations of Warranties
THE EXPRESS WARRANTIES SET FORTH IN THIS AGREEMENT ARE IN LIEU OF ALL OTHER WARRANTIES, EXPRESS OR IMPLIED, INCLUDING, WITHOUT LIMITATION, ANY
WARRANTIES OF MERCHANTABILITY OR FITNESS FOR A PARTICULAR PURPOSE. No oral or written information or advice given by the Company, its distributors, dealers or agents, shall increase the scope of this Limited Warranty or create any new warranties.
116707 Geographical Limitation of Warranty—This limited warranty is valid only within the country in which the Product is purchased/licensed.
Limitations on Remedies—YOUR EXCLUSIVE REMEDIES, AND THE ENTIRE LIABILITY OF TELESTREAM, INC. WITH RESPECT TO THE PRODUCT, SHALL BE AS STATED IN THIS LIMITED WARRANTY. Your sole and exclusive remedy for any and all breaches of any Limited Warranty by the Company shall be the recovery of reasonable damages which, in the aggregate, shall not exceed the total amount of the combined license fee and purchase price paid by you for the Product.
Damages
TELESTREAM, INC. SHALL NOT BE LIABLE TO YOU FOR ANY DAMAGES, INCLUDING ANY LOST PROFITS, LOST SAVINGS, OR OTHER INCIDENTAL OR CONSEQUENTIAL DAMAGES ARISING OUT OF YOUR USE OR INABILITY TO USE THE PRODUCT, OR THE BREACH OF ANY EXPRESS OR IMPLIED WARRANTY, EVEN IF THE COMPANY HAS BEEN ADVISED OF THE POSSIBILITY OF THOSE DAMAGES, OR ANY REMEDY PROVIDED FAILS OF ITS ESSENTIAL PURPOSE.
Further information regarding this limited warranty may be obtained by writing: Telestream, Inc.
848 Gold Flat Road
Nevada City, CA 95959 USA
You can call Telestream, Inc. via telephone at (530) 470-1300. Part number: 116707
Contents
CaptionMaker and MacCaption Quick Start Guide
1
Overview
9
Introduction 9Video Tutorials and Support 9 Old Manuals 10
Comparing Software Versions 10 Prerequisites for Captioning 11
Transcribing a Video 11 Using a Video File 11 Automatic Time Stamp (ATS) 12
Requirements 12 Results 12 Best Practices 12 Caption Style Guidelines 13
Installation
15
Installing and Activating CaptionMaker 16 Buying and Activating CaptionMaker 19 Activating CaptionMaker Offline 21 Upgrading CaptionMaker 24
Activating a CaptionMaker Upgrade 25 Deactivating a CaptionMaker License 26 Installing and Activating MacCaption 27
Buying and Activating MacCaption 29 Activating MacCaption Offline 32 Upgrading MacCaption 35
Activating a MacCaption Upgrade 36 Deactivating Your MacCaption License 38
CaptionMaker/MacCaption 6.0 Quick Start Guide
Quick Start
41
Your First CaptionMaker Project 42 Importing Text Files 42
Importing Video 44 Formatting Text 45
Synchronizing Captions (Time Stamping) 47 Checking Your Timing 49
Your First MacCaption Project 50 Importing Text Files 50 Importing Video 51 Formatting Text 52
Formatting Text (advanced) 53
Synchronizing Captions (Time Stamping) 55 Manual Time Stamping 55
Checking Your Timing 56 Exporting Your Finished Project 57
Exporting Standalone Caption Files 57 Embedding Captions into Video 57 Subtitle Files 58
Web Formats 58 DVD/Blu-ray 59
DVD Closed Captioning 59 DVD/Blu-ray Subtitle Formats 59 Broadcast Formats 59
Subtitling 61
Importing Caption Files 62 Live Captioning 63
Text Input for Live Events 63 CC Encoder Hardware 63
Overview
Introduction
This Quick Start Guide will help you install and learn the basics of CaptionMaker and MacCaption. The following topics are covered:
Overview—the chapter you’re reading now introduces key concepts
Installation—provides step-by-step installation procedures
Quick Start—introduces how to use the products
This guide includes links to additional helpful information on our websites:
telestream.net and cpcweb.com. Check the websites periodically for updates of this document.
When you purchase CaptionMaker or MacCaption, you will receive a software license key. You can easily download and install the license key by clicking on our downloads page at telestream.net or cpcweb.com and following the instructions.
Note: If you purchased CaptionMaker/MacCaption from CPC prior to October 2013, it is protected by a USB dongle. The dongle must be plugged into your computer in order for the software to run.
CAUTION: Do not lose your license key because your software will not work without it, and you will be charged to replace it.
Video Tutorials and Support
Telestream offers video tutorials and support:
•
Video tutorials: www.cpcweb.com/tutorial•
CPC Tech Support: www.cpcweb.com/supportCaptionMaker/MacCaption 6.0 Quick Start Guide
Old Manuals
Even though our old (CPC) manuals have not been updated since 2009, they contain very helpful information about old workflows, such as working with hardware encoders for live TV broadcast. These can be downloaded from the CPC support site listed above.
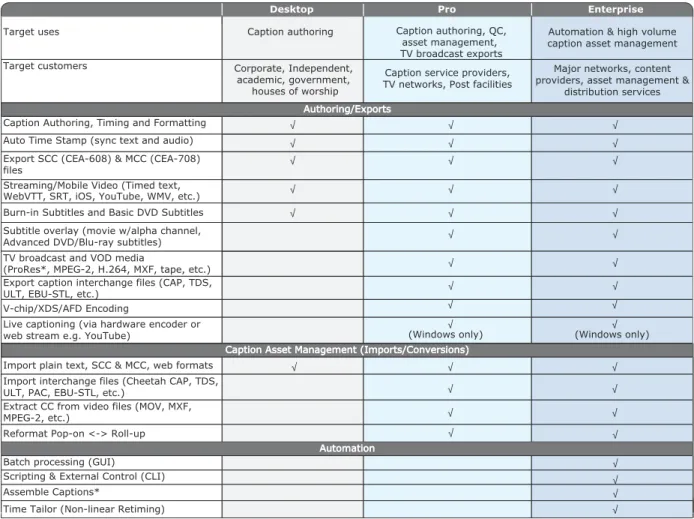
Comparing Software Versions
The CaptionMaker and MacCaption applications are available in 3 levels:
•
Desktop•
Pro•
EnterprisePlease refer to the chart below for the features of each level. You can purchase a software upgrade from one level to another at any time to add capabilities. If you are using software purchased from CPC prior to October 2013, see our support site for information on old software levels such as: Classic, WebPlus, NLE, DTV, etc.
Table 1. CaptionMaker and MacCaption Feature Comparison
Target uses Caption authoring Caption authoring, QC, asset management, TV broadcast exports
Automation & high volume caption asset management Target customers Corporate, Independent,
academic, government, houses of worship
Caption service providers, TV networks, Post facilities
Major networks, content providers, asset management &
distribution services Authoring/Exports
Caption Authoring, Timing and Formatting Auto Time Stamp (sync text and audio)
√ √ √ √ √ √ √ √ √ √ √ √ √ √ √ √ √ √ √
Caption Asset Management (Imports/Conversions)
Automation Batch processing (GUI)
Scripting & External Control (CLI)
*: Indicates feature that is currently platform dependent (Mac or Windows only)
√ √ √ √ √ √ √ √ √ √ √ √ √ √ √ √ √ √
Desktop Pro Enterprise
Export SCC (CEA-608) & MCC (CEA-708) files
Streaming/Mobile Video (Timed text, WebVTT, SRT, iOS, YouTube, WMV, etc.) Burn-in Subtitles and Basic DVD Subtitles Subtitle overlay (movie w/alpha channel, Advanced DVD/Blu-ray subtitles) TV broadcast and VOD media
(ProRes*, MPEG-2, H.264, MXF, tape, etc.) Export caption interchange files (CAP, TDS, ULT, EBU-STL, etc.)
V-chip/XDS/AFD Encoding
Live captioning (via hardware encoder or web stream e.g. YouTube)
Reformat Pop-on <-> Roll-up Extract CC from video files (MOV, MXF, MPEG-2, etc.)
Import interchange files (Cheetah CAP, TDS, ULT, PAC, EBU-STL, etc.)
Import plain text, SCC & MCC, web formats
Assemble Captions*
Time Tailor (Non-linear Retiming)
(Windows only) (Windows only)
CaptionMaker/MacCaption 6.0 Quick Start Guide
Prerequisites for Captioning
The two ingredients you need to start captioning a video are: (1) a video file, and (2) a transcript of the dialog in the video.
Transcribing a Video
There is no magic solution to transcription. It is by far the most time-consuming aspect of the closed captioning/subtitling process. However, there are methods to transcribe in the most efficient way possible. If you do not have a script of the video, you can efficiently produce the script in one of these ways:
•
Type the script on a regular keyboard. You can use a foot pedal control to help you transcribe the video. It costs less than $100 and will greatly speed up the transcrip-tion process by allowing you to control the video playback with your foot so that you can keep both hands on the keyboard.•
Train speech recognition software to recognize your voice and produce a transcript by listening to the video and repeating the speech for the software. Speech recog-nition software, such as Dragon Naturally Speaking, only picks up one speaker's voice at a time, and that person must go through a voice training process with the software. In other words, you can't simply feed in a video file with various speakers' voices and expect to get a good result.What you can do is a process called Shadow Speaking, or Voice Captioning. For this process you train a profile of your voice into the Dragon Naturally Speaking soft-ware so that it can recognize your speech accurately. Then you watch the video and repeat all of the dialogue you hear into a headset microphone. This takes a little practice to get good at listening and speaking at the same time, but for most peo-ple, it's much faster than typing on a regular keyboard. At first, you will probably get a lot of unrecognized words. As you continue to use the software and correct the errors, you can eventually expect to reach around 95% accuracy.
•
Use a professional transcription service. This is the easiest but most expensive way to generate the script.Our software can import scripts from a text file and most word processors, such as Word files. However, because of special formatting and characters used in some kinds of document files, it is usually best to start with a plain text (.txt) file.
Using a Video File
The other ingredient you need for producing captions is a video file. Make sure you are using a digital video file, not videotape, as your video source. Trying to transcribe from a tape can wear out your tape deck, and you'll spend too much time starting and stopping the tape. Our software can play back most types of QuickTime files (Mac/ Windows), and also Windows Media files (Windows). If you have another file format, please see our support page article about making a proxy movie for use with the captioning software.
CaptionMaker/MacCaption 6.0 Quick Start Guide
Automatic Time Stamp (ATS)
In most other captioning software, even after you import the transcript and video, you must go through a time consuming process to break the transcript up into
caption-sized pieces and then manually synchronize each piece of text so that it appears at the correct time in the video.
Auto Time Stamp automatically synchronizes the text transcript with your audio or video file, dramatically reducing the time it takes to caption a video. This feature works very well for videos with high quality audio and containing mostly dialog. It does not work as well if the audio has already been mixed with music or sound effects, so it is preferable to use a dialog-only audio mix.
Requirements
•
A video with a high quality audio track (i.e. good signal-to-noise ratio).•
An accurate transcript of all the dialogue in the video.•
See our System Requirements page for minimum computer specs.Results
•
Automatically synchronizes each caption; no need to manually time stamp captions.•
The process is much faster than real-time (15 times to 30 times faster, depending onthe speed of your computer).
•
The software automatically detects captions with poor synchronization and high-lights them in red, so you can spot check and manually correct these captions.Best Practices
•
An accurate transcript is vital. To get good results, the transcript cannot deviate sig-nificantly from the audio.•
High quality audio is also the key. Compression, sound effects or music can distort the sound.•
Speaker IDs that are indicated with >> Name: are treated as unspoken text.•
Non-verbal information in the transcript, such as music or sound effect indications, should be enclosed by brackets like this: [MUSIC], or [Applause].•
If the software highlights some caption lines as low confidence, you might want to do a quick AutoSync to spot check these sections. In many cases the low confi-dence sections may be fine or close enough for your needs. If not, you can do a manual time stamp just on these few sections to improve the alignment.•
As of October, 2012, Auto Time Stamp supports English language audio only.CaptionMaker/MacCaption 6.0 Quick Start Guide
Caption Style Guidelines
Adhering to good caption style is very important. The following is an excerpt from http://www.dcmp.org/:
Captioning is the key to opening up a world of information for persons with hearing loss or literacy needs. There are more than 30 million Americans with some type of hearing loss. Millions of others are illiterate, learning to read, or use English as a second language.
The first captioning of any kind was performed in the late 1950's by Captioned Films for the Deaf, the ancestor of DCMP, two decades before the advent of closed captioning on broadcast television. The first edition of the Captioning Key was published in 1994, and these guidelines were based on decades of experience by DCMP (then called Captioned Films and Videos Program), review of captioning research, and examination of standards developed by various captioning vendors. The Captioning Key has been applied to both entertain-ment and educational media, has been used for consumers at all levels (chil-dren through adults), has received international distribution, and has been translated into other languages.
These guidelines are a key for vendors performing captioning for the DCMP. The vendor list can be found at this URL: http://www.dcmp.org/caai/nadh11.pdf. The DCMP provides information on how to become an approved vendor on the DCMP Web site: http://www.dcmp.org.
The information is applicable to vendors and other businesses that provide closed captioning (CC) and subtitles for the deaf and hard of hearing (SDH) of all types of media at various levels. Thus, these guidelines will also be useful to media producers/ distributors and others considering captioning their products or learning about captioning. Some background information and rationale are included for the novice. For those who wish to save a copy of this resource, a PDF version of the Captioning Key is available for download from the DCMP:
http://www.captioningkey.org/captioning-key.pdf
A Spanish translation of the Captioning Key is also available: http://www.dcmp.org/caai/nadh52.pdf
Installation
The procedures in this chapter explain step-by-step how to install your captioning software. These are the topics presented:
Installing and Activating CaptionMaker
–
Buying and Activating CaptionMaker–
Activating CaptionMaker Offline–
Upgrading CaptionMaker Installing and Activating MacCaption
–
Buying and Activating MacCaption–
Activating MacCaption OfflineCaptionMaker/MacCaption 6.0 Quick Start Guide
Installing and Activating CaptionMaker
Follow these steps to install CaptionMaker:
1. Download CaptionMaker and run the setup program. A dialog box opens.
2. Click Setup to start the CaptionMaker InstallShield Wizard. Follow the installer steps.
CaptionMaker/MacCaption 6.0 Quick Start Guide
4. If you agree to the terms of the License Agreement, click Yes. The installer presents the Customer Information screen.
5. Enter your customer information and click Next. The installer presents the Choose Destination Location screen.
CaptionMaker/MacCaption 6.0 Quick Start Guide 6. Click Next to install CaptionMaker in the default location, or browse to select a new
destination for the CaptionMaker installation. The installer presents the Select Program Folder screen.
7. Click Next to install CaptionMaker program icons into the default folder, or select a new location for the program icons.
8. Click OK when you see the Operation Successfully Completed message, and then click Finish to close the installer.
CaptionMaker/MacCaption 6.0 Quick Start Guide
Buying and Activating CaptionMaker
Follow these steps to buy a license and activate the software:
1. Start the program for the first time by clicking on the CaptionMaker icon on your desktop, or go to the Start Menu, CPC folder, and click CaptionMaker. The first time the software runs, you will see the following message indicating CaptionMaker is running in DEMO mode.
2. Click OK to continue.
3. Open the Help menu, and select Manage CaptionMaker License.
CaptionMaker/MacCaption 6.0 Quick Start Guide 5. Enter your serial number and click OK, or click Purchase if you have not already
purchased the software.
6. Click Activate License. If you have Internet access, activation will complete automatically. The Manage CaptionMaker License says, “CaptionMaker is registered.”
7. Quit and restart the CaptionMaker software. Verify that the window title says CaptionMaker-Desktop, -Pro, or -Enterprise, matching the license you purchased (as shown below). You are now ready to use CaptionMaker.
CaptionMaker/MacCaption 6.0 Quick Start Guide
Activating CaptionMaker Offline
If you don’t have Internet access during license activation, an error message will appear (shown below). Cancelling the error message allows you to activate a license manually using a different computer that has Internet access.
1. Click Cancel in the error message to continue manual license activation. The Activate Options screen appears.
CaptionMaker/MacCaption 6.0 Quick Start Guide 2. Select Activate using a different computer that has web access, and click Next. A new
screen appears, providing you with an activation URL and an Installation ID.
3. Using another computer or device that has Internet access, open the URL shown on your MacCaption computer screen. The essellerate services page appears.
CaptionMaker/MacCaption 6.0 Quick Start Guide
4. Enter the Installation ID and click Submit. An Activation Key is displayed.
5. Enter the Activation Key on the CaptionMaker computer as shown below.
6. The screen indicates Success. Click Done to finish licensing CaptionMaker. Now when you restart CaptionMaker, the window title indicates the type of license you purchased as explained previously.
CaptionMaker/MacCaption 6.0 Quick Start Guide
Upgrading CaptionMaker
If you need to use features that are in a higher level of the software, for example, you purchased the Desktop version, but now you need a feature that is in the Pro version, you can buy an upgrade. Follow these steps to upgrade your license:
1. Open the Help menu, and select Manage CaptionMaker License.
2. In the Manage CaptionMaker License dialog, click Upgrade.
3. In the online store, select the license level you want to buy.
4. Follow the on-screen prompts to purchase the upgrade. The procedure that follows explains how to activate the upgraded license.
CaptionMaker/MacCaption 6.0 Quick Start Guide
Activating a CaptionMaker Upgrade
Usually the upgrade process will complete automatically, but in some cases you may receive the upgrade key via email. In that case you must deactivate your old key in order to enter the new key. To activate your upgraded license, follow these steps:
1. Open the Help menu, and select Manage CaptionMaker License. 2. Click Deactivate License. This requires an Internet connection.
3. Confirm that the screen shows The serial number is valid, but it is not activated.
4. Click Edit Serial Number. A dialog box opens to allow serial number entry.
5. Enter the new serial number, and click OK. 6. Click Activate License.
7. Confirm that the screen shows CaptionMaker is registered and shows the upgraded license level.
CaptionMaker/MacCaption 6.0 Quick Start Guide
Deactivating a CaptionMaker License
If you want to move the CaptionMaker license to another computer, you must first deactivate it on the current computer. This action requires Internet access. Follow these steps:
1. Open the Help menu, and click Manage CaptionMaker Activation. A dialog opens indicating that the product is registered and allowing you to deactivate the license.
2. Click Deactivate License.
3. Confirm that the screen shows The serial number is valid, but it is not activated.
4. You can now activate this serial number on another computer where you have installed another copy of CaptionMaker.
CaptionMaker/MacCaption 6.0 Quick Start Guide
Installing and Activating MacCaption
Follow these steps to install MacCaption:
1. Download the MacCaption installer and open the disk image.
2. Double-click the installer package to open it. The installer displays a Welcome screen.
CaptionMaker/MacCaption 6.0 Quick Start Guide 4. Click Continue. The installer displays the Software License Agreement.
5. Click Continue, and if you agree to the terms of the agreement, click Agree. The Standard Install screen opens.
CaptionMaker/MacCaption 6.0 Quick Start Guide
7. As part of the installation process, the Macintosh may request your user Name and Password. Enter your Mac user Name and Password, and click OK.
The installation continues, and at completion, a window opens to indicate success.
8. Click Close to complete the installation.
Buying and Activating MacCaption
Buy and activate a MacCaption license as follows:
1. To run MacCaption, find the MacCaption icon in your Applications folder, and double click it.
The first time the software runs, if you have not already activated it on this com-puter, you will be running in demo mode and many restrictions will apply. 2. Open the Help menu, and select Manage MacCaption License.
CaptionMaker/MacCaption 6.0 Quick Start Guide The MacCaption License dialog opens, indicating the software is not yet activated.
3. Click the lock icon and enter your Mac user name and password to authenticate your user account. Then return to the MacCaption License window.
CaptionMaker/MacCaption 6.0 Quick Start Guide
4. If you already have a serial number, click Enter Serial Number and type in your serial number. If not, click on Purchase License and follow the on-screen instructions to purchase a license online. After entering your serial number, you can choose whether to Upgrade or Activate your serial number.
5. Click Activate Serial Number. Next, you’ll be asked to confirm your serial number.
6. Confirm your serial number, and click Activate. Activation will complete automatically and MacCaption will say "MacCaption (Version): Activated." (Note: If you don’t have Internet access, you can activate using a different com-puter that has Web access. See Activating MacCaption Offline.)
7. Click OK, and then quit and restart the MacCaption software.
8. Go to the top menu: MacCaption > About MacCaption, and verify that you are running the proper license type (for example, Desktop, Pro, or Enterprise).
CaptionMaker/MacCaption 6.0 Quick Start Guide
Activating MacCaption Offline
If you don’t have Internet access from the MacCaption computer, you can activate MacCaption using a different Internet-connected computer. Follow these steps:
1. After starting the Activate Serial Number process described in the previous
procedure, make the following selection: Activate using a different computer that has web access and click Next.
2. Using the Internet-connected computer, access the URL that is presented on the MacCaption computer.
CaptionMaker/MacCaption 6.0 Quick Start Guide
3. On the eSellerate activation website, enter the Installation ID that MacCaption provided, and click Submit.
Esellerate displays your new activation key at the bottom of the page. You can also enter your email address to receive a copy of your activation key by email.
CaptionMaker/MacCaption 6.0 Quick Start Guide 4. Enter the Activation Key into the MacCaption Enter Activation Key page, and click
Activate. If the key is entered correctly, a message saying “Success” should be displayed.
5. Click Done to finish the activation process. MacCaption should now say “MacCaption (version) Activated.”
6. Quit and restart MacCaption. Then go to the top menu: MacCaption > About MacCaption, and verify that you are running the proper license type (for example, Desktop, Pro, or Enterprise).
CaptionMaker/MacCaption 6.0 Quick Start Guide
Upgrading MacCaption
If you need to use features that are in a higher level of the software, you can purchase an upgrade.
1. Open the Help menu and select Manage MacCaption License…
The MacCaption License window opens.
2. Click the lock icon to authenticate your Mac account. 3. Enter your Mac user name and password when prompted. 4. Click Upgrade License.
CaptionMaker/MacCaption 6.0 Quick Start Guide 5. The MacCaption online store window will open. Follow the on-screen prompts to
select and purchase your upgrade.
Activating a MacCaption Upgrade
Usually the upgrade process will complete automatically, but in some cases you may receive the upgrade key via email. In that case you must deactivate your old key in order to enter the new key.
1. Open the MacCaption Help menu, and select Manage MacCaption Activation. The MacCaption License window opens.
CaptionMaker/MacCaption 6.0 Quick Start Guide
2. Click the lock icon, and enter your Mac user name and password to authenticate your Mac user account. The lock unlocks and the license options are enabled.
3. Click on Deactivate Serial Number. This step requires Internet access.
4. After deactivation, MacCaption will automatically exit. Start the software again. It will start in Demo mode.
5. Open the Help menu, and select Manage MacCaption Activation.
6. Click the lock icon, and enter your Mac user name and password to authenticate your Mac user account. The license options are displayed again.
7. Click Activate Serial Number. The Serial Number entry form opens.
CaptionMaker/MacCaption 6.0 Quick Start Guide 9. Confirm that the screen now shows "MacCaption (Version): Activated" and displays
the upgraded license level.
10.Click OK. Then quit and restart MacCaption.
Deactivating Your MacCaption License
If you want to move the MacCaption license to another computer, you must first deactivate it on the current computer. This step requires Internet access.
1. Go to the MacCaption Help menu and select Manage MacCaption Activation. The MacCaption License window opens.
2. Click the lock icon and enter your Mac user name and password to authenticate your Mac account.
CaptionMaker/MacCaption 6.0 Quick Start Guide
4. Confirm that the screen shows "MacCaption (Version): Not Activated"
Quick Start
This chapter leads you step-by-step through your first projects in CaptionMaker and MacCaption. When you are finished, you will have gained a solid overview of how to use the products.
These are the topics covered in this chapter:
Your First CaptionMaker Project
Your First MacCaption Project
Exporting Your Finished Project
Importing Caption Files
CaptionMaker/MacCaption 6.0 Quick Start Guide
Your First CaptionMaker Project
The following topics lead you through a simple project in CaptionMaker.
Importing Text Files
CaptionMaker can import plain ASCII text, MS Word or an rtf file. Follow these steps to import a text file to use as your captions:
1. Click on File on the top menu bar, and then select Import (or drag and drop a text file from Windows Explorer into MacCaption’s text area).
2. Under File Type, select Text Documents, and then select the type of document.
3. Click Browse, and select your caption text file.
CaptionMaker/MacCaption 6.0 Quick Start Guide
5. Click Next again, and select the Options for how to break up the text into caption-sized pieces. We recommend the default settings for most captioning projects. The maximum number of characters for each line should be from 26 to 32 characters.
6. Select Display Mode for text, such as Pop-On, Paint-on, Roll-up, etc.
Note: For most post-production captioning projects, we recommend using the Pop-on mode. Roll-up captiPop-ons are typically used for live captiPop-oning.
CaptionMaker/MacCaption 6.0 Quick Start Guide
Importing Video
In order to bring in video follow these steps: 1. Import the video:
–
Click File > Open Movie, or–
Click on the Video Camera Icon , or–
Drag and drop a video file from Windows Explorer into CaptionMaker’s video window (the blue window at the top left).2. Make sure that the Video Playback selections shown are checked. Also click Use QuickTime if the video file is a QuickTime file and you have QuickTime installed.
3. Click Browse and locate the video file that you want to import. 4. Click OK.
The first frame of your video will now appear in the CaptionMaker preview window. Note: Opening a video only opens the video and audio for playback. If the video contains closed captions, a separate import step is needed to bring in the captions (File > Import File > Extract from Video > [select file type] > [select file]).
CaptionMaker/MacCaption 6.0 Quick Start Guide
Formatting Text
After you import the text document, the text will already be broken up into caption-sized pieces. However, you may want to format them to be more aesthetically pleasing, for example based on the recommendations in DCMP's Captioning Key guidelines.
1. The push and pull arrows allow you to quickly move text a word at a time between adjacent caption rows.
2. The expand and contract option allows you to adjust the width and number of caption lines, ranging from 1-4 lines. We recommend 1-2 lines for most captions.
3. To change the horizontal positioning of the text, you can click the Left-Center-Right buttons in the top toolbar, or right click on the horizontal justification (H) column, and select the position.
4. To move the text to the top or bottom of the screen, click on the Move to Top or Move to Bottom buttons in the toolbar. To fine control the vertical position, right click on the vertical (V) column and select the position.
5. To change the text justification within the caption area, right click on the justification option (the J column) and select a format.
6. To change the caption display option, right click the display box and select the display option. To change all captions to a different display, select the display column, and right click to select the captions.
CaptionMaker/MacCaption 6.0 Quick Start Guide 7. To format the text, highlight the text and select underline, italicize or blink from the
top toolbar.
Note: We don't recommend the Flash option as most viewers find it annoying. 8. To change the text color, highlight the text and select a color option from the top
toolbar (the A with a color ribbon below it).
9. To insert a music symbol, open the Attribute menu > Insert Music Symbol(s) > Single Music Symbol (or Surrounding Music Symbols), or click Ctrl-M.
CaptionMaker/MacCaption 6.0 Quick Start Guide
Synchronizing Captions (Time Stamping)
At this point you are ready to synchronize the text with the video. In many cases you can simply use the Auto Time Stamp feature by going to the menu Time Code > Auto Time Stamp. However in some cases, such as videos that are not in English or are heavy with music, you may need to do manual time stamping.
1. Make sure that the Mark Timecode On icon is selected in the Time Code toolbar.
2. For digital videos, choose Video Playback for your Time code reader type.
3. Now that the settings are correct, you are ready to start the time stamping process. Make sure the video is at the beginning by selecting the scrubber below the preview window and dragging it to the left.
CaptionMaker/MacCaption 6.0 Quick Start Guide 4. Select the first caption box, and hit Play on the VTR controls. (You can also use the
keyboard to start and stop the video).
5. When you hear the start of the words that are on the screen, press the + on your keyboard to set the timecode in, or click the IN icon. Make sure that you are selecting the in-point for the exact time when you want the text to appear.
6. Every time you press the + key on your keypad (or the IN icon), you will notice the timecode appearing under Start and you will automatically move down to the next caption.
7. If you need to change the timecode that you set, simply click on the text where you want to make the change, hit play and continue with the time stamping. You may also enter the timecode manually.
CaptionMaker/MacCaption 6.0 Quick Start Guide
Checking Your Timing
1. After time stamping all of your captions, you can preview what they are going to look like by clicking the AutoPreviewSync icon.
2. If you want to change the timecode for exporting to tape so it will start at 01:00:00:00, instead of 00:00:00:00, select the line where you want to ripple the timecode from, and right click on it.
3. Select Ripple and change the timecode to reflect the 1-hour mark. Click OK. Now you will notice that all of the caption timecodes are rippled to the 1-hour mark.
Now that you’ve put together a project, you need to think about how to export the project. Refer to Exporting Your Finished Project later in this guide.
CaptionMaker/MacCaption 6.0 Quick Start Guide
Your First MacCaption Project
The following topics lead you through a simple project in MacCaption.
Importing Text Files
1. Make sure that your text is saved as plain text or as a script file. If it is not, this can be done easily in the TextEdit program on your Mac.
2. Go to File > Import > Plain Text File, or drag and drop the text file onto the right side caption area in MacCaption. This will create a blue box around your text area. 3. On this page you can select various options for how the text is automatically
broken up into caption sized pieces. We recommend the default settings for most captioning projects. The maximum number of characters for each line should be between 26 to 32 characters.
CaptionMaker/MacCaption 6.0 Quick Start Guide
Importing Video
1. Your video must be QuickTime compatible, .mov, mp3, mp4, .avi, or any format that can be played by the QuickTime Player using plug-ins.
2. Go to File > Open Movie, or drag and drop that video file into the video preview area. Your video will appear in the preview screen.
.
Note: Opening a video only opens the video and audio for playback. If the video contains closed captions, a separate import step is needed to bring in the captions (File > Import > Extract CC from Media > [select format] >[select file]).
CaptionMaker/MacCaption 6.0 Quick Start Guide
Formatting Text
1. The push and pull arrows allow you to quickly move text a word at a time between adjacent caption rows.
2. The expand and contract option allows you to adjust the width and number of caption lines, ranging from 1-4 lines. We recommend 1-2 lines for most captions.
3. To change the position of the text on the screen from left, center, and right, use the L-C-R icons. To change the justification that these icons apply, click the small down triangle next to the button.
4. To format the text, use the italicize, underline, or blink/flash (B/F) icons.
CaptionMaker/MacCaption 6.0 Quick Start Guide
Formatting Text (advanced)
1. To move a group of caption blocks around at the same time, highlight caption blocks and then select the feature that you want from the icons. Select all by using Cmd-A.
2. In order to split a caption block, double click on the top caption, and then drag it to the desired location.
3. To move the entire caption box just click on the caption on the preview screen and move it manually wherever you prefer.
CaptionMaker/MacCaption 6.0 Quick Start Guide 4. Music Symbol: If you want to add music symbols to your text, select Format and
then select Insert Music Symbol (default keyboard shortcut: Cmd-M).
5. In order to change text to all upper or lower case, select Format, and then select "Upper and Lower Case."
6. To add or delete a row, use these icons.
7. If you are trying to search for a word in the text, select Edit and click on Replace. This will allow you to search for a word or replace the word you are looking for with a new word.
CaptionMaker/MacCaption 6.0 Quick Start Guide
Synchronizing Captions (Time Stamping)
At this point you are ready to synchronize the text with the video. In many cases you can simply use the Auto Time Stamp feature by going to the menu Time Code > Auto Time Stamp. However in some cases, such as videos that are not in English or are heavy with music, you may need to do manual time stamping.
Manual Time Stamping
1. Make sure that you select the top caption and that the scrubber is all the way on the left under the video.
2. If you click on the play button on the preview screen, it will automatically change the control mode to "Time Stamp."
3. While the video is playing hit the "in" button, or you can hit the plus button on the number pad of your keyboard. Notice that every time that you hit the "in" button, there is timecode being recorded. That timecode is when the caption is going to appear on your final video.
You can also control the video playback with the J, K, L keys on your keyboard. After Timestamping you are ready to check your timing.
CaptionMaker/MacCaption 6.0 Quick Start Guide
Checking Your Timing
Now that you have the captions positioned the way you want and time stamped, it's time to check your work.
1. Under Control Mode, select AutoSync.
2. The video will play in sync with the captions.
3. If you want to check a particular caption, you can use the scrubber under the preview screen to select the point where you want to start previewing, or you can select Special and select Position video when selecting caption text. Now the auto sync will begin playback at that point for every caption you click on.
Note: If you want to change the timecode for exporting to tape so it starts at
01:00:00:00, instead of 00:00:00:00, select the captions in which you want to ripple the timecode. Then choose the Ripple option from the Time Code menu.
Now that you’ve put together a project, you need to think about how to export the project. The remaining topics in this guide cover that subject.
CaptionMaker/MacCaption 6.0 Quick Start Guide
Exporting Your Finished Project
In this section, we briefly explore some of the export functions of CaptionMaker and MacCaption. It is important to note that not all versions of CaptionMaker and
MacCaption have the same exporting capabilities. See Table 1 in this document for a side-by-side comparison of all the features at a glance.
Both CaptionMaker and MacCaption have a variety of export options, including formats for web and mobile video, DVD/Blu-ray, Web, broadcast video formats for SD and HD, etc. Depending on which version of the software you purchase, different features will be available.
From here you will be able to familiarize yourself with the different file formats available for exporting text, caption files, and caption encoded video files. At this point, we encourage you to export any one of the different formats, using the Demo.cca sample file, and test the integration of those files into your workflow.
Exporting Standalone Caption Files
Many types of caption files are standalone, meaning the captions are in a separate file and not embedded into the video file. There are many different types of standalone caption files:
•
For use on the web, such as Timed Text, WebVTT, and SRT files. The type depends on what player you're using on the web.•
Some are meant for use in broadcast workflows, like SCC and MCC. (SCC is also used for DVD closed captioning.)•
Some are used for working with an NLE system to output to tape, such as Final Cut Pro, Avid, and Adobe Premiere.•
Some are used for interchange with other captioners or captioning software, such as Cheetah, CAP, TDS, Ultech ULT, etc.Embedding Captions into Video
Captions embedded in video are typically used for broadcast video files like ProRes, MPEG-2, and MXF. The captions are embedded directly into the video file instead of being saved to a separate file. CaptionMaker and MacCaption do not convert one type of video to another (this is called transcoding and can be done in other Telestream software like Episode Pro or Vantage). If you want to output, for example, an MPEG-2 file with embedded captions, you must provide our software with an MPEG-2 video file in the desired format, and then our program can embed captions in it.
CaptionMaker/MacCaption 6.0 Quick Start Guide
Subtitle Files
There are several ways you can export subtitles:
•
Burn-in: This permanently combines the subtitles and the video. They can't be turned off, but you never have to worry about whether they will work or not.•
Overlay: If you're working with a video editor that wants to burn-in the subtitles,you can send them an overlay file. They put the overlay into their NLE system and render the burn-in video from there. That way, the captioner doesn't need the full resolution master video from the editor.
•
DVD/Blu-ray: Several prosumer and professional software packages for authoring DVD and Blu-ray discs can accept subtitle files. In this case the viewer can turn the subtitle tracks on or off. The type of file to export depends on which authoring soft-ware is being used to author the DVD or Blu-ray.Web Formats
For more on the latest web formats and workflows, please see our Web Solutions page. QuickTime Player or mobile devices like Apple iPad, iPod, iPhone, etc. use a format supporting closed captions exactly like those on a TV, so all the formatting and positioning comes out the same as it does for a broadcast.
Flash videos typically use a Timed Text (DFXP) .XML file, or a SubRip .SRT file, to contain the captions in a file separate from the video file. These captions are tied to the video by the web master. The exact process depends on which Flash player is used on your web site. There are many different types of Flash skins in use. For some samples, please see the Web Samples page on our support site:
http://cpcweb.com/flowplayer/flowplayer_sample.htm
Windows Media videos use a separate SAMI .SMI file to contain the captions. This file should be given the same file name as the video (except for the extension) and placed in the same folder as the WMV video file.
YouTube uses a format called YouTube .SRT (different from SubRip .SRT). Once the video itself has been uploaded to YouTube, the account owner can go to the video Edit page, and upload the YouTube .SRT file under the Captions menu. YouTube also now supports .SCC files, which carry over all the same formatting, positioning, and caption styling as broadcast TV captions do. This is useful if you are uploading a YouTube video that has previously been broadcast with TV-style closed captions.
HTML5 is a technology used to embed video into many modern websites. Most browsers support using a WebVTT captions file included as a <track> element within the HTML5 <video> element on the web page. For more details, please see our support site.
CaptionMaker/MacCaption 6.0 Quick Start Guide
DVD/Blu-ray
You need a DVD authoring system to author the DVD with closed captions and/or subtitles. Our software may be used in conjunction with a DVD authoring system to create the subtitle/caption files that your authoring system requires.
DVD Closed Captioning
For closed captioning a DVD, the file type used is a Scenarist .SCC closed captions file. Unfortunately, the Blu-ray specification does not support closed captioning. However, you can create an SDH subtitle track to mimic the look and feel of closed captioning.
DVD/Blu-ray Subtitle Formats
The subtitle file format depends on what DVD/Blu-ray authoring system you are using.
Broadcast Formats
The DV workflow is ideal for captioning various analog tape formats such as VHS, Hi8, 8mm (through a video converter with Firewire), as well as several DV video formats including Digital8, DV, MiniDV and DVCAM. The export for DV actually adds captions to the DV file itself as part of the DV codec, allowing you to print back to tape via Firewire with captions.
Closed caption data sits in the VAUX Data area of a 720x480 DV video. On the other hand, closed caption data sits in Line 21 of NTSC (525 lines) video. When you transfer the DV video to NTSC, you must use a deck which can transfer the closed caption data from the DV VAUX data area to the NTSC Line 21.
The NLE Workflow is geared towards users who work with professional 720x486 video in SD with a Non-Linear Editing application (i.e. Final Cut Pro, Adobe Premiere, Avid, etc.). The NLE workflow consists of exporting a caption encoded video file from CaptionMaker and MacCaption (called a "black movie") that you drop into the top video track of your final timeline in your NLE. Once it is in your timeline, you simply crop the black movie 98% from the bottom so that only the caption information on the top is visible. You can now output to tape with captions! Black movie files are small enough to zip and email, allowing captioners to work remotely. The following figure shows a black movie with the closed caption data appearing as tiny dashes near the top.
CaptionMaker/MacCaption 6.0 Quick Start Guide The software then exports a 720x486 black video with closed caption data on row 0 or 1. The 720x486 video file is then imported into the NLE system and put on the time line along with the original video. A picture-in-picture or crop effect is then applied to the imported video to mask off all but the closed caption image line to merge the imported video with your original video.
In case you are not adding the closed captions to the video yourself, you can send this black video to the video editor at a different location to superimpose closed captions to the original video. Because these files are 99% black, they can be zipped to about 0.15% for transport. The .zip file can then be emailed or transferred by FTP to the video editor. You don't have to worry about big file sizes.
The FCP Workflow is for outputting SD or HD video from Final Cut Pro 7 over an AJA KONA card, Blackmagic DeckLink card, or Matrox MXO2. FCP7 has a new feature that allows you to add captions on output by pointing to a file with closed caption data that only CaptionMaker and MacCaption can create. Blackmagic and KONA cards can see this data and use it to add captions to your output. The Matrox MXO2 uses a custom workflow that even allows you to down-convert your captions from HD to SD in real time. Caption files for DTV workflows are also small enough to zip and email, allowing captioners to work remotely.
The Adobe Premiere Workflow is for outputting SD or HD video from Adobe Premiere CS 5.5 or later via a hardware card like a AJA KONA, etc. using a .MCC file (HD) or .SCC file (SD).
MPEG-2 is a common file delivery format and professional video codec to which The DTV software can add captions. Both CaptionMaker and MacCaption allow you to add captions to generic HD or SD MPEG-2 Elementary and Program streams. Transport streams are also possible using a 3rd party plug-in from Manzanita.
For more information:
Proofing your HD (708) captions
Note that HDMI and component connections do NOT carry closed captioning data. Consumer digital TVs can only receive caption data via the antenna (coax) input, or as line 21 on the analog SD inputs. The only high definition baseband interface which carries closed captioning data is HD-SDI.
If you are outputting to baseband HD-SDI (such as from an NLE system or a playback device with HD-SDI output), you can use an HD-SDI device to decode the captions. We've had good success with Link Electronics brand caption decoders, as well as TV Logic's monitors with built-in decoders.
For more information on broadcast formats, please see the Telestream/CPC Support Web sites:
•
Telestream—http://www.telestream.net/telestream-support/overview.htmCaptionMaker/MacCaption 6.0 Quick Start Guide
Subtitling
Unlike closed captions which have a rigidly fixed look and feel (white text on black opaque rectangle background, with a fixed font and size), subtitles allow you to use pretty much any font, color, size, etc. that you like. Subtitles also support more languages because unlike captions, you aren't limited to the Roman alphabet plus certain accented characters.
You can switch back and forth between captions and subtitles mode using Display > Display as Subtitles/Captions, or Cmd-D (for MacCaption) or using Subtitle menu and choosing a device like Generic DVD (for CaptionMaker).
Different captioning workflows are supported by different versions of CaptionMaker and MacCaption. See our support page for details.
Black Movie Subtitles are used when you want to deliver just the subtitles as a separate file, without the original video. This is handy if your editor wants to add burned-in (permanent) subtitles to a video using their NLE system. The subtitles file has an alpha channel so that it can be overlaid on top of the original video. These files are very small, so they are easy to e-mail to an editor.
Movie with Separate Subtitles is used when you want to export a high quality video with subtitles as a separate layer together in a single QuickTime file. However, if you're going to hand this video off to someone else, there is one more step. Because some other software doesn't read the extra subtitles layer, you should flatten the file by exporting it via QuickTime Pro or Compressor. This lets you choose the final specs of the file such, as the codec (for example, ProRes, H.264, etc.) and bitrate.
DVD/Blu-ray subtitles can be exported for a number of different professional disc authoring software, such as DVD Studio Pro, Adobe Encore, Scenarist, Blu-print, etc. The right format to choose depends on what software will be used to author the disc.
CaptionMaker/MacCaption 6.0 Quick Start Guide
Importing Caption Files
If you already have a caption file or video file with embedded captions, you might like to bring those captions into our software so you can check and edit them. This is a good way to QC the results after doing an export from our software.
In the previous section, we showed you how to bring a video file into the software for caption authoring. However this step only brings in the video and audio from that file. If the video has captions in it already and you'd like to access those, you must Import the captions from the video (as opposed to simply opening the video).
Our software can import many different types of standalone caption files, including almost all of the types that can be exported by our software.
Our software can also extract the CC portion from many different types of video files, including broadcast videos (ProRes, MXF, MPEG-2, DV, etc.) and also some kinds of web videos if they have embedded captions (H.264, MP4, QuickTime, WMV, etc.).
CaptionMaker/MacCaption 6.0 Quick Start Guide
Live Captioning
Live captioning is only available in the Windows version of our software.
Text Input for Live Events
For both live broadcast captioning and online (web) text streaming, you need a way to input the text in real time. It is not possible to type text on the computer keyboard as fast as people speak. There are two common practices—steno typing and speech recognition software.
Since it is impossible to type as fast as words are spoken, real-time captioning can only be done properly by using a steno machine. A professional real-time captioner can type more than 200 words per minute with over 99% accuracy using a steno machine. Due to their great skills, these professionals are quite expensive for a long term project. For low budget situations, speech recognition software is an alternative solution—not as good as real-time captioning with steno machines, but in some cases it is acceptable. If you are a speaker for live events on a regular basis, you may train speech recognition software to your voice and then caption directly off of your voice.
However, if you are not the only person speaking, that is where you reach the limits of speech recognition software. There is no speech recognition system that can simply take a program's audio feed with various speakers in it and automatically generate captions with sufficient accuracy. (If such a system existed and worked reliably, every TV station would simply have a "magic box" to do all of the captioning, and nobody would need to create their own closed captions.)
To get enough accuracy for closed captioning, you need another person involved in the process, who is known as a shadow speaker, voice captioner, or re-speaker. The shadow speaker acts somewhat like an interpreter who translates from one language to another for a live event. Instead of listening in one language and speaking in another, they just have to listen to the words from different speakers and repeat the words out loud (because the speech recognition software only recognizes their voice).
CC Encoder Hardware
For live broadcast TV encoding, you also need closed caption encoder hardware. They range in price from $1,200 to $10,000 depending on whether the video is analog, digital SD, or digital HD. We do not manufacture any closed caption encoder hardware, but we've typically had the best experience using Link Electronics brand encoders.
Index
A
Activating CaptionMaker19 Activating CaptionMaker Offline21 Activating MacCaption29
Activating MacCaption Offline32 Activating MacCaption Upgrade36 Activating Upgraded CaptionMaker
License25
Adobe Premiere Workflow60 ATS12
Automatic Time Stamp12
B
Black Movie Subtitles61 Broadcast Formats59
C
Caption Style Guidelines13 CaptionMaker42
CaptionMaker License, Deactivating26 CaptionMaker, Activating19
CaptionMaker, Activating Offline21 CaptionMaker, Installing16 CaptionMaker, Upgrading24 CC Encoder Hardware63 Copyright Notice2
D
DCMP13Deactivating CaptionMaker License26 Deactivating, MacCaption License38 DVD Closed Captioning59
DVD/Blu-ray59
E
Embedded Captions57
Exporting Standalone Captions57 Exporting Your Finished Project57
F
FCP Workflow60 Flash videos58
Formatting Text45, 52
Formatting Text (advanced)53
H
HD (708) captions60
I
Importing Text Files42, 50 Importing Video44, 51 Installation15
Installing and Activating CaptionMaker16
Installing and Activating MacCaption27
L
License, Deactivating MacCaption38 Live Captioning63
Live Events63
M
MacCaption50
MacCaption Offline Activation32 MacCaption Upgrade, Activating36
CaptionMaker/MacCaption 6.0 Quick Start Guide MacCaption, Activating29
MacCaption, Installing and Activating27 MacCaption, Upgrading35 Manuals, old10 MPEG disclaimers4 MPEG-260
N
NLE Workflow59notices, legal, generally2
P
Prerequisites for Captioning11
Q
QuickTime Player58S
Separate Subtitles61 Software Versions10 Subtitle Files58 Subtitling61 Support9 Synchronizing Captions47, 55T
Telestream contacting6 Time Stamping47, 55 Timing49, 56 Trademark Notices2 Transcribing a Video11 Tutorials9U
Upgraded License, Activating CaptionMaker25 Upgrading CaptionMaker24 Upgrading MacCaption35
W
Warranty and Disclaimers5 Web Formats58
Windows Media58
Y