-
o6
A member of the 3+0pen family of products. For use with OS/2, version 1.0 or higher, and DOS, version 3.1 or higher.
Copyright © 3Com Corporation, 1988. All rights reserved. 3165 Kifer Road
Portions of this manual are reproduced in whole or in part with permission from Microsoft Corporation.
Trademarks
3+®,3+Backup®, 3+Remote®, 3+Route@, 3+Share®, 3Server® ,3Server3®, 3Server386®, 3Wizard®, 3+ TurboShare®, Etherlink®, Etherlink Enhanced®, and EtherLink Plus® are all registered trademarks of 3Com Corporation. 3+0pen™,3+NetConnectTM, 3+Start™,3StationTM, EtherLink ITTM, EtherSeries™, EtherSeries Enhanced™, EtherStart™, TokenLink™, TokenLink Plus™, and 3Plus™ are trademarks of 3Com Corporation.
Microsoft, Microsoft Word, MS, and MS-DOS are registered trademarks of Microsoft Corporation. IBM PC and PC-DOS are registered trademarks of International Business Machines Corporation. Ethernet is a registered trademark of Xerox Corporation.
Apple, LaserWriter, LaserWriter Plus, Macintosh Plus, Macintosh SE, Macintosh II, and MacDraw are trademarks of Apple Computer, Inc. Macintosh is a trademark licensed to Apple Computer.
Recognition
Thanks to Alan Kessler.
Production by Lori Eng, Cate Lush, Adrian Boyer, Cindy Yates, Christa Schmidt, and Nancy Newlin.
Manual editing by Liz Kroha and Beth Dorrell.
Introduction
Before You Begin xiii
Contents of This Reference xiv Notational Conventions xiv
Notational Convention Examples xv Finding Further Information xvi
Conventions Used in This Guide xvii Keys xvii
Key Combinations xvii Procedural Conventions xvii
Chapter 1: About LAN Manager
Starting LAN Manager 1-1
Logging on to the Local Area Network 1-2 Automatic Startup 1-2
Using LAN Manager 1-3
The LAN Manager Screen 1-3 LAN Manager Commands 1-4 Getting More Information 1-4
On-Line Help 1-4 Error Messages 1-5
Servers Available on the Network 2-12 Listing a Server's Shared Resources 2-13 Resources at (Server) 2-14
Using a Shared Resource 2-15 Stop Using a Shared Resource 2-15 Use the Resource (Network Path) 2-16
Connecting to a Shared Resou rce 2-17
Network Resources in Use at Your Workstation 2-17 Adding a New Connection 2-19
Deleting a Connection 2-19
Getting More Information About a Resource 2-19 Use a Network Resource 2-20
Connecting to the Shared Resource 2-21 Accessing (Network Path) 2-22
Supplying a Password 2-23
Usage Information for a Network Resource 2.,23 Show Print Queues For 2-25
Listing a Server's Print Queues 2-26 Print Queues for (Server) 2-26
Changing the Status of Your Print Job 2-28
Getting More Information About a Job or Queue 2-28 Printing Options for Job 2-29
Changing the Position of a Print Job 2-30 Printing Options for Queue 2-31
Reading Logged Messages 2-43 Clearing the Message Log 2-43 Specify Message Log File 2-43
Specifying a New Message Log 2-45 Pausing Message Logging 2-45 Continuing Message Logging 2-46 Aliases for Messaging 2-46
Adding Message Aliases 2-47 Deleting Message Aliases 2-47 Add an Alias 2-48
Forward an Existing Alias 2-50 Config Menu 2-51
Logon 2-51 Logoff 2-52 Load Profile 2-52 Save Profile 2-52 Change Password 2-52 Stop Net Services 2-52 Log into Network 2-53
Logging on to LAN Manager 2-54 Load Configuration 2-55
Loading a Profile 2-56 Save Configuration 2-57
See Also 2-58
Error Log Record 2-67
Chapter 3: LAN Manager Command Reference
Using LAN Manager Commands 3-2
Service Name Abbreviations 3-2
Option Names 3-3
Commands that Start Services Automatically 3-3
Workstation Service 3-3
Your Log-On 3-4
Using Passwords with Commands 3-4
USing the * Option 3-5 USing IV es and INo 3-5
Command Information 3-6
Command Name and Purpose 3-6
Syntax 3-7
Comments 3-8
Example 3-8
See Also 3-8
Commands in This Manual 3-8
NET 3-10
Syntax 3-10
Comments 3-10
Example 3-11
See Also 3-11
See Also 3-19 NET COpy 3-20
Syntax 3-20 Comments 3-21 Example 3-23 See Also 3-23 NET ERROR 3-24
Syntax 3-24 Comments 3-25 Example 3-25 See Also 3-25 NET FORWARD 3-26
Syntax 3-26 Comments 3-26 Example 3-27 See Also 3-27 NET HELP 3-28
Syntax 3-28 Comments 3-28 Example 3-29 See Also 3-29
Example 3-36 See Also 3-36 NET LOGON 3-37
Syntax 3-37 Comments 3-37 Example 3-38 See Also 3-39 NET MOVE 3-39
Syntax 3-39 Comments 3-40 Example 3-40 See Also 3-41 NET NAME 3-41
Syntax 3-41 Comments 3-42 Example 3-43 See Also 3-43 NET PASSWORD 3-43
Syntax 3-43 Comments 3-44 Example 3-45 See Also 3-45 NET PAUSE 3-45
Syntax 3-45 Comments 3-46 Example 3-46
About Profile Files 3-53 Example 3-53
See Also 3-53 NET SEND 3-54
Syntax 3-54 Comments 3-54 Example 3-55 See Also 3-56
NET START MESSENGER 3-56 Syntax 3-56
Comments 3-57 Example 3-58 See Also 3-58
NET START NETPOPUP 3-59 Syntax 3-59
Comments 3-59 Example 3-59 See Also 3-60
NETSTARTWORKSTATION 3-60
Syntax 3-60 Comments 3-63 Example 3-64 See Also 3-64
See Also 3-72 NETVIEW 3-72
Syntax 3-72 Comments 3-73 Example 3-75 See Also 3-75
Appendix A: Error Messages
LAN Manager Network Error Messages A-1 Alerter Service Messages A-5
NetService Messages A-6 Command Syntax Messages A-6
LAN Manager Application Error Messages A-6
2-20 2-22 2-24 2-25 2-27 2-29 2-31 2-33 2-35 2-36 2-38 2-40 2-42 2-44 2-46 2-49 2-50 2-51 2-53 2-55 2-57 2-59 2-61 2-63 2-65 2-67
Figure 2-10 Figure 2-11 Figure 2-12 Figure 2-13 Figure 2-14 Figure 2-15 Figure 2-16 Figure 2-17 Figure 2-18 Figure 2-19 Figure 2-20 Figure 2-21 Figure 2-21 Figure 2-22 Figure 2-23 Figure 2-24 Figure 2-25 Figure 2-26 Figure 2-27 Figure 2-28 Figure 2-29 Figure 2-30 Figure 2-31 Figure 2-32 Figure 2-33 Figure 2-34
Use a Network Resource Dialog Box Accessing (Network Path) Dialog Box
Usage Information for a Network Resource Dialog Box Show Print Queues For Dialog Box
Print Queues for (Server) Dialog Box Printing Options for Job Dialog Box Printing Options for Queue Dialog Box Show Comm Queues For Dialog Box Comm Queues for (Server) Dialog Box Options for Comm Queue Dialog Box Message Menu
Send a Message Dialog Box
Contents of Current Message Log Dialog Box Specify Message Log File Dialog Box
Aliases for Messaging Dialog Box Add an Alias Dialog Box
Forward an Existing Alias Dialog Box Config Menu
Log Into Network Dialog Box Load Configuration Dialog Box Save Configuration Dialog Box
Change Logon Password at a Server Dialog Box Status Menu
Workstation Statistics Information Dialog Box Network Error Log Dialog Box
Error Log Record Dialog Box
This reference is designed to supplement the 3+0pen MS OS/2lAN Manager User Guide. Before using this reference, you should feel comfortable using MS OS/2. You should be able to create and work with flIes and directories. You should have LAN Manager installed on your computer and be familiar with it. You should be comfortable either using the LAN Manager Screen or typing LAN Manager
commands at the OS/2 prompt. In addition, you should have read the 3 + Open MS
OS/2 LAN Manager User Guide which teaches general LAN Manager concepts, procedures, and terms not explained in this reference.
For information about other manuals in the 3+Open MS OS/2 LAN Manager documentation set, see "Finding Further Information" in this chapter.
• Appendix A: Error Messages lists all of the LAN Manager error messages and comments that can appear at the OS/2 prompt or in LAN Manager Screen message boxes.
Notational Conventions
Throughout this manual, the following conventions are used to distinguish elements of text:
Text Element Indicates
ALL CAPITAL LEITERS Command names and filenames.
Bold New terms.
Bol.d Courier typeface Input.
Regular Courier typeface Screen text.
[Brackets] Nonalphabetic ~ey names such as [Enter] or optlonal optlons.
Italics Variable command option names.
Plain text: /delete Command options to be typed as is.
(NET COpy)~~~ ______ ~ __ ~--~ __ ~----__ ----~---__ ~~
pathnamel=pathname [ .•. 1 J..or---_---~
This means that to copy files you must type the words NET COpy followed by the pathname of the file or files you want to copy. (If you want, you can also specify the pathname to which you want files copied.)
• 3 + Open MS OS/2 LAN Manager User Reference, a reference for users working with LAN Manager commands and the LAN Manager Screen on a netstation. This reference describes each command and dialog box available to the local area network user.
• 3 + Open MS OS/2 LAN Manager Administrator Guide, a procedural guide for the administrator using LAN Manager on a server. This guide describes how to perform administrative tasks on a local area network.
• 3 + Open MS OS/2 LAN Manager Administrator Reference, a reference for the administrator working with LAN Manager commands and the LAN Manager Screen on a server. It describes how to use additional commands and dialog boxes available to administrators.
• 3 +Open MS-DOS@ LAN Manager User Guide, a guide to the command-oriented LAN Manager that runs on DOS netstations. This manual includes a complete reference to the commands available on MS-DOS netstations.
[Backspace] Backspace [Space bar] Space bar [Fl]-[Fx] Function keys
Fl through Fx
.J or [Return] Retumkey [Enter] Enter key
Key Combinations
If two or more keys are to be pressed simultaneously, the keys are linked with a "+" sign. For example, the following key combination resets a netstation:
[Ctrl]+[ Alt ] + [Del]
Procedural Conventions
Terms shown in italics should be replaced with specific information. For example:
makedisk n:.,J
means that you type the command MAKEDISK followed by a drive identifier and press [Return].
Chapter 1: About LAN Manager
3+0pen MS OS/2 LAN Manager provides networking capability to computers running MS OS/2. While 3+Open MS OS/2 LAN Manager is compatible with other PC networking products like 3+, MS Net® for MS-DOS and mM® PC-LAN version 1.2, it offers significant new capabilities, including the following features:
• The LAN Manager Screen, an easy-to-use, menu-oriented interface.
• Nondedicated servers-servers that may be used simultaneously as netstations.
• Advanced security system, user-level access control that allows different users different access permissions.
• Full integration with MS OS/2, including support for running advanced, distributed local area network applications.
Starting LAN Manager
To use a local area network, you must frrst start the 3+Open MS OS/2 LAN
The NET START WORKSTA nON command identifies your computer to the local area network so that you can perform networking tasks using either LAN Manager commands or the LAN Manager Screen.
You can also start two other services on This workstation-the Messenger service and the Netpopup service. For more information about these services, see the NET START MESSENGER, NET START NETPOPUP, and NET START
WORKSTA nON commands in Chapter 3.
Logging on to the Local Area Network
Not only must you identify your computer to the local area network, but you must also identify yourself. To identify yourself to the local area network, you must log on using your user name and log-on password. For example, Mary Sullivan, whose user name is marys and whose log on password is wanderer, uses the
following command to log on to the local area network:
net logon marys wanderer
Once you start the Workstation service and log on to the local area network, you can use local area network resources and perform other tasks using 3+0pen MS
OS/2 LAN Manager.
Automatic Startup
automatically. LAN Manager remembers your user name and password and uses them when you need to log on to a server. When you request use of a server, 3+0pen MS OS/2 LAN Manager automatically sends along your user name and password for verification. See Chapter 2: LAN Manager Screen Reference and Chapter 3: LAN Manager Command Reference for more detail.
Using LAN Manager
Once you have started the Workstation service, you can perform local area network tasks. There are two ways to perform tasks using LAN Manager:
• Typing LAN Manager commands at the OS/2 prompt.
• Selecting options from menus and dialog boxes contained in the LAN Manager Screen.
The LAN Manaaer Screen
The LAN Manager S"creen is a graphical user interface. Menus and dialog boxes provide you with various options from which you can choose without having to remember specific commands. Many people fmd that performing tasks using the LAN Manager Screen is easier and more convenient than typing commands.
For more information about menus and dialog boxes contained within the LAN Manager Screen, see Chapter 2: LAN Manager Screen Reference. For more information about using the LAN Manager Screen, see the 3 + Open MS OS/2 LAN
commands are similar to the commands used for Networks for MS-DOS or
mM
PC-LAN. And, if you are well acquainted with the commands and their options, . typing LAN Manager commands could be the quicker alternative when you perfonn certain local area network tasks.To automate local area network tasks, you can place LAN Manager commands in batch files, including in your STARTUP.CMD file.
For more infonnation about LAN Manager commands and how to use them, see Chapter 3: LAN Manager Command Reference.
See also the 3 + Open MS OS/2 LAN Manager User Guide for more information about performing local area network tasks using LAN Manager commands.
Getting More Information
3+Open MS OS/2 LAN Manager provides more infonnation when you need it by displaying infonnation or error messages and providing on-line help for both the LAN Manager Screen and LAN Manager commands.
On-Line Help
Whether you are perfonning local area network tasks using the LAN Manager Screen or LAN Manager commands, you can get additional infonnation to help you with what you are doing. When you are working in the LAN Manager Screen, you can press [Fl] to get context-sensitive help. This means, for example, that if you are working in the Device Status dialog box and press [Fl], infonnation is
word of the command. For example, if you want more information about using the NET USE command, type the following:
net help use
LAN Manager displays the following information:
The syntax of this command is :
NET USE [device I \ \computername\ sharename]
NET USE [device] \\computername\sharename [password] [/PRINT I /COMM]
NET USE [device I \\computername\sharename] /DELETE
You can also type NET HELP by itself to get a listing of topics for which NET HELP is available:
Help is available on:
AT COMPACT NET
Help on the following NET commands is available:
ACCESS ADMIN AUDIT COMM CONFIG
CONSOLE CONTINUE COpy DEVICE ERROR
FILE FORWARD GROUP HELP LOAD
LOG LOGOFF LOGON MOVE NAME
PASSWORD PAUSE PRINT RUN SAVE
SEND SEPARATOR SESSION SHARE START
STATS STATUS STOP USE USER
VIEW
Error Messages
Message text is a short message that describes the error.
You can use the MS OS/2 HELPMSG command to get further information about any LAN Manager message that appears at the OS/2 prompt. To get more
information, type the HELPMSG command followed by the message identification (NET####). For example, suppose you meant to type the NET START command, but instead typed the following:
net strat
This message would display the following:
NET2622: This command is unknown.
Type NET HELP to view a list of commands.
To get more information about the message itself, type the following:
he1pmsg net2622
LAN Manager then displays an explanation of the message and a suggestion for the next action you should take.
For a complete listing of LAN Manager error messages that may display at the OS/2 prompt, see Appendix A: Error Messages.
Chapter 2: LAN Manager Screen
Reference
With the LAN Manager screen, you use menus and dialog boxes to perform LAN Manager operations. This chapter contains individual reference pages that describe how to use many of the menus and dialog boxes of the LAN Manager screen.
This chapter is arranged as follows:
• Information about using the LAN Manager screen and its menus, dialog boxes, and Help facility.
• A reference page for the View menu, followed by reference pages for dialog boxes associated with that menu.
• Reference pages for the Message menu and related dialog boxes.
• Reference pages for the Config menu and related dialog boxes.
3: LAN Manager Command Reference.
For more infonnation about how to use the 3+Open MS OS/2 LAN Manager menus and dialog boxes, see the 3+ Open MS OS/2 IAN Manager User Guide.
Using the LAN Manager Screen
To display the LAN Manager screen, type the following command from the MS OS/2 command line:
net
Your screen will look something like Figure 2-1:
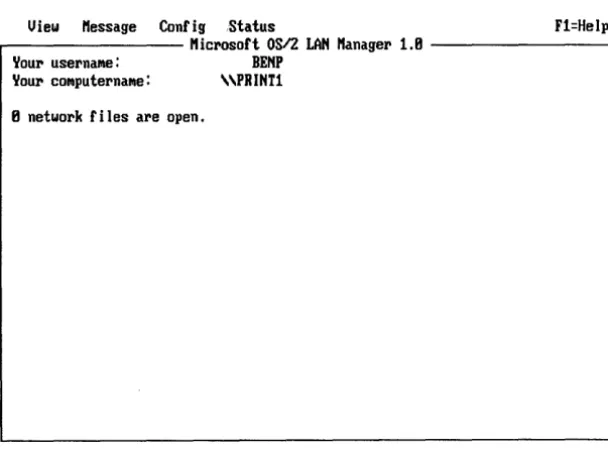
View "essage Config ,Status F1=Help r---l1icl'osoft OSI2 LAN l1anagel' 1.8 - - - ,
Your USel'naMe: BENP
YOUI' cOMputel'naMe: "PRINU
8 network files al'e open.
[image:27.545.64.368.323.548.2]Press the ALT key to select a Menu
• Menu bar.
• Action area.
• Message line.
The menu bar lists the names of all LAN Manager screen menus and a special item, [Fl]=Help.
The action area has two functions:
• It provides information about your server.
• It provides a place for menus, dialog boxes, help boxes, and message boxes to
be displayed.
The message line provides a short description of the selected option.
Netstation Information
The LAN Manager screen includes the following display fields:
Your username
Your computemame
(Number of) network files are open
Shows the name you used to log on.
Shows the name of your netstation. A computer name is always preceded with two backslashes (\\).
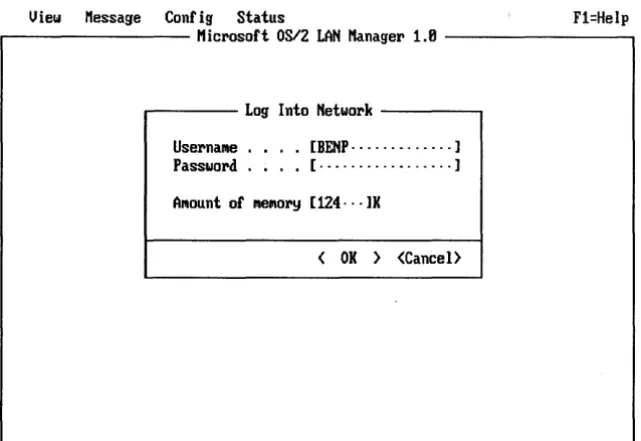
screen if you are not already logged on (see Figure 2-2).
View Message Config status Fl=Help
. . . - - - l 1 i c r o s o f t OS/2 LAN Manager 1.8 - - - ,
r - - - - - Log Into Network - - - , Usernallle . . . . [BENp··· - ... ] Password . . . . [ .. _ ... _ ... ] Alllount of lIIelllory [124···]K
[image:29.543.61.382.208.428.2]< OK ) <Cancel)
Figure 2-2. Initial LAN Manager Screen with Log Into Network Dialog Box
The Log Into Network dialog box allows you to log on to the local area network or to set your user name and password. Once your user name and password are set, you can access resources such as printers and files on the local area network.
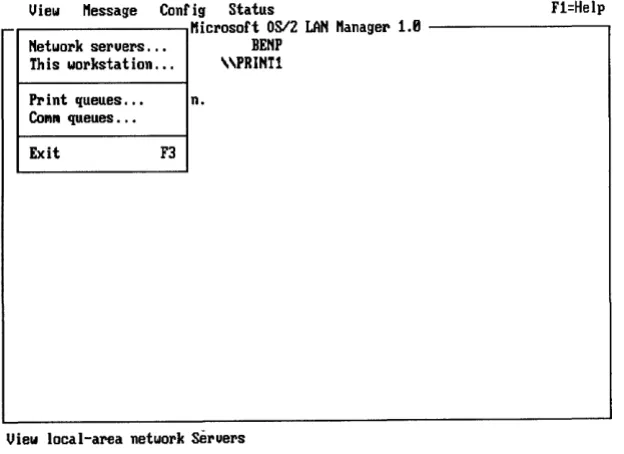
below the menu name. For example, if you type [Alt]+V, the View menu appears (see Figure 2-3).
View ~essage Config Status n=Help ~icrosoft 0812 LAN ~anage~ 1.8
Network serue~s ... BENP This workstation ... "PRINT1
Pr i nt queues ... n.
CollI.. queues ...
Exit F3
[image:30.541.83.395.218.445.2]View local-a~ea network Seruers
Figure 2-3. View Menu
A menu contains one or more options, called menu items. Except for the Exit menu item, any menu item you select leads to a dialog box. Use the arrow keys to select a menu item.
you have selected. When you press [FI], a help box like the one shown in Figure 2-4 displays information about the task that you are performing.
View Message Config status Accounts F1=Help . . . - - - Micl'osort OS/2 LAN l1anagel' 1.8 - - - ,
Your usernaMe: BEMP AdNinistel'ing: \\PRINT1 Your cOMputernaMe: \\PRINT1
8 n
About the LAN ManageI' SCl'een (Page 1 of 1)
The LAN Manager Screen is diuided into three pal'ts:
• Menu bal' -) View I1sg Conf Stat F1
11---f'1J1S OS/2 LAN ManageI' 1. 8----11
• Action area ----) • Message
line ---) Pl'ess the Alt key to select a Nenu.
MENU BAR lists the naMes of all LAN l1anager Screen Nenus. ACTIO" AREA
• shows inforMation about your WOl'kstation 01' Seruer.
• displays MenUSJ dialog boxes J helpJ and Message boxes. MESSAGE LINE describes the option you selected.
<Hext (PgDn) <Back (PgUp) <Index) (Cancel)
[image:31.543.66.374.221.442.2]Press the ALT key to select a Nenu
Figure 2-4. Using [F1] for Help
Help is context -sensitive, meaning that it provides you with information about what you are doing. For example, if you select the This workstation menu item and press [F 1], a help box appears, showing information about how to use this option. If you have not selected a menu, menu item, or dialog box, Help displays general information about the LAN
Manager screen.
_ - - - Dialog Box Name Display field
Text box List box
20 sessions [Name
1st list-box item
A
2nd list-box i t e m ' [image:32.543.75.455.218.577.2]( ) Option 1 (.) Option 2 [Xl Check box <Zoom> <Delete> <OK>
Figure 2-5. Dialog Box Name Sample
Dialog ooxes include one or more elements. Table 2-1 lists all possible dialog box elements and how to use them:
Table 2-1. LAN Manager Dialog Box Elements
Element How To Use It
List Box Use the arrow keys to select a list-box item. Typing the first letter of a list oox item will also bring the highlight on this item.
Text Box Type in infonnation, or select infonnation from a list box.
Command Button Use [Tab] to select a command button.
Option Button Use arrow keys to mark (enable) one option button in a set.
CheckBox Use [Space bar] to mark or unmark a check box. Or
use the Up arrow key i to mark and the Down arrow key .j, to unmark.
Display Field The display field contains infonnation only; cannot
• The name of the dialog box.
• The series of options you must select to access the dialog box.
Dialog Box Access Paths
The access path for a dialog box is documented in this form:
Menu -> Menu Item -> Command Button
The access path shows how to reach the dialog box by selecting a series of options. Options are separated by arrows. For example, a typical access line might look like this:
View-> Print queues -> Zoom
In other words, to get to this dialog box, you would perform these steps:
1. Select the View menu.
2. Choose the Print queues menu item.
3. From the dialog box that appears, choose the Zoom command button.
Menus and Dialoa Boxes in This Chapter
The remainder of this Chapter contains reference pages to the LAN Manager menus and dialog boxes shown in Table 2-2, which also shows their access paths. Note that menus and dialog boxes are arranged in this chapter according to access path.
Select To see
View View menu.
Network servers ... Servers available on the Network. ->Zoom Resources at (server).
-> Use Use the resource (network path).
This workstation ... Network Resources in Use at Your Workstation. ->Add use Use a Network Resource.
->OK Accessing (network path).
->Zoom U sage Information for a Network Resource. Print queues ... Show Print Queues For ....
->Zoom Print Queues for (server). ->Zoom Printing Options for Job. ->Zoom Printing Options for Queue. Comm queues ... Show Comm Queues For ....
->Zoom Comm Queues for (server). ->Zoom Options for Comm Queues. Message Message menu.
Send ... Send a Message.
Read ... Contents of Current Message Log. Log file ... Specify Message Log File.
Aliases ... Aliases for Messaging. -> Add alias Add an Alias.
-> Forward Forward an Existing Alias. Config Config menu.
Logon ... Log into Network. Load profile ... Load Configuration. Save profile ... Save Configuration.
Change password ... Change Logon Password at a Server. Status Status menu.
Workstation Statistics ... Workstation Statistics Information. Error Log ... Network Error Log.
[image:34.541.66.521.169.593.2]The View menu items let you use dialog boxes with information about resources on the local area network. Some of these dialog boxes show the resources being shared by servers. Others show the status of the resources you are using.
A resource can be a print queue, a communication-device queue, or a disk directory that can be shared by a server to the local area network.
The following sections describe the menu items for the View menu.
Network Servers
The Network Servers menu item displays the Servers Available on Network dialog box, which shows the names and comments for servers that are part of your LAN group. You can do the following things from this dialog box:
• Select the computer name of a server to list its shared resources.
• Type the computer name of any server on the local area network to list its shared resources.
• Use a shared resource from a local area network server.
• Stop using a shared resource.
This Workstation
The This Workstation menu item displays the Network Resources in Use at Your Workstation dialog box, which shows all shared resources the local netstation is using. From this dialog box you can do the following things:
• Get more information about one of your netstation's current connections.
• Pause temporarily the use of shared printers and communication devices from your netstation.
• Add a connection to a shared resource.
lists all servers and the print queues they own. It also lists all of your netstation's local devices that are connected to print queues. From this dialog box you can do the following things:
• List the contents of a print queue connected to a local device.
• List the print queues made available by a specific server.
• List the options of a print queue.
• Modify the status of your print job.
CommQueues
The Comm queues menu item displays the Show Comm Queues For dialog box, which lists all servers and the communication-device queues they own. It also names the local devices currently connected to shared communication-device queues. You can do the following things from this dialog box:
• List the communication-device queues for a specified server.
• Check the status of communication-device queues currently connected to a local device.
• List the options of a communication-device queue.
Exit
Access: View
->
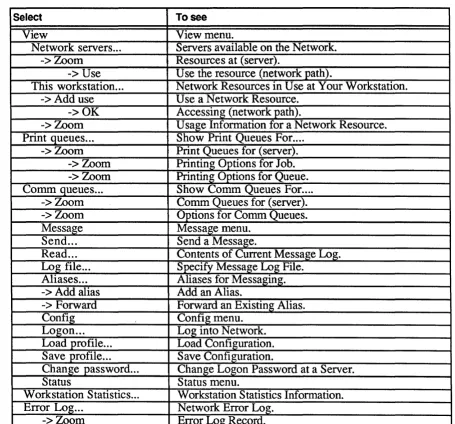
Network serversThe Servers Available on Network dialog box shows the servers available on the local area network. These servers can control resources such as disks, print queues, and
communication-device queues. If a server is sharing resources, you can use a shared resource by redirecting a local device to the network resource. Select the name of a server and the Zoom command button to see a list of resources being shared by a particular server. Figure 2-6 shows the Servers Available on Network dialog box.
View Message Config status F1=Help . . - - - l 1 i c l ' o s o f t 0812 LAN l1anagel' 1.8 - - - .
YOUI' usel'naflle: BENP YOUI' cOfllputel'naflle: \\PRINTl
8 Sel'uel's Auai lable on Netwol'k - - - ' - - - , Sel'uel'naflle [ ... ]
Visible sel'uel' Renal'k
I1IS l1acl'oCorp \\I1IS User Ed lab Server
,
< ZOOfll ) < Done )
[image:37.544.64.369.285.508.2]Press the ALT key to select a nenu
Figure 2-6. Servers Available on Network Dialog Box
Server name
Specifies the name of a server that you want to display more information about.Visible server Remark
Zrom
Done
The names of all visible servers.
A descriptive comment about each server.
Displays the Resources at (Server) dialog box, shown in Figure 2-7. (You must have access permission for a server in order to do this.)
Exits the dialog box and returns to the LAN Manager screen.
Listina a Server's Shared Resources
To see aetailed infonnation about a particular server, perfonn the following steps:
1. Specify the name of the server you want information about by doing one of the following:
• From the list box, select the name of a server.
• In the text box, type in the name of a server.
2. Choose the Zoom command button.
Access: View -> Network servers -> Zoom
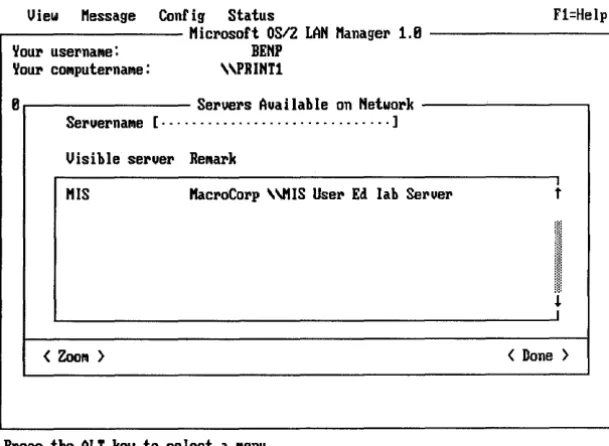
The Resources at (Server) dialog box shows the shared resources controlled by a server. It
shows the local area network name, device type, redirected device name, and a comment about the server. With this dialog box, you can use, or stop using, a shared resource.
View Message Contig Status F1=Help .---l1icrosoft OS/2 LAN Manager 1.8 - - - . ,
Your userna",e: BENP Your co",puternarne: '\PRINT1
S eruers A • I val a e on bl N t e war k
Sel'verna",e [\\11 IS ... ] Resources at \\MIS l1acroCorp \\I1IS User Ed lab Server
Sharenalile Type Used as Re",ark
DEMO Disk De",o share
t
LANMAN Disk LAN l1anager directory MODEM1 COlli'" Non-existent lIIode", SMALL Printer Condensed printing
r--'--- < Use ) < Un-use)
[image:39.546.63.369.242.461.2]Press the ALT key to select a ",enu
Figure 2-7. Resources at (Server) Dialog Box
The list box contains four columns:
Column Contents
I
J.I
< Done )
I
Sharename The name of each shared resource controlled by the server.
Used as The name of a local device redirected to the shared resource. you have redirected more than one local device to the shared
(If
resource, the fIrst local device name, followed by ellipses [\. \ . \ .], appears here.)
Remark
Use
Un-use
Done
A descriptive comment about the shared resource.
Displays the Use the resource (network path) dialog box (see Figure 2-8).
Disconnects the local device from the shared resource.
Returns to the Servers Available on the Network dialog box.
Using a Shared Resource
To use a shared resource, perform these two steps:
1. From the list box, select the name of that resource.
2. Choose the Use command button.
The Use the Resource (network path) dialog box appears. You can then redirect a local device to the shared resource.
Stop Using a Shared Resource
To stop using a shared resource, perform these three steps:
1. From the list box, select the resource.
2. Choose the Un-use command button.
A message box appears, asking you to confrrm your decision.
Access: View
->
Network Servers->
Zoom->
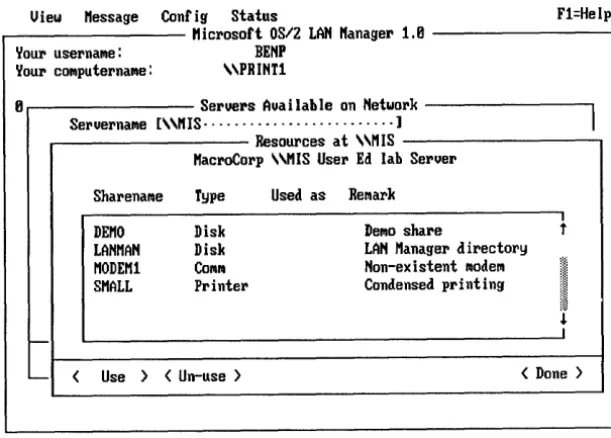
UseThe Use the resource (network path) dialog box allows you to use a shared resource on a server (see Figure 2-8). Depending upon the type of the shared resource you selected before entering this dialog box, a default local device name may appear in the fIrst edit field.
View ~essage Config Status F1=Heip . . . - - - -~icl'osoft 0812 LAN ~anagel' 1.8 - - - ,
YOUI' usel'nallle: BEHP YOUI' cOlllputel'nallle: "PRINT1
S el'uel's ual a A 'I hI e on N twol'k e -Sel'uel'nallle ["~IS· ... ]
I
Resources at "~IS
"MIS test Sel'uerJ UE Macl'oCol'P
Shal'enallle Type Used as Rel'llark
DEMO Disk DelllO shal'e
t
L Use the resoul'ce ""IS'DE~O yM DBlllo shal'e
~
SLocal deuice [F: ... ]
Password [ ... ] J.
I-- ----1
I - - - - < OJ( > (Cancel>
L - - < ( Done )
[image:41.541.64.374.251.475.2]View local-area netwol'k Sel'uers
Figure 2-8. Use the Resource (Network Path) Dialog Box
is running. A password is also required if you did not specify a password when logging on and if this is the frrst shared resource to which you are connecting.
OK Redirects the local device to the shared resource.
Cancel Exits the dialog box without redirecting to the resource and returns to the Resources at (server) dialog box.
Connecting to a Shared Resource
To use the selected shared resource, perfonn these three steps:
1. Type the local device name (for example, E: or LPT2) in the LocaI device text box.
LAN Manager typically suggests an available local device name for you to use.
You may accept the default device name or type in another one.
2. Type the password in the Password text box if necessary.
3. Choose the OK command button.
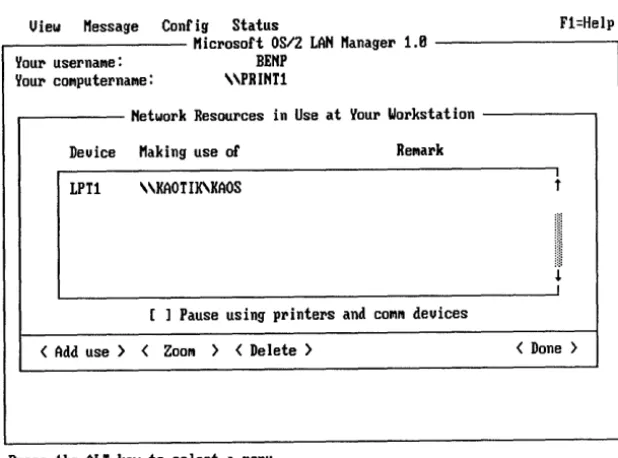
Network Resources in Use at Your Workstation
Access: View
->
This WorkstationYouX' usernaflle: BEHP Your cOfllputernaflle: "PRINTl
Hetwork Resources in Use at YouX' WorkstatIon
Deuice Making use of Refllark
LPTl \\KAOTlK'KAOS
t
II
J.
I [ ] Pause using pX'inters and COfllM deuices
( Add use > ( ZOOfll > ( Delete > < Done >
[image:43.548.67.376.159.388.2]Press the ALT key to select a fIIenu
Figure 2-9. Network Resources in Use at Your Workstation Dialog Box
This dialog box contains one list box with three columns:
Column
Device
Making use of
Remark
Pause using printers and
comm devices
Contents
The local device name.
The network path of the shared local area network resource (in the fonnat \ \server\resource.
A descriptive comment about the shared resource.
Zoom Displays the Usage Infonnation for a Network Resource dialog box.
Delete Disconnects a local device from a shared resource.
Done Exits the dialog box and returns to the LAN Manager screen.
Adding a New Connection
To connect to a new shared resource, perfonn this step:
1. Choose the Add use command button.
The Use a Network Resource dialog box appears, allowing you to use the shared resource you specify.
Deleting a Connection
To disconnect a local device from a shared resource, perform these two steps:
1. Select the device from the list box.
2. Choose the Delete command button.
Getting More Information About a Resource
To get more infonnation about a shared resource, perform these two steps:
1. From the list box, select the name of the shared resource.
2. Choose the Zoom command button.
Access: View -> This workstation -> Add use
The Use a Network Resource dialog box allows you to connect one of your local device names (such as LPT1 and COM1) to a shared resource (see Figure 2-10).
View l1essage Config status F1=Help . - - - Microsoft OS/2 LAN l1anager 1.8 - - - .
YOUI' userna",e: BENP YOUI' co",pute:rna",e: "PHINT!
Network Resources in Use at Your iii k or s a Ion t t'
Deuice Making use of He",a:rk
I I
Use a Network Resou:rce t
I
(.) Disk Type of Use ( ) Co",,,,1
~
( ) Printe:r ( ) Deuiceless use
J.
Local deuice [D: ... ] - - . J
Network resource [ ... ]
f-- Password [ ... ]
< Done >
' - - < OK > <Cancel>
[image:45.544.64.412.227.584.2]Press the ALT key to select a ",enu
Figure 2-10. Use a Network Resource Dialog Box
The Use a Network Resource dialog box includes four option buttons:
Button Function
Disk Defmes the local device as a disk.
Printer Defines the local device as a spooled printer.
Comm Defmes the local device as a communication device. Deviceless use Allows you to connect to a shared resource without
disk devices; LPT# for print queues; and COM# for communication-device queues).
Network resource Specifies the network path of the shared resource (use the format
\ \servenresource).
Password Specifies a password for the shared resource (if the resource requires a password).
OK
Redirects the local device to the shared resource.Cancel Exits the dialog box and returns to the Network Resources in Use at Your Workstation dialog box without redirecting the shared
resource.
Connectina to the Shared Resource
To connect a fOcal device name to a shared resource, perform these five steps:
1. Select the Disk, Printer, Comm, or Deviceless use option button.
LAN Manager fmds the first available local device name for the device type you select and displays that device name in the Local device text box. (No device name displays if you select Deviceless use.)
2. In the Local device text box, type in a new device name (such as E:, LPT2, or COMl) if you want to assign another local device name to the shared
resource.
3. In the Network resource text box, type the network path of the shared resource.
5. Choose the OK command button.
Accessing (Network Path)
NOTE: Network path is the name
of
a server followed by the name of a resource in the fonnat \\servenresource.
Access: View
->
This workstation->
Add use->
OKThe Accessing (network path) dialog box appears if you did not specify a password when connecting to a shared resource that requires a password. It asks you to supply a password for the resource specified (see Figure 2-11).
View ~essage Config Status F1=Help , . . . . - - - l1icrosort OS/2 LAN ~anager 1.8 - - - ,
Your usernane: BENP Your conputernane: \\PRINT1
Network Resources in Use a t Y OUI' W k t t· 01' S a Ion
Device Making use of ReNark
LPT! Accessing \\f1IS\T~P +
You nust supply a password.
I
Enter password [ ... ]
J.
----.J
< OK > <Cancel>
< Add use > < ZOOIll > < Delete > < Done >
[image:47.541.61.369.340.562.2]Press the ALT key to select a lIIenu
OK
Cancel
Redirects your local device to the shared resource if the password you typed is correct.
Exits the dialog box and returns to the Use a Network Resource dialog box.
Supplying a Password
To specify a password for a shared resource on a share-level server, perfonn these two steps:
1. Type in the password.
2. Choose the OK command button.
Usage Information for a Network Resource
Access: View -> This workstation -> Zoom
.---l1icrosoft OS/2 LAN Manager 1.8 - - - , Your usernaMe: BENP
Your cOMputernaMe: "PRINTl
Network Resources in Use at Your Workstation
Device l1aking use of ReMark
I
I
LPTl "KAOTIK'KAOS t Usage InforMation for a Network ResourceLocal device . : LPTl
Network resource : \\KAOTIK\KAOS Status . : OK
- ReNark:
1-'--- < Done>
1-Press the ALT key to select a Menu
Figure 2-12. Usage Information for a Network Resource Dialog Box
Local device
Network resource
Status
Remark
Done
Displays the local device name assigned to the resource (drive: for disk devices; LPT# for print queues; and COM# for communication-device queues).
Displays the network path of the shared resource (in the format
\ \server\resource ).
Displays the status of the local device. The status can be OK, Disconnected, Error, Connecting, or Reconnecting.
Displays a comment about the shared resource.
Access: View -> Print queues
The Show Print Queues For dialog box lists the names of servers in your LAN group and the print queues each is sharing with the local area network. This dialog box also shows local device names that are redirected to shared print queues (see Figure 2-13). From this dialog box, you can select the name of a queue and the Zoom command button to see more information about a particular queue (see Figure 2-14).
View Message Config Status n=Help . - - - Microsoft OS/2 LAN Manager 1.8 - - - ,
Vou:r USel'naMe: BEHP Vou:r cOMputernaMe: "PRINT1
8 n . . - - - Show P:rint Queues For ... - - - . Sel'uernane ["PRINT1···· ... ]
Visible serue:rs
MIS PRIHT1
< ZOOM )
~
IRedirected deuices
LPTl
,
I
< Done )
Pl'ess the ALT key to select a nenu
Figure 2-13. Show Print Queues For Dialog Box
Servemame
Visible servers
Redirected devices
Specifies the name of the server you want more information about.
Lists all servers in your LAN group. If you are using the Entry Level LAN Manager product, this list box should contain only one entry.
information about its shared print queues.
Done Exits the dialog box and returns to the LAN Manager screen.
Listing a Server's Print Queues
To list all print queues shared by a server, perform these two steps:
1. Specify the name of the server one of two ways:
• Select the name of the server from the server list box. • Type in the name of the server in the server text box.
2. Choose the Zoom command button.
Print Queues for (Server)
Access: View
->
Print queues->
ZoomThe Print Queues for (server) dialog box shows the print queues on a server. It also shows the jobs in each print queue and the status of each queue and job (see Figure 2-14). The status of a print queue can be OK, Held, Held until, Pending delete, or Error.
The status of a print job can be listed as Spooling, Held, Printing on (device), Held on (device), Out of paper on (device), Error on (device), Off line on (device), or Waiting.
Your usernallle: BEHP Your cOlllputernallle: \\PRIHTl
Print Queues for ""IS Halile Job I Size Status
DOTTY QUEUE ( 8 Jobs) * Queue Active *
+
SI1ALL QUEUE ( 1 Jobs) * Queue Held *
I
"ARYS 6 1925 Waiting
J.
J
<Hold> <Release> <Restart> <ZOOIIl> <Delete> <Purge> <Done>
Press the ALT key to select a IIlenu
Figure 2-14. Print Queues for (Server) Dialog Box
The Print Queues for (Server) dialog box contains a list box with four columns:
Column Name Job # Size Status
Hold
Release
Restart
Contents
Name of the print queue or owner of the print job. Identification number assigned to the print job. Size (in bytes) of the print job.
Status of the print queue or job.
Holds the selected print job in the print queue so it doesn't print.
Releases the job from its held state.
Delete Removes the selected print job.
Purge Is available to administrators only.
Done Exits the dialog box and returns to the Show Print Queues For dialog box.
Changing the Status of Your Print Job
To change the status of print jobs you own, perform these two steps:
1. Select the job from the list box.
2. Choose one of the following command buttons:
• Hold-to hold the job in the queue and not print it.
• Release-to allow a held job to be sent to the printer.
• Restart-to begin reprinting from the beginning a document that was interrupted due to some error.
• Delete-to remove the print job so that it won't be printed.
Getting More Information About a Job or Queue
1. Select the print job from the list box.
2. Choose the Zoom command button.
NOTE: administrators can change the status of print queues. For more information, see the 3 + Open MS OS/2 IAN Manager Administrator Reference.
Printing Options for Job
Access: View -> Print queues -> Zoom-> Zoom
The Printing Options for Queue dialog box displays printing options for a selected job (see Figure 2-15). From this dialog box, you can move the job to the beginning or the end of a queue.
View Message Config Status Fl=Help M Icroso . ft OS/2 LAN M anager 1 8
~our usernallle: BENP
~our cOlilputernallle: \\PRINI1
Print Queues for "MIS Nalile Job
•
Size StatusPrinting Options for Job
,
t
Job # : 1 Usernaflle : MARVS
I
Sharenaflle : SMALL Move job to: Size : 2741 (.) Unchanged Tiflle queued : 47:23 ( ) First in queue
Tiflle printing : 88:88 ( ) Last in queue
Printing on : l
L - Status : Waiting J
f---- 1
-(H COfllfllent [ ... ] >
< OK > <Cancel>
View spooled print queues
Figure 2-15. Printing Options for Job Dialog Box
Sharename
Size
Time queued
Time printing
Printing on
Status
Comment
Displays the name of the print queue containing the job.
Displays the size (in bytes) of the print job.
Displays the length of time the job has been in the print queue.
Displays the length of time the print job has been printing.
Displays the name of the printer.
Displays the job's status.
Provides a space for you to type the description of the print job.
The Printing Options for Job dialog box includes three option buttons:
Button Unchanged First in queue
Last in queue
OK
Cancel
Function
Print job maintains its original position in the queue. Moves the print job to the beginning of the print queue. This job is printed next.
Moves the print job to the end of the print queue. This job is printed last.
Saves the current options and the dialog box before exiting and returning to the Print Queues for (Server) dialog box.
Exits the dialog box without saving the options and returns to the Print Queues for (server) dialog box.
Changina the Position of a Print Job
• First in queue. • Last in queue.
2. Choose the OK command button.
Printing Options for Queue
Access: View> Print queues -> Zoom -> Zoom
The Printing Options for Queue dialog box displays information for a print queue (see Figure 2-16). Print queue options affect how the queue spools print jobs to its printers. From this dialog box, an administrator can change the options for a print queue.
View Message Config Status F1=Help ~---Microsoft 0812 LAN ManageI' 1.8 - - - .
Your usel'nallle: BENP YOUI' cOlllputernallle: "PRINT1
. . . . - - - Print Queues for "PRINT1 - - - . , . . . . - - - Printing Options fol' Queue ---~
f
-<
Sharenaille . . . : LASER Status . . . . : Held Priority . . . . [5····]
Printel' deuiceCs) [NUL···] Separatol' file [ ... ] Print aftel' . . . [12:88 AM··]
Pl'int until . . . [11:59 PM··]
PI' i nt pl'ocessor [ . . ... ]
Pal'ailleters [ ... ]
,
tI
JI -)
L..-- COllllllent... [ ... ] 1
-< OK > <Cancel)
Pl'ess the ALT key to select a lIIenu
Status Priority
Printer device (s)
Separator file Print after PrintuntiI Print processor
Parameters
CommentOK
CancelDisplays the status of the print queue.
Specifies the priority setting for the print queue. The highest priority is 1; the lowest is 9. (The default is 5.)
Specifies the names of the one or more printers to which the print queue can spool print jobs. Multiple device names are separated by semicolons (;), commas (,), or spaces.
Specifies the name of the file that contains the print job separator page. The print queue prints this page following each print job.
Specifies the time of day (in hh:mm format) the print queue is to begin spooling print jobs to printers. (The default is 00:00.)
Specifies the time of day (in hh:mm format) after which the print queue no longer spools print jobs. (The default is 23:59.)
Specifies the name of the print preprocessor (a program that prepares certain document files for the printer).
Specifies different parameters used by the print preprocessor.
Provides a description of the print queue.
Saves the options in the text boxes and returns to the Print Queues for (server) dialog box (if you arrived here through that dialog box).
Exits the dialog box without saving the options in the text boxes and returns to the Print Queues for (server) dialog box.
Access: View -> Comm queues
The Show Comm Queues For dialog box lists the names of servers controlling
communication-device queues. From this dialog box, you can examine a particular server to see which communication-device queues, if any, it is controlling (see Figure 2-17).
View Message Config Status F1=Help
r - - - Microsoft OSI2 LAN Manager 1.8 - - - , Your usernane: BENP
Your conputernane: "PRINT!
8 n , . - - - Show ConN Queues For ... - - - , Seruernalile [\\PRINT1··· .... ]
Visible seruers
PRINT1 TEST
< Zoon >
Redirected deuices
t
~
J
< Done >
[image:58.540.83.391.235.468.2]Press the ALT key to select a lIIenu
Figure 2-17. Show Comm Queues For Dialog Box
Servemame
Visible servers
Redirected devices
Specifies the name of a server you want more information about.
Lists the names of all servers in your LAN group. If you are using the Entry Level LAN Manager product, this list box should contain only one entry.
Exits the dialog box and returns to the LAN Manager screen. Done
Listing a Server's Comm Queues
To list all communication-device queues shared by a server, perform these two steps:
1. Specify the name of the server one of two ways:
• Select the name of the server from the server list box.
• Type in the name of the server in the server text box.
2. Choose the Zoom command button.
Listing a Comm Queue Linked to a Local Device
To find out which communication-device queue is linked to a particular local device name, perform these two steps:
1. From the Redirected devices list box, select the device name (for example, COM2).
2. Choose the Zoom command button.
Comm Queues for (Server)
Access: View -> Comm queues -> Zoom
The Comm Queues for (Server) dialog box displays a list of all communication-device queues on a server and shows the users' requests waiting in the queue (see Figure 2-18). Alternately, if you specified a particular local device name, this dialog box shows
r - - - l 1 i c r o s o f t OSI2 LAN l1anager 1.8 - - - , Your userna",e: BENP
Your co",puterna",e: "PRINTl
8 n Sh OW C
0"'''
Q ueues F or ... ICOIIIIII Queues for "MIS
Sharenallle Users ahead Users queued
t10DEMl 8
t
I
!.I
< ZOO" > <Purge alI> <Purge self> < Done >
[image:60.541.68.501.35.596.2]Press the ALT key to select a "enu
Figure 2-18. Comm Queues for (Server) Dialog Box
This dialog box displays a list box with three columns:
Column Contents
Sharename Name of the communication-device queue.
(Number of) Users ahead Number of requests preceding the specified request in the queue.
(Number of) Users queued Number of requests waiting in the
communication-Zoom
Purge all
Purge self
device . queue.
Displays the Options for Comm Queues dialog box.
Deletes all jobs in a queue; this command button is available to the administrator on! y.
Getting More Information About a Queue
To fmd out more about a particular communication-device queue, perform these two steps:
1. From the Comm Queues for (server) list box, select the queue.
2. Choose the Zoom command button.
Options for Comm Queue
Access: View -> Comm queues -> Zoom -> Zoom
The Options for Comm Queue dialog box displays information about the communication-device queue you selected. From this dialog box, administrators can change the queue's local devices and priority (see Figure 2-19).
View Message Config Status F!=Help . . . - - - Microsoft OS/2 LAN Manager 1.8 - - - ,
Your usernal'lle: BENP Your cOl'llputernal'lle: "PRIN!!
8 n Sh ow C 01'11111 Q ueues F or ... I
COI'III'II Queues for "MIS
Sharenallle Users ahead Users queued
MODEM! 8
t
Options for COllii'll Queue
Sharenal'lle . : tlODEM!
I Users in queue: 8
I Users ahead :
-Deuices • [COM!· ... ] < ZOOIil > Priority [5·· ... ]
< OK > <Cancel>
[image:61.546.61.370.345.566.2]Press the AL! key to select a lIIenu
# Users in queue
# Users ahead
Devices
Priority
OK
Cancel
Displays the number of requests in the queue.
Displays the number of requests that precede the request from your computer in the queue.
Specifies one or more communication devices to which the communication-device queue can route requests. Multiple device names are separated by semicolons (;), commas (,), or spaces.
Specifies the priority for the communication-device queue. The highest priority is 1; the lowest is 9. (The default is 5.)
Saves the information in the text boxes and returns to the Comm Queues for (server) dialog box.
Exits the dialog box without saving the information in the text boxes and returns to the Comm Queues for (Server) dialog box.
NOTE: Administrators can use this dialog box to change the status of communication-device queues. For more information, see the 3 + Open MS OS/2 IAN Manager Administrator Reference.
Message Menu
8 netwo Log file ..• en. Aliases ...
[image:63.544.55.362.137.363.2]Send a /IIessage
Figure 2-20. Message Menu
Send
The Send menu item displays the Send a Message dialog box from which you can send a messenge to one or more users on the local area network. You may type the text of the message in this dialog box or specify a file containing the message.
Read
The Read menu item displays the Contents of Current Message Log dialog box from which you can do the following things:
• Read messages sent to you by others on the local area network.
can do the following things:
• Type the filename of the message log to store incoming messages.
• Pause or continue message logging.
• Start or stop the Netpopup service.
Aliases
The Aliases menu item displays the Aliases for Messaging dialog box from which you can do the following things:
• Add message aliases to the list for your net station.
• Forward your messages to another user's alias.
• Receive messages for another user.
• Delete an alias.
• Stop forwarding your messages.
Send a Message
Access: Message -> Send
The Send a Message dialog box allows you to send a message or file to a user on the local area network (see Figure 2-21). The user's alias identifies the destination of your message.
Send a Message 8 n
To: (.) NaMe [ ... : ... ]
( ) All LAN users
Send: (.) Message text (type YOUI' Message and pl'ess ENTER)
[ ... ]
( ) Contents of file [*.* ... ]
Files in C:\
Other dl'iues/dil's 4281.DCP
t
5282.DCP BAT
t
ACCOUNTS.NET m~ BIN
ANSICALL.DLL J. BINB J.
J J
[image:65.544.56.501.110.589.2]( OK ) (Cancel> Press the ALT key to select a Menu
Figure 2-21. Send a Message Dialog Box
To Allows you to select from two options to specify the recipient:
Button Function
Name Sends the message to one or more aliases you type in the text box Aliases must be separated by semicolons (;), commas (,), or spaces.
All LAN Users Sends the message to all users on the local area network.
Send Specifies the type of message you are sending:
Button Function
Message text Sends a message you type in the Message text box.
long.
Contents of file Specifies the pathname of a file you want to send.
Files in (directory) Lists the names of files in the current directory. If you specify a wild-card character (* or ?) in the Send Contents of file text box and choose the OK command button, this list box displays filenames that match the wild-card search.
Other drives/dirs Lists the names of disks and directories containing possible message files. Selecting an item changes the contents of the Send Message text box. When you select an item from this list box and also select the OK command button, the contents of the Files in (directory) list box change.
OK Sends the message or file to the specified recipient(s) and returns to the LAN Manager screen.
Cancel Exits the dialog box without sending the message or file and returns to the LAN Manager screen.
Sending a Message
To send a message to one or more users of the local area network, perfonn these three steps:
1. Specify the recipient(s) of your message by selecting one of the To options.
2. Identify the type of message you want to send:
• Select the Message text option and type your message if you want to send a short message.
the wild-card search will appear in the Files in (directory) list box.
3. Choose the OK command button.
Contents of Current Message Log
Access: Message -> Read
The Contents of Current Message Log dialog box displays the contents of the current message log file and allows you to clear the contents of the flie (see Figure 2-21).
Uiew Message Config Status F1=Help
Mic~osoft OS/2 LAN l1anage~ 1.8 Your userna",e: BEHP
Your co",puterna",e: \\PRINT1
Contents of Current Message Log C:\LAHMAN\LOGS\MESSAGES.LOG
Message fro", MARYS to BENP on Jul 86, 1988, 12:49:48
t
Fro",: SERVER at "MIS To: MARYS BEHP JACKST MIKEG Subj: ** ADMIN ALERT **
Date: Jul 86, 1988, 11:46:53
8 access denied errors in the last 5 ",inutes. Recofllfllend you view the serve~'s aud i t t~a i l.
**** !
I
< Clear log > < Done >
[image:67.541.62.370.309.524.2]Press the ALT key to select a fIIenu
Clear log Clears all of the messages in the current log flie.
Done Exits the dialog box and returns to the LAN Manager screen.
Reading Logged Messages
To read die messages in the message log, perform these two steps:
1. Use the Arrow keys to scroll through the contents of the message log.
2. Choose the Done command button to exit the dialog box.
Clearina the Message Log
To erase tlie contents of tlie message log, perform this step:
1. Choose the Clear log command button.
All messages are deleted.
Specify Message Log File
Access: Message ->Log file
The Specify Message Log File dialog box allows you to pause message logging or change the file in which your messages are recorded. The default message log flie is
Specify Message Log File 8 networ
Cur:rent file: C:\LANHAN\LOGS\MESSAGES.LOG New file [*.LOG· .... , ... " ... ·1
Files in C:\LANMAN\LOGS
Other d:riues/di:rs MESSAGES.LOG
t
f
SCHED.LOG
..
IIII
[-A-1
[-B-1 mj
~ [-C-1 ~
I J
[ 1 Pause lIIessage logging
[X1 Enable lIIessage pop ups
( OK > (Cancel>
[image:69.554.64.372.139.353.2]P:ress the ALT key to select a lIIenu
Figure 2-22. Specify Message Log File Dialog Box
Current file New file
Files in (directory)
Other drives/dirs
Displays the filename of the current message log.
Specifies the pathname of a new message log file. Note that if you specify only a filename, LAN Manager creates that file in the LANMAN\LOGS directory. If you do not specify a filename extension, LAN Manager assigns an extension of .LOG.
Lists the files in the LANMAN\LOGS directory. If you specify a wild-card character (* or ?) in the New file text box and choose the OK command button, this list box displays filenames that match the wild-card search.
Lists the names of drives and directories on your computer. Use this list box to search for the name of the new log file for your computer. Selecting an item changes the contents of the New file text box. When you select an item from this list box and than choose the OK command button, the contents of the Files in
Enable message popups
OK
Cancel
message logging.
If marked, starts the Netpopup service. If unmarked, it stops the Netpopup service.
Changes the message log file to the specified file and returns to the LAN Manager screen.
Exits the dialog box without changing files and returns to the LAN Manager screen.
Specifying a New Message Log
To specify a new message log file, perform these two steps:
1. Specify the name of the new message log file in one of two ways:
• In the New file text box, type the filename.
• From the Files in (directory) list box, select the filename.
2. Choose the OK command button.
Pausing Message Logging
To stop the messages you receive from being appended to the messages log, perform these two steps:
1. Mark the Pause message logging check box.
steps:
1. Unmark the Pause message logging check box.
2. Choose the OK command button.
Aliases for Messaging
Access: Message -> Aliases
The Aliases for Messaging dialog box lists aliases for users currently pennitted to receive messages at this computer (see Figure 2-23). Next to each alias, it shows the aliases that the user forwards messages to, or for whom the user receives forwarded messages. You can add or delete an alias from the list, and you can forward or stop forwarding messages.
View Message Config Status F1=Help . - - - Microsoft OS/2 LAN Manager 1.8 - - - ,
YOIlI' IlSel'naMe: BEMP YOIlI' cOMpllternaMe: "PRINT1
8 ~---Aliases for l1essaging - - - , MaMe
BEMP PRIMTl
Forwal'ded to
<Add alias> <Forward> <Unforward> <Delete>
Press the ALT key to select a nenu
+
~
I [image:71.540.60.369.356.575.2]< Done )
Column
Name
Forwarded to
Add alias
Forward
Unforward
Delete
Done
Contents
The message aliases of users pennitted to receive messages
The alias to which the specified user has forwarded messages.
Displays the Add an Alias dialog box.
Displays the Forward an Existing Alias dialog box.
Stops forwarding messages to the selected user.
Removes the selected message aliases from the list of users pennitted to receive messages.
Exits the dialog box and returns to the LAN Manager screen.
Adding Message Aliases
To add a new alias to your netstation, perfonn these three steps:
1. Choose the Add Alias command button.
The Add an Alias dialog box appears.
2. Type the name in the text box.
3. Choose the OK command button.
Deleting Message Aliases
To delete an alias from the list of names that can receive messages at your netstation, perform these two steps:
1. From the list box, select the alias.
To forward your messages to another netstation or server, perform these three steps:
1. From the list box, select your message alias.
2. Choose the Forward command button.
3. The Add an Alias dialog box appears, allowing you to specify the alias of the person or computer to receive the forwarded messages.
When you are ready to stop forwarding your messages, perform these two steps:
1. From the list box, select your alias.
2. Choose the Unforward command button.
Add an Alias
Access: Message -> Aliases -> Add alias
8 . . . - - - Aliases fol' l'Iessaging - - - ,
Hallle
BENP PRIHU
FOl'warded to
r - - - - Add an Alias - - - ,
New alias [ ... ]
< OK > <Cancel>
<Add alias> <Forward> <Unforwal'd> <Delete> < Done >
[image:74.549.77.384.135.350.2]Press the ALT key to select a Nenu
Figure 2-24. Add an Alias Dialog Box
New alias
OK
Cancel
Specifies the message alias of a user. This can be an established user name or any other alias for which this netstation should receive messages.
Adds the specified alias to the list of users pennitted to receive messages and returns to the Aliases for Messaging dialog box.
Access: Message
->
Aliases->
ForwardThe Forward an Existing Alias dialog box allows you to forward your messages to another user (see Figure 2-25). You can forward messages to any user, unless a user is already forwarding messages to you. If you are already forwarding messages to one user and you want to forward to a different user, you must first stop forwarding your messages to the original user.
View Hessage Config Status F1=Help . . . - - - tlicrosoft 0812 LAN tlanager 1.8 - - - ,
Your usernallle: BENP Your cOlllputernallle: "PRINT1
8 . - - - -Aliases fol' tlessaging - - - , Nallle
HENP PRINT!
FOl'warded to
~ Forward an Existing Alias - ' - - - .
Forward alias: HENP
To . . . [ ... ]
( OK > (Cancel>
I
<Add alias> <Forward> <Unfol'ward> <Delete> < Done )
[image:75.541.61.372.249.468.2]Press the ALT key to select a lIIenu
Figure 2-25. Forward an Existing Alias Dialog Box
![Figure 2-4. Using [F1] for Help](https://thumb-us.123doks.com/thumbv2/123dok_us/947366.607822/31.543.66.374.221.442/figure-using-f-for-help.webp)