Configuring Your Gateman Proxy Server
A proxy server acts as an intermediary between a workstation users and the Internet to ensure security, administrative control, distribution of bandwidth and caching service. A proxy server together with a firewall protects a network from outside intrusion. An advantage of a proxy server is that caches pages. If one or more Internet sites are frequently requested, these are likely to be in the proxy's cache, which will improve user response time.A proxy can also log usage and sites visited, as well as block access to sites. This feature gives parents the ability to be aware of their children’s internet habits as well as provides them the ability to block undesirable sites. Within an office this feature allows monitoring usage of the internet facility for non-official purposes.
Gateman Internet Proxy Server Basics
Your Gateman Lifestyle Server includes an Internet Proxy Server that provides a secure internet experience to users. It is based on the World renowned ‘Squid’ Internet Proxy Server and utilizes ‘Squidguard’ Internet Proxy coupled with ‘University of Toulouse Blacklist’ collection to block configured categories of sites. Gateman’s Internet Proxy Server’s features include user configurable white lists, user configurable blacklists, the ability to share bandwidth, timing groups, proxy groups, preconfigured blacklists and reports based on monitored usage. Gateman provides an HTTP proxy service only; it does not provide proxy services for SMTP, POP or SOCKS as it has its own built-in e-mail server.
Internet Proxy Configuration
Configure Gateman’s Internet Proxy by selecting ‘Proxy’ from the ‘Administration’ menu. It opens a window that offers a variety of configuration options.
Configure the Allowed Sites
The ‘Misc settings’ screen (described in a later section) has a set of preconfigured blacklisted domains that the user may be barred from visiting. In the event some desirable sites are inadvertently blocked, the administrator may include the allowed site names in the ‘Allowed sites’ to over-ride the blocked sites. Click the ‘Allowed sites’ button to configure a set of domains that a user is allowed access to. This opens up the following page where the administrator may enter a set of filters for the purpose. Below is an explanation of required terms:
URL – The complete address that you see in the address bar of your internet browser e.g.
http://www.mygateman.org/files/ConfiguringYourGatemanProxyServer.pdf
Domain – It consists of the web site identifier – e.g. www.mygateman.org
URL path – The path to a resource within a domain – e.g. /files/ConfiguringYourGatemanProxyServer.pdf
Configure the Denied Sites
Click ‘Denied sites’ to configure the set of filters. They allow you to specify sites or files that you wish to block. For example, if you wish to deny download of mp3 files you could block any URL with the word ‘mp3’ within it or even within the ‘URL path’ alone. Use this screen to block access to sites or resources that you wish. In a later section you will configure the groups against which this will apply.
Choose a suitable name Choose the
appropriate radio button, then enter the filter details as
required
Click to Add the filter
Select the required name from the group and
click to ‘Delete’ Select the required
name from the group, modify the
filter entries and click to ‘Modify’
Enter a suitable name Choose the
appropriate radio button, then enter the filter details as
required
Click to Add the filter
Select the required name from the group list
and click to ‘Delete’ Select the required
name from the group list, modify
the filter entries and click to
Configure the Bandwidth Groups
Your Gateman Proxy Server provides you with the ability to share the available bandwidth in any ratio between different user categories. For example:
Within a home, if you find the children hogging the bandwidth with their large downloads, you may configure the proxy to drop the user speed for files beyond a certain size.
Within an organisation one may wish to have multiple bandwidth groups; a fast speed set aside for those who require frequent internet access for their work and a slow one for those that do not require internet access.
Note that you must set at least one bandwidth group. Also a user group must be assigned to a single bandwidth group.
Following are an explanation of the terms used:
User bandwidth (kbps) – The maximum bandwidth that will be allotted to any single user. User download (Kbytes) – The max size of file that can be downloaded at the User bandwidth
speed.
Group bandwidth (Kbps) – The bandwidth that will be shared between all users belonging to this group at any point in time
Group download (Kbytes) – If the total size of downloads by uses of this group an any point in time exceeds the specified size, then the users downloading the files will be slowed.
Example for a Home with a 2MBPS Internet connection Have a single Bandwidth group as follows...
Group name: FAST Group bandwidth: 2000 Group download: 2500 User bandwidth: 1000 User download: 1000
Configure the Timing Groups
Your Gateman Proxy Server allows you to configure times during which a person can browse the internet. This is useful in a variety of situations including:
Restricting internet access to children to between 7:00pm and 9:00pm on weekdays and between 8:00am and 9:00pm on weekends
Allowing internet access to a group of employees during their lunch break
In this section you must configure the Timing groups; selecting the timing appropriate to the user groups is done in the next section. Note a user group can be allowed access during multiple timing groups.
For a home with school going children one might configure the following Timing groups: Weekdays – Monday to Friday – 7pm to 9pm
Weekends – Saturday and Sunday – 7am to 9pm
Everyday – Monday to Sunday – 012:00:01am to 11:59:59pm
Configure the Internet Proxy Groups
Click the ‘Proxy groups’ button to open a screen that allows you to create a Proxy group and configure the properties for the group. These Proxy Groups will then be available within the ‘User Administration’ section where you may assign a user to a group.
Typically you will create a group for each category of user based on the different functional requirements. Within a home for example, one may have 3 categories; parents, children, guests. In a business one may have manager, staff, visitor, etc.
Configuration of a new Proxy Group is done through a wizard. Click the ‘New’ button to open the wizard screen.
Fig: New Proxy Group Wizard – Screen 1
Fig: New Proxy Group Wizard – Screen 2
Note IP Address Range is appropriate for facilities where there are a large number of users and the IP addresses are known or assigned by a DHCP server. This may be the case with Visitor or Student groups.
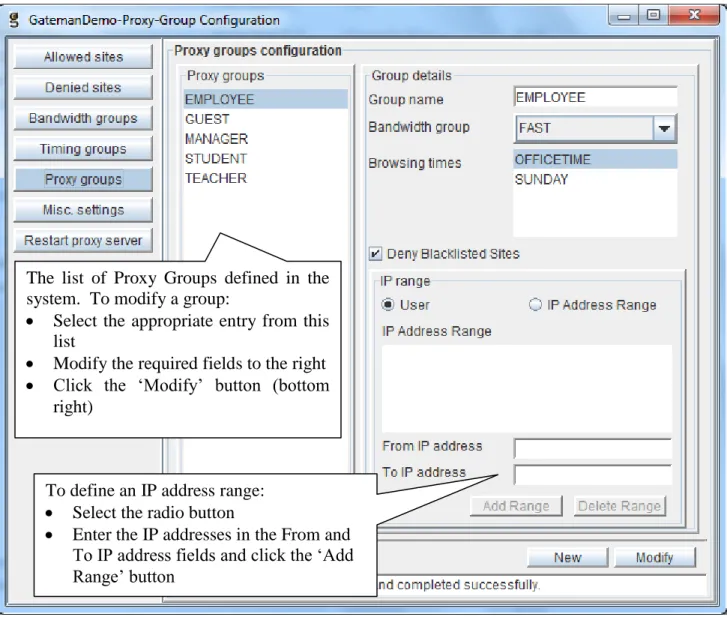
After clicking the ‘Finish’ button on the wizard, the configured group is displayed in the Proxy Groups Configuration page as shown.
A suitable name to identify the group
Select the bandwidth assigned to the group
Select one or more browsing times for
the group
Check to deny access to the blacklisted sites
defined earlier
The user will require to log in to the proxy server
to get to the internet
The user goes directly to the internet, if the IP address of the workstation is within the assigned range (defined later)
Fig: The Proxy Group Configuration Screen
Note a group once created can be renamed, but not deleted. A group may not have any user assigned to it.
Misc Settings for Gateman’s Internet Proxy Server
Click the ‘Misc settings’ button to be able to configure the additional settings for the proxy server. There are a number of subsections in this interface that are defined below.
Providing HTTP access on ports other than port 80
The ‘Enable HTTP Access on destination ports’ box must be checked and the suitable ports defined in order to allow a user to access sites via ports other than PORT 80 (the default HTTP port). Selecting FTP, POP, etc only define the default port traditionally assigned to those services; Gateman will now allow those remote ports to be accessed by the user for HTTP services (it does not mean
The list of Proxy Groups defined in the system. To modify a group:
Select the appropriate entry from this list
Modify the required fields to the right Click the ‘Modify’ button (bottom
right)
To define an IP address range: Select the radio button
Enter the IP addresses in the From and To IP address fields and click the ‘Add Range’ button
that it will provide an FTP or POP proxy protocol). This setting is useful to allow or block access to services such as Skype, MSN, etc which are on well defined ports.
Note if you wish to allow your users to access their email via a POP server on the internet, you will need to provide these users to NAT access via the ADSL router or through Gateman’s Firewall. In order to ensure that the users do not bypass the proxy server (if configured), please ensure that only certain destination ports (e.g. POP, SMTP, etc) are opened for NAT.
Banned categories for all users
As explained at the start, your Gateman Proxy server includes the widely used open source ‘Squidguard’ engine, that allows a user to block access to a set of predefined URLs on the web. Your Gateman proxy server utilises the ‘University of Toulouse’ Blacklist which is regularly updated, in order to provide a reliable set of blacklists in a set of predetermined categories. If you choose to use the blacklists, this restriction will apply to all Proxy Users irrespective of the group they belong to. You may however have a set of user’s directly access the Internet using NAT via the ADSL router or Gateman’s firewall. Note your Gateman’s blacklists are automatically updated regularly via our Internet Server (typically once a month)
The Configuration Screen Check to enable Gateman’s Internet Proxy Server
The port on which the proxy service is started; traditionally 8080 or 3128
The interfaces on which the proxy server will be started
Duration to retain the user internet access records for Cost info used in reports
Configuring Internet Proxy Users
After configuration of your Gateman Internet Proxy Server and other Gateman modules (e.g. Devices, Access Control and Attendance, File and Email Server), you need to define the users and assign them to various groups. This is done from within the ‘Administration -> Users’ menu. Please refer to the relevant document for additional details.
For each configured user, the administrator may enable or disable Internet Proxy access and assign the user to a suitable Proxy Group.
Applying the Changes
Once the configuration changes defined in each of the previous subsections is completed, you will need to restart your Gateman Service used for the Internet Proxy. Select the ‘Restart Proxy Server’ button and in the screen that opens select the ‘Restart Proxy Server’ button. This operation takes a few seconds and when complete, you will see a message in the ‘Status bar’.
Assign the user to a suitable Proxy Group