QNX
®
Software Development Platform 6.6
QNX
®
Software Development Platform 6.6
Screen Graphics Subsystem
Developer's Guide
©2010–2014, QNX Software Systems Limited, a subsidiary of BlackBerry Limited.
All rights reserved.
QNX Software Systems Limited
1001 Farrar Road
Ottawa, Ontario
K2K 0B3
Canada
Voice: +1 613 591-0931
Fax: +1 613 591-3579
Email: [email protected]
Web: http://www.qnx.com/
QNX, QNX CAR, Momentics, Neutrino, and Aviage are trademarks of BlackBerry
Limited, which are registered and/or used in certain jurisdictions, and used
under license by QNX Software Systems Limited. All other trademarks belong
to their respective owners.
Table of Contents
About Screen
...9
Typographical conventions ...11
Technical support ...13
Chapter 2: Overview of Screen ...17
Chapter 3: Understanding composition ...21
Chapter 4: Screen API
...27
Chapter 5: Contexts ...29
Create a context ...30
Context types ...31
Set a context property ...32
Chapter 6: Windows ...33
Window types ...34
Window properties ...36
Window parenting and positioning ...39
Create a window ...41
Create a child window ...43
Pixel formats ...44
Chapter 7: Displays ...47
Multiple displays ...48
Complete sample: Using multiple displays ...50
Chapter 8: Event Types ...55
Chapter 9: Screen Tutorials
...57
Tutorial: Draw and perform vsync operations using windows ...58
Create the background window ...58
Create the child windows ...60
Create the main() function ...63
Complete sample: A vsync application using windows ...67
Tutorial: Draw and perform vsync operations using blits, pixmaps, and buffers ...70
Create a context and initialize a window ...70
Create buffers and a pixmap ...71
Screen Graphics Subsystem Developer's Guide
Combine buffers with blit functions and properties ...72
Complete sample: A vsync application using blits, pixmaps, and buffers ...73
Tutorial: Write an application using OpenGL ES ...75
Use OpenGL ES in a windowed vsync application ...75
Complete sample: A windowed vsync application using OpenGL ES ...86
Tutorial: Screenshots ...99
Capture a window screenshot ...99
Complete sample: a window screenshot example ...102
Capture a display screenshot ...107
Complete sample: A display screenshot example ...110
Tutorial: Rendering text with FreeType and OpenGL ES ...113
Using FreeType library and OpenGL ES to render text ...113
Complete sample: Rendering text with FreeType and OpenGL ES ...119
Tutorial: Screen events ...131
Injecting a Screen event ...131
Complete sample: Injecting a Screen event ...133
Injecting a Screen mtouch event ...135
Complete sample: Injecting a screen event ...138
Chapter 10: Screen Configuration
...141
Configure Screen ...142
Configure khronos section ...144
Configure winmgr section ...146
Apply your Screen configuration ...167
Troubleshooting ...169
Chapter 11: Screen Library Reference ...179
Function safety ...180
Function execution types ...181
Apply execution ...182
Delayed execution ...182
Flushing execution ...183
Immediate execution ...183
Function types ...184
General (screen.h) ...189
Definitions in screen.h ...189
_screen_mode ...189
Screen CBABC mode types ...190
Screen alpha mode types ...191
Screen color space types ...192
Screen flushing types ...193
Screen idle mode types ...193
Screen mirror types ...194
Screen mouse button types ...195
Table of Contents
Screen object types ...196
Screen pixel format types ...196
Screen power mode types ...199
Screen property types ...200
Screen scaling quality types ...245
Screen sensitivity masks ...246
Screen sensitivity types ...249
Screen touch types ...250
Screen transparency types ...251
Screen usage flag types ...252
Blits (screen.h) ...255
Screen blit types ...255
screen_blit() ...258
screen_fill() ...260
screen_flush_blits() ...261
Buffers (screen.h) ...263
Screen buffer properties ...263
screen_buffer_t ...264
screen_create_buffer() ...264
screen_destroy_buffer() ...265
screen_get_buffer_property_cv() ...265
screen_get_buffer_property_iv() ...267
screen_get_buffer_property_llv() ...268
screen_get_buffer_property_pv() ...269
screen_set_buffer_property_cv() ...270
screen_set_buffer_property_iv() ...271
screen_set_buffer_property_llv() ...272
screen_set_buffer_property_pv() ...273
Contexts (screen.h) ...275
Screen context properties ...275
Screen notification types ...276
screen_context_t ...276
Screen context types ...277
screen_create_context() ...279
screen_destroy_context() ...280
screen_flush_context() ...280
screen_get_context_property_cv() ...281
screen_get_context_property_iv() ...282
screen_get_context_property_llv() ...284
screen_get_context_property_pv() ...285
screen_notify() ...286
screen_set_context_property_cv() ...287
screen_set_context_property_iv() ...288
screen_set_context_property_llv() ...289
screen_set_context_property_pv() ...290
Screen Graphics Subsystem Developer's Guide
Debugging (screen.h) ...292
Screen debug graph types ...292
Screen packet types ...293
screen_print_packet() ...294
Devices (screen.h) ...296
Screen device metric counts ...296
Screen device properties ...297
Screen game button types ...298
screen_device_t ...300
screen_create_device_type() ...300
screen_destroy_device() ...301
screen_get_device_property_cv() ...302
screen_get_device_property_iv() ...303
screen_get_device_property_llv() ...304
screen_get_device_property_pv() ...305
screen_set_device_property_cv() ...306
screen_set_device_property_iv() ...308
screen_set_device_property_llv() ...309
screen_set_device_property_pv() ...310
Displays (screen.h) ...311
Screen display metric count types ...311
Screen display mode types ...313
Screen display properties ...313
Screen display technology types ...315
Screen display types ...316
screen_display_mode_t ...317
screen_display_t ...317
screen_get_display_modes() ...318
screen_get_display_property_cv() ...319
screen_get_display_property_iv() ...320
screen_get_display_property_llv() ...322
screen_get_display_property_pv() ...323
screen_read_display() ...324
screen_set_display_property_cv() ...325
screen_set_display_property_iv() ...326
screen_set_display_property_llv() ...327
screen_set_display_property_pv() ...328
screen_share_display_buffers() ...329
screen_wait_vsync() ...330
Events (screen.h) ...332
Screen event properties ...332
Screen event types ...334
screen_create_event() ...337
screen_destroy_event() ...338
screen_event_t ...338
Table of Contents
screen_get_event() ...339
screen_get_event_property_cv() ...340
screen_get_event_property_iv() ...341
screen_get_event_property_llv() ...344
screen_get_event_property_pv() ...345
screen_inject_event() ...347
screen_send_event() ...348
screen_set_event_property_cv() ...349
screen_set_event_property_iv() ...350
screen_set_event_property_llv() ...353
screen_set_event_property_pv() ...354
Groups (screen.h)
...357
Screen group properties ...357
screen_create_group() ...357
screen_destroy_group() ...358
screen_get_group_property_cv() ...359
screen_get_group_property_iv() ...360
screen_get_group_property_llv() ...361
screen_get_group_property_pv() ...362
screen_group_t ...363
screen_set_group_property_cv() ...364
screen_set_group_property_iv() ...365
screen_set_group_property_llv() ...366
screen_set_group_property_pv() ...367
Pixmaps (screen.h) ...369
Screen pixmap metric counts ...369
Screen pixmap properties ...370
screen_attach_pixmap_buffer() ...371
screen_create_pixmap() ...372
screen_create_pixmap_buffer() ...373
screen_destroy_pixmap() ...373
screen_destroy_pixmap_buffer() ...374
screen_get_pixmap_property_cv() ...375
screen_get_pixmap_property_iv() ...376
screen_get_pixmap_property_llv() ...377
screen_get_pixmap_property_pv() ...378
screen_join_pixmap_group() ...379
screen_leave_pixmap_group() ...380
screen_pixmap_t ...381
screen_ref_pixmap() ...381
screen_set_pixmap_property_cv() ...382
screen_set_pixmap_property_iv() ...383
screen_set_pixmap_property_llv() ...384
screen_set_pixmap_property_pv() ...385
screen_unref_pixmap() ...386
Screen Graphics Subsystem Developer's Guide
Windows (screen.h) ...388
Screen window metric counts ...388
Screen window properties ...393
Screen window types ...395
screen_attach_window_buffers() ...396
screen_create_window() ...397
screen_create_window_buffers() ...398
screen_create_window_group() ...399
screen_create_window_type() ...400
screen_destroy_window() ...401
screen_destroy_window_buffers() ...402
screen_discard_window_regions() ...403
screen_get_window_property_cv() ...404
screen_get_window_property_iv() ...405
screen_get_window_property_llv() ...407
screen_get_window_property_pv() ...408
screen_join_window_group() ...410
screen_leave_window_group() ...411
screen_post_window() ...411
screen_read_window() ...414
screen_ref_window() ...415
screen_set_window_property_cv() ...416
screen_set_window_property_iv() ...417
screen_set_window_property_llv() ...419
screen_set_window_property_pv() ...420
screen_share_window_buffers() ...421
screen_unref_window() ...422
screen_wait_post() ...423
screen_window_t ...424
Table of Contents
About Screen
Screen Graphics Subsystem is a compositing windowing system that can composite
graphics from several different rendering technologies.
Screen allows developers to create specific vertical applications using industry-standard
tools in a UI development environment. UI technologies that Screen can combine
include HTML5, Elektrobit GUIDE, Crank Storyboard, Qt, and native (e.g., OpenGL
ES) code.
Screen
Board support package (BSP) Hardware Other frameworks - Crank Storyboard - Elektrobit GUIDE - more... HTML5 application environment - HTML5 - JavaScript - CSS3 QNX OS Vertical Applications HMI Qt development environment
Figure 1: Screen
Screen enables developers to create separate windows for the output of each rendering
technology (e.g., HTML5, Qt, Video, or OpenGL ES) so that each window can be
transformed (e.g., scaling, translation, rotation, alpha blending, etc.) to build the final
scene for display.
The Screen Graphics Subsystem Developer's Guide is intended for application
developers. This table may help you find what you need in this guide:
See:
To find out about:
Overview of Screen
(p. 17)
Overview of Screen
Understanding composition
(p. 21)
Composition
Screen API
(p. 27)
Screen API
Contexts
(p. 29)
Contexts
Windows
(p. 33)
Windows
Displays
(p. 47)
Displays
Event Types
(p. 55)
Event Types
Configuring Screen
(p. 141)
Configuring Screen
Screen Tutorials
(p. 57)
Screen Tutorials
See:
To find out about:
Screen Library Reference
(p. 179)
Screen Library Reference
10
© 2014, QNX Software Systems Limited
Typographical conventions
Throughout this manual, we use certain typographical conventions to distinguish
technical terms. In general, the conventions we use conform to those found in IEEE
POSIX publications.
The following table summarizes our conventions:
Example
Reference
if( stream == NULL)
Code examples
-lR
Command options
make
Commands
NULL
Constants
unsigned short
Data types
PATH
Environment variables
/dev/null
File and pathnames
exit()
Function names
Ctrl–Alt–Delete
Keyboard chords
Username
Keyboard input
Enter
Keyboard keys
login:
Program output
stdin
Variable names
parm1
Parameters
Navigator
User-interface components
Options
Window title
We use an arrow in directions for accessing menu items, like this:
You'll find the Other... menu item under Perspective
Show View.
We use notes, cautions, and warnings to highlight important messages:
Notes point out something important or
useful.
Cautions tell you about commands or procedures that may have unwanted
or undesirable side effects.
Warnings tell you about commands or procedures that could be dangerous
to your files, your hardware, or even yourself.
Note to Windows users
In our documentation, we typically use a forward slash (
/
) as a delimiter in pathnames,
including those pointing to Windows files. We also generally follow POSIX/UNIX
filesystem conventions.
12
© 2014, QNX Software Systems Limited
Technical support
Technical assistance is available for all supported products.
To obtain technical support for any QNX product, visit the Support area on our website
(
www.qnx.com
). You'll find a wide range of support options, including community
forums.
Chapter
1
About Screen
Screen Graphics Subsystem is a compositing windowing system that can composite
graphics from several different rendering technologies.
Screen allows developers to create specific vertical applications using industry-standard
tools in a UI development environment. UI technologies that Screen can combine
include HTML5, Elektrobit GUIDE, Crank Storyboard, Qt, and native (e.g., OpenGL
ES) code.
Screen
Board support package (BSP) Hardware Other frameworks - Crank Storyboard - Elektrobit GUIDE - more... HTML5 application environment - HTML5 - JavaScript - CSS3 QNX OS Vertical Applications HMI Qt development environment
Figure 2: Screen
Screen enables developers to create separate windows for the output of each rendering
technology (e.g., HTML5, Qt, Video, or OpenGL ES) so that each window can be
transformed (e.g., scaling, translation, rotation, alpha blending, etc.) to build the final
scene for display.
The Screen Graphics Subsystem Developer's Guide is intended for application
developers. This table may help you find what you need in this guide:
See:
To find out about:
Overview of Screen
(p. 17)
Overview of Screen
Understanding composition
(p. 21)
Composition
Screen API
(p. 27)
Screen API
Contexts
(p. 29)
Contexts
Windows
(p. 33)
Windows
Displays
(p. 47)
Displays
See:
To find out about:
Event Types
(p. 55)
Event Types
Configuring Screen
(p. 141)
Configuring Screen
Screen Tutorials
(p. 57)
Screen Tutorials
Screen Library Reference
(p. 179)
Screen Library Reference
16
© 2014, QNX Software Systems Limited
Chapter
2
Overview of Screen
Screen is a compositing windowing system.
Unlike traditional windowing systems that arbitrate access to a single buffer associated
with a display, this compositing windowing system provides the means for applications
to render off-screen.
Rendering to off-screen buffers allows the manipulation of window contents without
having to involve the applications that are doing the rendering. Windows can be moved
around, zoomed in, zoomed out, rotated, or have transparency effects applied to them,
all without requiring the application to redraw or even be aware that such effects are
taking place.
Screen is responsible for:
•
running all drivers (e.g., input, display, OpenGL ES)
•
allocating memory needed by application windows
•
displaying content when rendering completes
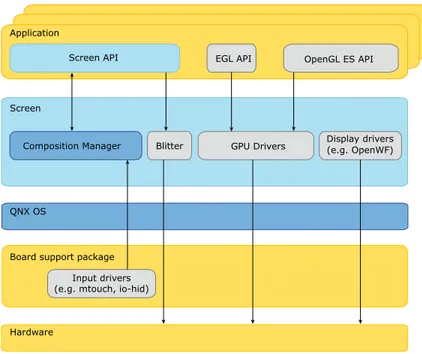
Screen integrates multiple graphics and user interface (UI) technologies into a single
scene. This scene is rendered into one image that is associated with a display.
Application
Screen
Board support package
OpenGL ES API Screen API EGL API
Blitter
Input drivers (e.g. mtouch, io-hid)
Hardware Composition Manager QNX OS Display drivers (e.g. OpenWF) GPU Drivers
Handling composition
The main responsibility of Screen is to combine all visible window buffers into one
final image that is displayed. This responsibility is handled by the Composition Manager
and is achieved using several classes of hardware. The Composition Manager can be
configured to use available compositing hardware in a way that best meets the needs
of a particular system.
Screen has a plug-in architecture that includes hardware-specific compositing modules
and a module for OpenGL for Embedded Systems (OpenGL ES).
Screen uses GPU-accelerated operations to optimally build the final scene. You may
resort to using software rendering if your hardware cannot satisfy the requests. The
graphics drivers and display controllers that run within Screen are based on the OpenWF
Display (WFD) API.
Communicating with applications
Applications communicate with the Composition Manager using Screen API to perform
such tasks as the following:
•
creating and destroying windows.
•
creating and destroying pixmaps.
•
using accessor functions to set and get native window, pixmap, display, device,
and buffer properties.
•
drawing into native buffers that are associated with windows and pixmaps
•
making areas, within buffers, that can be displayed.
•
Receiving and processing asynchronous events from Screen.
•
sending events to other windowed applications.
Applications can render using:
•
software; applications access the window buffer and write to it using the CPU.
•
OpenGL ES; use EGL to target the window buffer(s) with OpenGL ES calls.
Sample Screen applications
Screen provides a set of sample native applications that demonstrate what you can
do with the Screen API. These sample applications are installed on your host under
each target-specific directory under
$QNX_TARGET.
Running these applications will help in determining whether or not you have set the
appropriate Screen configuration.
/usr/bin/calib-touch
This utility loads or creates an
mtouch
calibration file,
/etc/system/con
fig/calib.<hostname>
. If the calibration file needs to be created, the
user will be prompted to calibrate.
18
© 2014, QNX Software Systems Limited
/usr/bin/display_image
This application displays a specified image to the specified display.
/usr/bin/egl-configs
This utility queries and displays the number of all the frame buffer
configurations for the specified display. If no display is specified, then the
default display is used.
/usr/bin/events
This application uses a window manager connection to Screen. It prints all
events to the console output as they are received.
/usr/bin/font-freetype
This application shows how to render text with FreeType and OpenGL ES
1.X.
/usr/bin/gles1-gears
This application shows windowed gears that use OpenGL ES 1.X for the
rendering API.
/usr/bin/gles2-gears
This application shows windowed gears that use OpenGL ES 2.X for the
rendering API.
/usr/bin/gles2-maze
This application uses OpenGL ES 2.X for the rendering; it demonstrates how
to use texture as well as vertex and fragment shaders.
/usr/bin/print-gestures
This application detects and displays recognized gestures.
/usr/bin/screenshot
This application takes a screenshot of a specified size of the display and
saves the output file in BMP format.
/usr/bin/sw-vsync
This application shows windowed vsync that uses software rendering.
/usr/bin/vcapture-test
This application demonstrates that you can connect to a device for video
input, capture frames from that input source, and then display the captured
frames using Screen.
/usr/bin/vkey
This application uses the privileged context,
SCREEN_INPUT_PROVIDER_CONTEXT
, to create a connection to the
Composition Manager. A key sequence is injected to whichever window has
input focus on the specified display. The application will exit as soon as the
last character is sent.
/usr/bin/yuv-test
This application displays a YUV test pattern.
20
© 2014, QNX Software Systems Limited
Chapter
3
Understanding composition
Composition is the process of combining multiple content sources together into a
single image.
Screen, as much as possible, uses hardware layering (pipelines) for composition. When
multiple pipelines and buffers are supported by the device driver, Screen takes
advantage of these hardware capabilities to use each pipeline and to combine the
pipelines at display time. For applications that require complex graphical operations,
you can also use hardware-accelerated options such as OpenGL ES and/or bit-blitting
hardware. Only when your platform does not support any hardware-accelerated options,
will Screen then resort to using the CPU to perform composition.
The following forms of transparency are used for composition:
Destination view port
Allows any content on layers below to be displayed. This transparency mode
has an implicit transparency in that anything outside the specified view port
is transparent.
Source chroma
Allows source pixels of a particular color to be interpreted as transparent.
Unlike a destination view port, source chroma allows for transparent pixels
within the buffer.
Source alpha blending
Allows pixel blending based on the alpha channel of the source pixel. Source
alpha blending is one of the most powerful forms of transparency because
it can blend in the range from fully opaque to fully transparent.
There are two types of composition:
Hardware composition
Composes all visible (enabled) pipelines of the display controller and then
displays them.
Screen composition
Composes mutliple elements that are combined into a single buffer that is
associated to a pipeline and displayed. The composition is handled by the
Composition Manager of Screen.
Hardware composition
Hardware composition capabilities are constrained by the display controller. Therefore,
they vary from platform to platform.
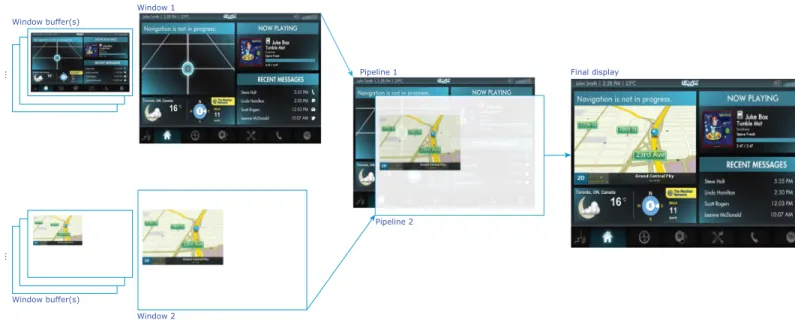
All visible (enabled) pipelines are composed and displayed. Each layer, at the time it
is displaying, has only one buffer associated to it.
The buffer belongs to a window that can be displayed directly on a pipeline. This
window is considered autonomous because no composition was performed on the
buffer by the Composition Manager. For a window to be displayed autonomously on a
pipeline, this window buffer's format must be supported by its associated pipeline.
Window buffer(s) ... Window 1 Pipeline 1 Pipeline 2 Window 2 Window buffer(s) ... Final display
Figure 4: An example of hardware composition with two windows and two supported
pipelines
This hardware composition example shows two windows. Each window posts a different
buffer and binds to a different pipeline. The output from both pipelines is combined
and fed into the associated display port and then onto the display hardware.
Access to hardware composition capabilites is system
dependent.
In order to use hardware composition, you must:
•
have the correct Screen configuration. Determine the pipelines that are on your
display controller and choose the pipeline on which you want to display a window.
The supported pipelines on your
wfd
device are configured in your
graphics.conf
file.
•
use screen_set_window_property_iv() to set
SCREEN_PROPERTY_PIPELINE
to
one of the supported pipelines you have configured in
graphics.conf
.
22
© 2014, QNX Software Systems Limited
•
use screen_set_window_property_iv() to set the
SCREEN_USAGE_OVERLAY
bit of
your
SCREEN_PROPERTY_USAGE
window property.
Screen composition
Many of the composition capabilities that are used in hardware composition can be
achieved in Screen composition by the Composition Manager.
When your platform doesn't have hardware capabilities to support a sufficient number
of pipelines to compose a number of required elements, or to support a particular
behavior, composition can still be achieved by the Composition Manager, an internal
component of Screen.
The Composition Manager combines multiple window buffers into one resultant buffer.
This is the composite buffer (Screen framebuffer).
Window 1
Screen framebuffer Pipeline 1 Window buffer(s) ... Window buffer(s) ... Window 2 Final display
Figure 5: An example of Screen composition with two windows and only one supported
pipeline
This Screen composition example shows two windows; each window posts a different
image. Those images are composed into one composite framebuffer, which binds to
the single pipeline. This output is then fed into the associated display port and then
onto the display hardware.
For Screen composition, don't set the
SCREEN_PROPERTY_PIPELINE
window property
or the
SCREEN_USAGE_OVERLAY
bit in your
SCREEN_PROPERTY_USAGE
window
property.
You can also maximize the advantages of both hardware and Screen composition
capabilities. What this means is that you can combine multiple windows into one
composite buffer, bind this buffer to a pipeline, and still take advantage of hardware
capabilities to combine output from multiple pipelines.
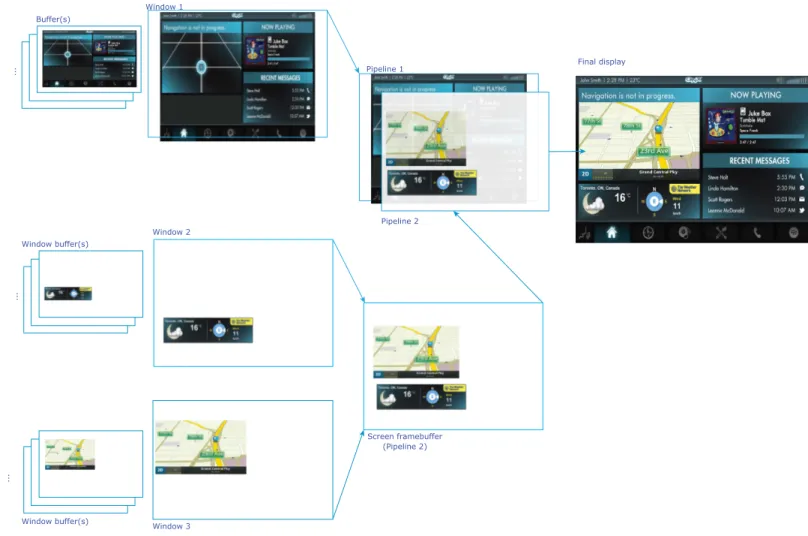
Buffer(s) ... Window 1 Pipeline 1 Pipeline 2 Window 2 Screen framebuffer Window buffer(s) ... Window 3 Window buffer(s) ... (Pipeline 2) Final display
Figure 6: An example of both Screen and hardware composition with three windows,
one composite buffer, and two supported pipelines
This composition example shows three windows. The first window posts and binds to
one specific pipeline. The second and third windows post to a framebuffer where the
buffers from these windows are combined. The framebuffer binds to the second
pipeline. The output from both pipelines is combined and fed into the associated
display port and then onto the display hardware.
For this composition, similar to the hardware composition, you must have the correct
Screen configuration and the appropriate window properties set.
Pipeline ordering and the z-ordering of windows on a layer are applied
independently of each other.
Pipeline ordering takes precedence over z-ordering operations in Screen. Screen
does not have control over the ordering of hardware pipelines. Screen windows
are always arranged in the z-order that is specified by the application.
If your application manually assigns pipelines, you must ensure that the z-order
values make sense with regard to the pipeline order of the target hardware.
For example, if you assign a high z-order value to a window (meaning it is to
24
© 2014, QNX Software Systems Limited
be placed in the foreground), then you must make a corresponding assignment
of this window to a top layer pipeline. Otherwise the result may not be what
you expect, regardless of the z-order value.
Comparing composition types
Both hardware and Screen composition types each have multiple advantages and
disadvantages. Some are very subtle and sometimes depend on the rate at which the
window's contents are refreshed.
Screen composition
Hardware composition
Advantages
•
Not as limited by pipeline capabilities
•
Window buffers don't need to be copied to
a composite framebuffer
•
Able to display a software cursor or to draw a
background
•
No processing power of CPU and/or GPU
required to compose buffers
•
Able to compose multiple buffers for display with
only a single pipeline
•
Efficient in handling windows with
high-frequency updates
•
May be able to create windows with a buffer
format that is not supported by a pipeline (i.e.,
Screen composition may be able to convert the
format to one supported by the pipeline when it
copies the window buffer)
Disadvantages
•
Window buffers, or part of them, need to be
copied to a composite buffer
•
Limited by pipeline capabilities, which can
vary from platform to platform
•
Limited by the number of supported
•
pipelines, which can vary from platform to
platform
May require processing power of CPU and/or
GPU to compose buffers
•
Limited by format support on pipeline
•
Can't display more than one buffer per
Chapter
4
Screen API
The Screen API is how your applications communicate with Screen.
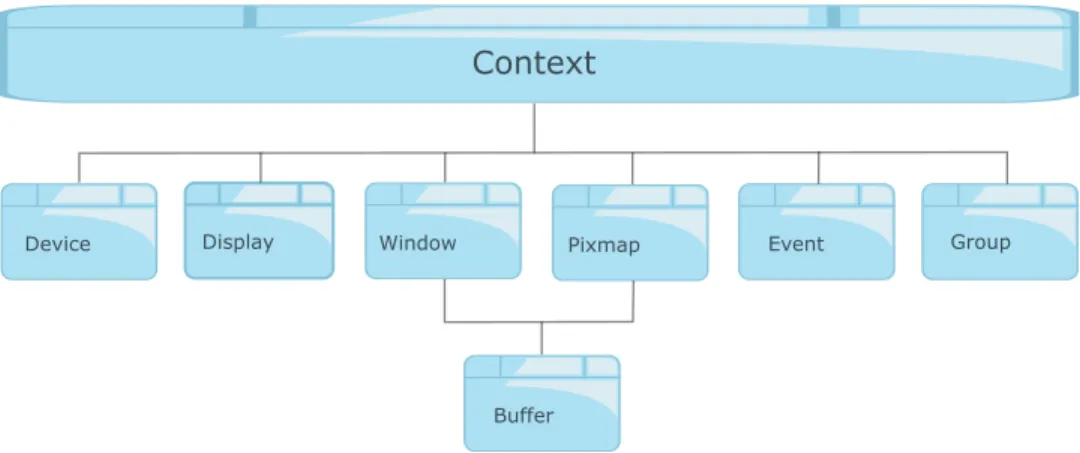
The principal components of the Screen API are closely associated with each other.
Context
Window Display Buffer Event Group Device PixmapFigure 7: Screen API components
Context
A context provides the setting for graphics operations within the windowing
environment.
All other API objects are created within the scope of a context and access
to these objects is always with respect to the context associated with the
object. You can identify and gain access to the objects on which you want
to draw (e.g., windows, groups, displays, pixmaps) to set or change their
properties and attributes.
Devices, displays and windows are dependent on the context, which is
associated directly with events, groups, and pixmaps.
Device
A device refers to an input device. This input device (e.g., keyboard, mouse,
joystick, gamepad, and multi-touch) can be focused to specific displays.
Display
A display refers to a physical device that presents images to viewers such
as monitors, touchscreen and displays. Using the display-specific API
components, you can gain access to display properties, modes, and vsync
operations.
A window represents the fundamental drawing surface. Windows can display
different kinds of content for different purposes, and so there are multiple
types of windows available: application windows, child windows, and
embedded windows.
Pixmap
A pixmap is similar to a bitmap except that it can have multiple bits per
pixel (a measurement of the depth of the pixmap) that store the intensity or
color component values. Bitmaps, by contrast, have a depth of one bit per
pixel.
You can draw directly onto a pixmap surface, outside the viewable area, and
then copy the pixmap to a buffer later on.
Event
An event includes such actions as window creation, setting properties,
keyboard events, and touch events. Events are associated with a context.
Screen API manages one event queue per context.
Group
A group is used to organize and manage multiple windows in your application.
Windows belonging to a group share the same properties; therefore, you
apply sets of properties to all the windows that are in the same group.
Buffer
A buffer is an area of memory not displayed where you can move data around
quickly without taking up CPU cycles. Although a buffer can be created in
the scope of a context, it cannot be used unless attached to a window or
pixmap.
Multiple buffers can be associated with a window whereas only one buffer
can be associated with a pixmap.
28
© 2014, QNX Software Systems Limited
Chapter
5
Contexts
The context defines the relationship with the underlying window system.
You can use the context to get and set display and window properties that define
window idle times, keyboard and multi-touch focus settings. You can also use the
context to return the number of displays on the current system. A context can be
associated with a single window, with a group of windows, or with one or more displays.
Create a context
You must create a context before you create a window. When you call
screen_create_context(), memory is allocated to store the context state. The composition
manager creates an event queue and associates it with the connecting process.
To create a context:
1. Create and initialize the context variable.
screen_context_t screen_context = 0;
2. Call screen_create_context() to create the context. The screen_create_context()
function takes a reference to a variable of type
screen_context_t
, and a flag
that represents the type of context. In the example below, the context is of type
SCREEN_APPLICATION_CONTEXT
indicating that the context can only create
and modify windows within the scope of the current application.
if (screen_create_context(&screen_context,
SCREEN_APPLICATION_CONTEXT) != 0) {
return EXIT_FAILURE;
}
You must destroy each context and free up the memory whenever your application is
done with it. To destroy a context, call the screen_destroy_context() function.
screen_destroy_context(screen_context);
30
© 2014, QNX Software Systems Limited
Context types
When you create a context, you must specify a flag in order to define the type of
context. The context defines the connection between your application and the
underlying windowing system. Depending on the needs of your application, and in
some cases, the permissions of your application, there are a number of different context
types available.
The following context types are supported for your system:
root
permission
required?
Description
Flag
No
This context type enables a process to create its own windows
and to control some of the window properties.
SCREEN_APPLICATION_CONTEXT
An application cannot modify a window that was created by
another application and it cannot send an event outside of
its own process space. An application's context is unaware
of other top-level windows in the system.
An application context can parent another window, even if
the window is created in another context within another
processes.
Yes
This context type enables a process to modify all windows in
the system whenever new application windows are created or
destroyed.
SCREEN_WINDOW_MANAGER_CONTEXT
The context also receives notifications when an application
creates new windows, when existing application windows are
destroyed, or when an application tries to change certain
window properties.
Yes
This context type enables a process to send an event to any
application in the system.
SCREEN_INPUT_PROVIDER_CONTEXT
This context does not receive notifications when applications
create new windows, when applications destroy existing
windows, or when an application attempts to change certain
window properties.
Yes
This context type provides access to power management
functionality.
SCREEN_POWER_MANAGER_CONTEXT
Yes
This context type provides access to display properties.
SCREEN_DISPLAY_MANAGER_CONTEXT
Set a context property
You can get and set context properties in order to define how your application will
behave within a window.
In Screen API, many get and set methods contain multiple variants, with each variant
corresponding to the type that is associated with a property. For example, the
screen_get_context_property_iv() method takes an integer, while the
screen_get_context_property_llv() takes a long long integer.
To set a context property:
1. Create a variable to pass into the function. The type must match the variant of the
function, and the value must represent a valid flag. In the example below, a Screen
format flag is passed into the function.
int context_idle = 5;
2. Call the variant function. The screen_set_context_property_iv() function takes a
reference to an integer that determines the length of time in seconds before the
window will timeout.
if (screen_set_context_property_iv(screen_context,
SCREEN_PROPERTY_IDLE_TIMEOUT, &context_idle) !=0) {
return EXIT_FAILURE;
}
You can flush the context of any delayed commands by calling the
screen_flush_context() function. When you call the screen_flush_context() function,
any delayed commands are processed from the buffer, and any associated displays
are updated. If you specify the
SCREEN_WAIT_IDLE
parameter, the function will not
return until all associated displays have been updated.
if (screen_flush_context(screen_context, SCREEN_WAIT_IDLE) !=0) {
return EXIT_FAILURE;
};
When debugging your application, it's a good idea to call the screen_flush_context()
function after you call any delayed function. This will help you to determine the exact
function call that caused the error.
32
© 2014, QNX Software Systems Limited
Chapter
6
Windows
You can create a window group to organize a set of windows into a hierarchy.
The concept of a window in Screen differs slightly from what you're probably used to
in a traditional windowing system. In Screen, applications are split into several windows
when content comes from different sources, when one or more parts of the application
must be updated independently from others, or when the application tries to target
multiple displays. For example, a user interface that was developed in Adobe AIR can
be overlayed on top of a native document viewer, or a plug-in can be embedded within
a web view or document. Adobe AIR components can be used to form user interface
controls for navigation or media playback. These controls can be contained within a
window that is overlayed over top of a map or multimedia. In this example, the
background window must be updated independently from the foreground user interface
controls.
You must create window groups in order to organize, display, and control the windows
in your application. A window group consists of a parent window and at least one child
window. To create a group, a window must call the screen_create_window_group()
function and provide a name for the group. The name of the window group is then
communicated to the other functions, threads, or even processes, that are responsible
for creating child windows. Any child window can join this group as long as it has the
associated group name. The parent window is notified each time a child window joins
the group. A window handle is included in the notification to allow the parent window
to control certain properties of a child window such as visibility, position, size, and
z-order. A parent window cannot access any of the child windows’ buffers. A child
window remains invisible until it is added to a window group and is made visible by
the owner of the group.
Window types
There are multiple window types in the Screen API. Each window type has a different
use and different positioning rules, and each window is typically used to display
different types of content.
You specify the window type at window creation time. The following types are available.
SCREEN_APPLICATION_WINDOW
The window type that's used to display the main application. The X and Y
coordinates are always relative to the dimensions of the display.
Application windows can be used to display an application in fullscreen
mode:
SCREEN_CHILD_WINDOW
The subwindow type that's commonly used to display a dialog. You must
add a child window to an application's window group; otherwise, the child
window is invisible. A child window's display properties are relative to the
application window to which it belongs. For example, the X and Y coordinates
of the child window are all relative to the top-left corner of the application
window.
Child windows can be used to display minimized applications:
SCREEN_EMBEDDED_WINDOW
34
© 2014, QNX Software Systems Limited
Used to embed a window control within an object. Like the child window,
the X and Y coordinates of the embedded window are all relative to the
top-left corner of the application window. You must add an embedded window
to an application's window group, otherwise the embedded window is
invisible.
Window properties
Screen API window properties are the properties of a window API object.
Screen distinguishes between parent and owner window properties.
Parent window properties
Parent window properties are the properties of the window that can be changed by a
parent application window or a window manager. A window manager's access to
properties is more limited than that of a parent window. A window manager can only
change the properties of top-level windows and windows that are created by the window
manager itself.
The owner of the window is allowed to set the parent window properties only if the
parent window has set its
SCREEN_PROPERTY_SELF_LAYOUT
property to true, or
when there is no parent window or window manager present.
Only the parent window has permission to set the
SCREEN_PROPERTY_SELF_LAYOUT
property—even if
SCREEN_PROPERTY_SELF_LAYOUT
has been set to true.
Owner window properties
Owner window properties are properties that can be changed by the owner of the
window; some owner window properties can be changed by both the owner and the
parent of the window.
Window Property Permissions
The following table lists all of the window properties and indicates whether each can
be changed by the parent window, the window manager or the window owner:
Window
Owner
Parent
Window/Window
Manager
Window Property
Yes
No
SCREEN_PROPERTY_ALPHA_MODE
Yes
No
SCREEN_PROPERTY_ALTERNATE_WINDOW
Yes
Yes
SCREEN_PROPERTY_ALTERNATE_BRIGHTNESS
Yes
No
SCREEN_PROPERTY_BRUSH
Yes
No
SCREEN_PROPERTY_BRUSH_CLIP_POSITION
Yes
No
SCREEN_PROPERTY_BRUSH_CLIP_SIZE
36
© 2014, QNX Software Systems Limited
Window
Owner
Parent
Window/Window
Manager
Window Property
Yes
No
SCREEN_PROPERTY_BUFFER_COUNT
Yes
No
SCREEN_PROPERTY_BUFFER_SIZE
Yes
No
SCREEN_PROPERTY_CBABC_MODE
Yes
Yes
SCREEN_PROPERTY_CLASS
No
Yes
SCREEN_PROPERTY_CLIP_POSITION
No
Yes
SCREEN_PROPERTY_CLIP_SIZE
Yes
No
SCREEN_PROPERTY_COLOR
Yes
No
SCREEN_PROPERTY_COLOR_SPACE
Yes
Yes
SCREEN_PROPERTY_CONTRAST
Yes
Yes
SCREEN_PROPERTY_DEBUG
Yes
Yes
SCREEN_PROPERTY_DISPLAY
Yes
Yes
SCREEN_PROPERTY_FLIP
Yes
Yes
SCREEN_PROPERTY_FLOATING
Yes
No
SCREEN_PROPERTY_FORMAT
Yes
Yes
SCREEN_PROPERTY_GLOBAL_ALPHA
Yes
Yes
SCREEN_PROPERTY_HUE
Yes
No
SCREEN_PROPERTY_ID_STRING
Yes
No
SCREEN_PROPERTY_IDLE_MODE
Yes
Yes
SCREEN_PROPERTY_MIRROR
Yes
Yes
SCREEN_PROPERTY_PIPELINE
No
Yes
SCREEN_PROPERTY_POSITION
Yes
No
SCREEN_PROPERTY_PROTECTION_ENABLE
Yes
Yes
SCREEN_PROPERTY_ROTATION
Yes
Yes
SCREEN_PROPERTY_SATURATION
Yes
Yes
SCREEN_PROPERTY_SCALE_QUALITY
No
Yes
SCREEN_PROPERTY_SELF_LAYOUT
Yes
No
SCREEN_PROPERTY_SENSITIVITY
No
Yes
SCREEN_PROPERTY_SIZE
Window properties
Window
Owner
Parent
Window/Window
Manager
Window Property
Yes
No
SCREEN_PROPERTY_SOURCE_CLIP_POSITION
Yes
No
SCREEN_PROPERTY_SOURCE_CLIP_SIZE
Yes
Yes
SCREEN_PROPERTY_SOURCE_POSITION
Yes
Yes
SCREEN_PROPERTY_SOURCE_SIZE
Yes
No
SCREEN_PROPERTY_STATIC
Yes
No
SCREEN_PROPERTY_SWAP_INTERVAL
Yes
No
SCREEN_PROPERTY_TRANSPARENCY
Yes
No
SCREEN_PROPERTY_USAGE
Yes
No
SCREEN_PROPERTY_VIEWPORT_POSITION
Yes
No
SCREEN_PROPERTY_VIEWPORT_SIZE
No
Yes
SCREEN_PROPERTY_VISIBLE
No
Yes
SCREEN_PROPERTY_ZORDER
38
© 2014, QNX Software Systems Limited
Window parenting and positioning
The window type determines what positioning rules are applied to a child window once
the window joins a group. A window's type also determines whether or not it can parent
another window.
The following window properties are relative to the parent window:
visibility
A child window is visible only when the associated parent window is visible.
z-order
The z-order of a child window is relative to the parent window. For example,
a positive value will place the child on top of (or above) its associated parent
window. Conversely, a negative z-order puts the child window underneath
the parent window.
position
The position of the child window is relative to the position of the parent.
Any translation of the parent also affects the child.
size
The size of the child is relative to the parent. Any scaling applied to the
parent is also applied to the child.
transparency
The global alpha of a child window is combined with the global alpha of the
parent.
Application windows
An application window is positioned according to absolute screen coordinates.
Therefore, an application window cannot be the parent of another application window.
An application window is implicitly part of a group that is owned by the window manager
if the application window has registered with Screen.
Child windows
A child window is not visible until it has become the child of an application window.
It does so by using the function, screen_join_window_group() to join the window group
created by its parent application window.
Embedded windows
An embedded window can join a window group whose parent is an application window
or a child window. An embedded window behaves like child window except that it is
clipped to the parent window's destination rectangle.
The embedded window type provides the illusion that the contents of both the parent
and child window represent a single logical view. When you scroll, the view of the
content in the parent window and the position of the embedded window are updated
synchronously.
When you zoom in the parent window, the embedded window will change size and be
repositioned independently, without the need for the parent to update the embedded
window. Thus, the position and size of embedded windows are relative to the source
rectangle and the virtual viewport of the associated parent window.
When you pan the source rectangle of the parent window within a larger buffer, the
position of any embedded window will be updated automatically. Alternatively, an
application can move a virtual viewport instead of the source rectangle and achieve
the same effect without requiring a window buffer that is larger than the source size.
All of these rules were created to abstract window managers and group parents from
the underlying window hierarchy. The window manager can move, fade, or scale a
window, and the results will be the same whether the window is a single window or a
more complex hierarchy of several windows.
40
© 2014, QNX Software Systems Limited
Create a window
Before you can render an animation or display video, you must create a window for
your application. There are a number of different window types. The following procedure
describes how to create a window that can be used to display video.
To create a window:
1. Create a variable for the context and window instances and create a variable to
store the name of the windowgroup.
screen_context_t screen_context = 0;
screen_window_t screen_window = 0;
static const char *window_group_name = "mainwindowgroup";
2. Create a context. The context describes the relationship between the application
and the underlying windowing system.
screen_create_context(&screen_context,
SCREEN_APPLICATION_CONTEXT);
3. Create a window. The screen_create_window() function takes the window variable
and the context variable that you created in the first step.
screen_create_window(&screen_window, screen_context);
4. Create a window group. The window_group_name variable stores the name of the
main window group. Remember that the name of the window group must be unique.
You must add your application window to a window group in order to make the
window visible.
screen_create_window_group(screen_window, window_group_name);
5. Set the window properties. In the following step, the pixel format and usage values
are set for the window. In this example, the window will be used to display a video.
int format = SCREEN_FORMAT_RGBA8888;
screen_set_window_property_iv(screen_window,
SCREEN_PROPERTY_FORMAT, &format);
int usage = SCREEN_USAGE_NATIVE;
screen_set_window_property_iv(screen_window,
SCREEN_PROPERTY_USAGE, &usage);
6. Create a window buffer. In this example, the buffer is used to store video data for
the window. The screen_create_window_buffers() function takes the window and
an integer that defines the number of buffers to create for this window.
screen_create_window_buffers(screen_window, 1);
Although any instances created are destroyed when the application exits, it is best
practice to destroy any window, pixmap and context instances that you created but
no longer require.
The following code snippet is included at the end of the application above.
screen_destroy_window(screen_window);
screen_destroy_context(screen_context);
42
© 2014, QNX Software Systems Limited
Create a child window
You can use the screen_create_window_type() function to create a child window.
To create a child window:
1. Create a variable for each of the context and window instances.
screen_context_t screen_context = 0;
screen_window_t screen_child_window = 0;
2. Create a context. The context describes the relationship between the application
and the underlying windowing system.
screen_create_context(&screen_context,
SCREEN_APPLICATION_CONTEXT);
3. Create a child window. The screen_create_window_type() function takes the window
and context variables and an integer representing the window type. In this case,
the window is of type
SCREEN_CHILD_WINDOW
.
int wintype = SCREEN_CHILD_WINDOW;
screen_create_window_type(&screen_child_window, screen_context,
wintype );
4. Join a window group. The window_group_name should be the name of the window
group created by the parent (or main) window through the
screen_create_window_group() function.
screen_join_window_group(screen_child_window, window_group_name);
Create a child window
Pixel formats
Window pixel formats define how color space information is stored in the GPU memory.
The RGBA color space uses the Red Green Blue (RGB) color model with extra
information about the alpha (transparency or opacity) channel. Applications that want
to disregard the alpha channel can choose a pixel format with an X.
The Screen API supports the following window pixel formats (pixel format descriptions
from
www.fourcc.org
):
Description
Format
SCREEN_FORMAT_BYTE
16 bits per pixel (4 bits per channel) RGB with alpha channel.
SCREEN_FORMAT_RGBA4444
16 bits per pixel (4 bits per channel) RGB with alpha channel disregarded.
SCREEN_FORMAT_RGBX4444
16 bits per pixel, 2 bytes containing R, G, and B values (5 bits per channel with
single bit alpha channel).
SCREEN_FORMAT_RGBA5551
16 bits per pixel, 2 bytes containing R, G, and B values (5 bits per channel with
single bit alpha channel, disregarded).
SCREEN_FORMAT_RGBX5551
16 bits per pixel; uses five bits for red, six bits for green and five bits for blue. This
pixel format represents each pixel in the following order (high byte to low byte):
RRRR RGGG GGGB BBBB.
SCREEN_FORMAT_RGB565
24 bits per pixel (8 bits per channel) RGB.
SCREEN_FORMAT_RGB888
32 bits per pixel (8 bits per channel) RGB with alpha channel.
SCREEN_FORMAT_RGBA8888
32 bits per pixel (8 bits per channel) RGB with alpha channel disregarded.
SCREEN_FORMAT_RGBX8888
9 bits per pixel planar YUV format. 8-bit Y plane and 8-bit 4x4 subsampled V and
U planes. Registered by Intel.
SCREEN_FORMAT_YVU9
Standard NTSC TV transmission format.
SCREEN_FORMAT_YUV420
12 bits per pixel planar YUV format. 8-bit Y plane and 2x2 subsampled, interleaved
U and V planes.
SCREEN_FORMAT_NV12
12 bits per pixel planar YUV format. 8-bit Y plane and 8-bit 2x2 subsampled U and
V planes.
SCREEN_FORMAT_YV12
16 bits per pixel packed YUV format. YUV 4:2:2 — Y sample at every pixel, U and
V sampled at every second pixel horizontally on each line. A macropixel contains 2
pixels in 1 u_int32.
SCREEN_FORMAT_UYVY
44
© 2014, QNX Software Systems Limited
Description
Format
16 bits per pixel packed YUV format. YUV 4:2:2 as in UYVY, but with different
component ordering within the u_int32 macropixel.
SCREEN_FORMAT_YUY2
16 bits per pixel packed YUV format. YUV 4:2:2 as for UYVY, but with different
component ordering within the u_int32 macropixel.
SCREEN_FORMAT_YVYU
Packed YUV format. Inverted version of UYVY.
SCREEN_FORMAT_V422
Packed YUV format. Combined YUV and alpha.
SCREEN_FORMAT_AYUV
Chapter
7
Displays
A display represents the physical display hardware such as a monitor or touchscreen
display.
You can use display API functions to:
•
query and set display properties
•
get display modes that are specific to a given hardware display
•
perform vsync operations
Note that to have full access to the display properties of the system, you must be
working within a privileged context. You create a privileged context by calling the
function screen_create_context() with a context type of
SCREEN_DISPLAY_MANAGER_CONTEXT
. Your process must have an effective user
ID of root to be able to create this context type. Some API functions will fail to execute
if you are not the correct context.
Multiple displays
It can be quite tricky to create and manage an application that uses multiple displays,
especially when you consider threading, performance, and graphics optimization.
Fortunately, Screen API provides the necessary functionality to let you create
applications that write to multiple windows and displays simultaneously.
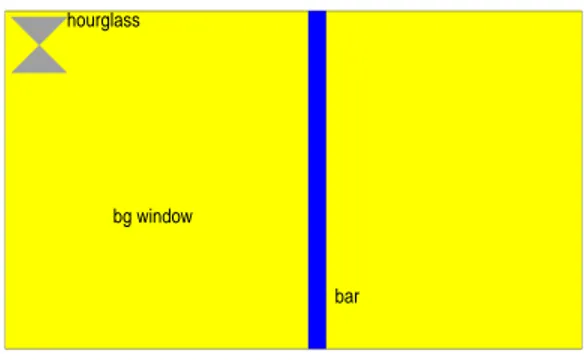
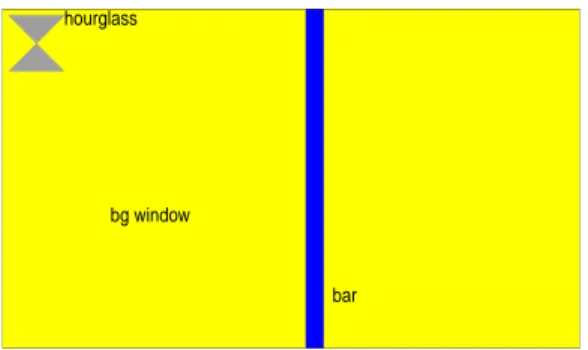
In our vsync application, an hour glass is placed in the top-left corner of an application
window while a vertical bar sweeps from left to right across the screen. This code
sample queries the context to determine the number of displays that are currently
attached to the system. When the bar reaches the right edge of the application window,
instead of returning to the left-hand side of the current display, the application sends
focus to the next display in the list and the bar continues its sweep at the left-hand
side of that other display.
hourglass
bar bg window
Figure 8: The sample vsync application
The application uses a
struct
to store the state (either detached, attached, or focused)
of each display.
struct {
pthread_mutex_t mutex; pthread_cond_t cond;
enum { detached, attached, focused } state; } *displays;
Before any of the drawing is done, the application iterates though each attached
display, and uses the screen_get_display_property_iv() property to return the state of
the current display. For each attached display, the application initializes a mutex and
calls the pthread_create(), passing in a display() function, to spawn a child thread
This display() function handles all graphics operations for the current display, meaning
that each display will be written to and updated within its own process. This allows
the graphics processor to handle any intensive operations, and ensures that if an error
occurs or a display becomes detached, the application will not fail.
displays = calloc(ndisplays, sizeof(*displays)); for (i = 0; i < ndisplays; i++) {
int active = 0;
screen_get_display_property_iv(screen_dpy[i], SCREEN_PROPERTY_ATTACHED, &active);
48
© 2014, QNX Software Systems Limited
if (active) { if (idx == -1) { displays[i].state = focused; idx = i; } else { displays[i].state = attached; } } else { displays[i].state = detached; } pthread_mutex_init(&displays[i].mutex, NULL); pthread_cond_init(&displays[i].cond, NULL); pthread_t thread;
pthread_create(&thread, NULL, display, (void *)i); }
The display() function sets up the current display and window, then locks the mutex
to determine whether or not the current display is active and has focus.
pthread_mutex_lock(&displays[idx].mutex);
attached = displays[idx].state != detached ? 1 : 0; focus = displays[idx].state == focused ? 1 : 0; pthread_mutex_unlock(&displays[idx].mutex);
A while loop checks conditions and handles the flow of execution for ach display. If
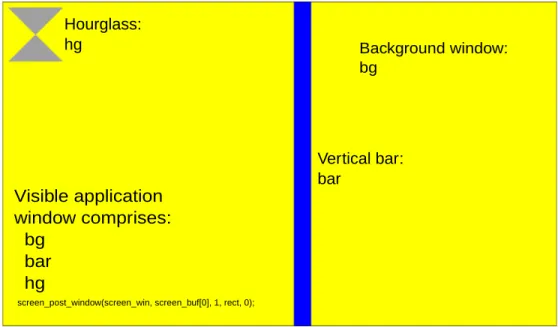
the display is currently attached, the display and window properties are initialized. A
buffer is created, a handle to the buffer is returned, and the background color is blitted
to the buffer. If the display has focus, the bar is blitted and written to the buffer at
the current position. Next, the hourglass is written to the buffer and the window is
posted.
The pos variable is incremented continuously, causing the bar to scan from left to
right across the current application window. When the bar reaches the right-most edge
of the screen, the mutex of the next display in the
displays
structure is locked and
the state of the next attached display is set to focused. This causes the bar to appear
at the left-most edge of the next display in the display list. It then scans across the
screen and repeats this behavior on the next display in the list of displays.
while (1) {
if (attached) { if (!realized) {
screen_get_display_property_iv(screen_dpy[idx], SCREEN_PROPERTY_SIZE, rect+2); screen_set_window_property_iv(screen_win, SCREEN_PROPERTY_BUFFER_SIZE, rect+2); screen_create_window_buffers(screen_win, 2);
realized = 1; }
screen_buffer_t screen_buf[2];
screen_get_window_property_pv(screen_win, SCREEN_PROPERTY_RENDER_BUFFERS, (void **)screen_buf); int bg[] = { SCREEN_BLIT_COLOR, 0xffffff00, SCREEN_BLIT_END };
screen_fill(screen_ctx, screen_buf[0], bg); if (focus > 0) { int bar[] = { SCREEN_BLIT_COLOR, 0xff0000ff, SCREEN_BLIT_DESTINATION_X, pos, SCREEN_BLIT_DESTINATION_WIDTH, barwidth, SCREEN_BLIT_END };
screen_fill(screen_ctx, screen_buf[0], bar); if (++pos > rect[2] - barwidth) {
for (i = (idx+1) % ndisplays; i != idx; i = (i+1) % ndisplays) { pthread_mutex_lock(&displays[i].mutex); if (displays[i].state == attached) { displays[i].state = focused; pthread_cond_signal(&displays[i].cond); pthread_mutex_unlock(&displays[i].mutex); break; } pthread_mutex_unlock(&displays[i].mutex);