Publication date: November 1998 PRT011B0998
Prepared by Software Marketing Compaq Computer Corporation
Summary ...3
Installation Requirements and Dependencies...3
Terms and Assumptions...4
Installation Scripts ...5
New Installation ...5
Upgrading from Windows 95 ...9
Upgrading from Windows 3.1x ...14
Installing Compaq Drivers and Enhancements...19
Compaq Drivers and Support Software ...19
SoftPaq Installation Procedures ...22
Appendix 1: Downloading Software from the Compaq Website...32
Appendix 2: Using the SoftPaq Utility...33
Appendix 3: Installing Diagnostics and Setup ...34
Appendix 4: Determining Your ROM Version and Upgrade Version...35
Determining Your ROM Version Using Inspect ...35
Appendix 5: Docking for the First Time...37
Appendix 6: ACPI ...38
Appendix 7: Enabling Hard Drive DMA...39
Appendix 8: Infrared Functionality...40
Installing Microsoft Windows 98
on Compaq Portable Products
Abstract: This White Paper focuses on the steps necessary for the successful installation of Microsoft Windows 98 on select Compaq Armada portable products. The steps outlined herein will provide the user with complete installation procedures for a clean installation or an upgrade installation over Windows 3.1x/Windows 95.
Compaq has made available the Windows 98 specific installation instructions and software enhancements (BIOS, hardware-enabling drivers, and software applications) for the Armada 1100, 1500, 1700, 3500, 4100, 4200, 7300, 7400, 7700, 7800, SB families, and LTE 5000 families. This white paper instructs you on installing the operating system and Compaq enhancements.
Although Compaq will support customers that upgrade to Windows 98 on the Armada 6500, doing so at this time is not recommended. Compaq continues to test Windows 98 on the Armada 6500 and intends to release updates to many existing Compaq drivers, BIOS and other software enhancements specifically for Windows 98 in 4Q98. Windows 98 will install and run on the Armada 6500.
However, it is important to note that without the updated versions of various Compaq enhancements, users will experience a loss of functionality.
Please refer to Read This First - Limitations When Using Microsoft Windows 98 on Compaq Armada Portables before you install Windows 98.
For details on Compaq’s overall operating system strategy and operating system features please refer to the white paper titled
Notice
The information in this publication is subject to change without notice and is provided “AS IS” WITHOUT WARRANTY OF ANY KIND. THE ENTIRE RISK ARISING OUT OF THE USE OF THIS
INFORMATION REMAINS WITH RECIPIENT. IN NO EVENT SHALL COMPAQ BE LIABLE FOR ANY DIRECT, CONSEQUENTIAL, INCIDENTAL, SPECIAL, PUNITIVE OR OTHER DAMAGES WHATSOEVER (INCLUDING WITHOUT LIMITATION, DAMAGES FOR LOSS OF BUSINESS PROFITS, BUSINESS INTERRUPTION OR LOSS OF BUSINESS INFORMATION), EVEN IF COMPAQ HAS BEEN ADVISED OF THE POSSIBILITY OF SUCH DAMAGES.
The limited warranties for Compaq products are exclusively set forth in the documentation accompanying such products. Nothing herein should be construed as constituting a further or additional warranty. This publication does not constitute an endorsement of the product or products that were tested. The configuration or configurations tested or described may or may not be the only available solution. This test is not a determination or product quality or correctness, nor does it ensure compliance with any federal state or local requirements.
Product names mentioned herein may be trademarks and/or registered trademarks of their respective companies.
Compaq, Contura, Fastart, Compaq Insight Manager, LTE, ROMPaq, LicensePaq, SmartStart, NetFlex, RemotePaq, BackPaq, TechPaq, SpeedPaq, QuickBack, PaqFax, Aero, SmartStation, MiniStation, and PaqRap, registered United States Patent and Trademark Office.
Netelligent, Armada, Cruiser, Concerto, LTE Elite, Vocalyst, PageMate, SoftPaq, FirstPaq, SolutionPaq, EasyPoint, EZ Help, MaxLight, MultiLock, QuickBlank, QuickLock, UltraView, Innovate logo, Wonder Tools logo in black/white and color, and Compaq PC Card Solution logo are trademarks and/or service marks of Compaq Computer Corporation.
Microsoft, Windows, Windows NT, Windows NT Server and Workstation, Microsoft SQL Server for Windows NT are trademarks and/or registered trademarks of Microsoft Corporation.
NetWare and Novell are registered trademarks and intraNetWare, NDS, and Novell Directory Services are trademarks of Novell, Inc.
Pentium is a registered trademark of Intel Corporation.
Copyright ©1998 Compaq Computer Corporation. All rights reserved. Printed in the U.S.A. Installing Microsoft Windows 98 on Compaq Portable Products
White Paper prepared by Software Marketing Second Edition (November 1998)
Summary
This white paper discusses installing Microsoft Windows 98 on Compaq Armada portable products. The intent of the white paper is to provide step by step instructions for the installation process either as an upgrade from Windows 3.1, Windows 95, or as a newly installed operating system on a Compaq Armada portable. When you have completed all the procedures outlined for your specific platform, you will have successfully installed Windows 98 and all Compaq
provided software deliverables that extend functionality and enhance the overall user experience. These scripts are for installing Windows 98 with APM (Advanced Power Management) support. If you wish to enable ACPI (Advanced Configuration and Power Management) on those Armada notebooks which support ACPI, see Appendix 6, “ACPI.”
Note: You must back up all data and applications before beginning any installation procedures of Windows 98.
Installation Requirements and
Dependencies
Before beginning the installation scripts for any of the platforms, you have to obtain the items listed below:
• The Retail Microsoft Windows 98 ROM or Upgrade ROM, or the Compaq Upgrade CD-ROM, as applicable.
• Microsoft DOS Boot Diskette with FDISK, FORMAT, and SYS utilities if not performing an upgrade installation. In addition, Microsoft utilities XCOPY and MSCDEX may also be needed if performing a clean installation or upgrading from Windows 3.1x.
• Windows 98 Drivers and Enhancements from Compaq.
Installing the latest versions of Windows 98 compatible Drivers and Enhancements is very important. Previous versions may not work or may produce anomalies.
You may obtain the drivers and enhancements in two ways; from the Compaq Support Software CD or by downloading the driver software from the Compaq website.
− The Compaq Support Software CD version 98.08 (or later) contains all updated drivers and deliverables listed in the section titled "Installing Compaq drivers and enhancements." The Compaq Support Software CD is updated monthly and is available either through an annual subscription or as a one-time purchase.
− The Compaq website at http://www.compaq.com/support/files/portables/us/index.html. has the downloadable driver software files. For instructions on using the Compaq websitesee Appendix 1, “Downloading Software from the Compaq Website.”
• Blank, high-density floppy diskettes, if you choose to make the recommended Windows 98 Startup Diskette, and for downloading SoftPaqs from the Compaq website.
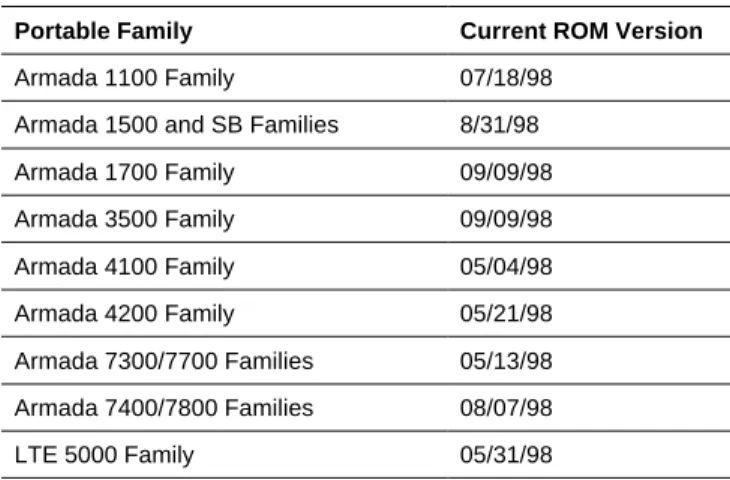
• ROM version required. For information on determining the current ROM version for your portable model and how to update if necessary, see Appendix 4, “Determining Your ROM Version and Upgrade Version.”
Table 1. Current Compaq ROM Versions
Portable Family Current ROM Version
Armada 1100 Family 07/18/98 Armada 1500 and SB Families 8/31/98 Armada 1700 Family 09/09/98 Armada 3500 Family 09/09/98 Armada 4100 Family 05/04/98 Armada 4200 Family 05/21/98 Armada 7300/7700 Families 05/13/98 Armada 7400/7800 Families 08/07/98 LTE 5000 Family 05/31/98
Terms and Assumptions
• Secondary-click—Throughout the scripts, the term secondary-click is used. For right-handed mouse users, this is the right mouse button. For left-handed mouse users, this is the left mouse button.
• Double-click—Throughout the scripts, you are asked to double-click certain items. If you are using Microsoft’s Internet Explorer 4.x and have turned on the click option, you should simply single-click the selection, not double-single-click as indicated in these instructions.
• Drive Letters—All drive letters used for hard drives and CD-ROM drives are examples only. Your individual configuration may vary. D: may be the drive letter used in the example, however the letter for your CD-ROM drive may actually be E:.
• Web—A term used synonymously with www.compaq.com/support/files/portables/us/index.html, the Compaq Support Software CD, the Compaq BBS, or the Compaq FTP site. It is important that you obtain the latest Windows 98 compatible drivers and enhancements from one of these sites.
• Drivers and Enhancement File Locations—Most drivers and enhancements are assumed to be in the directory C:\~COMPAQ\XXXXXXXX where XXXXXXXX is the subdirectory name created by the SoftPaq utility for these scripts. If you are unfamiliar with the SoftPaq utility and extracting files, see Appendix 2, “Using the SoftPaq Utility.” One exception is the Real Mode CD-ROM drivers that may be on diskette, normally the A: drive.
• Restarting the Computer—During the Windows 98 installation, and the installation of several drivers and enhancements, you are prompted to restart the computer. Be sure that you have removed any floppy diskettes from the diskette drive and the Windows 98 disk from the CD-ROM drive, as applicable, before restarting the computer.
• Real Mode CD-ROM Drivers—Depending on your platform, these can be found on the web www.compaq.com/support/files/portables/us/index.html either under Windows 3.1 or Windows 95. They are listed as either “IDE CD-ROM Drivers” under the Storage section or as “Real Mode Support” under the Utilities section.
Instructions for using the Compaq website and Compaq SoftPaqs are located in the appendices at the end of this document.
Installation Scripts
This scripts apply to the Armada 1100, 1500, 1700, 3500, 4100, 4200, 7300, 7400, 7700, 7800, SB families, and LTE 5000 families unless otherwise noted.
New Installation
Preliminary Steps
You must prepare an MS-DOS boot diskette with the Compaq Real Mode CD-ROM drivers to have access to the CD-ROM drive during the installation process.
1. Connect the unit to an AC power source. This prevents it from abruptly shutting down if the battery power gets too low, which could corrupt the Windows 98 installation.
2. Undock your system and remove any PC cards from the PCMCIA slots. For information on docking your Armada Portable for the first time, see Appendix 5, “Docking for the First Time.”
3. Obtain the latest Real Mode CD-ROM driver from the web and extract it from the SoftPaq. 4. Copy the CD-ROM driver, the SYS utility, and the MSCDEX file to the MS-DOS boot diskette by
typing the following commands at the DOS prompt, pressing Enter after each command: a. COPY CPQLTECD.SYS A:
b. COPY MSCDEX.EXE A: c. COPY SYS.COM A:
5. Create a CONFIG.SYS file and an AUTOEXEC.BAT file on the boot diskette to load the CD-ROM drivers. Use an editor of your choice to create a one line CONFIG.SYS file containing the entry:
DEVICE=CPQLTECD.SYS /D: IDECD001
Note: An editor is a program for creating and changing simple text files. Two examples are “EDIT” for DOS and “NOTEPAD” for Windows.
6. Use your editor to create a one line AUTOEXEC.BAT file containing the entry:
MSCDEX /D:IDECD001
If your hard drive does not currently have an operating system installed, or if your current operating system uses NTFS or HPFS for its file system, or if you have an operating system installed using the FAT file system and wish to remove it, perform steps 6a, 6b, and 6c to prepare the hard drive for Windows 98 installation. Otherwise, proceed to step 7.
Note: If you do not have a non-DOS partition as partition 1, Compaq strongly recommends the installation of Diagnostics and Setup after removing all other partitions and before proceeding with the operating system installation. For instructions on this installation, see Appendix 3, “Installing Diagnostics and Setup.”
Exception: The Armada 6500 does not use standard Compaq Diagnostics and Setup. a. Back up all data and applications before removing any partitions and reformatting the hard drive
or all data will be lost.
IMPORTANT: Do not delete the non-DOS partition that contains your installed Compaq Diagnostics and Setup.
To repartition the hard drive with a single Primary DOS partition:
c. Type FDISK and press Enter.
If you are not sure about the use of the FDISK program, refer to Microsoft’s KB article Q106423 for instructions. This article may be found online at
http://support.microsoft.com/support/kb/articles/q106/4/23.asp.
7. Reformat the hard drive. Boot the system with the MS-DOS boot diskette inserted into the diskette drive.
8. Type FORMAT C:/S from the MS-DOS A:> prompt and press Enter.
9. When warned that all data on the hard drive will be deleted, press Y and Enter to proceed with formatting the hard drive.
10. Enter a volume label or simply press Enter. A “system transferred” message should appear.
11. Copy the Real Mode drivers, AUTOEXEC.BAT, and CONFIG.SYS from the boot diskette to the hard drive.
From the MS-DOS A:> prompt, type each of the following lines, pressing Enter at the end of each line:
a. COPY AUTOEXEC.BAT C: b. COPY CONFIG.SYS C: c. COPY MSCDEX.EXE C:
d. COPY CPQLTECD.SYS C: (You may have to check the floppy drive directory for this file.) 12. Armada SB, 1100, 1500, 1700, 3500, 4100, and 4200 Familyusers should remove the Boot Diskette
from the floppy drive and restart the system by simultaneously pressing and holding Ctrl, Alt, and
Del.
Armada 7000 and LTE 5000 Familyusers should power off the system, swap the diskette drive for the CD-ROM drive, and restart the computer. If you are not sure how to swap the diskette drive for the CD-ROM drive, see your unit documentation.
Installation Procedure
This script relies on using the retail release of Windows 98. If upgrading from Windows 3.1 or Windows 95, see those respective sections. If using a Windows 98 upgrade CD for this
installation, your results may vary slightly. You will also need the original media for Windows 3.1 or Windows 95 to complete the upgrade.
1. Copy the Windows 98 setup files to the hard drive. You may need them for future additions of new hardware, such as PC Cards, or for docking the unit for the first time.
a. Type MD WIN98 and press Enter. b. Type CD WIN98 and press Enter.
2. Place the Windows 98 disk into the CD-ROM drive. a. Type COPY D:\WIN98\*.* and press Enter.
Note: If you want to install the Microsoft Channel Content, use the following command at step 2: XCOPY D:\WIN98\*.* /S.
Armada 7000 and LTE 5000 Familyusers only should now power off the system, swap the CD-ROM drive for the diskette drive and then restart the computer. If you are not sure how to swap the diskette drive for the CD-ROM drive, see your unit documentation. After the system reboots,
b. Type CD WIN98 and press Enter.
3. Type SETUP and press Enter. The next screen informs you how Setup will perform a routine system check.
4. Press Enter to continue. The Windows 98 Setup screen appears.
5. Click Continue. The License Agreement appears. After reading the License Agreement: a. Click on ‘I accept the Agreement.’
b. Click Next to accept the Agreement.
6. Enter the Product Key on the Certificate of Authenticity that came with your Windows 98 documentation, then click Next to continue.
7. Select the directory where the operating system will be installed. The recommended directory is the default directory, C:\WINDOWS.
Click Next to accept the default directory, or,
If you choose to use a directory other than the default directory: Click Other Directory, enter the directory name, then click Next.
8. Select the type of installation to be performed. If you are unsure of which type to select, contact your IT department, otherwise:
a. Select Portable. b. Click Next to continue.
9. Enter your name and, if desired, tab to the Company field and enter your company name, then click
10. Select the Windows Components to be installed. If you are unsure which to install: Click Next to install the most common components, or,
Click on ‘Show me the list of components so I can choose,’ select the components you want to install, then click Next to continue.
11. If the unit has an integrated modem, you are asked to enter the computer identification information. a. Every computer on a network must have a unique name. Accept the default or change the name as
appropriate. Tab to the next field.
b. A Workgroup is a group of related computers. Accept the default or change the Workgroup as appropriate. Tab to the next field.
c. The Computer Description is just that. Accept the default or change the description as appropriate. Click Next to continue.
12. Click Next to create a Startup Disk. You may elect to skip this process. However, Compaq strongly recommends creating a Startup disk.
a. Insert a blank, high-density diskette into the diskette drive and click OK. b. When prompted, remove the diskette and click OK.
13. The Windows 98 files are copied to their installation directory. Click Next to continue. 14. This phase is now complete and the unit reboots. Click Restart Now or wait.
15. Click Next from the PC Card Setup Welcome screen. 16. Click Next on the second PC Card Wizard screen. 17. Click Finish on the third PC Card Wizard screen.
18. Verify your geographical location, select the correct time zone, and date and time for your area. Click
Next.
19. After Setup finishes this phase, the unit reboots. Click Restart Now or wait. 20. The user name from the Identification setup (step 11) is displayed.
a. To change the user name:
Click the ‘User name’ field, delete the current name, and replace it with the user name you wish to use.
b. To enter a password:
Tab to the Password field and enter a case sensitive password. Confirm the password by retyping, then click OK to continue.
21. Windows finalizes your Personalized Settings. The Welcome to Windows 98 screen displays.
If you do not want to see this screen the next time you start Windows, click on ‘Show this screen each time Windows 98 starts’ to uncheck the box.
22. Click on the X in the upper right corner of the window to close it.
24. Remove the Real Mode drivers. To do this, delete the AUTOEXEC.BAT, CONFIG.SYS, CPQLETCD.SYS, and MSCDEX.EXE files.
a. Double-click on the “My Computer” icon.
b. Click View →→ Folder Options →→ View →→ Show All Files on the menu bar, then click OK c. Double-click the (C:) icon. You can view the files listed above.
d. Click each file name, then press Delete. Confirm that you are deleting the correct file, then click
YES. Repeat until all the files listed in step 24 have been deleted. 25. Double-click the WINDOWS folder.
26. Click SHOW FILES on the left side of the window.
27. Scroll through the list of files until you see the DOSSTART file.
28. Highlight the DOSSTART file and press Delete. Click YES to confirm deletion of this file.
The Windows 98 operating system installation is now complete. Proceed to the section titled “Installing Compaq Drivers and Enhancements” to install the other necessary files for your Compaq portable computer to ensure the system’s complete functionality and stability.
Note: Armada 1700 and 7000 family users may wish to enable DMA. For instructions on how to enable DMA, see Appendix 7, “Enabling Hard Drive DMA.”
Upgrading from Windows 95
A successful installation requires:
• A stable Windows 95 environment. If you are currently having problems with your Windows 95 operating system, or with applications while in Windows 95, Compaq recommends that these issues be resolved before upgrading to Windows 98.
• Either the retail version of the Microsoft Upgrade CD-ROM or the Compaq Upgrade CD-ROM, as applicable.
Please review the README.TXT file located in the root folder on the Windows 98 CD-ROM and the SETUP.TXT file in the WIN98 folder. README lists other text files that are installed as part of the operating system installation. These files contain information on known hardware and software issues that you should be aware of before installing Windows 98. These files are located in the file WIN98_47.CAB file. You may manually extract these files and review them before installing Windows 98. For instructions on how manually to extract these files before the installation, refer to Microsoft KB article Q129/6/05, which may be found online at http://support.microsoft.com/support/kb/articles/q129/6/05.asp.
Review the Microsoft website for any changes or additions to the README, SETUP, or other associated files.
Installation Procedure
1. Connect the unit to an AC power source. This prevents it from abruptly shutting down if the battery power gets too low, which could corrupt the Windows 98 installation.
2. Back up all data and programs before beginning the upgrade process.
3. Undock your system and remove any PC cards from the PCMCIA slots. For information on docking your Armada Portable for the first time, see Appendix 5, “Docking for the First Time.”
4. Swap the diskette drive for the CD-ROM drive. If you are not sure how to swap the diskette drive for the CD-ROM drive, see your unit documentation.
If you are not running Real Mode PCMCIA drivers, proceed to step 5.
If you are using Real Mode PCMCIA drivers, they should now be disabled; if unsure, please continue through steps 4a to 4p. These steps are for the Compaq specific version of
SystemSoft’s CardWizard. If you are using another company’s Card & Socket Services, please consult your documentation on how to disable them.
a. Click Start →→ Run on the Task Bar. b. Type SYSEDIT and click OK.
c. Click the title bar labeled C:\CONFIG.SYS.
d. Find the line ‘rem SystemSoft CardSoft/16™ PCMCIA Drivers.’ At least four lines may need to be commented out. If the drivers were installed to the default directory, they all contain
CARDWIZ, or CARDWORKS as part of the text. e. Type REM and a space at the beginning of each line.
f. Click the title bar labeled C:\WINDOWS\SYSTEM.INI. If it is not visible, click Window on the title-bar and select the SYSTEM.INI file by clicking on it. Scroll through this file until you see ‘[386Enh]’.
g. Again, look for the lines that contain the phrase ‘C:\CARDWIZ\.’ Place a ; (semicolon) and a space at the beginning of each line.
h. Close the System Configuration Editor by clicking on the X in the upper right corner of the windows. You are prompted to save each file. Confirm that you wish to save each file by clicking
YES.
i. Secondary-click the Start on the Taskbar. j. Click Explore.
k. Double-click Programs. l. Double-click Start Up.
m. If there is an icon named ‘CardWizard’ in the right pane, highlight it, then press Delete. n. Click YES to confirm deleting the icon.
o. Exit the window by clicking the X in the upper right corner.
p. Restart the computer by clicking Start →→ Shut Down →→ Restart and click YES.
You are now ready to install Windows 98 by first copying the Windows 98 setup files to the hard drive. You will need these files for future additions of new hardware or for docking for the first time.
IMPORTANT: For Armada 4100 and LTE 5000 users only:
You must uninstall Win 95-specific Infra-Red Support before beginning the Win 98 upgrade. Open the Control Panel and select Add/Remove Programs. Select “InfraRed Support for Win 95 Version x.x” by clicking once with the left mouse button, then click Add/Remove. Close the Control Panel.
You must uninstall Intelligent Manageability for Win 95 before beginning the Win 98 upgrade. Open the Control Panel and select Add/Remove Programs. Select “Compaq Insight Manager” by clicking once with the Left Mouse Button, then click Add/Remove. Close the Control Panel.
5. Double-click My Computer.
6. Double-click the hard drive icon ‘(C:)’.
7. Secondary-click in the open area of the My Computer window and choose New →→ Folder. 8. Type WIN98 and press Enter.
9. Double-click on the WIN98 folder.
10. Place the Windows 98 disk into the CD-ROM drive.
Note: If Autoplay (or Auto Insert Notification) is enabled, a dialog box appears informing you that the ‘…CD-ROM contains a new version of Windows …’ and asks if you would like to upgrade. Click NO. A window titled ‘Windows 98 CD-ROM’ is displayed. Click ‘Browse This CD’ and proceed to step 11.
11. Double-click My Computer.
12. Double-click the CD-ROM drive icon ‘(D:)’. 13. Double-click the folder WIN98.
14. Click View →→ List on the Menu bar.
15. Click the file named BASE4. Press and hold Shift and Ctrl, then press End (all listed files are selected).
Note: If you want to install the Microsoft Channel content, use the following instruction to replace the one in step 15: Click Edit →→ Select All.
16. Click Edit →→ Copy on the Menu bar.
17. Close this window by clicking on the X in the upper right corner. You should now see the window labeled C:\WIN98.
18. Click Edit →→ Paste on the Menu bar to copy the files.
19. Armada 7000 and LTE 5000 Family users only—After the files have been copied to the hard drive,
close all open windows, remove the CD-ROM disk from the its drive, and power off the system. Swap the CD-ROM drive for the diskette drive and then restart the computer.1
− Double-click in the following order: My Computer/the C: icon/Win98 folder.
20. Double-click the SETUP.EXE file in the C:\WIN98 directory. The ‘Windows 98 Setup’ screen appears.
21. Click Continue. The License Agreement appears.
22. After reading the License Agreement, click on ‘I accept the Agreement’ and click Next to accept the Agreement.
23. Enter the Product Key on the Certificate of Authenticity that came with your Windows 98 documentation, then click Next to continue.
24. You are asked if you wish to save the existing system files. Compaq strongly recommends doing so. Click on the appropriate selection, then click Next to continue.
Note: If you have more than one partition on your hard drive, you are prompted where to save the ‘uninstall’ files. Choose the appropriate drive and click OK.
If networking was not installed in your system as part of Windows 95, or if the unit has an integrated modem, proceed to step 26.
25. If networking was installed in your system as part of Windows 95 (other than Dial-Up Networking without the Microsoft client) or if the unit has an integrated modem, you are asked to enter the computer identification information.
a. Every computer on a network must have a unique name. Accept the default or change the name as appropriate. Tab to the next field.
b. A Workgroup is a group of related computers. Accept the default or change the Workgroup as appropriate. Tab to the next field.
c. The Computer Description is just that. Accept the default or change the description as appropriate. Click Next to continue.
26. You are asked to verify your geographical location, select the appropriate time zone, and date and time for your area. Make your selections and click Next.
27. Click Next to create a Startup Disk. You may elect to skip this process. However, Compaq strongly recommends creating a Startup disk.
a. Insert a blank, high-density diskette into the diskette drive and click OK.
b. When prompted, remove the diskette and click OK. The Windows 98 files are copied to their installation directory. 2 Click Next to continue.
28. No user input is required during this next phase. Do nothing while the system updates and finalizes your settings.
Note: The left margin on your screen informs of the time remaining in this finalization process.
29. After Setup finishes this phase, the unit reboots. Click Restart Now or wait.
30. After rebooting, if you performed step 25, the user name you entered in that step is shown.3 If you wish to change this, click the ‘User name’ field, delete the current name, and replace it with the user name you want to use. If you want to enter a password, Tab to the Password field and enter a password.4 Click OK to continue.
Note: If this is the first time this user name has been used on this computer, you are asked to reenter the password. Confirm the password by retyping it and click OK. If the passwords do not match, you are asked to type them again. Click OK to reenter the password. If you previously had a password for the user name entered, this one must match the previous.
31. Windows finalizes your Personalized Settings and displays the Welcome to Windows 98 screen. If you do not want to see this screen the next time you start Windows, uncheck the box ‘Show this screen each time Windows 98 starts’ by clicking on that text. Close this window by clicking on the X in the upper right corner of the window. The next time the unit reboots, click on the X in the upper right corner of the Welcome window to close it.
2
You may experience Windows 98 Setup needing to be reminded where the installation directory is. If you are prompted that a file cannot be found, click OK, reenter the path C:\WIN98, and click OK.
3 In certain instances, this step may be skipped. 4 Passwords are case sensitive.
This completes the Windows 98 installation. Proceed to “Installing Compaq Drivers and Enhancements”to install the other necessary files for your Compaq portable computer. IMPORTANT: You must install all drivers for your system to have complete functionality.
Note: Armada 1700 and 7000 family users may wish to enable DMA. See Appendix 7, “Enabling Hard Drive DMA” for instructions on how to enable DMA.
Upgrading from Windows 3.1x
A successful installation requires:
• A stable Windows 3.1x environment. If you are currently having problems with your Windows 3.1x operating system, or with applications while in Windows 3.1x, Compaq recommends that these issues be resolved before upgrading to Windows 98.
• Either the retail version of the Microsoft Upgrade CD-ROM or the Compaq Upgrade CD-ROM, as applicable.
• An original Disk One of Windows 3.1x to use the upgrade CD.
Please review the README.TXT file located in the root folder on the Windows 98 CD-ROM and the SETUP.TXT file in the WIN98 folder. README lists other text files that are installed as part of the operating system installation. These files contain information on known hardware and software issues that you should be aware of before installing Windows 98. These files are located in the file WIN98_47.CAB file. You may manually extract these files and review them before installing Windows 98. For instructions on how to manually extract these files before the installation, refer to Microsoft KB article Q129/6/05, which may be found online at http://support.microsoft.com/support/kb/articles/q129/6/05.asp.
Review Microsoft’s website for any changes or additions to the README, SETUP, or other associated files.
Installation Procedure
1. Connect the unit to an AC power source. This prevents it from abruptly shutting down if the battery power gets too low, which could corrupt the Windows 98 installation.
2. Back up all data and programs before beginning the upgrade process.
3. Undock your system and remove any PC cards from the PCMCIA slots. For information on docking your Armada Portable for the first time, see Appendix 5, “Docking for the First Time.”
4. Swap the diskette drive for the CD-ROM drive. If you are not sure how to swap the diskette drive for the CD-ROM drive, see your unit documentation.
If you have Compaq Real Mode CD-ROM drivers installed, proceed to step 6.
5. You must have the Compaq Real Mode CD-ROM drivers installed to install Windows 98. Please perform steps (a) to (g) to install the drivers.
a. Obtain the latest Real Mode CD-ROM drivers from the web and extract them from the SoftPaq. b. If not already in Windows, type WIN from the DOS prompt.
c. From the File Manager or Program Manager window, click File →→ Run. d. Type SYSEDIT and click OK.
e. The highlighted window should read C:\AUTOEXEC.BAT. Scroll to the end of this file and type following line: MSCDEX /D:IDECD001. Make sure that the correct path name is included f. Click the title bar labeled C:\CONFIG.SYS. If it is not visible, click Window on the menu bar and
select the CONFIG.SYS file by clicking on it. Scroll to the end of this file and add the following line: DEVICE= CPQLTECD.SYS /D:IDECD001. Make sure that the correct path name is included.
6. Disable the Real Mode PCMCIA drivers. If you are not running any PCMCIA drivers, proceed to step 7.
If your are using Real Mode PCMCIA drivers, or if unsure, continue through steps 6a to 6n. These steps are for the Compaq specific version of SystemSoft’s CardWizard. If you are using another company’s Card & Socket Services, please consult your documentation on how to disable them. a. If the System Configuration Editor is already running skip to step d.
b. From either the Program Manager or File Manager window, click File →→ Run. c. Type SYSEDIT and click OK.
d. Click the title bar labeled C:\CONFIG.SYS.
e. Find the line ‘rem SystemSoft CardSoft/16(TM) PCMCIA Drivers.’ At least four lines may need to be commented out. If the drivers were installed to the default directory, they all contain CARDWIZ, or CARDWORKS as part of the text.
f. Type REM and a space at the beginning of each of these lines. g. Place a semicolon (;) before these lines if they exist:
device=c:\dos\monoumb.386 device=c:\cardwiz\pccard.386 device=c:\cardwiz\ssvrdd.386 device=ssvcd.386
device=ssvcd311.386 COM1Base=3F8 COM1Irq=4 COM4Base=2E8 COM4Irq=11
EMMEXCLUDE=C800-CBFF EMMEXCLUDE=D000-D4FF And add:
device=*vcd
h. Click the title bar labeled C:\WINDOWS\SYSTEM.INI. If it is not visible, click Window on the menu bar and select the SYSTEM.INI file by clicking on it. Scroll through this file until you see ‘[386Enh]’.
i. Again, look for the lines that contain the phrase ‘C:\CARDWIZ\.’ Place a ; (semicolon) and a space at the beginning of each line.
j. Close the System Configuration Editor by clicking on the X in the upper right corner of the windows. You are prompted to save each file. Confirm that you want to save each file by clicking
YES.
k. Double-click the STARTUP group icon in the Program Manager. If the icon is not visible, click the word WINDOW on the menu bar and then click on the word MAIN. If the word Main does not appear when you click the word WINDOW, click the words MORE WINDOWS. A dialog box with all the groups listed displays. Scroll through until you see the STARTUP group, click it, and then click OK.
l. Click the icon labeled ‘CardWizard’ and then press Delete. m. Click YES to confirm deleting the icon.
o. Restart the computer by pressing, then releasing Ctrl+Alt+Delete simultaneously.
You are now ready to install Windows 98. The Windows 98 setup files must be copied to the hard drive first. You need them for future additions of new hardware, such as PC Cards, or for docking the unit for the first time.
7. Type MD WIN98 and press Enter. 8. Type CD WIN98 and press Enter.
9. Place the Windows 98 disc into the CD-ROM drive. 10. Type COPY D:\WIN98\*.* and press Enter.
Note: If you wish to install the Microsoft Channel Content, substitute the following command in step 10: XCOPY D:\WIN98\*.* /S
11. Armada 7000 and LTE 5000 Family users should now power off the system, swap the CD-ROM drive for the diskette drive, restart the computer, and proceed to step 20. If you are not sure how to swap the diskette drive for the CD-ROM drive, see your unit documentation.
Steps 12 to 19 are for Armada 1500 users only. All others should proceed to step 20. The video driver needs to be reset to the default VGA and a file needs to be renamed.
12. Type CD\WINDOWS and press Enter. 13. Type SETUP and press Enter.
14. Using the arrow keys, highlight the line titled ‘VGA‘ and press Enter.
15. Again, using the arrow keys, scroll through this list until you see VGA and highlight it. Press Enter. 16. Press Enter.
17. You are prompted that the driver is already installed. Press Enter.
Armada 1540, 1560, 1570, 1571, 1572, 1573, 1590, 1592, 1598 users also need to perform steps 18 and 19. Others should proceed to step 20.
18. Type CD SYSTEM and press Enter.
19. Type REN CHIPSCPL.CPL *.ORG and press Enter.
20. Start Windows by typing WIN and pressing Enter from the command prompt. 21. From the Program Manager or File Manager window, click File →→ Run. 22. Type C:\WIN98\SETUP and click OK.
23. The ‘Windows 98 Setup’ screen appears. Click Continue. The License Agreement appears. 24. After reading the License Agreement, click on ‘I accept the Agreement’ and click Next to continue. 25. Enter the Product Key on the Certificate of Authenticity that came with your Windows 98
documentation, then click Next to continue.
26. Select the directory where the operating system will be installed. The recommended directory is the default directory, C:\WINDOWS. Click Next to accept the default directory.
To use a directory other than the default directory, click Other Directory, enter the alternate directory, then click Next.
27. You are asked if you want to save the existing system files. Compaq strongly recommends doing so. Click on the appropriate selection and click Next to continue.
If you have more than one partition on your hard drive, you are prompted where to save the 'uninstall' files. Choose the appropriate drive and click OK.
28. Select the type of installation to perform. If you are unsure about which type of installation to select, contact your IT department, otherwise, select PORTABLE and click Next to continue.
29. Click Next to select the Windows Components to be installed. If you are unsure of which to install, a. Click on ‘Show me the list of components so I can choose’ and click Next.
b. Select the components you wish to install and click Next to continue.
If networking was not installed in your system as part of Windows 3.1x, and if you do not have an integrated modem, proceed to step 33.
30. If networking was installed in your system as part of Windows 3.1x (other than Dial-Up Networking without the Microsoft client) or if the unit has an integrated modem, you are asked to enter the computer identification information.
a. Every computer on a network must have a unique name. Accept the default or change the name as appropriate. Tab to the next field.
b. A Workgroup is a group of computers that are somehow related. Accept the default or change the Workgroup as appropriate. Tab to the next field.
c. The Computer Description is just that. Accept the default or change the description as appropriate. Click Next to continue.
31. Verify that the location is correct and click Next.
32. Click Next to create a Startup Disk. You may elect to skip this process. However, Compaq strongly recommends creating a Startup Disk.
a. Insert a high-density floppy into the diskette drive and click OK.
b. When prompted, remove the diskette and click OK. The Windows 98 files are copied to their installation directory. Click Next to continue.
33. This phase is now complete. The unit restarts. Click Restart Now or wait. 34. From the PC Card Setup Welcome screen, click Next.
35. Click Next on the second PC Card Wizard screen. 36. Click Finish on the third PC Card Wizard screen.
37. You are asked to verify your geographical location, select the appropriate time zone, and the date and time for your area. Make your selections and click Next.
38. After Setup finishes this phase, the unit restarts. Click Restart Now or wait.
39. After rebooting, if you performed step 30, the user name you entered in that step displays. If you want to change this, click the ‘User name’ field, delete the current name, and replace it with the user name you want to use. If you want to enter a password, tab to the Password field and enter a case sensitive password. Click OK to continue.
Note: If this is the first time this user name has been used on this computer, you are asked to reenter the password. Confirm the password by retyping it and click OK. If the passwords do not match, you are asked to type them again. Click OK to reenter the password. If you previously had a password for the user name entered, this one must match the previous.
40. Windows finishes its hardware configuration and finalizes your Personalized Settings. The Welcome to Windows 98 screen displays. If you do not want to see this screen the next time you start Windows, uncheck the box ‘Show this screen each time Windows 98 starts’ by clicking on that text. Close this window by clicking on the X in the upper right corner of the window. After the unit restarts, click on the X in the upper right corner of the Welcome window to close it.
41. Reference to the Real Mode drivers, if added, must now be removed. To do this, remove the lines added in steps 5e and 5f also using SYSEDIT.
Additionally, the DOSSTART file must be modified to remove Real Mode references. 42. Click Start →→ Run.
43. Type NOTEPAD C:\WINDOWS\DOSSTART.BAT and click OK. 44. Type REM and a space in front of the line
C:\WINDOWS\COMMAND\MSCDEX.EXE /IDECD001.
45. Click File →→ Exit on the Notepad title bar. 46. Click YES to save the file.
The Windows 98 installation is complete. Proceed to “Installing Compaq Drivers and Enhancements” to install the other necessary files for your Compaq portable computer. Note: You must install all drivers in order for your system to have complete functionality. Note: Armada 1700 and 7000 family users may wish to enable Hard Drive DMA. See Appendix 7, “Enabling Hard Drive DMA” for instructions on how to enable DMA.
Installing Compaq Drivers and
Enhancements
Compaq Drivers and Support Software
The necessary drivers and enhancements available for the Compaq Armada Portables discussed in this white paper are summarized in Table 2. The list is current at the date of this publication. You should always check the Compaq website for the complete, up-to date list of available drivers and enhancements and their associated SoftPaq numbers. Instructions for obtaining the SoftPaqs is in Appendix 1, “Downloading Software from the Compaq Website.” After obtaining the necessary files for your Armada portable, proceed to the installation instructions for each deliverable.
Important Notes
• Make sure that the system is undocked (Standalone) and there are no PC Cards in the PCMCIA slots when installing drivers. 5
• Any item with an asterisk is considered optional and may not be needed by all users depending upon their environment.
• Any first step which begins with ‘Double-click SETUP’ assumes that you have used ‘My Computer’ or Explorer to navigate to the directory where the files are located after extraction from the SoftPaq.
• These SoftPaqs are the minimum required for Windows 986. They may be superceded as noted on the Compaq website.
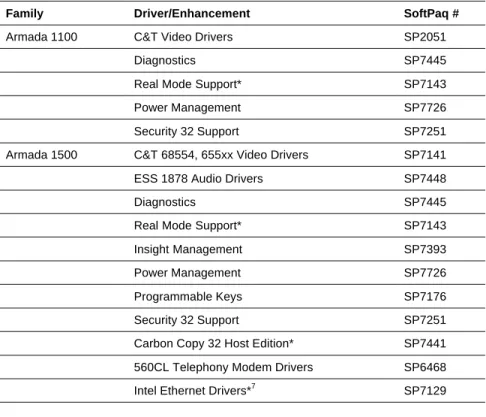
Table 2. Compaq Drivers and Enhancements SoftPaqs for Windows 98
Family Driver/Enhancement SoftPaq #
Armada 1100 C&T Video Drivers SP2051
Diagnostics SP7445
Real Mode Support* SP7143 Power Management SP7726 Security 32 Support SP7251 Armada 1500 C&T 68554, 655xx Video Drivers SP7141 ESS 1878 Audio Drivers SP7448
Diagnostics SP7445
Real Mode Support* SP7143 Insight Management SP7393 Power Management SP7726 Programmable Keys SP7176 Security 32 Support SP7251 Carbon Copy 32 Host Edition* SP7441 560CL Telephony Modem Drivers SP6468 Intel Ethernet Drivers*7 SP7129
5 See APPENDIX 5 DOCKING FOR THE FIRST TIME for information on docking your Armada Portable for the first time. 6 These SoftPaq numbers are for the US English versions. Versions for other language may vary.
Family Driver/Enhancement SoftPaq #
Armada SB C & T Video Drivers SP7141 ESS 1869 Audio Drivers SP7156
Diagnostics SP7445
Real Mode Support* SP7143 Insight Management SP7393 Power Management SP7726 Programmable Keys SP7176 Security 32 Support SP7251 Carbon Copy 32 Host Edition* SP7441 Portable Telephony Modem Drivers SP7447 Intel Ethernet Drivers*7 SP7129 Armada 1700 C&T Video Drivers SP7141 ESS 1869 Audio Drivers SP7156
Diagnostics SP7142
Real Mode Support* SP7143 Insight Management* SP7393 Programmable Keys SP7176 Security 32 Support SP7251 Carbon Copy 32 Host Edition* SP7441 Compaq 56VL Global Internal Modem Drivers SP7447 Intel Ethernet Drivers*7 SP7129 Armada 3500 C&T Video Drivers SP8326 ESS 1869 Audio Drivers SP8301
Diagnostics SP8288
Insight Management* SP7393 Power Management SP8071 Intel Ethernet Drivers*7 SP7129 Carbon Copy 32 Host Edition* SP7441 Programmable Keys SP7176 Real Mode Support* SP8289 Security 32 Support SP8086 Armada 4100 C&T Video Drivers SP6853
Diagnostics SP7142
Real Mode Support* SP8058 Insight Management* SP7393 ESS 6/88/1688 Audio Drivers SP2027
continued
7 As no two network setups are the same, it is highly recommended that you do not set up any networking components. You should
Family Driver/Enhancement SoftPaq #
Armada 4100 (continued)
Programmable Keys SP7176
Security 32 Support SP8086 Ethernet Drivers*7 SP2761 Armada 4200 C&T 68554, 655XX Video Drivers SP5469
Diagnostics SP7142
Real Mode Support* SP7143 Insight Management* SP7393 Programmable Keys SP7176 Security 32 Support SP7378 Ethernet Drivers*7 SP5387 Armada 7300/7700 S3 Display Drivers SP6300 ESS 1878 Audio Drivers SP6299
Diagnostics SP7142
Real Mode Support* SP7143 Insight Management SP7393 Programmable Keys SP7176 Security 32 Support SP7378 Carbon Copy 32 Host Edition* SP7441 Modem Information File SP3716 Armada 7400/7800 S3 M5 Video Drivers SP7411 External Display Configuration Utility SP7578 ESS 1879 Audio Drivers SP7603
Diagnostics SP7142
Real Mode Support* SP8058 Insight Management* SP7393 Programmable Keys SP7176 Security 32 Support SP8086 Carbon Copy 32 Host Edition* SP7441 Compaq Series II Modem Drivers SP6470 LTE 5000 Video Drivers EXCEPT model 5380 SP1859 Video Drivers for model 5380 SP2051 ESS 6/88/1688 Audio Drivers SP1860
Diagnostics SP7445
Real Mode Support* SP8058 Power Management SP7726
SoftPaq Installation Procedures
Installing the C & T Video Drivers—Armada SB, 1700 Family, 1505, 1540,
1560, 1570, 1571, 1572, 1573, 1590, 1592, and 1598
1. Secondary-click an open area on the Desktop. 2. Click Properties.
3. Click the SETTINGS tab. 4. Click Advanced Properties. 5. Click the ADAPTER tab. 6. Click Change.
7. Click Next on the first Wizard prompt.
8. Click ‘Display a list of all the drivers in a specific location…’ then click Next. 9. Click Have Disk.
10. Enter the path to the video driver extracted from the SoftPaq. 11. ‘Chips and Tech. 68554 PCI. (COMPAQ)’ displays. Click OK. 12. Click Next.
13. If the Version Conflict dialog appears, click NO to replace the existing files. 14. Click Close to end the installation.
15. Click Finish to return to the Adapter tab. 16. Click the MONITOR tab.
17. If your monitor type is listed as ‘Unknown,’ click Change. If the correct panel is displayed, skip to step 19.
18. Select either ‘Laptop Display Panel (800x600) or ‘Laptop Display Panel (1024x768) as appropriate for your computer8 then click OK.
19. Click Close. 20. Click Close again.
21. Click YES to restart the computer and begin using your new video drivers.
Installing the C & T 68554, 655xx Video Driver—Armada 4200 and 1700
1. Secondary-click an open area on the Desktop. 2. Click Properties.
3. Click the SETTINGS tab. 4. Click Advanced Properties. 5. Click the ADAPTER tab. 6. Click Change.
7. Click Next on the first Wizard prompt.
8. Click ‘Display a list …’ and then click Next. 9. Click Have Disk.
10. Enter the path or drive letter to the video driver extracted from the SoftPaq and click OK. 11. ‘Chips and Tech. 65555 PCI’ displays. Click OK.
12. Click YES to confirm that you want to install the Compaq video driver. 13. Click Next.
14. Click Finish to return to the Adapter tab. 15. Click the MONITOR tab.
16. If your monitor type is listed as ‘Unknown Monitor,’ click Change. If the correct panel is displayed, skip to step 19.
17. Select ‘Laptop Display Panel (800x600) then click OK. 18. Click Close.
19. Click Close again.
20. Click YES to restart the computer and begin using your new video drivers.
Installing the S3 Display Driver—Armada 7300 and 7700 Family
1. Secondary-click an open area on the Desktop. 2. Click Properties.
3. Click the SETTINGS tab. 4. Click Advanced.
5. Click the ADAPTER tab. 6. Click Change.
7. Click Next on the first Wizard prompt. 8. Click ‘Display a list…’ then click Next. 9. Click Have Disk.
10. Enter the path to the video driver extracted from the SoftPaq. 11. ‘S3 Inc. 86CM65’ displays. Click OK.
12. Click YES on the warning dialog. 13. Click Next.
14. Click Finish to return to the Adapter tab. 15. Click the MONITOR tab.
16. If your monitor type is listed as ‘Unknown,’ click Change. If the correct panel is displayed, skip to step 17.
17. Select ‘Laptop Display Panel (1024x768)’ then click OK. 18. Click Close.
19. Click Close again.
Installing the S3 M5 Video Drivers—Armada 7400 and 7800 Family
1. Double-click SETUP.
2. Click OK to restart the computer.
Installing the Cirrus GD7543 Video Drivers—LTE 5000 Family EXCEPT 5380
1. Secondary-click an open area on the Desktop.
2. Select Start →→ Settings →→ Control Panel →→ Display. 3. Click the SETTINGS tab.
4. Click Change Display Type. 5. Click the ADAPTER tab. 6. Click Change.
7. Click Have Disk, then OK.
8. Enter the path to the video driver extracted from the Softpaq, then click OK. The Select Device dialog appears.
9. Select “Cirrus Logic 7543 2.30a (Cirrus)” then click OK. 10. Click Close.
11. Click Close again.
12. Click Yes to restart the computer and begin using your new video driver.
Installing the Cirrus GD7548 Video Drivers—LTE 5380
1. Secondary-click an open area on the Desktop.
2. Select Start →→ Settings →→ Control Panel →→ Display. 3. Click the SETTINGS tab.
4. Click Change Display Type. 5. Click the ADAPTER tab. 6. Click Change.
7. Click Have Disk, then OK.
8. Enter the path to the video driver extracted from the Softpaq, then click OK. The Select Device dialog appears.
9. Select “Cirrus Logic 7548 1.35(Cirrus)” then click OK. 10. Click Close.
11. Click Close again.
Installing the Cirrus GD7548 Video Drivers—4100 Family
1. Secondary-click an open area on the Desktop.
2. Select Start →→ Settings →→ Control Panel →→ Display. 3. Click the SETTINGS tab.
4. Click Change Display Type. 5. Click the ADAPTER tab. 6. Click Change.
7. Click Have Disk, then OK.
8. Enter the path to the video driver extracted from the Softpaq, then click OK. The Select Device dialog appears.
9. Select “Cirrus Logic 7548 1.40m(Cirrus)” then click OK. 10. Click Close.
11. Click Close again.
12. Click Yes to restart the computer and begin using your new video driver.
Installing the Cirrus GD7548 Video Drivers—Armada 1100 Family
1. Secondary-click an open area on the Desktop.
2. Select Start →→ Settings →→ Control Panel →→ Display. 3. Click the SETTINGS tab.
4. Click Change Display Type. 5. Click the ADAPTER tab. 6. Click Change.
7. Click Have Disk, then OK.
8. Enter the path to the video driver extracted from the Softpaq, then click OK. The Select Device dialog appears.
9. Select “Cirrus Logic 7548 1.35(Cirrus)” then click OK. 10. Click Close.
11. Click Close again.
12. Click Yes to restart the computer and begin using your new video driver.
Installing the ESS 1879 Audio Drivers
1. Double-click the file SETUP.EXE. 2. Click Next from the Welcome screen.
Installing the ESS 1869 Audio Drivers
1. Double-click the file SETUP.EXE. 2. Click Next from the Welcome screen.
3. Click Finish to restart the computer and finish the installation.
Installing the ESS 1878 Audio Drivers—Armada 7300 and 7700
4. Click Start →→ Settings →→ Control Panel. 5. Double-click the System icon.
6. Click the tab labeled ‘Device Manager.’
7. Click the + sign next to ‘Sound, video and game controllers.’ 8. Click and highlight the second ‘ES1878 Control Interface (WDM).’ 9. Click Properties.
10. Click the DRIVER tab. 11. Click Update Driver. 12. Click Next.
13. Click ‘Display a list of all the drivers in a specific location.’ Select the driver you want, then click
Next.
14. Click Have Disk.
15. Enter the path to the ESS 1878 Audio Drivers. 16. Click OK.
17. Click YES to verify the installation of the Compaq driver. 18. Click Next.
19. Click Finish.
20. Repeat steps 4-16, substituting “ES1878 Plug and Play Audio Drive (WDM)” in step 5.
Installing the ESS 1878 Audio Drivers—Armada SB and Armada 1500
1. Double-click the file SETUP.EXE. 2. Click Next to continue.
3. Click ‘Yes, I want to restart my computer now,’ then click OK.
Installing the ESS 6/88/1688 Audio Drivers—LTE 5000 Family
4. Click Start →→ Settings →→ Control Panel. 5. Double-click the System icon.
6. Click the tab labeled ‘Device Manager.’
7. Click the + sign next to ‘Sound, video and game controllers.’ 8. Double-click ‘ES688 AudioDrive.’
10. Click Change Driver. 11. Click Have Disk.
12. Enter the path to the ESS 688 Audio Drivers. 13. Click OK.
14. Click YES to verify the installation of the Compaq driver. 15. Click OK at the Properties tab.
16. Click Close at the System Properties dialog box. You must reboot the system.
Installing the ESS 688/1688 Audio Drivers Armada—4100 Family
1. Click Start →→ Settings →→ Control Panel. 2. Double-click the System icon.
3. Click the tab labeled ‘Device Manager.’
4. Click the + sign next to ‘Sound, video and game controllers.’ 5. Double-click ‘ES1788 AudioDrive.’
6. Click the DRIVER tab. 7. Click Change Driver. 8. Click Have Disk.
9. Enter the path to the ESS 688 Audio Drivers. 10. Click OK.
11. Click YES to verify the installation of the Compaq driver. 12. Click OK at the Properties tab.
13. Click Close at the System Properties dialog box. You must reboot the system.
Installing the Compaq Insight Management Agents
1. Double-click SETUP. 2. Click NEXT to continue.
3. If you wish to install DMI 2.0 support, click Next otherwise click None and Next.
4. Accept the destination directory by clicking Next or choose Browse and enter a different destination directory, click OK, YES, Next, if installing DMI support.
5. When the program finishes, highlight ‘Yes, I want to restart my computer now’ and click Finish to restart the computer. Remove the diskette from the drive before restarting.
6. The IM Agents Help file displays the next time the unit is rebooted and you log on. Close the file by clicking on the X in the upper right corner of the window.
Power Management
1. Double-click the file SETUP.EXE. 2. Click Next to continue.
3. Click OK to complete the installation. 4. Click OK to restart the computer.
External Display Configuration Utility
1. Double-click the file SETUP.EXE. 2. Click Next to continue.
3. Click ‘Yes, I want to restart my computer now,’ then click OK.
Installing Diagnostics
1. Double-click the file SETUP.EXE. 2. Click Next to continue.
3. Click Finish to complete the installation.
Installing Programmable Keys
1. Double-click the file SETUP.EXE. 2. Click Next to continue.
3. Click OK to complete the installation.
4. Click ‘Yes, I want to restart my computer now,’ then OK.
Installing Real-Mode Support
1. Double-click the file SETUP.EXE. 2. Click Next to continue.
3. Click OK to complete the installation.
Installing Security 32 Support
1. Double-click the file SETUP.EXE. 2. Click Next to continue.
3. Click OK to complete the installation.
Installing Carbon Copy 32 Host Edition
1. Double-click the file SETUP.EXE.
2. To accept the displayed name and company information, click OK or change the information and then click OK.
3. If you would like to view the README.TXT9 file, click YES otherwise click NO.
4. When finished reading the README.TXT file, close it by clicking on the X in the upper-right hand corner.
5. Confirm the installation directory by click OK or type in a new directory and click OK. 6. Click OK to install the files.
7. Remove the diskette from the drive.
8. Click YES to restart the computer and finish the installation.
Installing the Modem Information File
1. Navigate to the folder that contains the Modem Information File. Double-click on the ‘My Computer’ icon on the Windows desktop.
a. Double-click on the ‘(C:)’ icon.
b. Continue to double-click folders until you are in the folder containing the extracted Modem Information File. You will see a file named SP7000NT.
2. Highlight the file SP7000NT and click on the ‘Copy’ icon.
3. Click on the change directory icon until you are in the root directory of C:\ 4. Double-click on the Windows folder.
5. Click Show Files on the left side of this window.
6. Click View →→ Folder Options →→ View →→ Show All Files on the menu bar, then click OK. 7. Double-click on the INF folder.
8. Click on the paste icon.
9. Click Start →→ Settings →→ Control Panel. 10. Double-click Modems.
11. If prompted, enter your area code and click Close. 12. Click Remove, then click Close.
13. Restart the computer by clicking Start →→ Shut Down →→ Restart the Computer and YES.
Once the computer restarts, it will properly identify your modem.
Installing the Compaq Series II Modem Driver
1. Click Start →→ Programs →→ MS-DOS Prompt on the Start Menu.
2. Type each of the following lines, pressing Enter at the end of each. Be sure to include the complete correct path and drive letter of the directory into which the drivers were extracted with the name of the first file.
a. COPY SPQ7000V.INF C:\WINDOWS\INF
b. COPY GBENABLE.VXD C:\WINDOWS\SYSTEM 3. Type Exit and press Enter to return to Windows.
4. Click Start →→ Settings →→ Control Panel on the Start Menu. 5. Double-click Modems.
6. If prompted, enter your area code and click Close. 7. Click Remove, then Close.
8. Restart the computer by clicking Start →→ Shut Down →→ Restart the Computer and YES.
Installing the 560CL Telephony Modem—Armada SB, 1505, 1540, 1560,
1570, 1571, 1572, 1573, 1590, 1592, and 1598
1. Click Start →→ Settings →→ Control Panel. 2. Double-click the System icon.
3. Click the tab labeled ‘Device Manager.’ 4. Click the + sign next to ‘Other devices.’ 5. Click Unknown Device.
6. Click Properties. 7. Click Reinstall Driver.
8. Click Next from the Wizard dialog. 9. Click Next to search for a better driver.
10. Click Floppy Disk Drive so that there is a check in the box, then click Next
11. Click Next to continue.
12. Click Next for the Wave Device installation. 13. Click Next to search for a better driver.
14. Click Floppy Disk so that there is a check in the box, then click Next. 15. Click Next to continue.
16. Click Finish on the Voice Modem Serial Wave Device dialog.
17. Scroll through the countries listed in the Country Settings and choose the appropriate country. 18. Click Change Country.
19. Confirm the country by clicking YES.
20. Click Finish on the Update Device Driver Wizard dialog. 21. Click YES.
22. Click Close to return to the System Properties dialog. 23. Click OK to close the System Properties dialog.
Installing the Portable Telephony Modem INF—Models 1510, 1520, 1530,
1535, 1550, 1580
1. Click Start →→ Settings →→ Control Panel.
2. Double-click ‘Add New Hardware’ to add the Communications port. a. Click Next on this dialog and the next three dialogs.
b. Click Finish.
3. Double-click the Modem icon.
4. Click Other so that the black circle appears in the white circle, then click Next.
5. Click ‘Don’t run the Hardware Installation Wizard’ so that there is a check in the box, then click Next. 6. Click ‘Don’t detect my modem…’ so that there is a check in the box, then click Next.
7. Click Have Disk.
8. Enter the path to the Portable Telephony Modem INF file and click OK. 9. Click Next to continue the installation.
10. Click ‘Communications Port (COM2) so that it is highlighted, then click Next.
11. The Location Information dialog must have the area or city code filled in as a minimum. Change and enter all appropriate information, then click Next.
12. Click Finish.
13. Click OK to close the Modems Properties window.
Installing the Compaq 56VL Telephony Modem Driver
1. Click Start →→ Settings →→ Control Panel. 2. Double-click the System icon.
3. Click the tab labeled ‘Device Manager.’ 4. Click the + sign next to ‘Other devices.’ 5. Click ‘Unknown Device.’
6. Click Properties. 7. Click Reinstall Driver. 8. Click Next.
9. Click the box ‘Display a list of all the drives in a specific location and select the driver you want. 10. Click Next.
11. Select Modem and Click Next. 12. Click Have disk.
13. Enter the path to the files.
Appendix 1: Downloading Software from
the Compaq Website
1. The base URL for all Compaq Portables software is
www.compaq.com/support/files/portables/us/index.html. Enter this location in the browser of your choice.
2. You are presented three drop-down dialog boxes for Family, Model, and Operating System. Fill in each box as appropriate and click the Locate button.
a. Family—which series of Armada are you trying to find software for; e.g. Armada 7700, Armada 4200, etc.
b. Model—the specific portable; e.g. 42XX where XX represents the last two digits—as in 4210 or 4220. For the 7800 Armada series, it is in the form of XXXX/Z/XXXX/Z/Z/Z—e.g.
6266/T/5000/D/M/1. See the bottom of your portable to obtain the proper model number. c. Operating system, in this case “Windows 98”
3. A list of all files currently available displays. Click on each sub-bulleted item. a. You are shown information on this particular deliverable.
b. Click the DOWNLOAD button.10
c. Place all of the files into a common directory so that they may be extracted for use in the scripts. A common directory used is C:\~COMPAQ.
See the instructions on how to use the SoftPaq utility in Appendix 2.
Appendix 2: Using the SoftPaq Utility
Currently, there are two versions of the SoftPaq utility on the Compaq website11. As drivers are updated and released as SoftPaqs, they are released using the most current version of the utility. You can tell which version is in use by looking at the application title-bar at the top of the screen. The procedure for using either version is outlined below.
SoftPaq 2.x
1. When you run the application, you are presented with information as to which software driver or program you are going to extract to floppy. Press PgDn to view the Licensing Agreement. 2. Type AGREE. The number of required diskettes is displayed.
3. Type the destination drive letter for the software extraction. 4. Insert a 3.5” 1.44 MB diskette into the drive and press Enter.
5. When the software has been extracted, the program exits automatically.
The software is now ready for installation from the diskette prepared according to the steps outlined in the section titled “Installing Compaq Drivers and Enhancements.” Compaq recommends viewing the README file for any updates.
SoftPaq 3.x
1. Place the SoftPaq file in a temporary directory where the files will be extracted.
2. When you run the application, you are presented with information as to which software driver or program you are going to extract to floppy. Press C to continue.
3. Press A to agree to the Licensing Agreement.
4. You are asked if the destination directory for extraction is OK. Type Y to continue. 5. When the software has been extracted, the program exits automatically.
The software is now ready to be used in the steps outlined in the section titled “Installing Compaq Drivers and Enhancements.” It will be installed from the directory to which it was extracted. Compaq recommends viewing the README files for any updates.
Appendix 3: Installing Diagnostics
and Setup
You need both the Diagnostics and Setup diskettes before beginning. If you do not have them, you can download them from the Compaq website. Ensure that there are no existing partitions on the hard drive with the FDISK utility. If you are unsure how to use the FDISK program, refer to Microsoft’s web page on the subject. This information is available at
http://support.microsoft.com/support/kb/articles/q106/4/23.asp.
1. Start the computer from the Diagnostics diskette. 2. Press Enter on the ‘Create Diagnostics Partition’ dialog. 3. Press Enter to restart the computer.
4. Press Enter to confirm that you have both the Diagnostics and Setup diskettes. 5. Insert the Setup diskette when prompted and press Enter.
6. Insert the Diagnostics diskette when prompted and press Enter. 7. Insert the Setup diskette when prompted and press Enter. 8. Press Enter to complete the installation.