BEAP DATA MANAGEMENT TOOL (BEAP DATA TOOL)
USER GUIDE
BASE ENGINEERING ASSESSMENT PROGRAM
Abbreviations 1
1.0 Introduction 1
2.0 Issues Register Input File 2
2.1 Issues Data Capture 2
3.0 BEAP Data Tool 4
3.1 Data Entry / Edit 6
4.0 Reports 12
4.1 Summary Tables 13
4.2 Work Request List 14
4.3 Issues Register Report 15
4.4 Summary Table (Pivot) 16
Appendix A
BEAP Data Tool Process Flowchart A
Figure 1 BEAP Data Tool Inputs 1
Figure 2 ‘Service’ Selection 2
Figure 3 ‘Sub-Service’ Selection 2
Figure 4 Next Available Issue Number 2
Figure 5 Nominate Issue Number 2
Figure 6 Alternative Issue Numbering 3
Figure 7 Incorrect ‘Sub-Service’ Selection 3
Figure 8 Start screen for the BEAP Data Tool 4
Figure 9 Add Issues Register Input Data 4
Figure 10 Navigation Pane 5
Figure 11 BEAP Matching Screen 6
Figure 12 Issue selection 7
Figure 13 Work Request details 7
Figure 14 Matching the Issue to a Defence asset 8
Figure 15 Input Spatial Data 9
Figure 16 Add new sub-asset to the Defence database 10
Figure 17 New asset numbering example 10
Figure 18 Asset Risk assessment 11
Figure 19 Navigation Pane 12
Figure 20 Standard BEAP summary tables for use in the BEAP Report 13
Figure 21 Work Request list 14
Figure 22 Issues Register Report Output Tab 15
Abbreviations
Abbreviation Description
BEAP Base Engineering Assessment Program
IBIS Interim Business Information System
GEMS Garrison Estate Management System
MCF Program Major Capital Facilities Program
1.0
Introduction
1. This document refers to a Microsoft Excel workbook that was developed to link issues identified during a
Base Engineering Assessment Program (BEAP) review of a base with existing Defence asset data, in order to include the cost estimates for those issues in Defence’s Major Capital Facilities (MCF) planning. The tool has the capability to create new assets which are generated from existing asset ID when an exact match is not possible.
2. To provide some context in terms of how the tool operates a process flowchart is shown in Appendix A.
This document should be read in conjunction with the BEAP Data Tool Process Flowchart. The steps of the flowchart are referred to throughout the report to aid the user (i.e. Step 2).
3. Defence will provide a directory which will include the following files named accordingly to the base being
assessed:
a. Base Name* Issues Register Input.xlsx (e.g. Irwin Barracks Issues Register Input.xlsx); b. Base Name* Asset Data.xlsx (e.g. Irwin Barracks Asset Data.xlsx);
c. Base Name* BEAP Data.xlsm (e.g. Irwin Barracks BEAP Data.xlsm); and d. IFM Cost Structure.xlsx.
4. The interaction between the above files and the BEAP Data Tool is shown below in Figure 1.
Figure 1 BEAP Data Tool Inputs
Issues
Register Input
Asset
Data
BEAP data
Tool
IFM Cost
Structure
5. The BEAP Data Tool:
a. loads data contained in the Issues Register Input spreadsheet which is populated by the site investigation team (Step 3);
b. allows the user to update/amend the Issues database (Step 6 and 7);
c. enables each “Issue” to be matched with a Defence asset, or a new SAMM asset to be created if a good match is not available or if the BEAP review has defined segments of an existing asset and identified issues with specific segments (Step 8a/b);
d. enables Work Request data and Risk Assessments to be added to the “Issue Record” (Step 7 and 10); e. allows spatial data to be assigned to an issue (Step 9)
h. includes a data summary file for the base in the format required for inclusion in the MCF planning process (Step 14).
2.0
Issues Register Input
6. Issue data is collected during the site investigations which are undertaken as part of Phases 1 and 2.
Without the population of the Issues Register Input file spreadsheet, provided by Defence, no issues are able to be loaded into the BEAP Data Tool.
2.1
Issues Register Input Capture
7. The first step of the BEAP process is to undertake the site investigation on the nominated base. Following
the site investigation, the Base Name* Issues Register Input.xlsx (e.g. Irwin Barracks Issues Register Input.xlsx)
is required to be populated (Step 3). No columns or rows can be deleted in the Issues Register Input file.
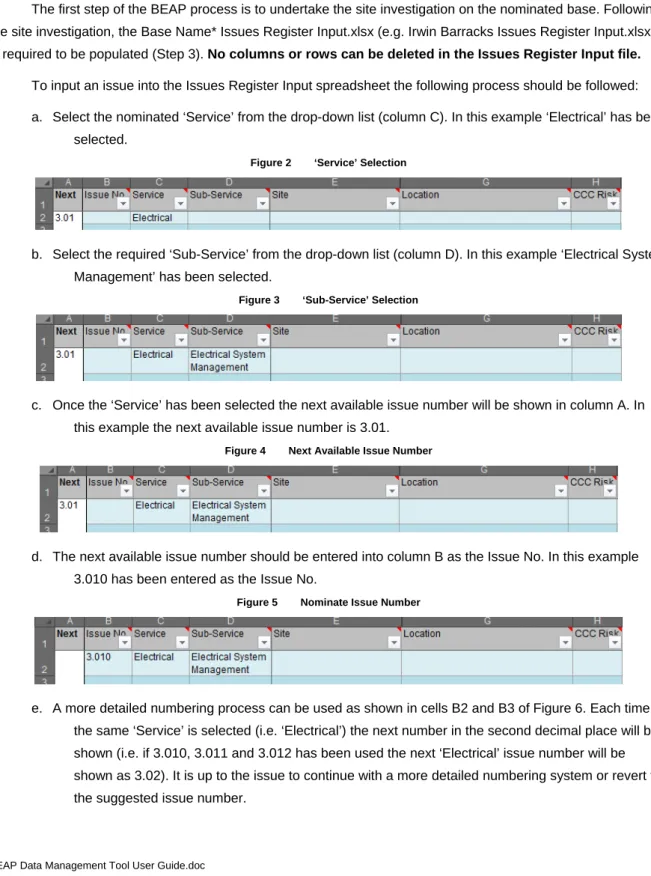
8. To input an issue into the Issues Register Input spreadsheet the following process should be followed:
a. Select the nominated ‘Service’ from the drop-down list (column C). In this example ‘Electrical’ has been selected.
Figure 2 ‘Service’ Selection
b. Select the required ‘Sub-Service’ from the drop-down list (column D). In this example ‘Electrical System Management’ has been selected.
Figure 3 ‘Sub-Service’ Selection
c. Once the ‘Service’ has been selected the next available issue number will be shown in column A. In this example the next available issue number is 3.01.
Figure 4 Next Available Issue Number
d. The next available issue number should be entered into column B as the Issue No. In this example 3.010 has been entered as the Issue No.
Figure 5 Nominate Issue Number
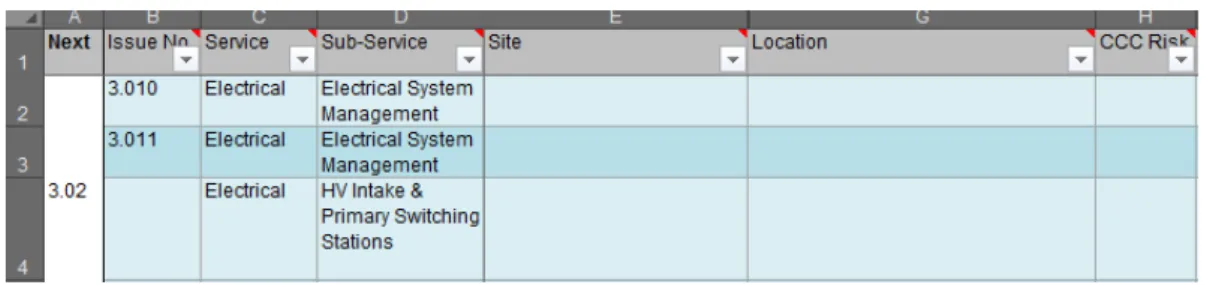
e. A more detailed numbering process can be used as shown in cells B2 and B3 of Figure 6. Each time the same ‘Service’ is selected (i.e. ‘Electrical’) the next number in the second decimal place will be shown (i.e. if 3.010, 3.011 and 3.012 has been used the next ‘Electrical’ issue number will be shown as 3.02). It is up to the issue to continue with a more detailed numbering system or revert to the suggested issue number.
Figure 6 Alternative Issue Numbering
f. If the user selects a Sub-Service which is not related to the selected Service (Figure 7) the Sub-Service will be highlighted orange as a prompt for the user to correct the selection.
Figure 7 Incorrect ‘Sub-Service’ Selection
g. Columns E to M are required to be populated with data collected from the site investigations. h. CCC Risk (column M) allows the user to assign a risk based on three drop-down options:
(1) Low;
(2) Medium; and
(3) High.
i. Priority (column L) allows the user to assign a Priority based on five drop-down options:
(1) P1:WHS (Immediate);
(2) P2: Next FY;
(3) P3: 1-5 Years;
(4) P4: 6-10 Years; and
(5) P5: > 10 Years.
j. Cost (column M) allows the user to estimate the cost of the recommended action. Costs must be entered as dollar values only (rates may not be used). Any text required to explain the cost estimate should be included in the Comments column.
k. Where Spatial Data is available this should be entered in columns N to S. There are two approaches available for the input of spatial data. The first option is to capture both the start and finish latitude and longitude values. The second option is to use GIS to create labels for assets, which can be referred to during the site investigation to identify the location of the inspection. Only one of the two options should be entered into the Issues Register Input spreadsheet.
l. After completion of the Issues Register Input spreadsheet, the user should save the spreadsheet (using the Base Site Group name as provided by Defence) in preparation of input into the BEAP Data Collection, Input and Analysis Tool.
3.0
BEAP Data Tool
9. The purpose of the BEAP Data Tool is to match issues to Defence assets or create new assets where
required, to add risk assessments for the Issues identified, and to enable editing of recommendations and work requests arising from the Issues.
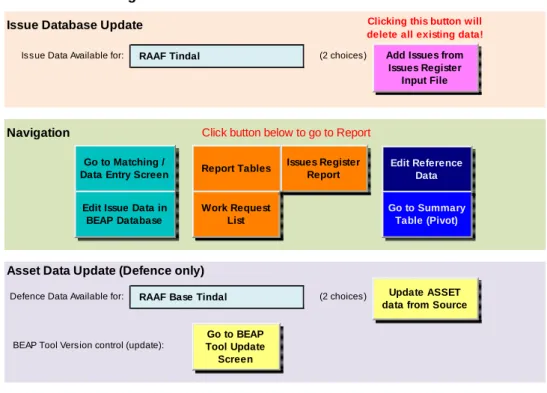
10. The entry screen (Figure 8) for the BEAP Data Tool provides data linking and update functions, and
navigation to other parts of the tool:
Figure 8 Start screen for the BEAP Data Tool
BEAP Data Management Tool Version: 2.02
Issue Database Update
Issue Data Available for: RAAF Tindal (2 choices)
Navigation Click button below to go to Report
Asset Data Update (Defence only)
Defence Data Available for: RAAF Base Tindal (2 choices) BEAP Tool Version control (update):
Clicking this button will delete all existing data!
Update ASSET data from Source
Add Issues from Issues Register
Input File
Go to Matching /
Data Entry Screen Report Tables
Issues Register Report
Edit Reference Data
Edit Issue Data in BEAP Database Work Request List Go to Summary Table (Pivot) Go to BEAP Tool Update Screen
11. The coloured buttons execute macros which run the tool’s functions.
12. The Asset Data Update (Defence only) section can be edited by authorised personnel only. When the user
receives the BEAP Data Tool the Asset Data will have been pre-populated.
13. The blue box next to ‘Issue Data Available for’ has a drop down list of Base options, which are taken from
the file named Base Name* Issues Register Input.xlsx (e.g. Irwin Barracks Issues Register Input.xlsx) in the Directory. There will only be one file using that naming convention present in the Directory provided by Defence.
14. With the correct Base selected, the ‘Add Issues from Issues Register Input File’ button should be pressed
(Step 5). This will clear the BEAP Data Tool of any existing data, and automatically update it with current
Issues Data.
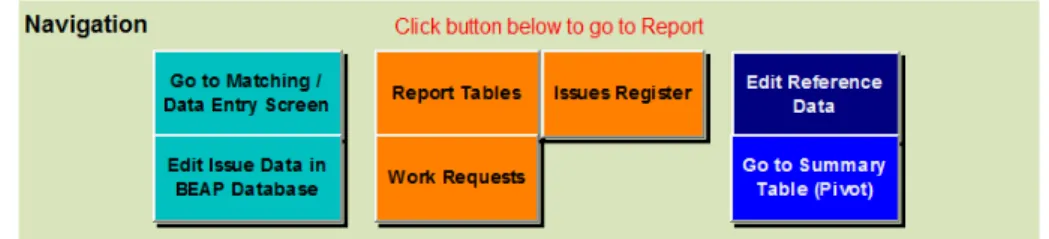
15. There are seven screens available in the Navigation pane of the BEAP Data Tool, their labels indicate their purpose.
Figure 10 Navigation Pane
16. Until all the Issues have been matched and the Work Request details added as necessary, only the first
button will be used, the ‘Go to Matching / Data Entry Screen’ button.
17. The remaining buttons have the following functions:
a. Orange buttons enable reports to be produced, discussed in Section 3.0 Reports;
b. The ‘Edit Reference Data’ button refers to the ‘Reference’ worksheet which is a hidden tab in the BEAP Data Tool. The ‘Reference’ worksheet is a standardised list of assumptions and matching
conventions as nominated by Defence, these assumptions are able to be modified by the user if required be Defence;
c. The ‘Go to Summary Table (Pivot)’ button provides access to a summary pivot table of the contents of the BEAP Data Tool, used for final quality checking purposes.
d. The ‘Go to Matching / Data Entry Screen’ takes the user to the matching screen Figure 11.
e. The ‘Edit Issue Data in BEAP Database’ button allows the user to edit the Issues Register Input Data in the BEAP Data Tool. This button is particularly useful when wanting to make bulk edits to existing issues or to copy the profile of one issue to another e.g. if you had multiple substations with an identical issue, you could easily apply the ‘risk assessment’ values to all the issues as opposed to having to do them individually in the ‘Go to Matching / Data Entry’ screen.
3.1
Data Entry / Edit
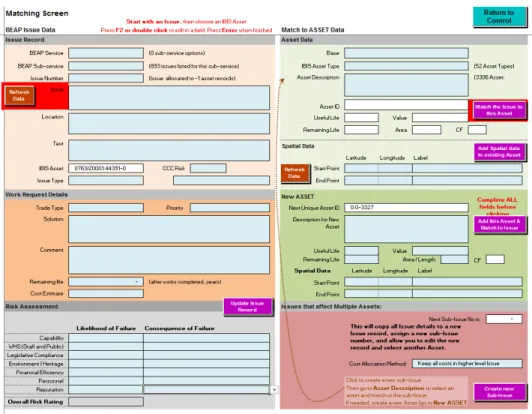
18. When the green ‘Go to Matching / Data Entry Screen’ navigation button is pressed, the user will be
presented with the Matching Screen:
Figure 11 BEAP Matching Screen
19. In this screen, the user will:
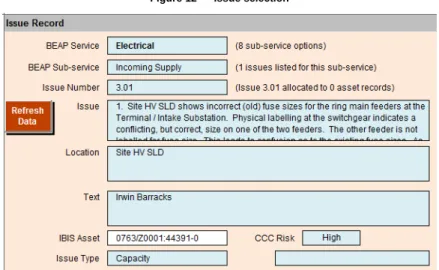
a. Select an Issue from the blue boxes in the top left of the screen (Step 6). (If the Issues Register Input spreadsheet has not been populated no issues will be available).
(1) Use the drop down menus available, working down the three
fields provided to get to a specific Issue number (Figure 12). See Figure 12
(2) Click on the brown ‘Refresh Data’ button when the correct Issue
has been selected, to repopulate the blue fields at the bottom of this part of the screen. If this Issue has already been matched to an IBIS Asset, the Asset identifier will appear in the white box.
(3) Data will appear in the blue boxes (taken from the Issue data entered originally in the Issues
Register Input spreadsheet.
(4) Press F2 or double-click to edit in a field, press enter when finished.
(5) The blue Issue Type fields are used to provide a Category (and a second if one is not
sufficient) for the selected Issue. Both boxes have the same drop down list. The second field is optional, and is available for use if the Issue addresses more than one purpose or outcome.
Figure 12 Issue selection
b. Provide Work request details for this Issue (Step 7):
(1) Use the blue boxes in that section of this screen (Figure 13).
(2) The first two boxes have drop down menus that provide a
choice. The remaining boxes are able to be edited directly.
(3) When all boxes are completed as required, the purple “Update
Issue Record’ button should be clicked. This will add the new or edited data to the Issue database.
See Figure 13
(4) The priority rating of the issue is populated by the user at the
time of entering the issue into the Issues Register Input spreadsheet and reflected in the BEAP Data tool.
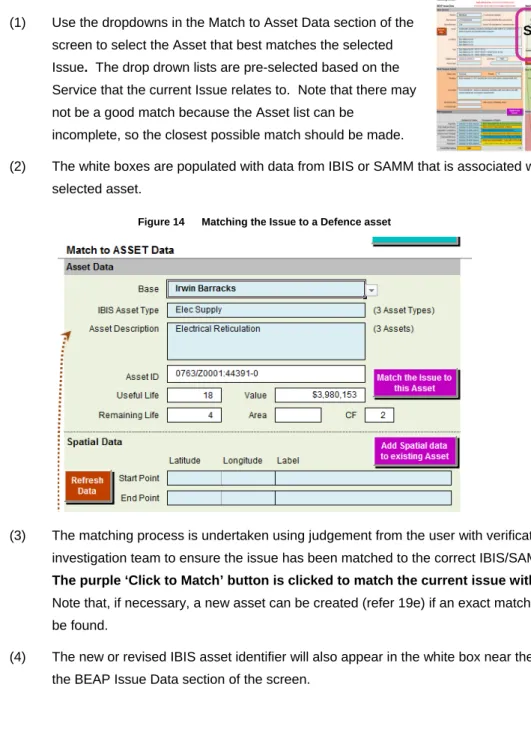
c. Match the selected Issue to a Defence asset (Step 8a):
(1) Use the dropdowns in the Match to Asset Data section of the
screen to select the Asset that best matches the selected
Issue. The drop drown lists are pre-selected based on the
Service that the current Issue relates to. Note that there may not be a good match because the Asset list can be
incomplete, so the closest possible match should be made.
See Figure 14
(2) The white boxes are populated with data from IBIS or SAMM that is associated with the
selected asset.
Figure 14 Matching the Issue to a Defence asset
(3) The matching process is undertaken using judgement from the user with verification from the
investigation team to ensure the issue has been matched to the correct IBIS/SAMM asset.
The purple ‘Click to Match’ button is clicked to match the current issue with the asset. Note that, if necessary, a new asset can be created (refer 19e) if an exact match is unable to be found.
(4) The new or revised IBIS asset identifier will also appear in the white box near the bottom of
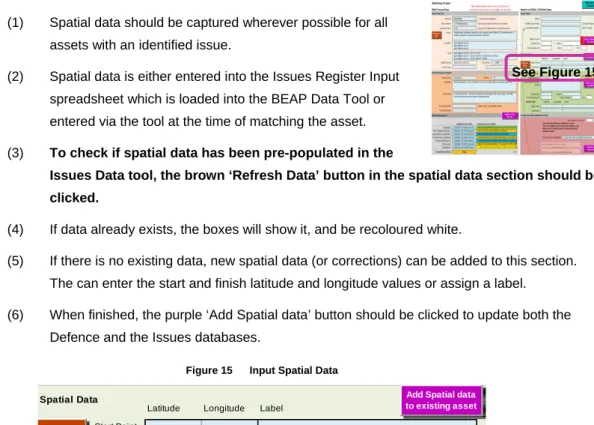
d. Update spatial data for the asset (Step 9):
(1) Spatial data should be captured wherever possible for all
assets with an identified issue.
See Figure 15
(2) Spatial data is either entered into the Issues Register Input
spreadsheet which is loaded into the BEAP Data Tool or entered via the tool at the time of matching the asset.
(3) To check if spatial data has been pre-populated in the
Issues Data tool, the brown ‘Refresh Data’ button in the spatial data section should be clicked.
(4) If data already exists, the boxes will show it, and be recoloured white.
(5) If there is no existing data, new spatial data (or corrections) can be added to this section.
The can enter the start and finish latitude and longitude values or assign a label.
(6) When finished, the purple ‘Add Spatial data’ button should be clicked to update both the
Defence and the Issues databases.
Figure 15 Input Spatial Data
Latitude Longitude Label Start Point
End Point
Spatial Data Add Spatial data
to existing asset Refresh
Data
e. Add a new asset to the Defence database for matching to an Issue (Step 8b):
(1) If the existing Defence assets are too high a level to match to
the Issue, or if it is desired to add a series of segments to the Defence asset database, the BEAP Data Tool provides functionality to do so (Figure 16).
See Figure 16
(2) A new asset would be created when an issue has been
identified for a non-existent asset and hence a gap is identified in the existing asset data e.g. issue identified for substation 11 which doesn’t exist in the asset data.
(3) New asset ID characteristics i.e. useful life, value, CF (Figure 16), should be based on
information from a number of sources including values in similar asset categories, available GPS information, site photos, and engineering judgement
(4) It is not possible to add an IBIS number or a SAMM number individually, the only option
available is to use an existing IBIS/SAMM combination and add sub-numbers. New IBIS/SAMM numbers are required to be created by Defence.
(5) The screen is pre-populated with the next number available. Data may be added to the blue
boxes.
Figure 16 Add new sub-asset to the Defence database
(7) New assets created from existing assets appear from row number 3000 onwards in the ‘In
Use Asset Data’ worksheet which is a hidden worksheet of the BEAP Data Tool. To easily identify new sub numbers a hyphen is placed after the existing asset number. An example of a new asset is shown in Figure 17.
Figure 17 New asset numbering example
(8) Since it is only possible to add new sub-numbers, the initial choice of the asset (refer 19c)
will have to be the closest match that does actually have a SAMM number. If there is not one available, the BEAP Data Tool will indicate that a sub-number cannot be created, and the user will have to try another selection.
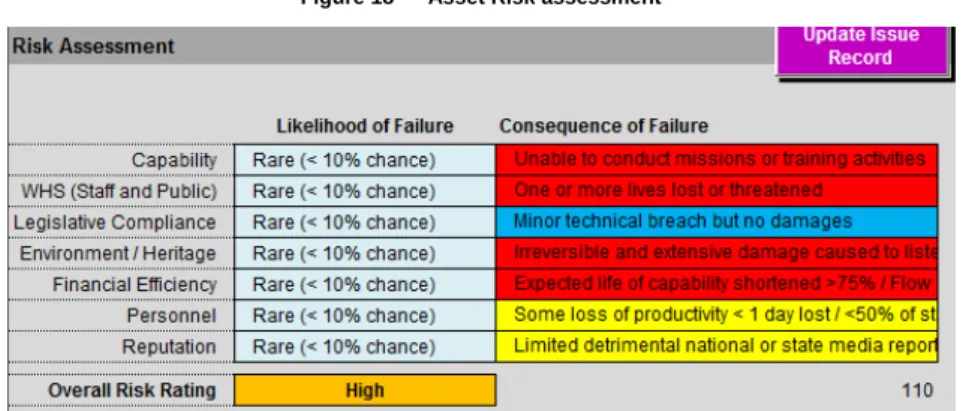
f. Add or update the Risk assessment for the asset (Step 10):
(1) The user completes the risk assessment once the issue has
been selected or when reviewing an issue. This is done in the last section of this screen (Figure 18).
(2) Each choice is made via a drop menu attached to each box.
(3) For efficiency if the user has completed a risk assessment of
an issue and wishes to replicate that assessment to another issue they can bulk edit using the ‘Edit Issues Data’ button (refer 16.e.) i.e. a risk assessment of one issue can be copied to another.
See Figure 18
(4) When finished, click the purple ‘Update Issue data’ button.
Figure 18 Asset Risk assessment
g. Next Action. There are three choices for the next action:
(1) Go back to the Issue Record section and select another Issue
(refer 17a);
(2) Edit the data showing for the selected Issue (and Update Issue
Record when finished; or
(3) Leave this screen to return to the Control screen, by clicking the
green ‘Return to Control’ button at the top right of the screen.
20. The BEAP Data tool should be saved using the Base Site Group name (the default, as provided by
4.0
Reports
21. Several reports are able to be produced from the BEAP Data Tool. The reports are accessed by clicking
on one of the three orange buttons in the navigation pane (Figure 19).
22. The ‘Go to Summary Table (Pivot)’ button is provided to the user for review purposes, as discussed in
Section 4.4.
4.1
Summary Tables
23. This screen is navigated to from the Control Screen (Figure 8).
24. It provides standard summary tables by Service and the table used in the Executive Summary of the BEAP
Phase 3 reports (Figure 20).
25. The nominated service is selected from the drop-down list. The Executive Summary table can then be
copied and pasted into the Phase 3 report.
26. In addition to the Executive Summary the table highlighted by the red box in Figure 20 should be copied to
the Part 1 – Overview Report with the Capacity, Condition and Compliance assessments to be manual entered based on the outcome of the Phase 3 investigations.
27. When finished, the orange ‘Return to Control’ button can be clicked to return to the Control screen.
Figure 20 Standard BEAP summary tables for use in the BEAP Report
Service: 1 7
Capacity Condition Compliance
Manual entry Manual entry Manual entry Manual entry 14 $5,846,200 Manual entry Manual entry Manual entry Manual entry 6 $7,385,000 Manual entry Manual entry Manual entry Manual entry 4 $7,565,000 Manual entry Manual entry Manual entry Manual entry 9 $3,590,800 Manual entry Manual entry Manual entry Manual entry
Manual entry Manual entry Manual entry Manual entry 18 $2,751,999 Manual entry Manual entry Manual entry Manual entry 31 $7,057,650
Manual entry Manual entry Manual entry 82 $34,196,649 Risk Level CEPS
HV Rings & Interconnector Cables Incoming Supply Intake & Primary Switching Stations LEGS LV Switchboards Subs, Ring Main Units & Transformers
Total Risk Level Electrical Fuel and Gas ICT Spatial Data Stormwater Wastewater Water Total
Very High Very High
No. 2 1 1 4 8 No. 8 4 1
Est Cost $3,650,000 $1,000 $1,640,000 $1,021,500 $6,312,500 Est Cost $6,312,500 $1,780,000 $8,092,500
High High
No. 5 3 2 4 13 11 38 No. 38 13 5 9 1 7
Est Cost $1,557,000 $7,385,000 $7,500,000 $3,508,500 $462,000 $2,740,000 $23,152,500 Est Cost $23,152,500 $20,534,175 $1,152,500 $16,353,040 $17,835 $10,855,000 $72,065,050
Medium Medium
No. 7 2 1 4 3 11 28 No. 28 13 14 10 10 6 81
Est Cost $639,200 $60,000 $81,300 $639,999 $2,878,500 $4,298,999 Est Cost $4,298,999 $1,396,500 $2,990,100 $12,994,000 $1,431,076 $13,841,490 $36,952,165
Low Low
No. 1 1 1 5 8 No. 8 1 7 1 2 19
Est Cost $5,000 $10,000 $417,650 $432,650 Est Cost $432,650 $15,000 $737,000 $3,000 $12,930 $1,200,580
Total No. 14 6 4 9 18 31 82 Total No. 82 27 26 19 12 19 185 Total Est Cost $5,846,200 $7,385,000 $7,565,000 $3,590,800 $2,751,999 $7,057,650 $34,196,649 Total Est Cost $34,196,649 $21,945,675 $4,879,600 $29,347,040 $1,451,911 $26,489,420 $118,310,295
CEPS HV Rings & Interconnector Cables Incoming Supply Intake & Primary Switching Stations LEGS LV Switchboards Subs, Ring Main Units & Transformers
Electrical Fuel and Gas ICT Spatial Data Stormwater Wastewater Water
P1 P1
No. No.
Est Cost Est Cost
P2 P2
No. 12 1 2 7 13 19 54 No. 54 18 9 6 9 14 110
Est Cost $4,771,200 $10,000 $60,000 $15,800 $2,109,000 $1,558,250 $8,524,250 Est Cost $8,524,250 $3,011,925 $1,016,000 $6,161,040 $1,293,260 $2,239,420$22,245,895
P3 P3
No. 2 5 2 2 5 10 26 No. 26 6 8 12 3 3
Est Cost $1,075,000 $7,375,000 $7,505,000 $3,575,000 $642,999 $5,088,400 $25,261,399 Est Cost $25,261,399 $18,306,250 $1,361,600 $19,205,000 $158,651 $4,250,000$68,542,900
P4 P4
No. 2 2 No. 2 3 9 1 2
Est Cost $411,000 $411,000 Est Cost $411,000 $627,500 $2,502,000 $3,981,000 $20,000,000 $27,521,500
P5 P5
No. No.
Est Cost Est Cost
Total No. 14 6 4 9 18 31 82 Total No. 82 27 26 19 12 19 185 Total Est Cost $5,846,200 $7,385,000 $7,565,000 $3,590,800 $2,751,999 $7,057,650 $34,196,649 Total Est Cost $34,196,649 $21,945,675 $4,879,600 $29,347,040 $1,451,911 $26,489,420 $118,310,295
Priority No. and Cost
Sub-Service
Grand Total
Executive Summary
Total
Priority No. and
Cost Grand Total Sub-Service
Electrical
HV Rings & Interconnector Cables Incoming Supply Intake & Primary Switching Stations LEGS Resultant No. of Issues Total Cost Estimate CEPS LV Switchboards Subs, Ring Main Units & Transformers Sub-service Assessment Spare Capacity Indicator 2 73 58 17 Return to Control
4.2
Work Request List
28. This screen is navigated to from the Control screen (Figure 8). It provides access to the standard Work
Request list produced by the BEAP program (Figure 21).
29. The list may be printed as is, or interrogated using the filters provided in the header row of the table.
30. The Work Request List is also used to feed into IBIS.
Figure 21 Work Request list Work Request List
Structure ID Structure Risk
Rating
Priority Trade Type Description Intended
Year Planned
Cost Status
0902/037 Base Pump Station / Fire Booster Pump Very HighP2 The Fire Chief suspects the cause of the burst pipes is water hammer as a result of pump start-up. Engage water hammer consultants/specialists to determine the underlying cause of these pipe bursts.
2015 $100,000 Future
0902/095 Substation #8 Very HighP2 Remove bee hive in substation brick cavity - seal under window. 2015 $2,000 Future 0902/620 Raaf Ric Hv - "New Ceps Switchroom" Very HighP2 Replace 11kV Generators - Archaic, unreliable and unserviceable - generators require
manual intervention to synchronise and operate
2015 $3,600,000 Future 0902/620 Raaf Ric Hv - "New Ceps Switchroom" Very HighP2 Detailed Cost benefit analysis to Install Castell keying system on existing generators or
replace generators / control system to upgrade to fully automated system
2015 $50,000 Future
0902/U01 Electrical Reticulation Services Very HighP2 Install HV rescue kits. 2015 $1,000 Future
0902/U01 Electrical Reticulation Services Very HighP2 Install addiitonal LV load shedding. 2015 $1,640,000 Future 0902/U01 Electrical Reticulation Services Very HighP2 Build separate LV / HV / transformer rooms with egress requirements met. 2015 $1,000,000 Future 0902/U01 Electrical Reticulation Services Very HighP2 Install insulation to exposed electrical connections. 2015 $6,000 Future
0902/U01 Electrical Reticulation Services Very HighP2 Install HV rescue kits. 2015 $13,500 Future
0902/U03 Water Reservoir Very HighP2 To provide better security and improved system redundancy in supply, it is recommended the feasibility of one (or more) direct connections from the water supply tank feed lines direct to the water reticulation network be investigated and implemented if feasible.
2015 $60,000 Future
0902/U03 Water Reservoir Very HighP2 To provide better security and improved system redundancy in supply, it is recommended the feasibility of installing a duplicate or standby DN375 main from the tanks to the reticulation network be investigated and implemented if feasible.
2015 $170,000 Future
0902/037 Base Pump Station / Fire Booster Pump Very HighP3 Multiple non-conforming hydrants were also encountered. Develop and execute a prioritized program of hydrant renewals, including developing an infrastructure database to record age, maintenance frequency and any other related issues.
2015 $1,450,000 Future
0902/037 Base Pump Station / Fire Booster Pump High P2 Re-establishing a hydrant flushing program to flush sediments, clear pipe biofilms, and bring fresh water into low-use parts of the system. It will also give the on-site plumbers the opportunity to continuously assess the condition of specific hydrants.
2015 $40,000 Future
Return to Control
32.
4.3
Issues Register Report
33. The issues register can be viewed by clicking on the orange issues register report button (Figure 8).
34. Data can be manually edited via the ‘Edit Issues Data in Database’ button in Figure 8.
4.4
Summary Table (Pivot)
35. A summary table has been provided for review purposes. This is a pivot table, so a variety of selections
and filters can be applied using the drop down lists available.
36. The blue ‘Refresh Pivot’ button should be clicked before using the table. After that, any combination of the
filters available can be selected for review.
Figure 23 Summary table
Appendix A
BEAP Data Tool Process
Flowchart
In pu ts to B EA BE AP D at a To ol