The
Vista
Simple,
Powerful,
Visual
Copyright
&
disclaimer
This product is approved for use in Europe and Australia/New Zealand and conforms to the following standards:
•
European Norms Australian / New Zealand Standards•
EN55103-1 AS/NZS 4251.1•
EN55103-2 AS/NZS 4252.1•
EN60950 AS/NZS60950Conformance has been achieved for intended usage in environment E1: Residential.
To ensure continued compliance with EMC Directive 89/336 and the Australian Radio communications Act 1992, use only high quality data cables with continuous shield, and connectors with conductive back shells. Examples of such cables are: DMX: Belden 8102 (100% Aluminium foil screen, 65% Copper braid)
TIP: This equipment has been tested and found to comply with the limits for a Class B digital device, pursuant to Part 15 of the FCC Rules. These limits are designed to provide reasonable protection against harmful interference in a residential installation. This equipment generates, uses and can radiate radio frequency energy and, if not properly installed and used in accordance with the instructions, may cause harmful interference to radio communications. However, there is no guarantee that interference will not occur in a particular installation.
If this equipment does cause harmful interference to radio or television reception, which can be determined by turning the equipment off and on, the user is encouraged to try to correct the interference by one or more of the following measures:
•
reorient or relocate the receiving antenna;•
increase the separation between the equipment and receiver;•
connect the equipment into an outlet on a different circuit from that to which the receiver is connected;•
consult the dealer or an experienced radio/television technician for help.on not nce or repair by unauthorised personnel, or by use other than that intended by the manufacturer.
by the manufacturer and in conjunction with the user manual. Disconnect mains power when not in use.
© Copyright JANDS PTY LIMITED 2004 - 2011 All rights reserved
a MASCOT NSW 1460 Sydney Australia
Disclaimer
Information contained in this manual is subject to change without notice and does not represent a commitment on the part of the vendor. Jands Pty Limited shall not be liable for any loss or damage whatsoever arising from the use of information or any error contained in this manual. It is recommended that all service and repairs this product be carried out by Jands Pty Limited or its authorised service agents. Jands Pty Limited can accept any liability whatsoever for any loss or damage caused by service, maintena
Jands lighting products must only be used for the purpose they were intended
Manufactured in Australia by:
JANDS Pty Limited ACN 001 187 837
Locked B g 15 (40 Kent Rd) Phone: +61-2-9582-0909 Fax: +61-2-9582-0999 Web: www.jands.com.au
Contents
Contents
1.
Welcome
to
the
Vista...2
‐
1
What’s different about the Vista? ... 2‐1
What things are the same as on other consoles?... 2‐1
About the generic fixture model... 2‐2
Need more information? ... 2‐2
2.
Getting
started...2
‐
1
Setting up the console ... 2‐1
Switching on ... 2‐2
Creating and loading shows ... 2‐4
3.
Using
the
interface...3
‐
1
Menu bar... 3‐1
Main toolbar... 3‐1
The Sidebar... 3‐9
Toolbars... 3‐10
4.
Patching
your
rig ...4
‐
1
Adding fixtures to the patch ... 4‐1
Changing universes ... 4‐4
Re‐arranging fixtures on the patch panel ... 4‐4
Setting fixture properties... 4‐5
Viewing the patch in different ways ... 4‐8
Controlling the fixtures ... 4‐10
Cloning fixtures ... 4‐10
Exporting and importing patch information ... 4‐11
Configuring the DMX & Ethernet Outputs ... 4‐13
5.
The
Chooser
window ...5
‐
1
The Chooser screen... 5‐1
Arranging fixtures in a layout... 5‐2
Using the Programmer Sidebar... 5‐18
The Palette tab ... 5‐18
Using the All panel ... 5‐21
Using the detailed panels... 5‐26
The Components tab... 5‐37
Contents
SmartFX...5‐49
Extracts ...5‐50
Using a keypad in the programmer window ...5‐51
The Programmer hardware controls ...5‐53
6.
Working
with
cuelists ... 6
‐
1
Store All ...6‐1
Store Part...6‐6
Opening a Cuelist in the Editor...6‐9
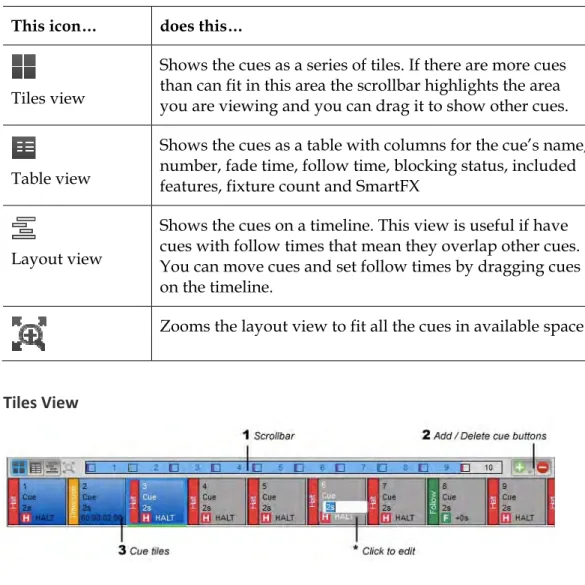
The Timeline window ...6‐10
Creating a Move in Black cue ...6‐18
About the timeline...6‐33
Timeline events ...6‐40
Creating and applying extracts...6‐47
Extracts ...6‐47
Using commands within cuelists ...6‐48
Updating Presets and Cuelists during playback ...6‐50
7.
SmartFX... 7
‐
1
Effect types ...7‐1
Using effects ...7‐1
Effect controls...7‐4
Creating an effect from scratch...7‐12
Stopping an effect ...7‐13
8.
Assigning
Audio
to
a
Cuelist... 8
‐
1
Using Learn Timing to adjust cue timing ...8‐2
9.
Automating
Playback... 9
‐
4
Using Timecode to control Cuelists...9‐4
Using Date and Time to control cuelists...9‐5
Creating a New Event ...9‐7
10.
The
Playback
Control
Window ... 10
‐
9
Controlling and monitoring playback ...10‐9
11.
Using
the
console
hardware ... 11
‐
1
Console layout ...11‐1
T4 Console ...11‐1
T2 Console ...11‐2
I3 Console ...11‐2
L5 Console...11‐2
S3 Control Surface ...11‐2
ii Vista User Guide, Version 2Contents
S1 Control Surface... 11‐2
M1 Control surface ... 11‐3
Grand Master and DBO ... 11‐3
Function keys ... 11‐3
The modifier keys... 11‐4
The Super Playback / Programmer controls ... 11‐4
Playbacks with faders... 11‐11
Playbacks without faders ... 11‐12
Page controls... 11‐12
Configuring the console for Playback ... 11‐13
Playback status indication... 11‐17
Playback popup menu... 11‐18
Setting cuelist properties ... 11‐19
Group Masters ... 11‐19
Pages ... 11‐21
Snapshots ... 11‐22
12.
The
Output
window ...12
‐
1
Configuring the Output window ... 12‐2
13.
The
Console
control
panel...13
‐
1
System settings (T & I series only) ... 13‐1
Calibrating the Pen tablet ... 13‐1
Display and Input Devices ... 13‐2
Using the screensaver ... 13‐3
Network preferences ... 13‐4
Date and time... 13‐5
14.
Appendix
1
–
menu
&
toolbar
reference ...14
‐
6
Menus... 14‐6
15.
Appendix
2
–
installing
new
software... 15
‐
18
Installation (T2, T4, I3 & L5 Consoles)... 15‐18
Installation (Windows XP, Vista & 7)... 15‐20
Connecting to the console via FTP ... 15‐20
16.
Appendix
3
–
creating
a
bootable
USB
device... 16
‐
22
17.
Appendix
4
–
tracking
backup ... 17
‐
25
Setting up ... 17‐25
Starting Tracking Backup... 17‐27
Contents
Troubleshooting ...17‐30
Private IP addresses...17‐30
18.
Appendix
5
–
using
VNC
on
T
&
I
‐
series
consoles... 18
‐
31
VNC password...18‐31
Starting VNC...18‐31
Connecting to Vista using a Windows PC ...18‐31
Connecting to Vista using a Mac ...18‐32
19.
Appendix
6,
Using
midi
show
control
(MSC)
to
control
cues 19
‐
34
Configuring the midi port ...19‐34
MSC lighting messages ...19‐35
20.
Appendix
7,
Using
serial
communication
to
control
cuelists 20
‐
38
Connecting to the serial port...20‐38
Enabling the serial port ...20‐38
Playback commands ...20‐39
Setting fixture levels ...20‐39
21.
Appendix
8
–
The
Fixture
Editor... 21
‐
41
The Fixture Type Library Editor ...21‐41
Creating a Fixture Profile...21‐42
Main tab: ...21‐43
DMX Chart tab: ...21‐45
Channels with Custom Ranges ...21‐66
22.
Appendix
9
–
Crash
Logs ... 22
‐
68
Retrieving Software Crash Files from a Console ...22‐68
23.
Appendix
10
–
the
touchpad
and
the
pen
tablet ... 23
‐
73
Using the touchpad ...23‐73
Working with the grip pen...23‐74
Tip switch / Pen Tip ...23‐74
Using a pen ...23‐75
Removing and installing the Duo Switch...23‐78
Precautions on using and handling the Pen‐Tablet...23‐80
24.
Appendix
11
–
technical
details ... 24
‐
82
Power...24‐82
Service & Maintenance...24‐82
Battery replacement...24‐82
Installation ...24‐83
T4 / T2 / I3 / L5 Shut down ...24‐83
iv Vista User Guide, Version 2Contents
General Specifications... 24‐83
Welcome to the Vista What’s different about the Vista?
1.
Welcome
to
the
Vista
Welcome to the User Guide for the Jands Vista lighting console. This guide is intended to give you the information you need to get your Vista up and running as quickly as possible.
Note that this guide will be regularly updated as enhancements are made to the Vista. A current version of the manual is available at www.jandsvista.com.
What’s
different
about
the
Vista?
You’ll have noticed that the Vista is a bit different to most other consoles you’ve used. Instead of a keypad, it uses a pen; instead of relying on you entering hundreds of key combinations, the Vista lets you do everything visually; instead of representing your show as numbers, the Vista represents it as events
happening over time.
If you’ve seen any of the digital editing software packages for sound and video that are available these days, the most different aspect of the Vista, the timeline, will be instantly familiar to you. If not, don’t worry, once you start using it you’ll pick it up very quickly.
The Vista is different, but that’s what makes it so much easier to use. Once you’ve read this guide you’ll have enough of an idea of how this console works to create your first lightshow.
What
things
are
the
same
as
on
other
consoles?
Apart from the pen and the timeline concept, the Vista contains all the basic elements of live lighting that you’re familiar with. You’ll find controls for intensity, colour, beam, gobos and so on; you’ll find libraries of all the
manufacturers’ most popular fixtures to choose from; you’ll find a console that has the usual faders, buttons and LCD displays.
So don’t worry, the Vista has a lot in common with other consoles – we’ve taken all the best elements of existing consoles and added a whole new dimension to them. You’ll soon be right at home with the Vista.
About the generic fixture model Welcome to the Vista
About
the
generic
fixture
model
One thing about the Vista that’s not immediately obvious is the ‘generic fixture model’. What is it? It’s a part of the software that works in the background and enables all fixtures, no matter what type or manufacturer to be treated the same way.
Let’s say you’ve programmed a show using one brand of fixture but need to replace some of them with a different kind. Normally this would be a major hassle because you’d have to find a similar fixture then re-program each and every cue.
With the Vista, you can replace a fixture and you don’t have to do any re-programming. Why? Because everything you’ve programmed is stored in generic form rather than as specific DMX channel values. For instance if you’ve programmed the lights to be Red, the Vista can send that information to any light and achieve the same colour.
Sure, if you replace a fixture that has colour mixing with a fixture that has a fixed colour wheel, you won’t expect to get the exact same result, but even in this case, the Vista will adapt and provide as near a match as the replacement fixture is capable of.
Need
more
information?
If you have questions about the Vista or you’d like more information, go to our website at www.jandsvista.com, or call us on +61-2-9582-0909.
Getting started Setting up the console
2.
Getting
started
Setting
up
the
console
Power
Connect the Vista T, I or S series console to any mains supply between 100 and 240vAC. The Vista M series obtains power via the USB port
External
displays
You can attach two external displays, including touch screen monitors to the Vista T series consoles using standard VGA connectors.
Vista I series consoles have connections for one DVI and one VGA monitor. A DVI – VGA cable can be used if you prefer to use two VGA monitors.
Vista L series consoles have connections for one DVI / HDMI and one DVI / VGA monitor.
Â
Vista has been tested with Wacom pen tablet LCDs and ELO ‘Intellitouch and Accutouch’ monitors. ELO makes many different touch screen monitors and not all models may be compatible. Please check for compatibility before purchasing touch screen monitors for use with your Vista console.For Vista M and S series control surfaces, monitor configuration will depend on the configuration of the computer you are using.
Desk
Lights
You can attach two Littlelite or equivalent desklights to the Vista L and T series console and one to the I and S series consoles.
Switching on Getting started
Switching
on
When you switch the console power on or launch the application on your PC, Vista starts up and displays the opening splash screen:
Once it finishes loading the program, Vista displays the Patch screen. If this is the first time you’ve opened Vista V2 or you are starting a new show the patch table will be empty.:
Getting started Switching on
This is the Patch window, waiting for you to start creating a new show. To see the other Vista windows you use the buttons on the toolbar at the top left of the screen:
This button… does this…
displays the Patch window
displays the Console hardware simulation window displays the Programmer Fixtures window
displays the Programmer Timeline view. displays the Playback control window displays the fixture Output window
Creating and loading shows Getting started
Creating
and
loading
shows
Creating
a
show
To create a new show at any time, choose the New Show option from the File menu.
Loading
existing
shows
To load a show you’ve already created, choose the Open Show option from the File menu. Vista displays the Open Show window:
To load a show archive you’ve previously saved (or transferred to the console using the export / import function), find the directory containing it, then click on the filename to select it and hit the Open button to load it.
Saving
shows
To save a show at any time, choose the Save Show option from the File menu. As with any computer, it’s a good idea to save regularly in case of power failure.
Getting started Creating and loading shows
The first time you save a new show, Vista displays the Save As window:
Type a name for the file and then click the Save button. Vista automatically creates a show folder, with the same name and puts the show file inside it. Once you’ve named the file, each time you choose the Save option from then on, Vista overwrites that file with the new details without displaying this window.
Saving
copies
of
shows
To save a separate version of a show with a different name, choose the Save Show As… option from the File menu. You can then give the file another name and save it in a separate show folder.
Importing
show
archives
You can also open shows you’ve created on a PC or another console onto the Vista. The shows must be on a CD or any kind of storage device that connects to the Universal Serial Bus (USB) port (such as a memory stick).
To open a show, attach the USB device or put the CD in the CD drive (if available) and choose the Import > Show… option from the File menu.
Exporting
show
archives
(backing
up)
It’s extremely important to make backup copies of your show user data folders. Like any other computer, the Vista stores your shows on a hard drive, and although it’s extremely unlikely, if this drive were to fail (e.g. if the console was dropped) you could lose all the show files stored on it.
For this reason we recommend that you make regular backups of your work, onto a storage device that you can connect via a USB port.
To export a show archive onto an external storage device:
Creating and loading shows Getting started
3. Click on the Show button and then select the show to backup from the list of show files.
4. Click the Next button. Vista displays the Export window:
5. Click the Browse button and choose a drive and directory on the computer or storage device and hit the Export button.
6. Click the Finish button to close the Export window.
Deleting
shows
To delete a show, choose the Open show option from the File menu, then right-click on the show folder name and choose ‘Delete’ from the popup menu.
Password
‐
protecting
your
console
or
show
You can lock your console or show file or disable editing, with a password. To do this:
1. Choose the Lock option from the File menu. Vista displays a popup menu with three options:
Getting started Creating and loading shows
This option… does this… Lock entire
console
the password is required to use any console functions or controls.
Disable all editing
the password is required to edit cuelists, groups, presets and all other show components
Lock current
show the password is required to save changes to the show file
2. Select an option from the popup menu. Vista displays the Password window:
3. Enter your password in both boxes and click ‘OK’ Your show or console is now password protected.
Using the interface Menu bar
3.
Using
the
interface
The latest version of Vista features a new simpler layout. No matter whether you have worked with Vista before or are seeing it for the first time it’s worth taking some time to get familiar with the new window layout and options.
Menu
bar
At the top of the window you’ll see the main menu bar. Click on any menu heading to access Vista’s dialog boxes, submenus and commands.
The main menu bar also shows:
•
the show file name - if Autosave is turned on you’ll see ‘[A]’ after the show name•
the Grand Master level setting•
the time.Main
toolbar
At the top of the window you’ll see the main toolbar which is common to ALL windows. This toolbar contain the most frequently used buttons and is divided into three sections. The centre section contains 12 buttons that map to the
Function buttons on Vista consoles and the ‘F’ keys on your keyboard you can be customized to suit your style of operation.
Window
navigation
You switch between the main windows using the 6 buttons on the top left side of the main toolbar. You can also switch between windows by selecting the Patch, Console, Fixture Chooser, Timeline, Playback or Output option from the View menu.
Â
Hovering over the icons shows the button name. This button… does this…Main toolbar Using the interface
This button… does this…
(Alt + 3) displays the Programmer Fixtures window (Alt + 4) displays the Programmer Timeline view. (Alt + 5) displays the Playback control window (Alt + 6) displays the fixture Output window
V1
classic
style
window
navigation
If you prefer to select windows from the bottom of the screen you can open a toolbar that emulates the earlier versions of Vista. To do this select the ‘Vista Toolbar’ option from the View menu.
Vista places the toolbar at the bottom of the window:
Click on the buttons to select the Patch, Console, Fixture Chooser, Timeline, Playback or Output window.
The
Soft
buttons
The twelve buttons in the centre of the main toolbar provide quick access to frequently used commands, functions and windows.
•
If you are using a T series console these buttons are automatically mapped to the function buttons, above the LCD / tablet.•
If you are using an I or S series unit the first 6 (5 on the S3) buttons are automatically mapped to the function buttons in the top centre section of the control surface.•
For all Vista systems you can use your keyboard F1-F12 buttons to activate these buttons.Â
You can display text labels, for the function buttons, at the top of your tablet or monitor. To do this select the ‘Softkey Toolbar’ option from the View menu.Using the interface Main toolbar
Standard
buttons
When you first start a new show Vista loads the standard set of buttons but you can customize each and every button, as described below.
This button… does this…
Saves the show file to disk
Opens a new Cuelist in the Editor Opens an existing Cuelist in the Editor
HiLite
Turns on the Editor’s ‘Highlight’ mode. When you are focusing or testing your fixtures you can use Highlight to bring up the intensity of each fixture automatically when you select it in the Fixture Chooser.
Store Part
displays the Store Part window where you can save the contents of the editor to any cue in any cuelist. Store part provides many options and must be used for tracking to operate correctly. See Store Part on page xxx
Store All
displays the Store Look window where you can save the complete output (the look on stage). Storing this way will ensure that when you play a Cue back it will appear exactly as it did when you saved it
Clear
Clear all information coming from the Live tab. If a Cuelist tab is selected this button closes that tab.
Update
displays the Update window where information coming from the Editor (the Live tab or any Cuelist tab) can be used to update one or more Cues and Presets.
Blind
Turns the output from the editor off. In this mode you can still edit cues but there will be no output sent from the editor to your fixtures.
Live
displays the Live time window where you can set a fade time that applies to any selections you make from the editor palettes or presets.
FX
displays the SmartFX window where you can create and edit effects. See SmartFX on page 7-1
Main toolbar Using the interface
This button… does this…
Release All
Clicking this button releases all the fixtures from their current settings as determined by the cuelists that are running and returns them to their default state.
Modified
soft
buttons
The soft buttons provide different functions when you press the Red (Shift), Green (Alt), Yellow (Control) or Blue (Control+Alt) modifier.
Shift
set
(Red
modifier)
Hold down the Red modifier button or the Shift button, on your keyboard, to access and display the Shift set.
This button… does this…
Next Fixture
Used to step through fixtures, selects the 1st fixture (or the one
after the current selection) and de-selects the others. Each subsequent press selects the next fixture. Useful when focusing fixtures.
Previous Fixture
Used to step through fixtures, selects the last fixture (or the one before the current selection) and de-selects the others. Each subsequent press selects the previous fixture. Useful when focusing fixtures.
Invert
Inverts the fixture selection (i.e. all selected fixtures are de-selected and all de-de-selected fixtures are de-selected).
Active
Selects all the active fixtures (i.e. those that have Intensity).
Programmed
Select all the fixtures that are programmed in the current cue.
All
Selects every fixture.
Using the interface Main toolbar
This button… does this…
De-select all
De-selects all fixtures
Previous selection
Vista remembers the last set of fixtures you selected; you use this button to toggle back to your previous fixture selection.
Next selection
If you have used the previous selection command this button will toggle back to the fixture selection you had before pressing previous selection.
Strike
Ignites the lamps in the selected fixtures
Douse
Switches off the lamps in the selected fixtures off.
Reset
Resets the selected fixtures to their factory default settings. This is useful if a fixture has a control problem and you need to get it ‘back to normal’.
Alt
set
(Green
Modifier)
Hold down the Green modifier button or the Alt (Option) button, on your keyboard, to access and display the Atlt (Option) set.
This button… does this…
Open Cuelist
Opens a new Cuelist in the Editor
New cuelist
Main toolbar Using the interface
This button… does this…
Append cue
Adds a new cue at the end of the cuelist being edited
Insert before
Inserts a new cue, before the cue that is being edited
Insert after
Adds a new cue after the cue that is being edited.
Delete Cue
Deletes the selected cue
New Preset
Displays the Create Preset window
New Extract
Displays the Create Extract window
New Snapshot
Displays the Create Snapshot window
New Group
Displays the Create Fixture Group window
Update Group
Updates the selected group to include any additional fixtures that have been selected.
New Matrix
Creates a new fixture matrix container in the Fixture Chooser window
Using the interface Main toolbar
Ctrl
set
(Yellow
Modifier)
Hold down the Yellow modifier button or the Control button, on your keyboard, to access and display the Control set.
This button… does this…
Live properties Opens a Live tab properties window. Cuelist
properties Opens the Cuelist properties window. Insert
Command Opens the Insert Command window where you can add a command to the cue you are editing (i.e. to play another cue) Convert to
release events Sets the selected events to release the feature.
Merge Cues Merges the events in2 or more selected cues into a single cue. Select the cues in the Cue navigator bar.
Show tracked events
Shows or hides tracked events in the time line. Tracked events are shown in a lighter, transparent colour and cannot be selected. Clear Fixtures Clears all features from the selected fixtures so that they return
to their previous state.
Home Fixtures Sends the selected fixtures to their Home settings
Block cue Blocking copies any tracked events into the selected cue and prevents any future changes, to earlier cues from tracking through. This means that no matter what changes are made to other cues in the list, the cue will play back the exact look it had at the time it was blocked.
See Blocking a cue on page 6-18
Super - Block cue
If you ‘Super Block’ a cue, when it runs any features, for the fixtures in the cue, that aren’t included in the cue are
automatically sent to their home value. This means that the cue will look as it would if no other cuelist was playing.
Un-Block cue Removes redundant events, from the selected cue. This means that if the selected cue includes an event that is the exactly the same as an event that is tracking through from a previous cue, that event will be removed. Unblocking will not change the cue’s
Main toolbar Using the interface
This button… does this…
Move in Black Opens the Move in Black window where you can Mark a cue and add MIB events that pre-set the selected fixtures so that when they turn on you don’t see them moving, changing colour etc.
Ctrl
+
Alt
set
(Blue
Modifier)
Hold down the Blue modifier button or the Control & Alt buttons, on your keyboard, to access and display the Control-Alt set.
This button… does this… Show selection
order Shows selection order numbers on the fixture icons.
Show Tracked
Events Shows timeline events for tracked fetures.
Cue Only Editing Not used Not used Set Event Timing
Opens the event timing window.
Align Start Aligns the start position of the selected events. Align End Aligns the end position of the selected events. Not used
Not used
Stop FX Stops all running effects.
Not used
Using the interface The Sidebar
Configuring
the
soft
buttons
To change the function of a soft button, right click on the button and choose a command or function from the popup menu. Any command from any menu can be assigned to the soft button. To change one of the alternate sets hold the Shift, Alt or Ctrl key while right clicking.
Soft
key
toolbar
The soft buttons correspond to the hardware buttons above the main screen on L and T series consoles. To make it easier to identify the buttons you can add on-screen labels below the buttons. To do this select the ‘Softkey Toolbar’ option from the View menu.
Vista places the softkey labels toolbar at the top of the window:
The
Sidebar
To show or hide the sidebar click on the ‘Sidebar’ button at the top right side of the main menu bar:
The sidebar provides access to different features, depending on the window you have open:
•
In the Patch window you use the sidebar to select fixtures from the library, and configure them.•
In the Console window you use the sidebar to select components (i.e. Cuelists, Groups, Presets and more) and assign them to the Playback sets. You can also assign fader and button functions to the playback controls.•
In the Fixture Chooser and Timeline the sidebar contains the palettes (i.e. Intensity, Position, Colour, Gobo, Beam) and component panels (i.e. Groups, Presets, Extracts, Effects and more)•
There is no sidebar in the Playback Control and Output windows.Configuring
the
sidebar
If you prefer the Sidebar can be moved to the left side of all windows. To do this select the Sidebar, ‘Dock Left’ option from the View menu.
Toolbars Using the interface
You can adjust the width of the sidebar by clicking on the window divider and dragging to the left or right.
Toolbars
Most windows have optional toolbars that provide buttons for sets of menu commands. To show or hide any of the optional toolbars select the ‘Toolbars’ option from the view menu.
Patch
window
toolbars
There are three toolbars available on the Patch window
View
toolbar
To open or close a toolbar select the ‘Toolbars’ option from the View menu:
This button… does this…
Table view Switches the main panel of the Patch window to the standard Table view.
List view Switches the main panel of the Patch window to the List view where the patched fixtures are shown as a list.
DMX view Switches the main panel of the Patch window to the DMX view
where the output of each channel of each fixtures is shown, on the patch table.
Fixture
Macro
toolbar
(also
available
on
the
Chooser
&
Timeline
window
To open or close a toolbar select the ‘Toolbars’ option from the View menu:
Using the interface Toolbars
This button… does this…
Strike Ignites the lamps in the selected fixtures.
Douse Switches off the lamps in the selected fixtures off.
Reset
Resets the selected fixtures to their factory default settings. This is useful if a fixture has a control problem and you need to get it ‘back to normal’.
Connections
toolbar
To open or close a toolbar select the ‘Toolbars’ option from the View menu:
This button… does this…
Connect Open the DMX Connections window where you can connect
your console’s DMX outputs and any external Ethernet-DMX interface boxes to the patch universes.
Chooser
&
Timeline
window
toolbars
There are nine toolbars available on the Editor windows
Update
toolbar
All the buttons, on this toolbar, are available on the standard soft button set. However if you have re-configured the soft buttons this toolbar may be useful:
This button… does this…
Opens a new Cuelist in the Editor Opens an existing Cuelist in the Editor
Store Part
displays the Store Part window where you can save the contents of the editor to any cue in any cuelist. Store part provides many options and must be used for tracking to operate correctly. See Store Part on page xxx
Toolbars Using the interface
This button… does this…
Store Look
displays the Store Look window where you can save the complete output (the look on stage). Storing this way will ensure that when you play a Cue back it will appear exactly as it did when you saved it
Clear
Clear all information coming from the Live tab. If a Cuelist tab is selected this button closes that tab.
Update
displays the Update window where information coming from the Editor (the Live tab or any Cuelist tab) can be used to update one or more Cues and Presets.
Blind
Turns the output from the editor off. In this mode you can still edit cues but there will be no output sent from the editor to your fixtures.
Live
displays the Live time window where you can set a fade time that applies to any selections you make from the editor palettes or presets.
Edit
toolbar
To open or close a toolbar select the ‘Toolbars’ option from the View menu:
This icon… does this…
Ctrl X Cuts the selected item. Ctrl C Copies the selected item
Ctrl V Pastes the selected item.
Undo
toolbar
To open or close a toolbar select the ‘Toolbars’ option from the View menu:
This icon… does this…
Using the interface Toolbars
This icon… does this…
Ctrl+Z Undo the last action
Ctrl+Y Redo the last action
Fixture
selection
toolbar
To open or close a toolbar select the ‘Toolbars’ option from the View menu:
This icon… does this…
Previous selection
Vista remembers the last set of fixtures you selected; you use this button to toggle back to your previous fixture selection.
Next selection
If you have used the previous selection command this button will toggle back to the fixture selection you had before pressing previous selection.
Previous Fixture
Used to step through fixtures, selects the last fixture (or the one before the current selection) and de-selects the others. Each subsequent press selects the previous fixture. Useful when focusing fixtures.
Next Fixture
Used to step through fixtures, selects the 1st fixture (or
the one after the current selection) and de-selects the others. Each subsequent press selects the next fixture. Useful when focusing fixtures.
De-select all De-selects all fixtures
Invert
Inverts the fixture selection (i.e. all selected fixtures are de-selected and all de-selected fixtures are selected).
All Selects every fixture.
Active
Selects all the active fixtures (i.e. those that have Intensity).
Toolbars Using the interface
This icon… does this…
Programmed
Select all the fixtures that are programmed in the current cue.
Command
Line
toolbar
See Using a keypad in the programmer windowon Page 5-51
Fan
toolbar
The fan toolbar is used to set how Feature values and Event times are spread.
This option… does this…
Linear Fan Diverged from centre.
Fanned values radiate in both positive and negative directions from the base value, starting from the centre of the fixture selection
Fan from end Linear from Start
The fanned feature values radiate in one direction from the base value, starting from the first selected fixture.
Fan from start Linear from End
The fanned feature values radiate in one direction from the base value, starting from the last selected fixture.
Fan from centre. Linear from Extremities
The fanned feature values radiate in one direction from the base value, starting from the first and last selected fixtures.
Inverted fan Diverged from extremities
The fanned values radiate in both positive and negative directions from the base value, starting from the first and last selected fixture.
Fan from both ends
Linear from Centre
The fanned feature values radiate in one direction from the base value, starting from the centre of the fixture selection.
Â
To fan a feature or events, select the fan mode and hold the Yellow modifier or Control key while setting the feature value or dragging the event bars.Using the interface Toolbars
Components
toolbar
The components toolbar includes buttons to create new Presets, Groups and Extracts
This option… does this…
Preset Opens the create New Preset window.
Group Opens the create New Group window.
Patching your rig Adding fixtures to the patch
4.
Patching
your
rig
Once you’ve got your Vista system connected and powered up you can patch your fixtures the way you want them using the Patch window.
If it’s not already open click on the Patch icon or select the ‘Patch’ option from the Window menu, Vista displays the Patch screen:
This is where you set up all the fixtures in your rig. You tell the Vista which DMX channels each fixture is assigned to, and in which universe, and can set a range of parameters to customise how each fixture operates.
Adding
fixtures
to
the
patch
The Fixture Type box in the sidebar gives you a few ways to add fixtures to the patch. You can:
•
choose a fixture from the ‘Factory’ folder, which lists the most up to date fixtures in the Vista library bymanufacturer and then in alphabetical order.
•
choose a fixture from the ‘User’ list, which includes all fixtures that you have created.Adding fixtures to the patch Patching your rig
Choosing
a
fixture
from
the
Factory
list
To add a fixture from the Factory list:
1. Click the ‘+’ symbol beside ‘Factory’ in the Fixture Type box. Vista displays a list of manufacturer’s folders.
2. Click the ‘+’ symbol beside the name of the manufacturer you want, to display the list of fixtures in that folder.
3. Scroll down the list until you find the fixture you want.
Adding
the
fixture
to
the
patch
panel
Once you’ve selected the fixture you want, there are two ways to add it to the patch panel:
•
you can drag and drop one or more fixtures onto a specific DMX location on the panel, or•
you can use the Patch tab to place multiple copes of the fixture onto the patch panel.Dragging
and
dropping
individual
fixtures
To patch fixtures this way, just click on the name of the fixture in the Fixture type box, type a number in the ‘Quantity’ box and drag the fixture(s) over to the spot on the patch panel where you want it.
When you ‘drop’ the fixture, Vista fills the required number of DMX channels with that fixture’s details. This example shows 8 Vari*lite VL2500 spot fixtures that use 22 DMX channels each, dropped onto channel 1:
Once you’ve dropped a fixture onto the patch panel you can move it around to any channel by clicking on it and dragging it to a new location.
Vista represents the fixture as a solid coloured bar with an ID number before the name. The bar covers as many DMX channels as the fixture needs, and some fixtures will take up more channels than others.
A solid colour shows that this fixture is currently selected. If you click anywhere else in the patch panel, Vista de-selects the fixture and makes the colour
transparent to show that it’s no longer selected.
Patching your rig Adding fixtures to the patch
In our example above the selected fixture is called ‘2 VL2500Sp’. This title consists of two components:
•
a unique ID number [2], that Vista assigns automatically. This number identifies the fixture uniquely within the whole system, across all the universes (i.e. no two fixtures will ever have the same unique ID number).•
a name (VL2500Sp)), which you can change if you want in the Name field on the Properties tab.Patching
multiple
fixtures
with
the
Patch
box
If you prefer using the keyboard to patch your fixtures you can use the Patch tab in the sidebar.
You use this feature to add multiple instances of a fixture at once. To do this:
1. Select the fixture you want from the ‘Factory’ or ‘User’ lists in the Fixture Type box.
2. In the Quantity field, enter how many of this type of fixture you want to add.
3. If not already selected, click the Patch tab to display the Patch box:
4. If you want to give the fixture a different name, type it in the Name field.
5. If you want to assign a specific set of unique ID numbers to this group of fixtures, click in the Fixture Number from field and set the unique ID
number (e.g. <44>) you want for the first fixture in the group. If you don’t set this, Vista assigns the next valid number.
Changing universes Patching your rig
7. In the DMX Universe field, Vista automatically displays the number of the currently selected universe. If you want to add these fixtures to another universe, enter the universe number.
8. In the DMX address field, set the number of the DMX channel where you want this group of fixtures to start. If you’ve already added any fixtures to this universe, Vista displays the next channel number in sequence.
9. If you prefer, you can patch fixtures to an ‘absolute address’ For example typing 513 in the Absolute address field, automatically sets the Universe to 2 and the DMX number to 1. If you’ve already added any fixtures to this universe, Vista displays the next channel number in sequence.
10. In the Spacing field, Vista displays the number of channels each instance of the fixture you’ve selected will take up. If you want to leave empty channels between each fixture you can increase this number. For example, if a fixture normally uses twelve channels and you increase this number to 14, Vista leaves a gap of two channels between each fixture in the group.
11. When you’ve set all the fields the way you want them, click the Patch button. Vista adds the group of fixtures to the patch panel.
Â
If you’ve already added a bunch of fixtures between say, channel 10 and channel 50, and you add another batch starting at channel 1, Vista fits as many of them as it can into channels 1 to 9, then ‘flows’ the rest over to channel 51.Â
onixtures and then tab through the Quantity and other fields.
, iverse tab at the top of the patch panel to display the next set of DMX channels.
n you drop them on the screen, Vista re-arranges them all from that channel.
After you type in the search box you can use the ‘Down Arrow’ button your keyboard to move the cursor into the list of f
Changing
universes
Each universe can only handle a certain number of fixtures, depending on the number of DMX channels each fixture needs. To add fixtures to another universe click another Un
Re
‐
arranging
fixtures
on
the
patch
panel
Moving
fixtures
around
the
patch
panel
Once you’ve added fixtures to the panel you can re-arrange them however you want. Just select the fixtures you want and drag them to a new channel; whe
Patching your rig Setting fixture properties
Note that you can’t place them in such a way that any of the channels will ‘fall off’ the end of the universe.
Renaming
fixtures
To rename one or more fixtures select them in the universe panel and choose the Properties tab in the sidebar:
Enter the name you want to give the selected fixtures in the ‘Name’ field and hit Enter. Vista renames all the fixtures you had selected.
Renumbering
fixtures
To change the unique system-wide ID number (e.g. <12>) of a fixture (it is not possible to renumber more than one fixture at a time):
1. Select the fixture in the universe panel.
2. Choose the Properties tab in the sidebar.
3. In the ID field, enter the new ID number and hit Enter on your keyboard.
Deleting
fixtures
You can delete fixtures from the patch panel at any time To do this:
1. Select the fixture in the universe panel.
2. Select the ‘Delete fixtures’ option from the Patch menu or right click on the fixture(s) you want to delete and select ‘delete’ from the popup menu.
Setting
fixture
properties
Once you’ve added the fixtures to the patch panel and placed them where you want them, you can set a number of properties for each fixture using the
Setting fixture properties Patching your rig
To view and set the properties for one or more fixtures, use the pen to select the fixtures you want on the patch panel. Vista displays the details of those fixtures in the Properties and Transforms tabs:
Â
If you select multiple types of fixture, Vista displays the details of the first type you selected. If the Patch box is currently displayed, press theProperties tab to display the Properties box.
Properties
tab
Name The name you entered or Vista assigned to this fixture when you dropped it onto to the patch panel. You can edit this here if you want to.
ID The unique system-wide ID number assigned to this fixture
when you dropped it onto the patch panel. You can change this number here if you want to, but note that Vista won’t allow you to use a number that’s already assigned to another fixture. Type This field is not editable. To change the type of fixture without
having to remove it click on the ‘Change Fixture Type’ button (see Swapping a fixture type).
Notes This field is used to display notes about the fixture. You can add whatever you like in this field.
Transforms
tab
Preheat A percentage value that sets the voltage the fixture lamp will sit at until you switch it on. This is useful for lamps such as Par 64s that take time to switch on from a cold start.
Limit A percentage value that determines the maximum intensity the fixture will ever reach. This is useful if you want to prolong
Patching your rig Setting fixture properties
lamp life or prevent fixtures from ever reaching full intensity. Dimmer
Curve ons;
nverse This popup lets you select a dimmer fade curve. The default option is Linear but you can select one of the available opti Linear, Damp, Snap Start, Snap end, Square Law, I
Square, Switch, Hot power, Flourescent and Sinus
Preview in Check this box if you’d like the fixture icons, in the chooser, to Chooser display the effects of the Intensity transforms.
Invert pan is
e sweep Selecting this checkbox reverses the sweep of the pan for th fixture. This is useful when you’re coordinating th
directions of fixtures hung in different directions. Invert tilt
e sweep Selecting this checkbox reverses the sweep of the tilt for this fixture. This is useful when you’re coordinating th
directions of fixtures hung in different directions. Swap
pan/tilt is
the movements of fixtures hung on Selecting this checkbox swaps the pan and tilt controls, so the fixture will pan when given a tilt command and vice-versa. Th is useful for coordinating
vertical trusses or pipes.
Preview the chooser, to
display the effects of the Position transforms. Check this box if you’d like the fixture icons, in
Advanced
transforms
The advanced button provides access to more Fixture ‘Transformers’ that allow you to further customize fixtures. For example the Pan and Tilt Offset parameters
en the transform window allow you to correct the home position for fixtures that are hung at an angle. To add a transform click the Advanced button to op
Viewing the patch in different ways Patching your rig
S sformers a ble from the Properties tab as described
a one of th ansformers click on Pan offset or Tilt
O
This option… ome of the tran
bove. To choose e advanced trre also availa ffset.
does this…
Minimum Sets the minimum (percentage) value for this f
For example setting a value of -25 on Pan means th fixtures will only pan left ¾ of their normal ran
eature. e ge
Maximum Sets the maximum (percentage) value for this
ange
feature. For example setting a value of -25 on Pan means the fixtures will only pan left ¾ of their normal r
Offset Sets the offset angle. For example setting a Pan offset
of 45 would move the fixtures Home position degrees
by 45
Value Curve e curve. The default
option is Linear but you can select one of the vailable options; Linear, Damp, Snap Start, Snap nd, Square Law, Inverse Square, Switch, Hot
ower, Flourescent and Sinus This popup lets you select a fad a
e p
Invert
Preview in Chooser Check this option to see the effect of the transform shown on the fixture chooser icons.
Channels
tab
This is a list of the features and channel numbers of the fixture and which DMX channel is controlling each feature.
nt types e table, List or DMX ee corresponding buttons: in the toolbar.
Viewing
the
patch
in
different
ways
Vista gives you three different views of your patch so you can get differe of information about the patch. To change the view, select th
option from the View menu or click one of the thr
Patching your rig Viewing the patch in different ways
Table
view
The Patch screen defaults to the Table view, as shown earlier in this section. This is the view you will use most of the time: here you can drag and drop fixtures into the patch panel for each universe and arrange them the way you want them.
List
view
If you choose the List option Vista displays the fixtures as a list with columns for the fixture:
You can choose the columns you want to show or hide by right-clicking in the header row and choosing the fields you want from the popup menu. You can also re-arrange the columns by clicking on the column name and dragging it to the left or right. The default column arrangement is:
Fixture Label (as shown in the chooser window), ID number
Name Fixture type
Patch part – for fixtures which re patched in 2 or more parts. For example some fixtures have a Intensity (Dimmer) part that is patched separately
DMX Universe DMX Address
If you click on any of the column headings the list will sort by that column. Click again to change the sort from ascending to descending or vice versa.
DMX
view
If you choose the DMX option Vista displays a table view where each cell shows the DMX channel and its output level:
Controlling the fixtures Patching your rig
You use this screen to display the output values of each and every DMX channel. Each cell displays the channel number and it’s DMX output value. The cells are clear if there is no output and change to a highlighted box if the output is adjusted. To display another output simply click on one of the other Universe tabs at the top of the display.
Controlling
the
fixtures
The Patch menu includes commands to control whatever fixtures are currently selected on the Patch panel there are also buttons for three of these commands:
Note that only some fixture types support these functions; refer to the user guide for your fixture types.
This command… does this…
Strike Ignites the lamps in the selected fixtures.
Douse Switches off the lamps in the selected fixtures off.
Reset
Resets the selected fixtures to their factory default settings. This is useful if a fixture has a control problem and you need to get it ‘back to normal’.
Park
Holds the fixture in it’s current settings.
For example to provide fixed lighting for backstage.. Once you’ve parked a fixture it will ignore all instructions until it is un-parked.
Unpark Sets a parked fixture to operate normally.
Â
These five commands are available through the Fixture menu and by right-clicking on the fixture icons in the Programmer or Patch window.Cloning
fixtures
Cloning is a special way to add fixtures to your patch. This method is useful if you’ve already programmed your show and want to include some new fixtures automatically in any Clips, Groups and Presets that you’ve created.
To clone one or more fixtures:
1. Select the fixture(s) you want to clone from the Patch table or list view.
Patching your rig Exporting and importing patch information
2. Select the ‘Clone Fixtures’ option from the Patch menu or right-click on the patched fixture and select Clone from the popup menu. Vista creates a clone of the selected fixture(s) in the fixture pool at the bottom of the Patch
window
3. Drag the cloned fixture(s) into the patch table.
Â
You can change the fixture type of the cloned fixture(s) by selecting the ‘Change Fixture Type’ option from the Patch menu,Exporting
and
importing
patch
information
To save time, you can import and export patch information from comma-separated value (.csv) files.
Exporting
the
patch
You can also export a .csv file containing your current show’s patch information. To do this:
1. Select the ‘Export Patch file…’ option from the Patch menu. Vista opens the Export Patch window
2. Give the file a name. The .csv extension is automatically appended.
3. Navigate to the directory or folder whee you want to save the file.
4. Click the Save button to confirm and the new fixtures are added to the patch.
Importing
the
patch
You can also import a .csv file containing your patch information. You can
import a file that you have exported from another show or you can create a file in a text editor or spreadsheet program. The easiest way to do this is to create a spreadsheet laid out as follows and save it as a .csv file using the Save as function.
ID Univ:Adrs Fixture Type Fixture Name
1 3:2 Dimmer Dimmer 36 3:24 Dimmer Dimmer 41 3:75+3:34 copy_of_Scroller Dimmer Scrl Dim 42 3:76+3:35 copy_of_Scroller Dimmer Scrl Dim 101 1:1 Mac 2000 Wash (Colour Wheel) 16 bit Mc2000Wc 102 1:22 Mac 2000 Wash (Colour Wheel) 16 bit Mc2000Wc 201 2:1 ColorSpot 700E AT Mode 1 CSp700a1
Exporting and importing patch information Patching your rig
302 1:241 VL2000 Spot Enhanced 16 bit V2000Se6 316 5:1 Color Block 2 Mode 3 ColBk2m3 317 5:17 Color Block 2 Mode 3 ColBk2m3 432 9:1 MediaMaster Layer Full 1.0 MeMaLF10 433 9:44 MediaMaster Layer Full 1.0 MeMaLF10 437 12:22 VL3000 Spot VL3000Sp 438 12:50 VL3000 Spot VL3000Sp
In this example the spreadsheet has a header row, which is optional, but shown here for explanation. The columns are laid out like this:
•
an ID (1), which determines the fixture’s unique ID•
a Universe : DMX address number (1:1), that sets the Universe and DMX start address for this fixture•
a Fixture Type (<VL3000 Spot>), that sets the type of fixture that will be patched•
a Fixture Name (<VL3000Sp >), that sets the fixture name. For two-part fixtures (i.e. fixtures with an external dimmer that is patched separately) you need to include both parts of the patch included in theUniverse/Address column. The format for the two parts is Control+Intensity. In the example above, Fixture ID 41 is a Scroller Dimmer with the scroller part patched to Universe 3 Channel 75 and the Intensity part patched to Universe 3 channel 34.
The ID, Universe:DMX Address information and Fixture Type must be in the .csv file. If you don’t specify a valid Vista Fixture Type, Vista prompts you to choose the correct fixture from a list when you import the file. The fixture Name does not need to match the name used in the Vista library.