IBM Security QRadar Risk Manager
Version 7.2.6
Getting Started Guide
Note
Before using this information and the product that it supports, read the information in “Notices” on page 31.
Product information
This document applies to IBM QRadar Security Intelligence Platform V7.2.6 and subsequent releases unless superseded by an updated version of this document.
Contents
Introduction to IBM Security QRadar Risk Manager . . . ..
v
Chapter 1. Get started with IBM Security QRadar Risk Manager. . . ..
1
Chapter 2. Deploy IBM Security QRadar Risk Manager. . . ..
3
Before you install . . . .. 3
Configure port access on firewalls . . . .. 4
Identify network settings . . . .. 4
Unsupported features in IBM Security QRadar Risk Manager . . . .. 4
Supported web browsers . . . .. 4
Enabling document mode and browser mode in Internet Explorer . . . .. 5
Access the IBM Security QRadar Risk Manager user interface . . . .. 5
Setting up a IBM Security QRadar Risk Manager appliance . . . .. 5
Adding IBM Security QRadar Risk Manager to IBM Security QRadar SIEM Console . . . .. 6
Establishing communication . . . .. 7
Adding the Risk Manager user role . . . .. 8
Chapter 3. Network data collection . . . ..
9
Credentials . . . .. 9
Configuring credentials . . . .. 9
Discovering devices . . . .. 10
Obtaining device configuration . . . .. 11
Import devices . . . .. 11
Importing a CSV file . . . .. 12
Troubleshoot device import . . . .. 12
Chapter 4. Manage audits. . . ..
15
Use case: Configuration audit . . . .. 15
Viewing device configuration history . . . .. 15
Comparing device configurations for a single device . . . .. 16
Comparing device configurations for different devices . . . .. 16
Use case: View network paths in the topology . . . .. 17
Searching the topology . . . .. 17
Use case: Visualize the attack path of an offense . . . .. 18
Viewing the attack path of an offense. . . .. 19
Chapter 5. Use case: Monitor policies . . . ..
21
Use case: Assess assets that have suspicious configurations . . . .. 21
Assessing devices that allow risky protocols . . . .. 22
Use case: Assess assets with suspicious communication. . . .. 22
Finding assets that allow communication . . . .. 22
Use case: Monitor policies for violations . . . .. 23
Configuring a question . . . .. 23
Use case: Use vulnerabilities to prioritize risks. . . .. 24
Finding assets that have vulnerabilities . . . .. 24
Use case: Prioritize asset vulnerabilities by zone or network communications . . . .. 24
Finding assets that have vulnerabilities in a network . . . .. 25
Chapter 6. Use cases for simulations
. . . ..
27
Use case: Simulate attacks on network assets . . . .. 27
Creating a simulation . . . .. 27
Use case: Simulate the risk of network configuration changes. . . .. 28
Creating a topology model . . . .. 28
Simulating an attack . . . .. 28
Notices
. . . ..
31
Trademarks . . . .. 33
Privacy policy considerations . . . .. 33
Introduction to IBM Security QRadar Risk Manager
This information is intended for use with IBM® Security QRadar®Risk Manager. QRadar Risk Manager is an appliance used to monitor device configurations, simulate changes to your network environment, and prioritize risks and vulnerabilities in your network.
Intended audience
This guide is intended for network administrators that are responsible for installing and configuring QRadar Risk Manager systems in your network.
Technical documentation
To find IBM Security QRadar product documentation on the web, including all translated documentation, access the IBM Knowledge Center (http://
www.ibm.com/support/knowledgecenter/SS42VS/welcome).
For information about how to access more technical documentation in the QRadar products library, see Accessing IBM Security Documentation Technical Note (www.ibm.com/support/docview.wss?rs=0&uid=swg21614644).
Contacting customer support
For information about contacting customer support, see the Support and Download Technical Note (http://www.ibm.com/support/
docview.wss?uid=swg21616144).
Statement of good security practices
IT system security involves protecting systems and information through prevention, detection and response to improper access from within and outside your enterprise. Improper access can result in information being altered, destroyed, misappropriated or misused or can result in damage to or misuse of your systems, including for use in attacks on others. No IT system or product should be
considered completely secure and no single product, service or security measure can be completely effective in preventing improper use or access. IBM systems, products and services are designed to be part of a lawful comprehensive security approach, which will necessarily involve additional operational procedures, and may require other systems, products or services to be most effective. IBM DOES NOT WARRANT THAT ANY SYSTEMS, PRODUCTS OR SERVICES ARE IMMUNE FROM, OR WILL MAKE YOUR ENTERPRISE IMMUNE FROM, THE MALICIOUS OR ILLEGAL CONDUCT OF ANY PARTY.
Please Note:
Use of this Program may implicate various laws or regulations, including those related to privacy, data protection, employment, and electronic communications and storage. IBM Security QRadar may be used only for lawful purposes and in a lawful manner. Customer agrees to use this Program pursuant to, and assumes all responsibility for complying with, applicable laws, regulations and policies.
Licensee represents that it will obtain or has obtained any consents, permissions, or licenses required to enable its lawful use of IBM Security QRadar.
Chapter 1. Get started with IBM Security QRadar Risk
Manager
IBM Security QRadar Risk Manager is a separately installed appliance. Use QRadar Risk Manager to monitor device configurations, simulating changes to your
network environment, and prioritize risks and vulnerabilities in your network. QRadar Risk Manager is accessed from the Risks tab on the IBM Security QRadar SIEM Console.
QRadar Risk Manager enhances QRadar SIEM by providing administrator with tools to complete the following tasks:
v Centralize risk management.
v Use a topology to view your network. v Configure and monitor network devices. v View connections between network devices. v Search firewall rules.
v View existing rules and the event count for triggered rules. v Search for devices and paths for your network devices. v Monitor and audit your network to ensure compliance.
v Define, schedule, and run exploit simulations on your network. v Search for vulnerabilities.
Centralized risk management and compliance for increased intelligence of information might involve the cooperation of many internal teams. As a next generation SIEM with an additional Risk Management appliance, we reduce the number of steps that are required from first-generation SIEM products. We provide network topology and risk assessment for assets that are managed in QRadar SIEM.
During the evaluation process, you consolidate your system, security, risk analysis, and network information through aggregation and correlation, providing complete visibility into your network environment. You also define a portal to your
environment, which provides visibility and efficiency that you cannot achieve by using manual processes and other point product technologies.
Chapter 2. Deploy IBM Security QRadar Risk Manager
Your QRadar Risk Manager appliance is installed with the latest version of QRadar Risk Manager software.
You must install the QRadar Risk Manager evaluation appliance. The software requires activation and you must assign an IP address to the QRadar Risk Manager appliance.
If you need assistance to activate your software and assigning an IP address, contact customer support.
The appliance is ready to accept information from your network devices. For information about using QRadar Risk Manager, see the IBM Security QRadar Risk Manager User Guide.
To deploy QRadar Risk Manager in your environment, you must:
1. Ensure that the latest version of IBM Security QRadar SIEM is installed.
2. Ensure all pre-installation requirements are met.
3. Set-up and power on your QRadar Risk Manager appliance.
4. Install the QRadar Risk Manager plug-in on your IBM Security QRadar SIEM Console.
5. Establish communication between QRadar SIEM and the QRadar Risk Manager
appliance.
6. Define user roles for your QRadar Risk Manager users.
Before you install
You must complete the installation process for an IBM Security QRadar SIEM Console before you install IBM Security QRadar Risk Manager. As a best practice, install QRadar SIEM and QRadar Risk Manager on the same network switch. You must review the following information:
v Configure firewall port access v Identify network settings
v Unsupported features in QRadar Risk Manager
v Supported web browsers
Before you install the QRadar Risk Manager evaluation appliance, ensure that you have:
v space for a two-unit appliance
v rack rails and shelving that are mounted
Optionally, you might want a USB keyboard and standard VGA monitor to access the QRadar SIEM Console.
Configure port access on firewalls
Firewalls between the IBM Security QRadar SIEM Console and IBM Security QRadar Risk Manager must allow traffic on certain ports.
Ensure that any firewall located between the QRadar SIEM Console and QRadar Risk Manager allows traffic on the following ports:
v Port 443 (HTTPS) v Port 22 (SSH) v Port 37 UDP (Time)
Identify network settings
You must gather information about your network settings before starting the installation process.
Gather the following information for your network settings:
v Host name
v IP address
v Network mask address
v Subnet mask
v Default gateway address
v Primary Domain Name System (DNS) server address
v Secondary DNS server (optional) address
v Public IP address for networks that use Network Address Translation (NAT) email server name
v Email server name
v Network Time Protocol (NTP) server (Console only) or time server name
Unsupported features in IBM Security QRadar Risk Manager
It is important to be aware of the features that are not supported by QRadar Risk Manager.
The following features are not supported in QRadar Risk Manager: v High availability (HA)
v Dynamic Routing for Border Gateway Protocol (BGP), Open Shortest Path First (OSPF), or Routing Information Protocol (RIP)
v IPv6
v Non-contiguous network masks
v Load-balanced routes
v Reference maps
v Store and Forward
Supported web browsers
For the features in IBM Security QRadar products to work properly, you must use a supported web browser.
When you access the QRadar system, you are prompted for a user name and a password. The user name and password must be configured in advance by the administrator.
The following table lists the supported versions of web browsers. Table 1. Supported web browsers for QRadar products
Web browser Supported versions
Mozilla Firefox 38.0 Extended Support Release 32-bit Microsoft Internet Explorer, with
document mode and browser mode enabled 10.0 11.0
Google Chrome Version 46
Enabling document mode and browser mode in Internet
Explorer
If you use Microsoft Internet Explorer to access IBM Security QRadar products, you must enable browser mode and document mode.
Procedure
1. In your Internet Explorer web browser, press F12 to open the Developer Tools window.
2. Click Browser Mode and select the version of your web browser.
3. Click Document Mode, and select the Internet Explorer standards for your Internet Explorer release.
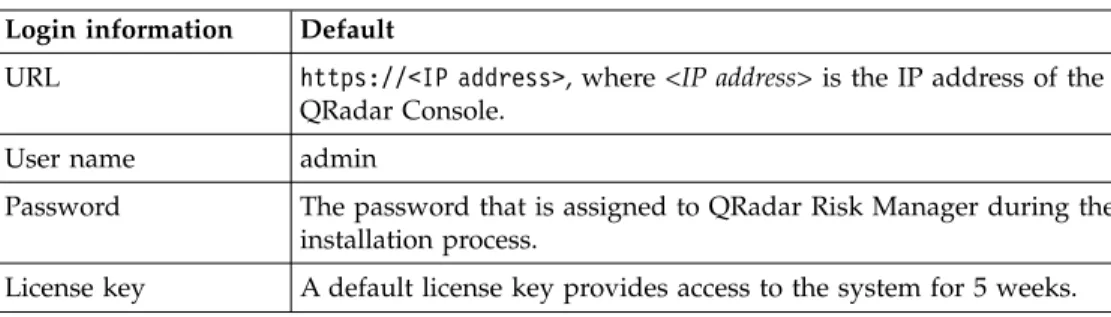
Access the IBM Security QRadar Risk Manager user interface
IBM Security QRadar Risk Manager uses default login information for the URL, user name, and password.
You access QRadar Risk Manager through the IBM Security QRadar SIEM Console. Use the information in the following table when you log in to your QRadar
Console.
Table 2. Default login information for QRadar Risk Manager Login information Default
URL https://<IP address>, where <IP address> is the IP address of the QRadar Console.
User name admin
Password The password that is assigned to QRadar Risk Manager during the installation process.
License key A default license key provides access to the system for 5 weeks.
Setting up a IBM Security QRadar Risk Manager appliance
You must connect the management interface and ensure that the power
connections are plugged into the IBM Security QRadar Risk Manager appliance.
Before you begin
Read, understand, and obtain the prerequisites.
About this task
The QRadar Risk Manager evaluation appliance is a two-unit rack mount server. Rack rails and shelving are not provided with evaluation equipment.
The QRadar Risk Manager appliance includes four network interfaces. For this evaluation, use the network interface that is labeled ETH0 as the management interface. The other interfaces are monitoring interfaces. All of the interfaces are on the back panel of the QRadar Risk Manager appliance.
The power button is on the front panel.
Procedure
1. Connect the management network interface to the port labeled ETH0.
2. Ensure that the dedicated power connections are plugged into the rear of the appliance.
3. Optional. To access the IBM Security QRadar SIEM Console, connect the USB keyboard and a standard VGA monitor.
4. If there is a front pane on the appliance, remove the pane by pushing in the tabs on either side and pull the pane away from the appliance.
5. Press the power button on the front to turn on the appliance.
Results
The appliance begins the boot process.
Adding IBM Security QRadar Risk Manager to IBM Security QRadar
SIEM Console
You must add IBM Security QRadar Risk Manager as a managed host to IBM Security QRadar SIEM Console.
Before you begin
If you want to enable compression, then the minimum version for each managed host must be QRadar Console V7.1 or QRadar Risk Manager V7.1.
To add a managed host that is not NATed to your deployment where the Console is NATed, you must change the QRadar Console to a NATed host. You must change the console before you add the managed host to your deployment. For more information, see the IBM Security QRadar SIEM Administration Guide.
Procedure
1. Open your web browser.
2. Type the URL, https://<IP Address>, where <IP Address> is the IP address of the QRadar Console.
3. Type your user name and password.
4. Click the Admin tab.
6. In the System and License Management window, click Deployment Actions, and then select Add Host.
7. Click Next.
8. Enter values for the following parameters:
Option Description
Host IP The IP address of QRadar Risk Manager.
Host Password The root password for the host.
Confirm Host Password Confirmation for your password. Encrypt Host Connections Creates an SSH encryption tunnel for the
host. To enable encryption between two managed hosts, each managed host must be running QRadar Console V7.1 or QRadar Risk Manager V7.1.
Encryption Compression Enables data compression between 2 managed hosts.
Network Address Translation To enable NAT for a managed host, the NATed network must be using static NAT translation. For more information, see the
IBM Security QRadar SIEM Administration Guide.
9. If you select the Network Address Translation check box, then you must enter values for the NAT parameters:
Option Description
NAT Group The network that you want this managed
host to use.
If the managed host is on the same subnet as the QRadar Console, select the console of the NATed network.
If the managed host is not on the same subnet as the QRadar Console, select the managed host of the NATed network. Public IP The public IP address of the managed host.
The managed host uses this IP address to communicate with other managed hosts in different networks that use NAT.
10. Click Add. This process can take several minutes to complete. If your deployment includes changes, then you must deploy all changes.
11. From the Admin tab, click Advanced > Deploy Full Configuration.
What to do next
Clear your web browser cache and then log in to QRadar Console. The Risks tab is now available.
Establishing communication
You must establish communication between your IBM Security QRadar Risk Manager appliance and your IBM Security QRadar SIEM Console before you set up and configure QRadar Risk Manager.
About this task
The process to establish communications might take several minutes to complete. If you change the IP address of your QRadar Risk Manager appliance or need to connect QRadar Risk Manager to another QRadar SIEM console, you can use the
Risk Manager Settingson the QRadar SIEM Admin tab.
Procedure
1. Open your web browser, and then clear the web browser cache.
2. Log in to QRadar SIEM. For information about the IP address, user name or root password, see Accessing the IBM Security QRadar Risk Manager user interface.
3. Click the Risks tab.
4. Type values for the following parameters:
Option Description
IP/Host The IP address or host name of the QRadar
Risk Manager appliance
Root Password The root password of the QRadar Risk Manager appliance.
5. Click Save.
What to do next
Define user roles.Adding the Risk Manager user role
You must assign the Risk Manager user role to provide access to IBM Security QRadar Risk Manager.
About this task
By default, IBM Security QRadar SIEM provides a default administrative role, which provides access to everything in QRadar Risk Manager. A user that is assigned administrative privileges, including the default administrative role, cannot edit their own account. Another administrative user must make any required changes.
For information about creating and managing user roles, see the IBM Security QRadar SIEM Administration Guide.
Procedure
1. Click the Admin tab.
2. On the navigation menu, click System Configuration.
3. In the User Management pane, click User Roles.
4. In the left pane, select the user role that you want to edit.
5. Select the Risk Manager check box.
6. Click Save
7. Click Close.
Chapter 3. Network data collection
You must configure IBM Security QRadar Risk Manager to read configuration information from the devices in your network.
The configuration information that is collected from your network devices generates the topology for your network and allows QRadar Risk Manager to understand your network configuration.
Data that is collected in QRadar Risk Manager is used to populate the topology with key information about your network environment.
Data collection is a three-step process:
v Provide QRadar Risk Manager with the credentials to download network device configurations.
v Discover devices to create a device list in Configuration Source Management. v Back up the device list to obtain the device configurations and populate the
topology with data about your network.
Credentials
IBM Security QRadar Risk Manager must be configured with the credentials to access and download the device configurations. Credentials allow QRadar Risk Manager to connect to firewalls, routers, switches, or Intrusion Prevention System (IPS) devices.
Administrators use Configuration Source Management to input device credentials, which provide QRadar Risk Manager with access to a specific device. QRadar Risk Manager can save individual device credentials for a specific network device. If multiple network devices use the same credentials, you can assign credentials to a group. For example, you can assign credentials to a group if all firewalls in the organization have the same user name and password. The credentials are
associated with the address sets for all the firewalls and are used to back up device configurations for all firewalls in your organization.
Note: If a network credential is not required for a specific device, then the parameter can be left blank in Configuration Source Management.
Configuring credentials
You configure network devices to provide IBM Security QRadar Risk Manager with access to the devices.
Procedure
1. Click the Admin tab.
2. On the navigation menu, click Plug-ins.
3. On the Risk Manager pane, click Configuration Source Management.
4. On the navigation menu, click Credentials.
5. On the Network Groups pane, click Add a new network group.
6. Type a name for the network group, and click OK.
7. On the Add address field, type the IP address of your device and click Add. Repeat this step for each address that you must add.
Note: Ensure that the addresses that you add display in the Network address section beside the Add address box. Do not replicate device addresses that already exist in other network groups in Configuration Source Management. You can type an IP address, a range of IP addresses, a CIDR subnet, or a wildcard. For example, to use a wildcard type 10.1.*.* or to use a CIDR use 10.2.1.0/24.
8. On the Credentials pane, click Add a new credential set.
9. Type a name for the new credential set, and click OK.
10. Select the name of the credential set that you created, and then configure values for the following parameters:
Option Description
Username A valid user name to log in to the adapter.
For adapters, the user name and password requires access to several files, such as rule.C, objects.C, implied_rules.C, and Standard.PF.
Password The password for the device.
Enable Password Type the password for second-level authentication.
This password is required when the credentials prompt the user credentials for Expert Mode.
SNMP Get Community Optional
SNMPv3 Authentication Username Optional parameter. SNMPv3 Authentication Password Optional parameter. SNMPv3 Privacy Password Optional parameter.
The protocol that you want to use to decrypt SNMPv3 traps.
11. Click OK.
Discovering devices
The discovery process adds network devices to the topology interface by using the credentials that you added.
Procedure
1. Click the Admin tab.
2. On the navigation menu, click Plug-ins.
3. In the Risk Manager section, click Configuration Source Management.
4. On the navigation menu, click Discover Devices.
5. Type an IP address or CIDR range to specify the location of devices that you want to discover.
7. If you want to search for devices in the network from the defined IP address or CIDR range, select the Crawl the network from the addresses defined above box.
8. Click Run.
Obtaining device configuration
You back up your devices to download the device configuration so IBM Security QRadar Risk Manager can include the device information in the topology.
Before you begin
You must configure credentials sets before you can download device configurations.
About this task
You can back up a single device or all devices.
For information about scheduling automated backups of device configurations from the Jobs tab, see the IBM Security QRadar Risk Manager User Guide.
Procedure
1. Click the Admin tab.
2. On the navigation menu, click Plug-ins.
3. On the Risk Manager pane, click Configuration Source Management.
4. Click the Devices tab.
5. To obtain the configuration for all devices, click Backup All in the navigation pane. Click Yes to continue.
6. To obtain the configuration for specific devices, select the individual device. To select multiple devices to back up, hold down the Ctrl key. Click Backup.
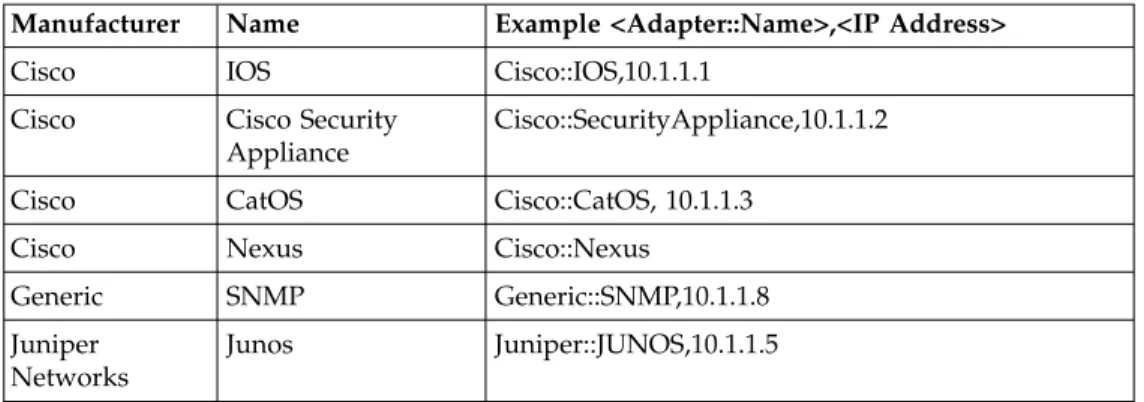
Import devices
Use Device Import to add a list of adapters and their network IP addresses to the Configuration Source Manager using a comma-separated value file (.CSV).
The device import list can contain up to 5000 devices, but the list must contain one line for each adapter and its associated IP address in the import file.
For example,
<Adapter::Name 1>,<IP Address> <Adapter::Name 2>,<IP Address> <Adapter::Name 3>,<IP Address>
Where:
<Adapter::Name> contains the manufacturer and device name, such as Cisco::IOS.
<IP Address>contains the IP address of the device, such as 191.168.1.1. Table 3. Device import examples
Manufacturer Name Example <Adapter::Name>,<IP Address> Check Point SecurePlatform CheckPoint::SecurePlatform,10.1.1.4
Table 3. Device import examples (continued)
Manufacturer Name Example <Adapter::Name>,<IP Address>
Cisco IOS Cisco::IOS,10.1.1.1
Cisco Cisco Security Appliance
Cisco::SecurityAppliance,10.1.1.2 Cisco CatOS Cisco::CatOS, 10.1.1.3
Cisco Nexus Cisco::Nexus
Generic SNMP Generic::SNMP,10.1.1.8 Juniper
Networks
Junos Juniper::JUNOS,10.1.1.5
Importing a CSV file
You can import a master device list to Configuration Source Management using a comma-separated value (CSV) file.
Before you begin
If you import a list of devices and then make a change to an IP address in the CSV file, then you might accidentally duplicate a device in the Configuration Source Management list. For this reason, delete a device from Configuration Source Management before re-importing your master device list.
Procedure
1. Click the Admin tab.
2. On the navigation menu, click Plug-ins.
3. In the Plug-Ins pane, click Device Import.
4. Click Browse.
5. Locate your CSV file, click Open.
6. Click Import Devices.
Results
If an error displays, then you need to review your CSV file to correct errors, and re-import the file. An import of the CSV file might fail if the device list is structured incorrectly or if the device list contains incorrect information. For example, your CSV file might be missing colons or a command, there could be multiple devices on a single line, or an adapter name might have a typo. If the device import aborts, then no devices from the CSV file are added to Configuration Source Management.
Troubleshoot device import
If you receive an error message after you try to import your device, it might be because the import of the CSV file failed.
Importing a device can fail if the device list is structured incorrectly. For example, the CSV file might be missing colons or a command, or multiple devices might be on a single line.
Alternatively, the import might fail if the device list contains incorrect information. For example, a typographical error for an adapter name.
If the device import aborts, then no devices from the CSV file are added to
Configuration Source Management. A list of valid adapter names for your installed adapters is displayed in the message. If an error is displayed, then you must review your CSV file to correct any errors. You can re-import the file after the errors are fixed.
Chapter 4. Manage audits
IBM Security QRadar Risk Manager helps to simplify the assessment of network security policies and compliance requirements by helping you answer questions. Compliance auditing is a necessary and complex task for security administrators. QRadar Risk Manager helps you answer the following questions:
v How are my network devices configured?
v How are my network resources communicating?
v Where is my network vulnerable?
Use case: Configuration audit
You can use the configuration information for network devices, which is captured by IBM Security QRadar Risk Manager, for audit compliance and to schedule configuration backups.
Configuration backups provide a centralized and automatic method of recording device changes for your audit compliance. Configuration backups archive configuration changes and provide a historical reference; you can capture a historical record or compare a configuration against another network device. Configuration auditing in QRadar Risk Manager provides you with the following options:
v A historical record of your network device configurations.
v A normalized view, which displays device changes when you compare configurations.
v A tool to search for rules on your device.
The configuration information for your devices is collected from device backups in Configuration Source Management. Each time QRadar Risk Manager backs up your device list, it archives a copy of your device configuration to provide a historical reference. The more often you schedule Configuration Source
Management, the more configuration records you have for comparison and for historical reference.
Viewing device configuration history
You can view the configuration history of a network device.
About this task
You can view history information for network devices that were backed up. This information is accessible from the History pane on the Configuration Monitor page. The history pane provides information about a network device configuration and the date that the device configuration was last backed up using Configuration Source Management.
The configuration displays the type of files that are stored for your network device in IBM Security QRadar Risk Manager. The common configuration types are: v Standard-Element-Document(SED), which are XML data files that contain
information about your network device. Individual SED files are viewed in their
raw XML format. If an SED is compared to another SED file, then the view is normalized to display the rule differences.
v Config, which are configuration files that are provided by certain network devices. These files depend on the device manufacturer. A configuration file can be viewed by double-clicking the configuration file.
Note: Depending on your device, several other configuration files might be displayed. Double-clicking these files displays the contents in plain text. The plain text view supports the find (Ctrl +f), paste (Ctrl+v), and copy (Ctrl+C) functions from the web browser window.
Procedure
1. Click the Risks tab.
2. On the navigation menu, click Configuration Monitor.
3. Double-click a configuration to view the detailed device information.
4. Click History.
5. On the History pane, select a configuration.
6. Click View Selected.
Comparing device configurations for a single device
You can compare device configurations for a single device.
About this task
If the files that you compare are Standard-Element-Documents (SEDs), then you can view the rule differences between the configuration files.
When you compare normalized configurations, the color of the text indicates the following rules:
v Green dotted outline indicates a rule or configuration that was added to the device.
v Red dashed outline indicates a rule or configuration that was deleted from the device.
v Yellow solid outline indicates a rule or configuration that was modified on the device.
Procedure
1. Click the Risks tab.
2. On the navigation menu, click Configuration Monitor.
3. Double-click any device to view the detailed configuration information.
4. Click History to view the history for this device.
5. Select a primary configuration.
6. Press the Ctrl key and select a second configuration for comparison.
7. On the History pane, click Compare Selected.
8. Optional. To view the raw configuration differences, click View Raw
Comparison. If the comparison is for a configuration file or another backup type, then the raw comparison is displayed.
Comparing device configurations for different devices
About this task
If the files that you compare are Standard-Element-Documents (SEDs), then you can view the rule differences between the configuration files.
When you compare normalized configurations, the color of the text indicates the following rules:
v Green dotted outline indicates a rule or configuration that was added to the device.
v Red dashed outline indicates a rule or configuration that was deleted from the device.
v Yellow solid outline indicates a rule or configuration that was modified on the device.
Procedure
1. Click the Risks tab.
2. On the navigation menu, click Configuration Monitor.
3. Double-click any device to view the detailed configuration information.
4. Click History to view the history for this device.
5. Select a primary configuration.
6. Click Mark for Comparison.
7. From the navigation menu, select All Devices to return to the device list.
8. Double-click the device to compare and click History.
9. Select another configuration backup to compare with the marked configuration.
10. Click Compare with Marked.
11. Optional. To view the raw configuration differences, click View Raw
Comparison. If the comparison is for a configuration file or another backup type, then the raw comparison is displayed.
Use case: View network paths in the topology
The topology in IBM Security QRadar Risk Manager displays a graphical representation of your network devices.
A topology path search can determine how your network devices are communicating and the network path that they use to communicate. Path searching allows QRadar Risk Manager to visibly display the path between a source and destination, along with the ports, protocols, and rules.
You can view how devices communicate, which is important on secured or restricted access assets.
Key features include:
v Ability to view communications between devices on your network. v Use filters to search the topology for network devices.
v Quick access to view device rules and configuration.
v Ability to view events that are generated from a path search.
Searching the topology
You can view device communication by searching the topology.
About this task
A path search is used to filter the topology model. A path search includes all network subnets containing the source IP addresses or CIDR ranges and subnets containing destination IP addresses or CIDR ranges that are also allowed to communicate using the configured protocol and port. The search examines your existing topology model and includes the devices that are involved in the
communication path between the source and destination and detailed connection information.
You can use vulnerabilities to filter the search if your topology includes an Intrusion Prevention System (IPS). For more information, see the IBM Security QRadar Risk Manager User Guide.
Procedure
1. Click the Risks tab.
2. On the navigation menu, click Topology.
3. From the Search list box, select New Search.
4. In the Search Criteria pane, select Path.
5. In the Source IP/CIDR field, type the IP address or CIDR range on which you want to filter the topology model. Separate multiple entries by using a
comma.
6. In the Destination IP/CIDR field, type the destination IP address or CIDR range on which you want to filter the topology model. Separate multiple entries by using a comma.
7. Optional. From the Protocol list, select the protocol that you want to use to filter the topology model.
8. Optional. In the Destination Port field, type the destination port on which you want to filter the topology model. Separate multiple ports by using a comma.
9. Click OK.
10. Move your mouse over a connection line to view details about the connection. If the search connects to a device that contains rules, a device rules link is displayed in the dialog.
Use case: Visualize the attack path of an offense
Offenses in IBM Security QRadar Risk Manager are events that are generated by the system to alert you about a network condition or event.
Attack path visualization ties offenses with topology searches. This visualization allows security operators to view the offense detail and the path the offense took through your network. The attack path provides you with a visual representation. The visual representation shows you the assets in your network that are
communicating to allow an offense to travel through the network. This data is critical during auditing to prove that you monitor for offenses, but also proves the offense does not have an alternate path in your network to a critical asset.
The key features for visualization are:
v Leverages the existing rule and offense system from IBM Security QRadar SIEM. v Displays a visual path for all devices between the source and destination of the
offense.
Viewing the attack path of an offense
You can view the attack path of an offense. The attack path shows the source, destination, and associated devices.
Procedure
1. Click the Offenses tab.
2. On the navigation menu, click All Offenses. The All Offenses page displays a list of offenses that are on your network. Offenses are listed with the highest magnitude first.
3. Double-click an offense to open the offense summary.
4. On the Offenses toolbar, click View Attack Path.
Chapter 5. Use case: Monitor policies
Policy auditing and change control are fundamental processes that allow administrators and security professionals to control access and communications between critical business assets.
The criteria for policy monitoring can include monitoring of assets and communications for the following scenarios:
v Does my network contain assets with risky configurations for PCI Section 1 audits?
v Do my assets allow communications using risky protocols for PCI Section 10 audits?
v How do I know when a policy change puts my network in violation? v How do I view vulnerabilities for hardened or high risk assets?
v How to I view assets in the network with vulnerabilities and Internet access? Use Policy Monitor to define tests that are based on the risk indicators, and then restrict the test results to filter the query for specific results, violations, protocols, or vulnerabilities.
IBM Security QRadar Risk Manager includes several Policy Monitor questions that are grouped by PCI category. For example, PCI 1, PCI 6, and PCI 10 questions. Questions can be created for assets or devices and rules to expose network security risk. After a question about an asset or a device/rule is submitted to Policy
Monitor, the returned results specify the level of risk. You can approve results that are returned from assets or define how you want the system to respond to
unapproved results.
Policy Monitor provides the following key features:
v Predefined Policy Monitor questions to assist with workflow. v Determines if users used forbidden protocols to communicate.
v Assessing if users on specific networks can communicate to forbidden networks or assets.
v Assessing if firewall rules meet corporate policy.
v Continuous monitoring of policies that generate offenses or alerts to administrators.
v Prioritizing vulnerabilities by assessing which systems can be compromised as a result of device configuration.
v Help identifying compliance issues.
Use case: Assess assets that have suspicious configurations
Organizations use corporate security policies to define risks and the
communications that are allowed between assets and networks. To assist with compliance and corporate policy breaches, organizations use Policy Monitor to assess and monitor risks that might be unknown.
PCI compliance dictates that you identify devices that contain cardholder data, then diagram, verify communications, and monitor firewall configurations to protect assets that contain sensitive data. Policy Monitor provides methods for
quickly meeting these requirements and allows administrators to adhere to corporate policies. Common methods of reducing risk include identifying and monitoring assets that communicate with unsecured protocols. These are protocols such as routers, firewalls, or switches that allow FTP or telnet connections. Use Policy Monitor to identify assets in your topology with risky configurations. PCI section 1 questions might include the following criteria:
v Assets that allow banned protocols. v Assets that allow risky protocols.
v Assets that allow out-of-policy applications across the network.
v Assets that allow out-of-policy applications to networks that contain protected assets.
Assessing devices that allow risky protocols
Use Policy Monitor to assess devices that allow risky protocols.
About this task
IBM Security QRadar Risk Manager evaluates a question and displays the results of any assets, in your topology, that match the test question. Security professionals, administrators, or auditors in your network can approve communications that are not risky to specific assets. They can also create offenses for the behavior.
Procedure
1. Click the Risks tab.
2. On the navigation menu, click Policy Monitor.
3. From the Group list box, select PCI 1.
4. Select the test question Assess any devices (i.e. firewalls) that allow risky
protocols (i.e. telnet and FTP traffic - port 21 & 23 respectively) from the internet to the DMZ.
5. Click Submit Question.
Use case: Assess assets with suspicious communication
Use Policy Monitor to identify PCI section 10 compliance by tracking, logging, and displaying access to network assets.
IBM Security QRadar Risk Manager can help to identify PCI section 10 compliance by identifying assets in the topology that allow questionable or risky
communications. QRadar Risk Manager can examine these assets for actual communications or possible communications. Actual communications display assets that used your question criteria to communicate. Possible communications display assets that can use your question criteria to communicate.
PCI section 10 questions can include the following criteria: v Assets that allow incoming questions to internal networks.
v Assets that communicate from untrusted locations to trusted locations. v Assets that communicate from a VPN to trusted locations.
v Assets that allow unencrypted out-of-policy protocols within a trusted location.
Finding assets that allow communication
About this task
IBM Security QRadar Risk Manager evaluates the question and displays the results of any internal assets that allow inbound connections from the Internet. Security professionals, administrators, or auditors in your network can approve
communications to assets that are not considered secure or containing customer data. As more events are generated, you can create offenses in IBM Security QRadar SIEM to monitor this type of risky communication.
Procedure
1. Click the Risks tab.
2. On the navigation menu, click Policy Monitor.
3. From the Group list box, select PCI 10.
4. Select the test question Assess any inbound connections from the internet to
anywhere on the internal network.
5. Click Submit Question.
Use case: Monitor policies for violations
IBM Security QRadar Risk Manager can continuously monitor any predefined or user-generated question in Policy Monitor. You can use monitor mode to generate events in QRadar Risk Manager.
When you select a question to be monitored, QRadar Risk Manager analyzes the question against your topology every hour to determine if an asset or rule change generates an unapproved result. If QRadar Risk Manager detects an unapproved result, an offense can be generated to alert you about a deviation in your defined policy. In monitor mode, QRadar Risk Manager can simultaneously monitor the results of 10 questions.
Question monitoring provides the following key features:
v Monitor for rule or asset changes hourly for unapproved results.
v Use your high and low-level event categories to categorize unapproved results. v Generating offenses, emails, syslog messages, or dashboard notifications on
unapproved results.
v Use event viewing, correlation, event reporting, custom rules, and dashboards in QRadar SIEM.
Configuring a question
You can use Policy Monitor to configure a question to be monitored.
Procedure
1. Click the Risks tab.
2. On the navigation menu, click Policy Monitor.
3. Select the question that you want to monitor.
4. Click Monitor.
5. Configure any of the options that you require to monitor your question.
6. Click Save Monitor.
Results
Monitoring is enabled for the question and events or offenses are generated based on your monitoring criteria.
Use case: Use vulnerabilities to prioritize risks
Exposed vulnerabilities are a significant risk factor for network assets.
IBM Security QRadar Risk Manager leverages asset information and vulnerability information in Policy Monitor. This information is used to determine if your assets are susceptible to input type attacks, such as; SQL injection, hidden fields, and clickjacking.
Vulnerabilities that are detected on your assets can be prioritized by their network location or a connection to another device that is vulnerable.
Vulnerability asset questions can include the following criteria: v Assets with new vulnerabilities reported after a specific date. v Assets with specific vulnerabilities or CVSS score.
v Assets with a specific classification of vulnerability, such as input manipulation, denial of service, OSVDB verified.
Finding assets that have vulnerabilities
You can find assets that have vulnerabilities.
About this task
IBM Security QRadar Risk Manager evaluates a question and displays the results of assets that contain your vulnerability. Security professionals, administrators, or auditors can identify assets in your network that contain known SQL injection vulnerabilities. They can promptly patch any assets that are connected to a
protected network. As more events are generated, you can create events or offenses in IBM Security QRadar SIEM to monitor assets that contain SQL injection
vulnerabilities.
Procedure
1. Click the Risks tab.
2. On the navigation menu, click Policy Monitor.
3. From the Group list, select Vulnerability.
4. Select the test question Assess assets with SQL injection vulnerabilities on
specific localnet(s) (i.e. protected server network).
5. Click Submit Question.
Use case: Prioritize asset vulnerabilities by zone or network
communications
Systems with vulnerabilities in the same network as protected assets are at a greater risk of data loss.
Detecting vulnerabilities on assets by zone or network are key measures to prevent exploits before they occur in your network. PCI section 6.1 and 6.2 stipulate that you review and patch systems within one month of a vulnerability patch release.
IBM Security QRadar Risk Manager assists with automating and prioritizing the patch process. As vulnerabilities are detected on your assets, you can prioritize by the network location or a connection to another device that is vulnerable.
Prioritizing is important for secured networks that can be connected to suspicious regions, or assets that contain a CVSS score greater than your internal policy allows.
Vulnerable asset questions can include the following criteria:
v Assets with a client side vulnerability, which communicated with suspicious geographic regions and contain protected assets.
v Assets with denial of service vulnerabilities in a specific network. v Assets with mail vulnerabilities in a specific network.
v Assets with vulnerabilities and the specific Common Vulnerability Scoring System (CVSS) score.
Finding assets that have vulnerabilities in a network
You can find assets that have vulnerabilities in a specific network.
About this task
IBM Security QRadar Risk Manager evaluates the question and displays the results in the specific location that contains OS-specific vulnerabilities. Security
professionals, administrators, or auditors of your network can approve
communications to assets that are not considered secure or containing customer data. As more events are generated, you can create offenses to monitor this type of risky communication.
Procedure
1. Click the Risks tab.
2. On the navigation menu, click Policy Monitor.
3. From the Group list box, select Vulnerability.
4. Select the test question Assess assets with OS specific vulnerabilities on a
specific localnet(s).
5. Click Submit Question.
Chapter 6. Use cases for simulations
Use case: Simulate attacks on network assets
You can use a simulation to test your network for vulnerabilities from various sources.
You can use attack simulations to audit device configurations in your network. Simulations provide the following key features:
v Simulations display the theoretical path permutations an attack can take against your network.
v Simulations display how attacks can propagate through your network devices to spread to other assets.
v Simulations allow monitoring to detect new exposure sites.
Creating a simulation
You can create a simulation for an network attack on an SSH protocol.
Procedure
1. Click the Risks tab.
2. On the navigation menu, select Simulation > Simulations.
3. From the Actions list, select New.
4. Type a name for the simulation.
5. Select Current Topology.
6. Select the Use Connection Data check box.
7. From the Where do you want the simulation to begin list, select an origin for the simulation.
8. Add the simulation attack, Attack targets one of the following open ports
using protocols.
9. For this simulation, click open ports, and then add port 22.
10. Click protocols, and then select TCP. SSH uses TCP.
11. Click OK.
12. Click Save Simulation.
13. From the Actions list, select Run Simulation. The results column contains a list with the date the simulation was run and a link to view the results.
14. Click View Results.
Results
A list of assets containing SSH vulnerabilities is displayed in the results, allowing network administrators to approve SSH connections that are allowed or expected in your network. The communications that are not approved can be monitored for events or offenses.
The results that are displayed provide your network administrators or security professionals with a visual representation of the attack path and the connections that the attack could take in your network. For example, the first step provides a
list of the directly connected assets affected by the simulation. The second step lists assets in your network that can communicate to first level assets in your
simulation.
The information provided in the attack allows you to strengthen and test your network against thousands of possible attack scenarios.
Use case: Simulate the risk of network configuration changes
You can use a topology model to define virtual network models based on your existing network. You can create a network model that is based on a series of modifications that can be combined and configured.
You can use a topology model to determine the effect of configuration changes on your network using a simulation.
Topology models provide the following key functionality: v Create virtual topologies for testing network changes. v Simulate attacks against virtual networks.
v Lower risk and exposure to protected assets through testing.
v Virtual network segments allow you to confine and test sensitive portions of your network or assets.
To simulate a network configuration change:
1. Create a topology model.
2. Simulate an attack against the topology model.
Creating a topology model
You can create a topology model to test network changes and simulate attacks.
Procedure
1. Click the Risks tab.
2. On the navigation menu, select Simulations > Topology Models.
3. From the Actions list, select New.
4. Type a name for the model.
5. Select any modifications you want to apply to the topology.
6. Configure the tests added to the Configure model as follows pane.
7. Click Save Model.
What to do next
Create a simulation for your new topology model.
Simulating an attack
You can simulate an attack on ports and protocols.
Procedure
1. Click the Risks tab.
2. On the navigation menu, select Simulation > Simulations.
3. From the Actions list box, select New.
5. Select a topology model that you created.
6. From the Where do you want the simulation to begin list, select an origin for the simulation.
7. Add the simulation attack, Attack targets one of the following open ports
using protocols.
8. For this simulation, click open ports, and then add port 22.
9. Click protocols, and then select TCP. SSH uses TCP.
10. Click OK.
11. Click Save Simulation.
12. From the Actions list, select Run Simulation. The results column contains a list box with the date the simulation was run and a link to view the results.
13. Click View Results.
Notices
This information was developed for products and services offered in the U.S.A. IBM may not offer the products, services, or features discussed in this document in other countries. Consult your local IBM representative for information on the products and services currently available in your area. Any reference to an IBM product, program, or service is not intended to state or imply that only that IBM product, program, or service may be used. Any functionally equivalent product, program, or service that does not infringe any IBM intellectual property right may be used instead. However, it is the user's responsibility to evaluate and verify the operation of any non-IBM product, program, or service.
IBM may have patents or pending patent applications covering subject matter described in this document. The furnishing of this document does not grant you any license to these patents. You can send license inquiries, in writing, to: IBM Director of Licensing
IBM Corporation North Castle Drive
Armonk, NY 10504-1785 U.S.A.
For license inquiries regarding double-byte character set (DBCS) information, contact the IBM Intellectual Property Department in your country or send inquiries, in writing, to:
Intellectual Property Licensing Legal and Intellectual Property Law IBM Japan Ltd.
19-21, Nihonbashi-Hakozakicho, Chuo-ku Tokyo 103-8510, Japan
The following paragraph does not apply to the United Kingdom or any other country where such provisions are inconsistent with local law:
INTERNATIONAL BUSINESS MACHINES CORPORATION PROVIDES THIS PUBLICATION "AS IS" WITHOUT WARRANTY OF ANY KIND, EITHER EXPRESS OR IMPLIED, INCLUDING, BUT NOT LIMITED TO, THE IMPLIED WARRANTIES OF NON-INFRINGEMENT, MERCHANTABILITY OR FITNESS FOR A PARTICULAR PURPOSE. Some states do not allow disclaimer of express or implied warranties in certain transactions, therefore, this statement may not apply to you.
This information could include technical inaccuracies or typographical errors. Changes are periodically made to the information herein; these changes will be incorporated in new editions of the publication. IBM may make improvements and/or changes in the product(s) and/or the program(s) described in this publication at any time without notice.
Any references in this information to non-IBM Web sites are provided for
convenience only and do not in any manner serve as an endorsement of those Web sites. The materials at those Web sites are not part of the materials for this IBM product and use of those Web sites is at your own risk.
IBM may use or distribute any of the information you supply in any way it believes appropriate without incurring any obligation to you.
Licensees of this program who wish to have information about it for the purpose of enabling: (i) the exchange of information between independently created programs and other programs (including this one) and (ii) the mutual use of the information which has been exchanged, should contact:
IBM Corporation 170 Tracer Lane,
Waltham MA 02451, USA
Such information may be available, subject to appropriate terms and conditions, including in some cases, payment of a fee.
The licensed program described in this document and all licensed material
available for it are provided by IBM under terms of the IBM Customer Agreement, IBM International Program License Agreement or any equivalent agreement between us.
Any performance data contained herein was determined in a controlled
environment. Therefore, the results obtained in other operating environments may vary significantly. Some measurements may have been made on development-level systems and there is no guarantee that these measurements will be the same on generally available systems. Furthermore, some measurements may have been estimated through extrapolation. Actual results may vary. Users of this document should verify the applicable data for their specific environment.
Information concerning non-IBM products was obtained from the suppliers of those products, their published announcements or other publicly available sources. IBM has not tested those products and cannot confirm the accuracy of
performance, compatibility or any other claims related to non-IBM products. Questions on the capabilities of non-IBM products should be addressed to the suppliers of those products.
All statements regarding IBM's future direction or intent are subject to change or withdrawal without notice, and represent goals and objectives only.
All IBM prices shown are IBM's suggested retail prices, are current and are subject to change without notice. Dealer prices may vary.
This information contains examples of data and reports used in daily business operations. To illustrate them as completely as possible, the examples include the names of individuals, companies, brands, and products. All of these names are fictitious and any similarity to the names and addresses used by an actual business enterprise is entirely coincidental.
If you are viewing this information softcopy, the photographs and color illustrations may not appear.
Trademarks
IBM, the IBM logo, and ibm.com® are trademarks or registered trademarks of International Business Machines Corp., registered in many jurisdictions worldwide. Other product and service names might be trademarks of IBM or other companies. A current list of IBM trademarks is available on the Web at "Copyright and
trademark information" at www.ibm.com/legal/copytrade.shtml.
Microsoft, Windows, Windows NT, and the Windows logo are trademarks of Microsoft Corporation in the United States, other countries, or both.
Privacy policy considerations
IBM Software products, including software as a service solutions, (“Software Offerings”) may use cookies or other technologies to collect product usage information, to help improve the end user experience, to tailor interactions with the end user or for other purposes. In many cases no personally identifiable information is collected by the Software Offerings. Some of our Software Offerings can help enable you to collect personally identifiable information. If this Software Offering uses cookies to collect personally identifiable information, specific information about this offering’s use of cookies is set forth below.
Depending upon the configurations deployed, this Software Offering may use session cookies that collect each user’s session id for purposes of session
management and authentication. These cookies can be disabled, but disabling them will also eliminate the functionality they enable.
If the configurations deployed for this Software Offering provide you as customer the ability to collect personally identifiable information from end users via cookies and other technologies, you should seek your own legal advice about any laws applicable to such data collection, including any requirements for notice and consent.
For more information about the use of various technologies, including cookies, for these purposes, See IBM’s Privacy Policy at http://www.ibm.com/privacy and IBM’s Online Privacy Statement at http://www.ibm.com/privacy/details the section entitled “Cookies, Web Beacons and Other Technologies” and the “IBM Software Products and Software-as-a-Service Privacy Statement” at
http://www.ibm.com/software/info/product-privacy.
Index
A
add Risk Manager 6 appliance 3, 6 appliance set up 6 assess devices 22 assets 21, 22, 23 attack path 18 audit 1, 21
audit compliance 15
B
backup 15 browser mode
Internet Explorer web browser 5
C
change control 21 compliance 21
configuration backups 15 configuration comparison 16, 17 configuration information 9 Configuration Monitor 15
Configuration Source Management 9 configurations:suspicious 21 connecting to the QRadar console 8 credentials 9
customer support v
D
data collection 9
default log in information 5 deployment 3
device
importing 11 device backup history 15 device configuration 11
device configuration: multiple 17 device configuration: single 16 device discovery 10
device import, CSV file 12 document mode
Internet Explorer web browser 5 documentation online v
dynamic routing 4
F
firewall configuration 3
G
gateway address 4
H
high availability (HA) 4 historical record 15 history 15 hostname 8
I
introduction v IP address 4, 8 IPv6 4
K
keyboard 3
L
log in information 5
M
managed host 6 monitor 3 monitor mode 23
monitor network devices 1
N
network administrator v network configuration 28 network device information 9 network group 9
network information 4 network mask address 4 network path 17
non-contiguous network masks 4 NTP server 4
O
offense 18 open port 28
P
password 5 PCI section 1 21, 22 PCI section 10 23 Policy Monitor 21 port 22 4 port 37 4 port 443 4
port requirements 4 prerequisites 3 protocol 27 protocols 28 protocols:risky 22
Q
question:configuring 23R
rack rails 3 risk assessment 21 risk management 1 risks for networks 28 roles 8
root password 8
S
search 18 setting-up 3 simulation 28 simulation creation 27 SSH simulation 27 subnet mask 4 supported versions
web browser 5
suspicious communication 22
T
technical documentation v topology 1, 18
topology model 28
U
unsupported features 4 user name 5
user role for Risk Manager 8
V
violations 23 vulnerability 21
W
web browser support 3