LOCATION STATUS INFORMATION
INSTALLATION GUIDE
NEC America, Inc.
NDA-30043-002
LIABILITY DISCLAIMER
NEC America reserves the right to change the specifications, functions, or features in this document at any time without notice. NEC America has prepared this document for use by its employees and customers. The information contained herein is the property of NEC America and shall not be reproduced without prior written approval from NEC America.
Copyright 1996
Location Status Information - Installation Guide CONTENTS
TABLE OF CONTENTS
Page
Chapter 1 - Introduction . . . 1
Chapter 2 - Application Configuration . . . 3
Step 1 – Application Characteristics . . . 3
Step 2 – Primary Configuration Parameters . . . 4
Step 3 – Facilities . . . 4
Step 4 – Secondary OAI Configuration Parameters . . . 5
Step 5 – User-Defined Parameters . . . . 6
Chapter 3 - Database Requirements . . . 7
Instructions . . . 7
Extension Database Information. . . 8
Field Definitions . . . 8
Employee Identification Database Information . . . 9
Field Definitions . . . 9
Chapter 4 - Control Options . . . 11
Chapter 5 - NEAX Command Assignments . . . 13
NEAX2400 Commands . . . 14
AOKC Command: (Assignment of OAI Key Codes) . . . 14
AKYD Command: (Assignment of Dterm Function Key). . . 14
Example . . . 15
NEAX2000 Commands . . . 16
CMD79: (Assignment of Internet Address) . . . 16
CMD7: (Assignment of MSF Operation Code) . . . 16
CONTENTS Location Status Information - Installation Guide
Location Status Information - Installation Guide Introduction
Chapter 1
Introduction
This guide provides specific field entries that need to be made in the process of installing and configuring Location Status Information. In addition to this guide, use the following manuals for this installation:
• Applications Manager (APM) Installation Manual – Contains step-by-step
instructions for installing the software from the release media.
• Applications Manager (APM) Operations Manual – Explains how applications
like Location Status Information are configured in the APM environment, using the entries and values provided in this guide.
• NEAX System Manuals - Give very detailed explanations about the
assignments that need to be made with the NEAX2400 Maintenance Administration Terminal (MAT) commands, the NEAX2000 Customer Administration Terminal (CAT), or the NEAX2000 Maintenance Operations Console (MOC).
Briefly, the installation and set up of Location Status Information involves the following processes:
• Software Installation - Location Status Information software must first be
loaded from the release media. Log in to the APM Platform Management Menu, select the Installation of Applications/Packages option, and follow the instructions provided in the APM Installation Manual to complete this part of the installation.
• Application Configuration - Location Status Information is internally
supported by the APM and must be configured in the APM environment. Application Configuration of this guide provides the information that must be entered into this APM configuration file. Use the instructions provided in the
APM Operations Manual to make the entries provided in this section.
• Database Requirements - Location Status Information requires two
application databases which are constructed and maintained through the APM
Database Administration option. Database Requirements of this guide defines
the information which must be included in these database files. Use the instructions provided in the APM Operations Manual to make the entries contained in this section.
• Control Options - If the AMS_to_LSI utility is running with AMS,
AMS_to_LSI must be set up to run nightly.
• NEAX Command Assignments - Before Location Status Information will
function, specific data settings must be assigned at the NEAX2400 Maintenance Administration Terminal (MAT), the NEAX2000 Customer Administration Terminal (CAT), or the NEAX2000 Maintenance Operations
Console (MOC). NEAX Command Assignments specifies the necessary
commands and the values at which they are to be set. Use the instructions provided in the appropriate NEAX System Manuals to make the entries contained in this section.
Introduction Location Status Information - Installation Guide
LOCATION STATUS INFORMATION INSTALLATION REQUIREMENTS
Discussed in
Chapter 1 Introduction
Chapter 2
Chapter 3
Chapter 4
Chapter 5
Software Installation
Software Release Media
Application Configuration
Application Characteristics Primary Parameter Configuration
OAI Facilities (Optional) OAI Configuration Parameters (Optional)
User-Defined Parameters
Database Requirements Master File Definitions
Master Database File Application File Definition
Application Database
Control Options
Instructions in:
APM Installation Manual
APM Operations Manual
APM Operations Manual
APM Operations Manual
NEAX2400 MAT Commands
NEAX2000 CAT/MOC Commands
NEAX2400 IMS
System Manuals
NEAX2000 IVS
Location Status Information - Installation Guide Application Configuration
Chapter 2
Application Configuration
Location Status Information is set up in the APM system using the Add function
of the Application Configuration option on the APM System Administration menu:
1. Enter the APM option from the APM Platform Management Menu.
2. Enter the System Administrator password at the APM password screen.
3. Enter the Application Configuration option from the System Administration menu.
This section contains the information that should be entered to the configuration file for Location Status Information. For specific instructions on what these parameters mean and how to make these entries, refer to the APM Operations
Manual.
Note: Configure AMS_to_LSI only if the Attendant Management System (AMS) is in-stalled on the same UAP as Location Status Information (LSI) and the LSI data-base will be generated from the AMS datadata-base. This option is only available on the NEAX2400 System.
Step 1 – Application Characteristics
In the APM Application Configuration option, choose the Add command to display the Define Application Characteristics screen. Then make the entries exactly as shown below:
Parameter LSI Entry AMS_to_LSI
Entry Definition
OAI Application Y N Whether (Yes or No) the application
communi-cates with the NEAX2400 using OAI processes.
CRT Application N N
Whether (Yes or No) the application requires a terminal screen of the same type as the one used by the APM.
Communication
Queue N N
Application Configuration Location Status Information - Installation Guide
Step 2 – Primary Configuration Parameters
On the APM Configuration Entry screen, make the following entries for the parameters shown below:
Step 3 – Facilities
According to instructions in the APM Operations Manual, designate the following facilities for Location Status Information using the Facilities command on the APM Configuration Entry screen:
MRFI Mode Release Facility (I) SCF Switch Control Facility
MRFR Mode Release Facility(R) TCFD Terminal Control Facility (D)
MSF OAI Mode Set Facility TCFI Terminal Control Facility (I)
NTF Number Transfer Facility
Note: The same MSF identification number (i.e., from 128 to 192) that is selected in the APM during Step 3 must be assigned to Location Status Information with the ap-propriate NEAX commands. See NEAX Command Assignments for more infor-mation.
Parameter LSI Entry AMS_to_LSI Entry Definition
Application
Name Location_Status AMS_to_LSI
The name to be displayed in the APM menus. This name is displayed exactly as it is entered here.
Executable
Filename /oai/app/lsi /oai/app/bldlsi
The path name of the executable file.
Group (no entry) (no entry) The application is not a group
member.
Response Mode I(gnore) I(gnore)
The default value, since the components do not belong to a group.
Initialization
Batch N(o) N(o)
The application is not to be initialized automatically when the OAI system is initialized.
Termination
Mode M(essage) T(erminate)
How the APM is to notify the application to terminate.
Standard Output /oai/log/dbg/lsi.out /oai/log/dbg/bldlsi.out Where output is sent.
Number of Restarts 0 0
Location Status Information - Installation Guide Application Configuration
Step 4 – Secondary OAI Configuration Parameters
Note: Entries for parameters that are marked with an asterisk (*) should be made ex-actly as shown. All other entries in this section serve as examples only.
Using the OAI-Conf command on the APM Configuration Entry screen, make the entry shown for each of these parameters required by Location Status
Information. Use the instructions provided for this option in the APM Operations
Manual:
† – The maximum Tenant Number for the NEAX2000 is 64.
Parameter Entry Definition
Database Name #1* /oai/db/cur/lsi_extn
The pathname of the database containing extension information. The database filename (i.e., lsi_extn) shown here with its path should be entered as the name of the application database as noted in the “Database Requirements” section.
Database Name #2* /oai/db/cur/lsi_msg
The pathname of the database containing the possible messages. The database filename (i.e., lsi_msg) listed here with its path should be entered as the name of the application database as noted in the “Database Requirements” section.
Time-out Value #1 20 The number of seconds LSI waits for user
input before it releases the Dterm.
Time-out Value #2 10 The number of seconds LSI displays a
message on the Dterm LCD.
Tenant Number (0-64)† 1 The number of the tenant that LSI serves.
Source Link Name OAI1TCP
The port on the source side of the communication link. This entry should match a link name in the APM system configuration file.
Destination Link Name PBX1TCP
The port on the destination side of the communication link. This entry should match a link name in the APM system configuration file.
Association Recovery 10
Application Configuration Location Status Information - Installation Guide
Step 5 – User-Defined Parameters
Make these parameter entries for LSI installation through the UserDefined command on the APM Configuration Entry screen:
This completes the configuration of Location Status Information in the APM.
Refer to Database Requirements for information on how to create its database
support.
Make this parameter entry for AMS_to_LSI installation through the UserDefined command on the APM Configuration Entry screen:
This completes the configuration of AMS_to_LSI in the APM. Refer to Control
Options to choose its control options.
User-Defined LSI Entry Definition
#1 Installation-dependent This is the OAI key assigned to LSI.
#2 /oai/db/cur/Lsi_extn The full pathname of the master LSI extension database.
#3 Installation-dependent Set to 1 if using in conjunction with AMS.
Set to 2 if using in conjunction with AMS and a space exists between the last name and first name in the AMS database. (i.e., ’last name, first name’)
User-Defined AMS_to_LSI Entry Definition
#1 /oai/db/cur/Lsi_extn This is the name of the master extension database for
Location Status Information - Installation Guide Database Requirements
Chapter 3
Database Requirements
Location Status Information requires two databases (i.e., extensions and
messages). These databases are created through the Database Administration option on the APM System Administration Menu. Database creation involves the following four-step process for each of the two required databases:
1. Define Master Database Fields: This step involves creating the master data-base fields. Generally one master set of fields serves as parent datadata-bases for several applications. Location Status Information, however, requires two sep-arate sets of fields, one for the extensions and one for the messages.
2. Build a Master Database File: This step involves entering data (e.g., actual extension numbers and the names associated with them) into the master data-base fields that were just defined in Step 1.
3. Specify Location Status Information Database Fields: This step defines how data from the master files is to be converted to meet the needs of Location
Sta-tus Information. The database names in the application configuration file
(lsi_extn and lsi_msg) must be entered during this step.
4. Process the Location Status Information Database: In this step, the Master Database input is converted to database files according to the definitions created in Step 3, using the Process and Install Application Database options on the APM Database Administration menu. Activate the Process command to draw data from the master database and convert it to the formats specified for
tion Status Information. Then activate the Install command to enable Loca-tion Status InformaLoca-tion to access its database.
Instructions
The information required in all four steps for each Location Status Information database is provided in table form on the following pages. Using this information with the procedural instructions provided in the APM Operations Manual, enter the Database Administration option on the APM System Administration Menu and build the Location Status Information databases, one at a time. Refer to the Process and Error Messages chapter of the APM Operations Manual for information about any messages displayed during these steps
Note: Remember to complete STEP 4, Process the Application Database, for each da-tabase after entering the information on the following pages in STEPS 1 through 3.
Step 1 – Define
Master Database Fields
Step 2 – Build
Master Database File
Step 3– Specify
Application Database Fields
Step 4 – Process
Database Requirements Location Status Information - Installation Guide
Extension Database Information
This database contains the extensions that can access Location Status
Information. For each, the name of the person associated with it and the person’s
identifying access code is given. Name the master file Lsi_extn and the application file lsi_extn.
Field Definitions
• Extension Key– The extension number followed by 0 for the first employee assigned to the extension, 1 for the second, etc.• Extension– An internal telephone number within the range from 1 to
99999.
• Name– The two- to 16-character name of the person assigned to the
extension.
• Access Code– The identification number used to identify this person.
• Message– This field should be left blank. It will be filled in by the
application unless the user changes status.
• Month– The two-digit number for the month. Initially, if there is no
message, this is 99.
• Day– The two-digit number for the day. Initially, if there is no
message, this is 99.
• Hour– The two-digit number for the hour. Initially, if there is no
message, this is 99.
Field Description
Master Definition File
Application Definition
File
Master Database
Type Size Min.
Value Max. Value Data Type Typical Entry
Extension Key N 6 1 999999 Long Integer 036150
Extension N 5 1 99999 Long Integer 03615
Name A 16 ASCII MILLER,
KAREN
Access Code N 10 0 9999999999 ASCII 805
Message A 16 ASCII
Month N 2 0 99 Integer 99
Day N 2 0 99 Integer 99
Hour N 2 0 99 Integer 99
Minute N 2 0 99 Integer 99
Phone to Call A 22 ASCII
Location Status Information - Installation Guide Database Requirements
Field Definitions
(Cont.)
• Minute– The two-digit number for the minute. Initially, if there is no
message, this is 99.
• Phone to Call– This field should be left blank.
• Active Flag– This should be set to 0.
Employee Identification Database Information
This database contains the messages that can be selected for display on the Dterm
LCD. Name the master file Lsi_msg and the application file lsi_msg.
Field Definitions
• Message Number– The number of the message that follows, from 1 to 14.• Message– The message itself, up to 16 characters long (e.g., On
Vacation, In a Meeting, In the Field, Out of Office, etc.).
Field Description
Master Definition File Application Definition File
Master Database
Type Size Min.
Value
Max.
Value Data Type
Typical Entry
Message
Number N 2 1 14 Short Integer 01
Database Requirements Location Status Information - Installation Guide
Location Status Information - Installation Guide Control Options
Chapter 4
Control Options
If AMS_to_LSI is running with AMS on a NEAX2400, it should be configured to run nightly as follows:
1. Choose Control Options from the System Administration menu.
2. Choose Applications from the Control Options menu.
3. Choose AMS_to_LSI from the Application Selection menu.
4. Choose Initialize from the Application Control Options menu.
This will build a new master extension file. To make these changes effective, take the following steps:
1. Choose Control Options from the System Administration menu.
2. Choose Databases from the Master File Options menu.
3. Choose Lsi_extn from the Database Control Options menu.
4. Choose Process Install from the Database Control Options menu.
In this example, Lsi_extn is built every night at 1:10 a.m. and is installed at 2:10 a.m. The one-hour difference permits the database building to end before the installation begins.
Application Control Options Screen
Field Name Entry
Minute (0-59): 10
Hour of Day (0-23): 1
Day of Month (1-31): *
Month of Year (1-12): *
Day of Week (0-6): *
Database Control Options Screen
Field Name Entry
Minute (0-59): 10
Hour of Day (0-23): 2
Day of Month (1-31): *
Month of Year (1-12): *
Control Options Location Status Information - Installation Guide
Location Status Information - Installation Guide NEAX Command Assignments
Chapter 5
NEAX Command Assignments
This guide assumes that data settings that affect the operation of all OAI software on a system-wide basis have already been assigned on the NEAX2400
Maintenance Administration Terminal (MAT) commands, the NEAX2000 Customer Administration Terminal (CAT), or the NEAX2000 Maintenance Operations Console (MOC). Such settings include, for instance, system index values and assignment of Interface I/O Port Data in the Interface Processor (IP). For more information about the system data settings and about the Code Master settings discussed in this section, refer to the following technical manuals for the specific NEAX system in use:
• OAI System Manual.
• Command Manual.
• Job Specification.
• Programming Manual (for RDS, MDS, and HDS systems).
• System Data Design Manual (for ICS systems).
Location Status Information requires assignment of the Mode Set Facility (MSF)
to an OAI-assigned function key on all Dterms affected by application. This process involves assigning the MSF and its Operation Code (Op-Code), configured for
Location Status Information in the APM Application Configuration option, to
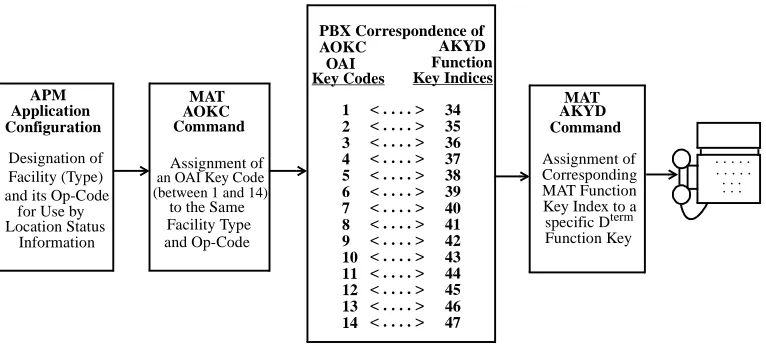
one of the 14 OAI Key Codes. (The MSF Op-Codes range from 128 to 191; available for on screen viewing through the Providers command in the APM Application Configuration option.) Each of the OAI Key Codes corresponds to an AKYD Function Key Index (FKI) value which is then assigned to the specific Dterm function key. This process is illustrated below.
Figure 5-1 OAI Function Key Assignment
. . . . . . . . . . . . .. . . APM Application Configuration Designation of Facility (Type) and its Op-Code
for Use by Location Status Information MAT AOKC Command Assignment of an OAI Key Code (between 1 and 14)
to the Same Facility Type and Op-Code MAT AKYD Command Assignment of Corresponding MAT Function Key Index to a specific Dterm Function Key
NEAX Command Assignments Location Status Information - Installation Guide
NEAX2400 Commands
Use the NEAX2400 Maintenance Administration Terminal (MAT) to enter these commands.
A knowledge of the Dterm stations in the NEAX system and which ones will have
access to Location Status Information is necessary to using the following commands:
AOKC Command:
(Assignment of
OAI Key Codes)
This command is used to associate the MSF facility and its Op-Code that was configured in the APM for Location Status Information to one of the 14 OAI Key Codes in the MAT.
(a) Select an unused OAI Key Code, from 1 to 14. To determine what Key Codes are available for assignment, use the LOKC command to list the AOKC Key Codes that are already assigned.
(b) Enter MSF as the facility to be assigned to the selected Key Code, using the values on the screen.
(c) Enter the same Op-Code that was configured for Location Status
Information in the APM. If necessary, retrieve it using the Providers
command on the APM Configuration Entry screen.
AKYD Command:
(Assignment of
D
termFunction
Key)
This command is used to assign key data on the Dterms that are to be used to access
Location Status Information.
MAT Function Key Indexes #34 to #47 have been designated for use in the OAI system and correspond to the 14 OAI Key Codes as illustrated on the previous
page. The AKYD command is used to assign a Dterm function key to the specific
MAT Function Key Index that, in turn, corresponds to the previously assigned OAI
Key Code. This command must be used to assign the function key on each Dterm
that is to be set up with access to Location Status Information.
(a) Enter the same tenant number that is configured for Location Status
Information in the APM Application Configuration option.
(b) Enter the station number of the Dterm on which the function key is being
Location Status Information - Installation Guide NEAX Command Assignments
(c) Enter to the Dterm function key field the MAT Function Key Index that
corresponds to the previously assigned OAI Key Code.
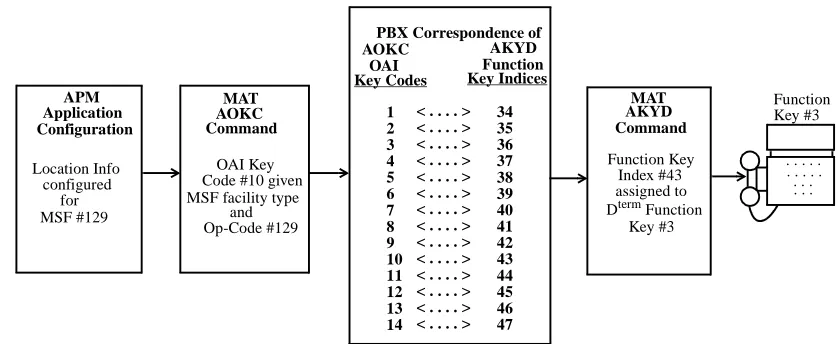
Figure 5-2 OAI Function Key Assignment Example
Example
The example above indicates that MSF #129 is configured for Location StatusInformation and is assigned through the AOKC command to OAI Key Code 10.
OAI Key Code 10 corresponds in the PBX to MAT Function Key Index 43. Each
Dterm in the system that is to access Location Status Information has function key
3 assigned to MAT Function Key Index 43 via the AKYD command. Now
whenever a phone user presses function key 3 on any assigned Dterm, MSF 129
initiates communication with Location Status Information.
Location Status Information is now installed and ready to be initialized. Enter
the APM Operations Menu and initialize Location Status Information according to instructions provided in the APM Operations Manual.
. . . . . . . . . . . . . . . . APM Application Configuration MAT AOKC Command MAT AKYD Command PBX Correspondence of
AOKC OAI Key Codes AKYD Function Key Indices 1 2 3 4 5 6 7 8 9 10 11 12 13 14 34 35 36 37 38 39 40 41 42 43 44 45 46 47 < . . . . > < . . . . > < . . . . > < . . . . > < . . . . > < . . . . > < . . . . > < . . . . > < . . . . > < . . . . > < . . . . > < . . . . > < . . . . > < . . . . >
Location Info configured
for MSF #129
OAI Key Code #10 given MSF facility type
and Op-Code #129
Function Key Index #43 assigned to Dterm Function
Key #3
NEAX Command Assignments Location Status Information - Installation Guide
NEAX2000 Commands
Use the NEAX2000 Customer Administration Terminal (CAT), or the NEAX2000 Maintenance Operations Console (MOC) to enter these commands. (Refer to the
NEAX2000 System Manuals for more information.)
A knowledge of the Dterm stations in the NEAX system and which ones will have
access to Location Status Information is necessary to using the following commands:
CMD79:
(Assignment of
Internet Address)
Assigns the Internet Address of TCP/IP-Ethernet.
1st data 00–03: Division No. of Internet Address
2nd data 0–255: Address Data (1–3 digits)
The Internet Address must be assigned to the 1st data 00–03 as follows:
CMD7:
(Assignment of
MSF Operation
Code)
Y=0: When pressing the OAI function key to start up MSF, assign the operation code to the OAI function key assigned by CM90.
1st data: F1032 Function Key Number 0
–
F1047 OAI Function Key Number 15
2nd data: 128–191 Operation Code for MSF
Y=0: When dialing a digit code (1–3 digits) after pressing OAI function key to start up MSF, assign the digit number of digit code, then assign the operation code to the digit code.
1st data: F1032 Function Key Number 0
–
F1047 OAI Function Key Number 15
2nd data: DCX (X=1–3) Operation Code for MSF
1st data (1) 00
01
02
03
Internet Address: XXX • XXX • XXX
[XXX: 2nd data (2)]
Location Status Information - Installation Guide NEAX Command Assignments
CM90:
(Assignment of the
OAI Function Key
for MSF)
Assigns the OAI function key for starting up MSF to a Dterm.
1st data My line number + , + Key Number
2nd data F1032 Function Key Number 0
–
NEAX Command Assignments Location Status Information - Installation Guide