•
• •
• • •
•
•
• •
• • •
•
•
•
• •
• •
S
P R I N T
®
THE
PROFESSIONAL WORD
PROCESSOR
USER
'
S GUIDE
SPRINT®
The Professional Word Processor
Borland's No-Nonsense License Statement!
This software is protected by both United States copyright law and international treaty provisions. Therefore, you must treat this software just like a book, with the following single
exception. Borland International authorizes you to make archival copies of the software for the sole purpose of backing-up our software and protecting your investment from loss.
By saying, "just like a book," Borland means, for example, that this software may be used by any number of people and may be freely moved from one computer location to another, so long as there is no possibility of it being used at one location while it's being used at another. Just like a book that can't be read by two different people in two different places at the same time, neither can the software be used by two different people in two different places at the same time. (Unless, of course, Borland's copyright has been violated).
LIMITED WARRANTY
With respect to the physical diskette and physical documentation enclosed herein, Borland International, Inc. ("Borland") warrants the same to be free of defects in materials and workmanship for a period of 60 days from the date of purchase. In the event of notification within the warranty period of defects in material or workmanship, Borland will replace the defective diskette or documentation. If you need to return a product, call the Borland Customer Service Department to obtain a return authorization number. The remedy for breach of this warranty shall be limited to replacement and shall not encompass any other damages, including but not limited to loss of profit, and special, incidental, consequential, or other similar claims.
Borland International, Inc. specifically disclaims all other warranties, expressed or implied, including but not limited to implied warranties of merchantability and fitness for a particular purpose with respect to defects in the diskette and documentation, and the program license granted herein in particular, and without limiting operation of the program license with respect to any particular application, use, or purpose. In no event shall Borland be liable for any loss of profit or any other commercial damage, including but not limited to special, incidental, consequential or other damages.
GOVERNING LAW
SPRINT
®The Professional Word Processor
User's Guide
Copyright ©1988 All rights reserved
All Borland products are trademarks or registered trademarks of
Borland International, Inc. Other brand and product names are trademarks or registered trademarks of their respective holders. Copyright ©1988 Borland International.
Printed in the U.S.A.
Table of Contents
Introduction
1
How to Use the Manuals ... 2
Inside This Manual . . . .. 3
Typographic Conventions ... 5
Hardware and Software Requirements ... 5
Borland's No-Nonsense License Statement ... 6
How to Contact Borland ... 6
Part
1Getting Started
Chapter
1Before You Begin
9 Reading the README File ... 9The Installation Program ... 10
Floppy Disk Installation . . . .. 11
Hard Disk Installation ... 13
Printer Installation ... 15
If Your Printer Isn't Listed ... 16
If You Have Trouble with Your Printer ... 16
Alternate Printer Installation . . . .. 16
Monitor/Screen Installation ... 17
User Interface Installation ... 17
User Interface Installation on a Two-Floppy System ... 19
Speller and Thesaurus Installation . . . .. 20
Conversion Utility Installation ... 21
Additional Notes for Two-Floppy Systems. . . .. 21
Starting Sprint ... 23
Chapter 2 Notes for the Beginning Word Processor
25 Getting In, Getting Out, and Getting Help ... 26What Is Word Processing? ... . . . .. 27
Getting Started with Sprint ... 27
Entering Text and Moving the Cursor . . . .. 28
Sprint Menus and Shortcuts ... 29
Moving Around in Your Text ... 31
Beyond the Backspace Key: Deleting . . . .. 32
Inserting Text . . . .. 32
Getting Help ... 33
Files-the Basic Storage Unit ... 33
Chapter 3 Notes for the Experienced User
37
Fast Track 0 0 0 0 0 0 0 0 · 0 0 0 0 0 0 0 0 0 0 0 0 0 0 0 0 0 0 0 0 0 0 0 0 0 0 0 0 0 0 0 0 0 0 0 0 0 0 0 0 0 0 0 0 0 0 37 If You Use Borland Text Editors 0 0 0 0 0 0 0 0 0 0 0 0 0 0 0 0 0 0 0 0 0 0 0 0 0 0 0 0 0 0 0 0 0 0 0 38 If You Know Another Word Processor 0 0 0 0 0 0 0 0 0 0 0 0 0 0 0 0 0 0 0 0 0 0 0 • 0 0 0 0 0 0 39 If You Like to Tinker with Software 0 0 0 0 0 0 0 0 0 0 0 0 0 0 0 0 0 0 0 0 0 0 0 0 0 • 0 0 0 0 0 0 40Chapter 4 Quick Start Tutorial
41Getting Started 0 0 0 0 0 0 0 0 0 0 0 0 0 0 0 0 0 0 0 0 0 0 0 0 0 0 0 0 0 0 0 0 0 0 0 0 0 0 0 0 0 0 0 • 0 0 0 0 0 0 42 Getting Help 0 0 0 0 0 0 0 0 0 0 0 0 0 0 0 0 0 0 0 0 0 0 0 0 0 0 0 0 0 0 0 0 0 0 0 0 0 0 0 0 0 0 0 0 • 0 0 0 0 0 0 43 The Final Result 0 0 0 0 0 0 0 0 0 0 0 0 0 0 0 0 0 0 0 0 0 0 0 0 0 0 0 0 0 0 0 0 0 0 0 0 0 0 0 0 0 0 0 0 0 0 0 0 0 44 Lesson 1: Starting Sprint and Creating a New File 0 0 0 0 0 0 0 0 0 0 0 0 0 0 0 0 0 0 0 0 47 Starting Sprint 0 0 0 0 0 0 0 0 0 0 0 0 0 0 0 0 0 0 0 0 0 0 0 0 0 0 0 0 0 0 0 0 0 0 0 0 0 0 0 0 0 0 0 0 0 0 0 0 47 Creating a New File 0 0 0 0 0 0 0 0 0 0 0 0 0 0 0 0 0 0 0 0 0 0 0 0 0 0 0 0 0 0 0 0 0 0 0 0 . 0 0 0 0 0 0 48 The Ruler Line 0 0 0 0 0 0 0 0 0 0 0 0 0 0 0 0 0 0 0 0 0 0 0 0 0 • • • • • • • • • • • • • • 0 • • • • • 0 48 The Status Line 0 • • • • • • • 0 • • • • • • • 0 • • • • • • • • • • • 0 0 • 0 0 0 0 0 0 0 0 0 • • • 0 0 49 Editing the Ruler .. 0 0 • • 0 0 • • • • • 0 • 0 0 0 • 0 0 0 • 0 0 • 0 0 0 0 0 0 0 0 0 0 0 • 0 0 • • 0 0 52 Saving Your Changes 0 0 0 • 0 0 0 0 0 0 0 0 0 0 • 0 • • 0 0 • 0 0 0 0 0 • 0 0 0 0 0 0 0 0 0 0 0 0 0 55 Lesson 2: Making Changes in a File 0 0 0 0 • • 0 • • 0 • • 0 • 0 0 0 • 0 0 0 0 0 0 0 0 0 • 0 0 o . 57
Adding and Deleting Text 0 0 . . 0 . . . 0 0 0 . . 0 0 . . . . 0 0 0 . . . 0 0 . . 0 • 0 0 59 Lesson 3: Opening and Closing a File. 0 • • • 0 . 0 0 o. 0 0 0 0 0 . 0 0 0 0 0 . 0 0 • • 0 " 61 Lesson 4: Choosing Typestyles and Centering Text. 0 0 • 0 • • • 0 • 0 • • • 0 • 0 • 0 65 Underlining Text ... 0 0 • • • • • 0 • • • • • 0 • • • • • 0 0 • • 67 Centering a Line of Text ... 0 0 • • • • • • • • • • • • • • • 68 Lesson 5: Setting and Using Tabs . 0 • • • • 0 • • 0 • • 0 • • • 0 • 0 0 • • 0 • • • • • • 0 0 0 • 0 69 Lesson 6: Selecting a Block and Block Commands .. 0 0 0 0 0 • 0 0 • • • • • 0 0 • o . 72
Block Select Commands .. 0 • • • • • • • • • • 0 • • 0 • 0 0 0 • 0 0 • 0 • • 0 • 0 0 0 • 0 • • • • 0 73 Moving a Block 0 0 0 • • • • • • • • 0 • • • • • • • • • • • • 0 • • • 0 • • • • 0 0 • • • • 0 0 • 0 • • 75 Using Typestyles with Block Commands . 0 0 0 • • • 0 • • • 0 • 0 • • • 0 • 0 • • • 79 Lesson 7: Making Lists ... 0 • 0 • • • • • 0 0 • • 0 0 0 • • • 0 0 0 • • 0 • 0 • o. 80 Lesson 8: Printing a File ... 0 • 0 • • 0 • • • ' 0 0 • • • 0 0 0 • • • 0 0 • • • • • 0 • • • 0 85 Lesson 9: Switching User Interfaces and Quitting Sprint .... 0 • • • 0 • 0 0 • • 89 Summary 0 • • • 0 0 • • • 0 • • • • • • • • 0 • • • • • • • • 0 • • • • 0 0 0 • • • • • • • o . 0 • • • • • o . o . 91
Part 2 Editing and Formatting
Chapter 5 Sprint Overview
95Sprint's Editor and Formatter ... o • • • • o • • • • • 0 • • • • • • • • • 95 Automatic Backup and Crash Recovery .. 0 • • • 0 0 • • • 0 0 0 • 0 0 • 0 0 • 0 0 • 0 0 • • 98 Menus, Commands, and Predefined Keys ... 0 0 • • 0 • 0 0 • • • 0 • • • • 0 0 0 • • 99 Sprint's User Interface ... 0 • • 0 • • • • • • • • • • • • • • 0 • • • 0 0 0 • • • o • • • • • 0 0 ' 100 Status Line ... 0 • • • • • • • • • • • • • • • • 0 • • • • • • • • • • • • 0 • • • • 0 0 • • • 0 • 0 • • 0 0 o. 101 Pop-Up Menus .. 0 • • 0 • • 0 • • 0 • • • • • • • 0 • • • 0 0 • • • • 0 0 • • • 0 0 0 • • 0 • 0 0 • • 0 0 • 0 103 Choosing a Menu Option ... 0 0 • • 0 0 • 0 • • • • 0 0 • • • • • 104 Getting Help . 0 • • • • • • • • • • 0 • • • • • • 0 • • • • • • • • 0 0 0 • 0 • 0 0 0 0 0 0 0 0 0 0 0 0 • 0 106
Changing Your Mind ("Un-Choosing" a Menu) ... 107
Multiple Files . . . .. 107
Multiple Windows ... 108
Printing Files ... 109
Chapter
6Editing: Tips, Tricks, and Techniques
111 How to Use This Chapter. . . .. 112Menus and Shortcuts ... 113
Defining Your Own Shortcuts ... 114
Cursor Movement and Editing Keys ... 115
Using a Mouse ... 115
The Ruler Line . . . .. 117
Suppressing the Ruler Line ... 117
Customizing the Default Ruler . . . .. 118
General Editing Techniques ... 118
Entering Text ... 120
Deleting and Retrieving Text. . . .. 120
The Clipboard ... 121
The Revert to Saved Command ... 122
Working with Blocks of Text ... 122
Moving and Copying Blocks . . . .. 124
Writing a Block to aNew File ... 125
Deleting a Block. . . .. 125
Changing the Typestyle of a Block . . . .. . .. .. 126
Control Characters in Text . . . .. 127
Searches ... 130
Search and Replace . . . .. 132
Wildcards in Searches. . . .. 132
Wildcards in Replacement Strings ... 134
Case in Replacement Strings ... 135
Typestyles and Control Characters in Searches ... 135
Setting and Using Place Markers in Your Document ... 136
Summary ... 136
Chapter
7Working with Files
137 Opening a File ... 137Working with Several Open Files ... 138
Moving between Open Files ... 140
Using Windows to View Several Open Files ... 141
Shrinking and Expanding a Window. . . .. 143
Closing a File or Window- ... 143
Merging Files . . . .. 144
The Automatic Backup (SP.SWP) File ... 144
The Preserve Editing Session Command. . . .. . . .. 146 Why You Should Leave Preserve Editing Session Set to Yes 146
When to Set Preserve Editing Session to No . . . .. 147
Using Wildcards in File Operations ... 148
The File Manager. . . .. 150
What to Do if Your Disk Fills Up ... 152
Working with Files in a New Directory .. . . .. . . .. . . . .. .. 152
Working with ASCII (Plain Text) Files . . . .. 153
Chapter 8 Basic Formatting 155 The Ruler Line . . . .. 158
Indenting and Outdenting . . . .. 160
Tabs ... 162
Precise Tabs ... 163
Centering Text . . . .. 164
Document-Wide Margins ... 164
Typestyles and Fonts ... 166
Typestyles. . . .. 167
Choosing and Changing Typestyles. .. . . .. . . .. . .. .. 169
Control Codes in Typestyle Commands ... 170
Typestyles and Hard Returns ... 170
Fonts ... 171
Page Headers . . . .. 173
Page Footers. . . .. 176
Spacing and Page Breaks ... 178
Line Spacing . . . .. 178
Spacing between Paragraphs. . . .. 180
Spacing between Words . . . .. . . .. . . .. . . .. . . . .. . . . .. 181
Reserving Blank Space ... 181
Keeping Text Together on a Page ... 182
Orphan and Widow Lines ... 182
Hyphenation ... 183
Lists ... 184
Outlines ... 185
Numbered Lists ... 188
Unnumbered Lists ... 190
Two-Column Lists. . . .. 192
Chapter 9 Printing 195 Printing from the Editor. . .. . . .. . . . .. . . .. . . .. . . . .. . . . .. . . . .. 196
Previewing Output on the Screen ... ". . . . .. 197
Viewing Page Breaks ... 197
The Print Options Menu ... 198
Printing Multiple Copies ... 198
Printing a Portion of Your Document. . . .. 199
Log Error Messages to a File ... 199
Formatter Warning and Error Messages ... 201
Quick Printing and Error Checking ... 201
Printing Complex Documents . . . .. 202
Unformatted Printing . . . .. 202
Printing on Cut Sheets or Continuous Paper ... 202
Printing to a File ... 203
Printing on an Alternate Printer ... . . .. 203
Printing ASCII Files ... 204
Printing from DOS ... 204
Menus vs. DOS ... 204
Chapter 10 Customizing Sprint 207 Reassigning Function Keys ... 208
Reset Shortcuts ... 209
Saving Your Shortcuts ... 210
Changing User Interfaces ... 210
Choosing and Customizing a Color Set . . . .. 212
Monochrome Monitors. . . .. 213
Color Monitors ... 214
The Screen Menu. . . .. 215
ASCII File Handling ... . . . .. 216
Displaying Menu Shortcuts . . . .. 216
The Options Menu ... 217
Preserve Editing Session ... 217
Background Save Period ... 217
Menu Display Delay . . . .. 218
Insert mode ... 218
Tone ... 218
Chapter 11 Sprint Utilities 219 Checking Spelling .. . . .. 220
Automatic Spell Checking . . . .. 221
Spell Checking a Word, Block, or File ... 223
Thesaurus . . . .. 223
Arrange-Sort ... 224
Line Drawing . . . .. 225
The Glossary Menu. . . .. 226
Defining Default Settings . . . .. 228
Keyboard Record Mode . . . .. 229
Potpourri: Assigning Special Functions to Keys. . . .. 229
QuickCard ... 230
Entering DOS Commands ... 231
Part 3 SprintMerge
Introduction
This Section's Structure
235 236
Chapter 12 Your Template, Records, and Letter File
237The SprintMerge Concept ... 238
The Record File ... 240
The Template for Data Command ... 242
Your Records ... 243
Field Separators . . . .. 244
Field Declarations ... 245
The Letter File ... 246
Chapter 13 Merging and Printing Your Files
249 The SprintMerge Menu ... ,... 249The Formatting and Printing Process. . . .. 251
Running SprintMerge from DOS ... 251
Using Files Created with Reflex: The Analyst ... 253
Using Files Created with Paradox ... 256
Using Files Created with dBASE ... 258
Chapter 14 A Tutorial on Merging
261 A Simple Form Letter . . . .. 262Create the Template ... 262
Enter the Records ... 263
Write the Form Letter . . . . .. . . .. 265
Run SprintMerge . . . .. 265
A Formatted Form Letter . . . .. 266
Write the Form Letter . . . .. 267
Run SprintMerge . . . • . . . .. 268
Adding Optional Variables to a Form Letter ... 269
Create the Template ... 269
Add Fields to the Records ... 270
Write the Form Letter . . . .. 270
Run SprintMerge . . . .. 271
Using Variable Paragraphs ... 272
Create the Template ... 272
Enter the Record ... 273
Write the Form Letter ... 274
Run SprintMerge . . . .. 275
Merging Selected Records ... 275
Select the Template ... 276
Specify the Record Criteria ... 276
Create the Template and Records 0 0 0 0 0 0 0 0 0 0 0 0 0 0 0 0 0 0 0 0 0 0 0 0 0 0 0 0 0 0 0 278 Write the Form Letters 0 0 0 0 0 0 0 0 0 0 0 0 0 0 0 0 0 0 0 0 0 0 0 0 0 0 0 0 0 0 0 0 0 0 0 0 0 0 0 0 279 Run SprintMerge 0 0 0 0 0 0 0 0 0 0 0 0 0 0 0 0 0 0 0 0 0 0 0 0 0 0 0 0 • • • • • • • • • 0 • • • 0 • • 0 280 Another Example Using Varying Letters 0 0 0 0 0 0 0 0 0 0 • 0 0 0 0 • 0 0 • 0 • 0 0 0 0 0 281 Create the Template 0 0 0 • • 0 0 0 0 • 0 • 0 • 0 • 0 0 0 • • 0 • 0 • 0 • 0 0 • 0 • • • 0 0 0 • 0 0 o . 281
Create the Form Letters .... 0 • • • • • • • • • • • • • • • • • • • • • • • • • • • • • • • . . • • 281
Run SprintMerge ... 0 • • • • • • • • • • • • • • • • • • • • • • • • • 282 Creating Mailing Labels and Inventory Stickers ... 283 Select the Template ... 0 • • • 283 Create the Label Format .... 0 • • • • • • • • • • • • • • • • • • • • • • • • • • • • • • 0 • • • 284 Run SprintMerge ... 0 • • • • • • • • 0 • • • • 0 • • • • • 0 • • • • • • • • • • • • • • • • • • 285 Printing from a Specific Label Number ... 0 • • • 0 • • • • • 0 • • • • • 0 • • 0 • • • 285 Using BASIC-Type Files . 0 • • 0 0 0 • 0 • • • 0 • • • • • • • • • • 0 0 0 • • 0 • • • • 0 0 • • 0 • • • 286 Create the Template ... 0 • • • • • • • • • • • • • • • • • • • • • • • • • • 0 • • • 0 0 • • 286 Write the Form Letter ... 0 • • • 287
Checking for Commas .... 0 • • • • • • 0 • • • • • • • • • 0 • • • • 0 • • • • • • 0 • • 0 • o. 287 Summary 0 • • • • • • • • • • 0 • 0 0 • • 0 0 • • • 0 0 • • 0 0 • • • • • 0 0 • • • • 0 • 0 0 • • 0 0 0 • 0 0 • • 288
Chapter 15 The SprintMerge Reference 289
The SprintMerge Concept .... 0 • • • • • • • • • • • • 0 • 0 • 0 • • • • • • • • • • • 0 • 0 •
o.
290 Running SprintMerge from the DOS Command Line .. 0 • • • • 0 • 0 • • o. 290 Commands .. 0 • • 0 0 0 0 0 0 0 0 0 0 • • 0 0 0 • 0 0 0 0 • • 0 0 0 0 • 0 0 0 • 0 • 0 0 0 • 0 • • 0 0 0 • • 0 0 291 Criteria . 0 • • • • 0 0 • • 0 • 0 • • 0 • • 0 • • • • • • • • • • 0 • 0 • 0 0 0 • • 0 • • • 0 0 0 • 0 0 0 • • 292 Data Format/Basic ... 0 0 0 • 0 • 0 • 0 • • • 0 0 • 0 • 0 0 • 0 0 • • • 0 • 0 • • 0 0 0 • 0 • • • 292 Ending Record 0 0 • • • 0 0 0 • 0 0 • 0 0 • • 0 • 0 • • • 0 0 • 0 0 0 • • • 0 0 • 0 • 0 • 0 • • 0 • 0 0 292 Go .. 0 0 • • 0 • • 0 • • 0 • • 0 . 0 0 . 0 0 . 0 0 0 • • 0 0 . 0 • • 0 . 0 . 0 • • 0 0 0 0 • • • 0 • • 0 • • 0 293 Initial Record 0 • • • 0 • 0 • 0 0 • 0 0 • • 0 0 • • 0 0 • 0 0 0 0 • • 0 0 • 0 0 0 0 0 0 • 0 0 • . • 0 0 0 0 293 Merge Field 0 0 • • 0 0 0 0 0 0 0 0 0 0 0 0 0 0 0 0 0 0 • 0 0 0 0 0 0 0 0 0 0 0 0 0 0 0 • • 0 0 • • • o . 293Order. 0 0 0 0 0 0 0 0 0 0 0 0 0 0 0 0 0 0 0 0 0 . 0 0 0 0 0 0 0 0 0 0 . 0 0 0 . 0 . 0 0 0 . 0 0 0 0 . 0 0 • • 294 Record File 0 0 0 0 0 0 0 0 0 • • 0 0 0 0 0 0 • 0 0 0 • 0 0 0 0 0 0 0 0 • • • 0 0 • • • 0 0 • 0 0 0 0 0 0 0 294 Screen Preview
o.
0 • • 0 0 • • 0 0 0 0 0 • • • 0 0 • • • 0 • • • • • 0 • 0 0 0 • • • 0 0 • • 0 •o.
294 Template for Data 0 0 • 0 0 0 • 0 0 0 0 • • 0 • 0 • • 0 0 0 • • 0 0 • • 0 0 0 0 • • 0 • • • • 0 0 0 0 294 Typestyle/Hidden . 0 0 • 0 0 0 0 0 0 0 0 • 0 • 0 0 0 0 0 0 • • 0 0 0 0 • 0 0 0 • • • 0 0 • • 0 0 0 294 @Data 0 . 0 0 . 0 0 0 0 0 0 0 0 0 0 . 0 0 0 0 0 0 0 0 0 0 0 0 0 0 0 0 . 0 . 0 0 0 • • 0 . 0 0 0 0 0 . 0 • • 0 294 @Include 0 0 • • 0 0 0 • 0 0 0 • • • 0 0 • 0 • • • 0 • • • • • 0 • • • • • • • • • • • • • • • 0 • • 0 • • • 294 @Remditto ... 0 • • • • • • • 0 • • 0 • • • 0 • • • • • • • • 0 • • • • 0 • • • • • • 295 @Sortfile .... 0 • • • • • • • • • 0 0 0 • • 0 • • • • • • • • • • • • • • 0 • 0 • • • • • • 0 0 0 0 0 0 0 295 @Startrec . 0 • • 0 0 0 • 0 0 0 0 0 • • 0 0 0 • 0 • • 0 0 • • 0 • • • 0 0 • • • • • • • • • • • • • • • • • • 295 -Out ... 0 • • • • 0 0 • • 0 0 0 0 . 0 0 0 . 0 0 0 0 0 • • 0 0 • • • • • • • • • • • • • 0 0 • • 295 SPMERGE .. 0 • • • • • • • • • • • • • • • • • • 0 • • • • • • • • • • • • • • • • • • • • • • • • • • • 296 Command Delimiters .. 0 0 • • • • • 0 • • 0 0 • • • 0 • • • • • • • • • • • • • • • • • • 0 0 • • • • • 296 Fields. 0 • • • • • • • • • • • • • • • 0 0 . 0 0 • • • • • • 0 • • • 0 • • 0 • • • • • • • • • 0 • • • • 0 0 . 0 • • • 296 Field Declarations .... 0 0 • • • 0 0 • • • • • • • • • • • • • • • 0 • • • • • • • • • • • • • • • • • 297 Field Names ... 0 . . . . 0 0 • • • • 0 0 • • • 0 • • • • • • • 0 • 0 0 • • 0 • • • 0 0 • • • 0 0 0 • • • • 0 297Field Separators ... 297
Field Types . . . .. 298
Fields, Empty and Default . . . .. 299
Fields, Multiline. . . .. 299
Letter Files ... 300
Record Files ... 301
Records . . . .. 301
Selection Specifications ... 302
Logical Operators ...•.. 302
Relational Operators ... 303
Sorting Specifications ... . . . .. 304
Technical Specifications and Limitations ... 305
Templates ... . . .. 306
Chapter 16 SprintMerge Troubleshooting and Error Messages 307 A Troubleshooting Checklist. . . .. 307
Command Line ... 307
Letter File ... . . . .. 308
Record Files ... 308
Sorting and Selecting ... 309
Error Messages ... 309
The Error Messages. . . .. 309
Other SprintMerge Messages ... 312
Part 4 Appendixes Appendix A A DOS Primer 315 What Is DOS? . . . .. 315
How to Load a Program. . . .. 316
Directories ... 317
Subdirectories ... 318
Where Am I? The $p $g Prompt .. .. .. . .. . . .. .. . .. .. . . .. .. . .. . .. .. 318
The AUTOEXEC.BAT File ... 319
Changing Directories ... 320
Appendix B Using Sprint on a Local Area Network 323 Sharing Sprint Files . . . .. 323
Which Files to Share? ... 324
Double Editing ... 325
Troubleshooting ... 325
Appendix C Converting Files to and from Sprint 327 Importing to Sprint . . . .. 328
Formats That Import Correctly . . . .. 328
Typestyles . . . .. 328
Layout Formats 0 0 0 0 0 0 0 0 0 0 0 0 0 0 0 0 0 0 0 0 0 0 0 0 0 0 0 0 0 0 0 0 0 0 0 0 0 0 0 0 0 0 0 0 329 Character Conversions 0 0 0 0 0 0 0 0 0 0 0 0 0 0 0 0 0 0 0 0 0 0 0 0 0 0 0 0 0 0 0 0 0 • 0 0 0 0 330 Formats That Are Not Imported . 0 0 0 0 0 0 0 0 0 0 0 0 0 0 0 0 0 0 0 0 0 0 0 0 0 0 • 0 0 0 0 330 Typestyles 0 0 0 0 0 0 0 0 0 0 0 0 0 0 0 0 0 0 0 0 0 0 0 0 0 0 0 0 0 0 0 0 0 0 0 0 0 0 0 0 0 0 0 0 • 0 0 0 0 330 Line and Paragraph Formats 0 0 0 0 0 0 0 0 0 0 0 0 0 0 0 0 0 0 0 0 0 0 0 0 0 0 0 0 • 0 • • • 330 Layout Formats .. 0 • • 0 0 0 0 0 0 0 0 0 0 0 0 0 0 0 • 0 0 0 • 0 0 0 0 0 0 0 0 0 0 • 0 0 0 • 0 0 0 0 331 Variables . 0 0 0 0 0 0 • 0 • 0 0 0 0 • • • 0 0 • • 0 • 0 0 0 • • • 0 • • • 0 0 0 0 • 0 • 0 • • 0 0 • • • 0 0 331 Layout Formats 0 0 0 • 0 • 0 0 0 0 • 0 0 0 0 0 • • • 0 • • 0 0 • • • • • 0 0 • • • 0 0 0 • • • • • • • 331 Exporting from Sprint 0 0 0 • 0 0 0 0 0 0 0 • 0 0 • 0 0 • 0 • 0 0 0 0 0 0 0 0 0 0 0 0 • 0 0 • 0 • 0 • • • 331 The Sprint Formats That Export Correctly ... 0 • • • • 0 0 • • • 0 0 0 • • • 0 • 0 0 332 Typestyles 0 0 . 0 0 0 0 0 • • • • 0 0 0 0 0 0 0 0 0 0 . 0 0 0 0 . 0 0 0 0 • • 0 0 0 0 0 0 0 0 . 0 . 0 0 . 0 332 Line and Paragraph Formats 0 0 0 . 0 . 0 0 0 0 . 0 0 0 • • 0 0 0 0 • • • 0 0 • • 0 • • • • 0 332 Lists 0 • • 0 0 0 0 0 • • 0 0 0 0 0 0 0 0 0 0 0 0 0 . 0 0 0 0 0 . 0 0 0 0 0 0 0 0 0 0 . 0 0 0 0 0 0 • • • • • • 0 333 Layout Formats 0 0 0 • • • 0 0 0 0 • 0 0 0 0 0 • • 0 0 • 0 0 0 0 • 0 0 • 0 0 • • 0 0 0 • • 0 • • • • • 333 Sprint Syntax . 0 0 0 0 • 0 • 0 0 0 0 • • 0 0 0 0 • 0 0 0 0 0 0 0 0 0 0 • 0 0 0 0 • 0 • 0 • • • • 0 0 0 0 333 Sprint Formats That Do Not Export Correctly 0 0 • • • 0 0 • • • 0 0 • • • • 0 0 • 0 334
Appendix D
Help! 335Answers to Common Questions about Sprint 0 0 0 0 0 0 0 0 0 0 0 • 0 0 0 0 • • 0 0 0 0 335 General Questions 0 • • • • 0 0 • • • • 0 0 0 • • • 0 0 0 • • 0 0 0 • • • 0 0 0 0 • 0 0 0 0 • • • 0 0 • 0 335 Backup File Confusion 0 0 0 • • 0 0 0 0 • 0 0 0 0 • 0 • • 0 0 • • 0 0 0 0 0 0 0 0 0 • 0 0 0 • 0 • 0 0 336 User Interfaces .... 0 0 0 0 • • 0 0 0 • • 0 0 0 0 • • • 0 0 • • 0 0 • • 0 • 0 0 • • • 0 0 • • • • 0 0 0 0 336 Control Codes .. 0 0 0 0 • • • 0 0 0 • 0 • • 0 • • • 0 • 0 • 0 0 0 • 0 0 • • 0 0 • • • 0 0 • • • • 0 0 o . 337
Shortcuts . 0 0 0 0 0 0 • • • • 0 0 0 0 • 0 • 0 0 0 • • 0 0 0 0 0 0 0 0 0 • 0 0 0 0 0 0 0 0 0 0 0 0 0 0 • • 0 0 0 338 Printing 0 • 0 • 0 0 • 0 0 0 • • • 0 0 0 0 • 0 • 0 0 0 0 • 0 0 0 0 0 0 0 0 0 • • 0 0 • • • 0 0 0 • • 0 0 • • 0 0 0 339 Rulers 0 0 0 0 0 • • 0 0 0 0 0 • • • 0 0 • • • 0 0 0 0 0 • • 0 0 0 . 0 0 0 0 0 0 0 0 0 • • 0 0 0 0 . 0 • • • • 0 . 340 Indexing . 0 0 0 0 • • • 0 0 0 0 0 0 • • 0 0 0 0 • 0 0 • • 0 0 0 0 0 0 • 0 0 0 • 0 0 0 0 0 • • • 0 0 0 • 0 0 0 0 340 Recovering from Mistakes . 0 • • • • 0 0 • 0 • • 0 • • • • 0 0 0 0 • • • • • • 0 0 0 0 • • 0 0 0 0 341 Error Messages .. 0 0 0 0 0 0 0 • 0 • 0 0 • • 0 0 • 0 0 • 0 • 0 0 • 0 0 0 0 0 0 • 0 • • 0 0 • • • 0 • 0 0 341 Searching. 0 0 0 . 0 0 0 0 0 • • 0 0 0 0 0 . 0 0 0 • • 0 0 0 0 0 . 0 0 0 0 • • 0 0 0 0 . 0 0 0 0 • • • 0 . 0 0 342
Appendix E
Working with ASCII (Plain Text) Files 343Translating Files 0 • • 0 • • • • • • • • • • • • 0 • • • • • • • • • • • • • • • 0 • • • 0 0 • • • • • • • • 0 343 Importing an ASCII File .... 0 0 0 0 • • • • 0 • • • • • 0 0 • • 0 0 0 0 • • • • • • • • • 0 • • 0 344 Exporting a Sprint File .. 0 • • 0 0 • 0 • • 0 0 0 0 • • 0 • 0 • 0 • 0 0 0 0 0 • • 0 0 0 • • • • 0 • • 346 Editing an ASCII File with Sprint 0 0 0 • 0 • • 0 0 • • • • 0 0 • • • • 0 • • • • 0 0 • • 0 • • • • 347 Suppressing the Ruler Line 0 • • • • 0 0 0 • • • • 0 • • 0 0 0 • 0 0 • • • • • • 0 0 • • 0 • 0 • 0 349 Tab Expansion ... 0 0 0 0 • • • 0 0 • • • • • • • • • 0 • • • • • • • • • • • • • • • • 0 0 • • 0 • • • • 349 Auto-Indent o . 0 0 • 0 0 0 • • 0 0 0 0 • • 0 0 0 0 • • 0 0 0 0 • • • 0 0 • • • 0 0 • • • 0 0 0 • • • 0 0 o . 350
Wrap Long Lines . 0 • 0 • • 0 0 • • • 0 • 0 0 • • • • • • • • • • • 0 • • 0 0 • • • • • 0 0 • • 0 0 0 • • 350 Formatting ASCII Files .... 0 . . . 0 . . . 0 0 . . 0 . . . 0 0 • 0 • • 0 0 350 @-Sign Commands ... 0 0 0 0 • • • 0 0 • • • ~ 0 • • • • • 0 0 • • • • • • • • 0 0 • • 0 • • • • 351 Printing ASCII Files 0 0 0 0 • • • 0 0 0 • 0 • 0 • 0 • • 0 0 • • 0 0 0 0 • • • • 0 0 0 • 0 0 0 0 • 0 0 • • • 352 Unformatted Printing ... 0 • • 0 0 • • • • • 0 • • • • 0 • • • • • 0 • • • • 0 0 • • • 0 • • • • 352 Wordwrapping an ASCII Document . 0 0 0 0 0 • 0 0 0 0 • 0 0 0 0 • 0 0 • • 0 . . 0 0 • 0 352
Changing the Size of Tabs ... 353
Appendix F Glossary of Terms 355
List of Figures
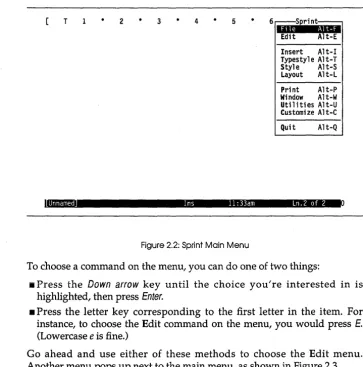
Figure 2.1: Sprint Opening Screen ... 28
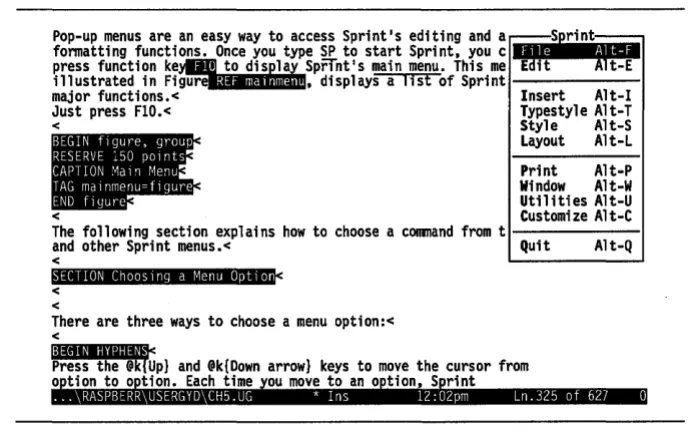
Figure 2.2: Sprint Main Menu ... 30
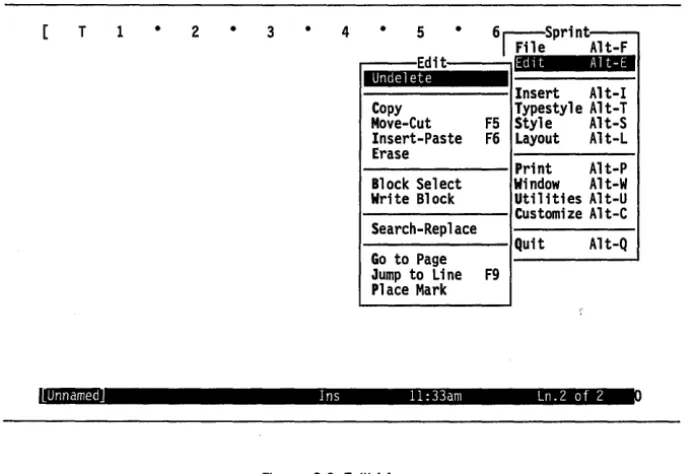
Figure 2.3: Edit Menu ... 31
Figure 4.1: Default Ruler Line ... 49
Figure 4.2: Sample Status Line ... 50
Figure 4.3: Justification of Left and Right Margins ... 53
Figure 4.4: The Letter After Centering ... 54
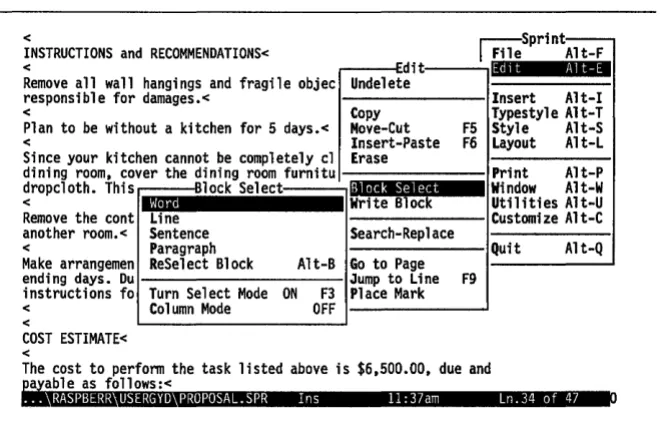
Figure 4.5: The Block Select Menu ... 73
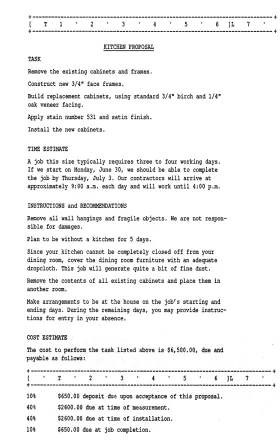
Figure 4.6: The COST ESTIMATE Block Before the Move ... 76
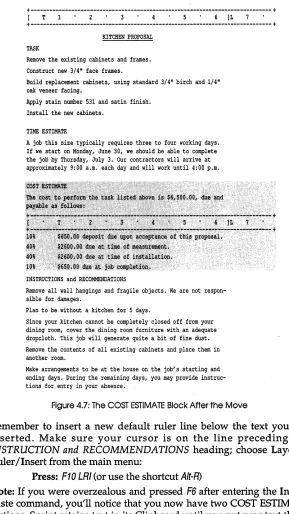
Figure 4.7: The COST ESTIMATE Block After the Move ... 78
Figure 4.8: The Lists Menu ... 81
Figure 4.9: The Proposal with List Formats Added ... 84
Figure 4.10: The Print Options Menu ... 86
Figure 5.1: Sprint's Editor and Formatter ... 96
Figure 5.2: Sprint's Automatic Backup ... 99
Figure 5.3: Status Line ... 102
Figure 5.4: Main Menu ... 103
Figure 5.5: File Menu ... 104
Figure 5.6: The Customize Menu .. , ... 105
Figure 5.7: Multiple Open Files ... 107
Figure 5.8: Three.;.Window Display ... 109
Figure 6.1: The Edit Menu ... ' ... 119
Figure 6.2: How the Clipboard Works ... 122
Figure 6.3: The Block Select Menu ... 124
Figure 6.4: The Typestyle Menu ... 126
Figure 6.5: The Customize/Screen Menu ... 127
Figure 6.6: Underlined Sentence with Codes On ... 129
Figure 6.7: The Insert Menu ... 130
Figure 6.8: The Search-Replace Menu ... 131
Figure 7.1: The File Menu ... 138
Figure 7.2: Multiple Open Files ... 139
Figure 7.3: Sample List of Open Files ... 140
Figure 7.4: The Window Menu ... 141
Figure 7.5: Two Windows, One Active File ... ~ ... 142
Figure 7.6: The Backup File vs. Your Named Files ... 145
Figure 7.7: File Manager Menu ... 150
Figure 8.1: Default Page Layout ... 156
Figure 8.2: The Ruler Menu ... 158
Figure 8.3: The Precise Settings Menu ... 160
Figure 8.4: Outdented Text ... 161
Figure 8.5: Setting One Tab for a Table ... 162
Figure 8.6: Two Rulers with Two Sets of Tabs ... 163
Figure 8.7: The Document-Wide Menu ... 165
Figure 8.8: Typestyle Menu ... 166
Figure 8.9: Sample Font Displays ... 172
Figure 8.10: The Header Menu ... 174
Figure 8.11: The Footer Menu ... 177
Figure 8.12: The Page Breaks Menu ... 178
Figure 8.13: The Line Spacing Menu ... 179
Figure 8.14: The Lists Menu ... 184
Figure 9.1: The Print Menu ... 195
Figure 9.2: The Options Menu ... 198
Figure 9.3: The Advanced Options Menu ... 200
Figure 10.1: The Customize Menu ... 208
Figure 10.2: The User Interface/Load Menu ... 211
Figure 10.3: Color Set Menu ... 213
Figure 10.4: Monochrome Palette ... ; ... 214
Figure 10.5: The Screen Menu ... 215
Figure 10.6: Special Characters in Sprint ... 216
Figure 10.7: The Options Menu ... 217
Figure 11.1: The Utilities Menu ... 219
Figure 11.2: The Spelling Menu ... 221
Figure 11.3: The Replacement Words Menu ... 222
Figure 11.4: The Alternative Words Menu ... 224
Figure 11.5: Line Styles ... 226
Figure 11.6: The Glossary Menu ... 227
Figure 11.7: The Potpourri Menu ... 230
Figure 12.1: The Record File ... 239
Figure 12.2: The Letter File ... 239
Figure 12.3: A Record's Fields in a Form Letter ... 240
Figure 12.4: The Template for Data Screen ... 242
Figure 13.1: The SprintMerge Menu ... 250
Figure 13.2: The Reflex Report Design Screen ... 255
Figure 13.3: The Reflex Print Settings Tool ... 256
Figure 13.4: The Paradox Report Design ... 258
Figure 14.1: Measuring a Typical Label ... 284
Figure E.1: The Translate Menu ... 344
Figure E.2: The Import From Menu ... 345
Figure E.3: The Export To Menu ... 346
List of Tables
Table 12.1: Record-File Commands ... 241
Table 14.1: The Selection Criteria Operators ... 276
Table 14.2: The Sort Order Specifications ... 277
Table 15.1: The SprintMerge Commands ... 292
N T R
o
Du
c
To
NWelcome to Sprint-Borland's fast and flexible word processor. Whether you're a beginner or a seasoned computer user, we think you'll find that Sprint meets all your word processing needs-from simple text editing to complex desktop publishing applications. In fact, this manual was created with Sprint's formatting commands and a PostScript typesetter!
Sprint is full of the bells and whistles that Borland customers have grown accustomed to-unique features that other word processors don't come dose to:
• Sprint automatically saves your text as you type, so you never lose a file, even if the power goes down.
• You can have up to 24 files open at one time. • You can use alternative user interfaces.
• Sprint drives over 200 printers and typesetters, including PostScript laser printers and phototypesetters.
• You can check your spelling as you type and get synonyms for words with a few keystrokes.
Besides Borland's standard user interface, which behaves a lot like Borland's SideKick and Turbo Pascal/Basic/C editors, you can also choose interfaces that work like Microsoft Word, WordPerfect, and WordStar. So if you know Borland's other editors, or any of the other three, you already know a lot about using Sprint.
Here's a closer look at a few of Sprint's many features:
• Easy-to-use menus. Sprint's extensive pop-up menu structure consists of clear instructions that even the most inexperienced word processor can understand .
• Automatic "incremental" saving. Sprint creates a continuous backup file as you work. If there's a power failure, you won't lose much, if any, of your work, even if you haven't saved your file recently.
• Powerful formatting capabilities. Sprint is capable of formatting everything from a business letter to a highly complex technical manual (like this one!).
• Multiple files and windows. You can work with up to 24 files at the same time. You can also open up to six windows at once, to work with different parts of the same file or more than one file at the same time. You can easily move text back and forth between open files and windows . • Macro language. If you're a power user, you can use Sprint's macro
language to create your own commands, modify existing ones, change the menu structure, and more .
• File import/export. You can transfer ASCII, MultiMate, Microsoft Word, WordStar, DisplayWrite 4, Wang, and WordPerfect files to and from Sprint.
• Form letter/mailing list generation. SprintMerge lets you create and vary customized form letters, as weB as mailing lists and labels.
• Extensive printer support. Sprint comes with drivers for over 200 printers, including laser printers and phototypesetters that understand PostScript.
How to Use the Manuals
Your Sprint documentation consists of several books: the User's Guide (this book), a Reference Guide, and the Advanced User's Guide. Also available is a booklet on Alternative User Interfaces.
• The User's Guide tells you how to install Sprint on your computer system, and provides a basic tutorial and other information to get you going right away. It also contains an overview of Sprint, chapters on basic editing and formatting techniques, as well as information about customizing Sprint, SprintMerge, and other Sprint utilities.
• The Reference Guide is a concise, comprehensive, alphabetical listing of Sprint commands and concepts.
• The Advanced User's Guide contains information about Sprint's advanced text formatting capabilities, as well as a tutorial and complete reference to programming with Sprint.
If you're an experienced computer user or familiar with one of Borland's other ASCII text editors (SideKick, Turbo Pascal/Basic/C, or Eureka), read the "Before You Begin" and "Notes for the Experienced User" chapters, browse through the "Quick Start Tutorial", and then take a look at the Quick Reference card; that may be all you'll need to get going. You can then refer to the Reference Guide for more details about specific commands and concepts. There are a few differences in the way Sprint works compared to, say, SideKick-for instance, blocks are handled differently. Also, Sprint is far more sophisticated than a simple text editor, so once you get your feet wet you may want to refer to the "how-to" information in the User's Guide and Advanced User's Guide.
If you want to use one of the alternative user interfaces-Microsoft Word, WordStar, or WordPerfect-be sure to read the Alternative User Interfaces booklet.
Inside This Manual
Following is a complete listing of the contents of this manual. See the other Sprint manuals for information about their respective contents.
Part 1, "Getting Started," contains the following chapters:
Chapter 1, "Before You Begin," describes how to get Sprint up and running on floppy-disk and hard-disk systems, how to install it for your printer, and how to choose different user interfaces.
Chapter 2, 'Notes for the Beginning Word Processor," is designed for the novice word processor. If Sprint is your first excursion away from your typewriter, this chapter is for you.
Chapter 3, "Notes for the Experienced User," is for the experienced computer user. If you've used one of Borland's other text editors or another word processor, or if you're a programmer or otherwise familiar with computing, refer to this chapter for tips on how to get started quickly with Sprint.
Chapter 4, "Quick Start Tutorial," is a tutorial that should get you going with Sprint in less than an hour. You'll use basic editing techniques to create and print a business letter and proposal.
Part 2, "Editing and Formatting," contains the following chapters:
Chapter 5, "Sprint Overview," takes an overall look at many of Sprint's features. This chapter introduces you to the editor and formatter, the menu system, multiple files and windows, and printing.
Chapter 6, "Editing: Tips, Tricks, and Techniques," is a compendium of how-to information about the Sprint editor. It discusses file and block operations, the ruler line, searches, menus and shortcuts, and other miscellaneous editing topics.
Chapter 7, "Working with Files," shows you how to open, close, and save a file, as well as work with multiple files.
Chapter 8, "Basic Formatting," details how to make use of the Sprint formatter. Refer to this chapter for information about formatting simpler documents like memos and straightforward business reports. We discuss the ruler line, setting margins and tabs, page headers and footers, hyphenation, and typestyles.
Chapter 9, "Printing," tells you all you need to know to print your Sprint files. We'll tell you how to print from the command line and from the menu system, how to set print options, and how to resolve formatter errors.
Chapter 10, "Customizing Sprint," tells you how to use the Customize menu to modify Sprint's default settings.
Chapter 11, "Sprint Utilities," discusses the commands on Sprint's Utilities menu, including the spelling dictionary and thesaurus.
Part 3, "SprintMerge," contains an introduction and the following chapters:
Chapter 12, ''Your Template, Records, and Letter File," walks you through the basics of the program. It discusses the template file, the record file, and the letter file. It also explains the command-line options.
Chapter 13, "Merging and Printing Your Files," covers the process of merging and printing your Sprint files, as well as running SprintMerge from DOS and using it with files from database programs like Reflex: The Analyst, Paradox, and dBASE.
Chapter 14, II A Tutorial on Merging," walks you through creating and
editing form letters and mailing labels.
Chapter 15, liThe SprintMerge Reference," discusses each element of SprintMerge in detail and gives the technical specifications of the program. The elements are listed alphabetically.
Chapter 16, "SprintMerge Troubleshooting and Error Messages," offers two checklists: causes of common problems and SprintMerge's error and other messages.
Part 4, "Appendixes," contains the following appendixes:
this appendix if you are new to computing, especially if your computer has a hard (fixed) disk.
Appendix B, "Using Sprint on a Local Area Network," provides tips for using Sprint in a multi-user environment, such as the Novell network.
Appendix C, "Converting Files to and from Other Word Processors," tells you how to take files created with another word processor and convert them to Sprint format-and vice versa.
Appendix D, "Help!," provides answers to commonly asked questions about Sprint. Look here if you're having a problem getting Sprint to do what you want it to.
Appendix E, "Working with ASCII Files," provides complete information on translating, editing, and printing ASCII files.
Appendix F, "Glossary," gives definitions of key terms used in this manual and in Sprint.
Typographic Conventions
All typefaces used in this manual were produced by Sprint and output on a PostScript typesetter. Their uses are as follows:
Monospace type
Italics
Keycap
This typeface represents text as it appears on thescreen and anything you must type.
Italics are used to introduce a new term; all new terms are defined in the Glossary.
This special typeface indicates a key on your keyboard. It is often used when describing a particular key you should type; for example, "Press Esc to cancel a menu."
Hardware and Software Requirements
Sprint runs on the IBM PC family of computers, including the XT, AT, and the PS/2 series, along with true IBM compatibles.
Sprint requires
• a two-floppy or hard-disk system • DOS 2.0 or higher
• at least 384K of RAM
The Sprint program is in the file called SP.EXE. It is not copy-protected, so you can easily transfer it to a hard disk or RAM disk. However, you should read Borland's No-Nonsense License Statement at the front of this manual for an explanation of your responsibilities with respect to copying Sprint, and then sign it and mail to us.
Borland's No-Nonsense License Statement
This software is protected by both United States Copyright Law and International Treaty provisions. Therefore, you must treat this software just like a book, with the following single exception: Borland International authorizes you to make archival copies of Sprint for the sole purpose of backing up your software and protecting your investment from loss.
By saying, "just like a book," Borland means, for example, that this software may be used by any number of people and may be freely moved from one computer location to another, as long as there is
no possibility
of its being used simultaneously at two locations.How to Contact Borland
The quickest and easiest way to contact Borland is to log on to Borland's Forum on CompuServe: Type GO BOR from the main CompuServe menu and choose "Enter Applications Products Forum" from the Borland main menu. Leave your questions or comments there for the support staff to process.
If you prefer (or do not suscribe to CompuServe), write a letter detailing your comments and send it to:
Technical Support Department: Sprint Borland International
P. O. Box 660001
Scotts Valley, CA 95066-0001, USA
You can also telephone our Technical Support department at 408-438-5300. Please note that you must be a registered owner to receive telephone support; be sure to send in your license statement. Please have the following information handy before you call:
• Sprint version number and serial number
• computer make, model number, and amount of RAM • operating system and version number
p A R T
1
Getting Started
c
H A p. T E R1
Before You Begin
This chapter provides all the information you need to get Sprint up and running on your computer. Topics covered:
• how to copy Sprint's files to your work disk(s)
• how to install Sprint for your computer (two-floppy or hard disk), screen, and printer(s)
• how to choose an alternative user interface
• how to install Sprint utilities that will allow you to transfer files to and from Sprint and Microsoft Word, WordStar, WordPerfect, and MultiMate
Note: If your computer is part of a local area network (LAN), your system administrator should read Appendix B, "Using Sprint on a Local Area Network," for instructions.
Reading the README File
Any last-minute changes or additions to the Sprint program are docu-mented in a file on the Program Disk called README. You should review this file carefully before working with Sprint and make note of any changes.
To display the README file one screenful at a time, simply insert the Program Disk in Drive A. On the DOS command line, type
A: Enter README Enter
Sprint will print the file for you from the DOS command line if you type
SPFMT README and press Enter. You can also print this file with the DOS PRINT command. This may not work if your printer hasn't been installed yet; if it doesn't, then install your printer with SP-SETUP and print the README file when you're finished.
The README file contains a complete list of the files on the distribution disks. Follow the prompts given by the installation program (described shortly) to copy the files to your floppy or hard disk. If you have a two-floppy system with no hard disk, you'll need to be certain that your Program A Disk is in Drive A at particular times when you use Sprint; see page 21 for guidelines.
Don't worry if you don't understand what some of these files actually do; for the most part, you don't need to know what they do, you just need to make sure you've got them in the right place at the right time.
The Installation Program
You use the SP-SETUP program (SP-SETUP.EXE on the Setup Disk) to set up Sprint for your particular computer system and printer. You can also use it to optionally choose an alternative user interface or install file conver-sions.
Although the remainder of this chapter explains how to use this program, it's very easy to use; you'll be prompted by the program and given instruc-tions when necessary. You use SP-SETUP before you run Sprint the first time, and to make changes to your setup later on. For instance, if you get a different printer at some point, you'll need to run SP-SETUP again to reinstall the printer.
To run SP-SETUP, put the Setup Disk in Drive A, type A: SP-SETUP on the DOS command line, and press Enter. You'll see the welcome screen. Press Enter again to see the Sprint Installation main menu.
Note: On some monitors, the screen or color combination may be hard to read; you can press the Tab key to change it.
until the highlight bar is positioned on the Exit command on the Sprint Installation main menu, then press Enter or Esc.
The SP-SETUP program can detect your particular hardware configuration (that is, whether you have a hard disk or two-floppy system, and what type of monitor you have). As you work through the questions in the program, Sprint will automatically position the highlight bar on the next question you should answer.
Any menu options not currently available to you (such as installing alter-nates when you haven't already chosen a default), will be dimmed onscreen.
Depending on whether you have a hard disk or two-floppy system, the highlight bar will first be positioned on Hard Disk Installation or Floppy Disk Installation. All you need to do is press Enter to go on to the first set of questions.
Note: If you don't understand some of the questions you're asked by the SP-SETUP program, or some of the explanations given in this chap-ter-chances are you don't need to. In fact, in most instances, you can accept Sprint's default settings by simply pressing Enter when presented with a choice. And, if you return later to SP-SETUP to make any changes or additions, you can press Enter to confirm the default settings you installed before.
SP-SETUP copies the Sprint files you need to your floppy or hard disk(s). Once you finish with SP-SETUP, put the original distribution disks in a safe place in case anything happens to the copies. Always use the installed version SP-SETUP creates for any work you do. That way, if something happens to them, you've always got the originals to make new copies from. You'll also need to use the distribution disks again if you want to set up Sprint for a different printer, monitor, or user interface.
Note to users with RAM disks: If you have a RAM (virtual) disk in your computer, SP-SETUP may interpret it as a hard disk (usually, "Drive" D). If you have a two-floppy system, you'll need to manually choose Floppy Disk Installation, since the highlight bar will be automatically positioned on Hard Disk Installation. If you have a hard disk system, be sure
not
to select the RAM disk "drive" when you install Sprint. (If you don't know what a RAM disk is, just ignore this note.)Floppy Disk Installation
Before you use SP-SETUP to install Sprint for your system, you need to have some blank, formatted floppy disks ready. The number you'll need
depends on the capacity of your disks; SP-SETUP uses as few as it can. It's a good idea, however, to prepare extra blank disks, since you may want to go back after you install your default settings and set up some alternate user interfaces or file conversions. For now, use the following guidelines to format the apppropriate number of blank, formatted disks you'll need to run SP-SETUP on your system (if you' prefer, you can use a batch file called MAKEDISK.BAT on the Setup Disk to format the disks-just insert the Setup Disk in Drive A and type A:MAKEDISK.BAT at the DOS prompt):
Standard 360K Disks: Six Disks Minimum
1. Format one blank disk by inserting it in Drive A and typing FORMAT A: /S
at the DOS prompt. This will be your Program A Disk (label it); Sprint needs to have the DOS operating system and COMMAND. COM on it. When DOS asks Format another?, press N for No. You need to format the rest of the disks differently.
2. To format the five remaining blank disks, insert each one in Drive A and type FORMAT A:. When DOS asks Format another?, press Y for Yes until
you've formatted all five.
3. Next, label one disk as Program B and copy just the COMMAND. COM file to it from your DOS System Disk. Put the DOS System Disk in Drive B, your Program B Disk in Drive A, and type
COPY B:COMMAND.COM A:
on the DOS command line.
4. The other four disks are ready to go as is; just label them as shown, so you have the following set of disks ready when you start SP-SETUP:
Program A (with the DOS operating system and COMMAND. COM) Program B (with just COMMAND.COM)
Data Help
Speller /Hyphen Thesaurus
720K and High-Density Disks: Three Disks Minimum
1. Format one disk with FORMAT:A/S and label it Program A. Format the other two with plain FORMAT: A and label them Data and Dictionary.
Program A (with the DOS operating system and COMMAND. COM) Data
Dictionary
2. The exact configuration of the Dictionary and Data Disks will differ between 720K and high-density drive systems. You may also want to prepare separate User Interface and Conversion disks if you'll be instal-ling alternate user interfaces or file conversion formats.
Now you're ready to start SP-SETUP. Insert the Setup Disk in Drive A and type A:SP-SETUP. If you're using a two-floppy system with no hard disk, the highlight bar will be positioned on Floppy Disk Installation on the Sprint Installation main menu. When you choose Floppy Disk Installation, you'll see a screen with information about the disks you just prepared. If you have your formatted disks ready, press Enter to begin copying the Sprint files from the distribution disk to your blank disks. Follow the prompts and insert disks when told to; SP-SETUP lets you know if you've inserted the wrong source disk at any time. As well as copying files from the distri-bution disks, SP-SETUP will also create a fixed-size backup (swap) file on your Data Disk (the disk on which you'll be storing files you create with Sprint). You don't need to know what the backup file does yet, but it's essential for Sprint's operations. Later on, when you use Sprint, you'll need to keep the Data Disk with its backup file in Drive B at all times.
As it copies your files, SP-SETUP will display the file names it's copying. Be sure to label each disk, if you haven't already, for ease of use later on. When it's finished, you'll be returned to the Sprint Installation main menu, with the highlight bar positioned on Printer Installation. Skip the next section (for hard-disk users) and go on to page 15 for further instructions on instal-ling Sprint. Once you've run the SP-SETUP program, be sure to read
1/ Additional Notes for Two-Floppy Systems" on page 21 for information about using Sprint with your computer.
Hard Disk Installation
If you're using a hard-disk system, SP-SETUP will automatically position the highlight bar on Hard Disk Installation on the Sprint Installation main menu. Press Enter.
If you have only one hard disk in your system (the usual configuration), SP-SETUP will ask you what name you want to use for the directory that
will contain your Sprint files. Note: A
directory
is simply an area of your hard disk. If you're unfamiliar with DOSdirectories,
you might want to read Appendix A, "A DOS Primer." By default, SP-SETUP will create a directory called SPRINT. If that name is acceptable, just press Enter. If you want to give it another name, simply type in the name and press Enter.If you have more than one hard disk in your system, if you have a RAM disk, or if you are connected to a local area network, SP-SETUP will first ask you which hard disk drive you want to copy the Sprint files to. In most systems, the main hard drive is C, and you'll probably want to specify this as the disk to store your Sprint files on. You can then specify the directory name.
Also Note: If there's not enough room on your hard disk for the Sprint files, Sprint will tell you so and exit to DOS. You'll need to delete some files to make room for the Sprint files, then type A:SP-SETUP again on the DOS com-mandline.
Once you've specified the directory name, Sprint will begin copying the Sprint files from the distribution disks to your hard disk. Follow the prompts and insert the distribution disks when told to. As it copies your files, SP-SETUP will display the file names it's copying. It won't copy
every
file on the distribution disks, just the ones you'll need. (If your needs change, you can run SP-SETUP again later to copy the additional files you need.)SP-SETUP will next ask if you want it to create sample AUTOEXEC.BAT and CONFIG.SYS files and modify your existing ones, or simply create the sample files and leave your original files undisturbed. You can also choose Exit to avoid creating any sample files. If you choose to modify your AUTOEXEC.BAT file, SP-SETUP will add a path to Sprint that will allow you to load Sprint from anywhere on your system, not just from the direc-tory where you store your Sprint files. We recommend that you allow SP-SETUP to modify your files; if you choose that option and you don't already have an AUTOEXEC.BAT file, SP-SETUP will create one that includes a path to Sprint.
Note: If you don't understand what path and AUTOEXEC.BAT mean, you can refer to Appendix A," A DOS Primer," although it isn't strictly necessary that you understand them at this point. If you let SP-SETUP modify your files, just remember that you can load Sprint from anywhere on your system by typing SP Enter.
Printer Installation
Once you've finished installing Sprint for your floppy or hard disk system, SP-SETUP will return to the Sprint Installation main menu and auto-matically position the highlight bar on Printer Installation. Printer Instal-lation allows you to choose one or more printers for use with Sprint. By default, Sprint is installed for a plain printer with no special capabilities. If
you don't install your particular printer, Sprint will still work with most printers; however, it won't be able to take advantage of any of your printer's fonts or other special features. So, it's likely you'll want to tell Sprint which printer you're using.
To do so, make sure the highlight bar is positioned on Printer Installation and press Enter. You'll see a list of supported printers from which you can select your printer.
Use the arrow keys to move to the name of your printer's manufacturer, then press Enter to choose your printer type. Note: If your printer is not listed, stop reading here and skip to the next section, "If Your Printer Isn't Listed."
If your printer has multiple fonts, you'll next be asked to select which font you want Sprint to use by default. Note that-no matter which font you choose-you'll still be able to use all the other fonts your printer supports; you're simply selecting the font Sprint will use when you don't tell it other-wise.
After you answer a couple of questions about the printer you'll be using, SP-SETUP will ask you where you want your formatted files sent. There are three choices: PRN, FILE, and OTHER. Normally, PRN is the correct choice, so you can just press Enter to accept it. If you select FILE, your formatted files will be printed to a file instead of sent to your printer.
Note: If you will usually want to send your files to the printer, and only occasionally to a file, select PRN. When you are ready to print your file, Sprint allows you to specify a file as the destination even though you have installed it to go to the printer by default.
You'll only need to select Other if you're using a serial printer, or if your printer is unable to operate directly through DOS. SP-SETUP will display a list of other output ports.
Select the output port used by your printer (for a serial printer, that's usually COM1), then press Enter.
Note to two-floppy system users: If you have 360K drives and you want to install a PostScript printer, it's best to choose any printer except a PostScript one as your default. Then, you can go back and install the PostScript
printer, inserting your Program B Disk when Sprint prompts you to insert a disk in Drive A.
If Your Printer Isn't Listed
If SP-SETUP does not list your printer, first check the reference manual that came with your printer; it may mention that your printer is compatible with some other printer type that is listed. If not, you can just press Esc and
not select anything. By default, Sprint will work automatically with a "plain" printer. It will still be able to print your files, but as mentioned earlier, you won't be able to take advantage of any special typestyles (such as italic) or other capabilities your printer may have. Finally, check with Borland Technical Support to see whether they have a customized printer driver file for your printer.
It's possible to tell SP-SETUP about your printer and all its capabilities by creating a customized printer driver file called an .SPL file. This is a rather technical task; you can find instructions for creating an .SPL file in the "Build Your Own Printer and Screen Drivers" appendix in the Advanced User's Guide.
If You Have Trouble with Your Printer
If, after installing your printer, you find that Sprint either doesn't print properly (or at all), please refer to the "Help!" appendix in this book.
Alternate Printer Installation
Sprint allows you to select both a default printer and any number of alter-nate printers. Once you've installed a default printer, you can return to Printer Installation on the main menu and install your alternate(s). For example, suppose you have a dot-matrix printer that you use for printing drafts, and a laser printer that you use for final printouts. You would first install the laser printer as your default (so the right fonts can be installed), then go back and install the dot matrix printer as your alternate.
To install an alternate printer, go through the complete printer installation again, choosing the printer you want to be an alternate as you did for the default. At the end, Sprint will remind you that you've already installed a default printer and will display a Default or Alternate? message. In this case, you want to install an alternate printer, so press A for Alternate. (If
When you tell Sprint to print a file, you must switch to the alternate printer; otherwise, it will send the file to the default printer.
Monitor/Screen Installation
Sprint automatically detects the type of video hardware you're using, so in most cases you needn't set up your screen. However, there may be times when you want to change the installation. For example, if you have an EGA, you could install Sprint to display in 43-line mode instead of 25-line mode. If you want to do this, make sure the highlight bar is positioned on Monitor /Screen Installation and press Enter. Sprint will display a list of supported screen/video board types.
SP-SETUP will position the highlight bar on the default video setup. To choose it, press Enter. To choose another one, move the cursor to the item you want (for example, EGA43), and press Enter.
Sprint allows you to select both a default screen and any number of alter-nate screens. You'll only want to install an alteralter-nate screen if your computer is (or will be) connected to more than one monitor. Once you've already installed your default screen, you can install the alternate screen by returning to Monitor/Screen Installation on the Sprint Installation main menu. Choose the screen from the list as you did for the default. At the end, SP-SETUP reminds you that you've already installed a screen, and asks if you want to reinstall the default or install an alternate screen. In this case, you want to install an alternate screen, so press A for Alternate. When you start Sprint, you can tell it to switch to the alternate screen by typing
SP -s=<ScreenName>
where ScreenName is the name given to the alternate screen; for example,
EGA43.
Note to two-floppy system users: If you have 360K drives, you won't be able to choose Hercules-RamFont as your screen type; choose Monochrome instead.
User Interface Installation
When you choose User Interface Installation from the Sprint Installation main menu, Sprint will prompt you to insert the distribution disk that contains user interface files, the Build disk; after you've inserted it, press Enter. First, highlight Default User Interface Installation and press Enter; you must do this before choosing any other options. You'll see a list of available
user interfaces; we recommend that you choose the SPTUTOR user inter-face, which you'll need to work through the tutorial-in Chapter 4. However, if you're using one of the alternative user interface packages (which help Sprint respond to many of the same commands you'd in use another word processor, such as Microsoft Word, WordStar, and WordPerfect), you'll have the option of installing one of these user interfaces as the default. Note that installing one of these alternative user interfaces is
entirely optional;
we recommend that you do this only if you're familiar with (and addicted to) one of these programs, and want Sprint to behave in ways you're already accUstomed to. Also note that Sprint willnot
look at all or behave exactly like these programs, although many of the key sequences and menu names will be similar. See theAlternative User Interfaces
booklet (supplied with the Alternative User Interface packs) for complete details.If you want to see more user interface choices, just choose Other; Sprint will prompt you to insert another disk containing additional user interfaces that you can install as your default. After you choose your default user inter-face, Sprint copies the relevant user interface file to your hard disk (or Program A Disk, for two-floppy system users) and returns to the User Interface Installation menu.
Once you've specified a default user interface, you can move on (if you like) to Borland User Interface installation. Sprint comes with three ver-sions of its user interface:
• SPTUTOR, a much-simplified version of the standard Borland interface you'll need to work through the Quick Start Tutorial in Chapter 4. You may want to install this now if you'll be working through the tutorial shortly, but it's not necessary; the tutorial will show you how to do it. • SPBASIC, the user interface version to which Sprint defaults unless you
specifically install another default user interface.
• SP ADV, an advanced version of the standard Borland interface that contains all the menu commands.
If you have a hard disk, you may choose to load all versions of the standard (Borland) user interface-one as your default, and the rest as alternates; that way, you can switch from one to another at your discretion without leaving Sprint.
available user interfaces. You can choose any of these as alternates; moreover, if you don't see the ones you want or you'd like to see all the choices before deciding, you can choose Other.
If you really want a free hand when it comes to loading alternate user inter-faces without leaving Sprint, you might want to install all user interinter-faces after choosing a default. When you choose this option, SP-SETUP will prompt you to insert the disk with user interface files; it will pause when the files on that disk have been copied and ask whether you want to insert the second Sprint user interface disk and copy its contents, too.
User Interface Installation on a Two-Floppy System
First, you must choose Default User Interface Installation. When you do, SP-SETUP will prompt you to insert the Sprint disk with user interface source files in Drive A and your Program A Disk in Drive B. It will then copy the default user interface you pick to your Program A Disk. Unless you have high-density disks, there's really not enough room on your Program A Disk for any other user interface files. (You might be able to fit one on a 720K disk, but it would be better to put it on a separate user interface disk.)
So how do you install alternate user interfaces after you've already installed the default user interface on your Program A Disk? Technically, there may be room on your Program B Disk, but it's better to leave that space available for something like a printer driver file. You have two choices. The first is simply to run SP-SETUP again to install a new default user interface on your Program A Disk whenever you want to switch user interfaces.
The second allows you to switch user interfaces later on without leaving Sprint; you make this possible by letting SP-SETUP copy additional alter-nate user interface files to a separate disk, like this:
1. After you install a default user interface, go back and choose Alternate User Interface Installation from the User Interface Installation menu. 2. SP-SETUP knows you've already copied a default user interface to your
Program A Disk and will prompt for another disk.
3. Insert a blank, formatted floppy that you have designated as your alter-nate user interface disk. (See page 12 for how create one.) Label this disk and put it aside.
4. After starting Sprint, keep the disk with your alternate user interfaces on it handy; the "Changing User Interfaces" section of Chapter 10 will
show you how to switch this disk to load alternate user interfaces lion the fly."
In short, those two-floppy users with 360K