Joep van de Zandt
Bachelor assignment at Cybermind Interactive Nederland Bachelor Industrial Design at Universiteit Twente
Casing design for a head mounted device for use on
children during a burn wound treatment
Joep van de Zandt | s1196367 Bachelor Industrial Design
Universiteit Twente
Oral exam: 20-8-2014
Bachelor assignment at Cybermind Interactive Nederland
Assesment panel
Chairman: Prof.Dr.Ir. A.O. Eger
Preface
This report describes the design process through which a concept design has been formed for a new Cybermind HMD. This concept design has been delivered to Cybermind for further development of the design into a final product. The assignment has been executed for Cybermind as a support for the industrial designer MSc P. Borgstein at Cybermind. My Tu-tors MSc P. Borgstein and MSc R.G.J Damgrave have helped me through-out this design process in understanding the design problems from dif-ferent perspectives and guide me throughout the bachelor assignment. Next to that BSc R. Storcken has helped out a lot in communication with internals and externals of Cybermind and keeping up with the progress of the assignment. After these three months I can say that I am content with the accomplished result and looking forward to seeing what results Cybermind draws from it over time.
Samenvatting
In deze opdracht is voor Cybermind Interactive Nederland (Cybermind) een ontwerp gemaakt voor de behuizing van een Head Mounted Device (HMD). De opdracht is onderdeel van het Gravilo project, een samenw-erking tussen Cybermind, Universitair Ziekenhuis Leuven en stichting Help Brandwonden Kids. Hierin wordt gewerkt aan een betere behandel-ing van kinderen met brandwonden door het gebruik van virtual reality. De opdracht heeft als doelstelling om een ontwerp af te leveren wat beter aansluit bij de gebruikers en de omgeving waarin de HMD gebruikt zal worden. De HMD zal gebruikt worden als middel van pijn-afleiding bij brandwonden behandeling bij kinderen in een ziekenhuis. Momenteel wordt er in meerdere brandwondencentra getest met een oude HMD van Cybermind, deze werkt niet optimaal in de behandelingsomgeving. Uit deze doelstelling volgt een hoofdvraag die leidend is binnen het ontwerpproces, deze luidt als volgt: “Welke aspecten spelen een rol in het gebruik van een HMD bij de brandwonden behandeling en aan welke eisen moet worden voldaan om dit gebruik te optimaliseren?”
Een vooronderzoek was de eerste fase van deze opdracht. Hierin is gekeken naar de gebruiksaspecten en beperkingen vanuit de brand-wonden behandelingsomgeving. De fysieke en mentale grenzen van de gebruikers, kinderen en behandelaars, zijn ook onderzocht. Daarnaast is gekeken naar de huidige HMD’s van de consumenten en professionele markt, hierbij is gelet op gebruiksaspecten en mogelijkheden in combi-natie met de brandwonden behandeling. Ook is gekeken naar de interne componenten van de HMD die vanuit Cybermind zijn vastgelegd. Als voorbereiding op de volgende fase is gekeken naar mogelijke oplossin-gen voor het vergemakkelijken van het inefficiënte reinigingsproces. Dit proces is als een van de grootste knelpunten van het huidige ontwerp bevonden. Dit vooronderzoek is afgesloten met een programma van eisen en wensen (PvE) waarin de belangrijkste aspecten waaraan het ontwerp dient te voldoen zijn gekwantificeerd.
Abstract
In this assignment a casing has been design for a Head Mounted Display for Cybermind Interactive Nederland (Cybermind). This assignment is part of the Gravilo project, which is a collaboration between Cybermind, University Hospital Leuven and the Help Brandwonden Kids foundation. The goal of this project is to improve the treatment of burned children with the use of virtual reality. This assignment has the goal to deliver a HMD design that better fits the environment in which it will be used and the people that use it. the HMD will be used for pain-distraction during burn treatment on children in the hospital environment. At the moment several burn centers are working with an old HMD from Cybermind, this does not work very well in the burn treatment environment.
This goal produces a research question to guide the design process; the research question is the following: “Which aspects play a role in the use of an HMD during burn treatment and which demands have to be met to optimize this use?”
The first part of the assignment is research. This research focuses on us-age aspects and limitations of the burn treatment environment. Research has also been done on the physical and mental limitations of the users; these are both the child patients and the practitioners. The HMD’s cur-rently on the consumer and professional market have been researched for their usage aspects and their possibilities in the burn treatment environment. The internal components of the HMD have been looked at; these components have been determined by Cybermind. In preparation for the next phase several possible solutions for facilitating the inefficient cleaning process have been looked at. This process has been deemed as one of the largest bottlenecks in the design. The research phase is wrapped up with a program of demands and wishes (PoD) in which the most important aspects of the design are quantified.
After the research phase a design has been created through an iterative design process. Three concepts have been created to provide different solutions to the stated design problem. The development of these con-cepts has been focused on the usage aspects of the design; mounting and setting up the HMD and cleaning and balance of the HMD. These are aspects where, according to the research phase, the most improvement is needed or where the most influence of the effectiveness of the overall design can be made. These concepts have been developed to the point where their functioning is clear. In an expert evaluation within Cyber-mind and an evaluation to the PoD the second concept has been chosen as the basis for the final concept. The best aspects of the other two con-cepts have been integrated in this final concept. In the detailing phase this final concept is further developed. Here design choices have been made concerning the mechanisms, materials and design- and usage aspects. This has resulted in a detailed final concept.
introduction
8
Research
phase
10
2.0
introduction
11
2.1
background
analysis
12
2.2
user
analysis
12
2.3 stakeholder analysis
13
2.4
usage
analysis
14
2.5
setting
analysis
14
2.6
function
analysis
15
2.7
Production 17
2.8 IPD measuring and setting
18
2.9 Analysis Modular design
18
2.10 HMD mounting analysis
20
2.12 Design and Style analysis
22
2.13 Program of Demands and Wishes 24
Ideation
26
3.0
Introduction
27
3.1
Ideation
28
Concept
generation
32
4.0
Introduction
33
4.2
Concept
1
34
4.3
Concept
2
38
4.4
Concept
3
42
concept
evaluation
46
5.0
Introduction
47
5.1 Evaluation with experts
48
5.2 Evaluation to PoD
49
5.3 General improvements
49
1
2
3
4
5
Detailing
50
6.0
introduction
51
6.1 expert interview Leuven
52
6.2 revision of head sensitivity
52
6.3
external
cable
54
6.4
ventilation 54
6.5
dimensions
54
6.6
inner
casing 54
6.7 size adjustment mechanism
56
6.8
straps
56
6.9 flexible head pad
56
6.10
flexible
sides
57
6.11
speaker
cups
57
6.12 IPD haptic mechanism
57
6.13
Foam
Padding
57
6.14 standard components
58
6.15
user
safety 58
Modeling
phase 60
7.0
introduction
61
7.1
part
production 62
7.2
screws 62
7.3
glue
63
7.4
Friction
63
7.5
assembly
64
Conclusion
66
Recommendations
67
References
68
appendix
70
6
7
8
9
10
1
This report describes the process and design choices made throughout this bachelor assignment. The goal was to create a design for the casing of a HMD. This design has been developed on the basis of research that has been done in the beginning of the assignment, the research phase. This research has delivered a direction for the design process in the form of a program of demands and wishes and a set of design guidelines. Through an iterative design process a concept design and prototype have been created. The first step is an ideation phase in which ideas have been cre-ated and developed. Here the focus lies on creating ideas that provide solutions to the problems found in the research phase. The phase of concept generation shows a bundling of similar or compatible ideas to form concept designs, these concepts are further developed to create several coherent design solutions. Concept evaluation is the next phase in which the concepts are evaluated side by side by experts and the program of demands and wishes. The chosen concept is further developed in the detailing phase where design choices on materials, mechanisms, user aspects and production are further elaborated on. This detailed final concept is transformed into a 3D model for production of the prototype through rapid prototyping. This report is wrapped up with a chapter of conclusions and recommendations where the final design proposal and design process are evaluated and recommendations for further development of the design are described.
To keep the report concise some of the more elaborate parts of the process are kept separate in the appendices.
2
Introduction
Introduction
The goal of this research phase is to expand the knowledge on the subject on Virtual Reality, Head Mounted Devices and the treatment of burn patients. This will allow the design process to progress in the right directions. It is important to have some knowledge of the concept of virtual reality and burn wounds to be able to design for this goal. Therefore a background analysis will be done on these subjects. This project is about creating a redesign of the current HMD system that better fits the hospital environment and the child burn patients. Therefore knowledge is needed about the characteristics and demands of the user’s. In the user analysis the patient will be studied both as a child and a burn patient, the other users will be studied as well. The hospitals restrictions and possibilities will be analyzed to make sure the design will be allowed in the hospital and function effectively here. A large part of this will be hygiene regulations, these will be researched. For a good design the functioning of the components and the connections between each other and with the user should be as effective and efficient as possible. Cybermind provides the VR technology for this product, these components cannot be changed. To be able to create a good casing design knowledge on these components’ functions and specifications is important.
This forms the basic research phase that is used in a design process. Before going in to the next phase of idea and concept generation some more design research has been done on user aspects and previous parts of the research phase. Research on modular design has been done as a possible solution to the challenges created by hygiene regulations, in this paragraph it is validated to what extent modularity is fit as a solution to the design problems created by the hospital environment. To create inspiration on the user aspects of the HMD concerning its mounting several other devices from the professional and consumer market have been studied. To create a product that is fit for all concerned users and markets a study on design styles, of product for these users and markets, has been done. This also forms a bridge to the next phase, together with the program of demands and wishes.
2.1 Background analysis
This paragraph describes the main subjects discussed and researched in this project. The basics of these subjects are explained to help with researching and facilitate reading the rest of the report.
2.1.1 Virtual reality
Virtual reality (VR) is the creation of a simulated three-di-mensional world in which the user is immersed trough visuals and interaction with the environment (Strickland, 2007). The first attempts at VR have been made in the 1960’s by Ivan Sutherland with the “ultimate display”. This display has guided most of the developments on VR to how it is described today. His system was mostly used for vehicle simulations by the military, NASA and airlines (Strickland, 2007).
Immersion for the user is the goal of VR. Immersion is the feeling of being inside or part of a world, combined with interaction this is called telepresence. Computer scientist Jonathan Steuer proposed depth and breadth of informa-tion as the two main components of immersion.
Depth refers to the quality of the information the user receives, i.e. the pixel density of a display. Breadth defines the number of sensory dimensions simultaneously present-ed, i.e. only visuals or also the sound of the environment. VR systems that incorporate sense of touch and give force feedback to the user are called haptic systems.
Another part of immersion is being unaware of the real world; therefore the user should be able to interact with the virtual environment without hindrance by the real world. For effective the interaction with the virtual environment the user should not experience any latency between phys-ical input; movements of the user, and virtual output. Also the display’s frame rate should be at least 20-30 fps for a convincing experience.
In project Morpheus Sony has setup six elements that a VR system needs to achieve (tele)presence: Sight, sound, track-ing, control, ease of use and content.
VR can be achieved with a wide range of hardware; the most common is a head mounted display (HMD), often in combination with other hardware; in this project a HMD is used.
2.1.2 Head mounted displays
A head mounted display is exactly what it says; one or multiple displays that are mounted on the user’s head close to the eyes to fill the user’s field of view (FOV) as much as possible with the display, creating immersion. LCD or OLED displays are the most common technology used in HMD’s today. Using one display for each eye creates an illusion of depth. These displays preferably have a high pixel density for more realism. The current Cybermind HMD uses this principle. For different users interpupilary distance (IPD) and focal length, of the optics used with the displays, are important settings. IPD is used to adapt for differences in distance between pupils of different users. Without variable focal length users with glasses would have to wear these with the HMD.
2.1.3 Burn treatment and rehabilitation
Burn wounds are among the most severe and painful wounds in the medical world. The rehabilitation process is also very painful. Patients with burn wounds often suffer from both physical and psychological trauma due to by the burning. The life quality of a burn victim can be greatly reduced because of the many physical complications that can occur with burns, mainly because of pruritus (Wille-brand et. al 2004). Treatment is therefore necessary and since the treatment is very painful, pain management is very important. By reducing pain during the treatment the patient can be more effectively treated. In this project VR is used because its analgesic effect lowers the pain levels for the patient during the treatment.
2.2 User analysis
The users of the HMD are children who are hospital pa-tients, the design aspects that have to be taken into ac-count because of this are described below.
2.2.2 Design guidelines
The users of the HMD are children who are hospital pa-tients, the design aspects that have to be taken into ac-count because of this are described below.
Children
Burn patients
Being burned often traumatizes burn patients. It is import-ant that this mental trauma is taken into account in the treatment procedure. Physical trauma can limit the patient’s freedom of motion, with burned hands also the ability to use the hands. This can make it difficult to put on the HMD; this should also be taken into account in the design process. The HMD cannot be used by patients with burns on the head because of the pain and the impossibility to treat the head when wearing the HMD.
2.2.3 Conclusion
The user as child and burn patient bring quite a few import-ant design aspects to the table. Smaller body dimensions and limited physical capabilities; strength and range of mo-tion, compared to adults a big part of this. Children below 7 years old have significantly less cognitive skills as well, therefore human machine interaction should be as simple and intuitive as possible. To make the children feel comfort-able the device should have an intuitive, non-intimidating, child friendly design.
2.3 Stakeholder analysis
2.3.1 Stakeholders
Patient
The patient has been hospitalized for treatment of burns to aid the healing process and prevent infections. Because treatment is very painful VR is used to achieve analgesia. Although the VR treatment is not addictive, contrary to opioids, the patient experiences more pain under VR than with opioids. Therefore the patient has a strong interest in a VR system with a maximized effectiveness to achieve the benefits of the opioids without the drawback of addiction. In this project the patient is a child who might be extra sen-sitive to stimuli and changes because of the traumatizing experience of being burned. Therefore it is important that the system adds a minimal amount of stress to the standard treatment procedure. Optimal would be for the patient to experience less stress in a VR treatment than a treatment without VR. Some treatments may need the patient to move; therefore the HMD should not restrict the user in its freedom of motion.
Practitioner
A nurse, physiotherapist or doctor will perform the treat-ment; the term practitioner is used as an all-encompassing term for this stakeholder. The treatment could be changing the bandages and washing the wound or stretching the burned skin by doing movement exercises; this prevents infection of the wound and stops the skin from becoming
stable. The practitioner has an interest in a system that is easy to use. It is also important for the practitioner to be able to verbally communicate with the patient during the treatment. In case the patient is not able to put on the HMD by himself, the practitioner should be able to do this for the patient. The HMD should therefore give the practitioner a clear view of how the HMD is mounted on the patient’s head for an optimal fitting.
Help Brandwonden Kids
The Help Brandwonden Kids foundation is a client of Cyber-mind. This foundation financially supports the treatment of child burn patients. HBK also gives lectures on safety and prevention of burns. HBK wants a new VR system that has a stronger analgesic effect during the burn treatment and better fits the general demands of the children.
Hospital
The VR system will eventually be used in a hospital; the hospital will buy the system, partly paid by HBK. For the system to work properly in the hospital and not obstruct the other procedures and systems running parallel to it, it is important for the system to be able to be integrated well in the hospital environment.
figure 2.1 stakeholders and interest
2.3.2 Conclusion
2.4 Usage analysis
Scenario
This scenario starts with the patient being in the room where the treatment will take place. First the treatment is setup, depending on the treatment the time required may vary. The treatment setup is mostly equipment needed for treatment; scissors, bandages, cleaning fluids for cleaning the wound and a moveable table to carry this equipment on. When this is all setup next to the patients bed the HMD setup begins. The HMD and externals should already be in the room, ready for use. First the VR system is placed next to the bed. The HMD will be mounted on the patients’ head; settings of the HMD are changed, preferably before mounting the device. The mounting and functioning of the VR system is checked by the patient and practitioner, if all is correct the VR system can be switched on and the treatment can begin.
During the treatment the patient plays a video game using the HMD and an external clicker. At the same time the practitioner performs the treatment on the patient; replacing the bandages or performing physical exercises on the patient. The treatments last around 15 minutes. At the end of the treatment the HMD is taken off by the patient and practitioner. The patient is now finished using the HMD. The practitioner will clean the HMD or replace/remove contaminated parts. The treatment equipment and the VR system are cleared away and the patient is taken back to its room.
Conclusion
The required functions in the redesigned casing from a user point of view mainly concern the required steps for setting up the device. As said in the previous paragraph the practitioner should have an insight in the settings of the HDM, the settings that can be made are IPD, focal length, placement of the speakers and the mounting of the HMD. These should be variable in the range of body dimensions of the patients; these are quantified in the PoD. For user comfort these settings should be variable with very little effort of the user. Correctly setting the mounting of the HMD prevents it from moving around relative to the user’s head during treatment. User comfort is very important in the immersion, therefore the HMD has a distributed load on the least sensitive and strongest points on the head, with this the patient should be able to wear the HMD comfortably for the duration of the treatment; ca. 15 minutes.
2.5 Setting analysis
The setting of VR system will be a hospital treatment room, this poses many regulations and challenges to the design of the VR system. This analysis has been made to set up a list of characteristics and demands from the environment.
2.5.1 Hygiene
Hospitals have many regulations concerning hygiene. Because the treatment involves working with open wounds the strictest regulations apply. These regulations are described in the next paragraphs.
Disinfection
The settings hygiene regulations are comparable to an IC or endoscopy room. This means that surfaces, furniture and utensils need disinfection against vegetative bacteria, yeast and, in case of contamination with blood, also against viruses. A common disinfectant used in hospitals is 70% ethanol; this kills yeast and most vegetative bacteria within 10 seconds and both lipophilic and hydrophilic viruses within 1 minute. In preparation to sterilization an instrument-washing-machine can be used to kill a large part of the micro-organisms beforehand, this replaces the use of ethanol but takes more time. These machines usually work in a range from 60°C to 100°C (Hoge Gezondheidsraad 2009). The ethanol disinfection is often done manually with a cleaning cloth; to make sure this is done properly it is important that HMD is easy to clean. The casing redesign could therefore be designed to minimize hard to reach spots; seams and connection points. (Werkgroep Infectiepreventie, 2009).
Sterilization
The preferred method of sterilization in hospitals is with moist heat; steam. The maximum temperature is reached in an overkill procedure; 134°C. The material used in the HMD should be able to cope with this temperature for a period of more than 3 minutes; the process’ duration. The goal of this process is sterility; to kill or deactivate all microorganisms to a max chance of a microorganism per unit = 1/106). Only the parts of the HMD that make direct contact with the patients skin need to be sterilized, it is therefore useful to make these parts easy to clean or disposable. Making the HMD water-resistant would mean that it can be put in the sterilization washer. Another option is to make components that need sterilization detachable so they can be sterilized separately (Werkgroep Infectiepreventie, 2009).
2.5.2 Conclusion
In the hospital environment hygiene is very important. The treatment room has an IC level hygiene regulations, therefore the product will be cleaned with cleaning cloths containing 70% ethanol. Sterilization is also used but only on parts that make direct contact with the patient. Sterilization occurs at 134°C in a medical washing machine. High density PE and PET are the recommended materials for the casing in these situations. The parts that need cleaning should have a minimal amount of hard to reach places like seams and holes to facilitate the cleaning process.
Although sterilization is a preferred method of cleaning due to its effectiveness it takes much more time and energy than disinfection and is therefore not applied unless absolutely necessary, this applies to the Leuven hospital, whether this is also the case for other hospitals is not known.
2.6 Function analysis
2.6.1 Components
The HMD’s components functionalities and characteristics are explained in this paragraph. In the section ‘external’ the remaining functions of the VR system are explained to complete the overview of the total VR system. Some of these parts are confidential, descriptions of these parts can be found in Confidential appendix A.
Audio
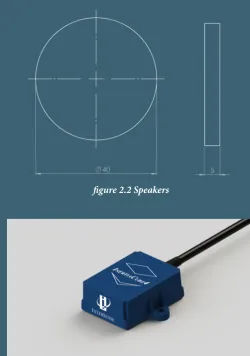
The audio devices create the sound that helps the patient be more immersed in the game. They are low power speakers comparable to those in a headphone. The
speakers receive their input signals from the electronics and indirectly the external components. The speakers are disks that need to be placed flat to the user’s ears. Figure 2.2
Motion tracker
[image:15.595.303.554.84.441.2]To create a stronger feeling of immersion a tracking system is used to link the head movements of the patient to the movements of the character in the game. An accelerometer, a magnetic field sensor and gyroscopes are used for this. For a more accurate measurement the sensor should move as much in sync with the patient’s head as possible. The sensor has an operating temperature of 0° to 50° C and a size of 36.6 mm x 27.7 mm x 13.8 mm (InterSense). to facilitate calibration and reduce the chance of errors the motion tracker should be place parallel to the direction the user’s face is pointing. Figure 2.3
figure 2.2 Speakers
Settings mechanisms
There is a minimum of settings that the HMD should have. The patient should be able to adjust the strap/mounting of the HMD, the IPD for the optics and displays, and the focal length of the optics. For more comfort a possible setting could be the choice between headphones or earphones and the placement of these. To keep the size of the HMD down it is important that these mechanisms are kept as compact as possible. Possible design solutions for these mechanisms are discussed in paragraph 8.
Casing
All of the previously mentioned components are held together inside the casing. The casing provides the structural strength of the HMD and gives it its shape and esthetics. Within this project a redesign of the Visette 45 SXGA will be made that is optimized for the current internal components. The casing should have an exterior that invites the patient to put the HMD on and guides the patient through setting up the HMD according to his or hers personal preferences. The patient should be able to set up the HMD so the patient can’t see outside the HMD and minimize hearing sounds from the surroundings. The current casing cannot easily be taken apart; for the purpose of hygiene a modular design of the casing will be researched in paragraph 9 of this chapter, this part of the research is a request from Cybermind. Balance and comfort are very important to the strength of the immersion, these aspects will be studied in the design process.
Externals
All of the other components of the VR system are named as external. A Microsoft surface pro 2 tablet runs the VR game and displays the user interface for the practitioner to monitor and alter the VR world as seen by the patient. An external battery forms the power source for the VR system, because of hospital regulations a battery is used instead of a power plug, making the system wireless. A bundled cable transfers power and data between the Externals and the HMD. The placement and design of the connection between the HMD and the Externals could be a large obstruction in the freedom of motion of the patient. Keeping this cable out of the way is therefore a point of interest. The user plays the game with a mouse or clicker as a trigger to shoot, if this component is not wireless it might be wise to attach the cable to the HMD to keep the VR system more compact.
2.6.2 Users Patient
The main function of the HMD is to create an immersive VR experience for the patient; this function can be split up in several sub-functions according to the different aspects that create the immersive experience. The main aspect of the VR experience is the visuals that the patient perceives. The HMD shows the patient an image of a virtual world. This immersion can easily be broken by the patient when he/she moves because then a latency between the real
world and the virtual world becomes clear. To avoid this problem the HMD registers the movements of the patient’s head and translates this to movements of the character in the VR world. The patient now perceives an image that corresponds with what the brain expects to see when it moves only the image is still only in 2D. Therefore the HMD shows a different image to each eye to create an illusion of depth, creating a seemingly 3D VR world. With the correct settings the patient should now see quite a convincing VR world through the HMD, because not all patients are the same these settings will be variable. The HMD allows the patient to change the IPD of the optics and the focal length of the lenses.
These functions cover all the visual aspects of the HMD. Another part of the immersion provided by the HMD is audio, corresponding with the VR world. The HMD has stereo sound to give the patient a sense of 3D sound. Just like the optics settings, not all patients have the same demands for audio. The HMD allows the patient to change the audio volume and the placement of the speakers. With the imaging and audio covered the patient has an optimal experience of the VR world, however to prevent the immersion from being broken by distractions from the real world there are a number of functionalities. To make sure the HMD fits correctly on the patient’s head and stays there the mounting of the HMD can be adjusted and secured by the patient according to its demands. The mounting is also strong enough to cope with the patient’s movements and does not let the HMD slide around when the patient moves. The HMD distributes the physical load over the patient’s head taking pressure away from the nose and focusing on the forehead and back of the head because these points can take the most pressure. The HMD does not limit the patient in the movements that have to be made during the treatment or within the VR world. The HMD minimizes any reduction in comfort experienced when the patients leans his/her back of the head against any surface; most commonly a pillow or mattress.
The design has to be created with design limitations of the child user in mind. To make sure the device does not intimidate the patient and possibly scares the patient away from using the HMD, it has a non-intimidating child friendly design, the design of the HMD makes the patient understand how to put it on and how to use it. This can be achieved by the esthetics of the HMD and ergonomics; i.e. general shape and use of color, button placement and apparent complexity. This is expanded on in paragraph 11. Practitioner
like seams and holes to facilitate the cleaning process and decrease the chance of infections, or can be detached for easier cleaning. Besides the hygiene the HMD should also give the practitioner feedback on the quality of the fitting of the devices on the user’s head.
2.6.3 Conclusion
The technology inside the HMD creates immersion through stereoscopic images, 3D sound and head tracking. The settings functions named in the usage analysis will be for the mechanisms inside the casing and the casing itself; these settings allow the immersion to be maximized. The previously described functions for hygiene will mostly apply to the casing and mechanisms. An overview of the components and their relations can be found in
Confidential appendix B.
2.7 Production
Although the design to be created in this project is not a production ready product it is useful to take a look at production and manufacturing. This project will produce a prototype of the new Cybermind HMD that is functional and can be used for user testing. To keep the cost down but not reduce the quality of the product, both functionally and esthetically, the preferred production method is 3D printing. The exact method will be determined later in the process dependent on the characteristics of the final concept. When creating a product for 3D printing it is important to take in mind the limitations of the materials that can be used, 3D printed materials can be of comparable strength to their basic material counterparts. However not all materials can be 3D printed and this may conflict with the preferable material for the functional purposes of the design. The materials named in paragraph 5.2; PE and PET are preferable for their applications in the biomedical world. Both of these materials have been proven to be useful in 3D printing (Whiteclouds),(Giugno 15, 2013). In a later phase of the design process the materials should also be examined from a hygiene perspective. The available materials might not all be suitable for the chemicals used in the hospital cleaning procedure.
2.8 IPD measuring and setting
In figure 2.4a and figure 2.4b the current IPD mechanisms for two HMDs are shown, these could be integrated in the HMD redesign but it would be preferable to create an even smaller and simpler mechanism to allow the HMD to become smaller in total. It would be useful for the speed of setting up the system if the HMD could be pre-calibrated, before the treatment starts. Therefore the HMD should allow the practitioner to see the current IPD setting on the HMD and save the preferences of the different patients, this could also be applied to the focal length, speakers and mounting.
The setting mechanism for the focal length has already been developed; this mechanism has been explained in the ‘video’ part in function analysis. It is important that the practitioner is able to see the focal length setting on the HMD to be able to realize the previously explained idea. For setting up the audio correctly a widely used adjustment mechanism can be used; figure 2.5. This is a very simple and effective mechanism that keeps the speakers in the right place while also applying the right amount of pressure to the ears for good isolation. It is important that this mechanism also works within the hospital regulations.
2.9 Analysis Modular design
2.9.1 Goals
The goal of this project is to design a casing for the HMD that is fit for a variety of patients and allows the practitioners to be able to easily maintain a high level of hygiene for the device. Hygiene will be a key aspect to the final design and for this Cybermind is interested in the possibilities of using modular design as a means of solving the hygiene problem. This is because an advantage has been recognized in the using of modular design regarding the cleaning procedure of the HMD. This paragraph is an elaboration on the previously described research on the setting of the HMD; the hospital room. In this paragraph modular design will be researched as a solution to the hygiene problems faced in this project. Its usefulness will be examined. It should be noted that the modular design intended here is focused on the usage of the product, not manufacturing, assembly, recycling etc.
2.9.2 Industrial Design
Depending on the manufacturing capabilities of
Cybermind it might be useful to setup a production line for components that need replacing after each treatment; this reduces cleaning time and effort, instead of cleaning the components a new component could be attached to the HMD. The components that need cleaning are the ones that come in direct contact with the patient, this are probably only the possibly soft pads that create comfort. If this is the case it might be feasible to make these replaceable. Although modular design often applies to manufacturing purposes there are quite a lot of products available that are modular for their usage, though no guidelines are figure 2.4a IPD mechanism Cybermind Visette
figure 2.4b IPD mechanism Sony Morpheus
available on this subject. This paragraph serves as a source of inspiration on modular industrial design.
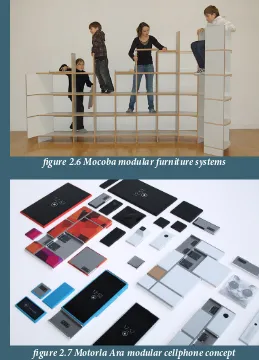
Often modular industrial design is used to allow expansion of products, like furniture systems (Mocoba®) figure 2.6, these systems often are one or several basic parts that can be repeated infinitely to create large and diverse products. Modularity can also be used to make components interchangeable a great example of this is the Motorola Ara “Phone blocks” project (Google, 2014) figure 2.7. Here a phone is build up from interchangeable parts, allowing the user to compose the perfect phone for its demands at that moment and to change it when the demand changes. Each module has a function, such as CPU or camera but the modules specifications may vary.
In this project modularity could be used to facilitate the cleaning of the device or maybe even the setting up of the device; IPD (Parker), focal length etc. To facilitate the first time setting up of the device it might be useful to “build” the device around the user’s head and saving the settings for a later time.
Removability or maybe interchangeability of components that need cleaning could therefore be useful. These components should be removable with ease but still conform to the hygiene regulations and demands of the hospital. Magnets would provide a good solution for this but cannot be used, due to the sensitivity of the head tracking device. Also things like Velcro or hooks, latches etc. are not preferable due to their complicated geometry which makes cleaning difficult. For this a solution has to be found in the next phase. An example of modularity with hygiene in mind is the Thermoscan® by Braun figure 2.8. This is a thermometer for use in patients’ ears, it has a plastic cover over the parts that goes inside the ear, this cover can be placed and removed without touching it figure 2.8 (Braun). It uses a click connection that can be released by pressing a button on the device.
9.3 Conclusion
In the design process that follows this research phase the focus should lie on creating a product that has
interchangeable components to improve hygiene and ease of use. For this inspiration can be taken from the products named in the previous paragraph.
Although the focus of this project is not on manufacturing it is important to keep this in mind when looking at modular design because design choices made on this subject can greatly influence the cost and complexity of the manufacturing process. Therefore several guidelines, methodologies and principles should be taken into account
Appendix A.
[image:19.595.300.559.73.433.2]figure 2.6 Mocoba modular furniture systems
figure 2.7 Motorla Ara modular cellphone concept
2.10 HMD mounting analysis
In this paragraph further research on usage aspects concerning the mounting of the HMD has been done. Technologies are not the subject here. A look will be taken at the consumer market and the professional market. Expect for the nVis all of the products below are still in development, therefore their design might still change.
2.10.1 Consumer products
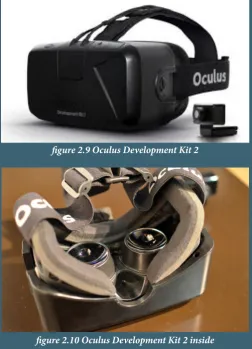
Oculus Dk2
The Oculus Development Kit 2 (DK2) figure 2.9 is a VR platform mainly aimed at the gaming industry, this will rarely require the user to move while using the HMD. The internal technologies are very high end while the mounting is very simple. The inside looks like a ski goggle with foam padding going all the way around the face figure 2.10. This allows for great exclusion from the real world and a comfortable wear, the nosepiece is not padded and seems to be an uncomfortable pressure point, assuming that it touches the nose. A very simple adjustable strap goes over and around the sides of the head. This keeps the HMD in place but because all the weight is at the front, this device is unbalanced, making it less comfortable. The DK2 provides a wide IPD range instead of an actual setting.
The Oculus DK2 is not wireless and does not have integrated audio.
Sony Morpheus
The Morpheus, also intended for gaming has a more innovative mounting. A flexible material is used to seal the face, it encloses the entire FOV. The Electronics are hung on a solid headband that rests on the forehead and the lower back of the head just above the neck; this provides a strong mounting on the head figure 2.11. Pressure is taken away from the nose and moved to the points that are stronger and less sensitive figure 2.12. The Morpheus is not wireless and does not have integrated audio. .
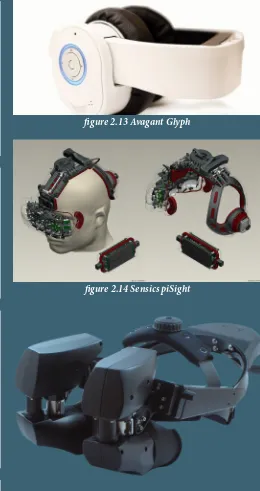
Avagant glyph
[image:20.595.35.288.75.425.2]The Glyph by Avagant is an HMD designed for a VR multimedia experience figure 2.13. The mounting of the Glyph is very simple; it hangs on the ears like a pair of headphones and rests on the nose like a pair of glasses. While the device is rather light and small the weight on the nose can become uncomfortable. The Glyph not meant for the full immersive experience of gaming HMD’s, the view of the user is therefore not sealed from the outside world. The Glyph is not wireless but does have integrated audio. figure 2.9 Oculus Development Kit 2
figure 2.10 Oculus Development Kit 2 inside
figure 2.11 Sony Morpheus
figure 2.13 Avagant Glyph
figure 2.14 Sensics piSight
figure 2.15 nVis nVisor SX111
2.10.2 Professional market
Sensics piSight
Sensics Inc. is a HMD company that specializes in panoramic HMD’s. Sensics has a wide range of corporate customers in government, defense and academic research applications. It has a number of products in these categories. Concept designs have been released on the mounting of the pSight;
Figure 2.14 this complex mechanism seems to be variable and allows the user to firmly fix the HMD on its head and blocking out light from the surroundings with a soft enclosure. Though this mounting seems very strong and balanced the large knob on the backside would be very unpractical in this project’s application. The piSight is not wireless and does not have integrated audio.
nVis nVisor SX111
nVis is a manufacturer of VR displays meant for training, simulation and research applications around the world (nVis, 2013). nVis provides a range of products in the categories head mounted displays, helmet mounted displays, binocular hand-held displays and simulated military devices. nVis has one VR head mounted display, called the nVisor SX111. Compared to the previously described devices it has a more basic mounting design
figure 2.15. The optics are separated from each other but can be adjusted for IPD. The optics are attached to the casing which goes around the head with a rigid band and a strap going over the top. It has a very basic and rugged design. Although esthetically it might not be fit for children the basic design might be useful for modular construction of the HMD. The nVisor is not wireless and does not have integrated audio.
2.10.3 Conclusion
Although there are much alternatives for the products developed by Cybermind the company defines itself as a developer for the professional market, explicitly not the consumer market. Cybermind provides solutions fit for very specific situations with high quality components. Because of the very specific development the Cybermind products are more expensive than their consumer market counterparts and better fit the demands of the customer. Much inspiration can be taken from the products described above on the user aspects of the product that is to be designed in this project.
figure 2.16 collage of medical devices figure 2.17 collage of HMD devices
2.12 Design & Style analysis
2.12.1 Medical devices
A collage has been made to capture the design
characteristics of medical devices. These devices can often be described using the words in the collage. For its need for a high level of usability these devices typically have a clean design with white or light grey as a base color and relatively bright colors, preferably a shade of red blue or green. These indicate points of interest such as the base of a devices, displays, buttons, switches, connectors etc. the design is often kept simple to promote the usability. Another factor is mobility; most devices should be mobile to be able to keep them near the patient or because it might be needed somewhere else. For this medical devices are either easily carried by hospital personnel or can be attached to or placed on a movable object, such as a cart or IV pole. figure 2.16.
2.12.2 Virtual Reality devices
Above several successful HMD’s designs are shown. From the style perspective it is clear that black, white and blue are popular base colors for these kinds of devices. The devices often have a simple and rather directional design that implies the intended usage. Most likely due to
technological reasons most of the devices have an apparent
weight in the front. There are some notable differences in the sizes of the devices; the bigger devices often have a tracking system or a stronger immersion compared to the smaller devices.
figure 2.18 collage of childrens´ products figure 2.19 collage of medical devices for children
2.12.3 children’s toys
Because the primary users are children a collage of children’s products has been made, mostly toys. What is clear are bright colors and more exaggerated shapes that make the products more attractive to children, this might also help them distinguish between objects because of the high color contrast. figure 2.18.
2.12.4 Medical devices for children
To connect the design aspects of children’s products to those of medical devices a collage has been made on medical devices for children. This collage shows a combination of the design aspects that have been deducted from the related collages. Medical devices aimed at children are often modified in dimensions and proportions to make them fit the children better and make them more likable by children; smaller and lighter devices, softer / rounder shapes, oversized components of interaction and a simple instructive design. The same color scheme as used in medical devices can be applied here;
procedure on their own level. figure 2.19
2.12.4 Conclusion
The collages provide a set of guidelines and characteristics on designing for the different users and markets. For the medical world a simple, clean and light design with color accentuations; preferably red, green or blue, on points of interaction is useful for the needed high level of usability. Mobility is also important in also for the sake of usability. VR devices often come in black white and blue as base colors, a simple and directional design is common and indicates the intended usage. Size often goes hand in hand with more depth and breadth of immersion. Possible mounting solutions are varied; this is elaborated on in paragraph 9.
Children’s products tend to be very colorful and high in contrast, the shapes are often exaggerated compared to reality, and this gives them a cheerful look and helps with the interaction.
[image:23.595.38.555.76.427.2]2.13 Program of Demands and Wishes
All of the functions listed throughout the research phase are put in the program of demands and wishes (PoD). These functions have been converted to demands and wishes, not all demands are paired with a wish. Although all demands need to be met for the optimized functioning of the final product not all demands are needed for the minimal functioning and some demands have a greater influence on the design aspects and functioning of the final product. To quantify this difference in importance the demands and wishes are weighed on a scale of 1 to 5. This produces a balanced PoD, which is necessary when evaluating the concepts at the end of the concept phase. Because most of the internal components of the HMD and all of the externals are not to be changed, the PoD mainly refers to the3
Introduction
Several important aspects of the design have been explored in this ideation phase. A large part of the design will be focused on hygiene.
In figure 3.1 possibilities for using modularity as a solution for hygiene have been explored. Different possibilities of fastening a possible inner casing to the main casing have been sketched. To allow for more inspiration a wide variety
of connections has been sketched, some may not be possible or preferable.
[image:28.595.38.270.217.463.2] [image:28.595.309.559.232.461.2]create a broad palette of design directions.
Another part of the design is the IPD mechanism; this has
The comfort of the HMD could make or break the immersion; therefore a look has been taken at the sensitivity of different points on the head. This results in a distribution of the head in sensitive and insensitive spots on the head. The face, temple and ears are points to avoid.
Figure 3.5.
Next an abstract form study has been made on possible distributions of the HMD on the head. This creates a sense of possible general shapes and component distributions around the head. Figure 3.6.
[image:30.595.45.277.76.317.2]In the next two blocks a number of possible shapes and mountings have been explored on the basis of the previous block and different distributions of the components on a 3D figure 3.5 Sensitiveness of the head figure 3.6 Abstract sketches of general form
model. This wide variety of possible mountings and shapes creates a good structure for developing different concepts.
[image:31.595.310.559.213.456.2]Figure 3.7 & figure 3.8.
concept
Introduction
The goal of this phase is to take the ideas created in the previous chapter and form these into concept designs. The concepts will focus on the problems recognized in the research phase and the demands formed in the PoD. Hygiene and usability are the most important aspects of this redesign. The concepts will be developed to a point where the ideas are transformed in technical mechanisms, systems and prin-ciples. Their workings will be explained. The reasoning behind the design choices made in the concepts’ development will be explained as well, this concerns both technical and styling aspects. Exact dimensions and parameters of the components will be determined in chapter six; detailing.
Because all concepts have the same basic aspects that have been developed the descriptions of the concepts have the same basic structure. First the concept is introduced with its primary idea or principle. Next the settings of the concept are explained, these are mechanisms and adjustment possibilities. To create a view on the usage aspects of the concept a visual scenario listed for the concept’s usage procedure. For production matter a basic idea is given of the used materials through a short explanation. Because hygiene is an important aspect the concept’s solution to this problem is also explained. Comfort represents the passive usability of the concept; the reasoning behind this is explained in each concept. The last part is styling, the styling influences the patient’s first reaction and impression of the HMD, making this reaction as positive as possible helps the treatment to become more effective.
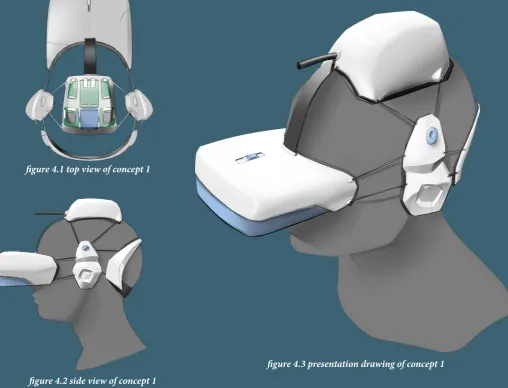
4.1.1 Introduction
This concept focuses on providing a simple and easy user experience for mounting the HMD, thereby solving the usability issue of the present HMD. The concept has a modular building allow the user to mount and adjust the HMD without the heavy weight of the optics attached, this weight was perceived as a problem in previous evaluations.
figure 4.4
4.1 CONCEPT #1
[image:34.595.41.550.68.456.2]figure 4.3 presentation drawing of concept 1 figure 4.2 side view of concept 1
figure 4.1 top view of concept 1
4.1.2 Settings
The user can adjust the IPD and diopter of the optics, the placement of the speakers and the tightness of the mounting. All of these settings are executed with simple actions like turning or sliding or directly moving an object around. This one-action adjustment simplifies and facilitates the adjustment procedure, as was stated as a demand in the PoD.
IPD is adjusted with the slider on top of the optics module, moving it forward lowers the IPD and vice versa figure 4.5. The IPD value is shown as a ruler in the slider space; this facilitates setting up the IPD. It also reduces the time the patient has to wear the HMD because this setting can be changed before the patient wears the HMD; the same advantage goes for the diopter adjustment. This time
Placing the speakers is done be placing the middle part of the mounting frame over the ears for a comfortable fit before tightening it. Figure 4.10.
[image:35.595.56.553.113.468.2]Tightening is done by turning the knobs on the sides of the HMD figure xx. This rolls up the cables that hold the other parts of the mounting frame together, pulling them closer to the middle part. By pressing the knob the tension is released. The mechanism behind this is similar to that of a snowboard boot lace-tightening mechanism figure 4.7. The difference is in the amount of cables being pulled at the same time. Each module has two cables connected to the center module for improved stability. Figure 4.3 & figure 4.8.
figure 4.7 tightening mechanism
figure 4.8 tightening mechanism side view
figure 4.9 connection system with suction cups
4.1.3 Materials
Since 3D printing is the desired production method the used materials for the design are limited. The casings and knobs and some parts of the mechanisms will be made from PE or PET this gives strength and rigidity. As was researched in the research phase these materials are fit for the medical environment. Materials that come in contact with the head will be plastic foams for more comfort with a smooth outside for hygiene purposes. Making the padding disposable removes the hygiene problem. This padding would need to be mass produced and effortless to apply and remove. The cables used for tightening will be twisted steel cables with a PE shell; this provides the required strength while still allowing easy cleaning with a medical cleaning agent.
4.1.4 Hygiene
Because of the detachable electronics and smooth surfaces on contact with the head the HMD is easy to clean, although the large surface area increases the cleaning time. To prevent dirt from entering the tightening mechanism openings for the cables on the middle module of the mounting frame are sealed with rubber rings. It is recommended that the cables are thoroughly cleaned in there extended position.
4.1.5 Comfort
As found in the research phase discomfort is created by hard materials pressing against (sensitive parts of) the head, an unbalanced HMD and the large backside of the HMD. Therefore this concept uses soft padding materials against the head and draws pressure away from sensitive parts like the nose by moving the weight more to the top and created a rigid mounting structure in the back to compensate for the weight in the front. This mounting structure avoids the far most back of the head for comfortable use while lying down. The cable to the externals is placed high on the HMD near the vertical turning axis of the head, therefore reducing the disturbances created by the cable. The electronics are placed in the top part of the head following its curvature. The IntertiaCube4 is placed parallel to the horizontal plane of the head with the cable pointed backwards; this assures optimal functionality but makes the top module larger. The user first mounts and adjusts the lightweight mounting frame before attaching the heavy electronics. The IPD and focal length are adjusted before mounting the electronics. The electronics modules are attached to the mounting frame with suction cups. Suction cups create a strong connection perpendicular to their flat side while still allowing effortless cleaning figure 4.9.
power &
data cables soft
padding material
suction cups hold optics in
4.1.6 Scenario
figure 4.10
1. The IPD and diopter are adjusted by the practitioner according to the demands of the patient. 2. The mounting frame is placed over the head and the speakers are placed over the ears.
3. Tightening is done by turning the knobs on the sides of the frame.
4. The electronics are placed on the front and top of the mounting frame, the audio is connected
5. The HMD is now ready for use.
4.1.7 Styling
The modular design of this first concept creates an open and transparent look; this open look is also part of the usage aspects of the HMD, because the patient’s view is not blocked by the optics when mounting the frame in the first step. To fit in with the devices that are used in a modern hospital room the concept is styled with hard but rounded shapes, chamfered edges and colorful surfaces. As stated as an important aspect in the research phase the points of interaction have been marked with bright colors, this makes the usage scenario more intuitive and easy for the practitioner. The used buttons, knobs and rings indicate their intended use by their shape. The tightening knob for example can be pinched and twisted with two fingers but also pressed. This is indicated by its two dents for the fingers and the direction of these dents; pointed towards the inside of the casing, which is the require direction to push. The concept has a soft light grey base color to express cleanliness and friendliness. The blue interaction points and surfaces have high contrast and are thereby highly visible and are congruent with the Cybermind corporate identity for the medical environment figure 4.3.
4.2.1 Introduction
This concept provides a high level of usability concerning hygiene and primary use. Its soft and one-module build allows for easy cleaning and gives a striking but calm look. The internal components are wrapped around the head in the longitudinal plane; this keeps the HMD compact and simple. There are no openings and very few seams to the HMD except for the holes for the optics, this promotes effortless cleaning figure 4.13.
figure 4.12 presentation drawing for concept 2
[image:38.595.37.542.69.449.2]figure 4.13 Graphic representation of concept qualities figure 4.11 views concept 2
4.2.2 Settings
Just like this first concept, the diopter is adjusted with rings on the bottom of the HMD. The diopter is indicated on the rings to make adjustment by the practitioner before mounting the HMD possible figure 4.14.
A turning knob on the side adjusts the IPD; this is the same as the current system. The IPD value is shown on the knob to facilitate the setup figure 4.15.
The speakers can be moved internally by sliding them forward or backward on a sliding mechanism. This allows for users of different sizes. By grabbing the sides of the HMD on the buttons in the back and the gripping point on the side the user can adjust the size of the mounting
figure 4.16 & figure 4.17. By pulling these together the size of the HMD is adjusted down. When the buttons in the back are released the setting is fixed. Internal cables hold the front and back together, by pressing the back buttons this friction connection is released. To release the mounting the user pushes the buttons on the back while pulling back on the straps. This simple system is very intuitive because the required action is very similar to the demanded result; pulling two parts together to
4.2.3 Materials
This concept uses PE or PET for the outer casing, knobs, buttons and diopter mechanisms, this is strong and rigid. PE and PET are materials that meet the demands of the medical world. The inner padding is soft foam. This part is sealed by the inner casing and does therefore not need cleaning. The material therefore only needs to be soft and flexible to assure a comfortable fit. A flexible foil like plastic will be used for the inner casing; this might pose a problem in 3D printing production. A foil has been chosen because it provides a seal for bacteria and is easy to replace while allowing deformation along the contours of the head. The flexible inner casing therefore provides the comfort and hygiene that is looked for in the redesign.
For the connection between the front of the HMD and the back strap a flexible rubber like material will be used. This allows the tightening mechanism to be adjusted without a seam in which bacteria could be trapped out of reach of a cleaning cloth. Rubber can also be 3D printed, by printing the rubber in the same print as the outer casing the seam between these parts can be minimized, this improves hygiene.
[image:39.595.49.550.69.436.2]figure 4.14 diopter mechanism
4.2.4 Hygiene
Cleaning the HMDs is very simple for its smooth shape and few seams. An inner casing can be taken out by pressing the top buttons around the ears; this inner casing can then be cleaned separately or replaced with a new one. The inner casing and the back straps are the only part that comes in contact with the head. This reduces the complexity of the cleaning process. The flexible part around the tightening mechanism reduces the number of hard to clean spaces. When stretched out the bumps and curves of this part are minimized, making it effortless to clean. Figure 4.19 &
figure 4.20.
4.2.5 Comfort
The flexible inner casing covers the soft padding around the inside of the HMD; this padding provides a comfortably wearable HMD. The extension on the forehead of the HMD removes pressure from the nose, creating comfort. The back straps avoid the far back of the head and are small, this allows to user to lie down comfortably. The lower back strap prevents the HMD from shifting forward onto the nose; this also helps create a more comfortable wear. The comfort of the HMD is one of the bottlenecks of the current design that break the immersion. The above described solutions should create more comfort for the patient; this minimizes the distraction from the game by the HMD itself and allows a stronger immersion.
[image:40.595.103.547.63.539.2]figure 4.16 tightening mechanism
figure 4.17 tightening mechanism explode
figure 4.18 steel cable
figure 4.19 inner casing
4.2.3 Scenario
figure 4.21
1. A clean inner casing is placed and clicked in place by the practitioner.
2. The IPD and diopter are adjusted by the practitioner according to the demands of the patient. 3. The user ready HMD is placed over the head with the back straps extended to their maximum.
4. The patient or the practitioner tightens the HMD on both sides of the HMD.
5. The HMD is now ready for use.
6. After the treatment the practitioner removes the inner casing by pressing the top buttons around the ears and then lifting it out.
4.2.7 Styling
This concept carries the same color scheme as the first concept with the same underlying motives; to create a clean and friendly looking device and clear interaction points for high usability. The general shape of the device expresses a very soft but robust feel due to its thick but rounded shape. The shape flows around the head starting big and robust at the front and flowing around the head dispersing into smaller lines; the straps and head rest on the top. This also indicates the use and focuses the attention on the front. The big blue surfaces on the side form around the grip for the size adjustment. They run through to the back adjustment button as one big blue surface to indicate the interaction that takes place on the side. The blue surfaces also add a playful and vibrant feeling to the device. The highly recognizable black rubber cover piece indicates its flexibility through its corrugated shape and its color; this also indicates the possible adjustment of the back part. The inner casing is a darker grey than the outer casing to indicate its removability. Its shape follows the inside of the HMD and wraps around to the outside, indicating its cover functionality. The corrugated parts around the ears indicate the place where the ears are meant to go. The padding is divided in several large areas whose shape indicates their purpose; around the eyes a ski goggle like padding assures a comfortable fit, around the ears the padding is similar to that of a set of headphones, indicating the location of the speakers and ears.
4.3.1 Introduction
[image:42.595.54.549.57.434.2]This third concept has a simple design with the weight and mounting in the front and an inner casing in the front, this facilitates the usage and cleaning of the HMD. its mounting is very basic to simplify the usage scenario. Contrary to the previous concepts this design is more on the face than around it, this creates a less intimidating look and simplifies the concept’s shape, increasing usability and hygiene figure 4.24.
figure 4.23 presentation drawing for concept 2 figure 4.22 views concept 2
4.3 CONCEPT #3
4.3.2 Settings
IPD and diopter adjustment are the same as the second concept however the knob for IPD adjustment is provides more grip from the side compared to the round knob with two large dents for the fingers of the second concept. This knob indicates its use by the grippy side edge. Figure 4.25. This concept has elastic straps going over and around the sides of the head to provide a secure fit for a wide range of users. Figure 4.23. Although the straps might need to be adjustable the interaction and mechanism would be very simple. This helps with the usability of the design.
The inner casing can be taken out by pressing the buttons on the back of the HMD figure 4.28 & figure 4.29. Because the knobs in the back are the only thing holding it in place the practitioner should not have to touch the contaminated inner casing when taking it out. This allows for a very clean usage scenario concerning the hygiene of the HMD. The speakers are fixed in place, contrary to the other concepts the padding is only on the ear, not around it. Fixing the speakers simplifies the design but the speakers need to disperse the sound over a wider range to deliver the sound to patients with different dimensions. Fixing the speakers allows for a better seal by the inner casing, increasing hygiene.
4.2.3 Materials
The casing for this concept will be 3D printed out of PE or PET, this provides rigidity and strength to the HMD, and these materials are fit for use in the medical world. The inner casing will be made out of a flexible foil like material to cover up the internals for hygiene but provide a comfortable surface. The internal padding will be soft foam. This foam will not come in contact with the patient and does therefore not have to meet hygiene demands. The elastic straps will be made of an elastic plastic rubber fabric composite. The used materials are focused on creating an easy to clean or comfortable surface.
[image:43.595.52.532.64.319.2]