Vocera User Console Guide
Version 4.3
Copyright © 2002-2012 Vocera Communications, Inc. All rights reserved. Protected by US Patent Numbers D486,806; D486,807; 6,892,083; 6,901,255; 7,190,802; 7,206,594; 7,248,881; 7,257,415; 7,310,541; 7,457,751; AU Patent Number AU 2002332828 B2; CA Patent Number 2,459,955; EEC Patent Number ED 7513; and Japan Patent Number JP 4,372,547.
Vocera® is a registered trademark of Vocera Communications, Inc.
This software is licensed, not sold, by Vocera Communications, Inc. (“Vocera”). The reference text of the license governing this software can be found at www.vocera.com/legal. The version legally binding on you (which includes limitations of warranty, limitations of remedy and liability, and other provisions) is as agreed between Vocera and the reseller from whom your system was acquired and is available from that reseller.
Certain portions of Vocera’s product are derived from software licensed by the third parties as described at http://www.vocera.com/legal/.
Java® is a registered trademark of Oracle Corporation and/or its affiliates. Microsoft® Windows®, Windows Server™ 2003, Windows® XP, Microsoft® Internet Explorer, and Microsoft® Excel are trademarks or registered trademarks of Microsoft Corporation in the United States and other countries.
All other trademarks, service marks, registered trademarks, or registered service marks are the property of their respective owner/s. All other brands and/or product names are the trademarks (or registered trademarks) and property of their respective owner/s.
Vocera Communications, Inc. www.vocera.com
tel :: +1 408 882 5100 fax :: +1 408 882 5101
Part No :: 930-01826 Rev B, 28-May-2012 Build 2349
Contents
Getting Started... 9
Logging in to the User Console... 9
Overview of the User Console... 11
Using the Documentation... 12
Displaying Help... 12 Basic Information... 13 Personal Info... 13 Phone... 16 Speech Recognition... 19 Announcements... 21 Genie Settings... 21 Notifications... 23 Miscellaneous... 25 Call Blocking... 29 Blocking Calls... 29 Accepting Calls... 32
Blocking Calls From Specific Group Members... 33
Blocking Calls With Voice Commands... 33
Call Forwarding... 35
Buddies... 37
Adding a Buddy... 37
Adding an Outside Buddy... 39
Deleting a Buddy... 40
Send Text... 43
Working with Groups... 45
About Group Management... 46
Group Call Forwarding... 46
Groups and Departments... 47
Departments and Voice Commands... 48
Departments and Accounting... 48
About Instant Conferences... 48
Maintaining Group Information... 49
Basic Group Information... 50
Department Groups... 52
Group Members... 54
Group Forwarding... 56
Group Permissions... 57
The Group Conference... 59
Recording Names for a Group... 60
Entering Spoken Names... 61
Rules for Entering Names... 62
Names and Speech Recognition... 62
Using Numeric Values in Names... 63
Genie Number Pronunciations... 64
Leading Zeros in Names... 64
Using Ordinal Numbers in Names... 64
Using Abbreviations in Names... 65
Using Slang and Jargon in Names... 65
Healthcare Acronyms and Abbreviations... 66
Working with Phone Numbers... 69
Special Dialing Characters... 70
Phone Number Rules... 71
Pop-Up Dialog Box Reference... 75
Select Group... 75
Select User or Group... 76
Select User, Group, or Address Book Entry... 77
Select Site... 78
Downloading the Client Redirect Utility... 79
List of Figures
1. User Console Welcome page... 10
2. Add Outside Buddy dialog box... 11
3. Personal Information page... 14
4. Telephone Information page... 17
5. Speech Recognition page... 20
6. Genie Settings page... 22
7. Notifications page... 23
8. Miscellaneous page... 25
9. Call Blocking page... 30
10. Select User or Group dialog box... 31
11. Call Blocking Page with calls accepted from a user... 31
12. Call Blocking page... 32
13. Call Blocking page... 33
14. Call Forwarding page... 35
15. Buddies page... 38
16. Add/Edit Buddy dialog box... 38
17. Add/Edit Outside Buddy dialog box... 39
18. Send Text page... 43
19. Select User or Group dialog box... 44
20. Groups page... 49
21. Edit Group dialog box... 50
22. Info page of the Edit Group dialog box... 51
23. Department page of the Edit Group dialog box... 53
24. Members page of the Edit Group dialog box... 54
25. Members added to a group... 55
26. Forwarding Options page of the Edit Group dialog box... 56
27. Permissions page of the Edit Group dialog box... 58
List of Tables
1. Telephone information fields... 17
2. Commands for calling a buddy... 41
3. Changing forwarding values... 56
4. Recording names for a group... 60
5. Spoken name fields... 61
6. Healthcare acronyms and abbreviations... 66
7. Special dialing characters... 70
8. Maximum phone number length per locale... 72
Getting Started
The User Console is a browser-based application you can use to enter profile information and customize settings. The profile registers you as a user on the system, and stores permissions and preferences that control how your badge works. Your profile is stored in a database on the Vocera server.
The User Console also gives you some additional capabilities, such as the ability to create “buddies” and to send text messages to badges.
The following topics will help you get started with the User Console: • Logging in to the User Console on page 9
• Overview of the User Console on page 11 • Using the Documentation on page 12 • Displaying Help on page 12
Note: If your Vocera deployment is a cluster, you should use the Client Redirect Utility to access the User Console. See Downloading the Client Redirect Utility on page 79.
Logging in to the User Console
The User Console is compatible with Internet Explorer 6, 7, 8, or 9. Configure the Internet Explorer security level to Medium or lower. If the security level is set to High, Internet Explorer prevents the scripts used by the User Console from executing completely. You can configure security settings through Tools > Internet Options > Security in Internet Explorer. See your Internet Explorer documentation for complete information.
The Vocera administrator will give you the URL (web address) of the User Console. Record it here:
Logging in to the User Console
The Vocera administrator may have created a user profile for you. If so, the administrator will give you a user ID and password. Change this password after your first log in. See Personal Info on page 13. As an alternative, the
administrator may tell you to use Self Registration to create your profile. When Self Registration is enabled, a Register button appears on the login screen. To log in to the User Console (and self-register, if necessary):
1. Open an Internet Explorer browser window.
2. In the Address field of the browser window, enter the URL provided by the administrator. This address should be in one of the following formats: • http://vocera_ip_address/console/index.jsp
• https://vocera_ip_address/console/index.jsp
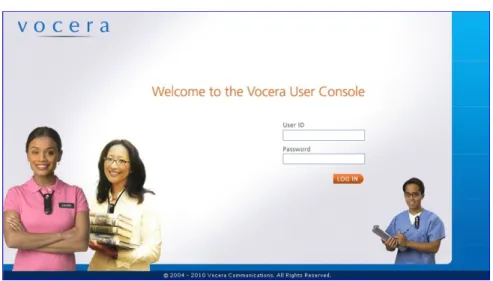
where vocera_ip_address is the numeric IP address of the Vocera server. Your Vocera administrator will tell you whether to use http or https. The User Console Welcome page appears.
Figure 1. User Console Welcome page
3. Do either of the following:
• If you already have a user ID and password, enter them in the corresponding fields and click Log In.
The Personal Information page of User Console appears. If you used a default password to access the User Console, change it as described in Personal Info on page 13.
Overview of the User Console
Note: Your password is case-sensitive. If you see an error message when you attempt to log in, make sure the Caps Lock on your keyboard is turned off.
• If the system administrator told you to add yourself to the system, click the Register button.
The Personal Information page of User Console appears. Enter basic information to create your profile, as described in Personal Info on page 13. After you save your basic information, other links will appear on the left navigation bar.
Overview of the User Console
The User Console opens to the Personal Information page, which is shown in Personal Info on page 13. To the left of this page is a navigation bar with buttons that provide quick access to the other pages in the User Console. These pages are described, in order, in this guide. You can also click the help button on any page or in any dialog box to get help on that topic.
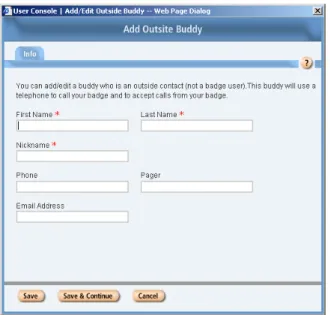
Some pages have buttons that open dialog boxes. For example, when you click the Add Outside Buddy button on the Buddies page, it opens the Add Outside Buddy dialog box:
Using the Documentation
Dialog boxes have tabs that group complex information to make it easier to enter and understand. Most have both a Save and Save & Continue button. • Clicking Save will save the data and close the dialog.
• Clicking Save & Continue will save the data and clear the fields, leaving the dialog open to allow faster entry of new information.
• If you click Cancel, or close the dialog without clicking Save or Save & Continue, the data showing will be lost.
Using the Documentation
Documentation is available from the User Console in PDF (Portable Document Format) format.
You must use the Adobe Reader, a free software program from Adobe Systems Incorporated, to view PDF documents. You can download the Adobe Reader or learn more about it on the Adobe Reader [http://www.adobe.com/products/ acrobat/readermain.html] home page.
To view the Vocera documentation:
1. Click Documentation on the navigation bar.
The Documentation page appears, displaying links to PDF versions of all the documentation.
2. Click a link to view each of the documents.
The manual or instruction sheet opens in a separate window.
Displaying Help
The User Console provide context-sensitive help. To display help, click the ? button on any console page.
Basic Information
The Basic Information screen offers the following pages: • Personal Info on page 13
• Phone on page 16
• Speech Recognition on page 19
Personal Info
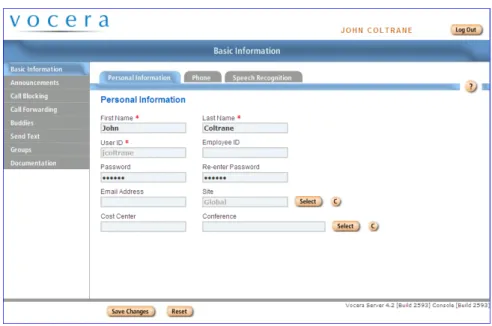
The Personal Information page lets you specify basic information such as a name, user ID, and password, as well as accounting information such as an employee ID and cost center ID.
To enter or change your personal information: 1. Click Basic Information in the left navigation bar.
2. Click the Personal Information tab to display the Personal Information page.
Personal Info
Figure 3. Personal Information page
3. Enter or change your First Name and Last Name in the corresponding fields.
The name must start with a letter or a digit. It must contain only letters, digits, spaces, apostrophes ('), underscores (_), or dashes (-).
Note: The names you enter here determine the names that other Vocera users can speak to contact you. If some people refer to you by a different name, such as a nickname or a married name, make sure you also enter it as an Alternate Spoken Name in the Speech Recognition tab.
4. The User ID field displays the ID you use to access the User Console; other people may also use it to send an email message to your Vocera device. Your User ID uniquely identifies you to Vocera.
Only a system administrator or tiered administrator can change the value in the User ID field.
5. Your system may optionally use a value in the Employee ID field to identify you to Vocera.
Only a system administrator or tiered administrator can change the value in the Employee ID field.
Personal Info
6. If you want, enter a Password of 5 to 15 characters, and enter it again in the Re-enter Password field to make sure you typed it correctly. The user ID is not case-sensitive, but the password is.
A password is not required, but it prevents unauthorized access to the User Console.
7. Enter your Email Address. When your email address is included in your user profile, other Vocera users can send voice email messages from their Vocera devices to your email address. See the Vocera User Guide for information about sending and receiving voice email messages.
Note: Your administrator must configure certain Email settings to enable this feature.
8. Specify your Site by clicking the Select button to open the Select Site dialog box, then choose a name from the list and click Finish.
In Vocera, a site is a specific physical location where users communicate with Vocera devices.
• If your organization has multiple sites connected to the same Vocera server, choose the site that represents your physical location.
• If your organization does not have multiple sites, accept the default Global setting.
9. Optionally specify a value in the Cost Center field.
A cost center ID enables Vocera to track system usage by users and potentially allows an organization to charge for relative usage.
10. Optionally specify the conference you want to use in the Conference field. Click Select, choose from the list of available conferences, and then click Finish.
In a conference, your Vocera device has the push-to-talk quickness and convenience of a walkie-talkie. You can communicate with everyone in the conference instantly. Everyone in a conference can hear you, anyone in a conference can reply as soon as you release the Call button, and everyone hears the reply immediately.
Your system administrator must grant you permission to enter or leave a conference. See the Vocera Badge User Guide for complete information about conferences.
Phone
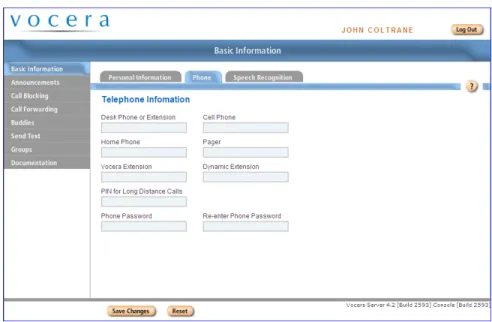
Phone
The Telephone Information page lets you provide telephone numbers and additional phone-related information for yourself. If your site has the telephony integration option enabled, entering telephone numbers provides a wide range of connectivity between your Vocera device, on- and off-site telephones, and pagers:
• You can forward calls from your Vocera device to any of the numbers that you enter. If you forward calls when these fields are left blank, the Genie tells callers that the number is not available.
• You can choose to use either the Desk Phone number or the Vocera Extension to route outside calls and calls made from the Smartphone keypad to your Vocera device. In addition, you can use a voice command to transfer calls to your Desk Phone number.
• Either the Desk Phone number or the Vocera Extension is displayed on a pager with the Vocera system number when you send someone a page. The person who receives the page can return your call, enter your extension at the Vocera system Genie prompt, and be connected directly to your Vocera device.
The system administrator must grant you permission to forward calls to telephones and to receive pages.
To enter phone information:
1. Click Basic Information in the left navigation bar.
Phone
Figure 4. Telephone Information page
3. Optionally specify any of the following values on the Telephone Information page:
Table 1. Telephone information fields Field Description Desk Phone or
Extension
Enables the following features:
• Lets you forward or transfer calls from your Vocera device to your desk phone.
• If no Vocera Extension is specified, allows outside callers to connect to your Vocera device by entering the your desk extension at the Vocera hunt group prompt, instead of saying your name.
• Allows you to send a page and receive the return phone call from a person you paged on your Vocera device.
• If users have appropriate permission and have been enabled to access the Genie from a phone, the Desk Phone or Extension field allows users to be authenticated by Caller ID when they call the Vocera hunt group number.
See Working with Phone Numbers on page 69 for complete information about entering phone numbers.
Phone
Field Description
Cell Phone Lets you forward calls from your Vocera device to your cell phone.
If you have appropriate permission and have been enabled to access the Genie from a phone, the Cell Phone field allows you to be authenticated by Caller ID when you call the Vocera hunt group number.
See Working with Phone Numbers on page 69 for complete information about entering phone numbers.
Home Phone Lets you forward calls from your Vocera device to your home phone.
See Working with Phone Numbers on page 69 for complete information about entering phone numbers.
Pager Lets you receive calls on your pager from other Vocera users who issue the “Send a Page” voice command. See Working with Phone Numbers on page 69 for complete information about entering phone numbers.
Vocera Extension Lets you route calls made to this virtual extension to go to your Vocera device instead. If the Vocera Extension field is filled in, it is used for
• Direct dialing from Smartphone keypads • Paging callbacks
• Vocera hunt number access
If you leave this field blank, Smartphone users and outside callers can dial your desk phone to be routed to your Vocera device.
See Working with Phone Numbers on page 69 for complete information about entering phone numbers.
Because the Vocera extension is a virtual phone number, you can put any number in the Vocera Extension field. If a user already has a desk phone number, you can reuse that number for the Vocera Extension field but prepend a digit, such as 8, to make the number unique in the Vocera system.
PIN for Long Distance Calls
Lets your organization authorize telephone usage and distribute telephone costs among different users, departments, or sites.
Speech Recognition
Field Description
Phone Password Password used to authenticate you when you access the Genie from a phone.
The Phone Password must be 5 to 15 characters consisting of letters or numbers. Special characters are not allowed. Do not enter your regular Vocera password that you use to log into the User Console. Re-Enter Phone
Password
Retype the same password you entered in the Phone Password field.
4. Click Save Changes.
Speech Recognition
When another user issues a command to call you, leave a message for you, locate you, and so forth, the Vocera system software analyzes the name the caller spoke and matches it to the text in the First Name and Last Name fields of your profile.
The Speech Recognition page provides a way for you to enter variations of your name, to increase the Genie’s ability to recognize you when someone is speaking your name.
To enter variations of your name:
1. Click Basic Information in the left navigation bar.
Speech Recognition
Figure 5. Speech Recognition page
3. Your first and last names, entered on the Personal Information page, are automatically used for speech recognition. If you are called by any other names, enter them in Alternate Spoken Names as follows:
• If you are called by one or more variations of your name (Bob Jones and
Rob Jones, in addition to Robert Jones, for example), enter each variation in a different field.
• If your name has an unusual pronunciation, and you find that the system is having trouble recognizing it, enter an Alternate Spoken Name that is spelled as your name is pronounced, rather than as it is usually spelled. For example, if the system does not recognize your name as Jodie Dougherty, you could enter Jodie Dockerty.
4. Optionally enter an Identifying Phrase that distinguishes you from others who have the same name or a name that sounds alike. For example, if there are two Mary Hills on the system, but you are on the third floor and the other is on the first floor, you could enter Mary Hill on the first floor as your Identifying Phrase.
Vocera also uses departments to differentiate among users with the same names. Departments are usually easier to set up and use than identifying phrases. See Personal Info on page 13.
Announcements
Your Vocera administrator specifies many behaviors and settings for your badge. For example, your administrator specifies whether you hear an alert tone when you receive a message or when you have unplayed messages waiting.
If your administrator does not automatically override your own settings, you can use the Administration screen to customize them, as described in the following sections:
• Genie Settings on page 21 • Notifications on page 23 • Miscellaneous on page 25
Genie Settings
Genie Settings personalize your interactions with the Vocera Genie. To change Genie Settings:
1. Click Announcements in the left navigation bar.
Genie Settings
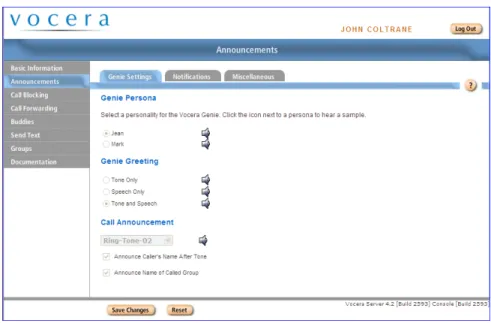
Figure 6. Genie Settings page
3. Select a Genie Persona. The Genie Persona selection determines the speaker of the prompts you hear when you interact with the system. To hear a sample of a persona, click the speaker icon next to the selection. 4. Select a Genie Greeting. The Genie Greeting is what you hear when you
press the Call button. Select Tone Only to be greeted with a short tone, Speech Only to hear the spoken greeting (“Vocera”), or Tone and Speech to hear the combination of tone and speech.
5. In the Call Announcements section, select a ring tone from the list and then click the speaker icon next to the tone to hear a sample.
6. If you want to hear who is calling the badge, check Announce Caller's Name After Tone. (It will take additional time to connect each call.) Note: Announce Caller’s Name After Tone is especially useful if you uncheck Auto Answer for Incoming Calls, because you are then given the opportunity to reject calls. When you reject a call, the caller is told that you are not available.
7. If you sometimes receive a call made to a group that you belong to and you would like the Genie to identify the group that was called and the group's site (if it is different from caller's site) to set the context of the call, check Announce Name of Called Group.
Notifications
Notifications
Notifications control many of the badge sounds you hear, and enable or disable certain automatic operations.
To change Notifications:
1. Click Announcements in the navigation bar.
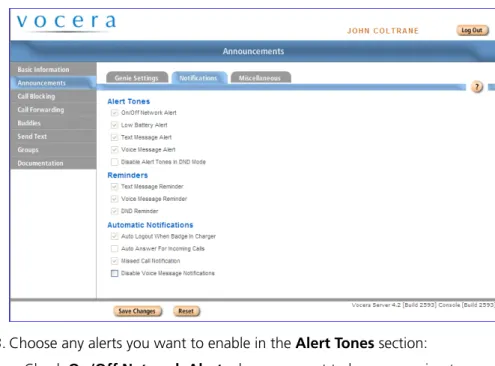
2. Click the Notifications tab to display the Notifications page. Figure 7. Notifications page
3. Choose any alerts you want to enable in the Alert Tones section:
• Check On/Off Network Alert when you want to hear a warning tone when the badge moves out of the range of your wireless network. (You can also monitor the network signal strength by looking at the badge display.)
If you normally move between buildings, and the network does not cover the outdoor spaces, you might not want to hear an audible alert.
• Check Low Battery Alert if you want the badge to tell you when the battery needs to be recharged. The warning will be repeated at intervals until you change the battery. (You can also monitor the battery level by looking at the badge display. In addition, the LED at the top of the badge will blink fast red when the battery is low.)
Notifications
• Check Text Message Alert to hear a tone when you receive a new text or email message. The tone sounds only once for each new message. • Check Voice Message Alert to hear an alert tone when you receive a
new voice message. The tone sounds only once for each new message. If you also enable Missed Call Notification (see below), you will not hear a tone whenever a verbal notification is given.
• Check Disable Alert Tones in DND Mode to suppress all alerts when you put the badge in Do Not Disturb mode.
4. Choose any reminders you want to enable in the Reminders section. When you set up reminders, your badge periodically plays a tone to notify you when you forget to pick up messages or when you are in Do Not Disturb mode for a long period of time.
• Check Text Message Reminder to hear a tone every 10 minutes until you pick up new text messages.
• Check Voice Message Reminder to hear a tone every 10 minutes until you pick up new voice messages.
• Check DND Reminder to hear a tone every 10 minutes when your badge is in Do Not Disturb mode.
5. Choose any notifications you want to enable in the Automatic
Notifications section. Automatic notifications allow you to bypass certain operations without confirming them.
• When you place your badge in a battery charger, Auto Logout When Badge in Charger sends a message to the Vocera server to log you out and then turns off the badge’s power. This is useful in situations where badges are shared; when the battery gets low, you can place the badge in an eight-bay charger, take a fully charged badge out of the charger, and immediately log in to the charged badge.
If you do not log in using voice commands (that is, you have a dedicated badge and are logged in all the time), the power on the badge will turn off when you place the badge in the charger, but you will not be logged off.
If Auto Logout When Badge in Charger is disabled, the badge power remains on and you stay logged in to the server while the battery is charging. This is convenient when you want to use the badge while it is sitting in a single-bay charger.
Miscellaneous
• Auto Answer For Incoming Calls connects callers immediately, without asking you whether or not you want to take the call. If you need all your calls to be connected quickly, you can enable this feature.
• When you press the Call button on your badge, Missed Call
Notification announces the names of callers who unsuccessfully tried to call your badge since the last time you pressed the Call button, and tells you who left messages.
• Disable Voice Message Notifications causes the Genie to suppress notifications when you receive a message. However, you may still hear a voice message alert tone (if the Voice Message Alert option is selected), and a telephone icon appears on the badge display when you have unplayed voice messages.
6. Click Save Changes.
Miscellaneous
The miscellaneous options control the behavior of the Play Messages commands and the call setup.
To change Miscellaneous settings:
1. Click Announcements in the navigation bar.
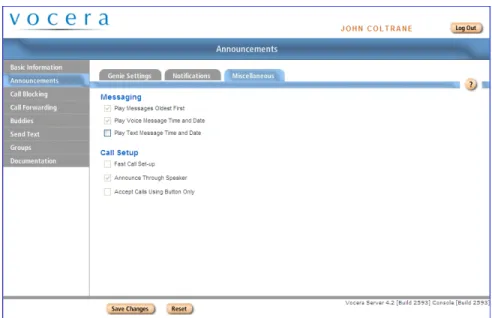
2. Click the Miscellaneous tab to display the Miscellaneous page. Figure 8. Miscellaneous page
Miscellaneous
3. Use the Messaging fields to control the behavior of the “Play messages” command. Check an option to enable it; uncheck an option to disable it. • Check Play Messages Oldest First if you want messages to be played in
the order in which they are received. If you leave this option unchecked, messages will be played in reverse order (newest first).
Note: Urgent messages will be played before non-urgent ones in any case.
• Check Play Message Time and Date if you want to hear the date and time each message was sent during message play.
Note: Even if you don’t choose this option, you can always hear the time a message was sent by pressing the Call button and saying “Time” during or just after the play of the message.
4. Use the Fast Call Setup field to specify whether you want to take advantage of fast call setup. Checking Fast Call Setup greatly speeds up your interaction with the Genie.
• If you check Fast Call Setup, a call is connected as soon as the recipient accepts it.
This choice can occasionally truncate the Genie’s announcement of the call to you.
• If you do not check Fast Call Setup, the Genie always completes the call announcement to you before connecting the call.
This choice can cause the recipient of a call to notice a brief delay
between the time when a call is accepted and the time when it is actually connected.
5. Use the Announce Through Speaker setting to control the way the badge plays call and message announcements when you are using a headset (or managed lanyard):
• Check Announce Through Speaker to play incoming call and message announcements through the badge speaker when a headset is plugged in. If you select this feature, only the announcement plays through the speaker; the actual call or message then plays through the headset. • Uncheck Announce Through Speaker to play both the announcement
Miscellaneous
When a headset is plugged into the badge, all audio plays through the headset by default. Consequently, if you don’t wear your headset all the time, you may not hear an incoming announcement, and you may not know that someone is trying to contact you.
If you select Announce Through Speaker, you can leave your headset plugged in, and simply put it on to communicate after you hear the announcement. If you turn on Announce Through Speaker and you are wearing your headset when a call comes in, you may not hear an announcement in a noisy environment (because it plays through the speaker); however, you will still hear the call or message through the headset.
Note: When your headset is not plugged in, all calls, messages, and announcements play through the speaker, as usual, regardless of the Announce Through Speaker setting.
6. Use the Accept Calls Using Buttons Only field to specify whether you want to allow the use of voice commands to accept or reject calls. Enabling buttons-only answering is useful in certain high-noise environments. For example, background noise can cause poor speech recognition in some situations, resulting in the Genie repeatedly saying "I'm sorry, I didn't understand". In other situations, background noise can cause the Genie to prematurely accept or reject calls without user input.
• Check Accept Calls Using Buttons Only to accept or reject incoming calls by pressing the Call or DND/Hold button only.
Selecting this feature disables the use of "Yes" and "No" voice commands to accept and reject incoming calls.
• Uncheck Accept Calls Using Buttons Only to accept or reject a call with either voice commands or buttons.
Call Blocking
Use call blocking to select which other users can get through to your badge. You can choose to accept or block calls from any user or group. For example, you might choose to accept only calls from certain individuals if you are in a meeting.
Like DND mode, Call Blocking prevents other users from reaching you. It gives you more flexibility than DND, however, because you can select exactly the users or groups of users you want to block or accept. Also, whereas DND mode automatically ends the next time you press the Call button, your Call Blocking settings remain effective until you explicitly change them.
The Call Blocking page has two lists: one for people whose calls you want to accept, and one for people whose calls you want to block. The Call Blocking Default setting list applies to people who does not appear in either list.
Blocking Calls
To block all calls, or to accept calls only from specific people:
Blocking Calls
Figure 9. Call Blocking page
2. Select Block calls from anyone not listed above as the Call Blocking Default.
3. To block calls from everyone, click Save Changes. All calls are now blocked. To accept calls only from specific individuals or groups, click the Add Name button below the Accept Calls From list. The Select User or Group dialog box appears.
Blocking Calls
Figure 10. Select User or Group dialog box
4. Choose users or groups whose calls you want to accept and click Finish. The names appear in the Accept Calls From list.
Figure 11. Call Blocking Page with calls accepted from a user
Accepting Calls
Accepting Calls
To accept all calls, or to block calls only from specific people: 1. Click Call Blocking in the left navigation bar. The Call Blocking page
appears.
Figure 12. Call Blocking page
2. Select Accept calls from anyone not listed above as the Call Blocking Default.
3. To accept calls from everyone, click Save Changes. All calls are now accepted.
4. To block calls from specific individuals or groups, and accept calls from everyone else, click the Add Name button below the Block Calls From list. The Select User or Group dialog box appears.
5. Choose users or groups whose calls you want to block and click Finish. The names of the blocked callers appear in the Block Calls From list.
Blocking Calls From Specific Group Members
Blocking Calls From Specific Group Members
To block calls from a group, but accept calls from some members of the group:
1. Click Call Blocking in the left navigation bar. The Call Blocking page appears.
Figure 13. Call Blocking page
2. Select Accept calls from anyone not listed above as the Call Blocking Default.
3. Click the Add Name button below the Block Calls From list. The Select User or Group dialog box appears.
4. Select the group whose calls you want to block and click Finish.
5. Click the Add Name button below the Accept Calls From list. The Select User or Group dialog box appears.
6. Select the names of the group members whose calls you want to accept and click Finish.
7. Click Save Changes.
Blocking Calls With Voice Commands
Blocking Calls With Voice Commands
• To block calls, press the Call button and tell the Genie to “Block all calls” or “Block all calls except from (and then speak the names of the exceptions).” • To accept calls, press the Call button and tell the Genie to “Accept all
calls” or “Accept all calls except from (and then speak the names of the exceptions).”
When you block or accept calls from your badge, the settings in the User Console change to match.
Call Forwarding
Call Forwarding options determine when and where calls are forwarded. No Forwarding means the Vocera server will prompt the caller to leave a message. Important: The system administrator must grant you permission to forward calls. In addition, you can forward calls to a phone number only if the Vocera system has been integrated with the telephone system. If you set forwarding options without the proper permissions, your calls are blocked—they are not forwarded, and they are not put through.
To choose Call Forwarding Options:
1. Click Call Forwarding in the left navigation bar to display the Call Forwarding page.
2. Click to select one of the following methods:
• No Forwarding means the Vocera server will prompt the caller to leave a message.
• Forward To Company Voice Mail transfers unanswered calls to the voice mailbox associated with your desk phone.
• Forward To Another Badge, Group, or Address Book Entry
automatically forwards unanswered calls to the badge of another user or to the phone of someone in the address book. If you choose this method, click Select, choose the user, group, or address book entry to whom you want to forward your calls from the list that appears, and then click Finish.
• Forward To Desk Phone, Forward To Cell Phone, and Forward To Home Phone forward calls to the corresponding number listed on your Personal Information page.
• Forward To Another Number allows you to enter the number to which you want to forward calls. See Working with Phone Numbers on page 69 for details about entering phone numbers. 3. Choose when to forward calls:
• All forwards all calls. Your badge will not ring.
• Unanswered forwards any calls you do not answer, for any reason. • Offline forwards all calls you receive when you are out of range of the
network or are logged off. 4. Click Save Changes.
Buddies
A buddy is someone you can call by using a nickname in a voice command, or a friend who is not in the Vocera system. You can assign a special ring tone to each buddy, and you can give buddies VIP status.
VIP status means that calls will be put through even if you blocked all calls or put the badge into Do Not Disturb mode. If one of these conditions is in force, the Genie asks the buddy if the call is urgent. If the buddy says “Yes,” the Genie puts the call through.
There are two types of buddies: outside buddies and inside buddies. An outside buddy is one you contact only by calling a telephone from your badge, or by sending email messages from your badge to an email account. An inside buddy is another badge user, a group, or an address book entry. You contact an inside buddy the same way you contact anyone with the badge. Important: The system administrator must grant you permission to place phone calls. In addition, you can call a phone number only if the Vocera system has been integrated with the telephone system.
Adding a Buddy
Adding a Buddy
Figure 15. Buddies page
2. Click Add Buddy or select an existing buddy in the list and click Edit Buddy.
The Add/Edit Buddy dialog box appears. Figure 16. Add/Edit Buddy dialog box
3. Click the Select button to display the Select User, Group, or Address Book Entry dialog box, choose an item from the list and click Finish.
Adding an Outside Buddy
The Select User, Group, or Address Book Entry dialog box closes, and the name you chose appears in the Add Buddy dialog box.
4. Use the Nickname field to specify the name that you want to use when you call this buddy.
Important: All the names you enter in the User Console must start with a letter or a digit. They must contain only letters, digits, spaces, apostrophes ('), underscores (_), or dashes (-).
5. Choose the Ring Tone that you want to be played to notify you that this buddy is calling. To hear a sample of each ring tone, select the ring tone from the drop-down list and then click the speaker icon next to the list. 6. Check Buddy Has VIP Status if you want this buddy to be able to call you
even when you are blocking calls or in Do Not Disturb mode.
7. Click Save to save the buddy information and return to the Buddies tab, or click Save and Continue to save this buddy and begin to add another buddy.
Adding an Outside Buddy
1. On the Buddies page, click Add Outside Buddy or select an existing outside buddy and click Edit Buddy. The Add/Edit Outside Buddy dialog box appears.
Deleting a Buddy
2. Use the First Name and Last Name fields to enter your buddy’s name. 3. Use the Nickname field to enter the name that you want to use when you
call this buddy.
Important: All the names you enter in the User Console must start with a letter or a digit. They must contain only letters, digits, spaces, apostrophes ('), underscores (_), or dashes (-).
4. If Vocera is integrated with your phone system, use the Phone field to enter your buddy’s telephone number. See Working with Phone Numbers on page 69 for details on entering phone numbers. Your system administrator must grant you permission to call outside numbers.
5. Optionally enter the telephone number for your buddy’s pager in the Pager field. See Working with Phone Numbers on page 69 for details about entering phone numbers.
If Vocera is integrated with your phone system, you can send your buddy a page from your badge. Your buddy’s return call is connected directly to your badge—you do not have to wait for someone to find you. You must have a Desk Phone or Extension defined in your user profile to receive the return call on your badge. See Personal Info on page 13.
6. Use the Email Address field to enter your buddy’s email address, if you want to send email with voice message attachments to this buddy. Note: Your administrator must configure certain Email settings to enable this feature.
7. Click Save to save the new buddy profile and return to the Buddies tab, or click Save and Continue to save this buddy and begin to add another buddy.
Deleting a Buddy
1. Click the Buddies link on the left navigation bar. The Buddies page appears. 2. Select the buddy name from the list and click Delete.
The buddy is removed from your list.
Calling a Buddy
To call a buddy, press the Call button, wait for the Genie to answer, and then tell the Genie to “Call (the buddy’s nickname)”.
Calling a Buddy
Table 2. Commands for calling a buddy
Action Recommended
Commands (Examples in Italics)
Alternate Forms
Calling a buddy Call Smitty. Find Smitty.Contact Smitty. If VIP status is enabled in your user profile, the buddy will be notified of your message immediately, even if he or she put the badge in Do Not Disturb mode, or issued a command to block calls.
Note that you can use an inside buddy’s nickname in any command, not just for Calls.
Send Text
You can send a text message to the display on another badge using the Send Text feature.
To send a text message:
1. Click Send Text link in the left navigation bar. The Send Text page appears. Figure 18. Send Text page
2. To choose the recipient(s), click the Select Recipient button. The Select User or Group dialog box appears.
Figure 19. Select User or Group dialog box
3. Choose the users and groups to whom you want to send the message. To select multiple names, hold down the Ctrl key while you click your selections. To select a range of names, click the first name in the range and then hold down the Shift key and click the last name in the range.
4. Enter up to 11 characters of text in the Subject field. 5. Enter up to 115 characters of text in the Message field. 6. Click Send. (To cancel the message, click Reset.)
Working with Groups
Groups provide a way for internal or external callers to communicate with badge users based on their roles within an organization.
For example, groups let you call someone who fits a specific role (“Call a sales person”), belongs to a certain department (“Call Accounts Receivable”), or has some other skill or authority that the caller requires (“Call a manager”).
Groups also provide a way to broadcast to specific set of users at the same time (“All cashiers to the front, please”) or to leave messages for many users at once (“Send a message to Nursing Assistants”).
Members of certain groups have management capabilities for other groups. For example, the members of the Charge Nurse group may manage the Code Blue group in a hospital, or members of the Head Cashier group may manage the Cashier group in a retail store.
Note: You use the Groups page in the User Console, as well as voice commands, to manage groups. You will see entries in the Group Name list only if you are a group manager. The rest of this chapter is relevant to group managers only. If you are not a group manager, continue with the next chapter. This chapter presents the following topics:
• About Group Management on page 46 • Group Call Forwarding on page 46 • Groups and Departments on page 47 • About Instant Conferences on page 48 • Maintaining Group Information on page 49 • Recording Names for a Group on page 60
About Group Management
About Group Management
If you are a member of a group with management capabilities, you can do any of the following tasks:
• Change all of the basic information except the group name and the site. The basic information includes alternate spoken names and other speech recognition features, scheduling options, and the group phone extension. • Specify whether to use the group as a department, enter a PIN for telephony,
and enter a cost center ID.
• Add and remove group members, change their order, and specify whether the group has only temporary membership.
• Change the forwarding options.
• Specify a group whose members can add themselves to the managed group. • Maintain the list of members in the associated conference group.
Members of a group with management capabilities can use voice commands to add and remove members from the managed group. For example, a member of the Head Nurse group that manages the Code Blue group could issue the following commands:
• Add Lin Ma to Code Blue
• Remove Cardiologists from Code Blue
Refer to the Vocera Badge User Guide for more information on these voice commands.
Often, these voice commands are the only features a group manager needs to use. However, all the tools for managing a group are available through the Edit Groups page of the User Console. This page appears in the User Console only if you are a member of a group that has permission to manage another group. The rest of this section shows you how to use the Edit Groups page.
Note: If you are a group manager and also a tiered administrator, you can use the Administration Console to perform both group management and tiered administrator tasks.
Group Call Forwarding
Groups determine the call forwarding that is possible within your organization. A combination of options lets you handle almost any forwarding scenario your organization requires, including chains that pass a call from one group to another until some individual is available to answer it.
Groups and Departments
For example, suppose a call—either an internal call from a badge, or an external call, when telephony is enabled—is directed to the Radiology group in a
hospital. When you create or modify the Radiology group, the forwarding options you select let you handle this situation in any of the following ways: • Never forward
Calls directed to Radiology are routed to an available member. If no member is available, the caller is prompted to leave a message.
• Forward only when a group member is unavailable
Calls directed to Radiology are first routed to an available member. If no member is available, the call is then forwarded to a badge, group, address book entry, or phone number.
For example, if no one in the Radiology group is available, you may want to forward the call to the Imaging group. Similarly, if no one in Imaging is available, you may want to forward the call to a desk extension or address book entry that is always available.
• Always forward, even if a group member is available
Calls directed to Radiology are forwarded immediately. Group members are never contacted directly.
For example, you may want to route calls to the Radiology group directly to a desk extension. Individuals in the group can then be contacted only by name. Do not confuse the call forwarding options you can specify for a group with the call forwarding options a group member can specify. Call forwarding for a group determines the call flow through an entire organization; call forwarding for an individual member is more of a courtesy or convenience.
Call forwarding for a group occurs only when a call is directed to a group (“Call Radiology”), not to one of its members (“Call Roberta Verdi”). If Roberta Verdi is a member of Radiology, calls that are placed directly to Roberta are forwarded according to the options she specifies through voice commands or the User Console. Similarly, when a call is placed to Radiology, the group properties determine where the call is forwarded, and the forwarding options specified by individual members are ignored.
Groups and Departments
A department is a special type of group that is related to the structure of the organization using the Vocera system. By designating a group as a department, you provide accounting features and speech recognition enhancements that are
Departments and Voice Commands
For example, suppose the Midtown Medical Center has units such as Pediatric Nurses and Pediatric Physicians. If your Vocera configuration has corresponding groups, it makes sense to designate those groups as departments. Users at Midtown Medical Center can then take advantage of the extended accounting and speech recognition features of these Vocera departments.
Departments and Voice Commands
Departments are a convenient way to let badge users contact each other with voice commands. When a caller specifies a department in a voice command, Vocera can:
• Differentiate among users with the same first and last names.
For example, if your organization has two individuals named John Smith, a user can issue the voice command “Call John Smith in Tech Support”. • Identify a badge user when the caller knows the first name and department,
but not the last name, of other people in the organization.
For example, a caller can issue the voice command “Call John in Tech Support”.
In addition to departments, you can also use identifying phrases to differentiate among users, as described in Speech Recognition on page 19. However, departments are usually easier to set up than identifying names, and more natural for users to work with.
Departments and Accounting
Implementing Vocera departments optionally allows an organization to distribute system usage and telephony costs among different divisions: • A telephony PIN authorizes members of a Vocera department to make toll
phone calls and allows an organization to charge departments for those calls. • A Cost Center ID enables Vocera to track system usage by department and
potentially allows an organization to charge its departments for relative usage.
About Instant Conferences
The conference feature provides badges with “push-to-talk” communication that simulates the behavior of a walkie-talkie. While you are in a conference, you can instantly communicate with other users in the same conference by pressing and holding the Call button—you don’t have to wait for speech recognition or Genie interactions.
Maintaining Group Information
Vocera supports a practically unlimited number of conferences. Many conferences can be active at the same time, with different users in each one. Users within the same conference can interact with one another.
Every group has a conference associated with it. For example, if your site has groups called Managers and Cashiers, users automatically have access to conferences with those names. Although users can be in multiple groups simultaneously, each user can be in only one conference at any time. Users do not need to be group members to use a conference; however, they need the Conference permission to enter or leave a conference. The Vocera administrator can assign users to conferences and also remove them. If you are a group manager, the User Console lets you maintain the user list for conferences associated with your groups.
Maintaining Group Information
Use the Edit Groups page to maintain group information. To maintain your groups:
1. Click Groups in the navigation bar.
The Groups page appears, displaying the list of groups that you can manage.
Figure 20. Groups page
Basic Group Information
The Group Information page of the Edit Group dialog box appears. Note: The Search field lets you type as quickly as you want, and the field displays a list of possible matches that is progressively filtered with every additional character you enter.
Figure 21. Edit Group dialog box
The rest of this section shows you how to maintain the information in this dialog box.
Basic Group Information
The Info page of the Edit Group dialog box lets you maintain the telephone extension for the group, alternate names for the group and its members, and scheduling options. The Info page appears when you select a group and click Edit Group on the Edit Groups page (see Maintaining Group Information on page 49).
Basic Group Information
Figure 22. Info page of the Edit Group dialog box
The values in the Group Name and Site fields are greyed out to indicate that you cannot change them. Only the Vocera Administrator can change the name of a group or its home site.
To maintain basic group information:
1. In the Phone Extension Field of the Info page, assign a telephone extension to the group. See Working with Phone Numbers on page 69 for details about entering phone numbers.
If Vocera is integrated with your phone system, outside callers who dial the Vocera system number can connect to the group by entering the group extension at the Genie prompt, instead of saying the group name.
2. In the Speech Recognition fields, optionally change the names that badge users can speak when they call the group.
• In the Member Name — Singular field, enter a name that describes a member of the group. For example, in the group called Sales, a group member could be known as a sales person. This allows the Genie to recognize a command such as “Call a sales person.”
Department Groups
• In the Member Name — Plural field, enter a name that collectively describes the members of the group. For example, in the group called
Sales, the collection of group members could be called all sales people. This allows the Genie to recognize a command such as “Send a message to all sales people.”
• In the Alternate Spoken Group Name field, you can enter a variation of the group name. For example, some people might say “The Sales team” instead of Sales. If you enter the Sales team as an Alternate Spoken Group Name, the Genie recognizes “Call the sales team.” 3. Use the Scheduling Options fields to specify how calls to the group are
routed:
• Choose Sequential if you want one person to be the main contact. The second member in the list is called only if the first person is not available, a third member is called only if the first two are unavailable, and so forth. Important: The order in which names appear in the Group Member Name list on the Members tab is important when you choose Sequential scheduling.
• Choose Round Robin if you want calls to be distributed as evenly as possible among group members. When you choose round robin, Vocera iterates through members in the group until someone accepts the call; however, the person who most recently accepted a group call is tried last. 4. Do either of the following:
• Click Save to close the Edit Group dialog box and return to the Edit Groups page.
• Click another tab in the Edit Group dialog box to maintain additional group information.
Department Groups
The Department page of the Edit Group dialog box lets you specify a group as a department and enter a telephony PIN or Cost Center ID for accounting purposes. The Department page appears when you click the Dept tab in the Edit Group dialog box (see Maintaining Group Information on page 49).
Department Groups
Figure 23. Department page of the Edit Group dialog box
To specify department properties:
1. Optionally check Use this Group as a Department to specify that the group you are editing is a department group.
If you check this field, the PIN for Long Distance Calls and Cost Center fields become available.
2. Optionally specify a value in the PIN for Long Distance Calls field. A telephony PIN authorizes members of a Vocera department to make toll phone calls and allows an organization to charge departments for those calls.
3. Optionally specify a value in the Cost Center field.
A Cost Center ID enables Vocera to track system usage by department and potentially allows an organization to charge its departments for relative usage.
4. Do either of the following:
• Click Save to close the Edit Group dialog box and return to the Edit Groups page.
• Click another tab in the Edit Group dialog box to maintain additional group information.
Group Members
Group Members
The Members page of the Edit Group dialog box lets you maintain the membership of a group. The Members page appears when you click the Members tab in the Edit Group dialog box (see Maintaining Group Information on page 49).
Figure 24. Members page of the Edit Group dialog box
Group membership can change over time. The Manager On Duty might change from shift to shift, as might the membership of the Code Blue Team. Users who are granted the permission “Add/Remove Me From Group” Voice Command can add themselves to a group or remove themselves from a group by issuing a command to the Genie.
A group can include any number of users, and can even include other groups. For example, the Company group may consist of all the department groups in your organization.
To manage members:
1. To add members to the group, click Add Name, then select the members from the list that appears.
When you are done, click Finish. The Select User or Group dialog box closes, and the names you selected appear in the Group Member Name list.
Group Members
Figure 25. Members added to a group
2. To remove a name from the list, select it and click Delete Name.
3. To change the position of a name in the list, select it and click Move Up or Move Down.
Note: The order of names matters only if sequential scheduling is selected in the Scheduling tab.
4. Optionally check Remove Users on Logout to specify that membership in the group is temporary.
When you check this field, Vocera automatically removes users from the group when they log out, but leaves the rest of the user profile in the database. Users are not added into the group automatically when they log back in.
5. Do either of the following:
• Click Save to close the Edit Group dialog box and return to the Edit Groups page.
• Click another tab in the Edit Group dialog box to maintain additional group information.
Group Forwarding
Group Forwarding
The Forwarding Options page of the Edit Group dialog box lets you maintain forwarding information for the group, including when to forward calls and the party to whom calls should be forwarded. The Forwarding Options page appears when you click the Forward tab in the Edit Group dialog box (see Maintaining Group Information on page 49).
Figure 26. Forwarding Options page of the Edit Group dialog box
To maintain group forwarding:
1. Optionally change forwarding values as follows: Table 3. Changing forwarding values
To forward in this situation
Do this
Group Permissions
To forward in this situation
Do this
Forward only when a group member is unavailable
Select either of the following values to specify the party to whom you want calls forwarded: • Check Forward to Another Badge, Group,
or Address Book Entry, then click Select and choose from a list of all possible values in the system.
• Check Forward to Another Number, then enter the number you want the call transferred to. See Working with Phone Numbers on page 69 for details about entering phone numbers. Then check Unanswered in the Forward When section.
Always forward, even if a group member is available
Select either of the following values to specify the party to whom you want calls forwarded: • Check Forward to Another Badge, Group,
or Address Book Entry, then click Select and choose from a list of all possible values in the system.
• Check Forward to Another Number, then enter the number you want the call transferred to. See Working with Phone Numbers on page 69 for details about entering phone numbers. Then check All in the Forward When section. See Group Call Forwarding on page 46 for more information about the forwarding situations.
2. Do either of the following:
• Click Save to close the Edit Group dialog box and return to the Edit Groups page.
• Click another tab in the Edit Group dialog box to maintain additional group information.
Group Permissions
The Permissions page of the Edit Group dialog box lets you determine whether the members of a group of users can add themselves as members to a
group that you manage. You can also view the permissions that the Vocera Administrator has granted the group you are managing; however, you cannot
Group Permissions
The Permissions page appears when you click the Permissions tab in the Edit Group dialog box (see Maintaining Group Information on page 49). Figure 27. Permissions page of the Edit Group dialog box
To manage permissions:
1. If you want to let members of a group add themselves to the group you are managing, click the Select button under Group of users permitted to add themselves to this group, choose the group that has this permission, then click Finish.
The Group Permissions page displays the name of the group with management permissions.
2. Do either of the following:
• Click Save to close the Edit Group dialog box and return to the Edit Groups page.
• Click another tab in the Edit Group dialog box to maintain additional group information.
The Group Conference
The Group Conference
The Conference page of the Edit Group dialog box lets you maintain the list of users who are in the conferences for the groups you manage. The Conference page appears when you click the Conference tab in the Edit Group dialog box (see Maintaining Group Information on page 49).
Figure 28. Conference page of the Edit Group dialog box
To manage conferences:
1. If you want to add users to the conference, click Add Name, select the users from the list that appears, then click Finish.
The Conference page displays the names you selected in the Conference Users list.
2. Do either of the following:
• Click Save to close the Edit Group dialog box and return to the Edit Groups page.
• Click another tab in the Edit Group dialog box to maintain additional group information.
Recording Names for a Group
Recording Names for a Group
When prompting users who want to call or leave a message for a group, or when confirming these commands, the Genie will say either the group name, or a variation of the group member name, depending on the situation. In the absence of recorded names, the Genie will use text-to-speech generation to say the appropriate name. To ensure more natural-sounding prompts, you can record group names that will be substituted for the synthesized speech.
To record group names, press the Call button, wait for the Genie to answer, and then tell the Genie “Record names for (group name)”. The Genie will then walk you through the steps to record the group name and the variations of the group member name.
Table 4. Recording names for a group
Action Recommended Commands (Italics indicate an
example)
Alternative Forms
Recording name prompts for a group
Record name for Technical Support.
Record name prompts for Technical Support.
Entering Spoken Names
As you create users, groups, and other entries in the Administration Console or the User Console, Vocera requires you to provide names. These names are more than just a tag to let you visually identify an entry when you are using one of the consoles—they are words users can speak when placing calls, and they are words that the Genie speaks in interactions with badge users. Because all Vocera names have speech recognition consequences, the exact way you enter them in the console is very important.
The following table lists all the name fields in Vocera: Table 5. Spoken name fields
Dialog Box Name Fields Add/Edit Site • Site Name
• Alternate Spoken Site Name Add/Edit User • First Name
• Last Name
• Alternate Spoken Names • Identifying Phrase Add/Edit Group • Group Name
• Member Name - Singular • Member Name - Plural • Alternate Spoken Group Name Add/Edit Location • Location Name
Rules for Entering Names
Dialog Box Name Fields Add/Edit Address
Book Entry
• First Name • Last Name • Name
• Alternate Spoken Names • Identifying Phrase
The rest of this appendix shows you how to use these name fields to create spoken names that are intuitive and meaningful for users.
Rules for Entering Names
The value in any name field must start with a letter or digit. It must contain only the following characters:
• Any of the 26 English letters, in lower or upper case • Digits, such as 0, 1, 2, 3, and so forth
• Spaces
• Apostrophes (') • Underscores ( _ ) • Dashes (-)
Names and Speech Recognition
The speech recognition system uses the values you enter in name fields to identify entities (users, groups, sites, locations, and address book entries). Any name that a user speaks in a badge command must appear in one of the name fields so the speech recognition system can identify it.
Each of these entities has one or more primary name fields (for example, First Name and Last Name are the primary name fields for a user; Group Name is the primary name for a group) as well as one or more Alternate Spoken Name fields.
Use the primary name fields to enter the most common name of an entity. This name should be the one that most people use, not the “official” name. For example, if everyone calls the user “William Bones” by the name “Billy”, you should enter “Billy” in the First Name field and “Bones” in the Last Name field.