Domino Certification
Authority and SSL
Certificates
Mike Bartlett
Setup Domino as Certification Authority
Process Client Certificate
Requests
Domino Certification Authority and SSL Certificates
November 2000
Redpaper
First Edition (November 2000)
This edition applies to Lotus Domino R5.0.4
This document created or updated on November 2, 2000. Comments may be addressed to:
IBM Corporation, International Technical Support Organization Dept. TQH Mail Station P099
2455 South Road
Poughkeepsie, NY 12601-5400
When you send information to IBM, you grant IBM a non-exclusive right to use or distribute the information in any way it believes appropriate without incurring any obligation to you.
Before using this information and the product it supports, be sure to read the general information in Appendix A, “Special notices” on page 59.
Contents
Preface . . . vii
The author that wrote this redpaper . . . vii
Chapter 1. Domino Certificate Authority and SSL Certificates . . . 1
1.1 Creating and configuring a Domino certificate authority database . . . . 3
1.2 Requesting and installing a Server Certificate . . . 10
1.2.1 Creating a server keyring . . . 13
1.2.2 Requesting a server certificate from a Certificate Authority. . . 15
1.2.3 Merging the Certificate Authority’s certificate into the server keyring 20 1.2.4 Install certificate into keyring . . . 25
1.3 Requesting Client (Browser) certificates . . . 36
1.3.1 Accept a certificate authority as a trusted root in your browser . . 38
1.3.2 Request a client certificate from the certification authority . . . 42
1.3.3 Approving a client certificate request in the Domino CA . . . 44
1.3.4 Accepting a client certificate into a browser keyring . . . 50
1.3.5 Requesting registration of a client certificate . . . 52
Appendix A. Special notices . . . 59
How to get IBM Redbooks . . . 63
Preface
To test certificate based authentication it is necessary to create keyrings to hold certificates for HTTP servers and for the browsers used to access the servers. This is most conveniently done by creating a certification authority to create and administer the necessary SSL certificates
This redpaper describes in detail how to setup Domino R5.0.4 as a Certification Authority (CA). We describe how to create and configure the Domino CA database, how to create a server keyring and how merge and install certificates into the keyring. Next, we describe how to issue client certificates from our newly created CA. This involves all the steps in accepting our CA as trusted root in the browser, requesting a certificate, approving the request, accepting the issued certificate into the browser keyring and finally requesting registration of the client certificate. We assume some knowledge of Public Key Infrastructure (PKI), x509 certificates and Domino administration.
The author that wrote this redpaper
This redpaper is a side product of the RedbookDomino and WebSphere Together, SG245955 that was produced by a team of specialists from around the world working at the International Technical Support Organization Cambridge Center. The authors biography is below.
Mike Bartlett is an IT Architect with IBM Global Services in Toronto, Ontario,
Canada. As an architect with the Domino-Notes Practice, his main role is the development of strategic e-Business solutions for IBM customers, including corporate extranets, messaging solutions and custom application design. Mike has over 26 years experience in consulting with client organizations in the insurance, distribution, finance, telecommunications, retail, and
manufacturing industries.
Chapter 1. Domino Certificate Authority and SSL Certificates
To test certificate based authentication it is necessary to create keyrings to hold certificates for HTTP servers and for the browsers used to access the servers. This is most conveniently done by creating a certification authority to create and administer the necessary SSL certificates. We chose to employ the Domino certificate authority to create the necessary keyrings and certificates. This paper describes the necessary steps to create a Domino based certification authority, browser certificates and client certificates to support SSL v3 certificate (x.509v3) based authentication.
We assume a good background understanding of the Public Key
Infrastructure (PKI) concepts involved and concentrate on the specific tasks to be performed in a Domino environment.
It is possible to use SSL for multiple protocols; however, we describe the setup for web access (that is HTTP and HTTPS protocols). Other protocols can easily be configured to use the certificate infrastructure we describe. The steps involved to setup a secure environment with both server and client (browser) SSL certificates using a Domino certificate authority (CA) are: 1. Create the Domino certificate authority database and the keyring for the
certificate authority.
This keyring holds the public and private key of the CA. The private key is exclusively used to sign server and client certificates, The public key of the CA is signed with the CA’s private key. This signed public key is used to provide a certificate flagged as a “trusted root” to be installed in server and clients to establish a chain of trust.
2. Create the Domino server’s keyring and have its public key certified by the Domino CA
This will require setting up a Domino Server Certificate Administration database to manage the server’s keyring file.
3. Request a client certificate(s) for the browser(s) and user(s) to access the server.
If you are using certificate based authentication (not just SSL
connections), store the client certificate(s) in the Domino directory for authentication.
The steps outlined require access by both a browser and a Domino Administrator client:
• Web browser:
The server administrator uses a browser to request and later receive a server certificate (as well as the “trusted root” certificate of the certificate authority)
The browser client uses their browser to request and receive their client certificate, and, as with the server, the certificate authority’s “trusted root” certificate
We tested using Netscape 4.7; the process Internet Explorer uses to accept client certificates is analogous, but not identical.
• Domino Administrator Client:
This is necessary to approve the certificate requests and to configure the Domino server’s HTTP task to support SSL.
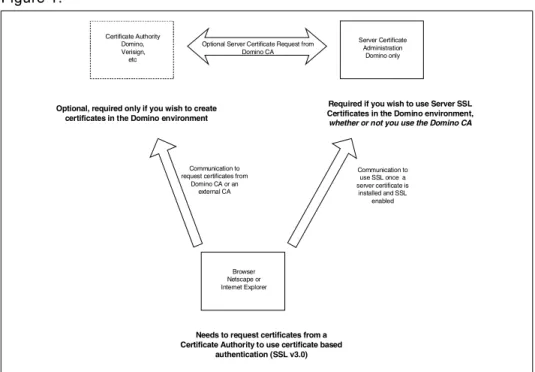
The relationship between the Domino certificate authority database, the Domino certificate administration database and the Web browser is shown in Figure 1.
Figure 1. Relationship between Domino CA database, Cert. admin. database and Web browser
Certificate Authority Domino, Verisign, etc Server Certificate Administration Domino only Browser Netscape or Internet Explorer
Optional, required only if you wish to create certificates in the Domino environment
Required if you wish to use Server SSL Certificates in the Domino environment, whether or not you use the Domino CA
Needs to request certificates from a Certificate Authority to use certificate based
authentication (SSL v3.0)
Communication to request certificates from
Domino CA or an external CA
Communication to use SSL once a server certificate is installed and SSL
enabled Optional Server Certificate Request from
1.1 Creating and configuring a Domino certificate authority database
To establish a Domino certificate authority to allow you to certify server and browser certificates, you must create a Domino certificate authority database. This database will allow you to create and manage an SSL certifier similar to a Notes certifier; the difference is that a Notes certifier is used in thecreation process for other certificates (in Notes ID files); the SSL certifier can onlysign certificate requests. Once a server or client’s public key (plus distinguished name and other identifying material) is signed by the SSL certifier, it can be used as an SSL certificate. Server or client certificates are used for SSL session setup and authentication; SSL certifiers are exclusively used to certify other public keys.The Domino certification authority application has the following functions: 1. Create and manage the Domino certificate authority keyring file, which
holds the certificate authority SSL certificate
2. Sign (that is, certify) server and client public keys when requested to create new certificates. The server administrator or client must paste a request into the CA database to start the certification process.
Clients can also use the certificates for S/MIME encryption and/or signing of e-mail (if they supply their e-mail address to be included in their certificate)
The Domino CA application allows automatic or manual addition of client certificates created by the application to be added to the Domino Directory 3. Add client certificates to the Domino Directory on request. The client
certificates can be either from the Domino certificate authority (if necessary) or an external certificate authority. Note that, even if you choose to use an external certificate authority to create server and client certificates, you may choose to install the CA application for the purpose of adding client certificates to the Domino Directory for authentication. 4. Create a server keyring file with a signed server certificate for the server
the Domino CA is installed on. This (optional) feature is a convenience to the CA administrator but is not absolutely necessary. We illustrate
requesting server certificates by browser since this would be necessary in any case for any Domino server other than the CA server and if using an external certificate authority.
The certificate authority database is created by creating a new database on the server using the usual command File - Database - New (preferably from a Domino Administration client with administrator rights) and specifying the
server, Database Title, filename and template as shown in Figure 2 on page 4:
Figure 2. Creating the Domino Certification Authority Database
Note that it is necessary to select “Show Advanced Templates” in the lower left corner of the panel for the Domino R5 Certificate Authority template to be listed. Press OK to create the database on the server specified. The
database will be created and will open to its default navigator. If for some reason it does not, you can also locate and open it in the Files tab of the Domino Administrator by double clicking on the database name. The initial Certificate Authority setup screen is shown in Figure 3 on page 5.
Figure 3. Domino Certificate Authority Initial Setup Screen
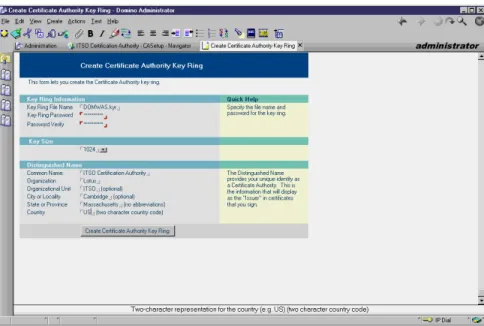
Select “1. Create Certificate Authority Key Ring and Certificate” by clicking on the line (it will show a outline box as you move your mouse cursor over it). This will open the certificate authority keyring creation dialog:
Fill out the fields:
• Key Ring File Name:
Choose a name for the Certificate Authority keyring or accept the default of “CAkey.kyr”. We choose “DOMWAS.kyr” for our testing. Since by default, all keyrings are created on the administrator’s workstation, the file name should give a hint of its purpose when viewed from the file system. You need not accept the default to create the keyring on the requesting workstations local drives: you can specify a network drive if desired. Note, however, that the CA keyring created here must be accessible from the workstation to use it to certify other (server and client) certificates. • Key Ring Password:
Choose a password that meets your organization’s security requirements. Since this keyring will be used to certify client and server certificates in the same way Notes certifiers certify Notes server and client certificates, it should be a secure password.Be sure to record the password used for the certificate authority keyring filesince it will be required for all of the subsequent operations using it.
• Key Size:
Specify the key size of the public-private key pair for the certification authority. You can choose either 512 or 1024 bits. Retain the default setting of 1024 bits (there is no legal requirement to use less even in international settings).
• Distinguished Name:
Specify the components of the certification authority name in the fields in the bottom of the panel in as much detail as necessary for your
environment; all components except Organizational Unit and City are required. The distinguished name shows as the “Issuer” in server and client certificates signed by the CA. Care should be taken to fill the components out so that it will be unlikely that another certification authority would have the same name.
When all fields have been filled in, press the button “Create Certificate
Authority Key Ring” to create the CA’s key ring. You will get a confirmation
Figure 5. Confirmation of Certificate Authority Keyring Creation
Press OK to dismiss the CA keyring creation confirmation panel. Note that the keyring has by default been created on the workstation used to submit the request, andnoton the server with the Certificate Authority database (unless you specified a network drive in the key ring file name in the creation dialog). From the main certificate authority database menu in Figure 3 on page 5 select “2. Configure Certificate Authority Profile” by clicking on it. The configuration options will be displayed as in Figure 6 on page 8. The purpose of this profile is to create a set of default values to be used when signing certificate requests from this certificate authority.
Figure 6. Specification of Certificate Authority Settings
Fill out the fields on the panel: • CA Key File:
This will default to the location where you originally created the certificate authority keyring file. If you have moved it since creating it, point to the new location where you will keep the keyfile permanently. In any case, confirm that the keyring file name is the one you created (“DOMWAS.kyr” in our example) since the application needs to access the certificate authority keyring file.
• Certificate server DNS name:
This is necessary to allow creation of the host name part of a reference URL in confirmation e-mails. If you choose not to inform users by e-mail, the field need not be filled in.
• Use SSL for Certificate transactions:
Again, this is necessary to allow the URL in a confirmation e-mail to be set up properly (HTTPS rather than HTTP). The setting will change the protocol from “HTTP” to “HTTPS”. Note that, if you select this option, you must configure the Domino server the CA is installed on to use SSL by creating and installing a server certificate and activating SSL as described in “Requesting and installing a Server Certificate” on page 10.
This is used to configure the URL in the confirmation e-mail. If you plan to change this in the server configuration, use the same HTTPS SSL port number. Note that the port number will not show in the URL created in the e-mail if it is the default (443) value.
• Mail confirmation of signed certificate to requestor:
Select this if you want automated confirmation to be sent when you approve certificates. The message will (if you approve the request) contain a URL to allow the requestor to receive their new certificate. The previous fields must have been filled in correctly for this URL reference to work properly. If you deny the request the reason you enter on the request form will be sent in place of the URL.
• Submit signed certificates to Adminp for addition to the Directory: This will automatically add any client certificate you approve to the Domino Directory by submitting a request to the Domino Administration Process. Note that, if the CA server is not also the Administration Server for the Domino Directory, the request will have to be replicated to that server to be processed. If you chose not to have this done automatically, you can still manually initiate the request from the document containing the approved certificate subsequently.
• Default validity period:
The default of 2 years is adequate for most client certificates; you can change this when approving a certificate. For example you might choose to do this for a server (10 years is common for server certificates). Note that the validity period begins from 12:00 midnight UT on the day a certificate is approved, not from the moment of approval. Thus the validity period could begin before or after the moment of approval depending on your local time zone.
When you have finished filling out the fields, scroll down and press the button marked “Save & Close” to return to the certificate authority main menu. Note that the options you chose will be stored in the certificate authority so you will not be prompted to enter the certificate authority’s keyring file password. The third option on this menu “3. Create Server Key Ring & Certificate” allows you to create a server keyring with a certificate from the Domino CA on the same server as the Certificate Authority.
This is convenient if you have a single test server but is not applicable to multiple servers or obtaining certificates from an external certificate authority. We therefore illustrate how to get server certificates from a certificate
and the Domino Server Certificate Administration database to manage the server’s keyring file.
This completes the installation and setup of the Domino Certificate Authority.
1.2 Requesting and installing a Server Certificate
The following steps are necessary to setup and request a server certificate from a certificate authority.
To enable SSL on a server, it must have access to a keyring file containing the server’s certified public key, private key and one or more certificates flagged as “trusted roots” from certificate authorities that have certified the server’s public key. This will later allow creation of trust relationships using SSL certificates between browsers and servers and between servers using SSL.
Server keyring creation and management uses a Domino Server Certificate Administration database. This database is necessary to manage server certificates whether you use the Domino certificate authority (which we used in our testing) or an external certificate authority. You need to create it before requesting a certificate. From a Domino Administration client, press
File-New-Database and fill out the panel as shown in Figure 7:
The Server Certificate Administration database will only be shown in the list of templates if the selection “Show advanced templates” is checked. Create the database on the server that you will use the SSL certificates on. (If you have multiple servers that use SSL, you will need to create the database on each server). Press OK to create the Server Certificate Administration database. Once the database is created, it should open automatically. If it does not, open it from the administration console’s “Files” tab (refreshed if necessary). The main server certificate administration menu will be displayed as shown in Figure 8 on page 11.
Figure 8. Server certificate administration main menu
We will use all four steps in the Server Certificate Administration menu:
1. Create Key Ring
This will create the server’s keyring file plus a “stash” file to hold the keyring’s password
2. Create Certificate Request
This will create a key pair (public and private) and display the public key in PKCS-12 format to allow it to be pasted into a browser for submission to a certificate authority. Although our example uses the Domino certificate authority, you would also use this to submit a request to an external certificate authority
3. Install A Certificate Authority’s Certificate (flagged as “Trusted Root”) into Key Ring
This is necessary to set up a ‘chain’ of certificates from the trusted root certificate authority’s certificate to the server’s certificate. This should be donebeforeinstalling the server’s certificate into the keyring file.
4. Install Certificate into Key Ring
Once the certificate request from 2 has been approved, it is ‘picked up’ in a browser and added to the server’s keyring file.
The fifth step, “Create a Key Ring with Self Certified Certificate” is for testing purposes where only a server (site) “self signed” certificate is required (not signed by a known certificate authority). Since we wish to use client certificates for authentication, this option is not appropriate for our purposes. Note that this option creates a certificate that can be used for encrypting sessions between servers and browser, but does not allow authentication of the server’s identify. It is intended for testing purposes (using SSLv2) only and shouldnotbe used in a production environment. If you use an external certificate authority, there will be a delay after
submitting your certificate request while the CA verifies your identity. In such circumstances, this option may be convenient for testing while you wait for your external certificate to be approved.
1.2.1 Creating a server keyring
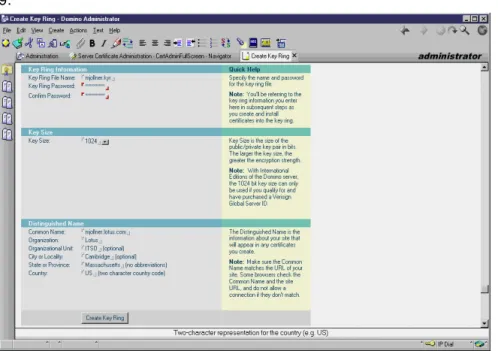
Select option 1 “Create Key Ring“ from the main menu of the Server
Certificate Administration database. This will open the panel shown in Figure 9:
Figure 9. Creating a server key ring file
Fill out the fields: • Key ring file name:
We chose to rename the keyring file to the server’s name rather than retain the default rather uniformative “keyring.kyr”. Note that this will require the name be changed in the server’s Server document (in the
Ports-Internet Ports tab) since this field also defaults to the “keyring.kyr”
name. This is described in “Configuring a Domino server to use SSL” on page 33.
By default the keyring file will be created on thelocaldrive of the
workstation used to submit the request. If you prefer, you can specify an network drive in this field. It is convenient to rename the keyring file as we describe since you can then keep copies of all server keyring files in a central place; the server’s name then helps to identify it. If you choose to create it and add certificates to it locally, it will be necessary later to copy it to the target server’s data drive
Specify and verify (by entering the password in the verification field) the server keyring file’s password. Be sure to record the password since it will be necessary to supply the keyring password when adding certificates to it. Note that you will not need to supply the password to the server directly since it is stored in a “stash” file. The name of the stash file is the same as the keyring file with the extension “.sth”. It must always be copied with the keyring file. Note that it should be protected from unauthorized access since, although the password is altered to protect it from casual access,it is not encrypted.
• Key size:
Choose either 512 bit or 1024 bits for the public private key pair sizes. We chose 1024 bits. It is now legal to use 1024 bits for international servers. • Distinguished name:
Fill out the distinguished name in the bottom field. Ensure that the server’s common name is filled out with its DNS name andnotits Notes server name. The DNS name is the host name (for example,
www.yourserver.com) that is specified in a URL to locate your server. This is recommended since some browsers compare the common name in the certificate to the hostname in the URL to access the server and will display a security warning to the client that the server’s certificate may have been copied from its intended site.
The distinguished name will show in the “subject” field of the server’s certificate when examined.
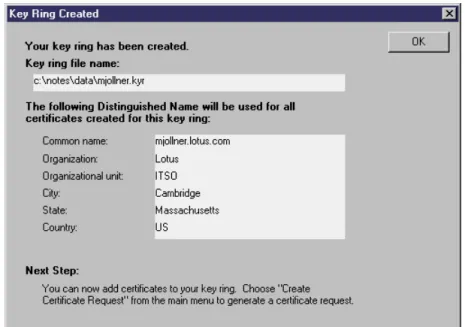
Press the “Create Key Ring” button. The keyring file with a public-private key pair will be created and stored on a local (usually \Lotus\Notes\Data) disk of the workstation from which the request was submitted, andnot the target server. You will receive a confirmation panel (Figure 10 on page 15) allowing you to confirm that the data has been entered and stored correctly.
Figure 10. Confirmation of server keyring file creation
We now have a public-private key pair in a keyring file. Since the public key is unsigned, the next step is to request a certificate authority to certify the public key. (The private keyneverleaves the keyring file). Press OK to return to the server certificate administration database main menu.
1.2.2 Requesting a server certificate from a Certificate Authority
You should be on the main menu of the server certificate administration database as shown in Figure 8 on page 11. Select option 2 “CreateCertificate Request“ by double clicking on the menu item and fill out the
Figure 11. Requesting a certificate for the server’s public key
Fill out the fields on this panel: • Key ring file name:
Confirm that the correct keyring file is filled in; by default, this will be the keyring file just created, but you can substitute another if wished. • Log certificate request:
If you specify (or retain the default) “yes”, a copy of your request will be kept in the server certificate administration database for later reference. You can access logged requests in the server certificate administration database by clicking on “View Certificate Request Log” in the bottom menu item in the left pane of the main menu as shown in Figure 8 on page 11; a view of all certificate requests will be presented. (Usually there is only one request logged). You can then open the request and view the content of the request including the distinguished name and public key submitted.
• Method:
You can chose to paste the server’s SSL public key into a form on the CA site or to e-mail it to the CA site. Most CA sites prefer that you paste the key into a form on their site.
In our example, we chose to paste the request into a form on the certificate authority site since the Domino CA supports this method of requesting certificates.
Press “Create Certificate Request” at the bottom of the panel. You will receive a prompt (shown in Figure 12 on page 17) to enter the password to open the server’s keyring file so that its public key can be read. (This is the password that was created and entered in Figure 9 on page 13).
Figure 12. Entering the server keyring file password
Enter the server keyring file’s password and press OK. You will receive a confirmation panel as shown in Figure 13 on page 18.
Figure 13. Server certificate request confirmation panel
Your distinguished name as it will appear in the certificate is displayed in the top pane for confirmation. You must now select all of the text in the bottom pane and copy it to the clipboard (you may need to scroll the display to capture all the text). Youmust include the “Begin New Certificate Request” and “End New Certificate Request” lines for the request to be valid. Press OK to be returned to the server certificate administration main menu.
You can now request a server certificate from a certification authority. Open a browser (we used Netscape 4.7 for our testing) and point it to the Domino Certificate Authority database created in “Creating and configuring a Domino certificate authority database” on page 3 by typing in the appropriate URL for your server and CA file name. In our example, we used
http://mjollner.lotus.com/itsocert.nsf?Open
You will need to substitute these values with your own site’s host name and certification authority file name.
You should see the CA database with a menu to select certification authority actions as shown in Figure 14 on page 19.
Figure 14. Domino Certificate Authority main menu viewed in a browser
Select “Request a Server Certificate” from the menu on the left. You will be presented with a form to paste the server’s public key from the clipboard as shown in Figure 15:
Enter any information you wish in the “Contact Information” and paste the server’s public key (which was placed on the clipboard in Figure 11 on page 16) into the field on the lower half of the panel.
Press the button marked “Submit Certificate Request”. You will receive the confirmation panel shown in Figure 16 on page 20.
Figure 16. Confirmation of server certificate request
The request has been created in the Domino Certificate Authority database for administrator approval. When you are notified that it has been approved you can pick up the certified public key and merge it into your server keyring file.
We will show the actions to approve the certificate in the Certificate Authority database in Figure 1.2.4.1 on page 25.
You now need to add the certificate Authority’s public key into the server’s keyring. This should in any case be done before adding the server’s approved certificate to the server’s keyring.
1.2.3 Merging the Certificate Authority’s certificate into the server keyring
This step is necessary to build a chain of trust starting at the certificate authority’s root certifier. By doing this you are setting up a trust relationship: your server will accept any certificates signed by this CA. Using your browser,connect to the certificate authority with the URL for your CA server and database as shown in Figure 14 on page 19.
Click on “Accept this authority in your server”. You will be presented with a panel allowing you to copy the CA’s certificate to the clipboard as shown in Figure 17 on page 22. You will install this in your server’s keyring file flagged as a “trusted root”. Note that by default your keyring file will have a number of common CA certificates flagged as “trusted root”; if you are applying for a certificate from one of these authorities you may not need to perform this step.
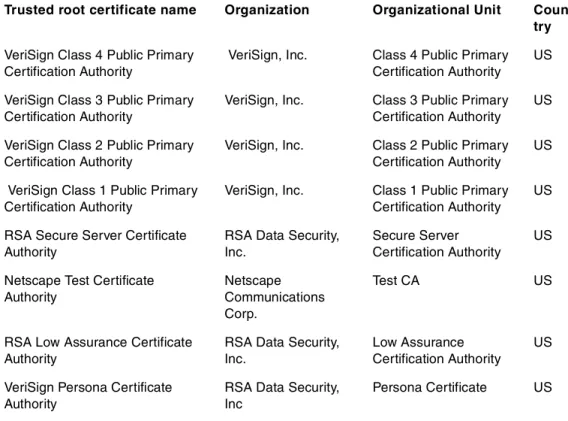
Domino includes several trusted root certificates by default when you create a server key ring file. You do not need to merge a third-party CA's certificate as a trusted root if it exists in the key ring file by default. The trusted roots (as described in the Domino Administration Help) are shown in Table 1:
Table 1. Default Trusted Root Certificates in a Domino server keyring
Trusted root certificate name Organization Organizational Unit Coun try
VeriSign Class 4 Public Primary Certification Authority
VeriSign, Inc. Class 4 Public Primary
Certification Authority
US
VeriSign Class 3 Public Primary Certification Authority
VeriSign, Inc. Class 3 Public Primary
Certification Authority
US
VeriSign Class 2 Public Primary Certification Authority
VeriSign, Inc. Class 2 Public Primary
Certification Authority
US
VeriSign Class 1 Public Primary Certification Authority
VeriSign, Inc. Class 1 Public Primary
Certification Authority
US
RSA Secure Server Certificate Authority
RSA Data Security, Inc.
Secure Server Certification Authority
US
Netscape Test Certificate Authority
Netscape Communications Corp.
Test CA US
RSA Low Assurance Certificate Authority
RSA Data Security, Inc.
Low Assurance Certification Authority
US
VeriSign Persona Certificate Authority
RSA Data Security, Inc
Figure 17. Picking up Certificate Authority’s Trusted Root Certificate
Select the certificate information on the browser panel by selecting it with your mouse cursor. Copy the certificate to the clipboard by pressing Ctrl-C or selecting Edit-Copy from the window menu.
The marked text should be highlighted as shown in Figure 18 on page 23. Be sure to select the two lines “Begin Certificate” and “End Certificate” as well as the certificate text.
Figure 18. Selecting CA trusted root certificate to copy it to the clipboard
Open the Server Certificate Administration database created in “Requesting and installing a Server Certificate” on page 10. Select option 3 “Install
Trusted Root Certificate into Key Ring“. You will be presented with a panel
with a field to allow you to paste the CA trusted root certificate into the form from the clipboard.
Ensure that the keyring file in the keyring file name field is the one for the server. Note that the keyring file must be on (or accessible to) the workstation submitting the request. You can enter an (optional) label for the Certificate Authority to allow you to identify it when examining the server’s keyring in future. Specify clipboard as the certificate source and paste the certificate into the bottom field as shown in Figure 19 on page 24.
Figure 19. Pasting Certificate Authority trusted root certificate into Server Certificate Administration database
Press the button “Install Trusted Root Certificate” at the bottom of the panel. After entering the server’s keyring password as shown in Figure 12 on page 17, you will receive the confirmation panel shown in Figure 20:
Press OK. You will be presented with a final information panel once the trusted root certificate is merged into the key ring. This is shown in Figure 21 on page 25.
Figure 21. Confirmation of CA trusted root certificate merge into server keyring
The certificate authority trusted root certificate has now been merged into your keyring. You can examine it and other certificates in your keyring and remove the “trusted root” designation or delete it at a future date by selecting “View and edit key rings” from the server certificate administration database main menu.
This completes addition of the CA trusted root certifier to the server’s keyring.
1.2.4 Install certificate into keyring
This step follows approval of the server’s certificate request which was created as described in “Requesting a server certificate from a Certificate Authority” on page 15. In general, the request would be to a external certificate authority whose processes would not be visible to the requestor. Since we are using the Domino certificate authority, we will also show the steps to approve a server certificate request. The subsequent process to “pick up” the certificate in a browser will be same whether the Domino CA or an external CA is used.
1.2.4.1 Approving server certificate request in the Domino CA
Open the Domino certificate authority database to the main menu as shown in Figure 3 on page 5 and select “Server Certificate Requests” from the menu on the left pane.
You will be presented with a view showing all outstanding requests as shown in Figure 22 on page 26.
Figure 22. Server Certification requests awaiting approval
Select the server certification request (there is only one in our example) and open the document. The request will be displayed ready for approval or denial as shown in Figure 23 on page 27. This is the same request we created and submitted from a browser in Figure 15 on page 19 and received confirmation of submission in Figure 16 on page 20.
Figure 23. Certificate authority showing server certificate request
There are only three fields on this form that may requiring entry:
1. A check box “Send a notification e-mail to the requestor”. If you check this (it will be checked by default if you specified this in the CA profile defaults as shown in Figure 6 on page 8 and described in the field “Mail confirmation of signed certificate to requestor:” on page 9). Confirmation could also be sent by telephone or a separately composed e-mail, but the requestor will have to be given a key to access their certificate. This is called a “Pick Up ID” key and is typically 10 alphanumeric characters so it may not lend itself to a voice communication.
2. Validity Period: the period (beginning at 0:00 UT on the day of approval) of validity of the certificate in years or days. You can change this default (again, derived from the CA profile) if you wish.
3. Reason: this is field which you can fill out with a reason if you chose to deny the request.
Once you are satisfied the request is valid, press the “Approve” button in the approve section. You will be prompted for the certificate authority’s keyring file password as shown in Figure 24 on page 28 so that it can be opened to retrieve the CA’s private key to sign the certificate request.
Figure 24. Entering the certificate authority’s key ring file password
You can view approved certificate requests by selecting “View approved Certificate requests” (button with a green check mark) from the view shown in Figure 22 on page 26.
The certificate we just approved is shown in Figure 25 on page 29; this would be useful to communicate any details (such as the Pick Up ID) to the server’s administrator. In addition, you can select and copy the certificate information (including the BEGIN and END lines) to the clipboard so that you could copy it into an e-mail message to the server’s administrator.
Figure 25. Approved server certificate request in the Domino CA database
This completes the certificate authority’s administrator’s actions to approve the server certificate; it is now ready for the server administrator to pick up the certificate using the Pick Up ID.
1.2.4.2 Installing the server’s certificate into the server’s keyring
Again, point a browser at the Domino certification authority database (or the external CA you chose to certify your public key) as shown in Figure 14 on page 19. Choose “Pick Up Server Certificate” from the menu on the left (it is the second item in our illustration). This will result in a pick up panel being displayed on the pane on the right of the screen as shown in Figure 26 on page 30.
If you received an e-mail notification that tells you that your certificate is approved and ready for pick up (we show you an example of a client
certificate notification in Figure 50 on page 50). If so, it should have a URL to allow you to directly access your certificate ready for pick up; if so, simply use the URL; it should open to the pick up screen shown on Figure 27 on page 31.
Figure 26. Entering Pick Up ID into Domino certificate authority
Enter the Pick Up ID in the field shown. If you received notification by e-mail it is most convenient to copy it to the clipboard and paste it into the field; otherwise type it into the field. Press “Pick Up Signed Certificate”. You will receive a confirmation panel from which you can then select the certificate and copy it to the clipboard. The confirmation panel is shown in Figure 27 on page 31.
Figure 27. Displaying approved certificate for Pick Up
Scroll down to display the certificate and select it (be sure to include the “Begin Certificate” and “End Certificate” lines) as shown in Figure 28:
Figure 28. Selecting approved server certificate
Press Ctrl-C or select Edit-Copy from the window menu to copy the certificate to the clipboard.
Now open the server certificate administration database as shown in Figure 8 on page 11 and select “Install Certificate into Key Ring“. You will be presented with a panel with three fields that you should verify and change if necessary:
1. The server keyring file name and path. This will have the value last typed into the field (as, for example, when you originally created the request) 2. The certificate label. This is a label which you choose to allow you to
identify the certificate if you later examine the keyring
3. The certificate source (file or clipboard). The default radio button is set to clipboard.
Finally, on the bottom of the panel there is a field (Certificate from
Clipboard) for you to paste the certificate into. Select this field by clicking in
it, and press Ctrl-V or Edit-Paste from the window menu. The resulting panel should resemble Figure 29:
Figure 29. Pasting server certificate into server certificate administration database
Press the button at the bottom of the panel (“Merge Certificate into Key
Ring”). You will be prompted for the server’s keyring file password as shown
in Figure 12 on page 17. After entering the keyring file’s password, you will receive a confirmation panel showing the contents of the key as shown in Figure 30 on page 33.
Figure 30. Server certificate contents for confirmation before adding to keyring
Examine the contents to ensure that all details are as expected and press OK when satisfied. The certificate will be merged into your server’s keyring file. A final confirmation panel (not shown) will confirm that the certificate has been successfully merged into your server’s keyring file. Press OK to dismiss the confirmation.
At this point you can copy the keyring file onto the server’s data disk (\Lotus\Domino\Data by default). You also need to copy the corresponding stash file -- it will have the same filename as the keyring file, but with an extension of “.sth”. The stash file has an (encoded) copy of the server’s keyring password so that the server can open the keyring.
You now need reconfigure the server’s HTTP task to use SSL by updating the Server document in the Domino Directory.
1.2.4.3 Configuring a Domino server to use SSL
The previous steps should have been completed and the server’s keyring should be in the data directory of the Domino server before starting. Open a Domino administrator client, select the server to have SSL enabled (or an administration server), and select the “Configuration” tab. Open the server document for Domino server to have SSL enabled in edit mode and select the Internet Ports subtab. Enter the keyring name in the field SSL key
Figure 31. Adding the server’s keyring file name to the server document
Now scroll down the document until the “Web http/https” section shows and change the SSL port status to “Enabled” as shown in Figure 32 on page 35. Also check the authentication options you will allow on your server:
• Client certificates for SSLv3 browser certificates • Basic Name and Password authentication • Anonymous access
Now that the server is configured for SSL, you can enable client certificate authentication. This can be combined with the other options as required.
Figure 32. Enabling the SSL port and authentication methods in the server document
Press Save and Close. If you edited the server document on a different server from the one in the server document, you should replicate the Names.nsf database to the remote server before trying to start SSL.
SSL will now be enabled the next time you start your Domino server. You can also stop and restart the HTTP task to immediately enable SSL. This can be done from the server console by typing
tell http quit
followed by
load http
You can also type
tell http restart
to have the HTTP server stop and restart in a single operation.
This completes the installation and enabling of SSL on your server. You can test it by accessing your server using a URL of the form
“https://myserver/homepage.nsf?Open” to confirm that SSL is enabled. You can also confirm that SSL is installed and active by typing the command
from the server console. If SSL is active you will get a response like the one shown in Figure 33:
Figure 33. Server console command and response showing SSL is active
The response should contain “SSL enabled”. Verify that the key file name is as expected.
You can also simply issue a “Show tasks” command from the Domino
console. The line for the HTTP task will show which ports it is listening on as shown in Figure 34:
Figure 34. Show task command showing the SSL port 443 for the HTTP task
Since the HTTP task is listening on port 443, SSL is active. This assumes that you did not change the default port assignment in the server document. If there was an error in the configuration (or you forgot to press ‘Save and Close’ from the server document) you will get a response warning you that SSL is not enabled (even if the keyring file is listed) from the command:
Figure 35. Server console command and response showing SSL is not active
1.3 Requesting Client (Browser) certificates
This process is necessary to request, create and install a client certificate in
> tell http show security
06/23/2000 09:28:18 AM Base server: 06/23/2000 09:28:18 AM SSL enabled
06/23/2000 09:28:18 AM Key file name: D:\Domino\Data\mjollner.kyr 06/23/2000 09:28:18 AM Secure server started
>show tasks
> HTTP Web Server Listening on port(s) 80, 443
> tell http show security
06/23/2000 05:13:34 PM Base server: 06/23/2000 05:13:34 PM SSL NOT enabled
06/23/2000 05:13:34 PM Key file name: D:\Domino\Data\mjollner.kyr 06/23/2000 05:13:34 PM Secure server not started. Waiting for HTTPS request
to the Person document corresponding the person named in the certificate. We illustrate using Netscape 4.7 and the Domino certificate authority
database but the process would be similar with other browsers and certificate authorities.
The steps necessary are:
1. Accept the Certificate Authority as a trusted root in your browser
This is very similar to the server process described in “Merging the Certificate Authority’s certificate into the server keyring” on page 20 except that the CA trusted root certificate will be added to your browser keyring. Note that, if you request a certificate from an external CA, you may already have its certificate installed by default.
For example, to check this with a Netscape browser, you can view the list of CA certificates flagged as “trusted roots” by pressing Security from the navigation toolbar (you may need to expand it if it is collapsed) and then selecting Certificates - Signers from the panel displayed. This is shown in Figure 42 on page 41.
To check with Microsoft Internet Explorer (we used IE 5 for this test; your version may be slightly different), select Tools-Internet Options from the window menu, select the tab Content and press the button Certificates and then select the tab Trusted Root Certification Authorities. You will be presented with a panel listing the default certification authorities. For either browser you can drop the flag “trusted root” for any certificate or delete it from your keyring.
2. Request a client certificate
This is done from the client’s browser; it generates a public-private keypair (unless a pair already exists), extracts the public key to be certified and posts it to the CA site for approval.
3. Certificate Authority approves certificate request
This is very similar to approving a server’s certificate request except that the administrator has an option to add the certificate to the corresponding Person document in the Domino Directory as part of the approval process.
4. Client merges approved certificate into their browser
The details of this process are browser dependent; we illustrate with Netscape 4.7.
If the administrator did not add this in 3 or the certificate is from an external certificate authority, this allows the browser certificate to be placed into the Domino Directory when approved by the CA administrator.
1.3.1 Accept a certificate authority as a trusted root in your browser
By doing this you are setting up a trust relationship: you (or rather your browser) will accept any certificates signed by this CA as valid because you have indicated you trust the CA.
Using your browser, navigate to the CA site (we are illustrating the Domino CA in our example) as shown in Figure 14 on page 19 and select Accept this
Authority in your Browser. The confirmation panel is shown in Figure 36 on
page 38.
Figure 36. Trusting a CA as a trusted root
Click on Accept This Authority in Your Browser. You will receive a series of warning prompts as shown in the following panels.
Figure 37. Warning panel for accepting a new certificate authority in Netscape
Press Next, and Next on the next panel (not shown). You will be presented with a panel (Figure 38 on page 39) which allows you to examine the CA certificate. Press More Info if you wish to examine the CA certificate.
Figure 38. Examination panel for CA certificate
If you choose to examine the certificate you will see a panel like the one shown in Figure 39:
Figure 39. Viewing the CA trusted root certificate
When you are satisfied with the CA certificate, press OK. You will be returned to the previous panel (Figure 38 on page 39). Press Next. You will be
prompted for the level of trust you want to grant this certificate authority. For our purposes it is adequate to specify “Accept this Certificate Authority for
Certifying network sites” as shown in Figure 40:
Figure 40. Specifying the level of trust of Certificate Authority
You may specify the other options if you wish. (You can change these options in the future by editing your certificate) Press Next. You will receive a panel which allows you to specify that you should be warned before sending information to sites certified by this CA. Do notselect this option. Simply press Next. Finally you will be asked to supply a name to identify this certificate authority in your browser when viewing all your “signers”
(certificate authorities, whether “trusted” or not). Supply a phrase that will allow you to recognize this CA in future and press Finish as shown in Figure 41 on page 41:
Figure 41. Specifying a short name to identify the certificate authority in future
You can confirm that the trusted root certificate has been added to your browser by selecting ‘Security’ from the Netscape Navigation Toolbar. You will be presented with a panel from which you can select “Signers” from the menu on the left of the panel shown in Figure 42:
You may examine the certificate by selecting it and pressing “Edit” if you wish. This also allows you to change the permissions you selected in Figure 40 on page 40. When you are finished, press OK.
This completes installing a trusted root in your browser.
1.3.2 Request a client certificate from the certification authority
Navigate to the certificate authority site and select Request a ClientCertificate. Fill out the resulting panel as shown in Figure 43 on page 42.
Figure 43. Requesting a client (browser) certificate from a Domino certificate authority
The fields on the top half of the form are mandatory and will form part of the information to be certified.
You can also fill out any necessary contact information for the CA administrator.
Finally choose the level of encryption (the available options will be
If you have never had a certificate in your browser you will receive an
information panel telling you that your private (and public) key are about to be generated. Press OK to continue.
You will be prompted to supply a password for your keyring as shown in Figure 44 on page 43. If it is a new keyring you will have to type it twice. Be sure to remember the keyring password since your certificates cannot be accessed without entering it.
Figure 44. Supplying a password for the browser keyring
Press OK to continue; you will see the response from the certificate authority confirming receipt of your certificate request as shown in Figure 45:
Figure 45. Certificate authority confirmation of receipt of client certificate request.
This completes the process of requesting a certificate. The certificate authority has to approve your request before you can proceed.
1.3.3 Approving a client certificate request in the Domino CA
Open the certificate authority database and select “Client Certificate
Requests” from the menu on the left side of the screen. A view with the
Figure 46. Client (browser) certificate requests waiting for approval
Select the client request(s) to be approved. There is only one in our example. Open the request to approve it as shown in Figure 47 on page 45.
The top of the form has the information from the client certificate request. The contact information neednotbe the same as the certificate information. They could be different if the submittor chose a colleague as a contact because, for example, a newly hired person without a telephone wished to register their certificate.
You can only view the certificate information. If it is wrong you will need to deny the request and ask the client to resubmit his corrected request. The remaining fields are:
• Register certificate in the Public Address Book:
This option allows you to have the certificate, once approved, to be added to the requestor’s Person document (Internet Certificates subtab of the
Certificates tab). If selected, a request will be placed in the Administration
Requests database to perform the action. It will be performed on the Administration server for the Domino Directory; this may not be the same as the server used for the Domino certificate authority. Note that this requires that you ensure that the person is already in the Domino Directory (preferably on all replicas, but itmustbe in the replica on the Administration Server for the Domino Directory when the request is performed).
If you do not select this action at this time, you can still do so in the future by opening the approved client request in the certificate authority
database. There will be an information section telling you that you did not add this person’s certificate to the Domino Directory. You will have a User Name field to allow looking up the requestor’s name in the Directory and a button to submit the request.
• User Name:
The name to locate the person in the Directory can be changed from this field. This is to allow the administrator to change it to match one of the entries in the username field of the person’s Person document. The submitted entry could be different if the certificate had a slightly different spelling or format but this should not invalidate adding it to the Domino Directory.
You can select the down arrow to the right of the field to open the Domino Directory (any directories known to your client) to search for names and select the desired name.
This checkbox allows you to select that an automatic e-mail will be sent to the requestor. It will be checked by default if you selected this option in the certificate authority profile as shown in Figure 6 on page 8. Note that users should be cautioned that, even when their request is approved, there may be a delay before their certificate is added to the Domino Directory and, once added, propagated to all replicas of it. The default message in the generated e-mail (Figure 50 on page 50) implies that the process is immediate.
• Validity period:
Again, this will be set to 2 years by default, but you can change it to any period (in years or days) that you wish.
• Reason:
If, for some reason, you deny the request you can fill out this field. It will be saved with the request for future reference and included in the e-mail to the requestor.
If you approve of the request, press the “Approve” button in the Action section. You will be prompted for the Domino certificate authority keyring file password and returned to the original view. You can view the approved requests by selecting the green check mark from the action bar and selecting the document you just approved.
If you wish to deny the request, press the “Deny” button in the Deny section You will want to fill out the reason before denying the request.
If you selected to have the certificate added to the Domino Directory by the Domino Administration Process, you may wish to confirm that the addition was successful after a reasonable delay for processing and replication. You can do this by:
1. Opening the person’s Person document, selecting the tab Certificates and the subtab Internet certificates and inspecting their Internet
certificate as shown in Figure 48 on page 48. If present, the addition was obviously successful. No further action is required other than ensuring that the Domino Directory replicates to all servers with the LDAP task enabled and pointed to by your Directory Assistance database for web browser authentication.
Figure 48. Viewing a person’s Internet certificate in the Domino Directory
2. You can also search for the certificate by running the ldapsearch command included with the Domino R5 server. This is run from the command line:
ldapsearch -v -L -h mjollner.lotus.com "cn=Joe*"
to search for the entry “Joe Green” that we added earlier. If present, you should see the certificate listed in the output:
ldap_open( mjollner.lotus.com, 389 ) filter pattern: cn=Joe*
returning: ALL
*** Filter is: (cn=Joe*) *** dn: CN=Joe Green
cn: Joe Green shortname: jgreen uid: jgreen
mail: [email protected] objectclass: top
objectclass: person
objectclass: organizationalPerson objectclass: inetOrgPerson objectclass: dominoPerson usercertificate;binary::
MIICiTCCAfKgAwIBAgIEOU/BszANBgkqhkiG9w0BAQQFADB/MQsw
CQYDVQQGEwJVUzEWMBQGA1UECBMNTWFzc2FjaHVzZXR0czESMBAGA1UEBxMJQ2FtYnJp ZGdlMQ4wDAYDVQQKEwVMb3R1czENMAsGA1UECxMESVRTTzElMCMGA1UEAxMcSVRTTyBD ZXJ0aWZpY2F0aW9uIEF1dGhvcml0eTAeFw0wMDA2MjAwMDAwMDBaFw0wMjA2MjAyMzU5 MDBaMIGSMQswCQYDVQQGEwJVUzEWMBQGA1UECBMNTWFzc2FjaHVzZXR0czESMBAGA1UE
AxMJSm9lIEdyZWVuMSQwIgYJKoZIhvcNAQkBFhVqZ3JlZW5AaXRzby5sb3R1cy5jb20w gZ8wDQYJKoZIhvcNAQEBBQADgY0AMIGJAoGBANP5/StWjPL/7T4IQrAmkAGdmleUa+Xt CRHafGKj9zEWrFY/KdzHB6n/QA4nJWqSCs01CE+Xi/IpUypK6QEn9/OX+4R0IXHQe0g2 8KgVEpZsqDTicJtQrFxcucDiUGs+AQ2VLEvrRODeA2zTlOBUmm/wVPKWFZ4+c/8fNyBg PaIZAgMBAAEwDQYJKoZIhvcNAQEEBQADgYEAm/qFfLAbQEJ9sChlo3bTc2PQou4ROVX0 iJDAjkP+HwvfjJlOdK8NE/1eG1QFix+8ErkTvN/YZS7HRQzKgn1Bot2jt0eDfQ2ueWlz TmRZckeBm/H9e14RItrRt5hWp1oP86bb6D9Sr0+t/n0hzKxtb0TTcLU9u1VfkbVbwh3G yBo= givenname: Joe sn: Green 1 matches
The presence of (binary) data in the “user certificate” field confirms the presence of a certificate in Joe Green’s Person record. You can find more information about the ldapsearch utility in the Domino administrator’s Help files under Domino Directories - The Domino LDAP Service - Using the
ldapsearch utility to search LDAP directories.
3. If the certificate is not (yet) present in the Person record in the Domino Directory you can open the Administration Requests database, open All
Requests by Server from the navigator on the left and expanding the
category Administration Server of Public Address Book and finally the sub- category Add Internet Certificate to Person Record. You should find your request (you may have to scroll to it if there are many requests) and the action performed on it as shown in Figure 49 on page 49:
Figure 49. Administration Requests database - Client Certification Requests
There will be a response document under the original request if it has been processed. In our example, Joe Green’s request has been processed but the request for Mary Brown has not yet been processed. If processing was successful, there will be a green check mark showing in the view beside the response document. No further action is required (other than ensuring that
the Domino Directory replicates to all servers). If there is a red “X” beside the response document, the addition failed. Open it to find why the request failed. Correct the situation and resubmit the request from the response document. This completes the approval process. The client certificate is now ready to be picked up by the client browser.
1.3.4 Accepting a client certificate into a browser keyring
You may receive a confirmation e-mail from your certificate administrator telling you that your certificate has been approved and is ready for pick up. If so it may have a URL you can paste into your browser to directly access the certificate ready for pickup. The e-mail message will resemble the one shown in Figure 50:
Figure 50. E-mail confirming certificate approval
You can also manually enter the correct URL in your browser to point to the Domino CA (as shown in Figure 14 on page 19) and select “Pick Up Client
Certificate”. You will be prompted for your Pickup ID (this is part of the URL
shown above in the e-mail) which will have been sent to you by the certificate administrator. The panel is very similar to the one to pick up a server
certificate shown in Figure 26 on page 30. Press “Pick up Signed
Certificate”. You will be presented with a confirmation panel as shown in
Figure 51 on page 51.
From: ITSO Certificate Administrator/ITSO Subject: Your Certificate Request
Your request for a client certificate has been approved. You can pick up the certficate at the following URL:
https://mjollner.lotus.com/ITSOCert.nsf/Pickup/CC0000093A?OpenDocument The certificate has been registered in the Domino Directory (Public Address Book), so you should be able to use your certificate
immediately. Contact your Certificate Authority if you have a problem using your certificate.
Figure 51. Pick Up Screen for signed client certificate
Press Accept Certificate after confirming the certificate was valid. The client certificate will be installed into your browser’s keyring. Note that there is no confirmation screen. However, you can confirm that the certificate was installed successfully in Netscape by pressing the Security button on the navigation toolbar and selecting Certificates-Yours. You should see your new certificate (if you have more than one, you may need to scroll the list). To view the contents of the certificate, press the View button. Press OK to dismiss the certificate panel and OK again to dismiss the security panel. This completes the process of requesting and installing a client certificate in your browser. If you used a Domino CA, your certificate administrator had the opportunity to add your public certificate to your Person record in the Domino Directory either while approving your request or subsequently by viewing the approved request and requesting registration. If so, no further action is necessary on your part.
If you received your certificate from an external certificate authority or your administrator did not copy your certificate to the Domino Directory, you can now request that this be done.
1.3.5 Requesting registration of a client certificate
As explained previously, this process exists to allow a client with a browser certificate to request that a copy be placed in their Person record in the Domino Directory. This will put a request record in the Domino Certification Authority database which the administrator will need to approve. If you have a certificate from the (same) Domino CA, you do not need to do this: if the administrator has a copy of your approved certificate request, they can request a copy be placed in your Person record by pressing a button on the approved request form. If the request is no longer present in the database or you received your certificate from another CA, you must follow this process to have your browser certificate copied the Domino Directory. This is necessary if your company uses certificate based LDAP authentication.
Your administrator must already have configured the server on which the Domino CA runs to support SSL as described in “Requesting and installing a Server Certificate” on page 10 and succeeding text.
To start the process, navigate to the Domino CA database (as shown in Figure 14 on page 19),ensuring that you specify SSL(by using https:// in the URL), and select Register a Client Certificate. You will be asked to fill in a panel with your contact information. Note that this information is only for the administrator since your ‘official’ information is contained in your certificate. This prompt screen is shown in Figure 52 on page 52.
Press Submit Certificate when you have entered your contact information. If you receive an error message like the one shown in Figure 53, you will need to resubmit the request.
Figure 53. Error message from registering a user certificate
The error message “Unable to process certificate registration request ...” can result from two possibilities:
1. You did not specify SSL. Correct the URL to specify “https:” and retry the request. You may need to clear your browser’s cache or restart it. Ensure that youspecify SSL when opening the CA database,not just when you submit the request. This is because the client certificate is requested as part of the SSL handshake when you first open the database.
2. The server the Domino CA uses does not support SSL. Contact your administrator to correct this and retry when it supports SSL.
When you connect sucessfully using SSL, you will be presented with a dialog requesting you to select which client certificate you wish to use as shown in Figure 54:
Figure 54. Selecting a client certificate to be registered in the Domino Directory
If you have more than one certificate, select the one you wish to have registered in the Domino Directory (you can expand the list by pressing the arrow to the right of the field with the label Select Your Certificate). You can inspect the certificate by pressing More Info .... When you have selected the correct certificate, press Continue. You will receive a confirmation panel like the one in Figure 55 on page 55.
Figure 55. Confirmation of certificate registration request submission
This completes your request. Your administrator must now approve it for the request to be processed. They have the option of e-mailing you a
confirmation that the request has been approved. Note that the actual copy into the Domino Directory may not be immediate since it is performed by a background system process (the Administration Process) and may have to performed on a different server than the one your request was submitted to. You will not have to perform any further action once the request is submitted.
1.3.5.1 Administrator approval of client registration request
Open the Domino CA database and select Client Registration Requests from the menu on the left. This action opens a view of outstanding client certificate registration requests similar to the view previously shown in Figure 22 on page 26 (showing server certificate requests). Select the document with the request to be approved and open it. You will be presented with an approval panel as shown in Figure 56 on page 56.
Figure 56. Client Certification Request
The top of the form has the contact information from the registration request. The contact information neednotbe the same as the certificate subject information displayed the “Certificate Subject” at the bottom of the panel. They could be different if the submittor chose a colleague as a contact because, for example, a newly hired person without a telephone wished to register their certificate.
You can only view the certificate information on the bottom of the panel. If it is wrong (because, for example, the client chose the wrong client certificate from his keyring) you will need to deny the request and ask the client to resubmit his corrected request.
The remaining fields are: • User Name:
This field is the same as the one with the same name on the certificate approval panel (Figure 47 on page 45). The name to locate the person in the Directory can be changed from this field. This is to allow the
administrator to change it to match one of the entries in the username field of the person’s Person document. The submitted entry could be different if
the certificate had a slightly different spelling or format but this should not invalidate adding it to the Domino Directory.
Again, you can select the down arrow to the right of the field to open the Domino Directory (any directories known to your client) to search for names and select the desired name.
• Send a notification e-mail to the requestor:
This checkbox allows you to select that an automatic e-mail will be sent to the requestor. It will be checked by default if you selected this option in the certificate authority profile as shown in Figure 6 on page 8. Note that users should be cautioned that, even when their request is approved, there may be a delay before their certificate is added to the Domino Directory and, once added, propagated to all replicas of it.
• Reason:
If you need to deny the request you can fill out this field. It will be saved with the request for future reference and included in the e-mail to the requestor.
If you approve of the request, press the “Approve” button in the Action section.
If you wish to deny the request, press the “Deny” button in the Deny section You will want to fill out the reason before denying the request.
You can check that the addition was successful by checking the requestor’s Person document Internet Certificates in their Person document in the Domino Directory, by using the ldapsearch utility to list their entry or by locating the request in the Administration Requests database as described in “Approving a client certificate request in the Domino CA” on page 44.