CHAPTER 21
Interacting with
Sending Email from ColdFusion
ColdFusion’s main purpose is to create dynamic, data-driven Web pages. But it also
provides a set of email-related tags that let you send email messages that are just as
dynamic and data-driven as your Web pages. You can also write ColdFusion templates
that check and retrieve email messages, and even respond to them automatically.
NOTE
<cfmail>
sends standard, Internet-style email messages using the Simple Mail
Transport Protocol (SMTP). SMTP isn’t explained in detail in this book; for
now, all you need to know about SMTP is that it’s the standard for sending
email on the Internet. Virtually all email programs, such as Thunderbird,
Outlook Express, Eudora, and so on send standard SMTP mail. The
exceptions are proprietary messaging systems, such as Lotus Notes or older
Microsoft Mail (MAPI-style) clients. If you want to learn more about the
underpinnings of the SMTP protocol, visit the World Wide Web Consortium’s
Web site at www.wc3.org.
Introducing the
<cfmail>
Tag
You can use the
<cfmail>tag to send email messages from your ColdFusion templates.
After the server is set up correctly, you can use
<cfmail>to send email messages to
anyone with a standard Internet-style email address. As far as the receiver is concerned,
the email messages you send with
<cfmail>are just like messages sent via a normal email
sending program, such as Thunderbird, Outlook Express, Eudora, OS X Mail, or the like.
Table 21.1 shows the key attributes for the
<cfmail>tag. These are the attributes you will
use most often. For clarity, they are presented here in a separate table. You have almost
certainly sent email messages before, so you will immediately understand what most of
these attributes do.
NOTE
Some additional
<cfmail>attributes are introduced later in this chapter (see
Table 21.2 in the “Sending Data-Driven Mail” section and Table 21.4 in the
“Overriding the Default Mail Server Settings” section).
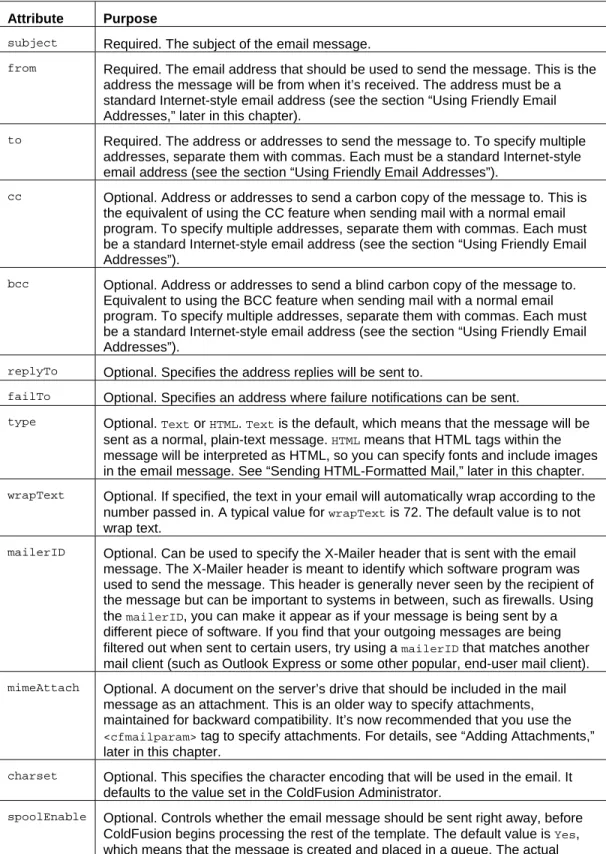
Table 21.1 Key
<cfmail>Attributes for Sending Email Messages
Attribute Purpose
subject
Required. The subject of the email message.
from
Required. The email address that should be used to send the message. This is the
address the message will be from when it’s received. The address must be a
standard Internet-style email address (see the section “Using Friendly Email
Addresses,” later in this chapter).
to
Required. The address or addresses to send the message to. To specify multiple
addresses, separate them with commas. Each must be a standard Internet-style
email address (see the section “Using Friendly Email Addresses”).
cc
Optional. Address or addresses to send a carbon copy of the message to. This is
the equivalent of using the CC feature when sending mail with a normal email
program. To specify multiple addresses, separate them with commas. Each must
be a standard Internet-style email address (see the section “Using Friendly Email
Addresses”).
bcc
Optional. Address or addresses to send a blind carbon copy of the message to.
Equivalent to using the BCC feature when sending mail with a normal email
program. To specify multiple addresses, separate them with commas. Each must
be a standard Internet-style email address (see the section “Using Friendly Email
Addresses”).
replyTo
Optional. Specifies the address replies will be sent to.
failTo
Optional. Specifies an address where failure notifications can be sent.
type
Optional.
Textor
HTML.
Textis the default, which means that the message will be
sent as a normal, plain-text message.
HTMLmeans that HTML tags within the
message will be interpreted as HTML, so you can specify fonts and include images
in the email message. See “Sending HTML-Formatted Mail,” later in this chapter.
wrapTextOptional. If specified, the text in your email will automatically wrap according to the
number passed in. A typical value for
wrapTextis 72. The default value is to not
wrap text.
mailerID
Optional. Can be used to specify the X-Mailer header that is sent with the email
message. The X-Mailer header is meant to identify which software program was
used to send the message. This header is generally never seen by the recipient of
the message but can be important to systems in between, such as firewalls. Using
the
mailerID, you can make it appear as if your message is being sent by a
different piece of software. If you find that your outgoing messages are being
filtered out when sent to certain users, try using a
mailerIDthat matches another
mail client (such as Outlook Express or some other popular, end-user mail client).
mimeAttachOptional. A document on the server’s drive that should be included in the mail
message as an attachment. This is an older way to specify attachments,
maintained for backward compatibility. It’s now recommended that you use the
<cfmailparam>tag to specify attachments. For details, see “Adding Attachments,”
later in this chapter.
charset
Optional. This specifies the character encoding that will be used in the email. It
defaults to the value set in the ColdFusion Administrator.
spoolEnable
Optional. Controls whether the email message should be sent right away, before
ColdFusion begins processing the rest of the template. The default value is
Yes,
which means that the message is created and placed in a queue. The actual
sending will take place as soon as possible, but not necessarily before the page
request has been completed. If you use
spoolEnable=”No”, the message will be
sent right away; ColdFusion won’t proceed beyond the
<cfmail>tag until the
sending has been completed. In other words,
Noforces the mail sending to be a
synchronous process;
Yes(the default) lets it be an asynchronous process.
priorityOptional. Determines the priority of the email. This can be either a number from 1
to 5, with 1 representing the most important priority, or a string value from the
following list:
highest(or
urgent),
high,
normal,
low(or
non-urgent).
Specifying a Mail Server in the Administrator
Before you can actually use the
<cfmail>tag to send email messages, you need to specify
a mail server in the ColdFusion Administrator. This is the mail server with which
ColdFusion will interact to actually send the messages generated by your templates.
To set up ColdFusion to send email, follow these steps:
1. If you don’t know it already, find out the host name or IP address for the SMTP mail
server ColdFusion should use to send messages. Usually, this is the same server your
normal email client program (Outlook Express, Eudora, and so on) uses to send your
own mail, so you typically can find the host name or IP address somewhere in your
mail client’s Settings or Preferences. Often, the host name starts with something such
as
mailor
smtp, as in
mail.orangewhipstudios.com.
2. Open the ColdFusion Administrator, and navigate to the Mail page, as shown in
Figure 21.1.
3. Provide the mail server’s host name or IP address in the Mail Server field.
4. Check the Verify Mail Server Connection option.
5. If your mail server operates on a port other than the usual port number 25, provide
the port number in the Server Port field. (This usually isn’t necessary.)
Figure 21.1
Before messages can be sent, ColdFusion needs to know which mail server to use.
TIP
These settings can be overridden in individual ColdFusion templates by the
<cfmail>
tag. See the “Overriding the Default Mail Server Settings” section,
later in this chapter.
►
For more information about the other Mail Server options shown in Figure
21.1, see Chapter 28, “ColdFusion Server Configuration,” in ColdFusion 8
Web Application Construction Kit, Volume 2: Application Development.
Sending Email Messages
Sending an email message via a ColdFusion template is easy. Simply code a pair of
opening and closing
<cfmail>tags, and provide the
to,
from, and
subjectattributes as
appropriate. Between the tags, type the actual message that should be sent to the
recipient.
Of course, you can use ColdFusion variables and functions between the
<cfmail>tags to
build the message dynamically, using the
#sign syntax you’re used to. You don’t need to
place
<cfoutput>tags within (or outside) the
<cfmail>tags; your
#variables and
TIP
As you look through the examples in this chapter, you will find that the
<cfmail>tag is basically a specially modified
<cfoutput>tag. It has similar behavior
(variables and expressions are evaluated) and attributes (
group,
maxrows,
and so on, as listed in Table 21.2).
Sending a Simple Message
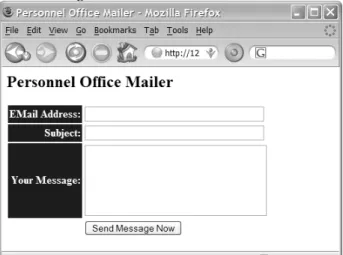
Listing 21.1 shows how easy it is to use the
<cfmail>tag to send a message. The idea
behind this template is to provide a simple form for people working in Orange Whip
Studios’ personnel department. Rather than having to open their normal email client
programs, they can just use this Web page. It displays a simple form for the user to type a
message and specify a recipient. When the form is submitted, the message is sent.
Listing 21.1
PersonnelMail1.cfm—Sending Email with ColdFusion
<!---
Filename: PersonnelMail1.cfm Author: Nate Weiss (NMW)
Purpose: A simple form for sending email --->
<html> <head>
<title>Personnel Office Mailer</title>
<!--- Apply simple CSS formatting to <th> cells ---> <style>
th { background:blue;color:white;text-align:right} </style>
</head> <body>
<h2>Personnel Office Mailer</h2>
<!--- If the user is submitting the Form... ---> <cfif isDefined(“FORM.subject”)>
<!--- We do not want ColdFusion to suppress whitespace here ---> <cfprocessingdirective suppressWhitespace=”No”>
<!--- Send the mail message, based on form input ---> <cfmail
subject=”#FORM.subject#”
from=”[email protected]” to=”#FORM.toAddress#”
bcc=”[email protected]” >This is a message from the Personnel Office: #FORM.messageBody#
If you have any questions about this message, please write back or call us at extension 352. Thanks!</cfmail>
<!--- Display “success” message to user ---> <p>The email message was sent.<br>
By the way, you look fabulous today. You should be in pictures!<br>
<!--- Otherwise, display the form to user... ---> <cfelse>
<!--- Provide simple form for recipient and message ---> <cfform action=”#cgi.script_name#” method=”post”>
<table cellPadding=”2” cellSpacing=”2”> <!--- Table row: Input for Email Address ---> <tr>
<th>EMail Address:</th> <td>
<cfinput type=”text” name=”toAddress” required=”yes” size=”40” message=”You must provide an email address.”>
</td> </tr>
<!--- Table row: Input for E-mail Subject ---> <tr>
<th>Subject:</th> <td>
<cfinput type=”text” name=”subject” required=”yes” size=”40” message=”You must provide a subject for the email.”>
</td> </tr>
<!--- Table row: Input for actual Message Text ---> <tr>
<th>Your Message:</th> <td>
<cftextarea name=”messageBody” cols=”30” rows=”5” wrap=”hard” required=”yes” message=”You must provide a message body.” /> </td>
</tr>
<!--- Table row: Submit button to send message ---> <tr>
<td> </td> <td>
<cfinput type=”submit” name=”submit” value=”Send Message Now”> </td> </tr> </table> </cfform> </cfif> </body> </html>
There are two parts to this listing, divided by the large
<cfif>/
<cfelse>block. When the
page is first visited, the second part of the template executes, which displays the form
shown in Figure 21.2.
Figure 21.2
Creating a Web-based mail-sending mechanism for your users is easy.
When the form is submitted, the first part of the template kicks in, which actually sends
the email message with the
<cfmail>tag. The message’s subject line and “to” address are
specified by the appropriate form values, and the content of the message itself is
constructed by combining the
#FORM.messageBody#variable with some static text.
Additionally, each message sent by this template is also sent to the personnel director as
a blind carbon copy, via the
bccattribute.
Around the
<cfmail>tag, the
<cfprocessingdirective>tag is used to turn off
ColdFusion’s default white-space-suppression behavior. This is needed in this template
because the
<cfmail>tag that follows is written to output the exact text of the email
message, which includes “newlines” and other white space characters that should be
included literally in the actual email message. Without the
<cfprocessingdirective>tag,
ColdFusion would see the newlines within the
<cfoutput>tags as evil white space,
deserving to be ruthlessly suppressed.
►
For more information about white-space suppression and the
<cfprocessingdirective>
tag, see the “Controlling White Space” section in
Chapter 31, “Improving Performance,” in Vol. 2, Application Development.
NOTE
There is a reason why the opening and closing
<cfmail>tags are not indented in
this listing. If they were, the spaces or tabs used to do the indenting would
show up in the actual email message. You will need to make some
exceptions to your usual indenting practices when using
<cfmail>. The
exception would be when using
type=”HTML”, as discussed in the “Sending
HTML-Formatted Mail” section, because white space isn’t significant in
HTML.
Using Friendly Email Addresses
The email address provided to the
to,
from,
cc, and
bccattributes can be specified as just
the email address itself (such as
[email protected]), or as a combination of
the address and the address’s friendly name. The friendly name is usually the person’s
real-life first and last names.
To specify a friendly name along with an email address, place the friendly name between
double quotation marks, followed by the actual email address between angle brackets.
So, instead of
you would provide
“Raymond Camden” <[email protected]>
To provide such an address to the
from,
to,
cc, or
bccattribute of the
<cfmail>tag, you
must double up each double quotation mark shown above, assuming that you are
already using double quotation marks around the whole attribute value. So, you might
end up with something such as the following:
<cfmail
subject=”Dinner Plans”
from=”””Nate Weiss”” <[email protected]>” to=”””Belinda Foxile”” <[email protected]>”>
If you find the use of the doubled-up double quotation marks confusing, you could
surround the
fromand
toattributes with single quotation marks instead of double
quotation marks, which would allow you to provide the double-quotation characters
around the friendly name normally, like so:
<cfmail
subject=”Dinner Plans”
from=’”Nate Weiss” <[email protected]>’ to=’”Belinda Foxile” <[email protected]>’>
Now, when the message is sent, the “to” and “from” addresses shown in the recipient’s
email program can be shown with each person’s real-life name along with their email
address. How the friendly name and email address are actually presented to the user is
up to the email client software.
The version of the
PersonnelMail.cfmtemplate shown in Listing 21.2 is nearly the same as
the one from Listing 21.1, except that this version collects the recipient’s friendly name in
addition to their email address. Additionally, this version uses a bit of JavaScript to
attempt to pre-fill the email address field based on the friendly name. When the user
changes the value in the
FirstNameor
LastNamefield, the
ToAddressfield is filled in with
the first letter of the first name, plus the whole last name.
NOTE
There isn’t space to go through the JavaScript code used in this template in
detail. It’s provided to give you an idea of one place where JavaScript can be
useful. Consult a JavaScript reference or online tutorial for details. One good
place to look is the JavaScript section of the Reference tab of the Code
panel in Dreamweaver.
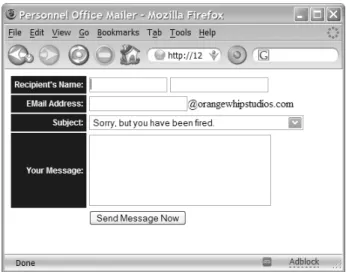
Limiting Input
This version of the form makes it impossible to send messages to anyone outside of
Orange Whip Studios, by simply hard-coding the
@orangewhipstudios.compart of the
email address into the
<cfmail>tag itself. Also, it forces the user to select from a short list
of Subject lines, rather than being able to type their own Subject, as shown in Figure 21.3.
Figure 21.3
Web-based forms can make sending email almost foolproof.
In a real-world application, you probably would make different choices about what
exactly to allow users to do. The point is that by limiting the amount of input required,
you can make it simpler for users to send consistent email messages, thus increasing the
value of your application. This can be a lot of what differentiates Web pages that send
mail from ordinary email programs, which can be more complex for users to learn.
Listing 21.2
PersonnelMail2.cfm—Providing Friendly Names
Along with Email Addresses
<!---
Filename: PersonnelMail2.cfm Author: Nate Weiss (NMW)
Purpose: A simple form for sending email --->
<html> <head>
<title>Personnel Office Mailer</title>
<!--- Apply simple CSS formatting to <th> cells ---> <style>
th { background:blue;color:white; font-family:sans-serif;font-size:12px; text-align:right;padding:5px;} </style>
<!--- Function to guess email based on first/last name ---> <script language=”javaScript”>
function guessEmail() { var guess;
with (document.mailForm) {
guess = firstName.value.substr(0,1) + lastName.value; toAddress.value = guess.toLowerCase();
} ; } ; </script>
</head>
<!--- Put cursor in FirstName field when page loads ---> <body <cfif not isDefined(“FORM.subject”)>
onLoad=”document.mailForm.firstName.focus()” </cfif>>
<!--- If the user is submitting the form... ---> <cfif isDefined(“FORM.subject”)>
<cfset recipEmail = listFirst(FORM.toAddress, “@”) & “@orangewhipstudios.com”>
<!--- We do not want ColdFusion to suppress whitespace here ---> <cfprocessingdirective suppressWhitespace=”no”>
<!--- Send the mail message, based on form input ---> <cfmail
subject=”#FORM.subject#”
from=”””Personnel Office”” <[email protected]>” to=”””#FORM.firstName# #FORM.lastName#”” <#recipEmail#>” bcc=”[email protected]”
>This is a message from the Personnel Office:
#uCase(FORM.subject)#
#FORM.messageBody#
If you have any questions about this message, please write back or call us at extension 352. Thanks!</cfmail>
</cfprocessingdirective>
<!--- Display “success” message to user ---> <p>The email message was sent.<br>
By the way, you look fabulous today. You should be in pictures!<br>
<!--- Otherwise, display the form to user... ---> <cfelse>
<!--- Provide simple form for recipient and message --->
<cfform action=”#cgi.script_name#” name=”mailForm” method=”post”>
<table cellPadding=”2” cellSpacing=”2”>
<!--- Table row: Input for Recipient’s Name ---> <tr>
<th>Recipient’s Name:</th> <td>
<cfinput type=”text” name=”firstName” required=”yes” size=”15” message=”You must provide a first name.”
onChange=”guessEmail()”>
<cfinput type=”text” name=”lastName” required=”yes” size=”20” message=”You must provide a first name.”
onChange=”guessEmail()”> </td>
<!--- Table row: Input for EMail Address ---> <tr>
<th>EMail Address:</th> <td>
<cfinput type=”text” name=”toAddress” required=”yes” size=”20”
message=”You must provide the recipient’s email.”>@orangewhipstudios.com </td>
</tr>
<!--- Table row: Input for EMail Subject ---> <tr>
<th>Subject:</th> <td>
<cfselect name=”subject”>
<option>Sorry, but you have been fired. <option>Congratulations! You got a raise!
<option>Just FYI, you have hit the glass ceiling. <option>The company dress code, Capri Pants, and you <option>All your Ben Forta are belong to us.
</cfselect> </td>
</tr>
<!--- Table row: Input for actual Message Text ---> <tr>
<th>Your Message:</th> <td>
<cftextarea name=”messageBody” cols=”30” rows=”5” wrap=”hard” required=”yes” message=”You must provide a message body.” /> </td>
</tr>
<!--- Table row: Submit button to send message ---> <tr>
<td> </td> <td>
<cfinput type=”submit” name=”submit” value=”Send Message Now”> </td> </tr> </table> </cfform> </cfif> </body> </html>
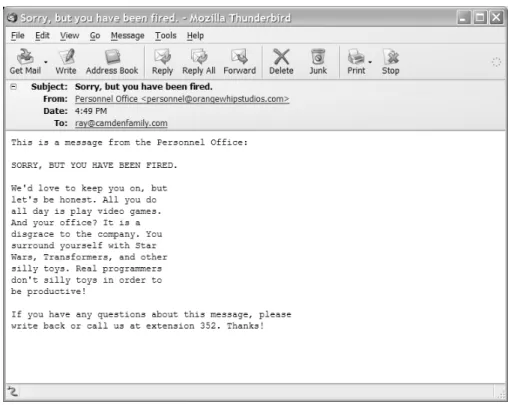
Figure 21.4 shows what an email message generated by Listing 21.2 might look like when
received and viewed in a typical email client (here, Thunderbird).
Figure 21.4
Providing a friendly name along with an email address makes for an email message that feels more
personal.
Sending Data-Driven Mail
In the last section, you saw that
<cfmail>can be thought of as an extended version of the
<cfoutput>tag because ColdFusion variables and expressions are evaluated without the
need for an explicit
<cfoutput>within the
<cfmail>. The similarity between the two tags
doesn’t end there. They also share attributes specific to the notion of looping over query
records. This capability enables you to send data-driven email messages using nearly the
same syntax and techniques that you use to output data-driven HTML code.
Table 21.2 shows the
<cfmail>attributes relevant to sending data-driven mail. Each of
these attributes behaves the same way as the corresponding attributes for
<cfoutput>.
Instead of causing HTML output to be repeated for each row in a query, these attributes
have to do with repeating email message content for each row in a query.
Table 21.2 Additional
<cfmail>Attributes for Sending Data-Driven Email Messages
Attribute Purpose
query
Optional. A query to use for sending data-driven email. Very similar to the
QUERYattribute of the
<cfoutput>tag.
startRow
Optional. A number that indicates which row of the query to consider when
sending data-driven email. The default is to start at the first row. Equivalent
to the
startRowattribute of the
<cfoutput>tag.
maxRows
Optional. A maximum number of query rows to consider when sending
data-driven email. Equivalent to the
maxRowsattribute of the
<cfoutput>tag.
group
Optional. A column name from the query that indicates groups of records.
Additional output or processing can occur when each new group is
encountered. You can indicate nested groups by providing a
comma-separated list of column names. Equivalent to the
groupattribute of the
<cfoutput>tag.
groupCaseSensitive
Optional. Whether to consider text case when determining when a new
group of records has been encountered in the column(s) indicated by
group. Equivalent to the
groupCaseSensitiveattribute of the
<cfoutput>tag.
NOTE
You may be thinking that a few of these additional attributes aren’t really
necessary. In today’s ColdFusion, you usually can achieve the same results
using a
<cfloop>tag around a
<cfmail>tag to send out multiple messages
or using
<cfloop>within
<cfmail>to include queried information in the
message itself. However, the
<cfmail>tag appeared in CFML before the
<cfloop>tag existed, which is one reason why these attributes exist today.
Including Query Data in Messages
By adding a
queryattribute to the
<cfmail>tag, you can easily include query data in the
email messages your application sends. Adding the
queryattribute to
<cfmail>is similar
to adding
queryto a
<cfoutput>tag—the content inside the tags will repeat for each row
of the query.
Additionally, if you add a
groupattribute, you can nest a pair of
<cfoutput>tags within
the
<cfmail>tag. If you do, the inner
<cfoutput>block is repeated for every record from
the query, and everything outside the
<cfoutput>block is output only when the value in
the
groupcolumn changes. This is just like the
groupbehavior of the
<cfoutput>tag itself.
►
See Chapter 10, “Creating Data-Driven Pages,” for more information about
grouping query results.
Listing 21.3 shows how the
<cfmail>tag can be used with the
queryand
groupattributes
to send data-driven email messages. This example creates a CFML custom tag called
<cf_SendOrderConfirmation>, which takes one attribute called
orderID, like this:
<!--- Send Confirmation E-Mail, via Custom Tag ---><cf_SendOrderConfirmation orderID=”3”>
The idea is for the tag to compose an order-confirmation type of email message for the
person who placed the order, detailing the items they purchased and when. If you’ve
ever bought something online, you probably received such a confirmation email
immediately after placing your order. This custom tag is used in Chapter 22, “Online
Commerce,” online, after a user makes an actual purchase.
NOTE
You should save this listing as a file called
SendOrderConfirmation.cfm, either
in the special
CustomTagsfolder or in the same folder as the other examples
from this chapter.
►
See Chapter 26, “Building Reusable Components,” in Vol. 2, Application
Development, for information about the
CustomTagsfolder and CFML
Listing 21.3
SendOrderConfirmation1.cfm—Sending a Data-Driven
Email Message
<!---
Filename: SendOrderConfirmation1.cfm Author: Nate Weiss (NMW)
Purpose: Sends an email message to the person who placed an order --->
<!--- Tag attributes --->
<cfparam name=”ATTRIBUTES.orderID” type=”numeric”>
<!--- Retrieve order information from database ---> <cfquery datasource=”ows” name=”getOrder”>
SELECT
c.ContactID, c.FirstName, c.LastName, c.Email, o.OrderDate, o.ShipAddress, o.ShipCity, o.ShipState, o.ShipZip, o.ShipCountry, oi.OrderQty, oi.ItemPrice, m.MerchName, f.MovieTitle FROM Contacts c, MerchandiseOrders o, MerchandiseOrdersItems oi, Merchandise m, Films f WHERE o.OrderID = #ATTRIBUTES.orderID# AND c.ContactID = o.ContactID AND m.MerchID = oi.ItemID AND o.OrderID = oi.OrderID AND f.FilmID = m.FilmID ORDER BY
m.MerchName </cfquery>
<!--- Re-Query the GetOrders query to find total $ spent ---> <!--- The DBTYPE=”Query” invokes CF’s “Query Of Queries” ---> <cfquery dbtype=”query” name=”getTotal”>
SELECT SUM(ItemPrice * OrderQty) AS OrderTotal FROM GetOrder
</cfquery>
<!--- We do not want ColdFusion to suppress whitespace here ---> <cfprocessingdirective suppressWhitespace=”no”>
<!--- Send email to the user --->
<!--- Because of the GROUP attribute, the inner <CFOUTPUT> ---> <!--- block will be repeated for each item in the order ---> <cfmail query=”getOrder” group=”ContactID” groupCasesensitive=”no”
startrow=”1” subject=”Thanks for your order (Order number #ATTRIBUTES.orderID#)” to=”””#FirstName# #LastName#”” <#Email#>”
from=”””Orange Whip Online Store”” <[email protected]>” >Thank you for ordering from Orange Whip Studios.
Here are the details of your order, which will ship shortly. Please save or print this email for your records.
Order Number: #ATTRIBUTES.orderID# Items Ordered: #recordCount#
Date of Order: #dateFormat(OrderDate, “dddd, mmmm d, yyyy”)# #timeFormat(OrderDate)#
--- <cfoutput>
#currentRow#. #MerchName#
(in commemoration of the film “#MovieTitle#”) Price: #LSCurrencyFormat(ItemPrice)#
Qty: #OrderQty# </cfoutput>
--- Order Total: #lsCurrencyFormat(getTotal.OrderTotal)#
This order will be shipped to: #FirstName# #LastName#
#ShipAddress# #ShipCity#
#ShipState# #ShipZip# #ShipCountry#
If you have any questions, please write back to us at [email protected], or just reply to this email. </cfmail>
</cfprocessingdirective>
This listing first needs to retrieve all the relevant information about the order from the
database, including the orderer’s name and shipping address; the name, price, and
quantity of each item ordered; and the title of the movie that goes along with each item.
This is all obtained using a single query called
getOrder, which is long but fairly
straightforward.
The
getOrdersquery returns one row for each item that was ordered in the specified
orderID. Because there is, by definition, only one row for each
orderIDand only one
ContactIDfor each order, the columns from the
MerchandiseOrdersand
Contactstables
(marked with the
oand
caliases in the query) will have the same values for each row.
Therefore, the query can be thought of as being grouped by the
ContactIDcolumn (or any
of the other columns from the
MerchandiseOrdersor
Contactstables).
Next, ColdFusion’s query of queries feature is used to get the grand total of the order,
which is simply the sum of each price times the quantity ordered. This query returns just
one row (because there is no
GROUP BYclause) and just one column (called
OrderTotal),
which means that the total can be output at any time by referring to
getTotal.OrderTotal.
►
For more information about
dbtype=”query”, the query of queries feature,
and the
SUMfunction used in this query, see Chapter 41, “More About SQL
and Queries,” online.
You could forgo the
getTotalquery and just add the prices by looping over the
getOrdersquery, as in the
OrderHistory2.cfmtemplate from Chapter 26. However, getting the total
via the query of queries feature is a quick and convenient way to obtain the total, using
familiar SQL-style syntax.
NOTE
In general, you should use the
<cfprocessingdirective>tag with
suppressWhitespace=”No”
whenever you send data-driven email. The
exception would be if you were using
type=”HTML”in the
<cfmail>tag, in
which case you should leave the suppression-suppression options alone.
See the section “Sending HTML-Formatted Mail,” later in the chapter, for
details.
Now the
<cfmail>tag is used to actually send the confirmation message. Because the
queryattribute is set to the
getOrderquery, the columns in that query can be freely
referred to in the
toattribute and the body of the email message itself. Columns specific
to each item ordered are referred to within the
<cfoutput>block. Columns specific to the
order in general are referred to outside the
<cfoutput>block, which will be repeated only
once because there is only one group of records as defined by the
groupattribute (that is,
all the query records have the same
ContactIDvalue).
NOTE
The custom tag you just created is used in Chapter 22, after a user makes an
actual purchase.
Sending Bulk Messages
You can easily use ColdFusion to send messages to an entire mailing list. Simply execute
a query that returns the email addresses of all the people the message should be sent to,
then refer to the email column of the query in the
<cfmail>tag’s
toattribute.
Listing 21.4 shows how easy sending a message to a mailing list is. This listing is similar
to the Personnel Office Mailer templates from earlier (refer to Listings 21.1 and 21.2). It
enables the user (presumably someone within Orange Whip Studios’ public relations
department) to type a message that will be sent to everyone on the studio’s mailing list.
Listing 21.4
SendBulkEmail.cfm—Sending a Message to Everyone
on a Mailing List
<!---
Filename: SendBulkEmail.cfm Author: Nate Weiss (NMW)
Purpose: Creates form for sending email to everyone on the mailing list --->
<html> <head>
<title>Mailing List</title>
<!--- Apply simple CSS formatting to <TH> cells ---> <style> th { background:blue;color:white; font-family:sans-serif;font-size:12px; text-align:right;padding:5px;} </style> </head>
<body>
<!--- Page Title --->
<h2>Send Message To Mailing List</h2>
<!--- If the user is submitting the form... ---> <cfif isDefined(“FORM.subject”)>
<!--- Retrieve “mailing list” records from database ---> <cfquery datasource=”ows” name=”getList”>
SELECT FirstName, LastName, EMail FROM Contacts
WHERE MailingList = 1 </cfquery>
<!--- Send the mail message, based on form input ---> <cfmail query=”getList” subject=”#FORM.subject#”
from=”””Orange Whip Studios”” <[email protected]>” to=”””#FirstName# #LastName#”” <#EMail#>”
bcc=”[email protected]” >#FORM.messageBody#
--- We respect your privacy here at Orange Whip Studios. To be removed from this mailing list, reply to this message with the word “Remove” in the subject line. --- </cfmail>
<!--- Display “success” message to user ---> <p>The email message was sent.<br>
By the way, you look fabulous today. You should be in pictures!<br>
<!--- Otherwise, display the form to user... ---> <cfelse>
<!--- Provide simple form for recipient and message --->
<cfform action=”#CGI.script_name#” name=”mailForm” method=”POST”>
<table cellPadding=”2” cellSpacing=”2”> <!--- Table row: Input for email Subject ---> <tr>
<th>Subject:</th> <td>
<cfinput type=”text” name=”subject” required=”yes” size=”40” message=”You must provide a subject for the email.”>
</td> </tr>
<!--- Table row: Input for actual Message Text ---> <tr>
<th>Your Message:</th> <td>
<cftextarea name=”messageBody” cols=”30” rows=”5” wrap=”hard” required=”yes” message=”You must provide a message body.” />
</td> </tr>
<!--- Table row: Submit button to send message ---> <tr>
<td> </td> <td>
<cfinput type=”submit” name=”submit” value=”Send Message Now” onClick=”return confirm(‘Are you sure? This message will be sent to everyone on the mailing list. This is your last chance to cancel the bulk mailing.’)”>
</td> </tr> </table> </cfform> </cfif> </body> </html>
Like Listings 21.1 and 21.2, this listing presents a simple form to the user, in which a
subject and message can be typed. When the form is submitted, the
<cfif>block at the
top of the template is executed.
The
getListquery retrieves the name and email address for each person in the
Contactstable who has consented to be on the mailing list (that is, where the Boolean
MailingListcolumn is set to
1, which represents true or yes). Then, the
<cfmail>tag is used to send
the message to each user. Because of the
query=”getList”attribute,
<cfmail>executes
once for each row in the query.
A few lines of text at the bottom of the message lets each recipient know that they can
remove themselves from the mailing list by replying to the email message with the word
“Remove” in the subject line. Listing 21.11—in the “Creating Automated POP Agents”
section of this chapter—demonstrates how ColdFusion can respond to these remove
requests.
Sending HTML-Formatted Mail
As noted in Table 21.1, you can set the optional
typeattribute of the
<cfmail>tag to
HTML,
which enables you to use ordinary HTML tags to add formatting, images, and other
media elements to your mail messages.
The following rules apply:
The recipient’s email client program must be HTML enabled. Most modern email
clients, such as Outlook Express or Thunderbird, know how to display the contents
of email messages as HTML. However, if the message is read in a program that isn’t
HTML enabled, the user will see the message literally, including the actual HTML
tags.
The mail message should be a well-formed HTML document, including . opening
and closing
<html>,
<head>, and
<body>tags.
All references to external URLs must be fully qualified, absolute URLs, including the
http://or
https://. In particular, this includes the
hrefattribute for links and the
srcattribute for images.
The version of the
<cf_SendOrderConfirmation>tag in Listing 21.5 expands on the
previous version (refer to Listing 21.3) by adding a
useHTMLattribute. If the tag is called
with
useHTML=”Yes”, an HTML-formatted version of the confirmation email is sent,
including small pictures of each item that was ordered (see Figure 21.5). If
useHTMLis
Noor is omitted, the email is sent as plain text (as in the previous version).
Although this approach is not covered in this chapter, you can use
<cfmailpart>to send
both HTML and plain text messages. This will send two versions of the same email to the
client. The downside is that the doubling up makes each mail message that much larger.
Figure 21.5
As long as the recipient’s email program supports HTML, your messages can include formatting,
images, and so on.
Listing 21.5
SendOrderConfirmation2.cfm—Using HTML Tags to
Format a Mail Message
<!---
Filename: SendOrderConfirmation2.cfm Author: Nate Weiss (NMW)
Purpose: Sends an email message to the person who placed an order --->
<!--- Tag attributes --->
<cfparam name=”ATTRIBUTES.orderID” type=”numeric”>
<cfparam name=”ATTRIBUTES.useHTML” type=”boolean” default=”yes”>
<!--- Local variables --->
<cfset imgSrcPath = “http://#CGI.HTTP_HOST#/ows/images”>
<!--- Retrieve order information from database ---> <cfquery datasource=”ows” name=”getOrder”>
SELECT
c.ContactID, c.FirstName, c.LastName, c.Email, o.OrderDate, o.ShipAddress, o.ShipCity, o.ShipState, o.ShipZip, o.ShipCountry, oi.OrderQty, oi.ItemPrice, m.MerchName, m.ImageNameSmall, f.MovieTitle FROM Contacts c, MerchandiseOrders o, MerchandiseOrdersItems oi, Merchandise m, Films f WHERE o.OrderID = #ATTRIBUTES.OrderID# AND c.ContactID = o.ContactID AND m.MerchID = oi.ItemID AND o.OrderID = oi.OrderID AND f.FilmID = m.FilmID ORDER BY
m.MerchName </cfquery>
<!--- Display an error message if query returned no records ---> <cfif getOrder.recordCount eq 0>
<cfthrow message=”Failed to obtain order information.”
detail=”Either the Order ID was incorrect, or order has no detail records.”> <!--- Display an error message if email blank or not valid --->
<cfelseif isValid("email", getOwer.email)>
<cfthrow message=”Failed to obtain order information.”
detail=”Email addresses need to have an @ sign and at least one ‘dot’.”> </cfif>
<!--- Query the GetOrders query to find total $$ ---> <cfquery dbtype=”query” name=”getTotal”>
SELECT SUM(ItemPrice * OrderQty) AS OrderTotal FROM GetOrder
</cfquery>
<!--- *** If we are sending HTML-Formatted Email *** ---> <cfif ATTRIBUTES.useHTML>
<!--- Send Email to the user --->
<!--- Because of the GROUP attribute, the inner <CFOUTPUT> ---> <!--- block will be repeated for each item in the order ---> <cfmail query=”getOrder” group=”ContactID” groupCasesensitive=”No” subject=”Thanks for your order (Order number #ATTRIBUTES.orderID#)” to=”””#FirstName# #LastName#”” <#Email#>”
from=”””Orange Whip Online Store”” <[email protected]>” type=”HTML”> <html> <head> <style type=”text/css”> body { font-family:sans-serif;font-size:12px;color:navy} td { font-size:12px} th { font-size:12px;color:white; background:navy;text-align:left} </style> </head> <body>
<h2>Thank you for your Order</h2>
<p><b>Thank you for ordering from
<a href=”http://www.orangewhipstudios.com”>Orange Whip Studios</a>.</b><br> Here are the details of your order, which will ship shortly.
Please save or print this email for your records.<br>
<p>
<strong>Order Number:</strong> #ATTRIBUTES.orderID#<br> <strong>Items Ordered:</strong> #recordCount#<br> <strong>Date of Order:</strong>
#dateFormat(OrderDate, “dddd, mmmm d, yyyy”)# #timeFormat(OrderDate)#<br>
<table> <cfoutput> <tr valign=”top”> <th colspan=”2”> #MerchName# </th> </tr> <tr> <td>
<!--- If there is an image available... ---> <cfif ImageNameSmall neq “”>
<img src=”#imgSrcPath#/#ImageNameSmall#”
alt=”#MerchName#” width=”50” height=”50” border=”0”> </cfif>
</td> <td>
<em>(in commemoration of the film “#MovieTitle#”)</em><br> <strong>Price:</strong> #lsCurrencyFormat(ItemPrice)#<br> <strong>Qty:</strong> #OrderQty#<br> <br> </td> </tr> </cfoutput> </table>
<p>Order Total: #lsCurrencyFormat(getTotal.OrderTotal)#<br>
<p><strong>This order will be shipped to:</strong><br> #FirstName# #LastName#<br>
#ShipAddress#<br> #ShipCity#<br>
#ShipState# #ShipZip# #ShipCountry#<br>
<p>If you have any questions, please write back to us at
<a href=”[email protected]”>[email protected]</a>, or just reply to this email.<br>
</body> </html> </cfmail>
<!--- *** If we are NOT sending HTML-Formatted Email *** ---> <cfelse>
<!--- We do not want ColdFusion to suppress whitespace here ---> <cfprocessingdirective suppressWhitespace=”no”>
<!--- Send email to the user --->
<!--- Because of the GROUP attribute, the inner <CFOUTPUT> ---> <!--- block will be repeated for each item in the order ---> <cfmail query=”getOrder” group=”ContactID” groupCasesensitive=”No” subject=”Thanks for your order (Order number #ATTRIBUTES.OrderID#)” to=”””#FirstName# #LastName#”” <#Email#>”
from=”””Orange Whip Online Store”” <[email protected]>” >Thank you for ordering from Orange Whip Studios.
Here are the details of your order, which will ship shortly. Please save or print this email for your records.
Order Number: #ATTRIBUTES.orderID# Items Ordered: #recordCount#
Date of Order: #dateFormat(OrderDate, “dddd, mmmm d, yyyy”)# #timeFormat(OrderDate)#
--- <cfoutput>
#currentRow#. #MerchName#
(in commemoration of the film “#MovieTitle#”) Price: #lsCurrencyFormat(ItemPrice)#
Qty: #OrderQty# </cfoutput>
--- Order Total: #lsCurrencyFormat(getTotal.OrderTotal)#
This order will be shipped to: #FirstName# #LastName#
#ShipAddress# #ShipCity#
#ShipState# #ShipZip# #ShipCountry#
If you have any questions, please write back to us at [email protected], or just reply to this email. </cfmail>
</cfprocessingdirective>
</cfif>
In most respects, Listing 21.5 is nearly identical to the prior version (refer to Listing 21.3).
A simple
<cfif>determines whether the tag is being called with
useHTML=”Yes”. If so,
<cfmail>is used with
type=”HTML”to send an HTML-formatted message. If not, a separate
<cfmail>tag is used to send a plain-text message. Note that the
<cfprocessingdirective>tag is needed only around the plain-text version of the message because HTML isn’t
sensitive to white space.
As already noted, a fully qualified URL must be provided for images to be correctly
displayed in email messages. To make this easier, a variable called
imgSrcPathis defined
at the top of the template, which will always hold the fully qualified URL path to the
ows/imagesfolder. This variable can then be used in the
srcattribute of any
<img>tags
within the message. For instance, assuming that you are visiting a copy of ColdFusion
server on your local machine, this variable will evaluate to something such as
http://localhost/ows/images/
.
Note
The
CGI.HTTP_HOSTvariable can be used to refer to the host name of the
ColdFusion server. The
CGI.SERVER_NAMEalso could be used to get the
same value.
In addition, Listing 21.5 does two quick checks after the
getOrderquery to ensure that it
makes sense for the rest of the template to continue. If the query fails to return any
records, the
orderIDpassed to the tag is assumed to be invalid, and an appropriate error
message is displayed. An error message is also displayed if the
Emailcolumn returned by
the query is not a valid email.
The error messages created by the
<cfthrow>tags in this example can be caught with the
<cfcatch>tag, as discussed in Chapter 51, “Error Handling,” online.
NOTE
If the recipient doesn’t use an HTML-enabled mail client to read the message,
the message will be shown literally, including the actual HTML tags.
Therefore, you should send messages of
type=”HTML”only if you know the
recipient is using an HTML-enabled email client program.
Adding Custom Mail Headers
All SMTP email messages contain a number of mail headers, which give Internet mail
servers the information necessary to route the message to its destination. Mail headers
also provide information used by the email client program to show the message to the
user, such as the message date and the sender’s email address.
ColdFusion allows you to add your own mail headers to mail messages, using the
<cfmailparam>tag.
TIP
You can see what these mail headers look like by using an ordinary email client
program. For instance, in Outlook Express, highlight a message in your
Inbox, select Properties from the File menu, and then click the Details tab.
Introducing the
<cfmailparam>
Tag
ColdFusion provides a tag called
<cfmailparam>that can be used to add custom headers
to your mail messages. It also can be used to add attachments to your messages, which is
discussed in the next section. The
<cfmailparam>tag is allowed only between opening
and closing
<cfmail>tags. Table 21.3 shows which attributes can be provided to
<cfmailparam>.
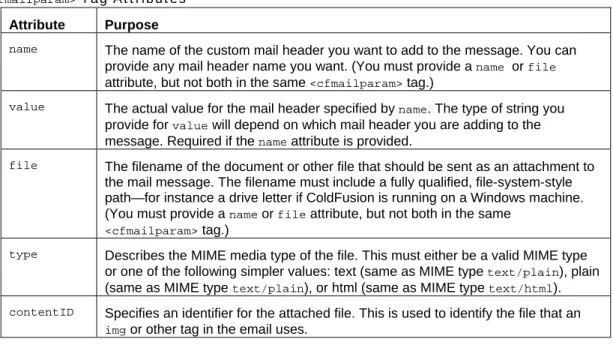
Table 21.3
<cfmailparam>Tag Attributes
Attribute Purpose
name
The name of the custom mail header you want to add to the message. You can
provide any mail header name you want. (You must provide a
nameor
fileattribute, but not both in the same
<cfmailparam>tag.)
value
The actual value for the mail header specified by
name. The type of string you
provide for
valuewill depend on which mail header you are adding to the
message. Required if the
nameattribute is provided.
file
The filename of the document or other file that should be sent as an attachment to
the mail message. The filename must include a fully qualified, file-system-style
path—for instance a drive letter if ColdFusion is running on a Windows machine.
(You must provide a
nameor
fileattribute, but not both in the same
<cfmailparam>
tag.)
type
Describes the MIME media type of the file. This must either be a valid MIME type
or one of the following simpler values: text (same as MIME type
text/plain), plain
(same as MIME type
text/plain), or html (same as MIME type
text/html).
contentIDSpecifies an identifier for the attached file. This is used to identify the file that an
disposition
This attribute describes how the file should be attached to the email. There are two
possible values,
attachmentand
inline. The default,
attachment, means the file
is added as attachment. If you specify
inline, the file will be included in the
message.
Adding Attachments
As noted in Table 21.3, you can also use the
<cfmailparam>tag to add a file attachment to
a mail message. Simply place a
<cfmailparam>tag between the opening and closing
<cfmail>tags, specifying the attachment’s filename with the
fileattribute. The filename
must be provided as a fully qualified file-system path, including the drive letter and
volume name. It can’t be expressed as a relative path or URL.
NOTE
The filename you provide for a
filemust point to a location on the ColdFusion
server’s drives (or a location on the local network). It can’t refer to a location
on the browser machine. ColdFusion has no way to grab a document from
the browser’s drive. If you want a user to be able to attach a file to a
<cfmail
> email, you first must have them upload the file to the server. See
Chapter 70, “Interacting with the Operating System,” in Vol. 3, Advanced
Application Development, for details about file uploads.
TIP
The attachment doesn’t have to be in your Web server’s document root. In fact,
you might want to ensure that it’s not, if you want people to be able to
access it only via email, rather than via the Web.
To add a Word document called
BusinessPlan.docas an attachment, you might include
the following
<cfmailparam>tag between your opening and closing
<cfmail>tags:
<!-- Attach business plan document to message ---><cfmailparam
file=”c:\ OwsMailAttachments\ BusinessPlan.doc”>
TIP
To add multiple attachments to a message, simply provide multiple
<cfmailparam>
tags, each specifying one
file.
NOTE
As noted in Table 21.1, you also can use the older
mimeattachattribute of the
<cfmail>tag to add an attachment, instead of coding a separate
<cfmailparam>
tag. However, it’s recommended that you use
<cfmailparam>
instead because it’s more flexible (it allows you to add more
than one attachment to a single message).
Overriding the Default Mail Server Settings
Earlier in this chapter, you learned about the settings on the Mail/Mail Logging page of
the ColdFusion Administrator (refer to Figure 21.1). These settings tell ColdFusion which
mail server to communicate with to send the messages that your templates generate. In
most situations, you can simply provide these settings once, in the ColdFusion
Administrator, and forget about them. ColdFusion will use the settings to send all
messages.
However, you might encounter situations in which you want to specify the mail server
settings within individual
<cfmail>tags. For instance, your company might have two
mail servers set up, one for bulk messages and another for ordinary messages. Or you
might not have access to the ColdFusion Administrator for some reason, perhaps because
your application is sitting on a shared ColdFusion server at an Internet service provider
(ISP).
To specify the mail server for a particular
<cfmail>tag, add the
serverattribute, as
explained in Table 21.4. You also can provide the
portand
timeoutattributes to
completely override all mail server settings from the ColdFusion Administrator.
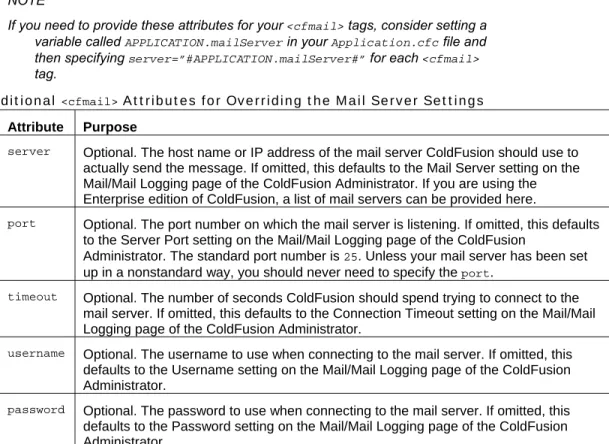
NOTE
If you need to provide these attributes for your
<cfmail>tags, consider setting a
variable called
APPLICATION.mailServerin your
Application.cfcfile and
then specifying
server=”#APPLICATION.mailServer#”for each
<cfmail>tag.
Table 21.4 Additional
<cfmail>Attributes for Overriding the Mail Server Settings
Attribute Purpose
server
Optional. The host name or IP address of the mail server ColdFusion should use to
actually send the message. If omitted, this defaults to the Mail Server setting on the
Mail/Mail Logging page of the ColdFusion Administrator. If you are using the
Enterprise edition of ColdFusion, a list of mail servers can be provided here.
port
Optional. The port number on which the mail server is listening. If omitted, this defaults
to the Server Port setting on the Mail/Mail Logging page of the ColdFusion
Administrator. The standard port number is
25. Unless your mail server has been set
up in a nonstandard way, you should never need to specify the
port.
timeout
Optional. The number of seconds ColdFusion should spend trying to connect to the
mail server. If omitted, this defaults to the Connection Timeout setting on the Mail/Mail
Logging page of the ColdFusion Administrator.
username
Optional. The username to use when connecting to the mail server. If omitted, this
defaults to the Username setting on the Mail/Mail Logging page of the ColdFusion
Administrator.
password
Optional. The password to use when connecting to the mail server. If omitted, this
defaults to the Password setting on the Mail/Mail Logging page of the ColdFusion
Administrator.
Retrieving Email with ColdFusion
You have already seen how the
<cfmail>tag can be used to send mail messages via your
ColdFusion templates. You can also create ColdFusion templates that receive and process
incoming mail messages. What your templates do with the messages is up to you. You
might display each message to the user, or you might have ColdFusion periodically
monitor the contents of a particular mailbox, responding to each incoming message in
some way.
Introducing the
<cfpop>
Tag
To check or receive email messages with ColdFusion, you use the
<cfpop>tag, providing
the username and password for the email mailbox you want ColdFusion to look in.
ColdFusion will connect to the appropriate mail server in the same way that your own
email client program connects to retrieve your mail for you.
Table 21.5 lists the attributes supported by the
<cfpop>tag.
NOTE
The
<cfpop>tag can only be used to check email that is sitting on a mail server
that uses the Post Office Protocol (POP, or POP3). POP servers are by far
the most popular type of mailbox server, largely because the POP protocol is
very simple. Some mail servers use the newer Internet Mail Access Protocol
(IMAP, or IMAP4). The
<cfpop>tag can’t be used to retrieve messages from
IMAP mailboxes. Perhaps a future version of ColdFusion will include a
<cfimap>
tag; until then, some third-party solutions are available at the
Developers Exchange Web site
(
http://www.macromedia.com/cfusion/exchange/index.cfm).
Table 21.5
<cfpop>Tag Attributes
Attribute Purpose
action GetHeaderOnly
,
GetAll, or
Delete. Use
GetHeaderOnlyto quickly
retrieve just the basic information (the subject, who it’s from, and so
on) about messages, without retrieving the messages themselves.
Use
GetAllto retrieve actual messages, including any attachments
(which might take some time). Use
Deleteto delete a message from
the mailbox.
server
Required. The POP server to which ColdFusion should connect.
You can provide either a host name, such as
pop.orangewhipstudios.com
, or an IP address.
username
Required. The username for the POP mailbox ColdFusion should
access. This is likely to be case sensitive, depending on the POP
server.
password
Required. The password for the POP mailbox ColdFusion should
access. This is likely to be case sensitive, depending on the POP
server.
name
ColdFusion places information about incoming messages into a
query object. You will loop through the records in the query to
perform whatever processing you need for each message. Provide a
name (such as
GetMessages) for the query object here. This
attribute is required if the
actionis
GetHeaderOnlyor
GetAll.
maxrowsOptional. The maximum number of messages that should be
retrieved. Because you don’t know how many messages might be in
the mailbox you are accessing, it’s usually a good idea to provide
maxrowsunless you are providing
messagenumber(later in this
table).
startRow
Optional. The first message that should be retrieved. If, for instance,
you already have processed the first 10 messages currently in the
mailbox, you could specify
startRow=”11”to start at the 11th
message.
messageNumber
Optional. If the
actionis
GetHeaderOnlyor
GetAll, you can use
this attribute to specify messages to retrieve from the POP server. If
the
actionis
Delete, this is the message or messages you want to
delete from the mailbox. In either case, you can provide either a
single message number or a comma-separated list of message
numbers.
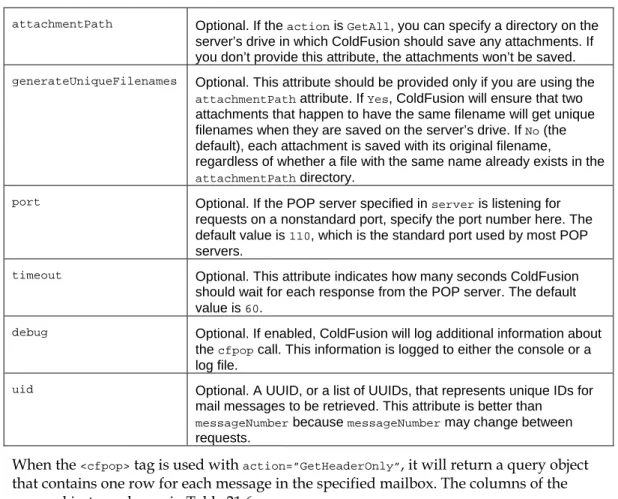
attachmentPath
Optional. If the
actionis
GetAll, you can specify a directory on the
server’s drive in which ColdFusion should save any attachments. If
you don’t provide this attribute, the attachments won’t be saved.
generateUniqueFilenamesOptional. This attribute should be provided only if you are using the
attachmentPath
attribute. If
Yes, ColdFusion will ensure that two
attachments that happen to have the same filename will get unique
filenames when they are saved on the server’s drive. If
No(the
default), each attachment is saved with its original filename,
regardless of whether a file with the same name already exists in the
attachmentPathdirectory.
port
Optional. If the POP server specified in
serveris listening for
requests on a nonstandard port, specify the port number here. The
default value is
110, which is the standard port used by most POP
servers.
timeout
Optional. This attribute indicates how many seconds ColdFusion
should wait for each response from the POP server. The default
value is
60.
debug
Optional. If enabled, ColdFusion will log additional information about
the
cfpopcall. This information is logged to either the console or a
log file.
uid
Optional. A UUID, or a list of UUIDs, that represents unique IDs for
mail messages to be retrieved. This attribute is better than
messageNumber
because
messageNumbermay change between
requests.
When the
<cfpop>tag is used with
action=”GetHeaderOnly”, it will return a query object
that contains one row for each message in the specified mailbox. The columns of the
query object are shown in Table 21.6.
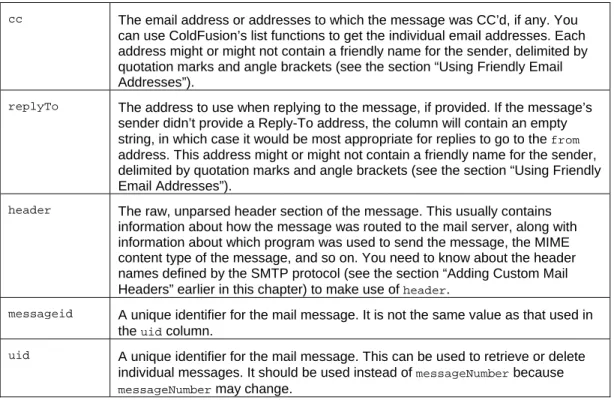
Table 21.6 Columns Returned by
<cfpop>When
ACTION=”GetHeaderOnly”Column Explanation
messageNumber
A number that represents the slot the current message is occupying in the
mailbox on the POP server. The first message that arrives in a user’s mailbox is
message number 1. The next one to arrive is message number 2. When a
message is deleted, any message behind the deleted message moves into the
deleted message’s slot. That is, if the first message is deleted, the second
message becomes message number 1. In other words, the
messageNumberisn’t
a unique identifier for the message. It’s just a way to refer to the messages
currently in the mailbox. It is safer to use
uid.
date
The date the message was originally sent. Unfortunately, this date value isn’t
returned as a native CFML
Dateobject. You must use the
ParseDateTime()function to turn the value into something you can use ColdFusion’s date
functions with (see Listing 21.6, later in this chapter, for an example).
subjectThe subject line of the message.
from
The email address that the message is reported to be from. This address might
or might not contain a friendly name for the sender, delimited by quotation marks
and angle brackets (see the section “Using Friendly Email Addresses,” earlier in
this chapter). It’s worth noting that there’s no guarantee that the
fromaddress is
a real email address that can actually receive replies.
to