Sybase
®
HIPAA Accelerator
6.0
Copyright © 1998-2006 by Sybase, Inc. All rights reserved.
This publication pertains to Sybase software and to any subsequent release until otherwise indicated in new editions or technical notes. Information in this document is subject to change without notice. The software described herein is furnished under a license agreement, and it may be used or copied only in accordance with the terms of that agreement.
To order additional documents, U.S. and Canadian customers should call Customer Fulfillment at (800) 685-8225, fax (617) 229-9845. Customers in other countries with a U.S. license agreement may contact Customer Fulfillment via the above fax number. All other international customers should contact their Sybase subsidiary or local distributor. Upgrades are provided only at regularly scheduled software release dates. No part of this publication may be reproduced, transmitted, or translated in any form or by any means, electronic, mechanical, manual, optical, or otherwise, without the prior written permission of Sybase, Inc.
Sybase, SYBASE (logo), ADA Workbench, Adaptable Windowing Environment, Adaptive Component Architecture, Adaptive Server, Adaptive Server Anywhere, Adaptive Server Enterprise, Adaptive Server Enterprise Monitor, Adaptive Server Enterprise Replication, Adaptive Server Everywhere, Advantage Database Server, Afaria, Answers Anywhere, Applied Meta, Applied Metacomputing, AppModeler, APT Workbench, APT-Build, APT-Edit, APT-Execute, APT-Translator, APT-Library, ASEP, Avaki, Avaki (Arrow Design), Avaki Data Grid, AvantGo, Backup Server, BayCam, Beyond Connected, Bit-Wise, BizTracker, Certified PowerBuilder Developer, Certified SYBASE Professional, Certified SYBASE Professional Logo, ClearConnect, Client-Library, Client Services, CodeBank, Column Design, ComponentPack, Connection Manager, Convoy/DM, Copernicus, CSP, Data Pipeline, Data Workbench, DataArchitect, Database Analyzer, DataExpress, DataServer, DataWindow, DataWindow .NET, DB-Library, dbQueue, Dejima, Dejima Direct, Developers Workbench, DirectConnect Anywhere, DirectConnect, Distribution Director, Dynamic Mobility Model, e-ADK, E-Anywhere, e-Biz Integrator, E-Whatever, EC Gateway, ECMAP, ECRTP, eFulfillment Accelerator, EII Plus, Electronic Case Management, Embedded SQL, EMS, Enterprise Application Studio, Enterprise Client/ Server, Enterprise Connect, Enterprise Data Studio, Enterprise Manager, Enterprise Portal (logo), Enterprise SQL Server Manager, Enterprise Work Architecture, Enterprise Work Designer, Enterprise Work Modeler, eProcurement Accelerator, eremote, Everything Works Better When Everything Works Together, EWA, ExtendedAssist, Extended Systems, ExtendedView, Financial Fusion, Financial Fusion (and design), Financial Fusion Server, Formula One, Fusion Powered e-Finance, Fusion Powered Financial Destinations, Fusion Powered STP, Gateway Manager, GeoPoint, GlobalFIX, iAnywhere, iAnywhere Solutions, ImpactNow, Industry Warehouse Studio, InfoMaker, Information Anywhere, Information Everywhere, InformationConnect, InstaHelp, Intelligent Self-Care, InternetBuilder, iremote, irLite, iScript, Jaguar CTS, jConnect for JDBC, KnowledgeBase, Legion, Logical Memory Manager, M2M Anywhere, Mach Desktop, Mail Anywhere Studio, Mainframe Connect, Maintenance Express, Manage Anywhere Studio, MAP, M-Business Anywhere, M-Business Channel, M-Business Network, M-Business Suite, MDI Access Server, MDI Database Gateway, media.splash, Message Anywhere Server, MetaWorks, MethodSet, mFolio, Mirror Activator, ML Query, MobiCATS, MobileQ, MySupport, Net-Gateway, Net-Library, New Era of Networks, Next Generation Learning, Next Generation Learning Studio, O DEVICE, OASiS, OASiS logo, ObjectConnect, ObjectCycle, OmniConnect, OmniQ, OmniSQL Access Module, OmniSQL Toolkit, OneBridge, Open Biz, Open Business Interchange, Open Client, Open ClientConnect, Open Client/Server, Open Client/Server Interfaces, Open Gateway, Open Server, Open ServerConnect, Open Solutions, Optima++, Partnerships that Work, PB-Gen, PC APT Execute, PC DB-Net, PC Net Library, Pharma Anywhere, PhysicalArchitect, Pocket PowerBuilder, PocketBuilder, Power++, Power Through Knowledge, power.stop, PowerAMC, PowerBuilder, PowerBuilder Foundation Class Library, PowerDesigner, PowerDimensions, PowerDynamo, Powering the New Economy, PowerScript, PowerSite, PowerSocket, Powersoft, PowerStage, PowerStudio, PowerTips, Powersoft Portfolio, Powersoft Professional, PowerWare Desktop, PowerWare Enterprise, ProcessAnalyst, Pylon, Pylon Anywhere, Pylon Application Server, Pylon Conduit, Pylon PIM Server, Pylon Pro, QAnywhere, Rapport, Relational Beans, RemoteWare, RepConnector, Report Workbench, Report-Execute, Replication Agent, Replication Driver, Replication Server, Replication Server Manager, Replication Toolkit, Resource Manager, RFID Anywhere, RW-DisplayLib, RW-Library, SAFE, SAFE/PRO, Sales Anywhere, Search Anywhere, SDF, Search Anywhere, Secure SQL Server, Secure SQL Toolset, Security Guardian, ShareSpool, ShareLink, SKILS, smart.partners, smart.parts, smart.script, SOA Anywhere Trademark,SQL Advantage, SQL Anywhere, SQL Anywhere Studio, SQL Code Checker, SQL Debug, SQL Edit, SQL Edit/TPU, SQL Everywhere, SQL Modeler, SQL Remote, SQL Server, SQL Server Manager, SQL SMART, SQL Toolset, SQL Server/CFT, SQL Server/DBM, SQL Server SNMP SubAgent, SQL Station, SQLJ, Stage III Engineering, Startup.Com, STEP, SupportNow, S.W.I.F.T. Message Format Libraries, Sybase Central, Sybase Client/Server Interfaces, Sybase Development Framework, Sybase Financial Server, Sybase Gateways, Sybase IQ, Sybase Learning Connection, Sybase MPP, Sybase SQL Desktop, Sybase SQL Lifecycle, Sybase SQL Workgroup, Sybase Synergy Program, Sybase Virtual Server Architecture, Sybase User Workbench, SybaseWare, Syber Financial, SyberAssist, SybFlex, SybMD, SyBooks, System 10, System 11, System XI (logo), SystemTools, Tabular Data Stream, The Enterprise Client/Server Company, The Extensible Software Platform, The Future Is Wide Open, The Learning Connection, The Model For Client/Server Solutions, The Online Information Center, The Power of One, TotalFix, TradeForce, Transact-SQL, Translation Toolkit, Turning Imagination Into Reality, UltraLite, UltraLite.NET, UNIBOM, Unilib, Uninull, Unisep, Unistring, URK Runtime Kit for UniCode, Viafone, Viewer, VisualWriter, VQL, WarehouseArchitect, Warehouse Control Center, Warehouse Studio, Warehouse WORKS, Watcom, Watcom SQL, Watcom SQL Server, Web Deployment Kit, Web.PB, Web.SQL, WebSights, WebViewer, WorkGroup SQL Server, XA-Library, XA-Server, XcelleNet, XP Server, XTNDAccess and XTNDConnect are trademarks of Sybase, Inc. or its subsidiaries. 05/06
Unicode and the Unicode Logo are registered trademarks of Unicode, Inc.
All other company and product names used herein may be trademarks or registered trademarks of their respective companies.
Use, duplication, or disclosure by the government is subject to the restrictions set forth in subparagraph (c)(1)(ii) of DFARS 52.227-7013 for the DOD and as set forth in FAR 52.227-19(a)-(d) for civilian agencies.
About This Book ... v
CHAPTER 1 About Sybase HIPAA Accelerator ... 1
What is HIPAA? ... 2
Standardized formats and data content ... 2
EDI standards... 2
HIPAA standards ... 3
Sybase HIPAA Accelerator solution and components ... 5
Standards database ... 5
HIPAA compliance maps... 6
Sybase HIPAA Accelerator testing ... 8
CHAPTER 2 Working with Compliance Maps ... 11
Setting up compliance maps using ECMap... 12
Creating a project ... 14
Creating default compliance maps ... 16
Creating compliance maps with business rules ... 22
Upgrading Sybase HIPAA Accelerator... 25
Updating maps, rules, and cross-reference tables... 27
Understanding claims attachments ... 29
HIPAA unique identifiers ... 32
National Provider Identifier ... 33
Employer Identification Number ... 35
CHAPTER 3 Running and Testing Compliance Maps ... 41
Verifying data compliance ... 42
Support for HCCO CCAP testing ... 48
CHAPTER 4 Troubleshooting Map Errors ... 49
Handling noncompliance errors... 50
Viewing the transaction log for an inbound map ... 50
Viewing the transaction log for an outbound map ... 51
Viewing the EDI file for an outbound map ... 52
Map error types ... 53
Common compliance scenarios and responses... 53
997 errors ... 54
The Sybase® HIPAA Accelerator is an add-on accelerator to the Sybase® Adapter for EDI, EDI Server, and Adapter Suite for EDI products. When used in conjunction with ECMap, Sybase HIPAA Accelerator allows for rapid development and deployment of HIPAA-compliant EDI messages in accordance with the HIPAA Implementation Guides and Addenda.
Audience This document is for application engineers and technical consultants who manage Sybase HIPAA Accelerator.
How to use this book This book describes how to use Sybase HIPAA Accelerator. It is organized into the following chapters:
• Chapter 1, “About Sybase HIPAA Accelerator” briefly describes the Health Insurance Portability and Accountability Act (HIPAA) and details the Sybase HIPAA Accelerator solution.
• Chapter 2, “Working with Compliance Maps” describes how to set up compliance maps, import cross-reference tables from map to map, and run HIPAA X12 data through the maps.
• Chapter 3, “Running and Testing Compliance Maps” describes how to run HIPAA compliance maps and enable optional edits to the maps. • Chapter 4, “Troubleshooting Map Errors” describes common errors
that HIPAA compliance maps might encounter.
Related documents The following documents ship with Sybase HIPAA Accelerator: • Sybase HIPAA Accelerator New Features Guide
• Sybase HIPAA Accelerator Installation Guide
• Sybase HIPAA Accelerator User’s Guide
• Release Bulletin for Sybase HIPAA Accelerator
Additional documents are referred to in the Sybase HIPAA Accelerator documentation to supply you with specific information that supports this product. See:
• ECMap User’s Guide to understand and build structured information
• ECMap Reference Guide to understand and recognize informational
messages
• ECRTP Reference Guide to use the data transformation engine
Documentation that supports Sybase HIPAA Accelerator can be found on the Product Manuals Web site at http://www.sybase.com/support/manuals. Select Sybase HIPAA Accelerator from the drop-down list, and click Go.
Other sources of
information Use the Sybase Getting Started CD, the SyBooks CD, and the Sybase Product Manuals Web site to learn more about your product:
• The Getting Started CD contains release bulletins and installation guides in PDF format and may also contain other documents or updated information not included on the SyBooks CD. It is included with your software. To read or print documents on the Getting Started CD, you need Adobe Acrobat Reader, which you can download at no charge from the Adobe Web site using a link provided on the CD.
• The SyBooks CD contains product manuals and is included with your software. The Eclipse-based SyBooks browser allows you to access the manuals in an easy-to-use, HTML-based format.
Some documentation may be provided in PDF format, which you can access through the PDF directory on the SyBooks CD. To read or print the PDF files, you need Adobe Acrobat Reader.
Note Refer to the SyBooks Installation Guide on the Getting Started CD, or the README.txt file on the SyBooks CD for instructions on installing and starting SyBooks.
• The Sybase Product Manuals Web site is an online version of the SyBooks CD that you can access using a standard Web browser. In addition to product manuals, you will find links to EBFs/Maintenance, Technical Documents, Case Management, Solved Cases, newsgroups, and the Sybase Developer Network.
To access the Sybase Product Manuals Web site, go to Product Manuals at http://www.sybase.com/support/manuals/.
• Infocenter is an online version of SyBooks that you can view using a standard Web browser. To access the Infocenter Web site, go to Sybooks Online Help at http://infocenter.sybase.com/help/index.jsp.
Sybase certifications
❖ Finding the latest information on product certifications
1 Point your Web browser to Technical Documents at http://www.sybase.com/support/techdocs/.
2 Click Certification Report.
3 In the Certification Report filter select a product, platform, and timeframe and then click Go.
4 Click a Certification Report title to display the report.
❖ Finding the latest information on component certifications
1 Point your Web browser to Availability and Certification Reports at http://certification.sybase.com/.
2 Either select the product family and product under Search by Product; or select the platform and product under Search by Platform.
3 Select Search to display the availability and certification report for the selection.
❖ Creating a personalized view of the Sybase Web site (including support pages)
Set up a MySybase profile. MySybase is a free service that allows you to create a personalized view of Sybase Web pages.
1 Point your Web browser to Technical Documents at http://www.sybase.com/support/techdocs/.
2 Click MySybase and create a MySybase profile.
Sybase EBFs and software
maintenance
❖ Finding the latest information on EBFs and software maintenance
1 Point your Web browser to the Sybase Support Page at http://www.sybase.com/support.
2 Select EBFs/Maintenance. If prompted, enter your MySybase user name and password.
3 Select a product.
4 Specify a time frame and click Go. A list of EBF/Maintenance releases is displayed.
Padlock icons indicate that you do not have download authorization for certain EBF/Maintenance releases because you are not registered as a Technical Support Contact. If you have not registered, but have valid information provided by your Sybase representative or through your support contract, click Edit Roles to add the “Technical Support Contact” role to your MySybase profile.
5 Click the Info icon to display the EBF/Maintenance report, or click the product description to download the software.
Conventions This documentation uses the following typographic conventions:
If you need help Each Sybase installation that has purchased a support contract has one or more designated people who are authorized to contact Sybase Technical Support. If you cannot resolve a problem using the manuals or online help, please have the designated person contact Sybase Technical Support or the Sybase subsidiary in your area.
Item Description
Code SQL and program code is displayed in a monospaced
(fixed-width) font.
User entry Text entered by the user is shown in bold serif type.
emphasis Emphasized words are shown in italic. file names File names are shown in italic.
database objects Names of database objects, such as tables and procedures, are shown in sans serif type in print, and in italic online. sybase\bin A backward slash (“\”) indicates cross-platform directory
information. A forward slash (“/”) applies to information specific only to UNIX. Directory names appearing in text display in lowercase unless the system is case sensitive.
File > Save Menu names and menu items are displayed in plain text. The
angle bracket indicates how to navigate menu selections, such as from the File menu to the Save option.
parse|put|get The vertical bar indicates • Options available within code • Delimiter within message examples segment Bold text indicates a glossary term.
About this chapter This chapter briefly discusses the HIPAA requirement and describes Sybase HIPAA Accelerator and its components.
Contents
Topic Page
What is HIPAA? 2
Standardized formats and data content 2
What is HIPAA?
In 1996, Congress passed the Health Insurance Portability and Accountability Act (HIPAA), a federal law that sets basic requirements that hospitals, physicians, and managed care companies must meet.
The Administrative Simplification provision, a requirement of primary interest to medical practices, contains requirements for the uniform transfer of electronic health care data, such as for billing and payment, protection of patient privacy, and data security.
Standardized formats and data content
For the health care industry to comply with HIPAA and achieve potential administrative cost savings with Electronic Data Interchange (EDI), the Accredited Standards Committee (ASC) X12 developed standards to be implemented consistently by all organizations.
To facilitate uniform implementation, HIPAA’s goal is to simplify and encourage the electronic transfer of information by replacing many of the current nationally-used nonstandard formats with a single set of electronic transactions to be used throughout the health care industry.
EDI standards
The X12 format, designed and maintained by the American National Standards Institute (ANSI), provides standard data formats that enable the exchange of business documents between trading partners. Different industries use different data formats or transaction types for different purposes. Common to all, however, is a three-digit numerical designation, which identifies these different transactions; for example, an 834 Benefit Enrollment and Maintenance transaction.
The standard defines a hierarchy of levels—Interchange, Group and
Transaction control segments—and specifies both the syntax and semantics of messages. For example, a field designated as quantity might be syntactically specified as required or optional, and the minimum and maximum size of the field might be syntactically defined as well.
HIPAA standards
HIPAA X12 standards are a specific subset of the X12 library of standards. Developed within X12N, the Insurance subcommittee of X12, the HIPAA standards provide a strict and unambiguous interpretation of the various HIPAA transactions named in the Final Rule. This interpretation is presented in a format called an Implementation Guide. HIPAA Implementation Guides, sometimes referred to as IGs, document a specific interpretation of the syntax and semantics of each transaction.
HIPAA
Implementation Guides
The HIPAA Implementation Guides satisfy several requirements: • Comply with HIPAA and its associated rules
• Facilitate a smooth transition to the EDI environment by providing standardized data requirements and content for users of each HIPAA transaction
• Allow the electronic exchange of information from computer to computer without human involvement
The following table lists the transaction standards as implemented through the appropriate Guide Addenda. Computer-based transmissions of the following transaction types must comply with the HIPAA standards.
Transaction Title and use
270/271 Health Care Eligibility Benefit Inquiry and Response Provider
uses the 270 to request details of health care eligibility and benefit information or to determine if an information source organization has a particular subscriber or dependent on file. Payer uses the 271 to respond to 270 inquiries.
276/277 Health Care Claim Status Request and Response Provider
uses to request the status of health care claims. Payer uses to respond to 276 requests.
275 Additional Information to Support a Health Care Claim or Encounter Provider uses the 275 to send requested information about a claim or encounter.
277 Health Care Claim Request for Additional Information Payer uses the 277 to request additional information about a health care claim or encounter.
278 Health Care Services Review Information Request and Response Health care providers use request transactions to request information on admission certifications, referrals, service certifications, extended certifications, certification appeals, and other related information.
Historically, health providers and plans have used many different electronic formats. HIPAA’s primary goal is to simplify the complex process of administration and payment of health care claims by implementing a single transaction standard and establishing the code sets used.
Under the enacted regulations, health plans will be able to reimburse providers, authorize services, certify referrals, and coordinate benefits using a
standardized electronic format. Additionally, providers will be able to check eligibility for coverage, check claim status, request referrals and service authorizations, and receive electronic remittance to post receivables.
Who is affected by
HIPAA requirements? HIPAA applies to the following health care organizations:
• Health plans
• Health care providers, such as hospitals and physicians, that conduct health transactions electronically
• Health care clearing houses that convert health care data between HIPAA-compliant and non-HIPAA-compliant formats
Entities that pay health care claims, as well as the providers and clearinghouses exchanging electronic payment information with each other, are affected by HIPAA requirements.
Getting additional information about HIPAA
For more detailed information on HIPAA and the Administrative Simplification provision, see the following Web sites:
820 Payment Order/Remittance Advice Insurance companies, third-party administrators, payroll service providers, and internal payroll departments use the 820 to transmit premium payment information. 834 Benefit Enrollment and Maintenance Benefit plan sponsors and
administrators use the 834 to transmit enrollment and benefits information to each other.
835 Health Care Claim Payment/Advice Payer and provider use the 835 to make payments on a claim, send Explanation of Benefits (EOB) remittance advice, or to send both the payment and EOB in the same transaction.
837 Health Care Claim There are three separate Implementation Guides for 837 Health Care Claims: Dental, Institutional, Professional
Each is used by the provider—dentist/dental group, clinic/hospital, and physicians/surgeons—or between payers to submit and transfer claims and encounters to the payer.
• Health and Human Services Web site at http://aspe.hhs.gov/admnsimp/index.shtml
• Centers for Medicare and Medicaid Services Web site at http://www.cms.hhs.gov/hipaa/default.asp
Note HIPAA X12 Implementation Guides are available to download from the
Washington Publishing Company Web site at http://www.wpc-edi.com.
Sybase HIPAA Accelerator solution and components
Sybase provides the first complete, easily administered health care transaction product. The Sybase HIPAA Accelerator is an add-on accelerator to the Sybase Adapter for EDI, EDI Server, and Adapter Suite for EDI products. When used in conjunction with ECMap, Sybase HIPAA Accelerator allows for rapid development and deployment of HIPAA-compliant EDI messages in accordance with the HIPAA Implementation Guide Addenda.Whereas it can take health care entities months to create a compliance methodology, Sybase HIPAA Accelerator supplies an immediate solution that includes the following components:
• A standards database containing X12 transactions • Compliance maps and source map files
• HIPAA-compliant test data
• Support for HCCO CCAP and external code set testing
Standards database
Sybase HIPAA Accelerator’s standards database contains the twelve X12 transactions as defined in the HIPAA Implementation Guides. Standards and maps for Sybase HIPAA Accelerator are based on and conform with the October 2003 HIPAA Implementation Guide Addenda.
Each HIPAA standard contains all of the required and situational data segments and elements as specified by the HIPAA Implementation Guides. HIPAA-defined transactions levels, maximum and minimum occurrences, not used elements, and implementation code lists are incorporated into the standards and are easily identifiable.
HIPAA compliance maps
Sybase HIPAA Accelerator distributes maps that facilitate compliance and validate data syntactically and semantically. These maps perform several key functions:
• Verify inbound and outbound HIPAA X12 transactions and check that required and conditional segments and elements are present, where appropriate
• Confirm that only the appropriate code values are present, that minimum and maximum occurrences have not been violated, and that data is not present within not used elements
• Let you add, delete, or change compliance rules, which allows for business logic and flow and validation of information, such as member numbers, provider numbers, and dates of birth versus dates of service
Note Modifying EDI data is a business-specific decision. Although Sybase HIPAA Accelerator maps impose no restrictions, Sybase strongly recommends business owner approval.
• Capture and report non-compliance errors to a transaction log in ECMap You can run data through the Sybase HIPAA Accelerator compliance maps with no modifications to verify that your data is HIPAA compliant. Since you also receive source map files, you can alternatively modify the maps by applying your own business rules and specific data checks.
Compliance map error tracking
Errors captured by the Sybase HIPAA Accelerator compliance maps are reported to ECMap’s Trans Log. This error logging identifies noncompliant data and lets you build business processes around the event, such as the submission of a 997 functional acknowledgement.
Situations that HIPAA
compliance maps trap The following list represents situations that the HIPAA compliance maps trap:
• Missing mandatory data segment or data element • Unexpected segment or loop – invalid map flow • Invalid internal code value
• Data length exceeds maximum or less than minimum • Maximum use exceeded for segment or loop
• Invalid data format for date or time • Not used element contains data
• Invalid data type, such as alphanumeric or numeric only • Violation of reasonable conditional edits (gray box rules)
• Violation of semantics contained in the front matter of the Implementation Guide that can be reasonably quantified
You can also enhance the HIPAA compliance maps to validate external code values, such as ZIP codes, country codes, and the like.
Situations that HIPAA compliance maps do not trap
The HIPAA compliance maps do not trap the following situations:
• Invalid crosswalk, such as application data, subscriber’s last name mapped to X12 transaction, or a subscriber’s first name
• Conditional edits that cannot be reasonably verified, such as if the presence of a person’s middle name is required, if known. It would be unreasonable to determine whether the submitting trading partner knew the patient’s middle name.
Error trapping gives you enough information to either modify the EDI data to create valid compliance information or notify senders so they can quickly correct the data. See Chapter 4, “Troubleshooting Map Errors” for more information.
Compliance map rules development guidelines
Sybase used the following guidelines in developing the compliance rules supplied with Sybase HIPAA Accelerator 6.0:
• The maps are based on the final Implementation Guide Addenda. Sybase does not create product based on drafts or HIPAA documents that are not finalized.
• If a gray box rule, note, or front matter explanation exists within the published HIPAA Implementation Guides and a validation rule can be reasonably determined, the gray box rule, note or front-matter explanation is included in the compliance maps.
• Assumptions or leaps of logic were not employed in the creation of validation rules.
• “Should” is interpreted as optional, whereas “must” is interpreted as required.
• Assumptions regarding negative conditions are not included. For example, if a gray box rule states, “If it is Tuesday, the patient’s eye color is required,” the rule would be written to verify the day of the week. If the day of the week was Tuesday, the compliance map would require that “eye color” be included. However, if the day of the week was any day but Tuesday and the “eye color” was still present, a rule would not be written to reject that condition.
Sybase HIPAA Accelerator testing
This section describes Sybase HIPAA Accelerator support for HCCO CCAP and external code set testing.
Support for HCCO CCAP testing
The HIPAA Conformance Certification Organization (HCCO) is a nonprofit organization that provides the health care industry with guidelines for complying with HIPAA regulation through the use of accreditation and certification standards and services. HCCO brings interoperability of HIPAA transactions to health care through its CCAP testing programs by helping vendors in interpreting the Implementation Guides in the same manner. CCAP is the only process available to vendors to test interoperability across health care covered entities.
Sybase HIPAA Accelerator implementation adheres to a careful interpretation of the gray box rules, called Industry Notes in the HIPAA Implementation Guides. Because these rules are subject to different interpretations, Sybase is involved with HCCO CCAP.
For more information on Sybase support for HCCO CCAP test suites, see “Support for HCCO CCAP testing” on page 48. See also the HIPAA Conformance Certification Organization Web site at http://www.hcco.us/.
Support for code set testing
The Strategic National Implementation Process (SNIP) is a WEDI-sponsored program that helps health care communities identify and resolve HIPAA implementation issues. WEDI, the Workgroup for Electronic Data Interchange, is a health care industry group that lobbied for HIPAA Administrative Simplification and has a formal consultative role under the HIPAA legislation. See Table 1-1 for the WEDI/SNIP testing types that Sybase HIPAA
Accelerator 6.0 supports.
Table 1-1: WEDI/SNIP testing types supported by Sybase HIPAA Accelerator
Testing type Description Type 1: EDI
syntax integrity testing
Validates basic syntactical integrity of EDI submission: segments, order, element attributes, testing numeric values in data elements, validation of X12 syntax, and compliance with X12 rules.
Type 2: HIPAA syntactical requirement testing
Testing for HIPAA IG-specific syntax requirements, such as limits on repeat counts, used/not used qualifiers, codes, elements and segments. Also, testing for HIPAA required or intra-segment situational data elements, testing for nonmedical code sets, and values and codes noted in the IG via an X12 code list or table. Type 3:
Balancing
Testing the transaction for balanced field totals, financial balancing of claims or remittance advice, and balancing of summary fields. For example, all claim line item amounts equal the total claim amount.
Type 4: Situation testing
Testing of specific inter-segment situations described in the IG, such that: If A occurs then B must be populated. This is considered to include the validation of situational fields given values or situations present elsewhere in the file. Example: if the claim is for an accident, the accident date must be present. Type 5: External
code set testing
Testing for valid IG-specific code set values and other code sets adopted as HIPAA standards. This level of testing validates the code sets and ensures the usage is appropriate for any particular transaction and appropriate with the coding guidelines that apply to the specific code set. Validates external code sets and tables, status codes, adjustment reason codes, and their appropriate use for the transaction.
Sybase HIPAA Accelerator supports type 5 validation for some situations. For example, Sybase HIPAA Accelerator does not support validation of U.S. zip codes.
Table 1-2: WEDI/SNIP testing types not supported by Sybase HIPAA Accelerator
For additional information, see the Workgroup for Electronic Data Interchange Web site at http://www.wedi.org/.
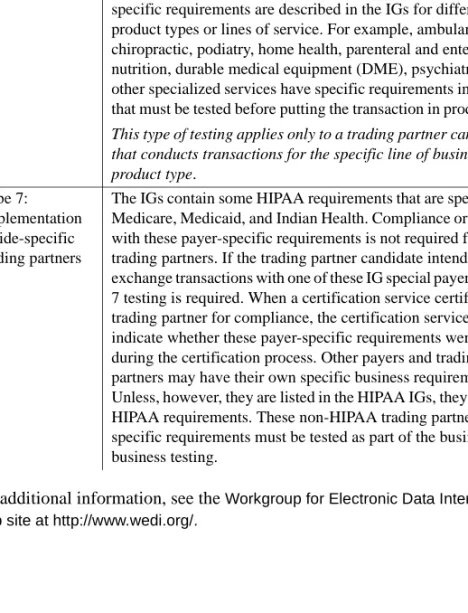
Testing type Description Type 6: Product
types or line of services
Testing type is required to ensure that the segments/records of data that differ based on certain health care services are properly created and processed into claims data formats. These specific requirements are described in the IGs for different product types or lines of service. For example, ambulance, chiropractic, podiatry, home health, parenteral and enteral nutrition, durable medical equipment (DME), psychiatry, and other specialized services have specific requirements in the IG that must be tested before putting the transaction in production. This type of testing applies only to a trading partner candidate that conducts transactions for the specific line of business or product type.
Type 7: Implementation Guide-specific trading partners
The IGs contain some HIPAA requirements that are specific to Medicare, Medicaid, and Indian Health. Compliance or testing with these payer-specific requirements is not required from all trading partners. If the trading partner candidate intends to exchange transactions with one of these IG special payers, Type 7 testing is required. When a certification service certifies a trading partner for compliance, the certification service must indicate whether these payer-specific requirements were met during the certification process. Other payers and trading partners may have their own specific business requirements. Unless, however, they are listed in the HIPAA IGs, they are not HIPAA requirements. These non-HIPAA trading partner specific requirements must be tested as part of the business-to-business testing.
About this chapter This chapter describes how to upgrade your version of Sybase HIPAA Accelerator, set up compliance maps, and import cross-reference tables from map to map.
Sybase HIPAA Accelerator supports two setup types for running HIPAA X12 data through a compliance map: default compliance maps and compliance maps with business rules.
For complete details on window entries, menu choices, and other advanced setup options, refer to the ECMap User’s Guide. For a comprehensive list of informational messages, see the ECMap Reference
Guide. Contents
Topic Page
Setting up compliance maps using ECMap 12
Upgrading Sybase HIPAA Accelerator 25
Updating maps, rules, and cross-reference tables 27
Understanding claims attachments 29
Employer Identification Number 35
Setting up compliance maps using ECMap
This section provides a brief overview of ECMap functionality and describes how to set up the HIPAA compliance projects and maps using ECMap, a powerful mapping tool that provides support for creating and processing structured information messages. For advanced setup options, refer to the
ECMap User’s Guide. Format classes that
ECMap supports
ECMap can handle three classes of formats: • Traditional formats of flat files and databases • EDI Standards: X12, EDIFACT, NCPDP, and HL7 • HTML or XML data
You can also import other standards with the EDI Standard Exchange Format (SEF) Import utility. Once imported, you can use these standards like the other standards that are bundled with the product. ECMap lets you perform application-to-application integration as well as Web-enabling XML data and XML-enabling databases.
Types of maps you can create with ECMap
ECMap lets you create the following:
• Transaction maps that perform data conversions between application data and EDI standards
• Any-to-any maps that convert data directly from one application to another
• Any-to-any maps that perform data conversions between HTML/XML data and application data
• Any-to-any maps that perform data conversions between HTML or XML data and EDI standards.
What ECMap does ECMap has the ability to
• Automatically generate a set of record and field definitions from a COBOL copybook, an ODBC file, a map, or a special file
• Automatically generate an ODBC database table from a set of record and field definitions
• Use a wide variety of rule commands, including conditional logic, to imbed business rules and proprietary compliance checks in your map • Use a wide range of SQL commands from within a SQL rule command,
allowing direct integration with any ODBC-compliant database
• Perform dynamic map switching at runtime • Perform interactive, real-time transactions
• Perform any-to-any mapping, directly integrating diverse application databases
• Process large volumes at high speeds, without having to break up and reassemble the data
• Translate data independent of file size
• Perform data conversions between HTML or XML data and EDI standards • Automatically generate a set of record and field definitions from an
HTML form
• Automatically create the template for an HTML form from a set of record and field definitions
• Dynamically build and populate an HTML form based on retrieved data and an HTML form template
• Perform dynamic interactions between an HTML form and the values in a database
• Map XML data to a proprietary application
• Import customized standards—such as those based on Implementation Guides—and use them just as you use the major standards included with the tool, X12, EDIFACT, and HL7
• Automatically create a field from an EDI element during map development
• Perform conditional mapping, by associating particular mapping
commands to a specific trading partner, to the presence or absence of data and the like
• Quickly and easily perform element-to-field mapping for any standard supported by ECMap
• Map directly from one proprietary application to another
• Create and run special compliance maps to verify that the data a map processes is compliant with the standard used
• Automatically generate a batch file that includes all of the switches needed to run the map from a command line
• Use the runtime capability of substituting either a new input file or a new output file for the file specified in the map, regardless of whether the files are flat files or ODBC databases
• Pass parameters into the map at runtime • Verify compliance with the HIPAA mandate
Creating a project
ECMap uses projects to organize maps so they are easy to locate and use. You can set up projects in any way that suits your business purposes, such as creating projects based on trading partners or on business applications. You can add, modify, select and delete projects, as well as import or export an entire project with all of its associated maps.
Where data is stored Each time you create a project, the system adds the data to a Microsoft® Access database file called projects.mdb. This master file comprises three tables, mproject, mtable, and mxref, which contain information about all of the projects, maps, and cross-reference tables in ECMap. The information in these tables is updated each time that you add, modify, or delete a project, map, or cross-reference table.
mproject table The mproject table contains the names of all of the projects in your system. It contains all of the information entered in the five text boxes within the New Project window: • Project Name • Project Description • Project Directory • Contact • Phone Number
mtable table mtable contains the names of all of the projects and maps in your system. The
project name links this table to the mproject table, and the project name/map name combination links this table to the mxref table. Each record in the table contains the name of a project, a map within that project, and the related trading partner information. The mtable table contains all of the information you entered in the four tabs of the Map Definition window.
mxref table The mxref table contains the names of all the project, maps, and cross-reference tables in your system. Each record in the table contains the name of a project, a map within that project, and a cross-reference table used in that map. The project name links this table to the mproject table, and the project name/map name combination links this table to the mtable table. Since the same cross-reference tables can be used in more than one map, there may be multiple records that have the same cross-reference table name.
When you export a project, ECMap creates a copy of these same three tables, but they contain information only for the project being exported. When you import the project, ECMap uses the exported project-specific information in these three tables to update the master projects.mdb database in the ECMap installation to which the project is being imported.
❖ Starting ECMap
1 Double-click the ECMap icon on your desktop or select Start > Programs > Sybase > ECMap > ECMap.
2 When the Login window displays, accept the default user name, Admin.
3 Type the password, ecmap, and click OK.
Note The password is case sensitive. Use lowercase.
❖ Creating a project
1 In the ECMap main window select File > Project > New. The New Project window displays.
2 Type information into the text boxes in the Project group:
a Project Name – Type a short title that helps you quickly recognize the contents of the project. This field is required.
b Project Description – Type a brief explanation of the project. This field is optional.
c Directory – Click Browse to navigate to the folder or directory where the project is physically stored and double-click the folder to populate the field. This field is required.
d Contact – Type the name of the individual responsible for the maps in this project. This field is optional.
e Phone Number – Type the telephone number of the individual responsible for the maps in this project. This field is optional.
3 Click OK to return to the Project window.
4 Highlight the Project you just created, right-click and choose Select from the submenu.
The project name now displays in ECMap’s status bar in the main window.
Creating default compliance maps
A map is a set of instructions used to transform data from one format to another. ECMap can create the following maps:
• Transaction maps use EDI standards data in the mapping process, either
as input or output.
• Any-to-any maps use application data as both the input and the output. An
any-to-any map can use EDI data, but it treats the EDI data as application data, rather than standards data.
You can add, select, modify, copy, or delete maps. You can also generate all maps in one project, generate all maps in all projects, or view all maps in a project.
Map direction Transaction maps are said to be either inbound or outbound.
• An inbound map uses an EDI message to create application data. The EDI message is the input to the map, and it is being sent in to your company from your trading partner.
ECMap also uses two specialized inbound maps, compliance maps and print maps. See the ECMap User’s Guide for more information on these two maps.
• An outbound map uses application data to create an EDI message. The EDI message is the output of the map, and it is generally being sent from your company out to your trading partner.
In ECMap, each transaction map is associated with a specific EDI standard— X12, EDIFACT, NCPDP, or HL7—and a specific transaction within that standard.You assign a map type when you create a new map.
Where maps are
stored Maps are stored in projects. You must have a separate map for each business message that you exchange with a trading partner. For EDI transactions, this
means one map per message type, application system, and map direction. The name given to a map often reflects the message type and the direction. For example, an X12 map that uses your company’s internal application data to produce an EDI invoice that is sent to a trading partner might be named 810OUT.
❖ Accessing the Map window
You perform all map-related actions from the Map window.
• Click the Map icon on the main ECMap toolbar or Choose File > Map > Select from the main menu.
Creating a map
Use the following procedure to create a default compliance map.
❖ Creating a map
1 Right-click the project you just created and select New > Map from the submenu.
The New Map Definition window displays with three tabs: Map Properties, Map Directories, and Map DSN. The Map Properties tab is initially active. You type information into various fields.
2 Populate the fields in the Map group:
a In the Project text box, the program automatically populates the field from the current project.
b In the Map Name field, type a map name; for example,
HIPAA_270_4010_60. This field is required.
See the Sybase HIPAA Accelerator Installation Guide for a list of map names provided in the Sybase HIPAA Accelerator installation. c In the Map Type field, click the arrow and choose X12. This field is
required and activates the Options group. 3 In the Options group, populate the following fields:
a In the Transaction field, type the transaction set number. This field is required.
This is the HIPAA transaction set corresponding to the HIPAA map name you entered above. Possible choices are 270, 271, 276, 277, 278, 820, 834, 835 and 837.
b In the Direction field, click the arrow and choose IN.
Note The direction of a compliance map must be IN, whether the data you are testing is inbound or outbound.
c In the Version field, click the down arrow and choose 004010.This field is required.
d In the Description field, type a brief description. This field is optional. e In the Century Minimum field, type a value. This field is required. f Select Y for 8 Digit Date in X12 Envelope.
4 Click the Map Directories tab to make it active and populate the fields within.
ECMap uses the directory location specified on the New Project window followed by the map name specified to automatically populate all directories except for the EDI Standard Tables. In the following example, the directory specified in the New Project window was C:\maps\MyMaps and the map name was HIPAA_270_4010_60.
When you define your EDI Standard Tables location on the New Map Definition window, refer to the location of the HIPAA standards.
Warning! It is very important that you point to the directory with the Sybase HIPAA Accelerator standards and not the default ECMap standards.
a Click Invert to protect the paths of all of the supplied map
information, or click Protect/Change for a specific directory to toggle back to protect or change a directory.
b Click Change All to type the path of the EDI Standard Tables. A dialog box opens for you to select a directory.
c Select the directory path to the HIPAA standards.
If you used the default install directory, identify the path as \Program
Files\Sybase\HIPAA52\ Standards\<Standard>. If you chose a
different directory path during installation, you must use that directory path.
5 Click the Map DSN tab if the trading partner and log information are stored in databases that will be accessed through ODBC.
a In the Trade Partner group, click the Data Source Name arrow. The Data Source Names window displays.
b Double-click a Data Source Name from the list to automatically populate the fields in the Trade Partner group.
If you have not created the DSN, click Configure Data Source to open the ODBC configuration window. Once you have created your DSN or DSNs, you may proceed.
Note For certain databases, such as Microsoft® SQL Server and Oracle, you may need to edit the string in the text box manually to add a user ID and password.
c To test the connections, click Test Trade Partner Connection in the Trade Partner group or Test Log File Connection in the Log group. If you select Clear TP Fields, the program removes all of the information you inserted in the text boxes on the Trade Partner section of this tab. If you select Clear Log Fields, the program removes all of the information you inserted in the text boxes on the Log section. 6 Click OK to return to the Project window.
Modifying the ALL TradePartner
ECMap uses mailboxes for routing. Mailbox folders are directories where the runtime engine (ECRTP) drops off EDI data produced by outbound maps and compliance runs and places inbound EDI data being passed through.
Mailboxes are attached to the trading partner and are used for both inbound and outbound routing.
• GOOD mailboxes are used by compliance maps.
• BAD mailboxes are used by compliance maps and inbound maps. • IN mailboxes are used both by inbound maps and by outbound maps with
the Route In switch set.
• OUT mailboxes are used both by outbound maps and by inbound maps with the Route Out switch set.
When you define a mailbox the folders, GOOD, BAD, IN, OUT AND OTHER appear in the directory in which the mailbox (file) is located. This directory is determined by the entry you made on the Trading Partner or Trade Agreement window in ECMap.
The transaction—all of the data between the ST and SE elements—that contains noncompliant (bad) data produced by compliance maps is placed in the BAD directory of the ALL TradePartner mailbox. For this to happen, the ALL TradePartner must have a mailbox.
Note The following procedure uses the ALL TradePartner mailbox, but you can also assign mailboxes to individual trading partner file entries.
For more detailed information on mailboxes, see ECMap User’s Guide.
❖ Modifying the ALL TradePartner
A mailbox is another name for a directory where map-produced EDI data resides. ECMap and EC Gateway use five mailboxes (files):
1 In ECMap’s main window, select File > Address Book > Contacts (Trading Partner). The Trading Partners window displays.
2 Right-click the ALL TradePartner and choose Properties from the submenu. The Trading Partner – Properties window displays. 3 Click the General tab to make it active.
4 In the Trading Partner group, click Browse to the right of the MailBox Folder field and locate the path to a mailbox for the ALL TradePartner. 5 Click OK to populate the field with the path to the mailbox directory. 6 Click OK to return to the Trading Partners window.
Changing the map’s purpose and status
This section describes two procedures: changing the purpose of the map to CMP (compliance) and confirming that the status corresponds to the status on ISA 15 of the incoming EDI data.
❖ Changing the map’s purpose
1 In the Trade Agreements With Trade Partner: ALL window, select Edit > Properties. The Standard Type for Map window displays.
The Trade Agreement - Properties window displays with tabs enabled: General, Overrides, and X12, EDIFACT, or HL7, depending on which standard type you selected. The General tab is active initially.
3 In the Map Information group, click the Map Type arrow and choose CMP.
❖ Confirming the map’s status
1 In the Map Information group, click the Test Indicator arrow. It should be the same as the status indicated in ISA 15 on your incoming EDI data: T (Test) or P (Production).
2 In the Version/Release/Industry Identifier Code field, type the version suffix identified in the HIPAA Implementation Guide for your specific transaction; for example, 270 has a version suffix of X092. Type this information after the default of 004010, which is the same version you entered on the Map Properties tab.
3 Set the functional acknowledgement, if appropriate.
a If you require no functional acknowledgement, click OK.
b If you require a functional acknowledgement, click the standard type tab that is enabled; for example, X12, EDIFACT, or HL.
1 In the Envelope Information group, click the ISA arrow and choose 00401.
2 In the Notification group, select the Expect FA 997 Functional Acknowledgement check box.
4 Click OK.
For more detailed instructions on building functional acknowledgements, see the ECMap User’s Guide.
Identifying company information
If you have not already identified your company information, it is necessary to do so before running the map. The company information is the electronic signature for your outgoing EDI messages.
❖ Identifying company information
1 In ECMap’s main window, select File > Address Book > Signature (Company ID). The Company ID window displays.
2 In the Company ID window, select File > New. The Company ID - New window displays.
3 Identify the Company information:
a In the Profile Number text box, type a value for the company. b In the Name text box, type the company name.
4 Identify the Interchange, which is required.
The Group, Authorization and Security codes are optional, as described in
ECMap User’s Guide and ECMap Reference Guide.
5 Click OK to save the company information.
Creating compliance maps with business rules
When you add rules to a compliance map, first copy the compliance map to an alternate location to retain the original map’s integrity. Once you add your business rules to the expanded map and regenerate it, your edited map is ready for use with the associated trading partners.
This section describes copying the map and modifying it with your own business logic.
Refer to the ECMap User’s Guide for detailed information on window entries, menu choices, and the detailed map modification process.
About rules Although ECMap lets customers create rules with any rule number, Sybase
allocates a range of numbers for customer use: 25000 to 32767. Confining customer-specific logic to a range lets customers easily identify which rules Sybase created and which rules they created.
Note Although the program allows you to create rules using numbers under 25000, there is no guarantee that Sybase will not overwrite the rule number on a subsequent release. To preserve the rules you create, use the Sybase-supplied range.
❖ Copying a map
1 In ECMap’s main menu, select Utilities > Copy Map. The Copy Map window displays.
On the Copy Map window, the program populates the Map Name and Project Name text boxes with the names of the currently selected map and the project in which it is stored.
2 You can accept the project and map names entered by the program, or you can change them.
a To accept the current settings, click Run.
b To change the project and its associated map, do the following: 1 Click the Project Name arrow. The Select Project and Map
window displays.
2 Double-click the appropriate project and its associated map. The Select Project and Map window closes and populates the Project Name and Map Name text boxes in the Copy Map window. 3 In the Trade Partner Option group, choose one of the following:
a Click Include Trade Partner Tables to copy all map-related files and databases, including trading partner tables (tp, tradstat, and wixset). b Click Exclude Trade Partner Tables to copy map-related files and
databases, excluding trading partner tables.
You usually include the trading partner tables when you copy a map, but you may want to exclude them for various reasons. For example, if you are copying a map to use in a different project, that project might use an entirely different set of trading partner tables. 4 Choose the appropriate option in the Map Copy Direction group.
Additional text boxes let you specify where you want the copy to reside.
Choose this option To do this
This Map to Map Copy the properties of this map to another map.
In the Copy Map To group, click the Browse button next to the Map Name box, choose the appropriate Project Name and Map Name from the dialog box.
This Map from Map Move the properties of another map into this map.
In the Copy Map From group, click the Browse button next to the Map Name box, choose the appropriate Project Name and Map Name from the dialog box.
This Map to Directory Copy this map to a new directory.
In the Copy Map To box, click the Browse button, then choose the destination directory.
❖ Confirming the copy command
Now that you have set all the options, you are ready to create the copy of your map.
1 Click Run. The program displays a confirmation dialog box that restates the details of the copy map option you have chosen.
2 The program asks for your confirmation before the map is actually copied. a If you do not want to proceed or you want to change something, click
No to return to the Copy Map window.
b If you want to copy the map, click Yes. The map is copied and you return to the main ECMap window.
❖ Viewing the copy map log
1 If you want to see a listing of the actions that took place during the copy process, click View Log. The View Log window displays.
2 The information on this window lists each of the databases that were copied. If any problems were encountered, it issues warnings and errors. You should look at all warnings, but they do not necessarily prevent the copied map from running correctly. You must look at errors since they indicate a condition that would prevent the map from running.
❖ Modifying and regenerating the map
Make you sure you are working in a copy of the map and not the original when adding additional business edits to the compliance map.
1 Modify your map to add additional logic or data validation that reflects your particular business environment.
This Map from Directory
Moves the properties of a map in another directory into this map.
In the Copy Map From box, click the browse button, then choose the directory where the map resides.
If you want to define a new map based on the copy, click Create This Map Definition from Directory Copy.
When you regenerate and run your modified compliance map, ECMap not only checks for HIPAA compliance but performs the added data checks. Refer to the ECMap User’s Guide for instructions on modifying your map, using features such as conditional logic, cross-reference tables, and rules. 2 Select Utilities > Generate Compliance Map. The Generate Compliance
Map window displays.
3 Click Generate Error for Ignored Elements with Data. 4 Click Run.
5 Click No on the Generate dialog box so that your changes are included in the map file.
❖ Associating cross-reference tables with maps
If errors occur during the generation of the map that indicate that cross-reference tables do not exist, you need to associate the tables with the compliance map elements.
1 In ECMap’s main window, select Tools > Cross Reference Tables. The Cross Reference Tables window displays a list of all currently used cross-reference tables.
2 Select Files > Directory Scan from the menu.
Any cross-reference tables that are not used in the map are displayed in the Cross Reference Directory Tables window.
3 Select all the tables in the Cross Reference Directory Tables window and click OK.
The tables are added to the list in the Cross Reference Tables window. 4 Regenerate the map.
Upgrading Sybase HIPAA Accelerator
This section contains recommendations on how best to use these features to facilitate upgrading HIPAA compliance maps from one release to the next.
To let customers modify compliance maps to meet their specific business requirements, Sybase HIPAA Accelerator includes compliance maps with source code. Previously, when you upgraded your version of Sybase HIPAA Accelerator, you had to merge your business-specific edits into the new map or maps manually.
This section describes development conventions for Sybase HIPAA Accelerator administrators who modify compliance maps.
When upgrading maps, there are three cases that Sybase HIPAA Accelerator administrators may need to address: Adding to a rule, replacing or deleting a rule, and deleting a command. The following procedures describe these cases.
❖ Adding to a rule or command
1 Select the rule and the location within the rule where the additional logic is required.
2 At the selected location, insert a Perform Rule command or an IF …THEN command that calls a new rule from the customer-reserved region, which contains the new logic.
❖ Replacing or deleting rules
1 Write the new replacement rule in the customer-reserved region.
2 Modify every Perform Rule command in the map that calls the rule to be replaced to call the new rule instead.
❖ Deleting commands
1 Identify the command that needs to be deleted.
2 Depending on which EDI version you are running, perform one of the following steps:
a Disable the command if you are working with EDI 4.x b Delete the command if you are working with EDI 2.9
In each case, carefully document all modifications as well as the locations of the modifications. This includes, as stated previously, new rules or commands and deleted rules or commands. When merging the changes from one version of Sybase HIPAA Accelerator to the next, refer to your documentation. For more detailed information on working with rules, see the ECMap User’s
Updating maps, rules, and cross-reference tables
Sybase HIPAA Accelerator 6.0 provides two capabilities to facilitate the upgrade process: An import rule capability helps you easily update maps and import rules, and an import XREF utility let you import cross-reference tables from one map to another.In addition to updating rules, you can modify cross-reference tables. For example, you can add tables to maps to handle certain situations or add values to a table supplied in the compliance map, such as inpatient/outpatient edits in the 837 Institutional map. See “Validating maps against National Employer ID values” on page 40.
Sybase HIPAA Accelerator 6.0 supplies a cross-reference utility that facilitates importing tables from one map to another.
❖ Importing cross-reference tables from one map to another
ECMap must be installed on the machine where you use the cross-reference utility, which works with any version of ECMap.
1 Navigate to the \Tools folder in your Sybase HIPAA Accelerator install directory; for example, C:\Program Files\Sybase\HIPAA52\Tools, and double-click XrefImport.exe to launch the application.
2 Select the location of the source cross-reference tables by browsing to the directory where the map resides (where the tables will be imported from). For example, if you are upgrading from Sybase HIPAA Accelerator 5.0.x to 5.1, your source is the location of the version 5.0.x map.
3 Double-click the directory and a list of cross-reference tables defined for that map displays.
4 Check the tables you want to import and click Next.
The Select Map for Table Import screen opens and displays a list of your projects and maps.
5 Open a project and select your destination map (where the tables will be imported to). In the case of the upgrade mentioned in step 2, the map you select is the 6.0 version of the Sybase HIPAA Accelerator map.
6 Click Finish to import the tables. The import process runs.
7 If the import table already exists in the destination map, a prompt displays asking if the import table should overwrite the current table. Click Yes to overwrite.
8 When the window opens that indicates the process is complete, click OK to continue.
• Import the current set of tables to another map by selecting that map on the Select Map for Table Import screen.
• Select a new set of tables from the Select Cross-Reference Tables to Import window and return to the Select Map for Table Import Window. • Select a different source and import those tables following the same steps. If you import a table to a map and the table did not exist previously, update the map to use the new table by linking it to the appropriate element or rule.
Note ECMap users can also access the cross-reference feature through the ECMap Utilities menu. See the ECMap User’s Guide for details.
Understanding claims attachments
The Health Insurance Portability and Accountability Act (HIPAA) recently introduced claims attachments into the group of HIPAA transactions. These transactions are based on the X12 version 4050, rather than the 4010 version.
A health care claim attachment conveys supplemental information about the services provided to a specific individual to support evaluation of a claim before it is paid.
Claims attachment
usage and goals The goal of health care claims attachments is to make the process of submitting and adjudicating health care claims more effective and efficient by providing a
structured and standard means of requesting clinical/supporting data for health care claims or encounters. Claims attachment usage includes:
• Supporting health care claims adjudication • Assessing prior authorization
• Validating policies and meet standards • Providing post-payment review • Mitigating fraud and abuse
Contributions to the ultimate outreach recommendations included determining the most frequently used attachments; considering the attachments where HL7 messages already existed or were in development; a need to standardize the questions payers ask; and the use of LOINC codes.
What is LOINC? LOINC stands for Logical Observation Identifier Names and Codes and comprises universal names and ID codes for identifying laboratory and clinical test results and other information meaningful in claims attachments.
LOINC is freeware owned by Regenstrief Institute at
http://www.regenstrief.org/ and the Logical Observation Identifier Names and Codes (LOINC) Committee.
Using LOINC allows for specific questions to be asked, when required, as many of the codes required for claims attachments are already present. Figure 2-1 illustrates the business flow solicited model for claims attachments.
Figure 2-1: Business flow solicited model
Figure 2-2 illustrates the business flow unsolicited model for claims attachments.
Figure 2-2: Business flow unsolicited model
Structure of claims
attachments As illustrated in Figure 2-3, a 277 asks for attachments or components by sending LOINC, whereas a 275 sends components consisting of answer parts
Figure 2-3: Structure of claims attachments
Sybase HIPAA Accelerator 6.0 includes the new claims attachments, along with rules spreadsheets, which document the changes to the compliance maps. These spreadsheets document the Implementation Guide (IG) map rules and conditions and enable users to quickly find the edits for a particular IG requirement.
HIPAA unique identifiers
HIPAA requires the use of unique identifier numbers for use in health care for individuals, employers, health plans, and health care providers.
The following list represents the status of those identifiers:
• National Provider Identifier: All numeric and 10 positions in length: the first 9 positions are the identifier and the last position is a check digit, which helps detect invalid NPIs. This string of digits may be prefaced by the value ‘80840,’ which is the card issuer ID.
• Employer Identification Number: Federal Employer Identification Number (EIN), 9 digits separated by a hyphen (XX-XXXXXXX). The hyphen is allowed in the third position only; thus the EIN is two digits, hyphen, 7 digits.
• National Health Plan Identifier: No proposed standard.
• National Individual Identifier: No proposed standard (on hold as of the publication of this guide).
Sybase HIPAA Accelerator provides support for the National Provider Identifier and Employer Identification Number data elements.
National Provider Identifier
The purpose of the National Provider Identifier (NPI) is to uniquely identify a health care provider in standard transactions, such as health care claims. NPIs can also be used to identify health care providers on prescriptions, in internal files to link proprietary provider identification numbers and other information, in coordination of benefits between health plans, in patient medical record systems, in program integrity files, and in other ways.
HIPAA requires that covered entities (health plans, health care clearinghouses, and those health care providers who transmit any health information in electronic form in connection with a transaction for which the Secretary of Health and Human Services has adopted a standard) use NPIs in standard transactions by the compliance dates, after which time the NPI will be the only health care provider identifier allowed for identification purposes in standard transactions by covered entities.
The NPI is all numeric and is 10 positions in length: the first 9 positions are the identifier, and the last position is a check digit, which helps detect invalid NPIs.
NPI data element
The NPI data element and its use are described in Final Rule for the Standard
Unique Health Identifier for Health Care Providers (69 FR 3434). Usage of the
NPI data element in electronic transactions covered under the HIPAA ruling is required as of January 1, 2006.
This section describes the support provided in Sybase HIPAA Accelerator maps, specifically the locations of the NPI data element in the HIPAA transaction maps.
Map rules have been added to the Sybase HIPAA Accelerator maps to test for NPI elements as defined in the HIPAA Implementation Guides (IGs). When an element is found that should contain an NPI value, that element is copied to a string and passed to the NPI test rules.
NPI testing is disabled as delivered in the product. Enable testing by setting Parameter 9 to 'Y' in ECMAP. See the ECMAP User’s Guide for details on setting parameters.
Table 2-1 illustrates the National Provider Identifier data elements.
Table 2-1: NPI data elements
Compliance map Loop HIPAA IG page
270 2100A 46 2100B 52 2100B 55 2100B 65 2100C 80 - 82 2100D 121 271 2100A 165 2100B 179 2100B 183 2120C 251 2120C 261-263 2120D 329 2120D 340 276 2100B 63 2100C 68 277 2100B 143 2100C 148 278RQ 2010A 71 2010B 75 2010E 154 278RP 2010A 267 2010B 277 2010CB 325 2010DB 377 2010E 389 2010F 482 834 2310 141-143 835 1000B 73 2000 80 2100 113 2110 157 837D 2010AA 76 2010AB 86 2310A 182 2310B 189 2310C 195