71:4 (2014) 115–122| www.jurnalteknologi.utm.my | eISSN 2180–3722 |
Full paper
Jurnal
Teknologi
Terrestrial
Laser
Scanners
Pre-Processing:
Registration
and
Georeferencing
Mohd Azwan Abbasa,b, Lau Chong Luha, Halim Setana, Zulkepli Majida, Albert K. Chongc, Anuar Aspuria , Khairulnizam M. Idrisa, Mohd Farid Mohd Ariffa
aFaculty of Geoinformation & Real Estate, Universiti Teknologi Malaysia, 81310 UTM Johor Bahru, Johor, Malaysia bFaculty of Architecture, Planning & Surveying, Universiti Teknologi MARA Perlis, 02600 Arau, Perlis, Malaysia cSchool of Civil Engineering & Surveying,University of Southern Queensland, Australia.
*Corresponding author: mohdazwanabbas@gmail.com
Article history
Received :6 February 2014 Received in revised form : 24 July 2014
Accepted :9 October 2014
Graphical abstract
Abstract
Terrestrial laser scanner (TLS) is a non-contact sensor, optics-based instrument that collects three dimensional (3D) data of a defined region of an object surface automatically and in a systematic pattern with a high data collecting rate. This capability has made TLS widely applied for numerous 3D applications. With the ability to provide dense 3D data, TLS has improved the processing phase in constructing complete 3D model, which is much simpler and faster. Pre-processing is one of the phases involved, which consisted of registration and georeferencing procedures. Due to the many error sources occur in TLS measurement, thus, pre-processing can be considered as very crucial phase to identify any existence of errors and outliers. Any presence of errors in this phase can decrease the quality of TLS final product. With intention to discuss about this issue, this study has performed two experiments, which involved with data collection for land slide monitoring and 3D topography. By implementing both direct and indirect pre-processing method, the outcomes have indicated that TLS is suitable for applications which require centimetre level of accuracy.
Keywords: Terrestrial laser scanner; pre-processing, data quality
Abstrak
Terrestrial laser scanners (TLS) adalah penderia tanpa-sentuh, peralatan yang berasaskan optik yang mencerap data tiga dimensi (3D) bagi permukaan objek yang ditakrifkan secara automatik dan sistematik dengan kadar cerapan data yang tinggi. Kemampuan ini menyebabkan TLS digunakan secara meluas bagi pelbagai aplikasi 3D. dengan kemampuan untuk menyediakan data 3D yang padat, TLS telah menambah baik fasa pemprossesan untuk menghasilkan model penuh 3D, yang lebih mudah dan cepat. Pra-pemprosessan merupakan salah satu fasa yang terlibat, yang terdiri daripada prosedur pendaftaran dan
georeferencing. Disebabkan oleh sumber selisih yang banyak didalam cerapan TLS, maka, pra-pemprosessan bole dianggap sebagai fasa yang sangat penting untuk mengenalpasti kehadiran selisih dan unsur luar. Kewujudan selisih di dalam fasa ini mampu mengurangkan kualiti produk akhir TLS. Dengan tujuan untuk membincangkan isu ini, kajian ini telah melaksanakan dua eksperimen, yang melibatkan cerapan data bagi pemantauan tanah runtuh dan topografi 3D. Dengan melaksanakan kedua-dua kaedah pra-pemprossesan secara langsung dan tidak langsung, hasil yang diperoleh menunjukkan bahawa TLS sesuai digunapakai untuk aplikasi yang memerlukan ketepatan pada tahap sentimeter.
Kata kunci: Terrestrial laser scanner; pra-pemprosessan, kualiti data
© 2013 Penerbit UTM Press. All rights reserved.
1.0 INTRODUCTION
Terrestrial laser scanner (TLS) uses laser technology in order to scan any surfaces or objects. With the capability to provide dense three dimensional (3D) data in short period of time, measurement method of laser scanner can be considered as combination of photogrammetry and total station. Scanning process is similar to taking a photograph and data measured by
scanner (i.e. range, horizontal and vertical angles) are similar to data provided by total station. There are three types of laser scanner available for 3D data collection and each type have been differentiated based on range measurement technique as follows:
iii. Triangulation based.
[image:2.612.59.292.153.335.2]Measurement technique applied also represents the range covered by the scanner. There are three categories of range namely long range for object distance from 150m until 1000m, medium range from 1m until 150m and the most accurate of all, close range from 0.5m until 2m [1]. Each range has its own application as shown in Figure 1.
Figure 1 Applications of terrestrial laser scanner
Most of the applications above can be performed by using traditional surveying techniques (i.e. theodolite, tacheometry, photogrammetry and GPS) but there are several advantages of TLS compared to them as stated by Rabbani [2] and Reshetyuk [3]:
i. Able to provide direct, rapid and high density 3D data compared to traditional approaches;
ii. Dramatic reduction in costs and much faster project completion;
iii. Similar to photogrammetry, TLS is a noncontact measurement method, which make it possible to survey remotely very complex, inaccessible and hazardous objects and areas, where other traditional techniques fail to do so;
iv. As an active measurement technique, TLS is almost independent of the lighting conditions and surface texture;
v. Completeness and comprehensiveness of scanning, which everything in the scene is captured in once with varied level of detail;
vi. Attachable or built-in camera, has made TLS also capable to provide coloured point clouds; and
vii. Multipurpose use of data, such as extracting 2D drawing, 3D map, 3D solid model and 3D CAD model (see Figure 2).
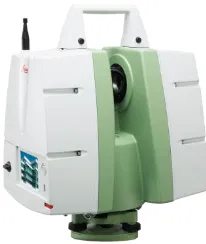
[image:2.612.373.476.295.417.2]The existence of TLS has considerably improved a procedure and the quality of final product in Geomatic field. Comparing with other approaches, the phase of processing involved in constructing complete 3D model is much simpler and faster. However, there is a phase that need to be performed carefully, any errors emerged in this phase can affect the quality of final product. This phase known as pre-processing, which consisted of registration and georeferencing procedures. Based on that argument, this study aim to review the quality assessment of TLS pre-processing (e.g. registration and georeferencing) results. For that purpose, Leica ScanStation C10 (Figure 3) was employed during data collections for land slide monitoring and 3D topography.
Figure 3 Leica ScanStation C10 scanner used in the experiments.
2.0 TERRESTRIAL LASER SCANNERS DATA
Compared to the traditional approaches for 3D modelling, TLS can be considered as combination of photogrammetric and reflectorless total station. Scanning process within field of view is similar to taking an image and data provided are similar to total station (points in 3D coordinate system). Even though most of the commercial softwares give 3D data in cartesian coordinates system (X, Y, Z) but based on Figure 4, TLS actually measures using spherical coordinates system (r, φ, θ) and has intensity value as an attribute. Therefore, the raw observables in TLS are:
i. Range, r;
ii. Horizontal direction, φ; and iii. Vertical angle, θ.
Applications of Terrestrial Laser Scanner
L
Long Range L
Medium Range Close Range L
Monitoring L
3D City Modelling
Reverse Engineering
Medical
Accident Investigation Facility
Management
Civil Engineering
Industry
Cultural Heritage
(a) (b) (c) (d)
[image:2.612.86.533.624.754.2]Figure 4 Data collection using terrestrial laser scanner.
For further processing, 3D data in spherical coordinate is more useful. Thus, conversion from Cartesian and spherical coordinates system can be expressed as follows:
2 2 1 1 2 2 2 Y X Z tan , angle _ Vertical Y X tan , direction _ Horizontal Z Y X r , Range (1)
And conversion from spherical to Cartesian coordinates system are: ) sin( r Z ) cos( ) sin( r Y ) cos( ) cos( r X (2)
3.0 REGISTRATION
The capability of laser scanner in providing high density and fast 3D data has made it applicable in various applications such as reverse engineering, construction design, historical modelling, accident investigation and structural deformation monitoring. From 3D data (point clouds) to the final 3D model, there are several processing stages that should be carried out as follows [4, 5, 6]:
i. Scanned data from multiple views; ii. Registration and georeferencing; iii. Triangulation and data sampling;
iv. Shape identification (primitive or free-form); v. Segmentation;
vi. Surface fitting; vii. Building 3D model; and viii. Texturing.
However, there also have different approaches such as proposed by Rabbani [2], which performed the modelling part at the beginning stage in order to employ a model based registration. One of the crucial part in the processing stage is known as registration. It is often occurred either by using tacheometry, photogrammetry or laser scanning measurement, single station
cannot afford to provide 3D data that cover the whole object surface. Thus, multiple stations are required during scanning process, and this will result in each scanned data acquired with local coordinate systems defined by the laser scanner. For visualization and further processing, all scanned data are needed to be orientated into one common coordinate system.
Generally, registration process can be divided into two main phase, which are course registration and fine registration. Course registration is applied to identify the approximated transformation parameters. In order to achieve that, corresponding points or features between overlapped scans data should be recognised. Based on the information from course registration, cost function for corresponding will be minimized using fine registration methods. The parameters that are also known as the rigid-body-transformation parameters (without scale factor) or six degrees of freedom [3] are as follows (Figure 5):
i. Translation for the 3 coordinate axes (ΔX, ΔY, ΔZ). ii. Rotation around the 3 coordinate axes (ω, φ, κ). Based on Figure 5, the determination of 6 transformation parameters from TLS 2 to TLS 1, at least, 6 coordinates, distributed over 3 points not at the same line are required. There are several approaches available to identify those points, and, consequently represented by several different registration approaches:
i. Point clouds. ii. Artificial targets.
iii. Common geometrical objects. iv. Surface matching.
[image:3.612.342.578.419.573.2]v. Information and features from images.
Figure 5 Determination of transformation parameters
manually mark at least three corresponding points that appeared on the 3D surfaces in triangle form [12].
4.0 GEOREFERENCING
Based on Wolf and Dewitt [13], georeferencing can be defined as a technique whereby the TLS coordinate system is processed, so that the final result is transformed to the ground coordinate system. This may be either national or local coordinate system. Correlation between two coordinate systems can be related by 6 transformation parameters (Figure 6). According to Gordon and Lichti [14], scale factor can be neglected because it has shown to be irrelevant in the transformation. There are two approaches available to carry out georeferencing procedure either indirect or direct method.
Figure 6 Transformation from TLS to ground coordinate system
4.1 INDIRECT GEOREFERENCING
This georeferencing approach requires minimum 3 points distributed not at the same line to determine transformation parameters by resection technique [15]. In practice, these points or targets should be increased in order to improve the global redundancy of the observations. Their targets may be determined by using total station or with GPS measurement technique.
According to Reshetyuk [3], indirect georeferencing can be performed through two approaches as follows:
i. Two-step approach; and ii. One-step approach.
Two-step approach carries out registration and georeferencing process separately because control points used for georeferencing are positioned at different scan views (Figure 7). In order to georeference all scanned data, two steps of procedure should be carried out. It begins with registration process to merge all point clouds from different scan views into global coordinate system. Then, second step will be followed with the georeferencing process. Mathematically, two-step indirect georeferencing can be presented as follows:
i. Step 1: Registration (XA into XB) A
AB AB
B X R X
X (3)
ii. Step 2: Georeferencing (XB into XC) B
BC BC
C X R X
X (4)
Substitute (2.16) into (2.17) yields: ) X R X ( R X
XC BC BC AB AB A (5)
Where,
XA, XB, XC = Coordinates of point clouds in X, Y, Z
ΔXAB, ΔXBC = Translation for X, Y, Z
RAB, RBC = Rotation matrices
[image:4.612.59.303.230.400.2]In contrast with previous approach, one-step approach requires at least 3 well distributed control points for each scan view (Figure 8). This approach also does not need any overlapping between scan views. This condition occurs because data from each scan view can be georeferenced independently using three control points (minimum) consisted in each view. Thus, registration process is not requisite since all the point clouds are already in the same coordinate system. Since, it only performs one step, thus, mathematically it can be represented by equation (3).
Figure 7 Indirect georeferencing using two-step approach
Figure 8 Indirect georeferencing using one-step approach
4.2 DIRECT GEOREFERENCING
[image:4.612.326.535.277.410.2] [image:4.612.328.512.456.594.2]i. Centering device either plum bob or optical plummet; ii. Circular bubble for rough levelling and dual-axis
compensator for precise levelling;
iii. A telescope for backsighting to the target; and iv. A mark indicated centre of TLS for height
measurement.
Position of TLS can be determined either by using total station or GPS receiver. In order to make it possible for direct georeferencing, some of manufacturers have equipped their scanner with an adapter. For example, Callidus CP 3200 scanner can be attached with GPS receiver or prism on top of the scanner. Without telescope, orientation of the scanner still can be determined by scanning the target (set up at control point) with high resolution.
Based on Alba and Scaioni [15], the transformation from scanner to ground coordinate system for direct georeferencing is given by the expression:
GROUND SCANNER
SG
GROUND R ( )X O
X (6)
Where,
XGROUND = Position based on ground coordinate system
XSCANNER = Position based on scanner coordinate system
RSG(κ) = Rotation matrix around Z axis
OGROUND = Scanner position based on ground coordinate
system
Consider the TLS is levelled, thus, the angles ω and φ are practically equal to zero. According to Reshetyuk [3], there are several conditions that can affect the accuracy of direct georeferencing such as follows:
i. Scanner positioning, centring, levelling, backsighting and height determination.
ii. Preparation of control points.
Using direct georeferencing approach, scanning method can be carried out such as traversing similar to the total station measurement. This situation has made this approach applicable without requiring any corresponding points and overlapping surfaces.
5.0 EXPERIMENTS
[image:5.612.347.576.59.214.2]Since there are two approaches available to carry out registration and georeferencing procedure, either via direct or indirect method, thus, two different experiments was designed to employ both method. In this study, Leica ScanStation C10 scanner was used for both experiments. First experiment focuses on data collection for land slide monitoring at Gunung Pass, Cameron Highland, Pahang (Figure 9).
Figure 9 Land slide monitoring at Cameron Highland.
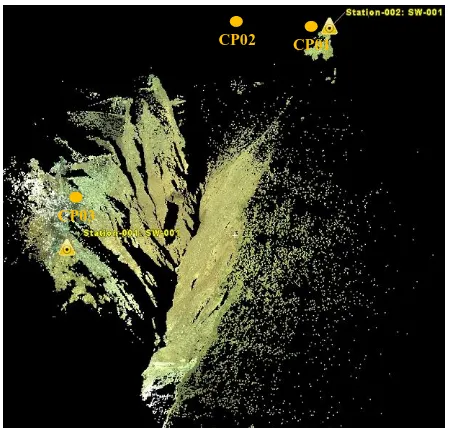
Due to the difficulty to select the suitable scan stations, this experiment has employed indirect georeferencing method. Three well distributed control points (e.g. CP01, CP02 and CP03) as depicted in Figure 10 were used for registration and georeferencing purposes. In this case, global positioning system (GPS) method (i.e. Topcon Hiper Ga) was applied to establish the ground coordinates for those three control points.
Figure 10 Three control points used for indirect registration and georeferencing procedures.
Second experiment was carried out by adapting the direct georeferencing method for 3D topography measurement. The site was located at academic area of Universiti Teknologi Malaysia, Johor (Figure 11). The ability of Leica ScanStation C10 scanner to perform traversing measuring technique has made registration and georeferencing are possible to be implemented in one single procedure. For this experiment, the ground coordinates for 10 stations in traverse (as illustrated in Figure 12) were established using total station (i.e. Topcon GTS250).
CP01 CP02
[image:5.612.329.554.333.547.2]Figure 11 3D topography measurement using TLS.
With the aid of Leica Cyclone V7.3.3 software, pre-processing was executed for both experiments. Using three control points which are available for registration and georeferencing procedure, data for land slide monitoring was processed through resection method. Report yielded from the
Figure 12 Implementation of traversing procedure for 3D topography measurement.
[image:6.612.346.581.58.211.2]processing will indicated the quality of the registration and georeferencing solution through the errors produced. Errors in pre-processing represent the misclosure between corresponding points from different scan positions (Figure 13). For instance, misclosure of corresponding points from scan A and scan B should be null, however due to the less quality of scanned data and centroid determination of control points, thus, the error emerged.
Figure 13 Errors in pre-processing for indirect method.
For direct method, evaluation of the quality of pre-processing is rather common. Since, the second experiment adapted the traverse measurement, thus, linear misclosure can be used to assess the results yielded from 10 control points. In contrast with previous experiment which obtained the misclosure for each control points, traverse only calculate the misclosure for final control point.
6.0 RESULTS AND ANALYSES
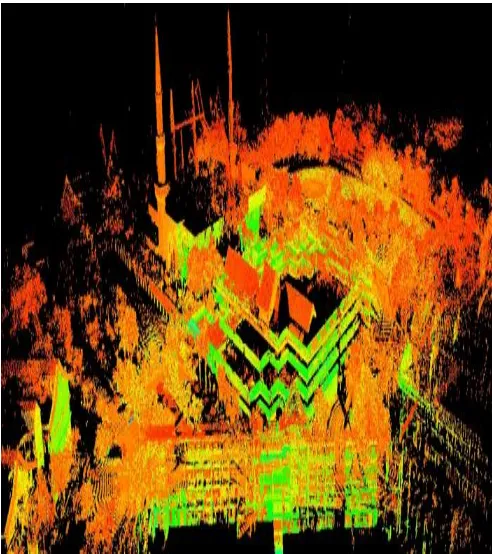
With the completion of pre-processing phase, all scanned data (for both experiments) are merged into one global coordinate system. Figure 10 has illustrated the outcome of first experiment, data for land slide monitoring. While the result for
Figure 14 Pre-processing result for 3D topography (second experiment).
CP01 CP02
CP03
0.027m 0.023m
0.042m
CP01 (Scan B)
0.027m
CP01 (Scan A)
CP01
CP02 CP03
CP04 CP05 CP06
CP07
CP08
[image:6.612.346.592.251.528.2] [image:6.612.55.304.329.484.2]3D topography (second experiment) was exemplified in Figure 14.
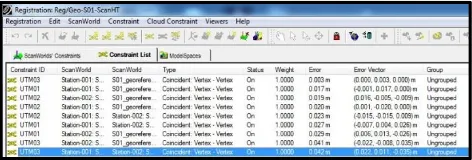
[image:7.612.55.291.131.211.2]Regarding the quality of pre-processing (for both direct and indirect method) procedure, Figure 15 has depicted the report produced by Leica Cyclone V7.3.3 software for the first experiment.
Figure 15 Pre-processing report for first experiment.
According to the results obtained as presented in Figure 15, the maximum error is 4.2cm, which is caused by registration procedure for scan station 001 and 002. As expected, this centimeter level of errors occurred due to the high incidence angles between scan station and control points. As shown in Figure 10, the positions of scan stations have high differences in elevation with the control points. However, for the land slide monitoring purposes, this centimeter level quality can be considered as within threshold. Furthermore, by taking into account all errors, the standard deviation yielded is 2.9cm. For the second experiment, the ability of Leica Cyclone V7.3.3 software was exploited to process the traverse as well as pre-processing for scanner data. With the total traverse length of 651.170m from 10 scan stations, the misclosure calculated is 10cm. In ratio form is 1:65117, which, if referring to the cadastral specification, this result can be considered as first class measurement.
7.0 SUMMARY
With rapid and dense 3D data provide by TLS, it has become an option for numerous applications especially for 3D modelling purposes. There are several steps require to produce the 3D model from scanned data. To ensure the quality of the model produced, the pre-processing step should be carefully performed. Any errors occurred in this step can decrease the quality of the end product. There are two procedure consist in pre-processing, registration and georeferencing. In order to produce a complete 3D model using TLS, then the scanning process has to be carried out from more than one station. This situation will require registration procedure to merge scanned data from different scan station. In Geomatic field, the final product should be used ground coordinates system or in other word, georeferenced model. As discussed earlier, georeferencing can be performed either using indirect or direct method. Indirect georeferencing requires the use of targets with known ground coordinate system. Whether using one or two step approaches, targets are used to calculate the coordinate transformation parameters from local to ground coordinate system. In contrast, direct georeferencing does not require any targets because all scanned data are already in ground coordinate system. However, the scanner must be setup at the known station with proper back sighting for orientation purpose. Two experiments were carried out to review the quality assessment for TLS pre-processing. Due to site difficulty, first experiment applied indirect method for land slide monitoring.
Two sations were used to scan the land slide area and three control points were established for registration and georeferencing purposes. With the centimeter level of accuracy, the outcome of the pre-processing has indicated that TLS is capable to be implementing for land slide monitoring. The later experiment which focuses on 3D topography was adapted the direct pre-processing method. Using traversing measument technique, the result of registration and georeferencing for second experiment has yielded first class level of measurement. Based on this study, conclusion can be made that pre-processing is a very crucial phase in TLS pre-processing. Any existence of errors and outliers can be identified during registration and georeferencing procedure. The lack of accuracy during preparing control points for registration or georeferencing purposes can cause the presence of errors, which subsequently can reduce the quality of TLS final product (e.g. 3D model).
Acknowledgements
The authors would like to express their sincere appreciation to Universiti Teknologi Malaysia and the Ministry of Higher Education (MoHE) of Malaysia for the UTM research grant GUP Flagship (00G23) given to this research project.
References
[1] Genechten, B. V. 2008. 3D Risk Mapping: Theory and Paractice on Terrestrial Laser Scanning. Publication compiles from training material prepared in the framework of the project ‘Learning tools for advanced 3D surveying risk awareness project (3DRiskMapping).
[2] Rabbani, T. 2006. Automatic Reconstruction of Industrial Installations Using Point Clouds and Images. A thesis for the degree of Doctor of Philosophy. TU Delft.
[3] Reshetyuk, Y. 2009. Self-Calibration and Direct Georeferencing in Terrestrial Laser Scanning. Doctoral Thesis in Infrastructure. Royal Institute of Technology (KTH). Stockholm, Sweden. 66.
[4] Varady, T. & Martin, R. 2002. Reverse Engineering. Chapter in Handbook of Computer Aided Geometric Design. Elsevier Science B. V.
[5] Frank, C. L. 2003. Beautification of Reverse Engineered Geometric Models. A thesis for the degree of Doctor of Philosophy. Department of Computer Science, Cardiff University.
[6] Shi Pu. 2008. Automatic Building Modeling. Terrestrial Laser Scanning. Springer-Verlag Berlin Heidelberg.
[7] Besl, P. J. and McKay, N. D. 1992. A Method For Registration of 3-D Shapes. IEEE Transactions on Pattern Analysis and Machine Intelligence. 14(2):239–256.
[8] Johnny, P. and Guilherme, N. D. 2004. 3D Modeling of Real-World Objects Using Range and Intensity Images. Innovations In Machine Intelligence and Robot Perception.
[9] Chen, Y. and Medioni, G. 1992. Object Modeling by Registration of Multiple Range Images. Image and Vision Computing. 14(2): 145–155. [10] Masuda, T. and Yokoya, N. 1994. A Robust Method for Registration and Segmentation of Multiple Range Images. In IEEE CAD-Based Vision Workshop. 106–113.
[11] Johnson, A. and Kang, S. 1997. Registration and Integration of Textured 3D Data. In Conference on Recent Advances in 3-D Digital Imaging and Modeling. 121–128.
[12] Zulkepli M., Halim S. and Albert K. C. 2009. Accuracy Assessments of Point Cloud 3D Registration Method for High Accuracy Craniofacial Mapping. Geoinformation Science Journal. 9(2) : 36–44. [13] Wolf, P. R. and Dewitt, B. A. 2000. Elements of Photogrammetry with
Application in GIS. Third Edition.The McGraw-Hill Companies, Inc. [14] Gordon, S. J. and Lichti, D. 2004. Error Propogation in Directly
Georeferenced Terrestrial Laser Scanner Point Clouds for Cultural Heritage Recording. FIG Working Weeks 2004. Athens, Greece. [15] Alba, M. and Scaioni, M. 2007. Comparison of Techniques for


