Cisco Press
800 East 96th Street
Indianapolis, IN 46240 USA
Cisco Press
SSL Remote Access VPNs
Jazib Frahim, Qiang Huang
Copyright© 2008 Cisco Systems, Inc.
Published by: Cisco Press 800 East 96th Street Indianapolis, IN 46240 USA
All rights reserved. No part of this book may be reproduced or transmitted in any form or by any means, electronic or mechanical, including photocopying, recording, or by any information storage and retrieval system, without writ-ten permission from the publisher, except for the inclusion of brief quotations in a review.
Printed in the United States of America
First Printing June 2008
Library of Congress Catalog Card Number: 2005923483
ISBN-13: 978-1-58705-242-2
ISBN-10: 1-58705-242-3
Warning and Disclaimer
This book is designed to provide information about the Secure Socket Layer (SSL) Virtual Private Network (VPN) technology on Cisco products. Every effort has been made to make this book as complete and as accurate as possi-ble, but no warranty or fitness is implied.
The information is provided on an “as is” basis. The authors, Cisco Press, and Cisco Systems, Inc. shall have neither liability nor responsibility to any person or entity with respect to any loss or damages arising from the information contained in this book or from the use of the discs or programs that may accompany it.
The opinions expressed in this book belong to the author and are not necessarily those of Cisco Systems, Inc.
Trademark Acknowledgments
All terms mentioned in this book that are known to be trademarks or service marks have been appropriately capital-ized. Cisco Press or Cisco Systems, Inc., cannot attest to the accuracy of this information. Use of a term in this book should not be regarded as affecting the validity of any trademark or service mark.
Corporate and Government Sales
The publisher offers excellent discounts on this book when ordered in quantity for bulk purchases or special sales, which may include electronic versions and/or custom covers and content particular to your business, training goals, marketing focus, and branding interests. For more information, please contact: U.S. Corporate and Government Sales 1-800-382-3419 [email protected]
Feedback Information
At Cisco Press, our goal is to create in-depth technical books of the highest quality and value. Each book is crafted with care and precision, undergoing rigorous development that involves the unique expertise of members from the professional technical community.
Readers’ feedback is a natural continuation of this process. If you have any comments regarding how we could improve the quality of this book, or otherwise alter it to better suit your needs, you can contact us through e-mail at [email protected]. Please make sure to include the book title and ISBN in your message.
We greatly appreciate your assistance.
Publisher Paul Boger
Associate Publisher Dave Dusthimer
Cisco Press Program Manager Jeff Brady
Executive Editor Brett Bartow
Managing Editor Patrick Kanouse
Development Editor Betsey Henkels
Senior Project Editor Tonya Simpson
Copy Editor Written Elegance, Inc.
Technical Editors Pete Davis, Dave Garneau
Editorial Assistant Vanessa Evans
Book Designer Louisa Adair
Composition Mark Shirar
Indexer Heather McNeil
About the Authors
Jazib Frahim, CCIE No. 5459, has been with Cisco for more than nine years. Having a bachelor’s degree in computer engineering from Illinois Institute of Technology, he started out as a TAC engineer in the LAN Switching team. He then moved to the TAC Security team, where he acted as a technical leader for the security products. He led a team of 20 engineers in resolving complicated security and VPN technologies. He is currently working as a technical leader in the Worldwide Security Services Practice of Advanced Services for Network Security. He is responsible for guiding customers in the design and implementation of their networks with a focus on network security. He holds two CCIEs, one in routing and switching and the other in security. He has written numerous Cisco online technical documents and has been an active member on the Cisco online forum NetPro. He has presented at Net-workers on multiple occasions and has taught many on-site and online courses to Cisco customers, part-ners, and employees.
He has recently received his master of business administration (MBA) degree from North Carolina State University. He is also an author of the following Cisco Press books: Cisco Network Admission Control, Volume II: NAC Deployment and Troubleshooting, and Cisco ASA: All-in-One Firewall, IPS, and VPN Adaptive Security Appliance.
About the Technical Reviewers
Pete Davis has been working with computers and networks since he was able to walk. By age 15, he was one of the youngest professional network engineers and one of the first employees at an Internet service provider. Pete implemented and maintained the systems and networks behind New England’s largest consumer Internet service provider, TIAC (The Internet Access Company). In 1997, Pete joined Shiva Corporation as a product specialist. Since 1998, Pete has been with Altiga Networks, a VPN con-centrator manufacturer in Franklin, Massachusetts, that was acquired by Cisco on March 29, 2000. As product line manager, Pete is responsible for driving new VPN-related products and features.
Dedications
Jazib Frahim:I would like to dedicate this book to my lovely wife, Sadaf, who has patiently put up with me during the writing process.
I would also like to dedicate this book to my parents, Frahim and Perveen, who support and encourage me in all my endeavors.
Finally, I would like to thank my siblings, including my brother Shazib and sisters Erum and Sana, sister-in-law Asiya, my cute nephew Shayan, and my adorable nieces Shiza and Alisha. Thank you for your patience and understanding during the development of this book.
Qiang Huang:
Acknowledgments
We would like to thank the technical editors, Pete Davis and David Garneau, for their time and technical expertise. They verified our work and provided recommendations on how to improve the quality of this manuscript. We would also like to thank Vincent Shan, Andy Qin, James Fu, and Awair Waheed from the Cisco Security Technical Group for their help and guidance. We also recognize Saddat Malik for providing content source for several figures in Chapter 2. Special thanks go to Scott Enicke and Aun Raza for reviewing this book prior to final editing.
We would like to thank the Cisco Press team, especially Brett Bartow and Betsey Henkels, for their patience, guidance, and consideration. Their efforts are greatly appreciated.
Many thanks to our managers, Ken Cavanagh, Raj Gulani, and Hasan Siraj, for their continuous support throughout this project.
Contents at a Glance
Introduction xviii
Chapter 1 Introduction to Remote Access VPN Technologies 3
Chapter 2 SSL VPN Technology 17
Chapter 3 SSL VPN Design Considerations 63
Chapter 4 Cisco SSL VPN Family of Products 85
Chapter 5 SSL VPNs on Cisco ASA 93
Chapter 6 SSL VPNs on Cisco IOS Routers 223
Chapter 7 Management of SSL VPNs 313
Contents
Introduction xviii
Chapter 1 Introduction to Remote Access VPN Technologies 3 Remote Access Technologies 5
IPsec 5
Software-Based VPN Clients 7 Hardware-Based VPN Clients 7
SSL VPN 7
L2TP 9
L2TP over IPsec 11
PPTP 13
Summary 14
Chapter 2 SSL VPN Technology 17
Cryptographic Building Blocks of SSL VPNs 17 Hashing and Message Integrity Authentication 17
Hashing 18
Message Authentication Code 18 Encryption 20
RC4 21
DES and 3DES 22 AES 22
Diffie-Hellman 23 RSA and DSA 24
Digital Signatures and Digital Certification 24 Digital Signatures 24
Public Key Infrastructure, Digital Certificates, and Certification 25
SSL and TLS 30
SSL and TLS History 30 SSL Protocols Overview 31
OSI Layer Placement and TCP/IP Protocol Support 31 SSL Record Protocol and Handshake Protocols 33 SSL Connection Setup 34
Application Data 42
SSL VPN 49
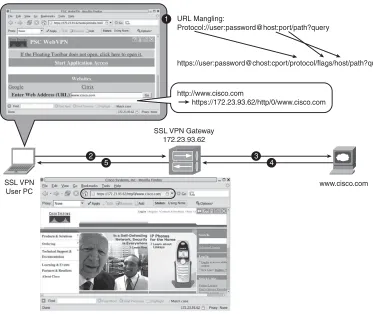
Reverse Proxy Technology 50 URL Mangling 52 Content Rewriting 53 Port-Forwarding Technology 55 Terminal Services 58
SSL VPN Tunnel Client 58
Summary 59
References 60
Chapter 3 SSL VPN Design Considerations 63
Not All Resource Access Methods Are Equal 63
User Authentication and Access Privilege Management 65 User Authentication 66
Choice of Authentication Servers 66
AAA Server Scalability and High Availability 67 AAA Server Scalability 67
AAA Server High Availability and Resiliency 68 Resource Access Privilege Management 68
Security Considerations 70 Security Threats 71
Lack of Security on Unmanaged Computers 71 Data Theft 71
Man-in-the-Middle Attacks 72 Web Application Attack 73
Spread of Viruses, Worms, and Trojans from Remote Computers to the Internal Network 73
Split Tunneling 73 Password Attacks 74 Security Risk Mitigation 74
Strong User Authentication and Password Policy 75 Choose Strong Cryptographic Algorithms 75 Session Timeout and Persistent Sessions 75
Endpoint Security Posture Assessment and Validation 75 VPN Session Data Protection 76
Techniques to Prevent Data Theft 76
Web Application Firewalls, Intrusion Prevention Systems, and Antivirus and Network Admission Control Technologies 77
Device Placement 78
Virtualization 79
High Availability 80
Performance and Scalability 81
Summary 82
References 82
Chapter 4 Cisco SSL VPN Family of Products 85
Overview of Cisco SSL VPN Product Portfolio 85
Cisco ASA 5500 Series 87
SSL VPN History on Cisco ASA 87 SSL VPN Specifications on Cisco ASA 88 SSL VPN Licenses on Cisco ASA 89
Cisco IOS Routers 90
SSL VPN History on Cisco IOS Routers 90 SSL VPN Licenses on Cisco IOS Routers 90
Summary 91
Chapter 5 SSL VPNs on Cisco ASA 93
SSL VPN Design Considerations 93
SSL VPN Prerequisites 95 SSL VPN Licenses 95
Client Operating System and Browser and Software Requirements 96 Infrastructure Requirements 97
Pre-SSL VPN Configuration Guide 97
Enrolling Digital Certificates (Recommended) 98 Step 1: Configuring a Trustpoint 98
Step 2: Obtaining a CA Certificate 99 Step 3: Obtaining an Identity Certificate 100 Setting Up ASDM 101
Uploading ASDM 102 Setting Up the Appliance 103 Accessing ASDM 104
Setting Up Tunnel and Group Policies 106 Configuring Group-Policies 107 Configuring a Tunnel Group 110 Setting Up User Authentication 110
Configuring SSL VPN Portal Customization 117 Logon Page 118
Portal Page 123 Logout Page 125
Portal Customization and User Group 126 Full Customization 129
Configuring Bookmarks 134 Configuring Websites 135 Configuring File Servers 137
Applying a Bookmark List to a Group Policy 139 Single Sign-On 140
Configuring Web-Type ACLs 141 Configuring Application Access 144
Configuring Port Forwarding 144 Configuring Smart Tunnels 147 Configuring Client-Server Plug-Ins 150
AnyConnect VPN Client Configuration Guide 152 Loading the SVC Package 154
Defining AnyConnect VPN Client Attributes 155 Enabling AnyConnect VPN Client Functionality 155 Defining a Pool of Addresses 156
Configuring Traffic Filters 159 Configuring a Tunnel Group 159 Advanced Full Tunnel Features 159
Split Tunneling 159
DNS and WINS Assignment 161
Keeping the SSL VPN Client Installed 162 Configuring DTLS 163
Cisco Secure Desktop 164 CSD Components 165
Secure Desktop Manager 165 Secure Desktop 165
Cache Cleaner 166 CSD Requirements 166
Supported Operating Systems 166 User Privileges 167
Supported Internet Browsers 167 Internet Browser Settings 167 CSD Architecture 168
Configuring CSD 169
Host Scan 182
Host Scan Modules 183 Basic Host Scan 183 Endpoint Assessment 183
Advanced Endpoint Assessment 184 Configuring Host Scan 184
Setting Up Basic Host Scan 184 Enabling Endpoint Host Scan 186
Setting Up an Advanced Endpoint Host Scan 187
Dynamic Access Policies 189 DAP Architecture 190
DAP Records 191 DAP Selection Rules 191 DAP Configuration File 191 DAP Sequence of Events 191 Configuring DAP 192
Selecting a AAA Attribute 193 Selecting Endpoint Attributes 195 Defining Access Policies 197
Deployment Scenarios 205
AnyConnect Client with CSD and External Authentication 206 Step 1: Set Up CSD 207
Step 2: Set Up RADIUS for Authentication 207 Step 3: Configure AnyConnect SSL VPN 208 Clientless Connections with DAP 209
Step 1: Define Clientless Connections 210 Step 2: Configuring DAP 211
Monitoring and Troubleshooting SSL VPN 212 Monitoring SSL VPN 212
Troubleshooting SSL VPN 215
Troubleshooting SSL Negotiations 215 Troubleshooting AnyConnect Client Issues 215 Troubleshooting Clientless Issues 217
Troubleshooting CSD 219 Troubleshooting DAP 219
Summary 220
Chapter 6 SSL VPNs on Cisco IOS Routers 223 SSL VPN Design Considerations 223
IOS SSL VPN Configuration Guide 226 Configuring Pre-SSL VPN Setup 226
Setting Up User Authentication 226
Enrolling Digital Certificates (Recommended) 229 Loading SDM (Recommended) 232
Initial SSL VPN Configuration 235
Step 1: Setting Up an SSL VPN Gateway 237 Step 2: Setting Up an SSL VPN Context 239 Step 3: Configuring SSL VPN Look and Feel 241 Step 4: Configuring SSL VPN Group Policies 245
Advanced SSL VPN Features 247 Configuring Clientless SSL VPNs 247 Windows File Sharing 253
Configuring Application ACL 257 Thin Client SSL VPNs 259
Step 1: Defining Port-Forwarding Lists 261
Step 2: Mapping Port-Forwarding Lists to a Group Policy 262 AnyConnect SSL VPN Client 264
Step 1: Loading the AnyConnect Package 264
Step 2: Defining AnyConnect VPN Client Attributes 266
Cisco Secure Desktop 276 CSD Components 277
Secure Desktop Manager 277 Secure Desktop 277
Cache Cleaner 278 CSD Requirements 278
Supported Operating Systems 278 User Privileges 279
Supported Internet Browsers 279 Internet Browser Settings 279 CSD Architecture 280
Configuring CSD 281
Step 1: Loading the CSD Package 282 Step 2: Launching the CSD Package 283
Step 3: Defining Policies for Windows-Based Clients 283 Defining Policies for Windows CE 298
Defining Policies for the Mac and Linux Cache Cleaner 298
Deployment Scenarios 301
Clientless Connections with CSD 301 Step 1: User Authentication and DNS 302 Step 2: Set Up CSD 303
AnyConnect Client and External Authentication 304 Step 1: Set Up RADIUS for Authentication 305 Step 2: Install the AnyConnect SSL VPN 306
Step 3: Configure AnyConnect SSL VPN Properties 306
Monitoring an SSL VPN in Cisco IOS 307
Summary 311
Chapter 7 Management of SSL VPNs 313 Multidevice Policy Provisioning 314
Device View and Policy View 314 Device View 314
Policy View 318
Use of Common Objects for Multidevice Management 320
Workflow Control and Role-Based Access Control 322 Workflow Control 323
Workflow Mode 324
Role-Based Administration 326 Native Mode 326
Cisco Secure ACS Integration Mode 327
Summary 331
References 331
Icons Used in This Book
Command Syntax Conventions
The conventions used to present command syntax in this book are the same conventions used in the IOS Command Reference. The Command Reference describes these conventions as follows:
• Boldfaceindicates commands and keywords that are entered literally as shown. In actual con-figuration examples and output (not general command syntax), boldface indicates commands that are manually input by the user (such as a show command).
• Italics indicate arguments for which you supply actual values. • Vertical bars (|) separate alternative, mutually exclusive elements. • Square brackets [ ] indicate optional elements.
• Braces { } indicate a required choice.
• Braces within brackets [{ }] indicate a required choice within an optional element.
Router Hub Gateway Workgroup Switch ISDN Switch Multilayer Switch Bridge Laptop Printer Modem Firewall
File Server IP Phone
Introduction
This book provides a complete guide to the SSL VPN technology and discusses its implementation on Cisco SSL VPN–capable devices. Design guidance is provided to assist you in implementing SSL VPNs in an existing network infrastructure. This includes examining existing hardware and software to deter-mine whether they are SSL VPN capable, providing design recommendations, and guiding you on set-ting up the Cisco SSL VPN devices.
Toward the end of Chapters 5 and 6, common deployment scenarios are covered to assist you in deploy-ing an SSL VPN in your network.
Who Should Read This Book?
This book serves as a guide for network professionals who want to implement the Cisco SSL VPN remote access solution in their network to allow users to access the corporate resources easily and safely. The book systematically walks you through the product or solution architecture, installation, configuration, deployment, monitoring, and troubleshooting the SSL VPN solution. Any network pro-fessional should be able to use this book as a guide to successfully deploy SSL VPN remote access solu-tions in their network. Requirements include a basic knowledge of TCP/IP and networking, familiarity with Cisco routers/firewalls and their command-line interface (CLI), and a general understanding of the overall SSL VPN solution.
How This Book Is Organized
Part I of this book includes Chapters 1 and 2, which provide an overview of the remote access VPN technologies and introduce the SSL VPN technology. The remainder of the book is divided into two parts.
Part II encompasses Chapters 3 and 4 and introduces the Cisco SSL VPN product lines, with guidance on different design considerations.
Part III encompasses Chapters 5 through 7 and covers the installation, configuration, deployment, and troubleshooting of the individual components that make up the SSL VPN solution.
• Part I, “Introduction and Technology Overview,” includes the following chapters: Chapter 1, “Introduction to Remote Access VPN Technologies”: This chapter covers the remote access Virtual Private Network (VPN) technologies in detail. Protocols, such as the Point-to-Point Tunneling Protocol (PPTP), Internet Protocol Security (IPsec), Layer 2 For-warding (L2F), Layer 2 Tunneling Protocol (L2TP) over IPsec, and SSL VPN, are discussed to provide readers with an overview of the available remote access VPN technologies.
• Part II, “SSL VPN Design Considerations and Cisco Solution Overview,” includes the follow-ing chapters:
Chapter 3, “SSL VPN Design Considerations”: This chapter discusses the common design best practices for planning and designing an SSL VPN solution.
Chapter 4, “Cisco SSL VPN Family of Products”: This chapter discusses the SSL VPN func-tionality on Cisco Adaptive Security Appliance (ASA) and Cisco IOS routers and provides product specifications that are focused on SSL VPNs.
• Part III, “Deploying Cisco SSL VPN Solutions,” includes the following chapters:
Chapter 5, “SSL VPNs on Cisco ASA”: This chapter provides details about the SSL VPN func-tionality in Cisco ASA. This chapter discusses clientless and full tunnel SSL VPN client imple-mentations and focuses on Cisco Secure Desktop (CSD). This chapter also discusses the Host Scan feature that is used to collect posture information about end workstations. The dynamic access policy (DAP) feature, its usage, and detailed configuration examples are also provided. To reinforce learning, many different deployment scenarios are presented along with their con-figurations.
•
SSL VPN•
L2TP•
L2TP over IPsec1
Introduction to Remote
Access VPN Technologies
Since the advent of the Internet, network administrators have looked for ways to leverage this low-cost, widespread medium to transport data while protecting data integrity and confidentiality. They looked for ways to protect the information within the data packets while providing transparency to the end user. This spawned the concept of Virtual Private Networks (VPN). Subsequently, the Internet Engineering Task Force (IETF) was engaged to craft standard protocols and procedures to be used by all vendors of VPNs for data protection and confidentiality.
The IETF defined a number of VPN protocols, including Point-to-Point Tunneling Protocol (PPTP), Layer 2 Forwarding (L2F) Protocol, Layer 2 Tunneling Protocol (L2TP), Generic Routing Encapsulation (GRE) Protocol, Multiprotocol Label Switching (MPLS) VPN, Internet Protocol Security (IPsec), and Secure Socket Layer VPN (SSL VPN).
VPN protocols can be categorized into two distinct groups:
•
Site-to-site protocols•
Remote access protocolsSite-to-site protocols allow an organization to establish secure connections between two or more offices so that it can send traffic back and forth using a shared medium such as the Internet. These connections can also be used to connect the private or semiprivate networks of an organization with the private or semiprivate networks of a different organization over the shared medium. This eliminates the need for dedicated leased lines to connect the remote offices to the organization’s network. IPsec, GRE, and MPLS VPN are commonly used site-to-site VPN protocols.
to decrypt the packet, the information enclosed within the packet remains secure while the packet traverses the public Internet.
Figure 1-1 IPsec Site-to-Site VPN Tunnel
The remote access protocols benefit an organization by allowing mobile users to work from remote locations such as home, hotels, airport internet kiosks and Internet cafes as if they were directly connected to their organization’s network. Organizations do not need to maintain a huge pool of modems and access servers to accommodate remote users. Additionally, they save money by not having to pay for the toll-free numbers and long-distance phone charges. Some commonly used remote access VPN protocols are SSL VPN, IPsec, L2TP, L2TP over IPsec, and PPTP.
Figure 1-2 shows a deployment model in which different types of remote users are using the remote access VPN technologies. The figure illustrates a mobile user, a home-office user, and a number of small branch office users accessing corporate resources using the remote access protocols.
Figure 1-2 Remote Access Deployment
Chicago London
Host A Host B
Message Message
Message Message
Users Behind Branch Office Internet
Home-Office User Corporate
Network
Mobile User
Remote Access Tunnel Remote Access
Tunnel
Remote Access
Many enterprises prefer to use IPsec because it can be used as either a site-to-site or remote access protocol. Additionally, IPsec is an obvious choice for a number of vendors because of its robust feature set and security characteristics, including data integrity and packet and data encryption. However, other VPN methods are commonly used as well, depending on the requirements and infrastructure of an organization. SSL VPN is becoming a preferred choice for many organizations because of its benefits. In many cases, it allows remote access VPN users to access corporate resources without needing to install additional software on the shared workstations.
Remote Access Technologies
Organizations are constantly under pressure to reduce costs by leveraging newer technology in their existing network infrastructure. With the growth of the Internet and greater focus on globalization, organizations are required to provide their employees with 24/7 access to organizational resources. The increasing number of mobile workers and telecommuters is a major factor in the exponential growth of remote access technologies. These users require the traditional LAN-based applications, such as data, voice, and video, to work seamlessly, thereby giving users the illusion of being directly connected to the corporate LAN. This chapter discusses a number of remote access technologies, including the following:
•
IPsec•
SSL VPN•
L2TP•
L2TP over IPsec•
PPTPThe sections that follow discuss all these technologies.
IPsec
NOTE A number of RFCs provide the framework for IPsec. They include RFC 2401–2412, 2104, 1829, and 1851.
Internet Key Exchange (IKE) uses the framework provided by the Internet Security Association and Key Management Protocol (ISAKMP) and parts of two other key management protocols, namely Oakley and Secure Key Exchange Mechanism (SKEME). The purpose of IKE, as defined in RFC 2409, “The Internet Key Exchange,” is to negotiate different security associations (SA) by using the available key management protocols.
ISAKMP negotiates using two phases. In Phase 1, ISAKMP creates a secure and authentic communication channel between the peers. By using this bidirectional channel, the VPN peers can agree on how the further negotiation should be handled by sending protected messages to one another. Phase 2 negotiations then create two unidirectional channels that are used to secure and authenticate the actual data packets.
The Cisco IPsec remote access solution introduces two additional sets of negotiations to successfully negotiate an IPsec tunnel. These negotiations, also referred to as Phase 1.5, include extended authentication (X-AUTH) and mode configuration (mode config) to provide additional security enhancements. Figure 1-3 illustrates these different phases. During X-AUTH, the VPN client is prompted to provide user credentials for authentication. After successful authentication, the IPsec gateway pushes a number of configuration parameters and security policies to the end-user connection in mode config.
Figure 1-3 IPsec Phases in Cisco Devices
The Cisco IPsec remote access solution comes in two different flavors:
•
Software-based VPN clients•
Hardware-based VPN clientsVPN Client Initiator
IPsec Gateway Responder
IPsec (Phase 2) Phase 1.5 (XAUTH, Mode-config)
Software-Based VPN Clients
The software-based IPsec remote access solution in Cisco products requires you to install a software-based VPN client on the workstations. In organizations where installation of a third-party application is not allowed, administrators can explore other technologies, such as L2TP over IPsec, which is discussed later in this chapter. The software-based VPN client runs on a variety of operating systems, such as Windows, Solaris, Linux, and Mac OS X. It can be downloaded from Cisco.com free of charge as long as the Cisco IPsec gateway is under a valid service contract.
Hardware-Based VPN Clients
The Cisco hardware-based VPN clients implement the same functionality as discussed in the earlier section using the dedicated Cisco hardware devices. The hardware-based VPN is supported on the following platforms:
•
Cisco IOS router•
Cisco PIX firewall•
Cisco ASA 5505•
Cisco VPN 3002 hardware clientA Cisco small office, home office (SOHO) router can act as a VPN client and initiate a VPN tunnel on behalf of the hosts residing on the private subnet. When the IPsec gateway receives interesting traffic destined to its protected network, it determines the IP address of the hardware client by checking the configuration.
SSL VPN
Secure Socket Layer (SSL) VPN is the emerging remote access technology that provides secure connectivity to the internal corporate resources through a web browser or a dedicated client. It sits between the transport and application layers of the OSI model. The SSL protocol was developed by Netscape to promote e-commerce sites that required data encryption and user authentication. With online banking, for example, the user session is securely established by using this protocol. Even though it was originally designed to provide secure web access, organizations are increasingly leveraging this protocol to provide secure access to commonly used applications, such as Simple Mail Transfer Protocol (SMTP), Post Office Protocol version 3 (POP3), and Internet Message Access Protocol (IMAP).
providing access to corporate resources without loading a VPN client but also providing strong data confidentially while using a cost-effective and flexible method. The Cisco solution enhances the SSL VPN functionality to provide many deployment modes that include the following:
•
Clientless mode:Provides secure access to corporate resources, specifically web and e-mail servers, without loading any applets or other clients.•
Thin client mode: Provides access to most of the TCP-based protocols, such as SMTP, POP, Secure Shell (SSH), Terminal, and Telnet by loading a Java applet on the client machine.•
Full tunnel mode: Provides full access to corporate resources as if you were connected directly to the network. This mode requires you to use a dynamically downloadable SSL VPN client before access is granted.NOTE To learn more about SSL VPN and the three deployment modes, consult Chapter 2, “SSL VPN Technology.”
SSL VPN offers the advantage that it is platform independent. Using any browser that supports SSL, you can access resources without worrying about the underlying operating system. Secondly, you do not have to troubleshoot a third-party VPN client, should the connection not work as expected. Additionally, SSL VPN solves the network traversal problem, as many organizations restrict most forms of VPN traffic, such as IPsec and PPTP, to pass through their networks.
Figure 1-4 SSL VPN Gateway and Connection Proxy
L2TP
Layer 2 Tunneling Protocol (L2TP), documented in RFC 2661, combines features from Layer 2 Forwarding (L2F) from Cisco Systems and PPTP from Microsoft. Documented in RFC 3931, enhancements were made in version 3 to add security features and improved encapsulation that meet the emerging industry requirements. It packages data within Point-to-Point Protocol (PPP) and uses registered User Datagram Protocol (UDP) port 1701 for both tunnel negotiations and data encapsulation.
L2TP can replace remote access deployments that currently use PPTP and L2F technologies. L2TP is usually deployed in two remote access models:
•
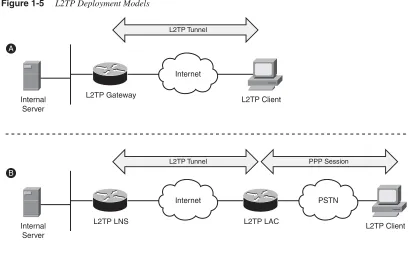
Voluntary tunnel model:This model works in a manner similar to PPTP, because the tunnel is initiated by an L2TP-enabled client and is terminated on an L2TP-enabled server. Consequently, the L2TP tunnel is established between the client and the server, and the Internet service provider (ISP) does not need to have L2TP enabled in its infrastructure. Part (a) of Figure 1-5 illustrates this model.•
Compulsory tunnel incoming call model:This model works in a manner similar to L2F, where a PPP session is established between the end workstation and the ISP gateway. Based on user authentication, the L2TP session is initiated by the ISP L2TP access concentrator (LAC) to the L2TP network server (LNS) that is owned by the organization. Therefore, the end user does not even know that the L2TP tunnel exists between the ISP LAC and the corporate LNS, as depicted in part (b) of Figure 1-5.SSL VPN Tunnel
Internet
Clear Text Communication
SSL VPN Gateway
SSL VPN Client intranet.secureinc.com
Figure 1-5 L2TP Deployment Models
NOTE L2TP uses UDP port 1701 for both tunnel negotiations and data encapsulation. Therefore, if you have a firewall between the client and the server, you need to allow only this protocol.
Most newer versions of Microsoft Windows, including Windows 2000 and Windows XP, have native support for L2TP as a remote access protocol. L2TP can use a number of authentication protocols for user authentication such as
•
Password Authentication Protocol (PAP)•
Challenge-Handshake Authentication Protocol (CHAP)•
Microsoft CHAP (MS-CHAP)Support for smart cards is also available when using Extensible Authentication Protocol (EAP). Data confidentiality is provided through 40-bit or 128-bit encryption by using Microsoft Point-to-Point Encryption (MPPE). However, it is highly recommended to add IPsec encryption to L2TP implementations. This way, IPsec can provide confidentiality, authentication, and integrity to the data wrapped within L2TP encapsulation. Integrating IPsec with L2TP is commonly referred to as L2TP over IPsec, and discussed in the next section.
Internet
L2TP Gateway Internal
Server
L2TP Client
Internet PSTN
L2TP LNS L2TP LAC
Internal Server
L2TP Client A
B
L2TP Tunnel
L2TP over IPsec
Organizations that prefer to use a built-in remote access client in the Windows-based operating systems can use L2TP. However, L2TP fails to provide strong data
confidentiality. Therefore, most of the L2TP implementations use IPsec to provide data security. This methodology is commonly referred to as L2TP over IPsec and is documented in RFC 3139.
[image:30.487.40.445.228.493.2]In an L2TP over IPsec implementation, the client workstation and the home gateway device go through seven steps, as depicted in Figure 1-6 and described in the corresponding list that follows.
Figure 1-6 L2TP over IPsec Negotiations
1 The user establishes a PPP session to the service provider access router and receives a dynamic public IP address. This step is optional if the workstation already has an IP address and can send traffic to the Internet.
2 The user launches the L2TP client that is configured to use IPsec for data security.
3 The client workstation initiates a session and negotiates a secure channel for exchanging keys (Phase 1 negotiations of IKE).
4 After successfully establishing Phase 1, the client establishes two secure channels for data encryption and authentication (Phase 2 negotiations of IKE). The data channels are set up to encrypt L2TP traffic that is destined to UDP port 1701.
Internet PSTN
L2TP Gateway ISP Gateway
Internal Server
L2TP over IPsec Client
PPP Session
L2TP IKE Phase 2
L2TP over IPsec IKE Phase 1
1
2
3
5 4 6
5 After IPsec is established, the client initiates an L2TP session within IPsec.
6 The user-specified authentication credentials are used to validate the L2TP session. Any PPP or L2TP attributes are negotiated after successfully authenticating the user.
7 After the L2TP session is established, the user workstation sends data traffic that is encapsulated within L2TP. The L2TP packets are encrypted by IPsec and then sent out to the other end of the tunnel over the Internet.
NOTE If you have a firewall between the L2TP over IPsec client and home gateway, you need to allow IP protocol 50 (ESP) and UDP port 500 to pass through. L2TP packets (UDP port 1701) are encapsulated within ESP. Some L2TP over IPsec vendors allow NAT
transparency (NAT-T) by encapsulating traffic into UDP port 4500.
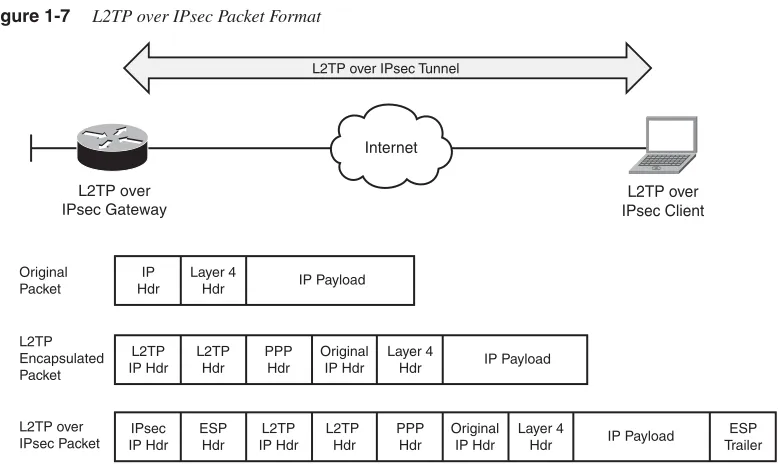
[image:31.487.45.434.302.535.2]Figure 1-7 shows an L2TP over IPsec packet format after all the headers and encapsulations have been added to the original packet.
Figure 1-7 L2TP over IPsec Packet Format
Internet
L2TP over IPsec Gateway
L2TP over IPsec Tunnel
Original Packet
IP Hdr
Layer 4
Hdr IP Payload
L2TP over IPsec Client L2TP Encapsulated Packet L2TP IP Hdr L2TP Hdr PPP Hdr Original IP Hdr Layer 4
Hdr IP Payload
L2TP over IPsec Packet IPsec IP Hdr ESP Hdr L2TP IP Hdr L2TP Hdr PPP
Hdr IP Payload
PPTP
Point-to-Point Tunneling Protocol (PPTP) is a client-server network protocol that allows remote users to access network resources over the Internet. PPTP was developed by Microsoft and is documented in RFC 2637. PPTP packages data within Point-to-Point Protocol (PPP) and then wraps the data within IP packets. PPTP uses an extended version of Generic Routing Encapsulation (GRE) Protocol as the encapsulating mechanism to make the IP packets routable.
With PPTP, the client uses TCP port 1723 to initiate the connection to the PPTP gateway. The gateway prompts the user for authentication credentials. After successfully
authenticating the user and negotiating other parameters, such as compression and encryption, the client encapsulates data packets in GRE and transmits them to the gateway over an insecure connection. The gateway de-encapsulates the packets and places them on the private network. Figure 1-8 illustrates the communication and transport channels of PPTP.
Figure 1-8 PPTP Connection Negotiations
NOTE GRE is Internet Protocol 47. If you have a firewall between the client and the server, make sure that you allow TCP port 1723 and GRE protocol to pass through it.
The data confidentiality is provided through 40-bit or 128-bit encryption using Microsoft Point-to-Point Encryption (MPPE), similar to L2TP.
PPTP functionality is freely available in most versions of Microsoft Windows operating systems. Consequently, it is the preferred choice for organizations that do not want to load a third-party VPN client and use solely Windows-based operating systems. However, PPTP
Internet
Internal Server
PPTP Client
PPTP Tunnel
PPTP Gateway
TCP 1723 for Tunnel Negotiations
is not a widely deployed remote access technology because of security flaws in its protocol implementation.
Remote access technologies can be selected depending on the security policy set by your enterprise. Table 1-1 summarizes the remote access technologies that were discussed in this chapter.
Summary
Remote access VPN services provide a way to connect home and mobile users to the corporate network. Until only a decade ago, the only way to provide this service was through dialup connections using analog modems. Organizations had to maintain a pool of modems and access servers to accommodate remote users. Additionally, they were billed for providing toll-free and long-distance phone services. With the rapid growth of the Internet technologies, more and more dialup mobile users are migrating to broadband digital subscriber line (DSL) and cable-modem connections. As a result, corporations are in the process of moving these dialup users to remote access VPNs for faster
communication. To help you select a remote access VPN technology that meets the needs and requirements of your organization, this chapter provides an overview of the different technologies. The remote access VPN technologies discussed included IPsec, SSL VPN, L2TP, L2TP over IPsec, and PPTP.
Table 1-1 Remote Access VPN Technologies Summary
Functionality PPTP IPsec L2TP L2TP over IPsec SSL VPN
VPN client Built in to most Windows OSs
Requires a third-party client
Built into newer Windows OSs
Built into newer Windows OSs
VPN client is optional
Encryption MPPE DES, 3DES,
AES
MPPE DES, 3DES, AES DES, 3DES, RC4-128, RC4-40, AES
Deployment Rarely used Extensively used
•
SSL and TLS2
SSL VPN Technology
As Secure Socket Layer (SSL) Virtual Private Network (VPN) technology has become more mature and has rapidly been deployed over recent years, it has gained the attention of network and IT administrators who are looking for remote access VPN solutions that provide ubiquitous access and low-cost deployment and management. At present, no official standards exist for SSL VPN technologies; various vendors use different implementations. This chapter takes a close look at the evolution of the SSL VPN technology to help you understand how this technology works.
Cryptographic Building Blocks of SSL VPNs
A VPN carries private traffic over public networks. A secure VPN meets the following basic requirements:
•
Authentication guarantees that the VPN entity communicates with the intended party. The authentication can apply to either a VPN device or a VPN user. For example, in a remote access VPN, the VPN head-end device can authenticate the user PC to make sure that it is indeed the PC that owns the IP address that it uses to connect to the concentrator. The concentrator can also authenticate the end user who is using the PC to properly assign user privileges based on the user’s information.•
Confidentiality ensures the data’s privacy by encrypting the data.•
Message integrityguarantees that the data’s content has not been modified during the transmission.The following sections examine how these requirements are fulfilled through the use of various cryptographic algorithms. Readers who are already familiar with these
cryptographic algorithms can skip these sections and move directly to the SSL section.
Hashing and Message Integrity Authentication
Hashing
Hashing plays an important role in a security system by ensuring the integrity of the transmitted message. A hashing algorithm converts a variable-length text field into a fixed-size string. Hashing algorithms used in a security system have the following two properties:
•
One-way hashing mechanism:This means that given the hash output, it is difficult to invert the hashing function to get the original message.•
Collision-free output:This means that for a hashing algorithm, it is computationally infeasible to find any two messages that have the same hash output.Because of these properties, a hash is also known as a message digest or digital fingerprint. People can generate a small hash output from a large document and use the hash output as the digital fingerprint of the document. This digital fingerprint can then be used to ensure that the message has not been tampered with during its transmission over an insecure channel. In addition, from the digital fingerprint, it is impossible to reveal the content of the original message.
Up to now, the most commonly used cryptographic hash algorithms have been message digest algorithm 5 (MD5) and Secure Hash Algorithm 1 (SHA-1). Both of these have been considered one-way and strongly collision-free hashing algorithms. MD5 provides 128-bit output, and SHA-1 provides 160-bit output. Because of its larger size, SHA-1 is normally considered more secure, but computationally more expensive, than MD5. With hardware and software implementation in today’s networks, the performance difference is usually not a concern. Therefore, SHA-1 is the preferred hashing algorithm for use in a VPN
deployment.
Message Authentication Code
Message authentication code (MAC) is a cryptographic checksum that is used to ensure the integrity of the message during transmission. To generate a MAC, you can use either an encryption algorithm, such as Data Encryption Standard (DES), or a hashing algorithm. Hashing is generally much faster than encryption algorithms, so the hash-based MAC (HMAC) is the most popular way. HMAC is a keyed hash function. Here is how it works: To generate an HMAC of a message M, you need to pick two system parameters, a hashing function H (normally MD5 or SHA-1) and a key K. The HMAC of the message is calculated as follows:
HMAC(K,M) = H(K XOR opad,H (K XOR ipad,M))
where opad is the string 0X5c and ipad is the string 0x36.
Figure 2-1 illustrates how HMAC functions between the sender and recipient of the message.
Figure 2-1 HMAC
The Security of MD5 and SHA-1
Recent research conducted by a group of Chinese cryptographers, including Xiaoyun Wang, has shown that MD5 and SHA-1 are not collision free, and algorithms have been developed to find collisions faster than using brute force. For example, SHA-1 has a 160-bit output, so if you hash 280random messages, you will find one pair of messages that have the same hash output. Three Chinese cryptographers proved that they can find collisions in SHA-1 with 269 operations, which is 2000 times faster than using brute force.
The implications of these findings are described by Bruce Schneier at his web blog (http:// www.schneier.com/blog/archives/2005/02/cryptanalysis_o.html) and by Eric Rescorla at http://www.rtfm.com/movabletype/archives/2004_08.html#001059.
Here is a brief summary:
•
The attack threatens the nonrepudiation property provided by hashing algorithms in digital certificates.•
It is believed that HMAC is still secure against this attack.•
The current attack is on the far edge of feasibility with current technology. These findings push industry toward developing more secure hash algorithms such as SHA-256 or other crypto methods. More details on SHA-2 can be found athttp://en.wikipedia.org/wiki/SHA-2.
Sender
Message
Message
Hash
MAC
MAC
MAC
Receiver Insecure Channel
?
=
Secret Key Known Only to Sender and Receiver
Message
Hash
Encryption
Encryption algorithms transfer plain text into cipher text. Different from hashing, encryption algorithms require keys for encryption and decryption. Two main types of encryption algorithms exist:
•
Symmetric encryption: Uses the same key for encryption and decryption. It is also known as secret-key cryptography. The symmetric algorithms are normally used to encrypt the content of a message. Two main types of symmetric encryption algorithms exist:— Stream ciphers, such as RC4
— Block ciphers, such as DES, Triple DES (3DES), and Advanced Encryption Standard (AES)
•
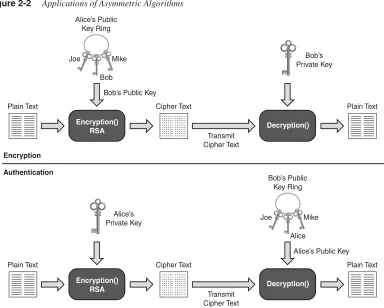
Asymmetric encryption: Uses different keys for encryption and decryption. Asymmetric encryption is also known as public-key cryptography. An asymmetric encryption system consists of two computationally associated keys. One, known to the public domain, is called the public key; the other is known only to the owner of the key pair. Depending on the use of the public and private key pairs, asymmetric algorithms can be used for either encryption or authentication purposes. Figure 2-2 illustrates the usage of asymmetric algorithms. Consider the example of Alice and Bob, who want to use asymmetric algorithms for secure communications. For encryption purposes, Alice would encrypt the message using Bob’s public key and send the cipher text to Bob. Upon receiving the cipher text, Bob, who is the only owner of the corresponding private key, can then decrypt the message with his private key. For authentication purposes, Alice would encrypt (or sign) the message using her own private key. Other people such as Bob can then verify the authenticity of the message by using Alice’s public key, which is the only key that matches the signing private key. The real-world use of asymmetric algorithms in crypto systems involves other components. We discuss them in the next few sections.Figure 2-2 Applications of Asymmetric Algorithms
RC4
Designed by Ron Rivest in 1987 for RSA Security, RC4 is the mostly widely used stream cipher. Because of its speed and simplicity, RC4 has been deployed in many applications, such as the SSL Protocol and the Wired Equivalent Privacy (WEP) Protocol, which are used to secure wireless network traffic.
As a stream cipher, RC4 works on bits of plain-text data and encrypts them one at a time by XORing the keystream with the plain text. The keystream is generated by passing the encryption key and initialization vector (IV) through a pseudorandom number generator.
For SSL, most web browsers support RC4 encryption with two different key sizes: RC4-40bit and RC4-128bit. Newer browsers, such as Internet Explorer 7.0 and Firefox, have started to support stronger ciphers such as AES.
Encryption() RSA
Plain Text Plain Text
Decryption() Cipher Text Transmit Cipher Text Bob’s Private Key
Bob’s Public Key
Authentication Encryption Alice’s Public Key Ring Joe Mike Bob Encryption() RSA
Plain Text Plain Text
Decryption() Cipher Text Transmit Cipher Text Alice’s Private Key
Alice’s Public Key Bob’s Public
Key Ring
Joe Mike
DES and 3DES
Data Encryption Standard (DES) is by far the most widely used symmetric encryption algorithm. DES is a 64-bit block cipher that works on an 8-byte data block. The output cipher block has the same 8-byte length. At the decryption side, the same algorithm is applied in reverse with the same key. Due to the requirement of having parity bits, the effective key strength of DES is 56 bits.
To encrypt a message that exceeds the DES block size, the individual cipher blocks are chained using a certain mode of operations. There are various modes of operations, such as Electric Code Book (ECB), cipher block chaining (CBC), and so on. The CBC mode is the commonly used mode of operation in commercial implementations. In CBC mode, each block of cipher text is XORed with the next plain-text block to be encrypted, thus making all the blocks dependent on all the previous blocks. The first block of data is XORed with the IV. The CBC mode adds more security compared to the ECB mode because of its extra XOR steps.
Since its design by IBM in 1970s, the DES algorithm has withheld aggressive
cryptoanalysis over the years. However, its 56-bit key length is too short, and it has become weak over the years with the rapidly increasing computational power of consumer-grade systems.
3DES addresses DES’s insufficient key length problem. 3DES performs DES three times with three sets of keys for a total of a 168-bit key length. To perform 3DES, the popular operation is to Encrypt-Decrypt-Encrypt (EDE). That is, DES encrypts the message using key 1, decrypts the message using key 2, and finally, encrypts the message using key 3.
AES is one of the cipher options for SSL v3 and Transport Layer Security (TLS).
AES
To replace the aging DES standard, the National Institute of Standards and Technology (NIST) called for the submission of an Advanced Encryption Standard (AES) in 1997. Out of several candidates such as MARS, Twofish, Serpent, Rijndael, and RC6, Rijndael was chosen as the final standard.
AES is also a block cipher that works on a 128-bit data block and has a key size of 128, 192, and 256 bits. More information on AES can be found at: http://en.wikipedia.org/wiki/ Advanced_Encryption_Standard.
Diffie-Hellman
Published in 1976, Diffie-Hellman (DH) was the first published public-key algorithm. Diffie-Hellman is a key agreement protocol that enables communication parties to agree on a shared secret without any prior-known secrets. Diffie-Hellman is often used in key exchange and during the establishment phase of a VPN tunnel. The Diffie-Hellman algorithm works as follows:
1 The communication parties agree on two system parameters: a large prime p and a generatorg. These are chosen such that for any value V<p, there exists a value wso thatgw mod p = V. With this requirement, g can be used to generate all the numbers from 1 to p–1.
2 Each communication party, say X and Y, generates a private key, x and y, each of which is a random number smaller than p. To calculate the corresponding public keys, Xx and Yy, the following formulas are used:
— Public key for party X: Xx = gx mod p — Public key for party Y: Yy = gy mod p
3 The two communication parties then exchange the public key over the insecure channel. Upon receiving the other side’s DH public key, each party calculates the shared secret (SS) using the following formulas:
Party X: SS = (Yy)xmodp = gyxmodp Party Y: SS = (Xx)y mod p = gxy mod p Both parties come up with the same common secret.
The DH parties must share the system parameters p and g, which are called DH group parameters. The following are several common DH groups with a different p:
•
Group 1: 768-bit modulus•
Group 2: 1024-bit modulus•
Group 5: 1536-bit modulusNote that during the DH public key exchange process, no authentication process is defined. This ensures that the communication parties are getting the right public key from the intended party. Thus, DH is vulnerable to a man-in-the-middle attack, in which an attacker can intercept the communication channel and spoof the identity of the communication parties to perform DH exchange with party X and Y, respectively. Thus, the attacker establishes two shared secrets with X and Y separately, and can use these shared secrets to intercept further communication between the two communication parties protected by the DH secrets. An authenticated DH exchange mitigates this vulnerability.
RSA and DSA
RSA and DSA are the two most common public key algorithms used in digital signature applications. RSA was designed by Ron Rivest, Adi Shamir, and Len Adelman (hence RSA) in 1977. Different from the Diffie-Hellman algorithm, the RSA algorithm is based on the fact that no efficient way exists to factor very large numbers. The common key size is 512-bit, 1024-bit, and 2048-bit. The performance of RSA is much slower than secret key algorithms such as DES. So RSA is normally not used for bulk data encryption. It is used mainly in digital signatures to “sign” the digital signature or in digital enveloping to encrypt a secret key that is used to encrypt the data.
In 1991, NIST proposed that the Digital Signature Algorithm (DSA) be used for applications that require digital signatures. It was standardized as the Digital Signature Standard (DSS) by the United States federal government standard for digital signatures.
Digital Signatures and Digital Certification
Authentication and integrity are important properties for secure VPNs. These include entity authentication, data origin authentication, integrity, and nonrepudiation. Digital signatures and certificates provide a scalable trust system. The following sections describe the digital signatures that provide the security properties and digital certification described in the preceding section.
Digital Signatures
In a secure communication, you must often ensure that a message comes from an authentic sender, not from malicious parties who spoof and claim that they are the intended sender. On the flip side, you might also require that the sender of the message cannot later deny being the source of the message (this is known as nonrepudiation). People sign paper documents and use the signatures as proof of authenticity and nonrepudiation. In the digital world, digital signatures (through digital signing) are designed for exactly the same purpose.
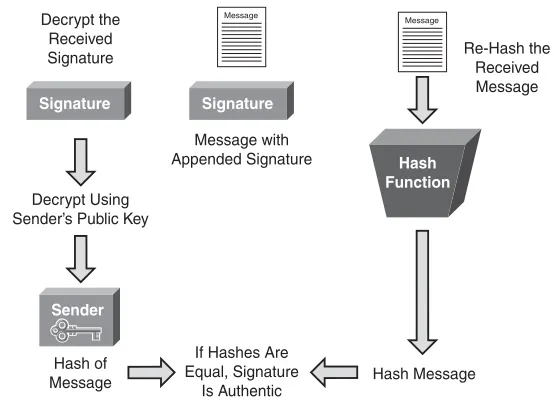
Figure 2-3 illustrates the signature verification process. Essentially, the recipient of the message with the corresponding signature performs two calculations: decryption of the received signatures using the sender’s public key to get the hash and calculation of the hash using the received message. After these two actions are completed, the recipient compares the two outputs. If they are the same, the recipient verifies the signatures to be authentic.
Figure 2-3 Digital Signature Verification
The common digital signature algorithms are RSA with MD5 or SHA-1 and DSS with SHA-1.
Public Key Infrastructure, Digital Certificates, and Certification
The preceding section showed how you can use digital signatures to achieve important security requirements, such as entity authentication, nonrepudiation, and data origin authentication. You might have noticed that one piece is still missing in the picture. To verify the digital signature, you need to have the sender’s public key. This public key should be distributed not only to the public in a scalable way but also be trusted as the true public key of the sender. (For example, Bob can post his public key and claim it is Alice’s public key.) In essence, you need to establish a trust system that provides a third-party vetting of, and vouching for, user identities. A public-key infrastructure (PKI) consists of protocols, standards, and services that establish and support the applications of such a trust system.
Sender Signature
Message Message
Hash Function Signature
Hash Message Hash of
Message Decrypt Using Sender’s Public Key
Decrypt the Received Signature
If Hashes Are Equal, Signature
Is Authentic Message with Appended Signature
PKI allows users to authenticate each other use digital certificates that are issued by certificate authorities. The following are the building blocks of a PKI system:
•
X.509:An ITU-T standard for PKI that defines the standard formats for public key certificates.•
Public-Key Infrastructure X.509 (PKIX):An IETF workgroup that defines the use of digital certificates.•
Public key cryptography standards (PKCS): Refers to a group of public key cryptography standards devised and published by RSA laboratories. PKCS is the cryptographic foundation of the PKI. Well known standards include the following:— PKCS 1 defines the RSA cryptography standard.
— PKCS 7 defines the Cryptographic Message Syntax Standard, which specifies the signing and encrypting of a message under a PKI.
— PKCS 10 defines the Certification Request Standard, which specifies the format of messages sent to a certification authority to request certification of a key pair.
The sections that follow examine digital certificates and certification, which are key components of a PKI system.
Digital Certificates
A digital certificate is essentially a binding between a user’s identity and its public key. The digital certificates are issued by a third-party entity called a certification authority (CA) to ensure trust in and authenticity of the certificate. The section that follows discusses CAs in the context of the certification process.
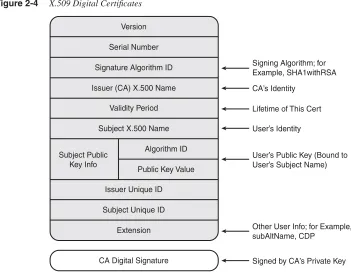
Figure 2-4 X.509 Digital Certificates
The VPN deployment fields shown in Figure 2-4 are as follows:
•
Signature algorithm ID: Specifies the signing algorithm (for example, RSA with SHA-1 or DSS with SHA-1).•
Issuer (CA) X.500 name:The CA server’s identity. Basically, this field specifies who issued this certificate.•
Validity period:Specifies the lifetime of this certificate. It is a good security practice to set a reasonable lifetime for a certificate. During the certification validation process, the VPN gateway will check the validity period to make sure that the received certificate is still valid.•
Subject name: Contains the user’s identity with the X.500 directory format. For example, cn=vpnuser1, ou=Marketing department, and o=Cisco Systems, Inc.•
Subject public key:Contains the public key of the user, which is bound to the user’s identity.Version
Serial Number
Signature Algorithm ID
Issuer (CA) X.500 Name
Validity Period
Subject X.500 Name
Algorithm ID Subject Public
Key Info
Public Key Value
Issuer Unique ID
Subject Unique ID
Extension
CA Digital Signature
Signing Algorithm; for Example, SHA1withRSA
CA’s Identity
Lifetime of This Cert
User’s Identity
User’s Public Key (Bound to User’s Subject Name)
Other User Info; for Example, subAltName, CDP
•
Extension: A placeholder for useful options.— SubAltName:This is used when the X.500 format is not a good way to represent the user’s identity. The SubAltName can be used to represent a user’s identity. The SubAltName can be a user’s e-mail address or FQDN (fully qualified domain name, often used by networking devices).
— Certificate revocation list (CRL) distribution point (CDP):The CDP is an essential component of a PKI system because it makes the CRL scalable. The CRL contains a list of the serial numbers of revoked certificates. A certificate can be revoked for various reasons, such as ceasing operation and a compromise of private keys. The CA is responsible for revoking certificates and maintaining the CRL. CDP specifies the location (normally a Lightweight Directory Access Protocol [LDAP] search string) where the CRL is stored. During the certificate validation process, VPN devices retrieve CRLs from the CDP and check whether the received certificate has been revoked.
In a large-scale PKI deployment, the CRL can become large. The Online Certificate Status Protocol (OCSP) is a new Internet protocol designed to provide a more scalable solution to manage the certification revocation status of the X.509 digital certificates. OCSP does not require VPN devices to retrieve the CRL and store and parse it locally.
With OCSP, the VPN device queries the CA about the certificate revocation status of a digital certificate under its validation. The CA server processes the query and replies with the certificate revocation status. The communication between the VPN devices and the CA server are digitally signed and cryptographically verifiable between the two parties.
•
CA digital signature:This field is the hash of the content of the digital certificate that is signed by the CA server.Certification
Figure 2-5 Digital Certification
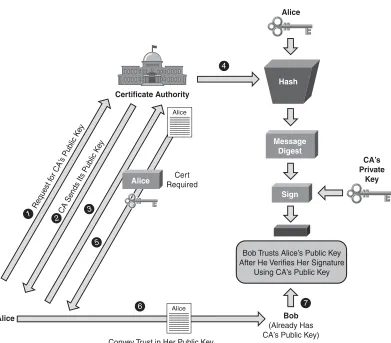
Alice wants to convey trust to Bob using a digital certificate. First she needs to enroll to the CA server to get her identity certificate. Alice follows these steps:
1 Alice first requests the root certificate, that is, the certificate of the CA server.
2 The CA server replies with its root certificate to Alice. Because this is the first communication between Alice and the CA server, no mechanism is predefined to protect this communication. So an out-of-band authentication is required after Alice gets the CA certificate to ensure that no man-in-the-middle attack occurs.
3 Alice generates a certificate request that has Alice’s identity information and her public key. Alice signs the certificate request using the CA’s public key that is inside the CA root certificate.
Message Digest Sign Hash CA’s Private Key Alice Bob (Already Has CA’s Public Key) Convey Trust in Her Public Key
Request f or CA’
s Pub lic K
ey
CA Sends Its Pub lic K
ey
Alice
Certificate Authority
1 2 3
4
5
6 7
Alice
Alice
Bob Trusts Alice’s Public Key After He Verifies Her Signature
Using CA’s Public Key
4 The CA server gets the certificate request, verifies Alice’s identity, and generates a digital certificate for Alice, binding her identity and her public key. This identity certificate is signed by the CA, which provides another binding between Alice’s identity and the CA’s identity.
5 The CA server issues the certificate to Alice.
6 Upon receiving her identity certificate, Alice presents it to Bob to convey trust.
7 Bob follows the digital signature verification process just described to validate Alice’s certificate and subsequently establishes trust to Alice’s public key.
As you can see, by trusting the CA (its public and private keys), people exchanging information demonstrate trust in the authenticity of the other party using the digital certification process described previously.
Sometimes, the CA delegates some of the tasks previously described to an entity known as a registration authority (RA). The RA provides an interface between the user and the CA server. For example, the interface could be a CGI script on the web server that receives the user’s certificate request.
Large scalable PKI systems can have a hierarchical structure that consists of multiple layers of CAs, a root CA, and many subordinate CAs that form certification chaining. During the certification validation process, an end user might want to go up the certification chain to validate the user certificate and all the subordinate certificates up to the root CA.
SSL and TLS
The following sections provide a brief overview of the SSL and TLS protocols. First, the evolution of these protocols is discussed. This is followed by protocol details to show how SSL and TLS employ the cryptographic building blocks that have just been described to provide secure communication. A short case study follows to show the protocol in action.
SSL and TLS History
The Secure Socket Layer (SSL) was originally developed in the 1990s by Netscape Communications to allow communications to occur securely in the World Wide Web (WWW) environment, which accommodates e-commerce applications such as online shopping. Such applications required secure communications. The design goal was to provide confidentiality, message integrity, identity authentication (server authentication and optional client authentication), and application transparency (to allow SSL to be used to secure other communication protocols such as mail and news).
SSL v2 was released by Netscape Communications in 1994 and deployed on Netscape Navigator browsers. In 1995, Netscape strengthened the cryptographic algorithms of SSL with the release of SSL v3. It addressed several security problems in SSL v2 such as
•
Downgrade attacks: SSL v2 allows attackers to force the selections of weaker ciphers. The release of SSL v3 authenticated the handshake messages, thereby solving this issue.v•
Truncation attacks:SSL v2 depends on the TCP connection closing to signal the end of transmission. This allows attackers to launch a denial of service attack by forging TCP connection closure. Adding the finished message in SSL v3 solved this problem.•
Weak MACs: In SSL v2, MAC relies on MD5 only.NOTE SSL v3 also added several new ciphers, such as DSS, DH, and FORTEZZA.
In 1996, the Internet Engineering Task Force (IETF) established the Transport Layer Security (TLS) working group in an effort to standardize SSL protocols from different vendors, mainly Netscape and Microsoft, which developed Private Communication Technology (PCT) and Secure Transport Layer Protocol (STLP). Finally, the standard protocol TLS was published as RFC 2246 in 1999. Overall, TLS is similar to SSL v3 with a few changes and additions.
Two new variants of TLS exist: Wireless TLS (WTLS) and Datagram TLS (DTLS). WTLS is designed to support wireless applications, and DTLS is designed to work over datagram transports such as UDP.
SSL Protocols Overview
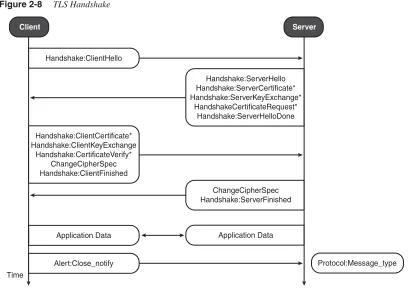
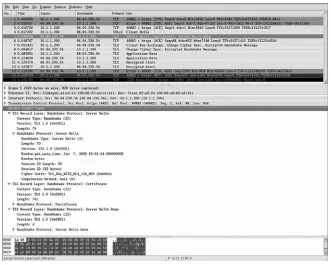
The following sections give a brief overview of a number of protocols: OSI Layer Placement and TCP/IP Protocol Support, SSL Record Protocol and Handshake Protocols, SSL Connection Setup, and 27Application Data. The sections end with a case study to demonstrate how SSL Connection Setup works.
OSI Layer Placement and TCP/IP Protocol Support
Figure 2-6 SSL and TCP/IP
SSL assumes reliable underlying packet delivery; thus, it always runs only on top of TCP, not over UDP or directly over IP. Although SSL should work with any static client-server TCP application in an ideal situation, in reality, it is not as easy as simply replacing the TCP socket calls with SSL calls. For the most popular applications defined in the TCP/IP suite, such as HTTP and Simple Mail Transfer Protocol (SMTP), standards have been defined for all the technical details to be used for SSL to secure the communications. The following are two well-known examples:
•
HTTP over SSL:Securing the web was the main initial drive for designing SSL, and HTTP is the first application-layer protocol secured by SSL.When Netscape first implemented HTTP over SSL in its Navigator, it used https:// for the pages that are fetched using HTTP over SSL to differentiate them from the standard pages that are fetched using HTTP with http://. HTTP over SSL then became known as HTTPS, which stands for HTTP over SSL. HTTPS later was standardized in RFC 2818. HTTPS operates on TCP port 443, while HTTP operates on TCP port 80 by default.
People have much the same user experience using HTTPS and HTTP. After the users enter https://URLin the browser, the browser, as a client, makes a connection to the server and negotiates an SSL connection. After the SSL connection is established, the HTTP data is transmitted over the SSL tunnel.
•
Email over SSL: Similar to HTTP over SSL, e-mail protocols such as SMTP, Post Office Protocol 3 (POP3), and Internet Message Access Protocol (IMAP) can be supported by SSL.The standard for SMTP over TLS was documented in RFC 2487.
The standard for POP3 and IMAP over TLS was documented in RFC 2595.
Later, we discuss how to use an SSL VPN to secure Microsoft Exchange Protocol.
HTTP
Secure Socket Layer
TCP/IP Layer
SMTP FTP
… Application Layer
Transport Layer