University of Southern Queensland
Faculty of Engineering and Surveying
E-tutorials for Electrical Engineering courses using
Dreamweaver
A dissertation submitted by
MUHAMMAD ZAKI BIN MUSTAFA
in fulfillment of the requirements of
ENG4112 Research Project
towards the degree of
Bachelor of Engineering (Electrical and Electronics)
Abstract
This dissertation report details the development of an interactive online tutorial for engineering courses using the software Dreamweaver, with Electrical Plant being the example in this particular project, with the aim to facilitate both on and off campus students of University of Southern Queensland. The dissertation helps to establish a clear understanding on what the whole project is about, the procedures in its
development, the testing and results, the problems encountered and further work recommendations.
The development of the online tutorial was carried out by first researching and learning the basic programming languages in webpage development such as HTML and Macromedia Flash. The next step was the understanding of the designing and constructing of the webpages. There are only guidelines in building a webpage as the designing of the layout will depend on the creativity and preferences of each designer. This proved to be crucial as Dreamweaver provided the author with numerous options and tools to work with.
University of Southern Queensland
Faculty of Engineering and Surveying
ENG4111/2 Research Project
Limitations of Use
The Council of the University of Southern Queensland, its Faculty of Engineering and Surveying, and the staff of the University of Southern Queensland, do not accept any responsibility for the truth, accuracy or completeness of material contained within or associated with this dissertation.
Persons using all or any part of this material do so at their own risk, and not at the risk of the Council of the University of Southern Queensland, its Faculty of Engineering and Surveying or the staff of the University of Southern Queensland.
This dissertation reports an educational exercise and has no purpose or validity beyond this exercise. The sole purpose of the course pair entitled âResearch Projectâ is to contribute to the overall education within the studentâs chosen degree program. This document, the associated hardware, software, drawings, and other material set out in the associated appendices should not be used for any other purpose: if they are so used, it is entirely at the risk of the user.
Prof R Smith Dean
Certification of Dissertation
I certify that the ideas, designs and experimental work, results, analyses and conclusions set out in this dissertation are entirely my own effort, except where otherwise indicated and acknowledged.
I further certify that the work is original and has not been previously submitted for assessment in any other course or institution, except where specifically stated.
MUHAMMAD ZAKI BIN MUSTAFA
0050003053
___________________________
Signature
___________________________
Acknowledgments
I would personally like to thank these people for their support and contributions during the process of me successfully completing this project.
Firstly I would like thank my supervisor, Mr Ron Sharma, for all his guidance and encouragements throughout the completion of this project.
I would also like to extend my heartfelt appreciation my family for their support and understanding and to my classmates whom have actively given me feedback and suggestions for the project.
MUHAMMAD ZAKI BIN MUSTAFA
Contents
Abstract i
Limitations of Use ii
Certificate of Dissertation iii
Acknowledgments iv
List of Figures x
List of Tables xviii
Chapter 1: Introduction 1
1.1 Project Overview . . . 1
1.2 Project Aim . . . 1
1.3 Specifications . . . 2
1.4 Dissertation Outline . . . 2
Chapter 2: Webpage Concepts 5
2.1 HyperText Markup Language (HTML) . . . 5
2.2 Macromedia Dreamweaver . . . 6
2.3 Macromedia Flash . . . 10
2.4 Dynamic Web Data . . . 11
2.5 Chapter Summary . . . 13
Chapter 3: Methodology 14
3.2 Dreamweaver Panels . . . 15
3.3 Design . . . 18
3.4 Layout . . . 19
3.5 Content . . . 20
3.5.1 Selection of Electrical Plant topics . . . 20
3.5.2 User Features . . . 22
3.5.3 Animated Graphics . . . 23
3.5.4 Practice Exercises . . . 24
3.5.5 Online Quiz . . . 45
3.5.6 Dynamic buttons . . . 46
3.5.7 Structure flow . . . 46
3.6 Project Timeline . . . 48
3.7 Chapter Summary . . . 50
Chapter 4: Design Construction and Implementation 51
4.1 Construction of Webpage . . . 51
4.2 Design . . . 51
4.2.1 Background . . . 53
4.2.2 Frames . . . 54
4.2.3 Tables . . . 61
4.2.4 Dynamic buttons . . . 63
4.2.5 Dropdown menu . . . 65
4.2.6 Animated graphics . . . 68
4.3 Practice Exercise . . . 79
4.3.2 Chapter 2: Practice exercise . . . 87
4.3.3 Chapter 3: Practice exercise . . . 93
4.4 Online Quiz . . . 101
4.4.1 Chapter 1: Online Quiz . . . 107
4.4.2 Chapter 2: Online Quiz . . . 113
4.4.3 Chapter 3: Online Quiz . . . 119
4.4.4 Interactive buttons . . . 125
4.5 Chapter Summary . . . 126
Chapter 5: Testing and Problem Solving 127
5.1 Problems Encountered . . . 127
5.1.1 Layout . . . 127
5.1.2 Animated graphics . . . 128
5.1.3 Practice exercise . . . 128
5.1.4 Online quiz . . . 130
5.2 Results . . . 131
5.3 Chapter Summary . . . 141
Chapter 6: Future Work 142
6.1 Achievement of Project Objectives . . . 142
6.2 Further Work . . . 142
6.2.1 Complete Electrical Plant topics . . . 143
6.2.2 Animated graphics . . . 143
6.2.3 Online tutorials . . . 143
6.2.5 Questions database . . . 144
6.3 Chapter Summary . . . 145
Chapter 7: Conclusion 146
7.1 Conclusion . . . 146
References 148
Appendix A: Project Specification 151
Appendix B: Programming Source Codes 154
B.1: Source code for iframe page (index.html) . . . 155
B.2: Source code for nested frames page (project.html) . . . 156
B.3: Source code for top frame page (top.html) . . . 157
B.4: Source code for side frame page (side.html) . . . 158
B.5: Source code for dropdown menu (dropdown.xml) . . . 159
B.6: Source code for introduction page (intropg.html) . . . 160
B.7: Source code for Chapter 1 Introduction page (chapt1_pg1.html) . . . . 161
B.8: Source code for Chapter 1 Advantages page (chapt1_pg2.html) . . . . 162
B.9: Source code for Chapter 1 Star page (chapt1_pg3.html) . . . 163
B.10: Source code for Chapter 1 Delta page (chapt1_pg4.html) . . . 166
B.11: Source code for Chapter 1 Exercise page (chapt1_pg5.html) . . . 169
B.12: Source code for Chapter 1 Summary page (chapt1_pg6.html) . . . 171
B.13: Source code for Chapter 1 Quiz page (chapt1_quiz.html) . . . 174
B.14: Source code for Chapter 2 Introduction page (chapt2_pg1.html) . . . 175
B.16: Source code for Chapter 2 Hysteresis page (chapt2_pg3.html) . . . . 178 B.17: Source code for Chapter 2 Exercise page (chapt2_pg4.html) . . . 180 B.18: Source code for Chapter 2 Types page (chapt2_pg5.html) . . . 182 B.19: Source code for Chapter 2 Quiz page (chapt2_quiz.html) . . . 185 B.20: Source code for Chapter 3 Introduction page (chapt3_pg1.html) . . . 186 B.21: Source code for Chapter 3 Circuit page (chapt3_pg2.html) . . . 187 B.22: Source code for Chapter 3 Torque-Slip page (chapt3_pg3.html) . . . 188 B.23: Source code for Chapter 3 Exercise page (chapt3_pg4.html) . . . 189 B.24: Source code for Chapter 3 Quiz page (chapt3_quiz.html) . . . 191
List of Figures
2.1 Dreamweaver workspace layout . . . 7
2.2 Basic Dreamweaver work area . . . 7
2.3 CSS Style Sheet. . . 9
3.1 The âCommonâ panel. . . 15
3.2 The âLayoutâ panel . . . 15
3.3 The 'Text' panel. . . 15
3.4 The 'Tables' panel . . . 16
3.5 The 'Frames' panel. . . 16
3.6 The âFormsâ panel . . . 16
3.7 The âTemplatesâ panel . . . 16
3.8 The âCharactersâ panel . . . 17
3.9 The âMediaâ panel. . . 17
3.10 The âHeadâ panel. . . 17
3.11 The âScriptâ panel . . . 17
3.12 The âASPâ panel . . . 18
3.13 The âApplicationâ panel. . . 18
3.14 Nested frames . . . 19
3.15 Nested layout of frames & tables . . . 20
3.16 Fusing Macromedia Flash into Dreamweaver. . . 23
3.17 Display window for the six template options . . . 24
3.19 âBreaking apartâ the individual components of the template . . . 26
3.20 Each individual component highlighted . . . 27
3.21 Interaction options in the âTrue or Falseâ component parameters window . . . 28
3.22 Options settings in the âTrue or Falseâ component parameters window . . . 29
3.23 âFill in the Blankâ template . . . 30
3.24 Interaction options in the âFill in the Blankâ component parameters window. 31 3.25 Options settings in the âFill in the Blankâ component parameters window. . 32
3.26 âDrag and Dropâ template. . . 33
3.27 Interaction options in the âDrag and Dropâ component parameters window. . 34
3.28 Options settings in the âDrag and Dropâ component parameters window. . . . 35
3.29 âHot Objectsâ template . . . 36
3.30: Interaction options in the âHot Objectsâ component parameters window. . . . 37
3.31 Options settings in the âHot Objectsâ component parameters window . . . 38
3.32 âHot Objectsâ template . . . 39
3.33 Interaction options in the âHot Spotâ component parameters window . . . 40
3.34 Options settings in the âHot Spotâ component parameters window. . . 41
3.35 âHot Objectsâ template . . . 42
3.36 Interaction options in the âMultiple Choiceâ component parameters window. 43 3.37 Interaction options in the âMultiple Choiceâ component parameters window. 44 3.38 Structure flowchart . . . 47
4.1 Dreamweaver window setup . . . 52
4.2 Background and fonts example . . . 53
4.3 Background and font colour html coding . . . 53
4.5 Top and nested left frames . . . 56
4.6 Nested frames with background . . . 56
4.7 Preview of the nested frames with no frameborder and no resize . . . 57
4.8 Blank iframe without the contents. . . 58
4.9 The iframe within a table border and background colour. . . 59
4.10 Final layout of the iframe with the incorporated nested frames inside . . . 60
4.11 Table properties . . . 61
4.12 Table options. . . 61
4.13 Table examples . . . 62
4.14 Dynamic button options . . . 64
4.15 Dynamic buttons . . . 64
4.16 Flash menu template . . . 65
4.17 XML dropdown menu file opened in Dreamweaver. . . 66
4.18 Minimized dropdown menu . . . 67
4.19 Expanded dropdown menu . . . 67
4.20 1st image using Adobe Photoshop . . . 68
4.21 Inverting the imageâs colour . . . 69
4.22 The image after colour inversion. . . 69
4.23 2nd graph image . . . 70
4.24 3rd graph image . . . 70
4.25 Animated graphic background . . . 71
4.26 1st graph image added onto the background. . . 72
4.27 Six layers of the animated graphic . . . 72
4.29 Animated graphic at frame 10. . . 73
4.30 Animated graphic at frame 20. . . 74
4.31 Animated graphic at frame 30. . . 74
4.32 Animated graphic at frame 50. . . 75
4.33 Animated graphic at frame 55. . . 75
4.34 Animated graphic at frame 60. . . 76
4.35 Animated graphic at frame 70. . . 76
4.36 Animated graphic at frame 70. . . 77
4.37 Animated graphic at frame 90. . . 77
4.38 Animated graphic at frame 100. . . 78
4.39 Animated graphic document properties . . . 78
4.40 Practice exercise background template. . . 79
4.41 Question template before âBreak Apartâ . . . 80
4.42 Individual components after âBreak Apartâ . . . 80
4.43 Chapter 1 - Practice exercise part (a) â âFill in the Blankâ template . . . 81
4.44 Chapter 1 - Practice exercise part (a) âInteractionâ settings. . . 81
4.45 Chapter 1 - Practice exercise part (a) âOptionsâ settings . . . 82
4.46 Chapter 1 - Practice exercise part (a) preview . . . 82
4.47 Chapter 1 - Practice exercise part (b) âInteractionâ settings. . . 83
4.48 Chapter 1 - Practice exercise part (b) âOptionsâ settings . . . 84
4.49 Chapter 1 - Practice exercise part (b) preview . . . 84
4.50 Chapter 1 - Practice exercise part (c) âInteractionâ settings. . . 85
4.51 Chapter 1 - Practice exercise part (c) âOptionsâ settings . . . 86
4.53 Chapter 2 - Practice exercise part (a) âInteractionâ settings. . . 87
4.54 Chapter 2 - Practice exercise part (a) âOptionsâ settings . . . 88
4.55 Chapter 2 - Practice exercise part (a) preview . . . 88
4.56 Chapter 2 - Practice exercise part (b) âInteractionâ settings. . . 89
4.57 Chapter 2 - Practice exercise part (b) âOptionsâ settings . . . 90
4.58 Chapter 2 - Practice exercise part (b) preview . . . 90
4.59 Chapter 2 - Practice exercise part (c) âInteractionâ settings. . . 91
4.60 Chapter 2 - Practice exercise part (c) âOptionsâ settings . . . 92
4.61 Chapter 2 - Practice exercise part (c) preview . . . 92
4.62 Chapter 3 - Practice exercise part (a) âInteractionâ settings. . . 93
4.63 Chapter 3 - Practice exercise part (a) âOptionsâ settings . . . 94
4.64 Chapter 3 - Practice exercise part (a) preview . . . 94
4.65 Chapter 3 - Practice exercise part (b) âInteractionâ settings. . . 95
4.66 Chapter 3 - Practice exercise part (b) âOptionsâ settings . . . 96
4.67 Chapter 3 - Practice exercise part (b) preview . . . 96
4.68 Chapter 3 - Practice exercise part (c), first template âInteractionâ settings . . . 97
4.69 Chapter 3 - Practice exercise part (a) âOptionsâ settings . . . 98
4.70 Chapter 3 - Practice exercise part (c), first template preview. . . 98
4.71 Chapter 3 - Practice exercise part (c), second template âInteractionâ settings. 99 4.72 Chapter 3 - Practice exercise part (c), second template preview . . . 99
4.73 Chapter 3 - Practice exercise part (c), third template âInteractionâ settings. . 100
4.74 Chapter 3 - Practice exercise part (c), third template preview . . . 100
4.75 A set of timeline frames for each online quiz . . . 101
4.77 The different layers for each online quiz. . . 102
4.78 Selecting quiz background colour. . . 103
4.79 Setting the colour for the quiz background. . . 104
4.80 Setting to âRadialâ mode in the Color Mixer panel . . . 104
4.81 Adjusting the colour panels. . . 105
4.82 Final background for online quiz . . . 105
4.83 Preview of the online quiz . . . 106
4.84 Component settings for question 1 of chapter 1 online quiz . . . 107
4.85 Component settings for question 2 of chapter 1 online quiz . . . 107
4.86 Component settings for question 3 of chapter 1 online quiz . . . 108
4.87 Component settings for question 4 of chapter 1 online quiz . . . 108
4.88 Chapter 1 online quiz page 1 preview . . . 109
4.89 Chapter 1 online quiz page 2 preview . . . 109
4.90 Chapter 1 online quiz page 3 preview . . . 110
4.91 Chapter 1 online quiz page 4 preview . . . 110
4.92 Chapter 1 online quiz page 5 preview . . . 111
4.93 Chapter 1 online quiz page 6 preview . . . 111
4.94 Chapter 1 online quiz score page preview . . . 112
4.95 Component settings for question 1 of chapter 2 online quiz . . . 113
4.96 Component settings for question 2 of chapter 2 online quiz . . . 113
4.97 Component settings for question 3 of chapter 2 online quiz . . . 114
4.98 Component settings for question 4 of chapter 2 online quiz . . . 114
4.99 Component settings for question 5 of chapter 2 online quiz . . . 115
4.101 Chapter 2 online quiz page 2 preview. . . 116
4.102 Chapter 2 online quiz page 3 preview. . . 116
4.103 Chapter 2 online quiz page 4 preview. . . 117
4.104 Chapter 2 online quiz page 5 preview. . . 117
4.105 Chapter 2 online quiz page 6 preview. . . 118
4.106 Chapter 2 online quiz score page preview. . . 118
4.107 Component settings for question 1 of chapter 3 online quiz. . . 119
4.108 Component settings for question 2 of chapter 3 online quiz. . . 119
4.109 Component settings for question 3 of chapter 3 online quiz. . . 120
4.110 Component settings for question 4 of chapter 3 online quiz. . . 120
4.111 Component settings for question 5 of chapter 3 online quiz. . . 121
4.112 Chapter 3 online quiz page 1 preview. . . 121
4.113 Chapter 3 online quiz page 2 preview. . . 122
4.114 Chapter 3 online quiz page 3 preview. . . 122
4.115 Chapter 3 online quiz page 4 preview. . . 123
4.116 Chapter 3 online quiz page 5 preview. . . 123
4.117 Chapter 3 online quiz page 6 preview. . . 124
4.118 Chapter 3 online quiz score page preview. . . 124
4.119 Insertion of interactive buttons . . . 125
4.120 The flash programming for the interactive buttons. . . 125
5.1 Setting for the practice exercise background dimensions and colour. . . 129
5.2 Action script coding for linking the quiz pages. . . 130
5.3 Screenshot of the Introduction page . . . 131
5.5 Screenshot of Chapter 1 Advantages page . . . 132
5.6 Screenshot of Chapter 1 Star page . . . 133
5.7 Screenshot of Chapter 1 Introduction page . . . 133
5.8 Screenshot of Chapter 1 Exercise page . . . 134
5.9 Screenshot of Chapter 1 Summary page. . . 134
5.10 Screenshot of Chapter 1 Quiz page . . . 135
5.11 Screenshot of Chapter 2 Introduction page. . . 135
5.12 Screenshot of Chapter 2 Circuit page . . . 136
5.13 Screenshot of Chapter 2 Hysteresis page . . . 136
5.14 Screenshot of Chapter 2 Exercise page. . . 137
5.15 Screenshot of Chapter 2 Types page. . . 137
5.16 Screenshot of Chapter 2 Quiz page. . . 138
5.17 Screenshot of Chapter 3 Introduction page. . . 138
5.18 Screenshot of Chapter 3 Circuit page . . . 139
5.19 Screenshot of Chapter 3 Torque-Slip page . . . 139
5.20 Screenshot of Chapter 3 Exercise page. . . 140
List of Tables
Chapter 1
Introduction
1.1
Project Overview
Distance learning is fast becoming a popular trend. Working adults wanting to upgrade themselves as well as the lure of recognized degrees abroad makes distance or correspond studying very appealing. And because of the mounting number of students doing these courses, we see the importance of online or web-based tutorials. Online tutorials not only cater to these off-campus students, but also to those on campus as well, as it provide easy access to study materials in their fields of study. This project hopes to provide an insight of how an online tutorial website can be done and shows how easy and useful it can be. With the power of the internet and a great web building tool such as the Macromedia Dreamweaver, online learning could be a refreshing and interesting experience.
1.2
Project Aim
1.3
Specifications
This project had a few specification requirements that needed to be satisfied. Firstly, the webpage layout was to be designed using primarily Macromedia Dreamweaver software. The tools that were provided by the Dreamweaver software gave numerous options for the design implementation. The design had to be original and simple with easy navigation for its users. Flashy animated GIFs or non-related pictures will not be tolerated. The contents of the webpage should have adequate study material from the Electrical Plant course module. They should be arranged accordingly into chapters.
Dreamweaver was not only used for the design and layout of the webpage. Macromedia Dreamweaver also supports and implements a range of interactive programming and features, such as the Macromedia Flash. As this project was an online tutorial, in addition to the static diagrams, interactive features such as animated graphics, short practice exercises and interactive quizzes were added at the end of each chapter. These practice exercises and quizzes had questions based on the chapter materials. It will consist of questions ranging from multiple choices to short answer and even drag-and-drop objects. This was the part whereby the Macromedia Flash was implemented. In addition to these interactive quizzes, some graphical simulation images also using the Macromedia Flash will be added.
1.4
Dissertation Outline
This dissertation is divided into an assortment of chapters that describe the different parts of the project. To better facilitate the reader, this section provides a brief description on what each chapter covers.
will help to provide a sense of understanding the importance of these scripting languages and webpage tools and why they should be chosen for this project.
Chapter 3: Methodology will mainly explore the research work involved and the planning of the webpage layout. This is an important chapter as it covers all the project specifications and requirements. There will be detailed explanations of the planning and designing of the layout and what were the features that were considered and those that compulsorily needed to be implemented into the webpage to satisfy the criteria of it being a learning tool.
Chapter 4: Design Construction and Implementation will take the reader into a step-by-step procedure in the construction of each aspects of the webpage. From the webpage layout to the practice exercises and online quizzes, the reader will be able to understand how each feature was constructed and inserted into the final webpage design. The programming coding, as well as the different interactive options that were tried and tested, will be discussed. The reasons why the final templates were chosen will also be explained.
Chapter 5: Testing and Problem Solving is a short chapter whereby it contains the detailing of all the testing and problem solving involved during the completion of the project. It will mainly discuss the different templates and layout used and the problems encountered in the process of completing the graphics and interactive quiz. It also shows screenshots of the resultant webpages that wee developed.
Chapter 2
Webpage Concepts
2.1 HyperText Markup Language (HTML)
HTML is the basic scripting language used by most web developers. Even with the emergence of other dynamic languages such as ASP and PHP, HTML still proves to be most commonly used web programming language. HTML is a document-layout and hyperlink-specification language. It defines the placement of special, embedded instructions that are not displayed by the browser. What it does is, it displays the contents of the document, such as text, images and other support media. The language enables a document to be interactive through special hyperlinks, be it linked through texts or images, which connect the document with other documents or with other Internet resources.
Being able to read and write HTML coding is an important criterion for a web designer. Even with advance software such as the Macromedia Dreamweaver, where code writing is not necessary, it is still helpful for the designer to know some basic HTML coding. Understanding the HTML codes can be the difference between a good and a great webpage layout. The HTML code usually has an open and close tag brackets. The tags always start with a â< >â and closes with a â< / >â. In a HTML document, it usually comprises of four main code tags which are the <html>, <title>, <head> and <body> tags. A HTML document would not work properly if either one of these tags is missing. The display titles, attributes and contents of the document are embedded within the boundaries of these tags.
standard and all other Web-related standards are developed under the authority of the World Wide Web Consortium (W3C). Standards, specifications and drafts of new proposals can be found at http://www.w3.org/.
2.2
Macromedia Dreamweaver
Dreamweaver MX does a lot more than just help you create HTML pages, it's a full featured rapid application development tool for web developers, and it can substantially reduce the time spend writing codes. Macromedia Dreamweaver is a professional editing program for designing, coding and developing static pages and dynamic web applications. It enhances web experience and provides easy interaction with the user. The visual editing features in Dreamweaver let you quickly create pages without writing a line of code. You can view all your site elements or assets and drag them from an easy-to-use panel directly into a document. You can streamline your development workflow by creating and editing images in Macromedia Fireworks or another graphics application using Macromedia Flash, then importing them directly into Dreamweaver. Among its many distinctions, Dreamweaver was the first web authoring tool capable of addressing multiple server models, making it equally easy for developers of ASP, PHP, ColdFusion or JavaServer Pages to use.
Figure 2.1: Dreamweaver workspace layout.
[image:26.612.173.471.397.628.2]
Dreamweaver is a program very much rooted in the real world. Dreamweaver recognizes the real-world problem of incompatible browser commands and addresses the problem by producing code that is compatible across browsers. Building any website, whether static or dynamic, is half craft and half art, and Dreamweaver is the perfect tool for blending these often dueling disciplines. Dreamweaverâs visual editor enables quick and artful page creation, and at the same time, its integrated editors offer the detail-oriented focus required by programmers. Dreamweaverâs key features include the following:
⢠Dreamweaver works the way professional web developers do, with integrated
visual and text editors. Dreamweaver wonât convert your code when itâs used with pre-existing web pages.
⢠It supports HTML standard commands with easy entry and editing of text, graphics, tables, and multimedia elements. Dreamweaver provides straightforward yet robust connectivity to data sources and access to the most popular server models.
⢠It makes cutting-edge features, such as Dynamic HTML and Cascading Style Sheets, easy to use.
⢠A super-charged editor features advanced options like code completion and
Code Hints.
⢠With Dreamweaverâs Live Data view, you can construct your page while viewing the actual data to be displayed in the online application.
⢠Dreamweaver offers you a variety of reusable server behaviors, JavaScript behaviors, object libraries, commands, Application objects, and templates to streamline your Webpage creation.
⢠Enhanced templates are possible with optional and conditional regions.
Figure 2.3: CSS Style Sheet.
David Deming wrote in his book, Dreamweaver MX Bible, âMacromedia has dutifully updated the worldâs leading Web development environment annually since the original Dreamweaver 1 release in December, 1997. It was getting to the point where you could plan family events around itâ. With the evolution of Dreamweaver, the nature and scope of Web development changed. It was reported that the likes of IBM and Cisco were suddenly laying people off and web-related projects were put on hold as if the Web was put on standby. The cyber world began to question the hype that had been generated the last couple years. The Dreamweaver team was putting out a new updated version each year and soon the people were getting skeptical over these so-called âupdated versionâ. The next version of Dreamweaver couldnât be about just incremental improvements and new features. It had to fundamentally change, just as the Web development landscape had fundamentally changed. The Web was here to stay, but there was no doubt that things were different; and with change comes opportunity.
come. Dreamweaver MX stands at the center of a complex series of overlapping worlds. Dreamweaver MX is the one program robust enough for them all. Webpage design is a blend of art and craft; whether youâre a deadline-driven professional or a vision-filled amateur, youâll find that the Dreamweaver underpinnings of this tool provide an intuitive way to make your Web visions a reality. Dreamweaver implies development, and Dreamweaver MX excels at producing multifaceted Web pages that bring content locked in a data store to the surface. From quick design prototyping to ongoing Web site management, Dreamweaver automates and simplifies much of a Webmasterâs workload.
Dreamweaver is not only the first web authoring tool to bring the ease of visual editing to an HTML code-oriented world, it also brings a point-and-click interface to complex coding whether server-side or client-side. With the advent of Web services, the opportunity to let developers add sophisticated functionality to their sites without learning Java or C was there for the taking. And with the convergence of the web development workforce, the potential was there to produce a single tool that all members of a web development team could use to get their jobs done, whether it was visually oriented, code-centric or some combination thereof. With a product as different and new as Dreamweaver MX, itâs not sure which is more difficult, building an application or describing it. Either way, the most significant release of Dreamweaver is there to solve real-world development problems.
2.3 Macromedia Flash
sophisticated interfaces and navigation schemes, and dynamically control graphics, video, sound, and text. Itâs not an exaggeration to say that Flash is revolutionizing the Web.
The Macromedia Flash helps the user to create interactive online instructional courses that can be run and embedded into an existing webpage document. There are many benefits of using the Flash extensions. Anyone with a Flash-enabled Web browser can design and customize their own interface to meet their needs. Because you are using Flash, you can create high-quality interfaces that load quickly and look the same on different platforms. Content developers can easily add interactive graphics to their online courses via the Flash learning interaction Smart Clips, which provide a simple interface for entering data, without writing code. The Flash learning interactions let the user send tracking information to a server side learning management system. Additionally, the sample template files give the user an idea of how each interactive example work by showing a frame by frame explanation. This helps the user in developing a more complete and interesting interactive graphical contents.
2.4 Dynamic Web Data
multimedia object, the desired data is chosen from the source dialog box. The linking code will automatically be written into the proper parameter for the object.
Incorporating dynamic data into your standard webpages is a core technology for data driven web applications, along with establishing a data source connection and defining a recordset. After having these three components in place, the user can begin combining HTML pages with text, images and even multimedia data. Software such as Macromedia Dreamweaver combines sophisticated connectivity with drag-and-drop simplicity for quick insertion of dynamic content. To integrate data-driven and static content:
⢠The Bindings panel displays fields available for inserting into a web document, much like the Assets panel, which shows available images and other elements. Like the Assets panel, data is inserted from the Bindings panel through a drag-and-drop procedure. For complex layouts, you can position your cursor precisely and choose the Insert button instead of dragging-and-dropping the dynamic fields.
⢠Dynamic text accepts two types of formatting: client-side and server-side. Client-side formatting is another term for standard HTML and CSS formatting; dynamic text may be styled with the same tags and attributes as regular text. The final look for these tags and attributes is interpreted by the browser. Server-side formatting, on the other hand, reshapes the data from the data source before it passes it on to the browser.
⢠If you encounter trouble inserting dynamic images into your web applications, its probably because the error may lie in the database setup. Itâs key to store the path and/or filename of the images in the data source as a text field rather than as a hyperlink.
2.5 Chapter Summary
Chapter 3
Methodology
3.1 Methodology Overview
There were many aspects that needed to be considered and a set of guidelines that had to be drawn up in order to effectively manage the project in the duration of time given. Research on the background of the programming languages to be used and website construction were also methodically done to minimize the errors in the later stages. Resources had to be carefully selected to ensure there are sufficient to comply with the requirements for an online tutoring tool. As Electrical Plant was used as an example for this project, materials from the University of Queensland Electrical Plant ELE3803 study books as well as other resources were used as guides for the content of the webpage tutorial.
Existing websites were reviewed to study the different designs and layouts. This helped in deciding the functions and features that are essential to the final webpage design. After deciding on the features and contents that needed to be implemented, only then can it be decided what were the additional tools and software to be integrated into the Macromedia Dreamweaver to complete the project. Software such as Adobe Photoshop and Macromedia Flash proved useful and will be reported in detail in the Chapter 4 as we discuss the construction and implementation of the graphics, practice exercises and the online quizzes.
3.2 Dreamweaver Panels
One of the main attractions of Macromedia Dreamweaver was its easy-to-use panels. In addition to the pull-down menus, these panels enable the user to easily insert tools and features into the design. There were a total of thirteen panels, each representing a main tool for webpage designing. Upon selecting each panel, a set of buttons will appear. These buttons represent the options for that particular panel. The thirteen panels were:
⢠Common
Gives the option of inserting dynamic tool such as hyperlinks, images, Flash features, rollover images or horizontal line.
Figure 3.1: The âCommonâ panel.
⢠Layout
Gives the option of having a âStandard Viewâ or a âLayout Viewâ.
Figure 3.2: The âLayoutâ panel.
⢠Text
Gives the option of changing the characteristics of the fonts (bold, italics, etc).
⢠Tables
Gives the option of inserting tables into the design.
Figure 3.4: The âTablesâ panel.
⢠Frames
Gives a variety of combination of nested frames.
Figure 3.5: The âFramesâ panel.
⢠Forms
Gives the different types of forms attributes such as textbox, checkbox, radio button and menu list.
Figure 3.6: The âFormsâ panel.
⢠Templates
Gives the option of inserting pre-designed templates that includes frames and tables.
⢠Characters
Shows the different types of symbols commonly used such as the ââ¬â sign and
the copyright trademark.
Figure 3.8: The âCharactersâ panel.
⢠Media
Gives the option of inserting multimedia features such as flash movies or dynamic applet.
Figure 3.9: The âMediaâ panel.
⢠Head
Provides comment lines for the coding window.
Figure 3.10: The âHeadâ panel.
⢠Script
Enables the addition of dynamic scripts such as the CSS styling or basic action scripts.
⢠ASP
Provides the option of inserting ASP programming codes into the design. ASP programming is a type of database programming that was not covered in this project.
Figure 3.12: The âASPâ panel.
⢠Application
Provides dynamic tools such as the rollover buttons and dynamic text.
Figure 3.13: The âApplicationâ panel.
3.3 Design
3.4 Layout
The next logical steps would be to list the parameters of the design. And in any webpage design, the layout always comes first. Layout of a webpage design basically covers the background, colours, fonts, templates, links, navigation and any additional dynamic tools needed. For this project, the author had to find a design that balances professional and fun. Thus the author had come out with a checklist to assist him in the designing process:
⢠The colour of the background ⢠The type of fonts
⢠The colour of the fonts
⢠What type of nested frames should be implemented
⢠If tables were required ⢠Navigation tools
⢠Hyperlinks
⢠The order of the contents
Figure 3.15: Nested layout of frames & tables.
3.5 Content
The amount of content in the webpage was critical as it had to meet the criterion of an online tutorial and should provide a reasonable amount of materials on the topics. It also had to satisfy the requirements set in the specifications in Chapter 1.3 on page 2 earlier. The interactivity level in the webpage was adequate and thus helped to enhance the usersâ understanding during the learning process. The presentation of the information had to be simple and concise with appropriate illustrations where necessary.
3.5.1 Selection of Electrical Plant topics
arrangement. Two textbooks have influenced the choice of materials and contents for this project.
The first was University of Queensland very own study books, written by Ron Sharma. The chapters were arranged in sequence, starting from the basic fundamentals to the more complex topics. This enabled the students to build up their foundations solidly before moving on to the more difficult concepts. The books also contain numerous diagrams and illustrations, making it easier for the students to visualize the concept behind the theory. The important points of each chapter were boxed up and there were a lot of practice examples for the students to try and practice. Basically the materials were clearly detailed and simple to understand. The contents in the study books were similar to what the author had in mind for the online tutorial. Thus getting the materials from the study books was essential.
The second reference textbook used was âElectrical Machines, Drives and Power Systemsâ by Theodore Wildi. It provided a wider range of topics in greater detail. In general, the contents in the textbook were quite complex and very technical in nature. However, due to its in-depth contents, it also provided a lot more work examples and static diagrams. At the end of each chapter, there were also quite a few practice exercises, ranging from the simple ones to the more complex ones. These practice exercises proved valuable for the short exercises and online quiz of the project.
make the materials concise and complete with enough interactive exercises for the students to revise and practice what they have learned for that course subject. Thus the first three chaptersâ materials of Electrical Plant, in accordance to the ones found in the University of Queensland study books, were inserted into the webpage. The first three chapters were;
Chapter 1: Three Phase Analysis
This first introductory chapter basically covered the three phase concept. It studies the three phase line and phase voltages and currents for both star and delta systems. It also teaches how to convert a star connection to a delta connection and vice versa. Three phase power systems and loads were also discussed with phasor diagrams to explain the system.
Chapter 2: Transformers
This chapter discussed the equivalent circuit of a transformer, how to determine the efficiency and voltage regulation of transformers and calculations involving parallel transformers. Protection and maintenance techniques for the transformers were also covered.
Chapter 3: Induction Machines
This chapter covered the analysis of the operation of induction machines. The torque-slip characteristics, the dynamics of a flywheel fitted motor and the specifications of induction motors were also explained.
3.5.2 User features
new page was selected, which could be annoying after a while, only the viewing window would refresh when a new page was selected. When a small detail such as this is taken into account, it could prove to be critical for the whole design layout at the end of it all.
As for the navigation, dynamic buttons were placed at the bottom of each page so that users could go through the pages easily. However, the webpage covers three chapters with each chapter having an average of five pages. It would be time consuming if a student wanted to view a certain particular page at the end of the chapter. In doing so, the student would have to go through all the earlier pages in order to reach the desired page. Thus a pull-down menu using a dynamic XML file was added to enable easier navigation.
3.5.3 Animated graphics
One of the researches done by the author before designing the webpage was finding out what features would attract an internet user. The author noticed that people tend to be attracted to moving objects or colourful images. The challenge for the author was to incorporate these aspects into the online tutorial. One way would be to implement animated graphics instead of just static diagrams that were similar to the textbooks. Only the important diagrams for the chapters would be chosen as making animated graphics was a tedious process involving software such as Adobe Photoshop and Macromedia Flash. The details of the process will be discussed in the next chapter, Chapter 4: Design Construction and Implementation.
3.5.4 Practice exercises
One of the main requirements for this project was to implement interactive problem solving questions into the webpage. There were two types of interactive tutorials for this project. The first was the interactive practice exercises. There was at least one practice question for each chapter. These practice exercises were basically short technical questions divided into two to three parts. Each part consists of a different type of question ranging from multiple choices, fill in the blanks, true or false to drag and drop. These questions involved calculations and understanding of the concepts related to the chapter topics.
For each part of the short exercise, the user would be given two tries to answer the question. Failing in giving the correct answer the first time round, a hint would be shown once the âcheck answerâ button was pressed. The user could then reset his or her answer and try again. If again the user keyed in a wrong answer after the second try, the word âIncorrectâ as well as the right answer would be shown. However if the user types the correct answer in either of the two tries, a simple âCorrectâ will be flashed.
These short practice exercises were done using the Macromedia Flash templates. These templates provided the author with the option of six types of questions.
Using the âTrue or Falseâ template in figure 3.18 on page 25 as an example, it shows that each template appeared as one piece. All the components were clumped as a whole, highlighted by the blue outline.
By selecting the âBreak Apartâ option from âModifyâ pull down menu, the author was able to separate the different components individually.
As can be seen from figure 3.20 on page 27, instead of having all the components boxed up by one blue outline, now each component is highlighted individually. This way, it was easier to change or edit each individual component and set the parameters.
⢠True or False
This was the easiest type of question to set as it basically gave the user only two options. Itâs the least complicated type of question and did not give the author a variety of options he could set. The author had shown the template for this option previously in figure 3.20 on page 27. Now the author will show the component parameters which was used to set each question. There were two options that needed to be set from the component parameters window. The first one was the âInteractionâ window. In this option window, the author recorded the actual question he wanted to display in the âQuestionâ textbox. The author then sets whether true or false was the correct answer by selecting the radio button on the right.
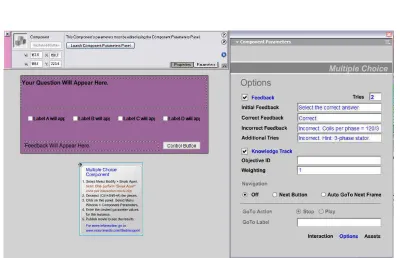
The next set of parameters that needed to be set from the component window was the âOptionsâ setting. Here the author sets the instructions to be displayed to the user in the âInitial Feedbackâ row space. The âCorrect Feedbackâ and âIncorrect Feedbackâ row spaces represent the text that would be displayed if the user keyed in a correct or incorrect answer respectively. The âWeightageâ row space represents the marks allocated by the author for that particular question and this would be the same for all templates. At the bottom of the window, the author had additional options of setting the navigation or any action scripts if any was needed. These two options setting from the component parameters window would be similar for all the six templates.
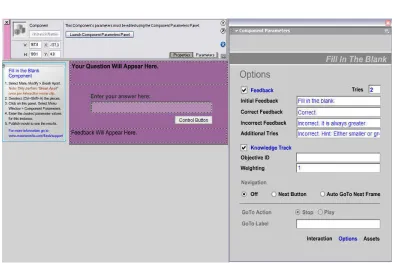
⢠Fill in the blank
This type of question required the user to type in the answer. The author could set a number of correct words or phrases that would be matched to the answer given by the user. So as long as the user keys in a word or phrase that matches those set by the author, his or her answer would be considered correct. However, the author also had the authority to set his answers to âexact matchâ or âcase sensitiveâ. Exact match meaning that the words or phrases keyed in by the user had to be exactly the same as those set by the author and case sensitive of course meant caps on or off.
The figure 3.24 on page 31 shows the interaction setting for the âFill in the Blankâ in the component parameters window. The actual question to be displayed would be typed in the âQuestionâ textbox. The âResponsesâ row spaces are the answers set by the author as the correct and acceptable answers. These answers were then ticked in the checkboxes on the left. The âCase Sensitiveâ and âExact Matchâ options could be selected by ticking the respective checkboxes.
The figure 3.25 on page 32 shows the options settings for âFill in the Blankâ template. The âTriesâ option sets the number of tries that the author wanted to give the user for that question. This âTriesâ setting would be the same for the rest of the templates as would all the other options available as previously explained on page 29. The âAdditional Triesâ would come into action if the author sets the tries to be more than one.
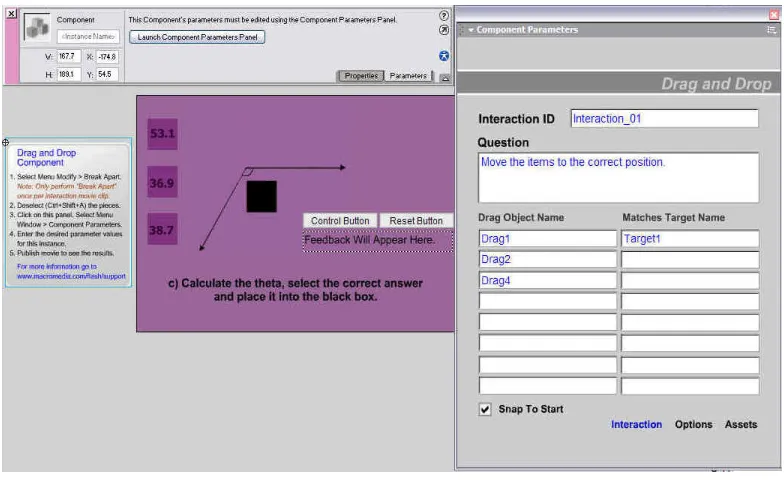
⢠Drag and Drop
Basically the user needs to drag a boxed-up graphic and drag it to the appropriate blank space. The number of graphics and blank spaces could be or not equal. However, the shape and dimensions must be the same as the graphics had to be fitted into the blank spaces.
The figure 3.27 on page 34 shows the interaction setting for the âDrag and Dropâ in the component parameters window. The main difference here was the âDrag Object Nameâ and the âMatches Target Nameâ options. Here the author sets how many objects and matching targets he wanted to display and also set the names for them. These objects and targets are the boxes in figure 3.26 on page 33.
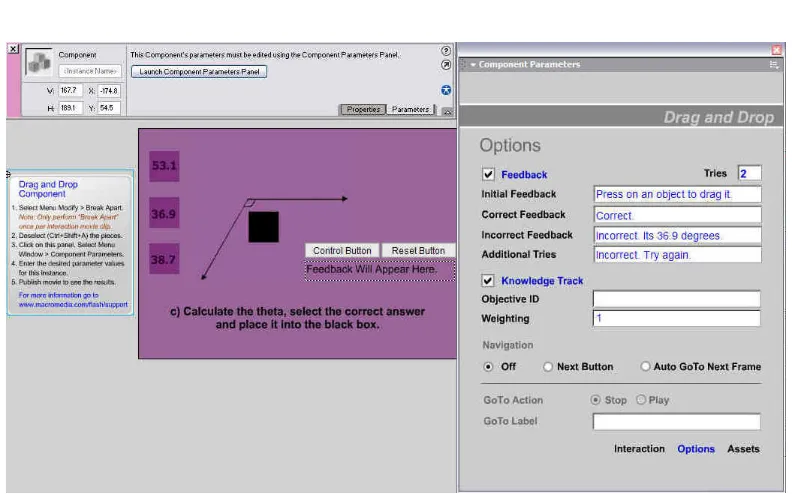
The figure 3.28 on page 35 shows the options settings for âDrag and Dropâ template.
⢠Hot Objects
A hot object question consists of a few objects or diagrams, usually between four to six objects. The user would then choose one of these objects as his correct answer.
The figure 3.30 on page 37 shows the interaction setting for the âHot Objectsâ in the component parameters window. The âHot Object Instance Nameâ gives the author the option of how many objects or diagrams he wanted to display as options for the user. The author then chooses and sets the correct answer by ticking the checkbox for that particular object name.
The figure 3.31 on page 38 shows the options settings for âHot Objectsâ template.
⢠Hot Spot
A hot spot question is similar to that of the hot object with the exception that it only consists of one diagram or object. This diagram or object is then dissected into different parts. The user would then need to select a part of the diagram or object as his or her answer.
The figure 3.33 on page 40 shows the interaction setting for the âHot Spotâ in the component parameters window. Here the âHot Object Instance Nameâ each represents a part or portion of the object or diagram displayed. The correct part would then be set by ticking the respective checkbox.
The figure 3.34 on page 41 shows the options settings for âHot Spotâ template.
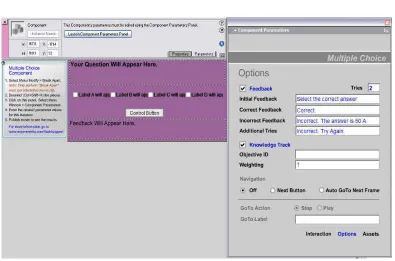
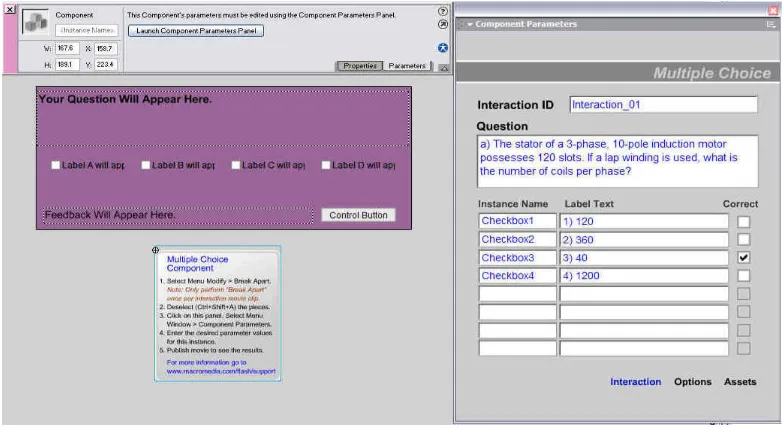
⢠Multiple Choice
The multiple choice question could be displayed using either checkboxes or radio buttons. The author could set as many options to the user as he desired. In addition to this, the author could also set multiple correct answers instead of just one correct answer. These options were helpful in order to set a variety of multiple choice questions.
The figure 3.36 on page 43 shows the interaction setting for the âMultiple Choiceâ in the component parameters window. The âInstance Nameâ sets how many options the author wants to give to the user while the âLabel Textâ sets the display names for the options. The correct answer will then be set by ticking the respective checkbox. The author also had the option of setting more than one correct answer for the multiple choice questions.
The figure 3.37 on page 44 shows the options settings for âMultiple Choiceâ template.
Figure 3.37: Interaction options in the âMultiple Choiceâ component parameters window.
3.5.5 Online quiz
The second type of interactive tutorial was the online quizzes. These online quizzes were implemented after the summarization of the whole chapter and act as an indication as the end of each chapter. The type of questions for the online quizzes was similar to those of the practice exercises. Here, the flash templates were again used with the same component parameters setting.
The main differences between the online quiz and the practice exercises were that firstly, the online quizzes were set as marked tutorial. Each question for the online quiz of each chapter had a mark weightage. The author again, was given the option of setting how much mark he wanted to set for each question. For simplicity purposes, the author had set each question amounting to one mark each. This mark for each question was crucial because at the end of the quiz, all the marks for the questions would be accumulated and displayed to the user. The number of correct and incorrect answers, as well the percentage of correct answer for the quiz would be displayed. These marked quizzes were important as it gave the user a gauge of how much he or she was prepared for that particular chapter topic.
The other difference between the online quizzes and practice exercises was that for the practice exercises, the user had two tries to submit his or her answer for each part, whereas for the quizzes, the user only had one try for each question. This was because the quizzes was a marked tutorial and each question had only one part, not broken down into two to three parts as previously done for the practice exercises.
and also add on the marks from page to page. These dynamic buttons will be explained in the next section.
3.5.6 Dynamic buttons
These dynamic buttons were necessary in the construction of the online quizzes. These buttons provided links between the pages and also act as a calculator, adding the marks for all the questions. Unlike the quiz questions that used flash templates, these buttons need added flash programming to make them function. The flash programmings were only a few lines of coding, basically made up of action scripts from the macromedia flash programming tool.
3.5.7 Structure flow
Figure 3.38: Structure flowchart.
Structure Flow
Webpage layout of 3 nested frames consisting of page title at the top, dropdown menu on the left and main
preview window on the right
Introduction page
Other than the dropdown menu, the user can also use the next and previous buttons located at the bottom ofeach page.
Chapter 1: 3-Phase Analysis Introduction page Chapter 1: 3-Phase Analysis Chapter 2: Transformers Chapter 3: Induction Motor
Chapter 2: Transformers
Chapter 3: Induction Motor
Dropdown Pg by Pg
3.6 Project Timeline
Planning the milestones and objectives was an important task. This was to ensure that the project could be managed and accomplished within the duration available. This was done to oversee the progress of the whole project such as meeting the deadlines, the activities that needs specific attention and also to serve as a guideline for estimating the approximate time frame allowed for each task. On the whole, the timeline was scheduled according to the Project Timeline in table 3.1on page 49, which was broken down into months. This scheduled timeline was for the whole project which for both ENG4111 and ENG4112.
Timelines and Activities
Jan
Feb
Mar
⦠Webpage concept
⦠Project Proposal : 15.03.2006 ⦠Project Specification : 27.03.2006
Apr ⦠Webpage design
May
⦠Webpage design ⦠Webpage layout
⦠Project Appreciation : 22.05.2006
Jun ⦠Layout
⦠Progress Assessment : 19.06.2006
Jul ⦠Collection of data/materials
⦠Implementation of online tutorials
Aug
⦠Inclusion of data
⦠Implementation of online tutorials
⦠Extended Abstract : 25.08.2006
Sep ⦠Addition of images/graphics
⦠Partial Draft Project Dissertation : 22.09.2006
Oct ⦠Implementation of online tutorials
⦠Residential School
Nov
⦠Final Draft Project Dissertation : 02.11.2006 ⦠Compilation and Documentation for Project
Dissertation : 02.11.2006
Dec ⦠Final Project Dissertation : 20.12.2006
Table 3.1: Timeline table.
S1
S2
3.8 Chapter Summary
Chapter 4
Design Construction and Implementation
4.1 Construction of Webpage
After researching and planning had been done, the next logical step was the construction of the webpage itself. It took a few weeks for the author to familiarize himself with the Macromedia Dreamweaver setup. The design was then finalized and having decided on the features that needed implementation, the author will now take the reader on a step by step report of how each feature was implemented.
4.2 Design
4.2.1 Background
Having a uniformed background theme was important because it showed that all the pages were standardized and belonged to one main webpage. Background usually comes in two options, either a picture background or a colour background and again, they could either be good or bad. There are those backgrounds that are so loud and so busy and cause so many distractions. This is obviously bad because if the user are unable or find it difficult to read the pages, then they will not be staying long. Backgrounds can either demonstrate the author's savvy or bad taste. The author decided to go for simple yet an eye-catching background. By applying the simple principle of dark backgrounds with light-coloured wordings or the other way around, the author had found a combination that was simple yet still attractive. The author had decided on a light coloured background, with the hexadecimal code of "#996699" and black fonts â#000000â, as he wanted to make it look professional. This combination will be used throughout the webpage.
Figure 4.2: Background and fonts example.
The coding for the background colour and font colour were inserted in the âbodyâ section of the html coding, as seen in figure 4.3 on page 53.
4.2.2 Frames
The next feature that was decided was the usage of nested frames. Frames are when your window is divided into two or more separate areas that are independent of each other. Sometimes the frames are obvious and other times the frames are invisible. Gratuitous use of frames is not recommended, especially when implementing them without a specific purpose behind their use. As some internet users hate this element, therefore the type of frames that the author were to use had to be chosen carefully so as they would not made to look redundant.
Insertion of frames into a webpage design could be difficult and might end up having disastrous results because they take a longer time to load than a single page and they are very prone to complications. These complications stem from both poor programming and poor navigation. Poor programming happens when the HTML author does not âtargetâ their frames correctly and the visitor ends up in "nested frames". That's where one frame, usually the menu frame, shows up twice or more times in your window. Poor navigation results from an internet user not knowing how to get out of a frame or how to move forwards or backwards within frames. Another problem with frames is the major variance between their appearance on different computers, different browsers and at different window widths. This is due to the strict tolerances that browsers have for displaying such things as scroll bars and the position of the elements that are found within the frame itself.
1. The author made sure he did not use relative widths (e.g. 40%) for left or top frames but instead use absolute widths (e.g. 250 pixels).
2. The author made sure he left plenty of room for "shifting" which may occur on some of the usersâ computers.
3. The author always specified a âtargetâ of "_top" or âvâ for links that go off the website. That way the users won't get stuck in one of the frames.
4. And lastly, as not everyone has the same resolution, thus the <noframes> tag was inserted so to maintain the aspect ration of the frames.
Macromedia Dreamweaver gave the author thirteen types of nested frames and from this thirteen, the author had decided on one the he felt comfortable with and in his opinion was the most appropriate one. The authorâs choice was a âtop and nested left framesâ.
Figure 4.4: Thirteen types of nested frames.
The top and nested left frame selected for the layout
Figure 4.5: Top and nested left frames.
The nested frames after the addition of background colour.
The figure 4.7 on page 57 shows the nested frames after the addition of the page titles and the dropdown menu.
1. The top frame was named âtopFrameâ and saved as âtop.htmlâ. It was set to 80 pixels in height, no frameborder, no resize of borders, no scrolling and white border colour or hexadecimal code of â#FFFFFFâ.
2. The left side of the frame that hosts the dropdown menu was named âsideFrameâ and saved asâside.htmlâ. It was set to 194 pixels in width, no scrolling and no resize.
3. The right frame was named âmainframeâ. It was not set to any size dimension as it will take on whatever remainder of the total pixels. This was the main window where all the links were targeted to. This was the only frame that would change and refresh every time a new page is selected.
The nested frames were not the final design for the layout. The nested frame was then incorporated into a main âIFrameâ. An iframe is a floating frame that box up its contents. The iframe was set to 900 pixels in width and 535 pixels in height. The margin width and margin height were both set to 5 pixels, aligned to middle, set to no scrolling and a frame border of 25 pixels. This iframe would be the final representation of the webpage layout. Figure 4.8 on page 58 shows a blank iframe before the contents were inserted.
The figure 4.9 on page 59 shows an enhanced updated version of the iframe with a table border and background colour for its contents. The table border was set to 20 pixels, with cellspacing and cellpadding of 2 pixels each, a dark border colour with a hexadecimal code of â#CCCCCCâ and a light border colour with a hexadecimal code of â#FFFFFFâ. The âcellspacingâ and âcellpaddingâ refers to the margin spaces around the table.
The fig 4.10 on page 60 shows the final layout of the iframe with the nested frames incorporated into it. This was the final layout that would be used for the webpage design.
4.2.3 Tables
Tables were basically used to box up and display the main important points or formulas in the page. Tables were used as attention seekers so users would know the main points that they needed to take note of for that particular page or chapter. The author could set how many rows and columns he wanted as well as the dimensions of the tables. These would all depend on the amount of data to be inserted.
Figure 4.11: Table properties.
\
4.2.4 Dynamic buttons
The layout of the webpage had to be simple and also user friendly. The first part had already been covered. As for easy navigation, the author implemented two features. The first one was the dynamic buttons. These were flash rollover buttons chosen from the âMediaâ panel. There were many different types of samples buttons to choose from. The chosen button was picked because it matched the colour scheme of the whole webpage layout. At least one button was placed in each page. The buttons were either the previous button or the next button or both. These buttons were for the users to go to the previous or next pages.
Figure 4.14: Dynamic button options.
4.2.5 Dropdown menu
The other feature used for navigation was the dynamic XML dropdown menu. An XML file is a dynamic tool because it provided animation as well as interactive features. The dropdown menu was to provide a better navigation as it gave the user the option of directly selecting the desired page, without having to go through each page using the dynamic buttons. The dropdown menu was done by embedding or inserting a flash menu template. The options for the dropdown menu were then added by using an XML file. This XML sets the options such as the menu topics and sub-menus. Another advantage of using this feature was also that the links changes colour as the pointer of the mouse hovers above the selected links. This way the user will know exactly if he or she is selecting the correct page that is to