BEA WebLogic
Server
™
8
FOR
by Jeff Heaton
BEA WebLogic
Server
™
8
FOR
BEA WebLogic Server™8 For Dummies®
Published by
Wiley Publishing, Inc.
909 Third Avenue New York, NY 10022
www.wiley.com
Copyright © 2003 by Wiley Publishing, Inc., Indianapolis, Indiana Published by Wiley Publishing, Inc., Indianapolis, Indiana Published simultaneously in Canada
No part of this publication may be reproduced, stored in a retrieval system or transmitted in any form or by any means, electronic, mechanical, photocopying, recording, scanning or otherwise, except as permitted under Sections 107 or 108 of the 1976 United States Copyright Act, without either the prior written permission of the Publisher, or authorization through payment of the appropriate per-copy fee to the Copyright Clearance Center, 222 Rosewood Drive, Danvers, MA 01923, (978) 750-8400, fax (978) 646-8700. Requests to the Publisher for permission should be addressed to the Legal Department, Wiley Publishing, Inc., 10475 Crosspoint Blvd., Indianapolis, IN 46256, (317) 572-3447, fax (317) 572-4447, e-mail:
Trademarks:Wiley, the Wiley Publishing logo, For Dummies, the Dummies Man logo, A Reference for the Rest of Us!, The Dummies Way, Dummies Daily, The Fun and Easy Way, Dummies.com and related trade dress are trademarks or registered trademarks of Wiley Publishing, Inc., in the United States and other countries, and may not be used without written permission. BEA WebLogic Server is a trademark of BEA Systems, Inc. All other trademarks are the property of their respective owners. Wiley Publishing, Inc., is not associated with any product or vendor mentioned in this book.
LIMIT OF LIABILITY/DISCLAIMER OF WARRANTY: WHILE THE PUBLISHER AND AUTHOR HAVE USED THEIR BEST EFFORTS IN PREPARING THIS BOOK, THEY MAKE NO REPRESENTATIONS OR WAR-RANTIES WITH RESPECT TO THE ACCURACY OR COMPLETENESS OF THE CONTENTS OF THIS BOOK AND SPECIFICALLY DISCLAIM ANY IMPLIED WARRANTIES OF MERCHANTABILITY OR FITNESS FOR A PARTICULAR PURPOSE. NO WARRANTY MAY BE CREATED OR EXTENDED BY SALES REPRESENTA-TIVES OR WRITTEN SALES MATERIALS. THE ADVICE AND STRATEGIES CONTAINED HEREIN MAY NOT BE SUITABLE FOR YOUR SITUATION. YOU SHOULD CONSULT WITH A PROFESSIONAL WHERE APPRO-PRIATE. NEITHER THE PUBLISHER NOR AUTHOR SHALL BE LIABLE FOR ANY LOSS OF PROFIT OR ANY OTHER COMMERCIAL DAMAGES, INCLUDING BUT NOT LIMITED TO SPECIAL, INCIDENTAL, CON-SEQUENTIAL, OR OTHER DAMAGES.
For general information on our other products and services or to obtain technical support, please contact our Customer Care Department within the U.S. at 800-762-2974, outside the U.S. at 317-572-3993, or fax 317-572-4002.
Wiley also publishes its books in a variety of electronic formats. Some content that appears in print may not be available in electronic books.
Library of Congress Control Number: 2003101896 ISBN: 0-7645-2472-0
Manufactured in the United States of America 10 9 8 7 6 5 4 3 2 1
About the Author
Dedication
This book is dedicated to my mother, Mary Heaton, for always supporting me in everything I do. I love you very much and am very grateful for all you have done for me over the years.
Author’s Acknowledgments
There are many people who were helpful in the creation of this book. I owe a great deal to Susan Pink for all her hard work editing this book and making sure that my ideas stayed on track and were easy to follow. I would also like to thank Allen Wyatt for helping construct the flow of many of the chapters in this book and adding additional material. Will Iverson did a great job as technical editor, making sure everything was just right and suggesting additional material as needed.
Everyone at Wiley was easy to work with, and I appreciate your support. I would like to thank Melody Layne for working out the initial details of this book and making it a reality. Melody was also helpful in getting information about version 8.1 of WebLogic.
Publisher’s Acknowledgments
We’re proud of this book; please send us your comments through our online registration form located at www.dummies.com/register/.
Some of the people who helped bring this book to market include the following:
Acquisitions, Editorial, and Media Development
Project Editor: Susan Pink
Acquisitions Editor: Melody Layne
Technical Development:Allen Wyatt, Discovery Computing Inc.
Technical Editor: Will Iverson
Editorial Manager: Carol Sheehan
Media Development Supervisor:Richard Graves
Editorial Assistant: Amanda Foxworth
Cartoons:Rich Tennant
(www.the5thwave.com)
Production
Project Coordinator: Nancee Reeves
Layout and Graphics: Seth Conley, Kelly Emkow, Carrie Foster, Lauren Goddard, Tiffany Muth
Special Art:
Proofreaders: David Faust, Andy Hollandbeck, Angel Perez, Carl William Pierce,
Charles Spencer, Brian Walls, TECHBOOKS Production Services
Indexer: TECHBOOKS Production Services
Special Help: Laura Bowman
Publishing and Editorial for Technology Dummies
Richard Swadley,Vice President and Executive Group Publisher
Andy Cummings,Vice President and Publisher
Mary C. Corder,Editorial Director
Publishing for Consumer Dummies
Diane Graves Steele,Vice President and Publisher
Joyce Pepple,Acquisitions Director
Composition Services
Gerry Fahey,Vice President of Production Services
Contents at a Glance
Introduction ...1
Part I: Installing and Configuring WebLogic ...7
Chapter 1: Introducing Application Servers ...9
Chapter 2: Installing WebLogic Server ...17
Chapter 3: Gentlemen, Start Your WebLogic Engines ...35
Chapter 4: Configuring and Administering WebLogic ...45
Part II: Understanding WebLogic Components ...67
Chapter 5: Creating Web Applications ...69
Chapter 6: Using EJBs ...87
Chapter 7: Using Entity Beans ...107
Chapter 8: Stepping Up to Enterprise Applications ...139
Part III: Employing Web Services ...153
Chapter 9: Building and Deploying Web Services ...155
Chapter 10: Accessing Web Services ...173
Chapter 11: Using WebLogic Workshop ...183
Part IV: The Forgotten Services ...201
Chapter 12: Accessing Data with JDBC ...203
Chapter 13: Finding EJBs with JNDI ...219
Chapter 14: Using Transactions with JTA ...229
Chapter 15: Sending Messages Between Programs with JMS ...239
Part V: Big-Time, Heavy-Duty Server Configuration ....269
Chapter 16: Working with Server Clusters ...271
Chapter 17: Tuning WebLogic Server ...289
Chapter 18: Implementing Security ...301
Part VI: The Part of Tens ...319
Chapter 19: Ten Best Practices for Developers ...321
Chapter 20: Ten Tips for Administrators ...327
Chapter 21: Ten Tasks Before Going Live ...333
Table of Contents
Introduction...1
About This Book ...1
Conventions Used in This Book ...1
What You Don’t Have to Read ...2
Foolish Assumptions ...3
How This Book Is Organized ...3
Part I: Installing and Configuring WebLogic ...3
Part II: Understanding WebLogic Components ...3
Part III: Employing Web Services ...4
Part IV: The Forgotten Services ...4
Part V: Big-Time, Heavy-Duty Server Configuration ...4
Part VI: The Part of Tens ...5
Icons Used in This Book ...5
Where to Go from Here ...5
Part I: Installing and Configuring WebLogic ...7
Chapter 1: Introducing Application Servers . . . .9
Application Server Basics ...9
Achieving reliability through redundancy ...10
Making applications scalable ...11
Improving modularity ...11
J2EE, Java’s Approach to Application Servers ...12
JavaServer Pages ...12
Enterprise JavaBeans ...12
Java Transaction Service ...13
Java Message Service ...13
Java Naming and Directory Interface ...13
Enterprise applications ...13
Major Features of WebLogic Server ...14
Platform support ...14
Web applications ...14
EJB support ...14
Database connectivity ...15
Web services ...15
Clustering ...16
Chapter 2: Installing WebLogic Server . . . .17
Installation Overview ...17
System requirements ...18
Getting WebLogic ...19
Understanding licensing ...20
Using the GUI Mode Installer ...21
Using Configuration Wizard ...24
Using the Console Mode Installer ...26
Installing under UNIX ...27
Installing under Windows ...28
Using the Silent Mode Installer ...29
Creating a template file ...30
Invoking the silent mode installation program ...33
Chapter 3: Gentlemen, Start Your WebLogic Engines . . . .35
Writing a WebLogic Startup Script ...35
The standard startup script ...36
Constructing your own startup script ...37
Starting WebLogic from the Windows Start Menu ...39
Starting WebLogic Server Automatically ...40
Configuring WebLogic as a Windows service ...40
Running WebLogic as a UNIX daemon ...43
Chapter 4: Configuring and Administering WebLogic . . . .45
Understanding Domains, Clusters, Servers, and Machines ...46
Using Administration Console ...47
Logging on to Administration Console ...47
Using Administration Console ...48
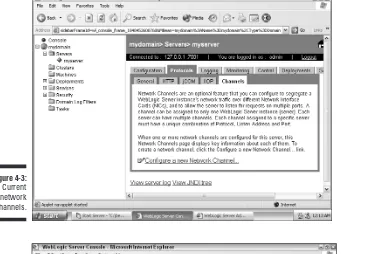
Defining Network Channels ...50
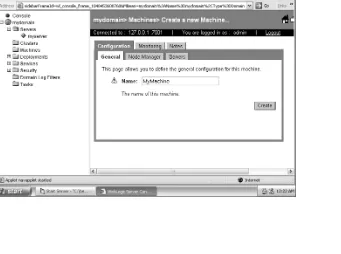
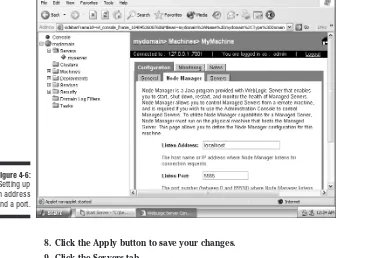
Introducing Node Manager ...53
Setting Up Node Manager ...54
Setting up the Node Manager hosts file ...54
Configuring SSL for Node Manager ...55
Configuring a control machine to use Node Manager ...56
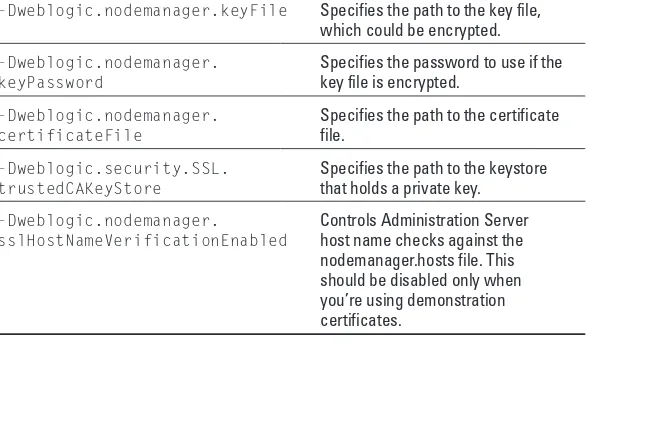
Configuring startup arguments for managed servers ...58
Starting Node Manager ...60
Starting Node Manager using start scripts ...60
Starting Node Manager as a Windows service ...61
Setting Node Manager environment variables ...61
Part II: Understanding WebLogic Components ...67
Chapter 5: Creating Web Applications . . . .69
Server Basics ...69
Setting Up a Web Application ...70
Creating your server ...71
Creating your web application ...71
Testing your web application ...73
Programming your web application ...74
Packaging your web application ...74
Deploying your web application ...75
Directory Structure for Your Web Application ...77
The Files in a Web Application ...78
Using JSP ...79
A quick look at servlets ...82
Using JSTL ...83
Chapter 6: Using EJBs . . . .87
Creating Stateless Session Beans ...88
Creating the remote interface ...88
Creating the home interface ...89
Creating the bean class ...90
Creating deployment descriptors ...91
Creating the client class ...93
Building the Stateless Session Bean EJB ...94
Deploying the Stateless Session EJB ...97
Testing the Stateless Session EJB ...98
Adding State ...99
Accessing Data with Entity Beans ...104
Configuring Message-Driven Beans ...105
Chapter 7: Using Entity Beans . . . .107
Understanding WebLogic Database Access ...107
Creating the connection pool ...109
Creating the data source ...109
Constructing a BMP Bean ...112
Constructing the bean interface ...112
Constructing the home interface ...112
Constructing the bean implementation ...113
Constructing the bean configuration files ...118
Compiling a BMP Bean ...120
Constructing a CMP Bean ...123
Constructing the value objects ...123
Constructing the local bean interfaces ...125
Constructing the remote bean interface ...126
Constructing the local home interfaces ...126
Constructing the remote home interface ...127
Constructing the abstract bean implementation ...128
Constructing the bean configuration files ...131
Compiling a CMP Bean ...137
Chapter 8: Stepping Up to Enterprise Applications . . . .139
Organizing Your Directories ...140
The structure of the WebLogic directory ...140
Examining the directory structure ...142
Creating Deployment Descriptors ...143
Understanding deployment descriptors ...144
Creating descriptors using tools ...145
Creating descriptors manually ...146
Packaging Your Enterprise Application ...149
Deploying Your Enterprise Application ...150
Part III: Employing Web Services ...153
Chapter 9: Building and Deploying Web Services . . . .155
Defining a Web Service ...156
Choosing and Building a Backend Component ...157
Building a Synchronous Web Service ...158
Working with a Java class backend component ...158
Working with a stateless session EJB backend component ...159
Building an Asynchronous Web Service ...161
Packaging Your Web Service ...162
Packaging a synchronous service ...162
Packaging an asynchronous service ...168
Deploying Your Web Service ...168
Chapter 10: Accessing Web Services . . . .173
Using a Static Client ...173
Understanding WSDL ...174
Generating the client stub ...175
Building the client application ...176
Running the client application ...179
Using a Dynamic Client ...180
Constructing the dynamic client ...180
Chapter 11: Using WebLogic Workshop . . . .183
Creating a Web Service ...183
Creating a Workshop application and a web service ...184
Adding methods to your web service ...185
Testing your web service ...189
Debugging Web Services ...193
Packaging and Deploying Web Services ...195
Directory locations ...195
Packaging a web service ...196
Packaging for a different host ...197
Deploying web services ...198
Part IV: The Forgotten Services ...201
Chapter 12: Accessing Data with JDBC . . . .203
Creating a Connection Pool ...203
Defining a Data Source ...206
Using JDBC with EJBs ...208
Obtaining the connection ...212
Closing the data source ...213
Executing an SQL statement ...214
Using prepared statements ...214
Submitting a query ...215
Monitoring JDBC ...216
Chapter 13: Finding EJBs with JNDI . . . .219
Understanding JNDI ...219
Understanding JNDI names ...220
JNDI as a universal naming service ...221
Implementing JNDI Using WebLogic ...222
Making WebLogic resources available through JNDI ...222
Enabling JNDI to access WebLogic objects ...225
Chapter 14: Using Transactions with JTA . . . .229
Understanding Transactions ...229
Two-phase commit ...230
When to use transactions ...231
When not to use transactions ...232
Using Transactions ...233
Importing packages ...233
Using JNDI to return an object reference ...234
Starting the transaction ...234
Updating the database ...235
Completing the transaction ...236
Chapter 15: Sending Messages Between Programs with JMS . . . .239
Creating a WebLogic Message Service ...240
Creating a connection factory ...241
Defining a backing store ...244
Defining destination keys ...246
Defining templates ...248
Creating a JMS server ...250
Creating queues and topics ...252
Accessing Your Message Service ...253
ConnectionFactory ...254
Connection ...254
Session ...255
Destination ...255
MessageProducer and MessageConsumer ...255
Message ...255
Creating a Point-to-Point JMS Client ...257
Creating the receiver ...258
Creating the sender ...260
Creating a Publish-and-Subscribe JMS Client ...263
Creating the subscriber ...263
Creating the publisher ...265
Part V: Big-Time, Heavy-Duty Server Configuration ....269
Chapter 16: Working with Server Clusters . . . .271
Understanding Clustering ...271
Performance through clustering ...272
Reliability through clustering ...273
Components of WebLogic Clustering ...273
Node Manager ...274
Clustered domain ...274
Clustered JDBC ...274
Load balancing ...275
Connection proxy ...275
Configuring WebLogic Clustering ...275
Installing WebLogic Server ...276
Creating a clustered domain ...276
Starting the WebLogic Server cluster ...283
Configuring Node Manager ...284
Configuring load balancing ...285
Configuring proxy plug-ins ...285
Chapter 17: Tuning WebLogic Server . . . .289
WebLogic Server Performance Packs ...289
Thread Settings ...291
Setting thread count ...291
Detecting stuck threads ...295
JDBC Performance Settings ...295
JDBC connection pools ...295
Caching prepared statements ...296
EJB Performance Settings ...297
Setting EJB pool size ...297
Allocating pool size for session and message beans ...297
Allocating pool size for anonymous entity beans ...298
Tuning initial beans in the free pool ...298
Setting EJB caching size ...298
Starting WebLogic Server with Performance Options ...299
Setting Your Java Compiler ...299
Chapter 18: Implementing Security . . . .301
Understanding WebLogic Security ...301
Secure Sockets Layer (SSL) ...301
Obtaining an identity ...303
Storing keys and certificates ...304
Enabling SSL on your server ...307
Introduction to Security Realms ...308
Users ...309
Groups ...311
Security roles ...314
Security policies ...316
Part VI: The Part of Tens ...319
Chapter 19: Ten Best Practices for Developers . . . .321
Keep Adequate Documentation ...321
Use Usenet ...322
Don’t Over-Engineer ...322
Set Up Development Environments ...323
Know What You’re Developing ...324
Understand the Tools ...324
Create Modular, Decoupled Systems ...324
Be Mindful of Security ...325
Test Your Software ...326
Manage Your Build Process ...326
Chapter 20: Ten Tips for Administrators . . . .327
Document Procedures ...327
Define a Service Level Agreement ...328
Set Up On-Call Procedures ...328
Plan for Growth ...329
Monitor Your Servers ...329
Back Up Your Servers ...330
Keep Your Systems Secure ...330
Understand Log Files ...330
Test with Clusters ...331
Keep WebLogic Up-to-Date ...332
Chapter 21: Ten Tasks Before Going Live . . . .333
Test Your System ...333
Conduct a Stress Test ...334
Set Up a Parallel Environment ...335
Perform Fault Testing ...335
Set Up a Bug Tracking System ...335
Formulate a Disaster Recovery Plan ...336
Choose Your Date ...337
Keep the Lines of Communication Open ...337
Be Ready for Anything ...337
Be Ready with Support ...337
Introduction
W
elcome to BEA WebLogic Server 8 For Dummies.Whether you are an administrator, a developer, a manager, or all of the above, you will find something in this book to make your job easier.WebLogic is the most widely used application server on the market today. You can use WebLogic in large or small projects and to develop both tradi-tional client-server as well as web-based applications.
About This Book
This book gives you a broad understanding of BEA WebLogic Server. The main audience consists of developers and administrators, but anyone involved in a WebLogic project will benefit from reading this book. Managers can gain an overview of the components that make up their system. Quality assurance personnel can benefit from the same understanding.
For developers, this book shows quick examples to get you up and running in many of the technologies supported by WebLogic. Rather than give you extensive application examples, I focus on short, easy-to-follow examples than can become the starting point for something more complex. For admin-istrators, I step you through many common WebLogic tasks and the configu-ration settings you should use.
Finally, everyone should have an understanding of how the components of a web application fit together and what WebLogic can do for your application. This book gives you that viewpoint too.
Conventions Used in This Book
Throughout this book, several typefaces are used. Here’s a brief explanation:
When an important term is introduced, it appears in italics.
All URLs in the book appear in computer font. For example:
The code examples appear in computer fontas well. For instance:
int i=0;
And when a variable or command appears in the text, it’s in computer fonttoo. For example: “The JAVA_OPTIONSvariable allows you to pass additional parameters to the Java virtual machine.”
Directories appear in computer font. You’ll see something like this: “You should switch to the weblogic\bindirectory.”
Sometimes, you’ll see italic computer font, such as
c:\weblogic\bin> install -name yourWebLogicServer
This means you should type everything as written, except you should replace yourWebLogicServerwith — you guessed it — the name of your server.
When you should choose menu options, each option is separated by an arrow, like this: Start➪All Programs➪Accessories➪Command Prompt.
Code listings contain complete Java source files or configuration files. A code listing always has a title, such as “Listing 1-1: Count to Ten.”
Code snippets are small sections of source code that do not make up a complete source file on their own.
What You Don’t Have to Read
For Dummiesbooks are designed so that you can read any chapter you like, in any order you want. This makes it easier to skip chapters that contain informa-tion you’re already familiar with or simply don’t need. In addiinforma-tion, if you
Already have a WebLogic server up and running, you can skip Part I.
Are familiar with EJB development or aren’t planning to use EJBs, you can skip Part II.
Are not using web services, you can skip Part III.
Are developing a non-web application, you can skip Part IV.
Are just starting out with WebLogic, don’t concern yourself too much with clustering, security, and performance tuning. These Part V topics might be useful later, though.
Foolish Assumptions
You should have at least a passing knowledge of the Java programming lan-guage, but you don’t need to be an expert in Java. You should be familiar with the following concepts:
Entering Java programs
Compiling and executing Java programs
Using classes, methods, and variables
You should also have a basic familiarity with the Internet, including the use of web browsers and downloading software from web sites.
You should also have some knowledge of SQL to understand how WebLogic accesses external data, which is stored in databases. It is not necessary for you to be an SQL expert, but you should be familiar with basic SELECT,
INSERT, UPDATE, and DELETEstatements.
How This Book Is Organized
BEA WebLogic Server 8 For Dummies has six parts. As you proceed through the book, each part increases in complexity. Each chapter covers a specific topic and provides code examples, explanations, and sample projects for you to complete. As you complete each chapter, you will have completed one or more projects that demonstrate the main ideas discussed in that chapter.
Part I: Installing and Configuring
WebLogic
I begin by showing you how to install WebLogic. If you need no special options, installing WebLogic can be as easy as installing any other Windows application. If your installation has special needs, it can be a bit trickier. I show you a standard installation and describe the details of a more complex installation. After you find out how to install WebLogic, you discover how to customize it to meet your needs.
Part II: Understanding WebLogic
Components
Creating web applications is perhaps the most common use for WebLogic. In Part II, you find out about some of the components that make up a web appli-cation. One of the primary components is Enterprise JavaBeans (EJB). I show you how to construct various types of EJBs and describe their differences.
Part III: Employing Web Services
Web services work much like any Java object that contains a set of reusable methods. The main difference is that a web service allows other programs to call these methods through the Internet. Web services are usually accessed using the simple object access protocol (SOAP), which means different sys-tems can communicate. An object hosted on a Windows computer could be accessed by a Macintosh, for example. In this part, you create a web service using WebLogic. You also find out how to access your own web services and those provided by third parties.
Part IV: The Forgotten Services
A number of services run behind the scenes, so they’re not noticed in a typical web application. These services take care of binding the entire application together and providing access to the underlying databases. For example, Java Database Connectivity (JDBC) allows your web application to access databases, Java Message Service (JMS) allows programs to exchange mes-sages, and Java Naming and Directory Interface (JNDI) allows named resources to be located. In Part IV, you discover the ins and outs of all these “behind the scenes” services.
Part V: Big-Time, Heavy-Duty
Server Configuration
Part VI: The Part of Tens
In Part VI, you find out about ten best practices that are a result of my experi-ence with WebLogic and web development in general. I also provide tips for administrators and general tips to heed before going live.
Icons Used in This Book
This icon signals a tip that I think you might find useful. These tips are pro-vided to jumpstart your knowledge of WebLogic and save you from having to go through a lot of trial and error.
This icon lets you know that the information you’re about to read is some-thing that’s often overlooked but should be remembered. For example, when you’re setting a configuration option, doing so may have an unintended side effect. The remember icon will alert you to this.
Technical stuff is important, and you may find it interesting. But understand-ing somethunderstand-ing flagged with this icon is not necessary to accomplishunderstand-ing a job.
This icon means what it says. Pay attention to the common pitfalls or errors described. These warnings are issues that I have run into myself. By heeding these warnings, you can save yourself the time that I spent learning these issues.
Where to Go from Here
This book will give you a solid introduction to WebLogic. This will definitely get you up and running with a web application. However, entire books are dedi-cated to many of the topics that are covered here in a single chapter. In particu-lar, you may want to check out books on some of these topics: EJB, JSP, JSTL, JMS, JDBC, and Java. You can find a lot of information about WebLogic on the web. Visit the WebLogic documentation site at http://e-docs.bea.comand the Sun site at http://java.sun.com.
Part I
Installing and
Configuring
In this part . . .
Chapter 1
Introducing Application Servers
In This Chapter
Understanding the role of application servers
Meeting the J2EE family of technologies
Outlining the major features of WebLogic
I
n the most general sense, a serveris a program that provides information to a client that requests that information. Sometimes a server is a computer used to centralize resources so that they can be shared by a number of differ-ent users. For instance, file servers cdiffer-entralize file storage, database servers centralize data storage, and web servers centralize the distribution of web con-tent. In a similar vein, an application server centralizes key programming tasks. Doing so has many advantages, as you will discover.In this chapter, you find out about application servers, in particular BEA’s WebLogic Server. In a recent Gartner study, BEA WebLogic Server had 34 per-cent of the application server market share — the largest market share of any single vendor. BEA Systems is at the forefront of market developments and support of new standards.
WebLogic is not the only application server on the market. WebLogic’s main competitors are IBM’s WebSphere and JBoss, an open-source applica-tion server released under the LGPL license. In addiapplica-tion to these two Java-based application servers, WebLogic faces non-Java competition, mainly from the growing Microsoft .NET family of products.
Application Server Basics
A machine hosting and executing an EJB object is called an EJB application server. WebLogic, as an EJB application server, also acts as a container for EJBs. A container provides a management system for EJB objects. An efficient container removes the need for users and developers (to a certain extent) to be concerned about exactly how an object will be used. Put another way, an EJB application server provides APIs and interfaces, and an EJB is like a plug-in that provides busplug-iness logic for a specific application. As a developer, you’re writing modules (EJBs) that are dropped into the application server, which then loads and runs the EJBs when needed.
Servers work closely with clients. A clientrequests information from a server or requests that a server do something. The server, acting on the request, sends the requested information to the client or does what it is asked to do. BEA WebLogic Server, as an EJB application server, interacts with clients in a similar manner. The machine that requests WebLogic to run an EJB program is the client. This client program can be a stand-alone Java program or another server. (Often web servers are the clients for the services of EJBs.) EJBs allow a busy web server to focus on what it was designed to do: serve web pages. The web server calls upon EJBs, which reside on an application server, to perform business-specific tasks, such as retrieving data from a database. This division of labor is the key reason to use an application server. Dividing the task between the client and the application server results in three imme-diate advantages:
Reliability
Scalability
Modularity
Achieving reliability through redundancy
Making applications scalable
As more and more clients make requests of an application server, more and more demands are placed on that server. As the overall demands become greater, the capability of the server to quickly fulfill each individual request decreases. One solution to this problem is to add more horsepower to the machine used to run the application server — perhaps more memory, a faster hard drive, or even a faster CPU. A better solution, however, is to add another server, clustering it with the existing server. Now the deluge of client requests can be serviced by two machines acting as one. Need more power? Add a third, fourth, or fifth machine. This is the essence of scalability.
As requests for services come in from the clients, the cluster automatically dispatches these requests to the least busy of the application servers. This allows you to increase the capacity of your application by simply adding additional application servers rather than going through the costly process of upgrading a production server. As a bonus, the additional servers also increase the reliability of your system.
Improving modularity
Modularity has long been one of the chief design goals of computer program-ming. Modular program designbreaks the program into smaller units, or mod-ules, that are developed separately. Often these modules can be reused across several applications. Object oriented programming (OOP) was created to facil-itate the creation of modular programs, among other design goals.
One of the most fundamental ways of making a program modular is to separate presentation logic— the part of the program that interacts with the user — from business logic— the part of the program that makes decisions and performs calculations. Presentation logic should be housed in the web server, because the web server is responsible for transmitting the HTML that will be presented to the user. Business logic should be housed in the applica-tion server so that it can be reused by any web pages that may need it. The same business logic is often needed across many web pages. For example, the business logic to update inventory would be reused on any page that affects inventory.
An application server enables this separation. Business logic is placed in EJBs. The application server executes the EJBs, and the results are sent to the presentation program running on the web server.
J2EE, Java’s Approach to
Application Servers
Java 2 Platform, Enterprise Edition (J2EE)contains additions to the Java envi-ronment that Sun Microsystems created to facilitate such enterprise con-cepts as application servers. Sun has defined a specific way in which to build application servers for Java. One advantage to this approach is that content you develop for WebLogic Server can be used also with other J2EE applica-tion servers. In other words, you can migrate the content to another J2EE application server, if needed.
J2EE is not just one technology, but rather a collection of technologies. Sun defines standards embodied as J2EE, which other vendors implement. For example, WebLogic implements the following J2EE components:
JavaServer Pages (JSP)
Enterprise JavaBeans (EJB)
Java Transaction Service (JTS)
Java Message Service (JMS)
Java Naming and Directory Interface (JNDI)
In other chapters, you find out more about these components of J2EE. In this section, I briefly review the function of each of these to give you an overview of how they fit together.
JavaServer Pages
JavaServer Pages(JSP) allow you to embed Java code directly into HTML-like documents. JSP has access to nearly all the core features of the Java pro-gramming language, except you’re returning only streams back to the user’s browser. This allows you to construct complex applications using only JSP. However, just because you can construct complex JSP-based applications does not mean that you should. JSP is best restricted to presentation logic, with more complex business logic delegated to EJBs.
Enterprise JavaBeans
consists of JSP. EJB coordinates access with the database and shields higher levels, such as JSP, from the need to directly access the database. In this way, if you were to change database servers or the format of your database, all code related to data access would be in one location.
Java Transaction Service
Java Transaction Service (JTS)is a transaction manager that allows requests to be segmented into transactions. These transactions succeed or fail as a whole. This prevents partial transactions from persisting if only a part of the transaction is successful.
Java Message Service
The Java Message Service (JMS)API was developed to allow Java applications to be message driven. A message-compatible EJB can receive and generate messages. These messages can contain any data needed by the program. Messaging is asynchronous, so considerable time can elapse before a response message is received, if at all. JMS also allows messages to be saved to a mes-sage store, such as a file or a database.
Java Naming and Directory Interface
Java Naming and Directory Interface (JNDI)is a standard extension to the Java platform that provides naming and directory information to Java programs. This allows EJB and other resources to have names that can be looked up by their client programs. JNDI is a high-level standard and can use any number of underlying name and directory services.
Enterprise applications
Enterprise applicationstie many of the previously mentioned components together into one application. An enterprise application is most commonly made up of a web application and any EJB that may be used by that web appli-cation. The entire enterprise application is packaged as a single archive file, which can be easily deployed to a server such as WebLogic. This allows for easy packaging, distribution, and deployment of your enterprise applications.
Major Features of WebLogic Server
As mentioned, WebLogic is the most popular application server available for Java. WebLogic has gained this popularity due, in part, to a full set of fea-tures. In this section, you are introduced to some of these feafea-tures. In other chapters, they are described in much greater detail.
Throughout this text, I refer to BEA’s WebLogic Server product simply as
WebLogic.BEA, however, uses the term WebLogicto refer to a family of prod-ucts, including WebLogic Portal, WebLogic Integration, WebLogic Workshop, and WebLogic Express. The popularity of the core WebLogic Server product, however, has led to the shortening of the name to simply WebLogic in many circles.
Platform support
WebLogic can run on many platforms, including Windows and many flavors of UNIX. WebLogic is available also for many large mainframe computer systems, providing WebLogic with greater processing power and scalability. The exten-sive platform support of WebLogic allows you to mix and match technologies. For example, you might run WebLogic on a mainframe computer system, back-ing it up with a cluster of less expensive machines that run the same applica-tions. Further, you can test your application on less expensive machines and run your production system on more expensive, higher-bandwidth hardware.
Web applications
Although WebLogic is most commonly thought of as an application server, it can also handle many web server functions. This means WebLogic could be used as an all-in-one solution. JavaServer Pages (JSP) is one of the most common forms of server-side Java programming. WebLogic includes the capability to execute JSP. You can to create web applications in WebLogic that make use of technologies such as JSP and custom tag libraries. Web applications are covered in Chapter 5.
EJB support
Stateless bean
Stateful bean
Message bean
Container-managed persistence (CMP) entity bean
Bean-managed persistence (BMP) entity bean
Additionally, WebLogic makes other important services available to these beans, such as database connection pooling and naming services. EJB sup-port is discussed in Chapters 6 and 7.
Database connectivity
Databases are often the heart of any serious application. Because of this, WebLogic includes extensive support for relational databases. One of the most important features is database connection pooling.This allows WebLogic — instead of individual EJBs — to manage connections to the database. Database connections are an expensive resource. Processor cycles and extensive network communication are required to open and close these connections, and this can slow down other operations. By using a database connection pool, WebLogic can reuse its pool of open database connections, freeing the application from the overhead of constantly creating and destroy-ing database connections. Database connectivity is discussed more fully in Chapter 12.
Web services
Web servicesare a new technology that provides a more uniform way of accessing the components of an application. Web services allow your appli-cation to receive XML messages from other appliappli-cations and respond to those requests using XML. This means other applications can make use of your application using only the HTTP protocol.
XML messages are sent and received using the Simple Object Access Protocol (SOAP), a W3C standard that specifies how web services should be accessed by their client programs. By supporting a standard protocol such as SOAP, many different systems can access the web services that you make available through WebLogic Server. Web services are discussed in Chapter 9. Acces-sing web services is discussed in Chapter 10.
One of the new features of WebLogic (as of Version 7) is WebLogic Workshop, which enables someone who is not familiar with J2EE to construct web ser-vices. WebLogic Workshop provides a number of tools and frameworks to make designing web services easier. WebLogic Workshop is discussed in Chapter 11.
Clustering
Clusteringis the capability to chain together many individual application servers. These application servers are clones of each other, performing the same task. The clustering capabilities of WebLogic enable these servers to handle requests even though some of the application servers may fail. This greatly increases the reliability of your application.
Clustering also allows your web application to become very scalable. Because you now have many application servers handling requests from clients, you can handle a greater number of incoming requests. Clustering is discussed in more detail in Chapter 16.
Security
Security is a major concern in any application — and when your application is accessible through the Internet, the need for security increases. WebLogic can help you with three specific areas of security:
Securing your data transmissions.Data transmissions are secured using SSL/HTTPS. This prevents a hacker from accessing data packets as they are transmitted between the browser and the web server.
Controlling access by users.You may want to restrict some users from accessing the overall system and restrict other users from accessing only certain parts of the system. WebLogic provides features that allow you to define users and control exactly what they have access to.
Chapter 2
Installing WebLogic Server
In This Chapter
Preparing to install
Installing using GUI mode
Introducing Configuration Wizard
Installing using console mode
Installing using silent mode
I
t makes sense that before you can use WebLogic, you must install it on the machine that you want to use as your Internet server. This chapter discusses the different ways that you can install the program on your system. Even if you inherited a server that already has WebLogic installed, you will probably want to at least skim this chapter so that you’re aware of the differ-ent installation (and configuration) options available.Installation Overview
Installing WebLogic is a straightforward process. WebLogic has several instal-lation methods available, one of which should fit your needs:
GUI installation. This is the most common method of installing WebLogic — and the easiest. The graphical user interface(GUI) allows you to see what’s happening during the installation process.
Console installation. If you’re working with a so-called “headless” remote server, which allows only terminal connections, this installation method is for you.
All three installation methods work on both Windows and UNIX systems. Which installation method should you choose? Unless restricted by the capa-bilities of the target system, the answer lies in your needs and your comfort level with your computer. Each installation method is covered in this chapter, so you can get a good idea of which method you should choose.
First, however, you should know the system requirements for WebLogic as well as how to get your hands on the software. It also doesn’t hurt to know how WebLogic is licensed by BEA Systems. Read on for all the details!
System requirements
Before you can take a class at a local college, you must meet the prerequi-sites. To be successful in the class, you must fulfill the stated requirements. The same is true of WebLogic Server. The installation program will check that your system has met certain prerequisites before it attempts the installation. Those requirements are outlined in this section.
Essentially, you need a computer system that will function well under Windows NT Server 4; Windows 2000 Server; Windows 2000 Advanced Server; Sun Solaris 7, 8, or 9; HP-UX 11 or 11i; IBM AIX 4.3.3 or 5L; or several flavors of Linux. If your system will run one of these comfortably, you should have no problems running WebLogic.
You can find detailed information about which systems are certified to work with WebLogic at the following address:
http://e-docs.bea.com/
Hard-drive space requirements
If you install the complete WebLogic Server, approximately 525MB of disk space are required. This number includes 35MB for the JDK installation and 142MB for the examples. This is only the hard-drive space required for WebLogic itself. Your own application data will require additional space. Hard-drive space requirements used to be considerably more important when hard drives cost more money than they do these days. It takes a con-siderable amount of trouble to move a system from one hard drive to a larger drive. Due to the low cost of hard drives today, it simply makes sense to go for one of the larger sizes available for your system.
fails, your system will continue running while you replace the faulty hard drive. Plus, with a RAID array, your system does not go down during the replacement. The full scope of your system’s redundancy and reliability capability is, in the end, driven by uptime needs and budget.
Memory requirements
Just as regular applications have memory requirements, so does WebLogic. However, the memory requirements for WebLogic are considerably higher than regular end-user applications that you may have installed. For WebLogic Server, 1GB of RAM is recommended. You can get by with less RAM, but it may degrade the performance of your server.
JDK requirements
WebLogic requires Java to be present. If you’re using a Windows installation, a copy of Java Development Kit is bundled with your installation program. Some UNIX distributions of WebLogic do not include a copy of JDK. Versions of the WebLogic installation program that do include JDK have a .bin exten-sion. If you’re trying to install from one of these distributions, you must make sure that the JDK BINdirectory is in your path. If you don’t have a copy of JDK already installed on your system, you should use a version of WebLogic that includes JDK.
Finding out whether Java is properly installed on your UNIX or Windows machine is easy. Simply enter the following command at the command prompt:
java –version
If Java is properly installed, you’ll see the version information for your JDK. If Java isn’t installed, you’ll get an error. For more information about installing Java, refer to the online documentation provided with JDK that you downloaded.
Other requirements
Finally, if you’re installing using the GUI installation program, you must have a color depth of at least 8 bits. Nearly any computer produced since 1997 will have a color depth of at least 8 bits and most likely higher. If you’re using either of the other two installation methods, you don’t need to worry about color.
Getting WebLogic
WebLogic is available on CD-ROM or from the BEA Systems web site. If you have WebLogic on CD-ROM, you save some time because you don’t have to download a huge installation file. (CD-ROMs are available for purchase from
any BEA Systems sales representative.) Most people download WebLogic from the BEA Systems web site. You can find the download here:
http://commerce.beasys.com/showallversions.jsp?family=WLS
The preceding URL is accurate as of this writing, but it may have changed by the time you read this book.
Registration is required of everyone who wants to download. After register-ing, you can proceed to the download area.
You can download WebLogic in two ways. The first is called the net installer
and is similar to many net-aware installation programs. You essentially down-load a 20MB installation program and answer some questions; then the instal-lation program downloads additional elements, as necessary.
The second download method is called the package installer.With this method, you download the entire stand-alone installation program, which varies in size depending on the version of WebLogic you want to download. (The size could be anywhere from 155MB to 275MB.) This option is great if you want to keep a copy of the installation program on CD (as a backup). If you plan on doing a silent installation, you must download the entire package installer. The silent installation mode is not supported by the net installer. If you choose to use the net installer, the installation process is similar to downloading the package installer and using the GUI installation. Refer to the appropriate major sections, later in this chapter, for more information on each of the installation modes and how to use them.
Understanding licensing
To use WebLogic Server, you must have a valid license. When you first install WebLogic, an evaluation license is created and is valid for 90 days. This evalua-tion version works just like a real license, except that you’re limited to 20 con-current connections. After this evaluation period is up, you must purchase a real WebLogic license.
You can choose from two different licenses:
Development license
Production license
The development license allows you to create several development servers, potentially one for each of your developers, to create your system before you place it into production. This spares you the prohibitive cost of buying a pro-duction license for each developer.
If you have licenses for older versions of WebLogic, you must purchase new license files. Contact BEA software to see whether upgrade pricing is available.
Using the GUI Mode Installer
The easiest way to install WebLogic is to use the GUI mode installer. This pro-gram uses a graphical user interface to guide you through the installation process. Here’s how to do an installation using the GUI mode installer:
1. If you obtained WebLogic as a CD-ROM product, insert the CD-ROM in your CD-ROM drive. If you obtained WebLogic from the web, double-click the installer that you downloaded.
The installer program begins, and you see the Welcome screen shown in Figure 2-1.
2. Click Next.
A license agreement appears.
3. Assuming you agree to all the fine print, choose the Yes option and click Next.
Figure 2-1: The Welcome screen
for the WebLogic GUI installation.
The screen shown in Figure 2-2 appears. The BEA home directory is where the common programs used by all BEA software are stored. The default home directory on Windows is c:\bea.
4. Use the default directory or choose a new directory.
If you want a new directory, click Browse and select the directory or type a new directory path in the text box just above the Browse button.
5. When you’re satisfied with the home directory, click Next.
The screen shown in Figure 2-3 appears.
6. Choose the type of installation you want and then click Next.
Usually, you’ll want to perform a typical installation. If you choose Typical Installation, skip to Step 8. You might choose Custom Installation if you don’t want certain WebLogic components installed for security or space considerations.
7. If you choose Custom Installation, specify what you want to install, as shown in Figure 2-4, and then click Next.
By default, all components are installed. If you don’t need a certain com-ponent installed, clear the check box beside its name.
8. Specify a directory for WebLogic, as shown in Figure 2-5.
In Steps 4 and 5, you created a BEA home directory. This step creates a directory for WebLogic itself. This product directory is usually a sub-directory of the BEA home sub-directory. The product sub-directory will contain all files needed by your application.
As in Steps 3 and 4, you can use the default directory, you can use the Browse button to select a different directory, or you can simply type a new directory path in the text box.
9. When you’re satisfied with the product directory, click Next.
The installation begins. In the installer’s title bar and in the lower-right corner, you can see progress indicators. When the indicators reach 100%, the installation is complete, and you see a Congratulations mes-sage, as shown in Figure 2-6.
Figure 2-4: You can specify which components to install.
Note the option shown at the bottom of Figure 2-6. This option allows you to install XML Spy, which is an XML development environment.
Using Configuration Wizard
In this section, you use Configuration Wizard to create a server. After installing WebLogic, Configuration Wizard is accessible right away.
Throughout this process, you’ll see references to a domain.Although a domain can contain multiple web servers, the examples in this chapter assume that your domain has only one server. For more on domains, see Chapter 4.
To create a domain, follow these steps.
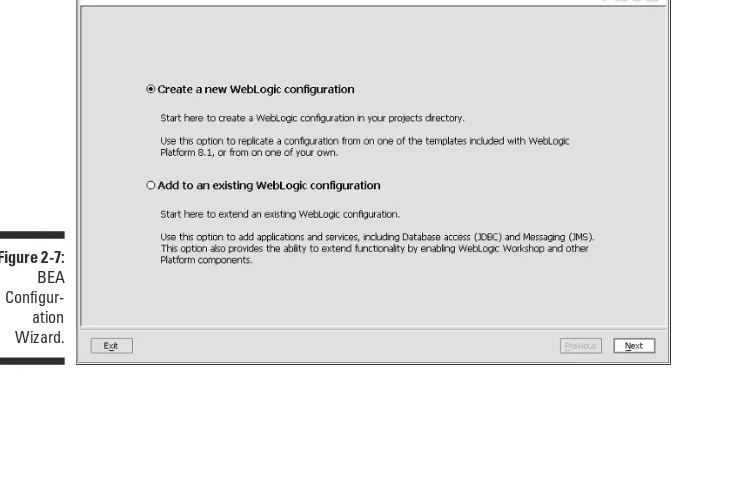
1. Choose Start➪BEA WebLogic Platform 8.1➪Configuration Wizard.
Configuration Wizard starts and the screen shown in Figure 2-7 appears.
2. Select the Create a new WebLogic configuration option, and then Click Next.
In this example, you create a server. To modify an existing server, you would choose the Add to an existing WebLogic configuration option.
3. Select a template and type a name for your domain. Click Next.
To follow along with the example, select the Basic WebLogic Server Domain template.
4. Choose Express as your configuration type.
[image:44.531.74.452.356.599.2]This is the most common option. (You might choose Customized if you want to create a clustered environment, which is covered in Chapter 16.)
Figure 2-7: BEA Configur-ation Wizard.
5. Create the administrative user.
To create the administrative user, type a user name and a password. Ideally, the password should be something that’s not found in the diction-ary and should consist of both letters and numbers.
Make sure that you remember the user name and password because you’ll need them to change configuration settings on your server.
6. Click Next.
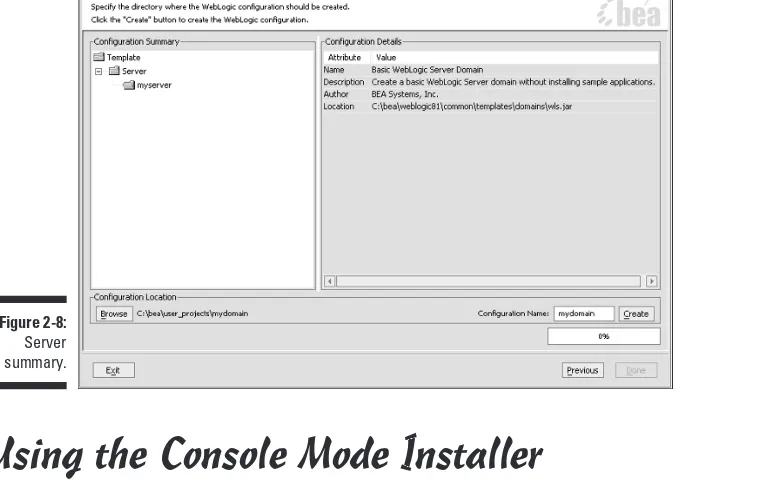
The screen shown in Figure 2-8 appears.
7. Review your settings, and then click Create.
In a few moments, your domain is created.
Using the Console Mode Installer
[image:45.531.73.453.253.499.2]The console mode installer does not use a graphical interface, and many people think it’s harder to use than the GUI installer. You can use the console mode installer in Windows or UNIX. If you’re using a UNIX system that doesn’t have access to a GUI, you must use the console mode installer.
Two types of console mode installers are available, and which type BEA Systems provides depends on the version of the operating system you’re using. If you have UNIX, the extension of your installer can be .bin or .jar. For Windows, it’s .exe. The following sections describe how to install under UNIX and Windows operating systems.
Installing under UNIX
If your system uses UNIX, your installer could have a .bin or a .jar file name extension. If your installer has the .bin extension, that means the installer includes Java Development Kit (JDK), as described earlier. Installation files ending in .jar do not include JDK.
Installing with a .bin file
If you have an installer file that ends in .bin, how you install the file depends on whether you downloaded the installation file from the Internet or have it available on CD.
To install your .bin file if you have it available on a CD, follow these steps:
1. Log on to the system as the user who will run WebLogic Server.
2. Open a command-line shell.
3. Insert the WebLogic CD in the CD-ROM drive.
4. Change to the weblogic_platform801directory on the CD.
5. Invoke the following command:
./filename.bin –mode=console
where filename.binis the name of the installer.
The installation program installs WebLogic.
If you downloaded the .bin file, the steps are slightly different:
1. Log on to the system as the user who will run WebLogic Server.
2. Open a command-line shell.
3. Go to the directory where you downloaded WebLogic and invoke the following two commands:
chmod a+x filename.bin ./filename.bin –mode=console
where filename.binis the name of the installer.
The installation program installs WebLogic.
Installing with a .jar file
If you have an installer file that ends in .bin, follow these steps:
1. Log on to the system as the user who will run WebLogic Server.
2. Open a command-line shell.
3. Include the bindirectory of your JDK at the beginning of the PATH variable:
PATH=javapath/bin:$PATH export PATH
where javapathis the full path to your JDK directory. 4. Change to the directory that contains the .jar file.
5. Do one of the following:
• If you’re using JDK 1.3.1_03 or higher, type the following:
java –jar filename.jar –mode=console
where filename.jaris the name of the installer.
• If you’re using the AIX version of UNIX, type the following:
java –classpath filename.jar
com.bea.installer.BEAInstallController
where filename.jaris the name of the installer. The installation program installs WebLogic.
Installing under Windows
If you have an install file that uses the .exe file extension, WebLogic assumes that you already have Java installed and set up in your system path. How you install the file depends on whether you downloaded the installation file from the Internet or have it available on CD.
If you’re installing from a CD-ROM, follow these steps:
1. Log on to the system as the user who will run WebLogic Server.
2. Open a command-prompt window.
3. Go to the weblogic_platform801directory on the CD-ROM.
If you obtained WebLogic from the Web, go to the directory where you downloaded WebLogic.
4. Invoke the following command:
net_platform801_3in32.exe –mode=console
The installation program installs WebLogic.
If you downloaded WebLogic from the web, follow these steps instead:
1. Log on to the system as the user who will run WebLogic Server.
2. Open a command-prompt window.
3. Go to the directory where you downloaded WebLogic.
4. Invoke the following command:
filename –mode=console
where filenameis the name of the file that you downloaded.
Using the Silent Mode Installer
Silent mode installation works much like the GUI installation program. The main difference is that the silent mode installer gets all its input from a file, whereas the GUI installer gets all its input from the user. Silent installation can be used under Windows and UNIX.
Silent installation is valuable when you must perform the same installation on many different computers.
Using the silent mode installer involves two main steps:
1. Create an installer properties file.
2. Use the installer properties file to invoke the installer.
You perform Step 1 once and then repeat Step 2 on every computer on which you want to install the server.
In this section, you see how to carry out these two steps. I begin by showing you how to create an installer properties file, sometimes referred to as a tem-plate file.
Creating a template file
To install using the silent method, you must create a template file. The tem-plate file contains all the setting information that you would normally provide to the GUI installation utility. These settings are all expressed inside XML tags. Make sure that you do not modify the structure of the XML tags. Follow these steps to create a template file:
1. Obtain a template file from the following location:
http://e-docs.bea.com/wls/docs81/install/instsil. html#1042712
An example template file is also shown later in this chapter.
2. Save the contents of the template file to a file named silent.xml. Place this file in the directory containing the WebLogic Server installation program.
3. Modify your template file so that the settings make sense for your needs.
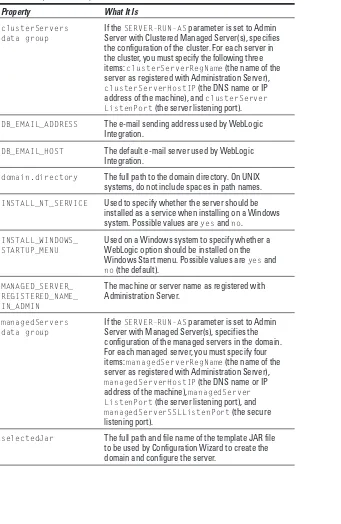
See Table 2-1 for a list of settings.
Table 2-1
Mandatory Silent Mode Installation Properties
Property What It Is
BEAHOME The BEA home directory. This directory holds common files used by multiple BEA products, such as the license file.
RUN_DOMAIN_WIZARD Specifies whether Configuration Wizard should be run. If True, the wizard is run; if False, it is not. If you choose to run Configuration Wizard, you must spec-ify the data values used by the wizard, as detailed in Table 2-2.
USER_INSTALL_DIR The directory into which you will install WebLogic.
Table 2-2
Configuration Wizard Properties
Property What It Is
ADMIN_HOST_NAME_OR_IP The Administration Server name or IP address.
ADMIN_LISTEN_PORT The port at which the Administration Server listens.
C_domainName The beginning of a domain name specification. One or more of these attributes can be specified to create domains. (On UNIX systems, do not include spaces in the domain name.)
C_password The password to be used with the administrative user for this server. The password must contain at least 8 characters but no more than 20. Do not use spaces or XML reserved characters such as <, >, {, or }.
C_serverListenAddress The DNS name or system IP for the server.
C_serverListenPort= Used to specify the server listen port. Most web servers use port 80. WebLogic uses port 7001 by default.
C_serverName Used to specify the server name for the specified domain. Do not include spaces in the server name.
C_serverSSLListenPort= Used to specify the SSL server listen port, which is used for HTTPS connections. Most web servers use port 443. WebLogic uses port 7002 by default.
C_username A user name to start the server and access Administration Console. Do not use spaces or XML reserved characters such as <, >, {, or }.
ClusterMCAddr The multicast IP address that Administration Server uses to communicate with clustered servers. WebLogic uses 237.0.0.1 by default.
ClusterName Name of the cluster (if any) to create. Do not include spaces in the cluster name.
ClusterPort The multicast port that Administration Server uses to communicate with clustered servers. WebLogic uses port 7777 by default.
(continued)
Table 2-2
(continued)
Property What It Is
clusterServers If the SERVER-RUN-ASparameter is set to Admin
data group Server with Clustered Managed Server(s), specifies the configuration of the cluster. For each server in the cluster, you must specify the following three items: clusterServerRegName(the name of the server as registered with Administration Server),
clusterServerHostIP(the DNS name or IP address of the machine), and clusterServer ListenPort(the server listening port).
DB_EMAIL_ADDRESS The e-mail sending address used by WebLogic Integration.
DB_EMAIL_HOST The default e-mail server used by WebLogic Integration.
domain.directory The full path to the domain directory. On UNIX systems, do not include spaces in path names.
INSTALL_NT_SERVICE Used to specify whether the server should be installed as a service when installing on a Windows system. Possible values are yesand no.
INSTALL_WINDOWS_ Used on a Windows system to specify whether a
STARTUP_MENU WebLogic option should be installed on the Windows Start menu. Possible values are yesand
no(the default).
MANAGED_SERVER_ The machine or server name as registered with
REGISTERED_NAME_ Administration Server.
IN_ADMIN
managedServers If the SERVER-RUN-ASparameter is set to Admin
data group Server with Managed Server(s), specifies the configuration of the managed servers in the domain. For each managed server, you must specify four items: managedServerRegName(the name of the server as registered with Administration Server),
managedServerHostIP(the DNS name or IP address of the machine), managedServer ListenPort(the server listening port), and
managedServerSSLListenPort(the secure listening port).
Property What It Is
SERVER-RUN-AS Determines the server configuration created by Configuration Wizard. Possible settings are Single Server, Admin Server with Managed Server(s), Admin Server with Clustered Managed Server(s), and Managed Server (with owning Admin Server configuration).
To specify a setting for a property, you use the property name and value as an XML tag. For example, the following sets a value for the
USER_INSTALL_DIRproperty:
<data-value name=”USER_INSTALL_DIR” value=”C:\bea\weblogic81” />
Using the property types shown in Table 2-1, you can create a properties file that the installer will use. An example of a Windows silent.xml file is shown in Listing 2-1.
Listing 2-1:
Silent Install Properties File
<?xml version=”1.0” encoding=”UTF-8”?> <domain-template-descriptor>
<input-fields>
<data-value name=”BEAHOME” value=”C:\bea” />
<data-value name=”USER_INSTALL_DIR” value=”C:\bea\weblogic81” /> <data-value name=”RUN_DOMAIN_WIZARD” value=”false” />
<data-value name=”domain.directory” value=”C:\bea\user_domains\mydomain” /> <data-value name=”C_domainName” value=”mydomain” />
<data-value name=”C_serverName” value=”myserver” /> <data-value name=”C_username” value=”system” /> <data-value name=”C_password” value=”weblogic” /> <data-value name=”C_serverListenAddress” value=”” /> <data-value name=”C_serverListenPort” value=”7001” /> <data-value name=”C_serverSSLListenPort” value=”7002” /> <data-value name=”ClusterName” value=”mycluster” /> <data-value name=”ClusterPort” value=”7777” /> <data-value name=”selectedJar”
value=”C:\bea\weblogic81\common\templates\domains\wls.jar” /> <data-value name=”INSTALL_NT_SERVICE” value=”no” />
<data-value name=”INSTALL_WINDOWS_STARTUP_MENU” value=”no” /> <data-value name=”DB_EMAIL_HOST” value=”myserver” /> <data-value name=”DB_EMAIL_ADDRESS” value=”[email protected]” /> </input-fields>
</domain-template-descriptor>
Invoking the silent mode
installation program
Now that you’ve created a properties file to be used as a template for your installation, you’re ready to invoke the silent installer program and perform the actual installation. You can perform the silent installation once or many times. (The silent mode was designed to be used when you want to perform the same installation more than once.)
The instructions for how to start the silent mode installation program are slightly different between UNIX and Windows. The next two sections explain invoking the silent mode installer in both UNIX and Windows.
If you’re using the silent mode installation under Windows, follow these steps:
1. Log on to the Windows system with an account that has administrator rights.
2. Open a command-prompt window.
3. If you’re installing from a CD-ROM, go to the CD-ROM directory. If you obtained WebLogic from the web, go to the directory where you downloaded WebLogic.
4. Invoke the following command:
filename.exe –f fullpath\silent.xml
where filename.exeis the name of the installer and fullpathis the path to your installer properties file.
The installation program installs WebLogic.
If you’re using the silent mode installation under UNIX, follow these steps:
1. Log on to the UNIX system as the target user.
2. Open a command-prompt window.
3. If you’re installing from a CD-ROM, go to the CD-ROM directory. If you obtained WebLogic from the web, go to the directory where you downloaded WebLogic.
4. Invoke the following command:
sh filename.bin -f fullpath/silent.xml
where filename.binis the name of the installer and fullpathis the path to your installer properties file.