Contents
1 Linux Find Command Tutorial 1
1.1 Find by file name . . . 1
1.1.1 By literal name . . . 1
1.1.2 By regular expression. . . 1
1.2 Find by file properties. . . 2
1.2.1 Through time . . . 2
1.2.1.1 In minutes . . . 2
1.2.2 In days . . . 3
1.2.3 By permissions . . . 3
1.2.4 By file type . . . 3
1.2.5 By size . . . 4
1.3 Using conditions . . . 4
1.4 Executing actions with exec . . . 4
1.5 Useful and recurrent commands . . . 5
1.6 Conclusion . . . 5
2 Linux Screen Command Tutorial 6 2.1 Installation . . . 6
2.2 Creating a screen . . . 6
2.2.1 Creating windows inside screens. . . 7
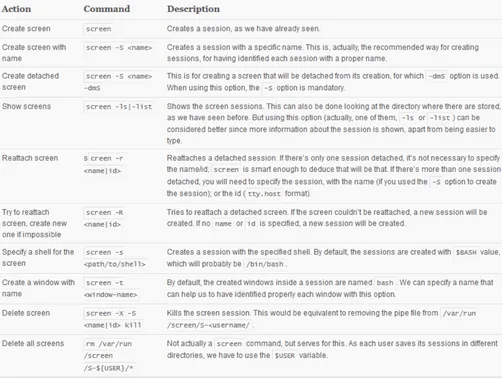
2.3 Screen commands options . . . 7
2.4 Key bindings . . . 8
2.5 Customizing Screen. . . 9
2.5.1 Disabling startup message . . . 9
2.5.2 Setting default windows for each session . . . 9
2.5.3 Key bindings . . . 10
3 Linux chown Example 11
3.1 Introduction . . . 11
3.1.1 Linux Machine . . . 11
3.2 Syntax . . . 11
3.3 Description . . . 11
3.4 Options . . . 11
3.5 Examples . . . 12
3.5.1 Change User Owner . . . 14
3.5.2 Copy ownership from one file to another. . . 14
3.5.3 Change the group of a file . . . 15
3.6 Conclusion . . . 16
4 Linux chmod Example 17 4.1 Linux permission system . . . 17
4.2 Changing permissions. . . 18
4.2.1 Octal representation . . . 18
4.2.2 Symbolic representation . . . 19
4.3 Special permissions . . . 20
4.3.1 setuid . . . 20
4.3.2 setgid . . . 21
4.3.3 sticky . . . 21
4.4 Summary . . . 22
5 Linux Create User Example 23 5.1 How users are organized . . . 23
5.2 Using native binary: useradd . . . 23
5.2.1 Setting a password . . . 24
5.2.2 Creating the home directory . . . 24
5.2.3 Setting a different home directory . . . 25
5.2.4 Setting the shell. . . 25
5.2.5 Other options . . . 25
5.2.5.1 Specifying the primary group . . . 25
5.2.5.2 Setting secondary groups . . . 25
5.2.5.3 Setting an expiration date . . . 25
5.2.6 Setting personal information . . . 26
5.3 Using a user-friendly wrapper for useradd: adduser . . . 26
5.3.1 Changing the options . . . 26
6 Linux Add User to Group Example 28
6.1 How groups are organized . . . 28
6.2 Non-existing users . . . 29
6.2.1 Primary group . . . 29
6.2.1.1 Changing default configuration of primary group assignment . . . 29
6.2.2 Secondary groups. . . 29
6.3 Existing users . . . 29
6.3.1 Primary group . . . 30
6.3.2 Secondary groups. . . 30
6.4 Giving users sudo permissions . . . 30
6.5 Summary . . . 31
7 Linux tar Examples 32 7.1 Create a tar archive of a directory. . . 32
7.2 Create a zipped archive . . . 32
7.3 List the contents of a tar archive . . . 32
7.4 Extract tar archive contents . . . 33
7.5 Extract tar.bz2 archive contents. . . 33
7.6 Extract a single file from tar archive . . . 34
7.7 Create a compressed archive of the current directory. . . 34
7.8 Create an archive in a different directory . . . 35
7.9 Extract a single directory from tar archive . . . 35
7.10 Extract a single directory from tar.gz archive . . . 36
7.11 Check the size of the tar, tar.gz and tar.bz2 Archive File . . . 36
7.12 Verify integrity of tar file . . . 36
7.13 Find the difference between an archive and file system . . . 36
7.14 Delete a file from tar ball . . . 36
7.15 Add a file to an existing archive . . . 36
7.16 Add a directory to an existing archive . . . 37
7.17 Extract group of files from tar, tar.gz, tar.bz2 archives using regular expression . . . 37
7.18 Untar multiple files from tar, tar.gz and tar.bz2 File . . . 37
7.19 Restore files with tar . . . 37
7.20 Check the manual page for tar . . . 38
8 Linux sed Examples 39 8.1 Replacing string . . . 39
8.2 Replacing the nth occurrence of a pattern in a line . . . 39
8.3 Replacing all the occurrences of a pattern in a line. . . 40
8.5 Duplicating the replaced line with /p flag. . . 40
8.6 Replacing string on a specific line number . . . 41
8.7 Replacing string on a range of lines . . . 41
8.8 Replacing on a line which matches a pattern . . . 41
8.9 Deleting lines . . . 42
8.10 Duplicating lines . . . 42
8.11 Changing the slash (/) delimiter. . . 43
8.12 Using & as the matched string . . . 43
8.13 Using 1,2 and so on to 9 . . . 43
8.14 Running multiple sed commands . . . 43
8.15 Printing only the replaced lines . . . 43
8.16 Using sed as grep . . . 44
8.17 Adding a line after a match is found. . . 44
8.18 Adding a line before a match . . . 45
8.19 Changing a line . . . 45
8.20 Transforming like tr command . . . 45
8.21 Man sed . . . 46
9 Linux cut Examples 47 9.1 Printing characters by position . . . 47
9.2 Printing characters by range . . . 47
9.3 Printing fields usingcommadelimiter . . . 47
9.4 Printing fields using space delimiter . . . 48
9.5 Displaying range of fields. . . 48
9.6 Displaying first field from file. . . 48
9.7 Displaying fields from 1st to nth . . . 49
9.8 Displaying fields from nth to last . . . 49
9.9 Ignoring lines that do not contain delimiter. . . 49
9.10 Inverting field selection . . . 50
9.11 Specifying delimiter to be used in output . . . 50
9.12 Printing bytes . . . 50
9.13 man cut . . . 51
10 Linux curl Examples 52 10.1 Installation . . . 52
10.2 Basic usage . . . 52
10.3 Requests . . . 53
10.3.1 GET. . . 53
10.3.3 Custom requests: PUT and DELETE . . . 54
10.3.4 Adding extra headers . . . 54
10.4 FTP . . . 54
10.5 Other interesting options . . . 54
10.5.1 HTTP authentication . . . 55
10.5.2 Ignoring SSL errors. . . 55
10.5.3 Cookies . . . 55
10.5.4 Making requests through proxy . . . 55
10.5.5 Download depending on the modification time . . . 55
Copyright (c) Exelixis Media P.C., 2016
All rights reserved. Without limiting the rights under copyright reserved above, no part of this publication
Preface
Bash is a Unix shell and command language written by Brian Fox for the GNU Project as a free software replacement for the Bourne shell. First released in 1989, it has been distributed widely as it is a default shell on the major Linux distributions and OS X.
Bash is a command processor that typically runs in a text window, where the user types commands that cause actions. Bash can also read commands from a file, called a script. Like all Unix shells, it supports filename globbing (wildcard matching), piping, here documents, command substitution, variables and control structures for condition-testing and iteration. The keywords, syntax and other basic features of the language were all copied from sh. Other features, e.g., history, were copied from csh and ksh. Bash is a POSIX shell, but with a number of extensions. (https://bit.ly/2bBmYap)
About the Author
SCGs (System Code Geeks) is an independent online community focused on creating the ultimate Operating System developers resource center; targeted at the technical architect, technical team lead (senior developer), project manager and junior developers alike.
SCGs serve the OS developer, OS engineer and DevOps communities with daily news written by domain experts, articles, tutorials, reviews, announcements, code snippets and open source projects.
Chapter 1
Linux Find Command Tutorial
Linuxfindcommand is a powerful and flexible search tool that not only every system administrator must master, but also any kind of Linux user. This tutorial will show how to use it to perform almost any type search with this useful command.
For this tutorial, Linux Mint 17.3 andfind4.4.2 have been used.
1.1
Find by file name
The syntax for find command is the following find [path] [expression]
1.1.1
By literal name
To find, for example,README.txtfiles inhomedirectory, we would type the following: find /home -name README.txt
The-nameexpression is case sensitive. The following command will find everyREADME.txtfile in the whole disk, not taking into account the case sensitivity:
find / -iname README.txt
1.1.2
By regular expression
Using regular expressions is useful mostly when we are looking for certain type of files. For example, to find every.txtfile in the home directory, the regular expression would be: find /home -regextype posix-extended -regex ".*\.txt"
Let’s see it carefully:
• With-regextypewe are specifying a regular expression type,posix-extended, which is more widely implemented in other systems thanfind’s default one.
• And the regular expression itself:
– The*is for searching zero or more repetitions. Combined with., will look for every file in the specified directory, because every file will have at least a character, repeated zero or more times.
– Once that we have looked for every file, we have to filter the results. In this case, we are finding for every string ending in. txt. Note that we have escaped the dot character, with., since it’s a special character for regex.
Regular expressions can be as flexible as we want. We can find every .txt and .log files with the following command: find /home -regextype posix-extended -regex ".*(\.txt|\.log)"
What we are doing is to tell find to look for every file ending with the .txt substringorwith the .log substring. The | character is an or operand. And everything inside round braces, is for matching that exact substring.
We have seen how to match exact substrings. Now, let’s see how to match characters inside a range. For that, we will find files that have numbers in their name:
find /home -regextype posix-extended -regex ".*[0-9]"
The square brackets are for matching specific characters (not strings). And we can define ranges with the hyphen. To end with this section, let’s see how we would find files that are composed by a date (supposing it in UK format): find /home -regextype posix-extended -regex ".*[0-9]{2}-[0-9]{2}-[0-9]{4}.*"
The curly braces are used for repetitions. So, we are looking for something with*XX-XX-XXXX*format. Note: for finding files by their extension, there’s a shorter way using-name:
find /home -name "*.txt"
Which is a more appropriate option when we want to make a search specifying an unique file extension.
1.2
Find by file properties
Apart from the name, we can also find for some specific file properties. In this section we will see for which properties we can make searches, and how.
1.2.1
Through time
1.2.1.1 In minutes
There are many cases in which we can be interested in finding by the time they have been modified (as same as when we sort by modification time when using a GUI).
We can look for files that have been modified, for example, in thelast 30 minutes: find /home -mmin -30
Note that we are using a hyphen when specifying the minutes. Without it,findwould look for files that have been modificated exactly 30 minutes ago:
find /home -mmin 30
For finding files byaccess time, is almost the same than for modification time, but with-aminexpression instead of-mmin: find /home -amin -30
There’s another property for finding through the time, that is thechange time. Don’t confuse it with modification time. The change time is a status change (for example, permission or owner change).
1.2.2
In days
We have seen how find files through time, specifying the time in minutes. But we can also make searches specifying the time in days. For that, we have to change the*minsuffix of the previous expressions, with*timesuffix.
Take into account that the searches made with*timeare always truncated. So, if we want to find modified files between the current moment and the previous day, we have to type:
find /home -mtime 0
1.2.3
By permissions
Finding files by permissions is so simple. We can look for files belonging to a certain user or group: find /home -user julen
find /home -group development
And also by the permissions of the files: find / -perm 777
The above command would find the files with exactly777permissions, which can be useful to find files with permissions that should be fixed.
There is the dash prefix available, /, for finding files that match at least one of the specified permission bits. It’s easier to understand seen in an example:
find / -perm /755
The above command would find files that are readable, writable or executable by the owner; readable or executable by the owner group; or readable or executable by other users. Finds
Of course, we can also use the symbolic notation to find files by permissions: find / -perm a=rwx
Which would be the equivalent to777.
1.2.4
By file type
You may noticed thatfindalso returns folders, for example. By default, find looks for every file that matches with the criteria, regardless its type.
If we are only looking for a certain type of files, we have to specify it with-type: find / -perm a=rwx -type f
That command would only find the regular files. findaccepts the following values for this option: • d: directory
• f: regular file • l: symbolic link • b: buffered block • c: unbuffered character • p: named pipe
1.2.5
By size
Finding by size is specially useful when we can to free some space in the disk. And is pretty simple: find /var/log -size +20M
The above command will find files bigger than 20 megabytes in/var/logdirectory, a typical directory whose size has to be continuously watched by systems administrators.
We have several units to choose:
• b: 512-byte blocks (the one used by default, if no other unit is specified) • c: bytes
• k: kilobytes • M: megabytes • G: gigabytes
1.3
Using conditions
findallows to useand,notandorboolean conditions. Let’s see it with an example for each one:
find / -size +10M -and -name "*.txt" find / -perm 777 -not -user root
find / -user developer -or -group development
Which, respectively, mean: "find every file bigger than 10MBandwith.txtextension", "find every file with777permissions thatdoes notbelong torootuser", and "find every file that belongs todeveloperuserortodevelopmentgroup". Actually, the-andexpression is not necessary to combine expressions withandlogic.
find / -size +10M -name "*.txt"
The command shown above would work as same as the previous one with-and.
1.4
Executing actions with exec
This is the most powerful feature offind. The-execoption allows us to execute commands for every found file. A very typical use of-execis for showing file information as we would do withlscommand:
find / -size +500M -exec ls -l {} \;
1.5
Useful and recurrent commands
To end with the tutorial, we will see some of the most commonfindcommands. Delete old and big log files
find / -iname "*.log" -mtime +1 -size +10M -exec rm {} \;
Fix 777 permissions
find / -perm 777 -exec chmod 755 {} \;
Delete empty folders
find / -type d -empty -exec rm --dir {} \;
Find 10 biggest files
find / -type f -exec ls -s {} \; | sort -n -r | head -10
Delete broken symbolic links
find / -xtype l -exec rm {} \;
1.6
Conclusion
Chapter 2
Linux Screen Command Tutorial
Screen is a window manager that allows to have several virtual terminals, several sessions and programs in text mode executing simultaneously in the same console. In this tutorial we will see how to use it.
For this tutorial, Linux Mint 18 has been used.
2.1
Installation
If you don’t have installed Screen, you can install it easily withapt-get: sudo apt-get update
sudo apt-get install screen
2.2
Creating a screen
To create a screen, we just have to execute thescreencommand: screen
We will see an informative screen about the software itself. Just hit return to exit.
At this moment, a new screen will be generated inside the terminal window. You may have noticed it, since the buffer has been cleared.
And that’s it!
This has created a pipe file for this session in/var/run/screen/S-<username>/directory. The username I’m working with is namedjulen, so, the directory is/var/run/screen/S-julen/.
In my case, the name for the session is 3360.pts-0.julen-VAIO. screengenerates the sessions with the following format:
<pid>.<tty>.<host>
You may be wondering how to exit the screen. You can obviously close the terminal, but that would leave the session alive. If you want to kill it, you can execute the following command inside the session you want to kill:
exit
You will see that you return to the "original" shell, and thatscreenhas told that, effectively, you have exited its screen: [screen is terminating]
2.2.1
Creating windows inside screens
We have seen that executingscreenin the host computer, creates a new session, which is saved in /var/run/screen/S-<username>/directory. If we would executescreenn times in the host, we would have n sessions.
Inside each session, we can have other several screens, named windows. The windows are created, again, executing thescreen command. So, the following:
screen
# We are know inside a screen session screen
Would only create a session in/var/run/screen/S-<username>/: 11714.pts-0.julen-VAIO
This is because, as we have said, executingscreeninside a screen session will create a window inside that screen, not another session.
In the next sections we will see the commands available for these screens.
2.3
Screen commands options
Figure 2.1: Most popular key bindings
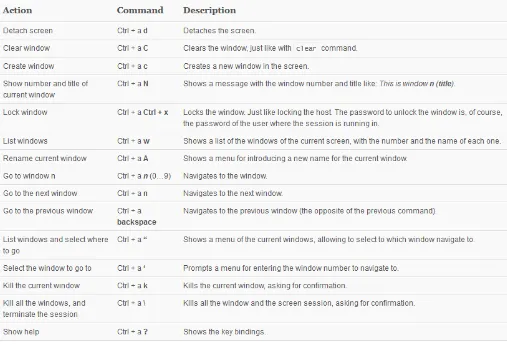
2.4
Key bindings
When we are inside a screen and its windows, we have available some special key combinations to perform some actions, e.g., navigating through different windows.
These key bindings consist on pressing Ctrl + a, and then pressing the key(s) in question. Not at the same time: first, Ctrl + a; then, release them; and finally, press the key in question.
Figure 2.2: Most popular key bindings
2.5
Customizing Screen
screenallows us to configure it as we want. It looks for the configuration in a file named.screenrcin the user’s home directory; or system wide, in/etc/screenrc.
2.5.1
Disabling startup message
You may already be tired of the startup message when you create a screen, that one about the version, copyright, etc. This can be disabled with the following line in the configuration file:
startup_message off
2.5.2
Setting default windows for each session
One of the most interesting possibilities is defining a set of default windows for everyscreensession. For that, we just have to write the commands we would execute, in the configuration file.
screen -t Shell /bin/bash
screen -t Python /usr/bin/python3ve
screen -t PHP /usr/bin/php -a # Interactive mode.
select 0 # After creating the windows, go to the first one.
Now, for the configuration shown above, you would have, for eachscreensession, those three windows.
2.5.3
Key bindings
The remaining customization that is worth mentioning is the configuration of key bindings, for having a better experience. A usual practice is to use the function keys (F1 - F12). For example, we could use them for accessing windows:
bindkey "^[[[A" select 1 # F1 -> window 1 bindkey "^[OQ" select 2 # F2 -> window 2 bindkey "^[OR" select 3 # F3 -> window 3 bindkey "^[OS" select 4 # F4 -> window 4 bindkey "^[[15~" select 5 # F5 -> window 5 bindkey "^[[17~" select 6 # F6 -> window 6 bindkey "^[[18~" select 7 # F7 -> window 7 bindkey "^[[19~" select 8 # F8 -> window 8 bindkey "^[[20~" select 9 # F9 -> window 9 bindkey "^[[21~" select 10 # F10 -> window 10 bindkey "^[[23~" prev # F11 -> previous window bindkey "^[[24~" next # F12 -> next window
Note: if you want to know which key code corresponds to each keystroke, you can useshowkey: showkey -a
And then press a key to know its code.
2.6
Summary
Chapter 3
Linux chown Example
3.1
Introduction
In this example, we will see how to use the Unix-like system commandchown Thechowncommand changes the owner and owning group of files.
3.1.1
Linux Machine
If you are on Windows OS, before we get into the details of this command, I would suggest you to have a Linux machine for better understanding of the usage of this command.
Not necessarily you need to physically have a separate machine. You can very much have a virtual Linux machine on a virtual box like Oracle VirtualBox.
3.2
Syntax
chown [_OPTION_]...[_OWNER_][:[_GROUP_]] _FILE_... chown [_OPTION_]...--reference=_RF ILE_ _FILE_...
3.3
Description
chownchanges the user and/or group ownership of each given file.
If only an owner is given, that user is made the owner of each given file, and the files’ group is not changed.
If the owner is followed by a colon and a group name, with no spaces between them, the group ownership of the files is changed as well.
If a colon but no group name follows the user name, that user is made the owner of the files and the group of the files is changed to that user’s login group.
If the colon and group are given, but the owner is omitted, only the group of the files is changed; in this case,chownperforms the same function aschgrp. If only a colon is given, or if the entire operand is empty, neither the owner nor the group is changed.
3.4
Options
-c, --changes like verbose but report only when a change is made.
-f, --silent, --quiet suppress most error messages.
-v, --verbose output a diagnostic for every file processed.
--dereference affect the referenced file of each symbolic link rather than
the symbolic link itself. This is the default.
-h, --no-dereference affect symbolic links instead of any referenced file. This is useful only on systems that can change the ownership of a symlink.
--from=CURRENT_OWNER:CURRENT_GROUP change the owner and/or group of each file only if its current owner and/or group match those specified here. Either may be omitted, in which case a match is not required for the omitted attribute.
--no-preserve-root do not treat/ (the root directory) in any special way. This is the default.
--preserve-root Do not operate recursively on/.
--reference=RFILE use RFILE’s owner and group rather than specifying
OWNER:GROUP values
-R, --recursive operate on files and directories recursively.
The following options modify how a hierarchy is traversed when the-Roption is also specified. If more than one is specified, only the final one takes effect.
-H if a command line argument is a symbolic link to a
directory, traverse it.
-L traverse every symbolic link to a directory encountered
-P do not traverse any symbolic links. This is the default.
--help display this help and exit.
--version output version information and exit.
Owner is unchanged if unspecified. Group is unchanged if unspecified, or changed to the login group if implied by a:following a symbolicOWNER.OWNERandGROUPmay be numeric as well as symbolic.
3.5
Examples
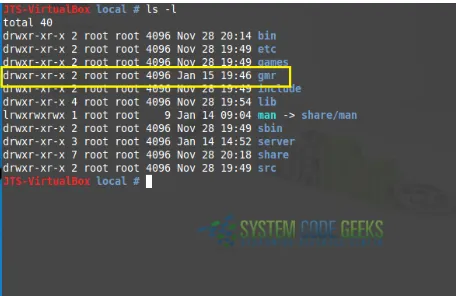
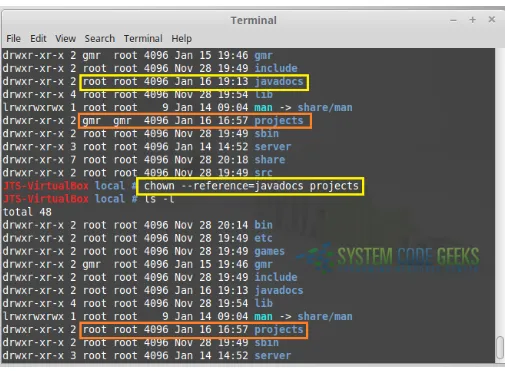
Figure 3.1: List Command Details
We will see the details of the information given above with yellow rectangle mark. • 1st Character - File Type:First character specifies the type of the file.
In the picture above thedin the 1st character indicates that this is a directory. Following are the possible file type options in the 1st character of the ls -l output. • Field Explanation
• - normal file • d directory • s socket file • l link file
Field 1 - File Permissions:
The remaining 9 characters, in order, refer to the read/write/execute(rwx) permission for the user owner, the read/write/exe-cute(rwx) permission for the group owner, and then the read/write/exeread/write/exe-cute(rwx) permission for everyone else.
In this example, rwxr-xr-xindicates write-execute permission for user, execute permission for group, and read-execute permission for others.
Field 2 - Number of links:Second field specifies the number of links for that file. In this example, 2 indicates 2 links to this file. Field 3 - Owner:Third field specifies owner of the file. In this example, this file is owned by usernameroot.
Field 5 - Size:Fifth field specifies the size of file. In this example, ’4096’ indicates the file size.
Field 6 - Last modified date & time:Sixth field specifies the date and time of the last modification of the file. In this example, Jan 15 19:46specifies the last modification time of the file.
Field 7 - File name:The last field is the name of the file/directory. In this example, the file name isgmr.
3.5.1
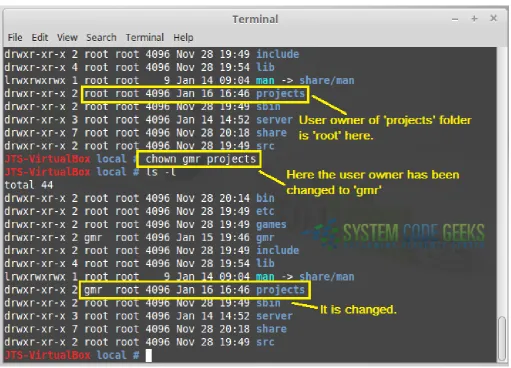
Change User Owner
[image:24.595.57.569.203.571.2]Please refer the image shown below. In this the user owner of a folder has been changed to a new user.
Figure 3.2: Change Owner
But, user owner has been changed only for the directoryprojects. Ownership of the inner files or directories will remain the same, unchanged.
If the flag-Ris used, it will change the owner for inner files / directories also.
Recursively grant ownership of the directoryprojects, and all files and sub-directories, to usergmr. chown -R gmr projects
3.5.2
Copy ownership from one file to another
# chown --reference=file tmpfile
[image:25.595.58.563.135.506.2]As shown below, ownership ofjavadocsfolder has been copied toprojectsfolder.
Figure 3.3: Copy ownership
3.5.3
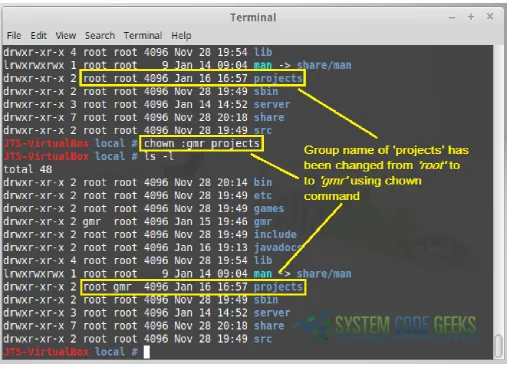
Change the group of a file
Figure 3.4: Change group name
3.6
Conclusion
Chapter 4
Linux chmod Example
One of the most critical jobs a system administrator has to continuously be dealing with is the permission administration. The most small carelessness with the permissions can lead to a security hole in the system.
This example will show how are changed the permissions, a task for whichchmodcommand is used For this example, Linux Mint 17.3 has been used.
4.1
Linux permission system
What makes the Linux permission system so great is its simplicity, specially when it’s compared to others, such us Windows’. In any case, we will see briefly how it works.
There are three main things that have to be understood: theelementsthe permissions are defined for, theactionsthat can be performed, andwhocan perform them.
The elements are two: • Files.
• Directories. The actions are three: • Read
• Write.
• Execute. Apart from for executing scripts and binaries, alsocorresponds to folders: to create files and other folders inside it. And who can perform them, other three:
• The user that owns the file.
• The group that the user owning the file belongs to.
• Any other user that is not the owner and does not belong to the group the owner does. To see how the permissions are organized, we can list the files in the terminal:
ls -l
-rw-r--r-- 1 julen julen 0 Jun 26 14:20 file.txt drwxr-xr-x 2 julen julen 4096 Jun 26 14:22 folder
The first section, 10 characters, are which correspond to permissions. Let’s examine it:
• The first character is for file type.-means that the file is a regular file, anddmeans that is a directory.
• The following nine characters are for read (r), write (w) and execute (x) permissions for the owner, the group of the owner, and others, respectively.
4.2
Changing permissions
To change the permissions, thechmodcommand (contraction of change and mode) is used. The syntax is the following: chmod permissions file [file 2] [file n]
The specification of the files seems quite obvious, but, how are the permissions specified?
4.2.1
Octal representation
One of the options is the octal notation.
For example, for setting read and write permissions for the owner, read permissions for its group, and no permission for others, to afile.txtfile, we would have to execute:
sudo chmod 640 file.txt
We can try to read the file with a user that is not the owner and does not belong the the owner’s group, to see what happens: sudo -u other-user more file.txt
And we would receive an error message: file.txt: Permission denied
But where comes that640from?
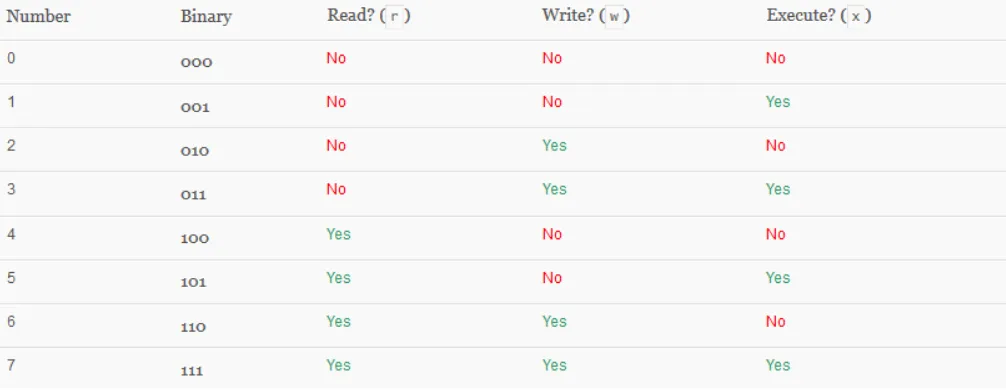
Each digit of that number represents which permissions will have the owner, its group, and others. And each digit is the octal representation of the permission combination we want to assign. So:
• 0for no permission.
• 1is for execution permission. • 2is for write permission. • 4is for read permission.
Figure 4.1: Most popular key bindings
4.2.2
Symbolic representation
Apart from octal representation,chmodalso allows symbolic representation. In the symbolic representation letters and arithmetic operators are used: For theusers, the symbols are the following:
• u: file owner. • g: file owner’s group. • o: other users. • a: all users.
Theactionsare represented with the same symbols that we have seen before: • r: read.
• w: write. • x: execute.
And the operators to set the permissions are:
• =: sets the permissions as specified, overwriting any other previous permissions. • +: adds permissions.
• -: removes permissions.
The syntax for the symbolic representation is the following:
sudo chmod who operator action(s)[,who operator action(s),...]
sudo chmod u=rw,g=r,o-rwx file.txt
As you can see, for this example, this notation requires much more verbosity.
But for other cases is more suitable. For example, if we want to maintain the current permissions, but allowing now everybody to write, we would have to type:
sudo chmod a+w file.txt
And the file would pass from these permissions:
-rw-r--- 1 julen julen 0 Jun 26 17:38 file.txt
To these ones:
-rw-rw--w- 1 julen julen 0 Jun 26 17:39 file.txt
4.3
Special permissions
Apart from those permissions we have seen, there are three more special permissions in Linux: the setuid(user id), the setgid(group id), and thesticky.
4.3.1
setuid
Thesetuidbit (set user ID) can be assigned to executable files, which is for, when a file is executed, allow the process acquire that file’s owner’s permissions.This is generally used to allow normal users (those without superuser privileges) to obtain root privileges for some executables.
This can be seen, for example, in common binaries, such us/bin/ping. If we check its permissions, we will see that it has the setuidbit bit assigned:
-rwsr-xr-x 1 root root 44168 May 7 2014 /bin/ping*
Which is expressed with as, in the place for the execution bit for the owner. If we remove thesetuidbit from that executable:
sudo chmod u-s /bin/ping
A normal user won’t be able to useping, and if it would try to use it: ping localhost
The following message will be shown:
ping: icmp open socket: Operation not permitted
Of course, an user withsudopermissions could execute the command with root privileges, but, as said before,this bit is though for users that don’t have superuser privileges.
4.3.2
setgid
If the setuidbit allows the user acquire the permissions of the owner,thesetgid(set group id) allows to acquire the permissions of the group.
The bit can be set as follows with the octal notation: sudo chmod 2777 script.sh
Which is set with the2. And with symbolic notation: sudo chmod g+s script.sh
If thesetuidbit was placed in the owner’s execution bit place, in this case, is placed in the group’s execution’s place: -rwxrwsrwx 1 julen julen 14 Jun 27 19:22 script.sh*
4.3.3
sticky
The sticky bit is used in directories, when we wanta file, or folder writable for several users, but where files and folders inside it can only be deleted by the owner. This bit is used, for example, in/tmpand/var/tmpdirectories.
The sticky bit can be assigned the following way: sudo chmod 1777 sticky/
Where the sticky bit is set with the leading1, and then, the wanted permissions (which usually are777for this cases). And, with symbolic notation:
sudo chmod +t sticky/
The sticky bit is expressed with atin the place for the execution bit for others: drwxrwxrwt 2 julen julen 4096 Jun 27 19:22 sticky/
We can see how it works, we can create a file in oursticky/directory, try to modify it with the owner and other user, and also to delete it:
touch file.txt
echo "written with owner" > file.txt
sudo -u other-user echo "written with other user" > file.txt
Which would work. But if we try to delete it with the user that is not the owner. . . sudo -u other-user rm file.txt
And we would see:
rm: remove write-protected regular file ’file.txt’?
We can typeyto confirm, but. . .
rm: cannot remove ’file.txt’: Operation not permitted
But the owner of the file could delete it with no problem. To remove the sticky bit:
4.4
Summary
Chapter 5
Linux Create User Example
This example will show you how to create users in Linux, looking at the two different available commands: the default utility, useradd; and a script that acts as more friendly front-end for the default utility, which is namedadduser.
For this example, Linux Mint 17.03 has been used.
5.1
How users are organized
The existing users of the system are registered in the file/etc/passwd.This file defines who has legit access to the system. This is an example of a line of the file:
julen:x:1000:1000:Julen Pardo:/home/julen:/bin/bash
Which follows the following format:
username:password:uid:gid:real_name:home_directory:command_shell
• Theusernameis the account name for the login.
• Thepasswordfield is actually not used in modern systems. The users credentials are stored in/etc/shadowfile. • Theuid(user id) andgid(group id) are the unique identifiers of the user and the group it belongs to, respectively. • Thereal_nameis that, the user’s real name.
• Thehome_directoryis the working directory of each user, usually/home/<username>.
• Finally, thecommand_shellis the program that is ran at login. Usually, this is the path to a shell. If not set,/bin/shis used.
It’s better not to touch manually this file to add(or modify/remove)users. To add users, we should use the methods that we will see in this tutorial.
5.2
Using native binary: useradd
useraddis the native, low level, binary of Linux systems. Its use is very simple: sudo useradd [options] username # superuser privileges are needed.
sudo useradd john_doe
Now, a new user namedjohn_doehas been created in the users database. We can check it in the/etc/passwdfile: grep "john_doe" /etc/passwd
Which will show:
john_doe:x:1002:1005::/home/john_doe:
5.2.1
Setting a password
We have created a user without a password! We can check it in the/etc/shadowfile: grep "john_doe" /etc/shadow
Returning:
john_doe:!:17018:0:99999:7:::
That exclamation mark!means that no password is set for the user.
Setting a password for each user is not an advice, but mandatory. For this, we have two options: create the user and then set the password (withpasswdcommand), or specify it at creation time with-p(--password) option. The recommended option is the first one, since the second one has two obvious downsides:
• The password is visible in the command line.
• We are not asked for confirmation, so we won’t notice if we make a miss typing the password.
Use always the passwdcommand to set the passwords. We only have to run it specifying the user, as in the following example:
sudo passwd john_doe
And we will be asked to set the password (with confirmation).
5.2.2
Creating the home directory
Now that we have this new user, we can try to login in the system with it: sudo -u john_doe -i # Login with user john_doe.
But we will get an error:
sudo:unable to change directory to /home/john_doe:No such file or directory
This is becauseuseraddsets the home directory for new users, but it does not create it by default. We can fix it by creating manually the directory, but is better to create the home directory at user creation time. This is achieved passing the-m( --create-home) option touseradd:
sudo userdel john_doe # To delete it. sudo useradd john_doe -m
5.2.3
Setting a different home directory
For some reason, we might want to set the home directory in a different place from/home. This is allowed using the-b( --base-dir) option. For example:
sudo useradd john_doe -b /tmp
Will create the following entry in/etc/passwd: john_doe:x:1002:1005::/tmp/john_doe:
Note that we only have specifiedthe directory where the home directory will be placed, not the home directory name itself. When we use this option, we also have to telluserradto create the home directory, as in the example of the previous section: sudo useradd john_doe -b /tmp -m
5.2.4
Setting the shell
You may have noticed that the in the line for our user, the value for the shell is not set. Usually, we would want to use/bin/ bashinstead of the default/bin/sh. To specify the shell, we have to use the-s(--shell) option:
sudo useradd john_doe -m -s /bin/bash
5.2.5
Other options
Let’s see other common options foruseraddcommand.
5.2.5.1 Specifying the primary group
The default behavior when creating a user is to create a group for it, with the same name, and set it as primary. But we have the option to avoid this and specify a group name (orgid) to be the primary of the creating user. For this,-g(--gid) option is used, as in the following example:
sudo useradd john_doe -g developers
Andjohn_doewill be created withdevelopersas primary group. We can check it with thegroupscommand: groups john_doe
5.2.5.2 Setting secondary groups
Similarly to the primary group, we may want to set secondary group(s) for a user at creation time. This time,-G(-groups) option has to be used, specifying the list of groups separated by commas, without whitespaces, e.g.:
sudo useradd john_doe -G developers,another_secondary
5.2.5.3 Setting an expiration date
This option is useful when we have to create accounts for users that we know beforehand have to have access to the system only until a certain date. For this, we have to use the-e(--expiredate) option, specifying the date inYYYY-MM-DDformat. Let’s see it with an example:
5.2.6
Setting personal information
Actually, we can set any type of additional comments, but this option is usually used to specify personal information, such as real name. We have to use the-c(--comment) option, specifying the information between quotes (single or double, doesn’t matter) if the comment contains whitespaces, e.g.:
sudo useradd john_doe -c ’John Doe’
Will generate the following entry:
john_doe:x:1002:1005:John Doe:/home/john_doe:
5.3
Using a user-friendly wrapper for useradd: adduser
Withuseradd, we have seen that creating users is not actually difficult, but, by default, it doesn’t perform some actions that can be supposed as essential, like creating the home directory. We can even create a user without a password, and do not notice it.
To make user creation easier and in a more comfortable way,adduserwas created. This is just a Perl script for an interactive use ofuseradd.
If we try to create a user withadduser, e.g.: sudo adduser john_doe
And we will see that, only typing that,adduserdoes many things for us: Adding user ’john_doe’ ...
Adding new group ’john_doe’ (1001) ...
Adding new user ’john_doe’ (1002) with group ’john_doe’ ... Creating home directory ’/home/john_doe’ ...
Copying files from ’/etc/skel’ ... Enter new UNIX password:
Retype new UNIX password:
passwd: password updated successfully
Changing the user information for john_doe
Enter the new value, or press ENTER for the default Full Name []: John Doe
Room Number []: 1
Work Phone []: 111-111-111
Home Phone []: 222-222-222 Other []: 333-333-333
Is the information correct? [Y/n] Y
(In italic the values specified by hand).
That is, apart from creating the home directory and setting the password withpasswd, also allows to set personal information about the user. And also sets/bin/bashfor the shell. This is the line that has been added in/etc/passwdfor the user we have just created:
john_doe:x:1002:1001:John Doe,1,111-111-111,222-222-222,333-333-333:/home/john_doe:/bin/ ← -bash
5.3.1
Changing the options
Even ifadduserdoes makes more comfortable the user creation, we can change the options. Let’s see the equivalents for adduserthat we have seen foruseradd.
sudo adduser <username> [option1] <value1>...[optionN] <valueN>
• Changing the home directory:--home • Changing the shell:--shell
• Specifying the primary group:--ingroup
Theadduserutility does not provide options for setting secondary groups and and an expiration date.
5.4
Summary
Chapter 6
Linux Add User to Group Example
In this tutorial we will see how to add users to groups in Linux, looking at the different possibilities (existing or non-existing users), and taking into account also the different types of groups users can belong to (primary and secondary groups).
For this example, Linux Mint 17.03 has been used.
6.1
How groups are organized
Linux defines the groups in the file/etc/group. If we open it, we will see many rows, with the following format: adm:x:4:syslog,julen
Which follows this format:
group_name:password:gid:user1,user2,...,userN
• Thegroup_nameis the name we give to the group when we create it withgroupadd. • Thepasswordis optional. Really, this is almost never used.
• Thegid(group identifier) is the numerical identifier that each group has. • Finally, the members of the group are listed.
It is possible to modify this file manually, but also dangerous, since it can become corrupt. In any case, there is available a tool for checking the integrity of this file, calledgrpck. To use it, just execute it withsudopermissions. If the file is correct, no message will be shown.In any case, is not recommendable to modify it manually.
It is necessary to know that Linux distinguishes two types of groups for a user: the primary, and secondaries. The primary group is the one used when the user creates files and directories. Let’s suppose that we have a user namedjohn_doe, whose primary group isdevelopers, but that is enrolled also in a group calledtesters. Every file created by him:
touch foo
Will be created with withdevelopersas the owner group: -rw-r--r-- 1 john_doe developers 0 jul 27 12:03 foo
To see to which groups a user belongs to, we can use thegroupscommand, specifying the user name: groups <username>
Which will return an output with the following format:
<username> : <primary_group>[<secondary_group1>,...,<secondary_groupN>]
6.2
Non-existing users
When we are going to create a new user, withuseradd, we can specify its group(s), so we can create users and assign groups to it with one command.
6.2.1
Primary group
The primary group is configured with-g(--gid) option. For example, to create ajohn_doeuser with thedevelopers group as primary, we would have to type:
sudo useradd john_doe -g developers
(Remember to always assign a password to each new user, withpasswdcommand.) We can check that it has been created as expected, usinggroupscommand: groups john_doe
Which would return: john_doe : developers
6.2.1.1 Changing default configuration of primary group assignment
If no primary group is specified, the assignation of the primary group will depend on the configuration defined in/etc/login. defs. If the variableUSERGROUP_ENABis set toyes, the primary group of the user will be a new group with the same name as the username. If the variable is set to no, the primary group of the user will be the one specified in/etc/default/ useradd, in theGROUPvariable.
So, if we assume that every user created in the future has to have a specific group as primary, e.g.,developers, we first have to edit the/etc/login.defsfile:
USERGROUP_ENAB no
The second and last step is to specify the group in/etc/default/useraddfile: GROUP=developers
6.2.2
Secondary groups
The option for assigning secondary groups to the user that is going to be created is-G(--groups), specifying the list of groups separated by commas, without whitespaces. For example:
sudo useradd john_doe -G developers,testers
Would create thejohn_doeuser, withdevelopersandtestersgroups as secondary. john_doe : john_doe developers testers
6.3
Existing users
Theusermodcommand, as its name suggests, is for modifying users, in all its facets, including their groups.
6.3.1
Primary group
Changing the primary group of an existing user is pretty simple, we just have to use the-goption for theuseradd, as told before:
sudo usermod john_doe -g developers # Now primary group of ’john_doe’ is ’developers’.
The manual ofuseraddwarns about changing the primary group of a user:
Any file from the user’s home directory owned by the previous primary group of the user ←
-will be owned by this new group.
The group ownership of files outside of the user’s home directory must be fixed manually.
This manual fixing for the whole disk can be easily done withfind. Let’s suppose that we have changedjohn_doeuser’s primary group fromjohn_doetodevelopers, and that we want to change the owner of every file to this one. We could execute the following:
sudo find / -group john_doe -exec chgrp developers {} \;
Finding every file in/and subdirectories (i.e., all the disk) that hasjohn_doeas group owner, executing for each result a chgrpto change to group owner todevelopers.
6.3.2
Secondary groups
Let’s suppose that we have ajohn_doeuser with the following output forgroups: john_doe : john_doe
Now, we want to assign some groups,developersandtesters, to the existingjohn_doeuser. We would just have to execute theusermodcommand with the-Goption, specifying the groups:
sudo usermod john_doe -G developers,testers
If we now check the groups with groups, we will see: john_doe : john_doe developers testers
According to the manual ofusermod, this is what happens when using-Goption:
[...] If the user is currently a member of a group which is not listed, the user will be removed from the group.This behavior can be changed via the -a option, which append s the user to the current supplementary group list.
In the previous case, we can see that the group thatjohn_doewas already belonging to (the primary), has not disappeared, but this isjust because it was the primary group. Note that, with the current groups forjohn_doe, the following:
sudo usermod john_doe -G another_group
john_doewould be removed fromdevelopersandtestersgroups: john_doe : john_doe another_group
To append groups, use the-a(--append) option, as the manual suggests.
6.4
Giving users sudo permissions
Users are givensudopermissions by just being added tosudogroup. So, the only thing we have to do is to add the users to sudogroup, as same as we have been seeing in this example:
6.5
Summary
Chapter 7
Linux tar Examples
I am a real fan of learning Linux commands by examples and from my personal experience it will really help to see some Linux tar command examples. But first, a brief bit of background information. The name "tar" stands for "tape archive".
As that name implies, originally it was a command that Unix administrators used to deal with tape drives. Where we now use the Linux tar command to create a tar file, we used to tell it to write the tar archive to a device file (e.g in /dev).
Nowadays the Linux tar command is more often used to create compressed archives that can easily be moved around, from one disk to anther disk or machine to machine, in other words we can call it as backup utility and its been used in most of the Unix flavors. One user may archive a large collection of files, and another user may extract those files, with both of them using the tar command.
7.1
Create a tar archive of a directory
In this example we will come to know basic tar command using optioncvf to create a tar archive. Here we are creating a tar file my-archive.tarfor a directory/home/my-directoryin current working directory:
[root@chasiota /]# tar cvf my-archive.tar /home/my-directory
c - Creates a new .tar archive file v - Verbosely list files which are processed f - File name type of the archive file
7.2
Create a zipped archive
In order to make tar ball as zipped archive , we need to use the option "z". In below example the command will make "my-archive.tar.gz" for a directory "/home/my-directory" in current working directory.
[root@chasiota /]# tar cvzf my-archive.tar.gz /home/my-directory
7.3
List the contents of a tar archive
To list the contents of an uncompressed tar archive, just replace the cflag with the tflag, like this: [root@chasiota /]# tar tvf my-archive.tar
This lists all the files in the archive, but does not extract them. To list all the files in a compressed archive, add the zflag like before:
or for a tar.gz archive:
[root@chasiota /]# tar tzvf my-archive.tar.gz
7.4
Extract tar archive contents
To extract the contents of a Linux tar archive, now just replace the tflag with the x("extract") flag. For uncompressed archives the extract command looks like this:
[root@chasiota /]# tar xvf my-archive.tar
For compressed archives the tar extract command looks like this: [root@chasiota /]# tar xzvf my-archive.tar.gz
or this for *.tgz:
[root@chasiota /]# tar xzvf my-archive.tgz
7.5
Extract tar.bz2 archive contents
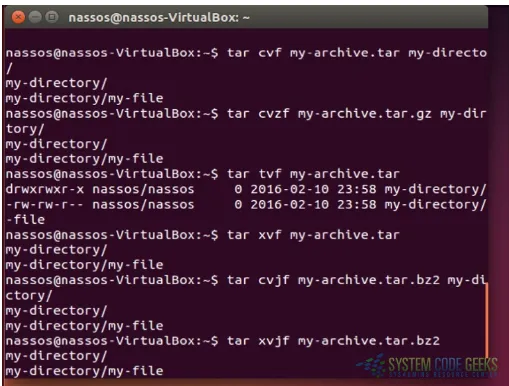
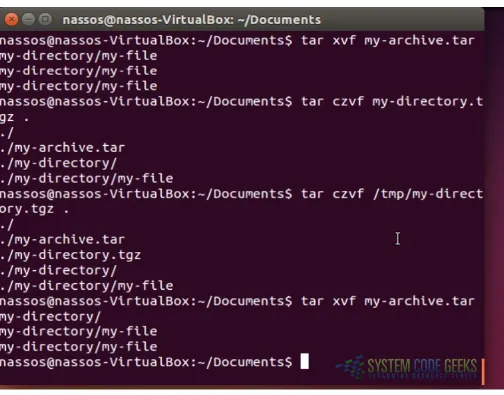
In order to extract the contents of a *.tar.bz2 file the options are "xj". [root@chasiota /]# tar xvjf my-archive.tar.bz2
Figure 7.1: Tar Commands (1)
7.6
Extract a single file from tar archive
To extract a specific file from a tar archive, specify the file name at the end of the tar xvf command as shown below. The following command extracts only a specific file (my-file.sh) in the current directory from a large tar file.
[root@chasiota /]# tar xvf my-archive.tar my-file.sh
7.7
Create a compressed archive of the current directory
Many times when using the Linux tar command you will want to create an archive of all files in the current directory, including all subdirectories. You can easily create this archive like this:
[root@chasiota /]# tar czvf my-directory.tgz .
7.8
Create an archive in a different directory
You may also want to create a new tar archive like that previous example in a different directory, like this: [root@chasiota /]# tar czvf /tmp/my-directory.tgz .
As you can see, you just add a path before the name of your tar archive to specify what directory the archive should be created in.
7.9
Extract a single directory from tar archive
To extract a single directory (along with its subdirectory and files) from a tar archive, specify the directory name at the end of the tar xvf command as shown below. The following extracts only a specific directory from a large tar file:
[root@chasiota /]# tar xvf my-archive.tar home/my-directory/
[image:45.595.58.562.312.707.2]Check below image for examples 6-9:
7.10
Extract a single directory from tar.gz archive
We just need to add “z” to the above extract command “xvf”
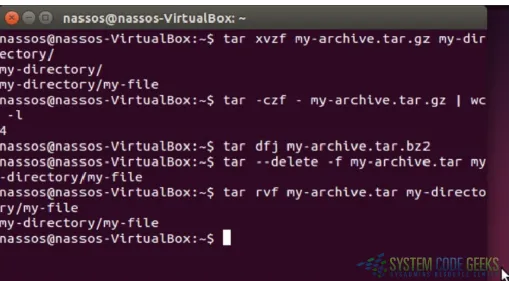
[root@chasiota /]# tar xvzf my-archive.tar.gz home/my-directory/
7.11
Check the size of the tar, tar.gz and tar.bz2 Archive File
For any tar, tar.gz and tar.bz2 archive file, the below commands will display the size of archive file in Kilobytes (KB): [root@chasiota /]# tar -cf - my-archive.tar | wc -l
[root@chasiota /]# tar -czf - my-archive.tar.gz | wc -l
[root@chasiota /]# tar -cjf - my-archive.tar.bz2 | wc -l
7.12
Verify integrity of tar file
As part of creating a tar file, you can verify the integrity of the archive file that got created using the option “W” as shown below: [root@chasiota /]# tar tvfW my-archive.tar
If an output line starts with Verify, and there is no differs line then the file/directory is OK. If not, you should investigate the issue.
Note: for a compressed archive file ( *.tar.gz, *.tar.bz2 ) you cannot do the verification.
7.13
Find the difference between an archive and file system
Finding the difference between an archive and file system can be done even for a compressed archive. It also shows the same output as above excluding the lines with Verify.
Finding the difference between gzip archive file and file system: [root@chasiota /]# tar dfz my-archive.tgz
Finding the difference between bzip2 archive file and file system: [root@chasiota /]# tar dfj my-archive.tar.bz2
7.14
Delete a file from tar ball
You can use the following syntax to delete a file from a tar ball:
[root@chasiota /]# tar --delete -f my-archive.tar home/my-file
7.15
Add a file to an existing archive
7.16
Add a directory to an existing archive
Adding a directory is also the same. We need to mention the directory name instead of the file name: [root@chasiota /]# tar rvf my-archive.tar my-dir/
7.17
Extract group of files from tar, tar.gz, tar.bz2 archives using regular
expres-sion
You can specify a regular expressions , to extract files matching a specified pattern. For example, the following tar command extracts all the files whose file ends with .java:
[root@chasiota /]# tar xvf my-archive.tar --wildcards ’*.java’
7.18
Untar multiple files from tar, tar.gz and tar.bz2 File
To extract or untar multiple files from the tar, tar.gz and tar.bz2 archive file. For example the below command will extract “my-file-1” “my-file-2” and "my-file-3" from the archive files:
[root@chasiota /]# tar -xvf my-archive.tar "my-file-1" "my-file-2" "my-file-3"
[root@chasiota /]# tar -zxvf my-archive.tar.gz "my-file-1" "my-file-2" "my-file-3"
[root@chasiota /]# tar -jxvf my-archive.tar.bz2 "my-file-1" "my-file-2" "my-file-3"
7.19
Restore files with tar
More important than performing regular backups is having them available when we need to recover important files. The following command will restore all files from the full-backup-Day-Month-Year.tar archive, which is an example backup of our home directory:
[root@chasiota /]# tar xpf /dev/st0/full-backup-Day-Month-Year.tar
Figure 7.3: Tar Commands (3)
7.20
Check the manual page for tar
Chapter 8
Linux sed Examples
Sed is basically a stream editor used for modifying files in unix or linux. It provides a nifty way to perform operations on files which can be passed around through pipes. Most people never learn its real power, they just simply use sed to replace text. You can do many things apart from replacing text with sed.
As mentioned earlier, sed is an editor that allows us to use pattern matching to search and replace within a file, or an input stream. This works by using Regular Expressions. By default, the results of any edits we make to a source file, or input stream, will be sent to STDOUT, the standard output. The original file will be unaffected by the edits.
Also the sed command can be incredibly useful when bootstrapping a new server, or machine, as it can easily be scripted. A common use case for sed is to script the editing of configuration files on a new server instance to facilitate the further setup of the needed environment for that machine.
In this article I will describe the capabilities of sed with examples. Consider the below file as input to our examples: >cat example.txt
I want to learn java. Learn java. Learn java
java is the best java forever
8.1
Replacing string
Sed command is mostly used to replace the text in a file. The below sed command replaces the word "java" with "guava" in the file only for the first occurrence in each line:
>sed ’s/java/guava/’ example.txt
Here the "s" specifies the substitution operation. The "/" are delimiters. The "java" is the search pattern and the "guava" is the replacement string.
By default, the sed command replaces the first occurrence of the pattern in each line and it won’t replace next occurences.
8.2
Replacing the nth occurrence of a pattern in a line
Use the /1, /2 etc flags to replace the first, second occurrence of a pattern in a line. The below command replaces the second occurrence of the word "java" with "guava" in a line:
8.3
Replacing all the occurrences of a pattern in a line
The substitute flag /g (global replacement) specifies the sed command to replace all the occurrences of the string in the line: >sed ’s/java/guava/g’ example.txt
8.4
Replacing from nth occurrence to all occurrences in a line
Use the combination of /1, /2, /n and /g to replace all the patterns from the nth occurrence of a pattern in a line. The following sed command replaces from the second occurrence until the nth of the word "java" with the word "guava" in a line:
>sed ’s/java/guava/2g’ example.txt
8.5
Duplicating the replaced line with /p flag
The /p print flag prints the replaced line twice on the terminal. If a line does not have the search pattern and is not replaced, then the /p prints that line only once.
>sed ’s/java/guava/p’ example.txt
Figure 8.1: Sed Examples 1-5
8.6
Replacing string on a specific line number
You can restrict the sed command to replace the string on a specific line number. The below sed command replaces the string "java" only on the second line:
>sed ’2 s/java/guava/’ example.txt
8.7
Replacing string on a range of lines
You can specify a range of line numbers to the sed command for replacing a string. Here the sed command replaces the lines with range from 1 to 3. You may use the $ operator to indicate the last line in the file:
>sed ’1,$ s/java/guava/’ example.txt
8.8
Replacing on a line which matches a pattern
the pattern "java" and then replaces the word "java" with "guava". >sed ’/java/ s/java/guava/’ example.txt
8.9
Deleting lines
You can delete the lines of a file by specifying the line number or a range of numbers: >sed ’2 d’ example.txt
>sed ’1,$ d’ example.txt
8.10
Duplicating lines
You can use the sed command to print each line of a file two times: >sed ’p’ example.txt
The below image illustrates the execution of the previous 5 sed commands:
8.11
Changing the slash (/) delimiter
You can use any delimiter other than the slash. As an example if you want to change the web url to another url, using too many backslashes makes the sed command look awkward. In this case we can change the delimiter to another character as shown in the below example:
>sed ’s_https://_www_’ example.txt
8.12
Using & as the matched string
There might be cases where you want to search for the pattern and replace that pattern by adding some extra characters to it. In such cases & comes in handy. The & represents the matched string:
>sed ’s/java/{&}/’ example.txt
8.13
Using 1,2 and so on to 9
The first pair of parenthesis specified in the pattern represents the 1, the second represents the 2 and so on. The 1,2 can be used in the replacement string to make changes to the source string. As an example, if you want to replace the word "java" in a line with twice as the word like "javajava" use the sed command as below:
>sed ’s/\(java\)/\1\1/’ example.txt
8.14
Running multiple sed commands
You can run multiple sed commands by piping the output of one sed command as input to another sed command. Sed provides also an -e option to run multiple sed commands in a single sed command:
>sed ’s/java/guava/’ example.txt | sed ’s/guava/python/’
>sed -e ’s/java/guava/’ -e ’s/guava/python/’ example.txt
8.15
Printing only the replaced lines
Use the -n option along with the /p print flag to display only the replaced lines. Here the -n option suppresses the duplicate rows generated by the /p flag and prints the replaced lines only one time:
>sed -n ’s/java/guava/p’ example.txt
Figure 8.3: Sed Examples 11-15
8.16
Using sed as grep
You can make sed command to work as similar to grep command. Here the sed command looks for the pattern "java" in each line of a file and prints those lines that have the pattern:
>grep ’java’ example.txt
>sed -n ’/java/ p’ example.txt
8.17
Adding a line after a match is found.
The sed command can add a new line after a pattern match is found. The "a" command to sed tells it to add a new line after a match is found:
8.18
Adding a line before a match
The sed command can add a new line before a pattern match is found. The "i" command to sed tells it to add a new line before a match is found:
>sed ’/java/ i "New line"’ example.txt
8.19
Changing a line
The sed command can be used to replace an entire line with a new line if a match is found. The "c" command to sed tells it to change the line.
>sed ’/java/ c "Change line"’ example.txt
8.20
Transforming like tr command
The sed command can be used to convert the lower case letters to upper case letters by using the transform "y" option. In the below example the sed command transforms the alphabets "av" into their uppercase format "AV"
>sed ’y/av/AV/’ example.txt
[image:55.595.54.569.400.726.2]The below image illustrates the execution of the last 5 sed commands:
8.21
Man sed
We tried to present some basic examples of using the sed command. Of course you may always use the man command to find the full functionality of the sed command:
Chapter 9
Linux cut Examples
Cut is a Unix command line utility which is used to extract sections from each line of input, usually from a file. It is currently part of the GNU coreutils package and the BSD Base System. It first appeared in AT&T System III UNIX in 1982. Extraction of line segments can typically be done by bytes (-b), characters (-c), or fields (-f) separated by a delimiter (-d - the tab character by default).
A range must be provided in each case which consists of one of N, N-M, N- (N to the end of the line), or -M (beginning of the line to M), where N and M are counted from 1 (there is no zeroth value). Basically the cut command slices a line and extracts the text.
In this article, we will start with a few basic examples and then explore all the advanced options thatcutprovides. First consider the below text file as an example:
>cat example.txt
I want to learn linux, learn linux, learn linux. Linux is the best
Linux forever
9.1
Printing characters by position
The cut command can be used to print characters in a line by specifying the position of the characters. To print the characters in a line, use the -c option in cut command. The below cut command prints the fourth character in each line of the file. You can also print more than one character at a time by specifying the character positions in a comma separated list.
>cut -c4 example.txt
9.2
Printing characters by range
You can print a range of characters in a line by specifying the start and end position of the characters. The below cut command prints the characters from fourth position to the seventh position in each line:
>cut -c4-7 example.txt
9.3
Printing fields using
comma
delimiter
>cut -d, -f2,3 example.txt
[image:58.595.60.569.139.329.2]The below image illustrates the execution of the first 3 cut commands:
Figure 9.1: Cut Examples 1-3
9.4
Printing fields using space delimiter
The below cut command prints the second field in each line by treating the space as delimiter. You can also print more than one fields by specifying the position of the fields in a comma delimited list.
>cut -d’ ’ -f2 example.txt
9.5
Displaying range of fields
You can print a range of fields by specifying the start and end position. The below cut command prints the first, second and third fields:
>cut -d’ ’ -f1-3 example.txt
9.6
Displaying first field from file
The /etc/passwd is a delimited file and the delimiter is a colon (:). The cut command to display the first field in /etc/passwd file is the following:
>cut -d’:’ -f1 /etc/passwd
Figure 9.2: Cut Examples 4-6
9.7
Displaying fields from 1st to nth
As we already shown in 5th example, a range of fields can be printed by specifying the start and end position. There is also a possibility to omit the start position and declare only the last. The below cut command prints all fields from first to 3rd using space as a delimiter:
>cut -d’ ’ -f-3 example.txt
9.8
Displaying fields from nth to last
You can also print all fields by omitting the last position and declaring only the start. The below cut command prints from second field until the last one using space as delimiter:
>cut -d’ ’ -f2- example.txt
9.9
Ignoring lines that do not contain delimiter
The cut command can be also be used to print only the lines that do not contain a certain delimiter by using the -s option. The below cut command prints only the lines which contain the comma delimiter and fields from 2nd to last: