Theses Thesis/Dissertation Collections
9-20-2007
Imaginary spaces
Daniel J. Weisbard
Follow this and additional works at:http://scholarworks.rit.edu/theses
This Thesis is brought to you for free and open access by the Thesis/Dissertation Collections at RIT Scholar Works. It has been accepted for inclusion in Theses by an authorized administrator of RIT Scholar Works. For more information, please [email protected].
Recommended Citation
ROCHESTER INSTITUTE OF TECHNOLOGY
A Thesis Submitted to the Faculty of the College of Imaging Arts and Sciences In candidacy for the degree of Master of Fine Arts
Imaginary
Spaces
Daniel J. Weisbard
Chief Advisor:Marla Schweppe, Professor, Computer Graphics Design
Signature of Committee Chair Date
Associate Advisor:Daniel DeLuna, Assistant Professor, Computer Graphics Design
Signature of Committee Member Date
Associate Advisor: Alex Bitterman, Assistant Professor, Graphic Design
Signature of Committee Member Date
School of Design Chairperson:
Patti Lachance, Associate Professor, School of Design
Signature of Administrative Chairperson Date
Reproduction Granted:
I, Daniel J. Weisbard, hereby grant permission to Rochester Institute of Technology to reproduce my thesis documentation in whole of part. Any reproduction will not be for commercial use or profit.
Inclusion in the RIT Digital Media Library Electronic Thesis and Dissertation (ETD) Archive:
I, Daniel J. Weisbard, additionally grant Rochester Institute of Technology Digital Media Library the non-exclusive license to archive and provide electronic access to my thesis in whole or in part in all forms of media in perpetuity. I understand that my work, in addition to its bibliographic record and abstract, will be available to the worldwide community of scholars and researchers through the RIT DML. I retain all other ownership rights to the copyright of this thesis. I also retain the right to use in future works (such as article and books) all or part of this thesis. I am aware that Rochester Institute of Technology does not require registration of copyright for ETDs. I hereby certify that, if appropriate, I have obtained and attached written permission statements from owners of each third party copyrighted matter to be included in my thesis. I certify that the version I submit is the same as that approved by my committee.
Table of Contents
Abstract……… i
Acknowledgements……… ii
I. ……. 1
A. Technical Overview 1
Introduction………
II. l nning……… 2
III. Design and Aesthetic Decisions……… 4
A. bandoned Underground Tunnel 4
B. Office Environment
IV.
nclusion………
VI. Appendix………. 14
A. Thesis Proposal 14
o
Target Audience
o Production
liography………
P a
A
7
C. Changes to Thesis Proposal 10
Unexpected Obstacles……….. 12
V. Co …... 2
.Project Description
o
B. Literature Review 18
C. Images 20
Abstract
Current three dimensional computer graphics technology has given artists and
puter generated images.
Imaginary Spaces is a series of images which visually depict two unique and imaginative
digitally produced environments. By utilizing modern computer graphics technology, these
have been brought to life in stunning realism and detail. Imaginary Spaces
consists of seven total images which showcase each environment from alternating vantage
i.
designers a new set of tools for producing amazingly life-like com
artificial spaces
ii.
cknowledgements
would like to take a moment to thank all of the people who helped to make this
project a reality. First I would like to thank my family. It was your enduring support that
nabled me to complete this great accomplishment. I would next like to thank my faculty
dvisors. Marla Schweppe, without your help this project would have never made it past the
lanning stage. Whenever I hit a dead end, you were always there to help get me back on
uch a great teacher, advisor, and friend. Dan Deluna, over the
past tw hile
ow
an,
o the
A
I
e
a
p
course. Thank you for being s
o years, you have been an invaluable mentor to me. You proved this once again w
part of my thesis committee. Without you, I would have never developed the skills and
techniques necessary to complete this project. Alex Bitterman, your advice was crucial in h
I chose to design the interior elements of this thesis. Thank you for sharing your vast
knowledge. Finally, I would next like to thank my great friends and classmates. Roxy Feldm
you were always there with me every step of the way. Thank you for your patience and
support. I could have never done it without you. Jen Witkowski, thanks so much for getting
my poster printed. It was a great addition to the project. I would also like to say thanks t
entire CGD class of 2007. You could always be counted on for great suggestions and
I.
INTRODUCTION
The most challenging part of this thesis was developing the original concept.
By studying books, magazines, and online galleries, I was able to generate many new
and diverse ideas. These reference materials related mainly to video game design,
high-end 3D computer graphics, and architecture. In addition to design and
conceptualization research, I needed to familiarize myself with some advanced
practices for creating realistic 3D rendered environments. To accomplish this, I
consulted books such as, Advanced Maya Texturing and Lighting, by Lee Lanier and
Digital Lighting and Rendering, by Jeremy Birn. Useful web resources included
highend3d.com and cgartchitect.com.
In the past, most of my student projects involved building simple 3D scenes.
The technical and creative demands of this thesis were far more complex than
anything I had previously worked on. Adapting to this new level of complexity
required me to develop a more comprehensive understanding of 3D computer
graphics technology. By the time that this project had reached completion, my overall
knowledge and skill had risen to a whole new level.
A. Technical Overview
Before proceeding, I feel that it is necessary to provide a brief overview of the
technology used in creating this thesis. Imaginary Spaces was created using Autodesk
Maya, which is a high-end 3D computer graphics application. Every observable object
in Imaginary Spaces was individually built or modeled in the computer. Like any object
in the real world, a model exists in three dimensions, meaning that it can be rotated
and observed from any desired vantage point. Creating a model involves defining the
virtual dimensions of an object by constructing a wireframe mesh. This grid of
intersecting lines defines the exterior boundaries of a model. Like the shell of an egg,
2
Imaginary Spaces
After a model has been built, color and surfaces details are added during a
process called texturing. A texture is a two dimensional image which is wrapped
around a model like a skin. Texturing can be compared to the process of peeling an
orange and then laying the removed peel flat on a table. Like a texture, the
unwrapped peel represents the exact outer surface area of the orange. One could use
this unwrapped peel as a reference to specifically place a graphic element on the
orange’s exterior. After placing artwork over the flattened peel, it can be reapplied to
perfectly wrap around the orange’s round body.
Like with the orange peel example, texturing a 3D model requires one to first
unwrap a model’s outer surface area so that any specific graphics can be applied.
Once this skin or “texture” receives the intended graphic elements, it will precisely
cover the model’s exterior surface area when reapplied. Textures not only provide
models with color information, but they can also be used to control details such as
surface consistency & shininess.
After a model has been textured, virtual light sources are added to a 3D scene.
These controllable lights are designed to mimic the way that actual light interacts with
objects in the real world. They provide realistic light and shadow effects to objects in a
3D computer graphics scene.
Following the lighting process, a scene is ready to be rendered. At this stage,
the computer interprets the scene and generates a detailed visual representation in
the form of an image. Rendering is similar to taking a photograph in virtual space. A
camera is positioned at a particular angle in three-dimensional space. Like in
photography, the computer will produce a visual representation of whatever objects
lay in the camera’s frame.
II.
PLANNING
Following the approval of my thesis proposal, I began the process of planning
and conceptualization. This phase of the project was very difficult and time
objective was to develop environments that were truly one of a kind. Planning an
entire environment from the ground up proved to be much more complicated than I
had anticipated. Designing the physical spaces as well as all of the individual props
had to be carefully planned. Maintaining proper design continuity required an intense
amount of time and attention. I did not want objects in either environment to appear
out of place. To help gain some further insight into interior design, I studied many
photographs from architecture and interior design magazines.
My second major planning strategy was to keep a sketch book with me at all
times. This allowed me to make a quick visual record of inspirational observations
made during my normal daily routine. While sketching, I always tried to make very
rough, gestural drawings. This prevented me from duplicating the exact features of an
object that I was observing. These vague sketches could later be transformed into a
concept that was entirely new. In a few cases, I chose to leave certain objects in this
thesis unchanged. The office desk for example, has a design which I have always
admired. I grew up with this object and it possesses a certain sentimental quality that I
did not want to alter.
4
Imaginary Spaces
During the planning stage, I created a general list of ideas which I felt had the
potential to be great. The ideas from my original list included:
• Classical Ruins
• Outdoor Environment
• Abandoned Underground Tunnel
• An Office
• Science Fiction Inspired Environment
Each of these ideas contains elements of my personality as well as some of my life
long interests. I really wanted this project to reflect part of me and maybe even bring
elements of my own imagination to life. Unfortunately the short time frame of this
project made it impossible to build all of the five environment ideas. After careful
thought and consideration, I narrowed my list down to the Office Environment and
Abandoned Underground Tunnel. I felt that these two ideas were visually different
from one another and would provide this project with a nice variety of environmental
elements.
III.
DESIGN AND AESTHETIC DECISIONS
A. Abandoned Underground Tunnel
I envisioned the abandoned underground tunnel as a place reminiscent of an old
bunker or Cold War fallout shelter. This environment drew influences from certain 3D
video game levels which I admired while growing up. The underground tunnel was
designed to appear neglected; a place which had not experienced human presence in
many years. Some of the original ideas from my design notes include:
• Corroded cement brick walls
• Filthy cement floor
• Peeling paint
• Rusted metal on doors and pipes running along the walls
• Dirt and grime in cracks and along wall borders
• Corroded signs/wall graphics
Figure B.
I eventually incorporated additional objects into the tunnel’s design. These
included rusted metal doors, utility spotlights that could be pivoted, and a second
smaller room which could be accessed through one of the metal doors.
To give the tunnel a realistic look and feel, I chose to develop all of the wall,
floor, and ceiling textures by hand. Photographs of concrete brick and cement served
as the starting point for all environment textures created for the tunnel environment.
Experience has taught me that photographs are a great place to begin when trying to
create realistic environment textures. After using photographs to build the base
textures, dozens of subsequent graphics were introduced and layered above.
Photoshop’s layer modes were instrumental in creating realistic dirt, stains, and
peeling paint effects. This technique allowed these imperfections to appear as if they
were actually part of the original brick and concrete. The color of brick and concrete
6
Imaginary Spaces
tint of green or yellow to create an appearance of wall and floor stains. In addition to
color, textures played an important role in creating surface details such as roughness,
wetness, and reflection.
For certain scene props, bright colors were used. This allowed these objects to
contrast well with the monochromatic floors and ceilings. The color red was used for
the metal doors and pipes because I felt that it would elicit feelings of danger. The
utility spotlight models were assigned a bright yellow because I wanted them to look
new and clean when compared to the tunnel’s concrete floors and ceilings.
In order to develop a strong atmosphere, I chose to incorporate dramatic
lighting effects into the tunnel environment. Creating the tunnel’s dark and
mysterious appearance relied heavily on high contrast lighting. The plan was to
project bright pools of light on ceiling and wall areas while maintaining areas of
intense shadow on the floors. Two utility lights which I modeled were incorporated to
provide additional illumination to areas of interest such as doors and pipes. The image
below illustrates the lighting quality of the abandoned underground tunnel
Figure C.
B. Office Environment
In the house that I grew up in, there is a space which contains an antique
wooden desk. During certain times of the day, sunlight passes through this room’s
large windows. When this occurs, the entire interior becomes blanketed with
interesting patterns of light and shadow. After observing this effect during winter
break, I decided to incorporate this effect into the office environment of my thesis.
Unlike the room in my family’s home, the office environment of this thesis
consists of objects primarily made of wood. These objects include shelves, a floor,
window frames, a coffee table, end tables, and chairs. The antique desk is the only
object in this thesis which remains entirely original. I actually modeled this object
using exact measurements that were taken during winter break.
Figure D.
In terms of overall appearance, the office environment is a visual opposite of the
underground tunnel. Unlike its dark counterpart, the office environment was
8
Imaginary Spaces
space littered with evidence of a human presence. Objects like books, glasses, coffee
mugs, and random scattered papers were included to suggest the recent presence of
some unknown person.
Some of the objects listed in my original design notes included:
• Wooden chairs
• Coffee table
• Full bookshelf
• Large windows
• Antique wooden desk
• Scattered books and papers
• A banker’s lamp
• Wooden floor
To maintain continuity between all of the office’s furnishings, I chose to use the
antique desk as a design guide for developing all additional furniture. The shelf, chair,
table, floor, and window frame models were built to exhibit features similar to those of
the desk. These common details can be observed in all of the office environment’s
furniture, window frames, and floor. Each of elements exhibit the same rounded
edges and dark, grainy wood textures. At one point during this project, I realized that
the heavy use of wood was becoming somewhat overbearing. To resolve this issue I
chose to incorporate a round floor carpet into the environment. This object’s green
color and rough surface texture helped to balance out all of the office’s wood.
To enhance the realism of the office environment, all models were assigned their
own custom textures. These textures were built from either stock photography which
I purchased, or actual photographs taken with my digital camera. During the
planning stage, I always carried my camera and frequently took pictures of many
different objects. One day, while researching in the library, I decided to take
photographs of some old books that were stacked on the shelves near me. Months
later I used these same photographs to texture the office’s book models. For the
heavily used wood textures, I purchased high resolution stock photographs which
were modified for each different model.
naturally lit. I felt that this fit well with the heavy use of natural wood throughout the
environment. The space was designed so that sunlight would enter into the scene
from three tall windows on the left wall. As light poured in, uniquely patterned areas
of light and shadow interact will all objects in the environment.
Figure E.
C. Changes to Thesis Proposal
Due to time constraints, I was required to make a number of major changes to
the original proposal of this thesis. Early in the planning stage I began to realize that if I
wanted to achieve the desired level of detail and realism, I would need to remove the
Flash based navigation component. The complex nature of my original proposal
required a greater amount of time and resources than originally anticipated.
Thankfully, with the aid of my committee members, I was able to devise an
alternative to using the originally planned point and click navigation component. The
first proposed alternative was to create an animated camera “flythrough” of the
environments. A number of tests indicated that the camera flythrough would not be
10
Imaginary Spaces
my thesis chair, Marla Schweppe suggested that I produce a number of high quality
color prints. This idea proved to be a terrific solution because it provided a means for
displaying all of the environmental detail in high resolution. Furthermore, prints could
be generated quickly and did not require the use of a computer or monitor for display
purposes. Furthermore, using prints was an ideal means for showcasing all the artistic
detail that went into this project.
In its finished form, Imaginary Spaces consisted of a total of seven high quality
framed prints. This included four images of the underground tunnel and three images of
the office scene. Each of the seven images was rendered at a resolution of 1500x1940
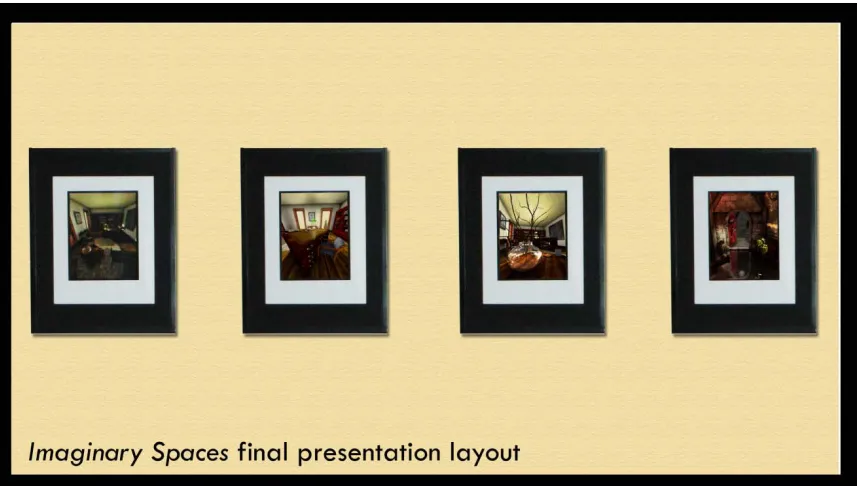
pixels. This translated into 5” x 6.5” vertically oriented prints. For the thesis show, the final,
framed prints were hung horizontally and arranged so that images from each
environment were grouped together. In addition, to the framed prints, I created an 18” x
22” poster which described the project. The image below illustrates the final display
[image:16.612.113.542.384.627.2]configuration of Imaginary Spaces.
Figure F. - please note: the actual final display configuration contained a total of seven horizontally oriented pictures. The above is an illustration.
A second change that I made to my proposal relates to the environment’s
order to achieve a type of forced “perceptual inconsistency”. During the planning
stages I began to place a greater level of importance on developing complex textures
and light setups. I felt that developing these skills were the true focus of my studies at
RIT and wanted this project to reflect the best of my abilities as a 3D artist and
designer.
With the exception of the above mentioned changes, this thesis followed the
originally proposed goal of creating extremely realistic virtual environments which
immerse the viewer. By eliminating certain elements from my original proposal, I was
able to achieve a level of production quality that would have otherwise been
impossible.
IV.
UNEXPECTED OBSTACLES
During the course of this project, a number of unexpected technical obstacles
had to be dealt with. The greatest problem which I encountered had to do with
rendering. By spring quarter, my files were far larger than anything I had previously
worked with. Combining such a large number of models, lights, and textures into a
single Maya scene drove the required render time through the roof. The Maya file for
the office environment eventually became so large that I was forced to separate it into
smaller, individual files that could be referenced by a master file.
Another related problem occurred when I attempted to render an image at
print resolution. In some cases I had to render each final image in pieces so that they
could later be reassembled as a whole. Although successful, this solution was not
always reliable and sometimes required me to stay and monitor the computer for up
to 24 hours.
By the end of spring quarter I had ironed out all of the major technical issues
and completed the project as planned. All of the final rendered images were
assembled, color corrected and then sent to the printer. Upon return each of the prints
were matted, placed in frames, and packed up in preparation for the 2007 RIT Computer
12
Imaginary Spaces
V.
CONCLUSION
Imaginary Spaces successfully met the goal of presenting a set of realistic and
unique virtual environments. At the thesis show, many individuals commented that
they at first believed the images were actual photographs. Using color prints as the
presentation format for this project proved very successful. They were a terrific means
of exhibiting the high level of detail of each environment. This straightforward format
allowed individuals from all backgrounds to observe and fully absorb the aesthetic
quality of this thesis.
Imaginary Spaces is the culmination of all my graduate school accomplishments.
Working on this project taught me a great deal about planning and time
management. Without the guidance of my thesis committee members, Imaginary
Spaces would have never been possible. I firmly believe that this experience has
VI.
APPENDIX
A. Thesis Proposal
Project Description
Unlike the physical spaces observed in reality, this project will allow users to
explore a world of the impossible; a place absent of logic and reason. The navigable
spaces of this unlikely environment will be distinct & unique from one another. The
experience in one room may be quite different from that in another. For example,
Room A may appear dark, damp, and humid whereas Room B may be illuminated and
seem more sterile. Perception will be intentionally distorted in ways such as
exaggerating and varying the scale of objects in relation to the viewers perceived size.
While exploring the spaces, users will have the option of positioning themselves
forward and backward, as well as turning left or right. This will be achieved through a
simple and intuitive point and click navigation interface. Movement within the
environment will be simulated by a system of interchanging, pre rendered images.
When a user decides to travel in the forward direction, the current viewed image of
the scene becomes replaced by another perspective of the environment which is now
ahead of the previous location by perhaps a few feet. The same transitions will occur
when a user decides to turn left or right.
Target Audience
The target audience of this project is intended to be any member of the computer
14
Imaginary Spaces
universal; however, an understanding of the English language will be necessary to
fully enjoy certain parts of the experience.
A theme of architectural and perceptual inconsistency will be present throughout
the entire project. For example, a user exiting a room styled from the Victorian era will
unexpectedly transition into a high-tech science fiction inspired area populated by
blinking screens and illuminated consoles. Personal items such as written notes &
photographs may be scattered through areas. Some objects are intended to give
users a feeling that some mysterious individual was recently in that area. An example
could be something like observing a partially eaten snack lying on a table or counter.
Other special objects in the scene will give users the chance to view outside by looking
through certain designated objects such as windows or maybe a telescope. Similarly,
users will have the ability to travel “up close” to certain other “unique” objects by
clicking on them for a detailed view. These objects of focus are intended to enhance
immersion factor as well as help elicit some additional curiosity in the viewer in order
to maintain motivation and interest.
To enhance the overall experience, ambient sounds and music will be employed.
Music will run throughout the project and environmental sounds will be applied
where necessary. For example, an outdoor area might be accompanied by the sound
of blowing wind.
Production
All 3D content and environmental detail will be modeled and rendered entirely
with Autodesk Maya. Texturing will be done using Maya in conjunction with Adobe
Photoshop and possibly ZBrush. Photoshop will be used for the post production
cleanup of all rendered images. Adobe Flash will be used for creating a custom
navigation interface. This medium will be flexible for handling the exchange of
images and interface design components. Furthermore, Flash would potentially allow
for the project to be experienced over the web.
Following completing of the main project, a fully animated camera “fly-through”
second machine located adjacent to the computer running the main project. Scenes
from this animation may be eventually incorporated into the Flash component to
serve as an introduction clip or title sequence for the project.
The overall goal of this project is to design and produce a series of very high
quality and originally conceived virtual environments. To achieve this, all areas will be
carefully lit. High quality image maps will be applied to every object to achieve
realistic surface detail throughout the environments. Particles and light effects may be
used to build atmosphere and special effects if necessary. Much of the project’s
navigable space will include organic props such as indoor plants that will be modeled
and textured. Atmospheric and nature effects will be incorporated into the outdoor
areas as well as indoor spaces if necessary.
To capture the required scene perspectives in Maya, cameras will be placed at pre
determined intervals throughout the environment to gather consistent front, behind,
left, and right viewing angles. Images will be captured at 90 or 60 degree angles. In
some instances, other angles will be taken. It may be possible to key frame or possibly
script the changing camera locations so that image sets can be batch rendered. This
method will require further research.
For transitions between rooms, animated image sequences may be used. For
example, when trying to exit through a door, the user will click on the door to trigger
an animation of the door opening followed by the camera moving towards the open
door. The clip will then fade/transition to the enter position image of the destination
room. Additional testing will be required to determine if Flash can handle this type of
animation.
After all of the required CG images have been rendered, touched up, and
formatted, they will be imported into a pre-assembled Flash document. Prior to
bringing the images into flash, a hand drawn schematic of the virtual spaces will serve
as an organizational aid for placing images. This labeled diagram will show where
each set of images is to be placed. As shots are imported, they will be crossed off the
16
Imaginary Spaces
Once in Flash, images will be housed on specific frames inside the timeline.
Clicking on a particular region of the screen will jump a user to their desired position
by referencing a specific frame’s label. Every stored perspective of the environment
will have its own labeled frame on the Flash timeline so that it can be easily identified
and referenced. Image names and frame labels will remain consistent.
The appearance of pointers will vary depending on the mouse’s position over the
perspective image. For the user to look left, the mouse will need to be positioned over
the left side of the screen. Moving the pointer to this region will cause it to change into
a new arrow indicating that a left turn is possible. A pointer’s particular change will
provide the user with information about what movements are possible from a given
location. Custom pointers will be set to swap in and out depending on the mouse’s
position over the screen.
After all images are imported, an interface will be built around the screen
perimeter to contain the scene view area. Certain hints about navigation options will
be displayed within a dedicated area incorporated into the interface. There may also
be a type of “mini map” embedded within the interface that will allow the user to
gauge their current location within the environment. Dimensions of the interface will
likely be around 1024x768 pixels. Imported images will be to roughly 2/3 of that area.
If the demands of this project end up exceeding the capacity of Flash, a software
package called Easypano Studio can serve as an alternative. This visualization tool is
capable of producing standalone 360-degree panoramas similar to those of QuickTime
VR. Useful additional features include the ability to incorporate smooth animated
movements between different panorama locations based on certain mouse actions.
Using QTVR will stay reserved as a third backup.
The following elements will require preliminary testing:
a. Animated enter/exit doors sequence. b. Interface mini map.
c. Flash based image replacement system
f. Pre-animate camera positions/angles for batch render.
B. Literature Review
Books
Fleming, Bill(1999). Advanced 3D Photorealism Techniques. John Wiley & Sons,
Inc.
As the title implies, this book offers many methods for producing 3D content as
realistically as possible. Although dated, this book offers a huge array of information
related to modeling and texturing. Lessons range from creating natural environments
to setting up urban scenes with details such as cracked roads. Despite being 7 years
old, this book’s concepts still apply to current technology and practice. This book will
serve to be very useful for the lesson on creating realistic and tileable textures and
incorporating them with a variety of other image maps.
Omernick, Matthew(2004). Creating the Art of the Game. New Riders Publishing.
Creating the Art of the Game brings the reader through every step involved in creating
video game content from an artist’s perspective. Each of the chapters focus heavily on
techniques for advanced modeling, texturing, lighting, and special effects. The book
continually reminds the reader that a video game artist’s goal is not to just create
objects from pixels and polygons, but rather to create and populate entire imagined
worlds. Based on this message, the book takes the reader through lessons that are
focused primarily on building and populating fantasy worlds. I find that this book will
be a very aid for this thesis because it concentrates on techniques for building
engaging fantasy spaces and worlds.
18
Imaginary Spaces
This book offers tips and techniques for creating 3D landscapes realistically. It
overviews a number of current 3D packages and outlines each of their strengths and
weaknesses. Using displacement maps to create terrain elevation and contour is
discussed. Although this book is concerned mainly with Cinema 4D, the overall
concepts offer helpful insight into modeling 3D outdoor environments. Other useful
tips include some approaches to realistic plant modeling and texturing.
Deussen, Oliver & Linterman, Bernard(2005). Digital Design of Nature: Computer
Generated Plants and Organics. Springer-Verlag Berlin Heidelberg.
The author offers many techniques for creating realistic organic 3D models such as
plants and trees. Chapters are focused primarily on creating realistic content for
visualization purposes such as virtual outdoor landscapes, botany, virtual reality, and
architecture. As a whole, this book is very technical; however, it does provide insight
into the modeling and rendering techniques which work well in producing realistic
plants.
Epic Software Group(2003). The Best of 3D Graphics. Rockport Publishers.
This book showcases the top 3D computer graphics of 2003. Each page contains a
full color image of a rendered CG image. Information is divided into chapters which
each showcase works from within the various sectors of the computer graphics
industry. Unlike most of the 3D CG books which are primarily lesson based, The Best
of 3D Graphics provides the reader with visual inspiration. Many of the showcased
images will be useful in studying and understanding the way in which different
professionals go about composing their scenes.
Allen, Isabel(2000). Structure as Design. Rockport Publishers.
Structure as Design is book which provides a visual survey of architectural structures
from around the world. Each showcased building is unique in that the most striking
Practically all of the architectural examples contained in this book are completely
custom designs. This visual overview will serve as a valuable aid in planning and
conceptualizing the architectural environments and spaces of this thesis project.
C. Images
Figure A. p.3
Original sketch if abandoned underground tunnel environment.
Figure B. p.5
This was the concept drawing for the spotlight model which is seen in the
underground tunnel environment. This prop’s built in lights provide additional
illumination to the dark environment.
Figure C. p.7
Final rendered view of the abandoned underground tunnel environment.
Figure D. p.8
A comparison between the original office desk photograph and the 3d modeled
version.
Figure E. p.10
A final rendered view of the office environment.
Figure F. p. 11
This image illustrates the how the final frames prints were configured at the 2007
thesis show. Please not that the actual presentation consisted of seven individual
20
Imaginary Spaces
VII.
BIBLIOGRAPHY
Books
Allen, Ilabel. Structure as Design. Rockport Publishers. 2004.
Birn, Jeremy. Digital Lighting & Rendering. California: New Riders. 2006.
Danahar, Simon. Creating 3D Worlds. Cambridge: Alastair International. 2005.
Duessen, O. & Linterman, B. Digital Design of Nature: Computer Generated Plants &
Organics. Springer Verlag Berlin Heidelberg. 2005.
Epic Software Group. The Best of 3D Graphics. Rockport Publishers. 2003.
Fleming, Bill. Advanced 3D Photorealism Techniques. John Wiley & Sons. 1999.
Lanier, Lee. Advanced Maya Texturing & Lighting. Indiana: Wiley Publishing, Inc. 2006.
Omernick, Matthew. Creating the Art of the Game. New Riders Publishing. 2004.
CGarchitect.com. 2001-2006. CGarchitect Digital Media Corporation.
CGSociety.com. 2002-2007. The CGSociety.