WALKENBACH
Excel 2003. No matter what your level of expertise, you’ll benefit from hundreds of examples, exercises, tips,
techniques, and workarounds, all served with a generous helping of the master’s expert advice.
Inside, you’ll find complete coverage of Excel 2003
•
Learn your way around cells, rows, columns, worksheets, workbooks, and ranges
•
Discover how to create charts and diagrams, organize lists, and simplify complex tasks using Excel
•
Develop formulas that manipulate text, look up values, and perform financial applications
•
Analyze data using external database files and pivot tables
•
Perform “what if” analysis, use Goal Seek and Solver, and gain proficiency with the Analysis ToolPak
•
Use XML to facilitate data reporting, analysis, importing, and exporting
•
Explore conditional formatting, link and consolidate worksheets,
and use Excel in a workgroup
•
Understand how Excel uses HTML in Internet applications
•
Program Excel using VBA, develop UserForms, and create custom add-ins
Shelving Category:
Computers/Spreadsheets
Reader Level:
Beginning to Advanced
System Requirements:
See the CD appendix for details and complete system requirements.
ISBN 0-7645-3967-1
$39.99
USA$59.99
Canada£27.95
UKE
xcel
20
03
E
xcel
20
03
Harness
XML power
for data reporting,
analysis, importing,
and exporting
Discover
how Excel
can support reports,
presentations,
record-keeping, and
more
Explore
advanced
Excel programming
techniques with the
top spreadsheet
authority
E
xcel 2003
John Walkenbach
,!7IA7G4-fdjghb!:p;N;t;T;t
Bonus software and searchable eBooks on CD-ROMw w w . w i l e y . c o m / c o m p b o o k s / o f f i c e b i b l e s 2 0 0 3
W H A T Y O U N E E D O N E H U N D R E D P E R C E N T
Chart your data effectively
E
xcel 2003
Bible
“Mr. Spreadsheet,” author of Excel Charts
*85555-IGIEEb
BONUS CD-ROM
ANDCOMPANION WEB SITE
More than 600MB of Office-compatible bonus software and eBooks included on the CD!Bonus CD-ROM and companion Web site!
• Exclusive Office 2003 Super BibleeBook, with more than 500 pages of information about how Microsoft Office components work together
• Bonus shareware, freeware, trial, demo, and evaluation programs that work with or enhance Microsoft Office
• Searchable eBook version of Excel 2003 Bible
• An easy-to-use interface that allows you to browse and install everything on the CD
Visit the companion Web site for links to all programs on the CD as well as additional software, complete tables of contents for all seven Wiley Office 2003 Bibles,and links to other Wiley Microsoft Office titles.
Microsoft O
ffi
ce
Microsoft O
ffi
ce
Excel 2003 Bible
Excel 2003 Bible
Published by
Wiley Publishing, Inc. 10475 Crosspoint Boulevard Indianapolis, IN 46256 www.wiley.com
Copyright © 2003 by Wiley Publishing, Inc., Indianapolis, Indiana
Published simultaneously in Canada
ISBN: 0-7645-3967-1
Manufactured in the United States of America
10 9 8 7 6 5 4 3 2 1
1B/RY/QZ/QT/IN
No part of this publication may be reproduced, stored in a retrieval system or transmitted in any form or by any means, electronic, mechanical, photocopying, recording, scanning or otherwise, except as permitted under Sections 107 or 108 of the 1976 United States Copyright Act, without either the prior written permission of the Publisher, or authorization through payment of the appropriate per-copy fee to the Copyright Clearance Center, 222 Rosewood Drive, Danvers, MA 01923, (978) 750-8400, fax (978) 646-8700. Requests to the Publisher for permission should be addressed to the Legal Department, Wiley Publishing, Inc., 10475 Crosspoint Blvd., Indianapolis, IN 46256, (317) 572-3447, fax (317) 572-4447, E-Mail:
is a trademark of Wiley Publishing, Inc.
LIMIT OF LIABILITY/DISCLAIMER OF WARRANTY: WHILE THE PUBLISHER AND AUTHOR HAVE USED THEIR BEST EFFORTS IN PREPARING THIS BOOK, THEY MAKE NO REPRESENTATIONS OR WARRANTIES WITH RESPECT TO THE ACCURACY OR COMPLETENESS OF THE CONTENTS OF THIS BOOK AND SPECIFICALLY DISCLAIM ANY IMPLIED WARRANTIES OF MERCHANTABILITY OR FITNESS FOR A PARTICULAR PURPOSE. NO WARRANTY MAY BE CREATED OR EXTENDED BY SALES REPRESENTATIVES OR WRITTEN SALES MATERIALS. THE ADVICE AND STRATEGIES CONTAINED HEREIN MAY NOT BE SUITABLE FOR YOUR SITUATION. YOU SHOULD CONSULT WITH A PROFESSIONAL WHERE APPROPRIATE. NEITHER THE PUBLISHER NOR AUTHOR SHALL BE LIABLE FOR ANY LOSS OF PROFIT OR ANY OTHER COMMERCIAL DAMAGES, INCLUDING BUT NOT LIMITED TO SPECIAL, INCIDENTAL, CONSEQUENTIAL, OR OTHER DAMAGES. FULFILLMENT OF EACH COUPON OFFER IS THE SOLE RESPONSIBILITY OF THE OFFEROR.
For general information on our other products and services or to obtain technical support, please contact our Customer Care Department within the U.S. at (800) 762-2974, outside the U.S. at (317) 572-3993 or fax (317) 572-4002.
Wiley also publishes its books in a variety of electronic formats. Some content that appears in print may not be available in electronic books.
Library of Congress Control Number: 2003101915
About the Author
Credits
Acquisitions Manager
Gregory S. Croy
Project Editor
Linda Morris
Technical Editor
Bill Manville
Senior Copy Editor
Diana R. Conover
Editorial Manager
Kevin Kirschner
Vice President & Executive Group Publisher
Richard Swadley
Vice President and Publisher
Andy Cummings
Editorial Director
Mary C. Corder
Project Coordinator
Erin Smith
Graphics and Production Specialists
Carrie Foster LeAndra Hosier Michael Kruzil Lynsey Osborn Heather Pope Mary Gillot Virgin
Quality Control Technicians
Laura Albert Susan Moritz Carl William Pierce Brian H. Walls
Senior Permissions Editor
Carmen Krikorian
Media Development Specialist
Greg Stafford
Proofreading and Indexing
Preface
T
hanks for purchasing the Excel 2003 Bible. My goal in writing this book is to share with you some of what I know about Excel, and in the process, make you more efficient on the job.The book contains everything that you need to know to learn the basics of Excel and then move on to more advanced topics at your own pace. You’ll find many use-ful examples and lots of tips and tricks that I’ve accumulated over the years.
Is This Book for You?
The Bibleseries from Wiley Publishing, Inc. is designed for beginning, intermediate, and advanced users. This book covers all the essential components of Excel and provides clear and practical examples that you can adapt to your own needs.
In this book, I’ve tried to maintain a good balance between the basics that every Excel user needs to know and the more complex topics that will appeal to power users. I’ve used Excel for many years, and I realize that almost everyone still has something to learn (including myself). My goal is to make that learning an enjoyable process.
Software Versions
Conventions This Book Uses
Take a minute to scan this section to learn some of the typographical and organiza-tional conventions that this book uses.
Excel commands
In Excel, as in all Windows programs, you select commands from the pull-down menu system. In this book, such commands appear in normal typeface. An option available under a particular menu is indicated after an➪symbol, as in “Choose File➪Print to print your document.”
Filenames, named ranges, and your input
Input that you make from the keyboard appears in bold. Named ranges may appear in a code font. Lengthy input usually appears on a separate line. For instance, I may instruct you to enter a formula such as the following:
=”Part Name: “ &VLOOKUP(PartNumber,PartList,2)
Key names
Names of the keys on your keyboard appear in normal type. When two keys should be pressed simultaneously, they are connected with a plus sign, like this: “Press Alt+E to select the Edit menu.” Here are the key names as I refer to them throughout the book:
Alt down arrow Num Lock right arrow
Backspace End Pause Scroll Lock
Caps Lock Home PgDn Shift
Ctrl Insert PgUp Tab
Delete left arrow Print Screen up arrow
Functions
Excel’s built-in worksheet functions appear in uppercase, like this: “Enter a SUM for-mula in cell C20.”
Mouse conventions
your mouse. The mouse pointer is usually an arrow, but it changes shape when you move to certain areas of the screen or when you’re performing cer-tain actions.
✦Point:Move the mouse so that the mouse pointer is on a specific item: for example, “Point to the Save button on the toolbar.”
✦Press:Press the left mouse button once and keep it pressed. Normally, this is used when dragging.
✦Click:Press the left mouse button once and release it immediately.
✦Right-click:Press the right mouse button once and release it immediately. The right mouse button is used in Excel to pop up shortcut menus that are appro-priate for whatever is currently selected.
✦Double-click:Press the left mouse button twice in rapid succession. If your double-clicking doesn’t seem to be working, you can adjust the double-click sensitivity by using the Windows Control Panel icon.
✦Drag:Press the left mouse button and keep it pressed while you move the mouse. Dragging is often used to select a range of cells or to change the size of an object.
What the Icons Mean
Throughout the book, you’ll see special graphic symbols, or icons, in the left mar-gin. These call your attention to points that are particularly important or relevant to a specific group of readers. The icons in this book are as follows:
This icon signals the fact that something is important or worth noting. Notes may alert you to a concept that helps you master the task at hand, or they may denote something that is fundamental to understanding subsequent material.
This icon marks a more efficient way of doing something that may not be obvious.
I use this symbol when a possibility exists that the operation we’re describing could cause problems if you’re not careful.
This icon indicates that a related topic is discussed elsewhere in the book.
Cross-Reference
This icon indicates that a related example or file is available on the companion CD-ROM.
This icon indicates a feature that is new to Excel 2003.
How This Book Is Organized
Notice that the book is divided into six main parts, followed by five appendixes.
Part I: Getting Started With Excel:This part consists of seven chapters that pro-vide background about Excel. These chapters are considered required reading for Excel newcomers, but even experienced users will probably find some new informa-tion here.
Part II: Working with Formulas and Functions:The chapters in Part II cover every-thing that you need to know to become proficient with performing calculations in Excel.
Part III: Creating Charts and Graphics:The chapters in Part III describe how to create effective charts as well as use graphics in your workbooks.
Part IV: Analyzing Data with Excel:Data analysis is the focus of the chapters in Part IV. Users of all levels will find some of these chapters of interest.
Part V: Using Advanced Excel Features:This part consists of nine chapters dealing with topics that are sometimes considered advanced. However, many beginning and intermediate users may find this information useful as well.
Part VI: Programming Excel with VBA:Part VI is for those who want to customize Excel for their own use or who are designing workbooks or add-ins that are to be used by others. It starts with an introduction to VBA programming and then pro-vides coverage of UserForms, add-ins, toolbars, menus, and events.
Part VII: Appendixes: Part VII contains a wide variety of appendixes that cover everything from Excel worksheet functions, to the contents of the book’s CD-ROM, to some fun games and diversions created using Excel.
How to Use This Book
This book is not intended to be read cover to cover. Rather, it’s a reference book that you can consult when:
✦You’re stuck while trying to do something.
✦You need to do something that you’ve never done before.
New Feature
thing new.
The index is comprehensive, and each chapter typically focuses on a single broad topic. If you’re just starting out with Excel, I recommend that you read the first few chapters to gain a basic understanding of the product and then do some experi-menting on your own. After you become familiar with Excel’s environment, you can refer to the chapters that interest you most. Some users, however, may prefer to follow the chapters in order.
Don’t be discouraged if some of the material is over your head. Most users get by just fine by using only a small subset of Excel’s total capabilities. In fact, the 80/20 rule applies here: 80 percent of Excel users use only 20 percent of its features. However, using only 20 percent of Excel’s features still gives you lots of power at your fingertips.
New Features in Excel 2003
This section briefly describes the new features in Excel 2003, relative to Excel 2002. Where applicable, I provide additional details later in this book. You’ll notice that the list is surprisingly short.
XML support
Excel 2003 has improved support for XML (eXtensible Markup Language). This means that you can import XML data and assign the data elements to specific cells in a worksheet.
List ranges
You can define a portion of a workbook as a list range. This may make it a bit easier to work with the list — for example, add new items and summary formulas. You can also export the list range to SharePoint Team Services to share it with others. The list on a Web site based on SharePoint Team Services can be linked to the original range of cells.
Research Pane
A new feature, Research Pane, lets you search standard reference books and Web sites by using Excel’s Task Pane.
Smart tag improvements
Statistical functions
Advanced users often complain about the inaccuracy of some of Excel’s statistical functions. Microsoft claims to have corrected these long-standing problems.
What’s on the Companion CD and Web Site
Wiley has provided so much add-on value to this book that we couldn’t fit it all on one CD! With the purchase of this book, you not only get access to over 200 bonus software programs and demos, but you also get an entire eBook — free!
Please take a few minutes to explore the bonus material included on the CD:
✦Author-created materials:Demonstration and sample files from the book.
✦Bonus software materials:Over 200 programs (shareware, freeware, GNU software, trials, demos, and evaluation software) that work with Office. A ReadMe file on the CD includes complete descriptions of each software item.
✦Office 2003 Super Bible eBook:Wiley created this special eBook, consisting of over 500 pages of content about how Microsoft Office components work together and with other products. The content has been pulled from select chapters of the individual Office Bibletitles. In addition, some original content has been created just for this Super Bible.
✦PDF version of this title:As always, if you prefer your text in electronic for-mat, the CD offers a completely searchable, PDF version of the book that you hold in your hands.
After you familiarize yourself with all that we have packed onto the CD, be sure to
visit the companion Web site at www.wiley.com/compbooks/officebibles2003/.
Here’s what you’ll find on the Web site:
✦Links to all the software that wouldn’t fit onto the CD
✦Links to all the software found on the CD
✦Complete, detailed tables of contents for all the Wiley Office 2003 Bibles: Access 2003 Bible, Excel 2003 Bible, FrontPage 2003 Bible, Office 2003 Bible, Outlook 2003 Bible, PowerPoint Bible, andWord 2003 Bible
Contents at a Glance
Preface . . . vii
Part I: Getting Started with Excel . . . 1
Chapter 1: Introducing Excel . . . 3
Chapter 2: Entering and Editing Worksheet Data . . . 25
Chapter 3: Essential Worksheet Operations . . . 43
Chapter 4: Working with Cells and Ranges . . . 63
Chapter 5: Worksheet Formatting . . . 85
Chapter 6: Understanding Files and Templates . . . 105
Chapter 7: Printing Your Work . . . 121
Part II: Working with Formulas and Functions . . . 139
Chapter 8: Introducing Formulas and Functions . . . 141
Chapter 9: Creating Formulas That Manipulate Text . . . 169
Chapter 10: Working with Dates and Times . . . 189
Chapter 11: Creating Formulas That Count and Sum . . . 221
Chapter 12: Creating Formulas That Look Up Values . . . 249
Chapter 13: Creating Formulas for Financial Applications . . . 269
Chapter 14: Introducing Array Formulas . . . 295
Chapter 15: Performing Magic with Array Formulas . . . 317
Part III: Creating Charts and Graphics . . . 337
Chapter 16: Getting Started Making Charts . . . 339
Chapter 17: Learning Advanced Charting . . . 373
Chapter 18: Enhancing Your Work with Pictures and Drawings . . . 419
Part IV: Analyzing Data with Excel . . . 435
Chapter 19: Working with Lists . . . 437
Chapter 20: Using External Database Files . . . 463
Chapter 21: Analyzing Data with Pivot Tables . . . 479
Chapter 22: Performing Spreadsheet What-If Analysis . . . 501
Chapter 23: Analyzing Data Using Goal Seek and Solver . . . 515
Part V: Using Advanced Excel Features . . . 543
Chapter 25: Using Custom Number Formats . . . 545
Chapter 26: Customizing Toolbars and Menus . . . 563
Chapter 27: Using Conditional Formatting and Data Validation . . . 575
Chapter 28: Creating and Using Worksheet Outlines . . . 591
Chapter 29: Linking and Consolidating Worksheets . . . 599
Chapter 30: Excel and the Internet . . . 613
Chapter 31: Sharing Data with Other Applications . . . 623
Chapter 32: Using Excel in a Workgroup . . . 639
Chapter 33: Making Your Worksheets Error-Free . . . 651
Part VI: Programming Excel with VBA . . . 677
Chapter 34: Introducing Visual Basic for Applications . . . 679
Chapter 35: Creating Custom Worksheet Functions . . . 703
Chapter 36: Creating UserForms . . . 715
Chapter 37: Using UserForm Controls in a Worksheet . . . 733
Chapter 38: Working with Excel Events . . . 745
Chapter 39: VBA Examples . . . 757
Chapter 40: Creating Custom Excel Add-Ins . . . 773
Part VII: Appendixes . . . 785
Appendix A: Worksheet Function Reference . . . 787
Appendix B: What’s on the CD-ROM . . . 803
Appendix C: Just for Fun . . . 815
Appendix D: Additional Excel Resources . . . 837
Appendix E: Excel Shortcut Keys . . . 845
Index . . . 853
Contents
Preface . . . vii
Part I: Getting Started with Excel
1
Chapter 1: Introducing Excel . . . 3
What Is It Good For? . . . 3
Understanding Workbooks and Worksheets . . . 4
Moving Around a Worksheet . . . 6
Navigating with your keyboard . . . 7
Navigating with your mouse . . . 8
Using the Excel Menus and Toolbars . . . 9
Using menus . . . 9
Using shortcut menus . . . 11
Using shortcut keys . . . 12
Using toolbars . . . 12
Working with Dialog Boxes . . . 14
Understanding dialog box controls . . . 14
Navigating dialog boxes . . . 15
Using tabbed dialog boxes . . . 16
Creating Your First Excel Worksheet . . . 17
Getting started on your worksheet . . . 18
Filling in the month names . . . 18
Entering the sales data . . . 19
Summing the values . . . 19
Making your worksheet look a bit fancier . . . 20
Creating a chart . . . 21
Printing your worksheet . . . 22
Saving your workbook . . . 22
Chapter 2: Entering and Editing Worksheet Data . . . 25
Understanding the Types of Data You Can Use . . . 25
Understanding numerical values . . . 26
Understanding text entries . . . 26
Understanding formulas . . . 27
Entering Text and Values into Your Worksheets . . . 27
Entering Dates and Times into Your Worksheets . . . 28
Entering date values . . . 29
Modifying Cell Contents . . . 30
Erasing the contents of a cell . . . 30
Replacing the contents of a cell . . . 30
Editing the contents of a cell . . . 31
Learning some handy data-entry techniques . . . 32
Applying Number Formatting . . . 37
Improving readability by formatting numbers . . . 37
Adding your own custom number formats . . . 42
Chapter 3: Essential Worksheet Operations . . . 43
Learning the Fundamentals of Excel Worksheets . . . 43
Working with Excel’s windows . . . 43
Making a worksheet the active sheet . . . 46
Adding a new worksheet to your workbook . . . 47
Deleting a worksheet you no longer need . . . 48
Changing the name of a worksheet . . . 48
Changing a sheet tab’s color . . . 49
Rearranging your worksheets . . . 49
Hiding and unhiding a worksheet . . . 51
Controlling the Worksheet View . . . 52
Viewing a worksheet in multiple windows . . . 52
Comparing sheets side by side . . . 53
Splitting the worksheet window into panes . . . 54
Keeping the titles in view by freezing panes . . . 54
Zooming in or out for a better view . . . 55
Saving your view settings . . . 57
Monitoring cells with a Watch Window . . . 58
Working with Rows and Columns . . . 58
Inserting rows and columns . . . 59
Deleting rows and columns . . . 60
Hiding rows and columns . . . 60
Changing column widths and row heights . . . 61
Chapter 4: Working with Cells and Ranges . . . 63
Understanding Cells and Ranges . . . 63
Selecting ranges . . . 64
Selecting complete rows and columns . . . 65
Selecting noncontiguous ranges . . . 65
Selecting multisheet ranges . . . 66
Selecting special types of cells . . . 68
Copying or Moving Ranges . . . 71
Copying by using toolbar buttons . . . 72
Copying by using menu commands . . . 73
Copying by using shortcut keys . . . 73
Copying by using drag-and-drop . . . 73
Copying to adjacent cells . . . 74
Copying a range to other sheets . . . 75
Using the Office Clipboard to paste . . . 76
Creating range names in your workbooks . . . 80
Creating a table of range names . . . 82
Modifying existing range names . . . 82
Adding Comments to Cells . . . 83
Chapter 5: Worksheet Formatting . . . 85
Getting to Know the Formatting Tools . . . 85
Using the Formatting toolbar . . . 86
Using the Format Cells dialog box . . . 86
Using Formatting in Your Worksheets . . . 87
Using different fonts . . . 87
Changing text alignment . . . 90
Using colors and shading . . . 94
Adding borders and lines . . . 95
Adding a background image to a worksheet . . . 96
Using AutoFormat for quick and easy worksheet formatting . . . 97
Using Named Styles for Easier Formatting . . . 98
Applying styles to your worksheets . . . 100
Creating new styles . . . 101
Modifying a style to meet your needs . . . 102
Merging styles from other workbooks . . . 102
Controlling styles with templates . . . 103
Chapter 6: Understanding Files and Templates . . . 105
Understanding Excel Files . . . 105
Creating a new workbook . . . 105
Opening an existing workbook . . . 107
Saving and closing your workbooks . . . 110
Using AutoRecover . . . 111
Safeguarding your work . . . 114
Understanding Excel Templates . . . 115
Working with the default templates . . . 116
Creating custom templates . . . 118
Chapter 7: Printing Your Work . . . 121
Printing with One Click . . . 121
Adjusting Your Print Settings for Better Results . . . 122
Adjusting the settings in the Print dialog box . . . 122
Adjusting the Page Setup settings . . . 125
Controlling where pages break in your printouts . . . 132
Preventing certain cells from being printed . . . 132
Using Print Preview . . . 133
Viewing the print preview . . . 133
Changing print settings while previewing . . . 134
Using Page Break Preview mode . . . 135
Part II: Working with Formulas and Functions
139
Chapter 8: Introducing Formulas and Functions . . . 141
Understanding Formula Basics . . . 141
Using operators in formulas . . . 142
Understanding operator precedence in formulas . . . 143
Using functions in your formulas . . . 145
Entering Formulas into Your Worksheets . . . 147
Entering formulas manually . . . 148
Entering formulas by pointing . . . 148
Pasting range names into formulas . . . 148
Inserting functions into formulas . . . 149
Function entry tips . . . 150
Editing Formulas . . . 151
Using Cell References in Formulas . . . 152
Using relative, absolute, and mixed references . . . 152
Changing the types of your references . . . 154
Referencing cells outside the worksheet . . . 155
Correcting Common Formula Errors . . . 156
Handling circular references . . . 157
Changing when formulas are calculated . . . 159
Using Advanced Naming Techniques . . . 160
Using names for constants . . . 161
Using names for formulas . . . 161
Using range intersections . . . 162
Applying names to existing references . . . 164
Tips for Working with Formulas . . . 165
Don’t hard-code values . . . 165
Using the formula bar as a calculator . . . 165
Making an exact copy of a formula . . . 166
Converting formulas to values . . . 166
Chapter 9: Creating Formulas That Manipulate Text . . . 169
A Few Words about Text . . . 169
How many characters in a cell? . . . 169
Numbers as text . . . 170
Text Functions . . . 171
Determining whether a cell contains text . . . 171
Working with character codes . . . 171
Determining whether two strings are identical . . . 173
Joining two or more cells . . . 173
Displaying formatted values as text . . . 175
Displaying formatted currency values as text . . . 176
Repeating a character or string . . . 176
Removing excess spaces and nonprinting characters . . . 179
Counting characters in a string . . . 179
Changing the case of text . . . 179
Extracting characters from a string . . . 180
Replacing text with other text . . . 181
Finding and searching within a string . . . 182
Searching and replacing within a string . . . 182
Advanced Text Formulas . . . 183
Counting specific characters in a cell . . . 183
Counting the occurrences of a substring in a cell . . . 183
Extracting a filename from a path specification . . . 184
Extracting the first word of a string . . . 184
Extracting the last word of a string . . . 184
Extracting all but the first word of a string . . . 185
Extracting first names, middle names, and last names . . . 185
Removing titles from names . . . 187
Counting the number of words in a cell . . . 187
Chapter 10: Working with Dates and Times . . . 189
How Excel Handles Dates and Times . . . 189
Understanding date serial numbers . . . 189
Entering dates . . . 190
Understanding time serial numbers . . . 192
Entering times . . . 194
Formatting dates and times . . . 195
Problems with dates . . . 196
Date-Related Functions . . . 198
Displaying the current date . . . 199
Displaying any date . . . 199
Generating a series of dates . . . 200
Converting a non-date string to a date . . . 201
Calculating the number of days between two dates . . . 202
Calculating the number of workdays between two dates . . . 203
Offsetting a date using only workdays . . . 204
Calculating the number of years between two dates . . . 204
Calculating a person’s age . . . 205
Determining the day of the year . . . 206
Determining the day of the week . . . 206
Determining the date of the most recent Sunday . . . 207
Determining the first day of the week after a date . . . 207
Determining the nthoccurrence of a day of the week in a month . . . 207
Calculating dates of holidays . . . 208
Determining the last day of a month . . . 210
Determining whether a year is a leap year . . . 211
Time-Related Functions . . . 211 Displaying the current time . . . 212 Displaying any time . . . 212 Calculating the difference between two times . . . 213 Summing times that exceed 24 hours . . . 214 Converting from military time . . . 217 Converting decimal hours, minutes, or seconds to a time . . . 217 Adding hours, minutes, or seconds to a time . . . 218 Rounding time values . . . 219 Working with non-time-of-day values . . . 219
Chapter 11: Creating Formulas That Count and Sum . . . 221
Counting and Summing Worksheet Cells . . . 221 Basic Counting Formulas . . . 223 Counting the total number of cells . . . 224 Counting blank cells . . . 225 Counting nonblank cells . . . 225 Counting numeric cells . . . 226 Counting nontext cells . . . 226 Counting text cells . . . 226 Counting logical values . . . 226 Counting error values in a range . . . 226 Advanced Counting Formulas . . . 227 Counting cells by using the COUNTIF function . . . 227 Counting cells by using multiple criteria . . . 228 Counting the most frequently occurring entry . . . 231 Counting the occurrences of specific text . . . 232 Counting the number of unique values . . . 234 Creating a frequency distribution . . . 235 Summing Formulas . . . 239 Summing all cells in a range . . . 240 Computing a cumulative sum . . . 241 Summing the “top n” values . . . 242 Conditional Sums Using a Single Criterion . . . 242 Summing only negative values . . . 243 Summing values based on a different range . . . 244 Summing values based on a text comparison . . . 245 Summing values based on a date comparison . . . 245 Conditional Sums Using Multiple Criteria . . . 245 Using And criteria . . . 246 Using Or criteria . . . 247 Using And and Or criteria . . . 247
Chapter 12: Creating Formulas That Look Up Values . . . 249
The VLOOKUP function . . . 252 The HLOOKUP function . . . 253 The LOOKUP function . . . 254 Combining the MATCH and INDEX functions . . . 255 Specialized Lookup Formulas . . . 257 Looking up an exact value . . . 257 Looking up a value to the left . . . 258 Performing a case-sensitive lookup . . . 260 Choosing among multiple lookup tables . . . 260 Determining letter grades for test scores . . . 261 Calculating a grade-point average . . . 262 Performing a two-way lookup . . . 263 Performing a two-column lookup . . . 265 Determining the cell address of a value within a range . . . 266 Looking up a value by using the closest match . . . 267
Chapter 13: Creating Formulas for Financial Applications . . . 269
The Time Value of Money . . . 269 Loan Calculations . . . 270 Worksheet functions for calculating loan information . . . 271 A loan calculation example . . . 274 Credit card payments . . . 275 Creating a loan amortization schedule . . . 277 Summarizing loan options by using a data table . . . 279 Calculating a loan with irregular payments . . . 282 Investment Calculations . . . 283 Future value of a single deposit . . . 284 Future value of a series of deposits . . . 288 Depreciation Calculations . . . 290
Chapter 14: Introducing Array Formulas . . . 295
Editing an array formula . . . 304 Expanding or contracting a multicell array formula . . . 305 Using Multicell Array Formulas . . . 306 Creating an array from values in a range . . . 306 Creating an array constant from values in a range . . . 306 Performing operations on an array . . . 307 Using functions with an array . . . 308 Transposing an array . . . 308 Generating an array of consecutive integers . . . 309 Using Single-Cell Array Formulas . . . 311 Counting characters in a range . . . 311 Summing the three smallest values in a range . . . 312 Counting text cells in a range . . . 313 Eliminating intermediate formulas . . . 314 Using an array in lieu of a range reference . . . 315
Chapter 15: Performing Magic with Array Formulas . . . 317
Working with Single-Cell Array Formulas . . . 317 Summing a range that contains errors . . . 318 Counting the number of error values in a range . . . 318 Summing based on a condition . . . 319 Summing the nlargest values in a range . . . 320 Computing an average that excludes zeros . . . 321 Determining whether a particular value
appears in a range . . . 322 Counting the number of differences in two ranges . . . 323 Returning the location of the maximum value
in a range . . . 323 Finding the row of a value’s nth occurrence
Part III: Creating Charts and Graphics
337
Chapter 16: Getting Started Making Charts . . . 339
Chapter 17: Learning Advanced Charting . . . 373
Understanding Chart Customization . . . 373 Changing Basic Chart Elements . . . 374 Selecting chart elements . . . 374 Modifying properties by using the Format dialog box . . . 376 Modifying the Chart Area . . . 377 Modifying the Plot Area . . . 377 Working with chart titles . . . 378 Working with the legend . . . 379 Changing the chart gridlines . . . 381 Modifying the axes . . . 382 Working with Data Series . . . 385 Deleting a data series . . . 386 Adding a new data series to a chart . . . 386 Changing data used by a series . . . 387 Displaying data labels in a chart . . . 389 Handling missing data . . . 390 Controlling a data series by hiding data . . . 390 Adding error bars . . . 391 Adding a trend line . . . 392 Modifying 3-D charts . . . 392 Formatting a surface chart . . . 393 Creating combination charts . . . 394 Using secondary axes . . . 395 Displaying a data table . . . 395 Creating Custom Chart Types . . . 396 About custom chart types . . . 396 Creating your own custom chart types . . . 396 Learning Some Chart-Making Tricks . . . 398 Creating picture charts . . . 398 Creating a thermometer chart . . . 399 Creating a gauge chart . . . 400 Creating a comparative histogram . . . 401 Creating a Gantt chart . . . 402 Creating a chart that updates automatically . . . 403 Plotting mathematical functions with one variable . . . 404 Plotting mathematical functions with two variables . . . 405 Frequently Asked Questions . . . 406 Questions about chart settings . . . 406 Chart formatting questions . . . 408 Chart series questions . . . 412 Chart type questions . . . 414 Miscellaneous chart questions . . . 415
Chapter 18: Enhancing Your Work with Pictures and Drawings . . . 419
Formatting AutoShape objects . . . 423 Selecting multiple objects . . . 423 Moving objects . . . 423 Copying objects . . . 424 Rotating AutoShapes . . . 424 Modifying AutoShapes . . . 424 Changing the stack order of objects . . . 424 Grouping objects . . . 424 Using the Drawing Toolbar . . . 425 Aligning objects . . . 425 Spacing objects evenly . . . 426 Changing an AutoShape to a different AutoShape . . . 426 Adding shadows and 3-D effects . . . 426 Changing the AutoShape defaults . . . 427 Printing objects . . . 427 Working with Other Graphic Types . . . 428 About graphics files . . . 428 Using the Microsoft Clip Organizer . . . 428 Inserting graphics files . . . 430 Copying graphics by using the Clipboard . . . 430 Importing from a digital camera or scanner . . . 430 Displaying a worksheet background image . . . 431 Modifying pictures . . . 431 Using the Office Applets . . . 432 Creating diagrams and org charts . . . 432 Creating WordArt . . . 434
Part IV: Analyzing Data with Excel
435
Chapter 19: Working with Lists . . . 437
Working with a Designated List . . . 460 Creating a designated list . . . 460 Adding rows or columns to a designated list . . . 461 Adding summary formulas to a designated list . . . 462 Advantage in using a designated list . . . 462
Chapter 20: Using External Database Files . . . 463
Understanding External Database Files . . . 463 Retrieving Data with Query: An Example . . . 465 The database file . . . 465 The task . . . 466 Using Query to get the data . . . 466 Working with Data Returned by Query . . . 472 Adjusting the external data range properties . . . 472 Refreshing a query . . . 473 Deleting a query . . . 474 Changing your query . . . 474 Using Query without the Wizard . . . 474 Creating a query manually . . . 475 Using multiple database tables . . . 476 Adding and editing records in external database tables . . . 477 Formatting data . . . 477 Learning more about Query . . . 477
Chapter 21: Analyzing Data with Pivot Tables . . . 479
About Pivot Tables . . . 479 A pivot table example . . . 480 Data appropriate for a pivot table . . . 482 Creating a Pivot Table . . . 484 Step1: Specifying the data location . . . 484 Step 2: Specifying the data . . . 485 Step 3: Completing the pivot table . . . 486 Grouping Pivot Table Items . . . 492 Creating a Calculated Field or Calculated Item . . . 495 Creating a calculated field in a pivot table . . . 496 Inserting a calculated item into a pivot table . . . 497
Chapter 22: Performing Spreadsheet What-If Analysis . . . 501
Defining scenarios . . . 509 Displaying scenarios . . . 512 Modifying scenarios . . . 513 Merging scenarios . . . 513 Generating a scenario report . . . 513
Chapter 23: Analyzing Data Using Goal Seek and Solver . . . 515
What-If Analysis — in Reverse . . . 515 Single-Cell Goal Seeking . . . 516 A goal-seeking example . . . 516 More about goal seeking . . . 517 Introducing Solver . . . 518 Appropriate problems for Solver . . . 518 A simple Solver example . . . 519 More about Solver . . . 523 Solver Examples . . . 524 Minimizing shipping costs . . . 524 Allocating resources . . . 527 Optimizing an investment portfolio . . . 528
Chapter 24: Analyzing Data with the Analysis ToolPak . . . 531
Part V: Using Advanced Excel Features
543
Chapter 25: Using Custom Number Formats . . . 545
About Number Formatting . . . 545 Automatic number formatting . . . 545 Formatting numbers by using toolbar buttons . . . 546 Using shortcut keys to format numbers . . . 547 Using the format cells dialog box to format numbers . . . 547 Creating a Custom Number Format . . . 548 About custom number formats . . . 549 Parts of a number format string . . . 550 Custom number format codes . . . 551 Custom Number Format Examples . . . 553 Scaling values . . . 553 Displaying leading zeros . . . 557 Displaying fractions . . . 557 Displaying a negative sign on the right . . . 558 Formatting dates and times . . . 559 Displaying text with numbers . . . 559 Suppressing certain types of entries . . . 560 Filling a cell with a repeating character . . . 561
Chapter 26: Customizing Toolbars and Menus . . . 563
Customizing Toolbars . . . 563 Types of customizations . . . 564 Shortcut menus . . . 565 Moving Toolbars . . . 565 Using the Customize Dialog Box . . . 565 The Toolbars tab . . . 565 The Commands tab . . . 568 The Options tab . . . 568 Adding or Removing Toolbar Buttons . . . 569 Moving and copying buttons . . . 570 Inserting a new button . . . 570 Other Toolbar Button Operations . . . 570 Changing a Toolbar Button’s Image . . . 572 Using a built-in image . . . 572 Editing a button image . . . 572 Copying another button image . . . 573
Chapter 27: Using Conditional Formatting and Data Validation . . . 575
Specifying validation criteria . . . 585 Types of validation criteria you can apply . . . 586 Creating a drop-down list . . . 587 Using formulas for data validation rules . . . 589 Using data validation formulas to accept only specific entries . . . 589
Chapter 28: Creating and Using Worksheet Outlines . . . 591
Introducing Worksheet Outlines . . . 591 Creating an Outline . . . 594 Preparing the data . . . 594 Creating an outline automatically . . . 595 Creating an outline manually . . . 596 Working with Outlines . . . 597 Displaying levels . . . 597 Adding data to an outline . . . 597 Removing an outline . . . 597 Hiding the outline symbols . . . 598
Chapter 29: Linking and Consolidating Worksheets . . . 599
Linking Workbooks . . . 599 Why link workbooks? . . . 599 Creating external reference formulas . . . 600 Working with external reference formulas . . . 602 Potential problems with external reference formulas . . . 604 Consolidating Worksheets . . . 605 Consolidating worksheets by using formulas . . . 606 Consolidating worksheets by using Paste Special . . . 607 Consolidating worksheets by using the Consolidate command . . . 608
Chapter 30: Excel and the Internet . . . 613
Understanding How Excel Uses HTML . . . 613 How does it work? . . . 614 Adding some complexity . . . 615 What about interactivity? . . . 616 Saving as an XML spreadsheet . . . 617 Working with Hyperlinks . . . 619 Inserting a hyperlink . . . 619 Using hyperlinks . . . 620 Using Web Queries . . . 620
Chapter 31: Sharing Data with Other Applications . . . 623
Embedding Objects in Documents . . . 628 Embedding an Excel range in a Word document . . . 629 Creating a new Excel object in Word . . . 630 Embedding objects in an Excel worksheet . . . 632 Working with XML Data . . . 632 What is XML? . . . 633 Importing XML data by using a map . . . 634 Importing XML data to a list . . . 636 Exporting XML data from Excel . . . 636
Chapter 32: Using Excel in a Workgroup . . . 639
Using Excel on a Network . . . 639 Understanding File Reservations . . . 640 Sharing Workbooks . . . 641 Understanding shared workbooks . . . 642 Designating a workbook as a shared workbook . . . 642 Controlling the advanced sharing settings . . . 643 Mailing and Routing Workbooks . . . 645 E-mailing a worksheet or workbook . . . 645 Routing a workbook to others . . . 646 Tracking Workbook Changes . . . 647 Turning Track Changes on and off . . . 647 Reviewing the changes . . . 649
Chapter 33: Making Your Worksheets Error-Free . . . 651
Using AutoCorrect . . . 673 Using AutoComplete . . . 675
Part VI: Programming Excel with VBA
677
Chapter 34: Introducing Visual Basic for Applications . . . 679
Introducing VBA Macros . . . 679 Two Types of VBA Macros . . . 680 VBA Sub procedures . . . 680 VBA functions . . . 681 Creating VBA Macros . . . 683 Recording VBA macros . . . 683 More about recording VBA macros . . . 689 Writing VBA code . . . 691 Learning More . . . 702 Read the rest of the book . . . 702 Record your actions . . . 702 Use the online Help system . . . 702 Get another book . . . 702
Chapter 35: Creating Custom Worksheet Functions . . . 703
Overview of VBA Functions . . . 703 An Introductory Example . . . 704 A custom function . . . 704 Using the function in a worksheet . . . 704 Analyzing the custom function . . . 705 About Function Procedures . . . 705 Executing Function Procedures . . . 706 Calling custom functions from a procedure . . . 707 Using custom functions in a worksheet formula . . . 707 Function Procedure Arguments . . . 708 A function with no argument . . . 708 A function with one argument . . . 709 A function with two arguments . . . 710 A function with a range argument . . . 711 Debugging Custom Functions . . . 712 Inserting Custom Functions . . . 712 Learning More . . . 714
Chapter 36: Creating UserForms . . . 715
Creating UserForms: An Overview . . . 720 Working with UserForms . . . 720 Adding controls . . . 720 Changing the properties of a control . . . 722 Handling events . . . 723 Displaying a UserForm . . . 723 A UserForm Example . . . 723 Creating the UserForm . . . 724 Testing the UserForm . . . 725 Creating an event handler procedure . . . 725 Another UserForm Example . . . 726 Creating the UserForm . . . 727 Testing the UserForm . . . 728 Creating event handler procedures . . . 729 Testing the UserForm . . . 730 Making the macro available from a toolbar button . . . 731 More on Creating UserForms . . . 731 Adding accelerator keys . . . 732 Controlling tab order . . . 732 Learning More . . . 732
Chapter 37: Using UserForm Controls in a Worksheet . . . 733
Why Use Controls on a Worksheet? . . . 733 Using Controls . . . 735 Adding a control . . . 735 About design mode . . . 736 Adjusting properties . . . 736 Common properties . . . 737 Linking controls to cells . . . 738 Creating macros for controls . . . 738 The Controls Toolbox Controls . . . 739 CheckBox control . . . 739 ComboBox control . . . 740 CommandButton control . . . 740 Image control . . . 741 Label control . . . 741 ListBox controls . . . 741 OptionButton controls . . . 741 ScrollBar control . . . 742 SpinButton control . . . 743 TextBox controls . . . 743 ToggleButton control . . . 744
Chapter 38: Working with Excel Events . . . 745
Using the Open event . . . 749 Using the SheetActivate event . . . 750 Using the NewSheet event . . . 750 Using the BeforeSave event . . . 750 Using the BeforeClose event . . . 751 Working with Worksheet Events . . . 751 Using the Change event . . . 752 Monitoring a specific range for changes . . . 752 Using the SelectionChange event . . . 753 Using the BeforeRightClick event . . . 754 Using Non-Object Events . . . 754 Using the OnTime event . . . 755 Using the OnKey event . . . 755
Chapter 39: VBA Examples . . . 757
Working with Ranges . . . 757 Copying a range . . . 758 Copying a variable-size range . . . 759 Selecting to the end of a row or column . . . 759 Selecting a row or column . . . 760 Moving a range . . . 760 Looping through a range efficiently . . . 761 Prompting for a cell value . . . 762 Determining the type of selection . . . 763 Identifying a multiple selection . . . 764 Changing Excel’s Settings . . . 764 Changing Boolean settings . . . 765 Changing non-Boolean settings . . . 765 Working with Charts . . . 766 Modifying the chart type . . . 766 Modifying chart properties . . . 767 Applying chart formatting . . . 767 VBA Speed Tips . . . 768 Turning off screen updating . . . 768 Preventing alert messages . . . 768 Simplifying object references . . . 769 Declaring variable types . . . 769
Chapter 40: Creating Custom Excel Add-Ins . . . 773
ThisWorkbook . . . 778 UserForm1 . . . 779 Testing the workbook . . . 780 Adding descriptive information . . . 781 Protecting the project . . . 782 Creating the add-in . . . 782 Opening the add-in . . . 783
Part VII: Appendixes
785
Appendix A: Worksheet Function Reference . . . 787
Appendix B: What’s on the CD-ROM . . . 803
Appendix C: Just for Fun . . . 815
Appendix D: Additional Excel Resources . . . 837
Appendix E: Excel Shortcut Keys . . . 845
Getting Started
with Excel
T
he chapters in this part are intended to provide essentialbackground information for working with Excel. Here you’ll see how to make use of the basic features that are required for every Excel user. If you’ve used Excel (or even a different spreadsheet program) in the past, much of this infor-mation may seem like review. Even so, it’s possible that you’ll find quite a few tricks and techniques.
✦ ✦ ✦ ✦
In This Part Chapter 1
Introducing Excel
Chapter 2
Entering and Editing Worksheet Data
Chapter 3
Essential Worksheet Operations
Chapter 4
Working with Cells and Ranges
Chapter 5
Worksheet Formatting
Chapter 6
Understanding Files and Templates
Chapter 7
Printing Your Work
✦ ✦ ✦ ✦
I
Introducing
Excel
T
his chapter serves as an introductory overview of Excel.It is intended primarily for those who have no experience with this product. But even if you’re already familiar with Excel, you may find a few new wrinkles here. If you’re moving up from Excel 2002, you’ll also find a quick summary of the new fea-tures in Excel 2003.
What Is It Good For?
Excel, as you probably know, is a spreadsheet program and is part of the Microsoft Office suite. Several other spreadsheet programs are available, but Excel is by far the most popular.
Much of the appeal of Excel is due to the fact that it’s so ver-satile. Excel’s forte, of course, is performing numerical calcu-lations, but Excel is also very useful for non-numerical applications. Here are just a few of the uses for Excel:
✦Number crunching:Create budgets, analyze survey results, and perform just about any type of financial analysis you can think of.
✦Creating charts:Create a wide variety of highly cus-tomizable charts.
✦Organizing lists:Use the row-and-column layout to store lists efficiently.
✦Accessing other data:Import data from a wide variety of sources.
✦Creating graphics and diagrams:Use Excel AutoShapes to create simple (and not-so-simple) diagrams.
✦Automating complex tasks:Perform a tedious task with a single mouse click with Excel’s macro capabilities.
1
1
✦ ✦ ✦ ✦
In This Chapter
Understanding what Excel is used for
Using Excel menus, toolbars, and dialog boxes
Navigating Excel worksheets
Introducing Excel with a quick hands-on session
Understanding Workbooks and Worksheets
The work you do in Excel is performed in a workbook file, which appears in its own window. You can have as many workbooks open as you need. By default, work-books use an XLS file extension.
Each workbookis comprised of one or more worksheets, and each worksheetis made up of individual cells.Each cell contains a value, a formula, or text. Each worksheet is accessible by clicking the tabat the bottom of the workbook. In addition, work-books can store chart sheets. A chart sheetdisplays a single chart and is also acces-sible by clicking a tab.
Newcomers to Excel are often intimidated by all of the different elements that appear within Excel’s window. You’ll soon see that the Excel screen really isn’t all that diffi-cult to understand after you learn what the various pieces do.
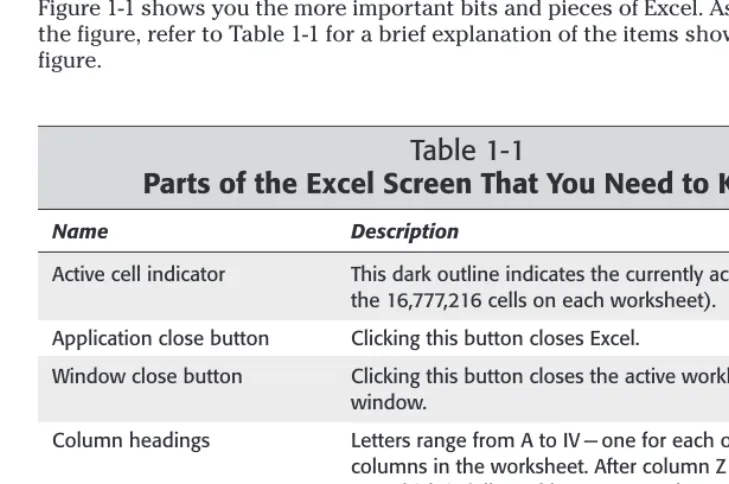
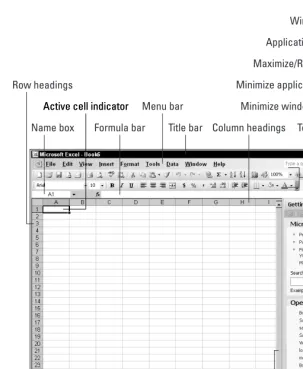
[image:40.639.101.466.328.570.2]Figure 1-1 shows you the more important bits and pieces of Excel. As you look at the figure, refer to Table 1-1 for a brief explanation of the items shown in the figure.
Table 1-1
Parts of the Excel Screen That You Need to Know
Name Description
Active cell indicator This dark outline indicates the currently active cell (one of
the 16,777,216 cells on each worksheet).
Application close button Clicking this button closes Excel.
Window close button Clicking this button closes the active workbook
window.
Column headings Letters range from A to IV — one for each of the 256
columns in the worksheet. After column Z comes column AA, which is followed by AB, AC, and so on. After column AZ comes BA, BB, and so on until you get to the last column, labeled IV. You can click a column heading to select an entire column of cells.
Formula bar When you enter information or formulas into Excel, they
appear in this line.
Name Description
Maximize/Restore button Clicking this button increases the workbook window’s size
to fill Excel’s complete workspace. If the window is already maximized, clicking this button “unmaximizes” Excel’s window so that it no longer fills the entire screen.
Menu bar This is Excel’s main menu. Clicking a word on the menu
drops down a list of menu items, which is one way for you to issue a command to Excel.
Minimize application button Clicking this button minimizes Excel’s window.
Minimize window button Clicking this button minimizes the workbook window.
Name box Displays the active cell address or the name of the selected
cell, range, or object.
Row headings Numbers range from 1 to 65,536 — one for each row in the
worksheet. You can click a row heading to select an entire row of cells.
Sheet tabs Each of these notebook-like tabs represents a different
sheet in the workbook. A workbook can have any number of sheets, and each sheet has its name displayed in a sheet tab. By default, each new workbook that you create contains three sheets.
Tab scroll buttons These buttons let you scroll the sheet tabs to display tabs
that aren’t visible.
Status bar This bar displays various messages as well as the status of
the Num Lock, Caps Lock, and Scroll Lock keys on your keyboard.
Task pane This pane displays options that are relevant to the task you
are performing.
Task pane selector Clicking here enables you to select from different task
panes so you can open workbooks, use the Office Clipboard, or work with XML data.
Title bar All Windows programs have a title bar, which displays the
name of the program and holds some control buttons that you can use to modify the window.
Toolbars The toolbars hold buttons that you click to issue commands
to Excel. Some of the buttons expand to show additional buttons or commands.
Figure 1-1: The Excel screen has many useful elements that you will use often.
Moving Around a Worksheet
This section describes various ways to navigate through the cells in a worksheet. Every worksheet consists of rows (numbered 1 through 65,536) and columns (labeled A through IV). After column Z comes column AA; after column AZ comes column BA, and so on. The intersection of a row and a column is a single cell. At any given time, one cell is the active cell.You can identify the active cell by its darker border, as shown in Figure 1-2. Its address (its column letter and row number) appears in the Name box. Depending on the technique that you use to navigate through a workbook, you may or may not change the active cell when you navigate.
Window close button
Tab scroll buttons
Sheet tab Horizontal scrollbar
Vertical scrollbar
Status bar Task pane
Task Pane selector Application close button
Maximize/Restore button
Minimize application button
Minimize window button
Name box
Active cell indicator
Formula bar Menu bar
Title bar Column headings Toolbars
Active cell indicator
make it easier to identify the row and column of the active cell.
Figure 1-2: The active cell is the cell with the dark border — in this case, cell C14.
Navigating with your keyboard
As you probably already know, you can use the standard navigational keys on your keyboard to move around a worksheet. These keys work just as you would expect: The down arrow moves the active cell down one row, the right arrow moves it one column to the right, and so on. PgUp and PgDn move the active cell up or down one full window. (The actual number of rows moved depends on the number of rows displayed in the window.)
You can scroll through the worksheet without changing the active cell by turning on Scroll Lock. This can be useful if you need to view another area of your work-sheet and then quickly return to your original location. Just press Scroll Lock and use the direction keys to scroll through the worksheet. When you want to return to the original position (the active cell), press Ctrl+Backspace. Then, press Scroll Lock
again to turn it off. When Scroll Lock is turned on, Excel displays SCRLin the status
bar at the bottom of the window.
The Num Lock key on your keyboard controls how the keys on the numeric keypad behave. When Num Lock is on, Excel displays NUMin the status bar, and the keys on your numeric keypad generate numbers. Most keyboards have a separate set of nav-igational (arrow) keys located to the left of the numeric keypad. These keys are not affected by the state of the Num Lock key.
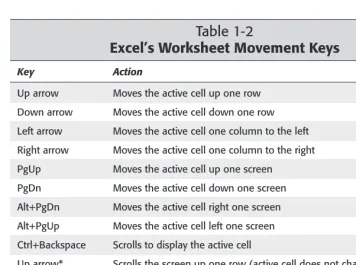
Table 1-2 summarizes all the worksheet movement keys available in Excel.
Tip
Table 1-2
Excel’s Worksheet Movement Keys
Key Action
Up arrow Moves the active cell up one row
Down arrow Moves the active cell down one row
Left arrow Moves the active cell one column to the left
Right arrow Moves the active cell one column to the right
PgUp Moves the active cell up one screen
PgDn Moves the active cell down one screen
Alt+PgDn Moves the active cell right one screen
Alt+PgUp Moves the active cell left one screen
Ctrl+Backspace Scrolls to display the active cell
Up arrow* Scrolls the screen up one row (active cell does not change)
Down arrow* Scrolls the screen down one row (active cell does not change)
Left arrow* Scrolls the screen left one column (active cell does not change)
Right arrow* Scrolls the screen right one column (active cell does not change)
* With Scroll Lock on
Navigating with your mouse
To change the active cell by using the mouse, click another cell; it becomes the active cell. If the cell that you want to activate is not visible in the workbook win-dow, you can use the scrollbars to scroll the window in any direction. To scroll one cell, click either of the arrows on the scrollbar. To scroll by a complete screen, click either side of the scrollbar’s scroll box. You also can drag the scroll box for faster scrolling.
If your mouse has a wheel on it, you can use the mouse wheel to scroll vertically. Also, if you click the wheel and move the mouse in any direction, the worksheet scrolls automatically in that direction. The more you move the mouse, the faster the scrolling. If you prefer to use the mouse wheel to zoom the worksheet, select
Tools➪Options, click the General tab, and then select the Zoom on Roll with
IntelliMouse check box.
Using the scrollbars or scrolling with your mouse doesn’t change the active cell. It simply scrolls the worksheet. To change the active cell, you must click a new cell after scrolling.
Using the Excel Menus and Toolbars
If you’ve used other software, you will have no problem adapting to Excel. Its user interface (that is, the menus and toolbars) offers few surprises, and they work just like the other programs you’ve used.
In many cases, you can issue a particular command in several different ways. For
example, if you want to save your workbook, you can use the menu (the File➪Save
command), a shortcut menu (right-click the workbook’s title bar and click Save), a toolbar button (the Save button on the Standard toolbar), or a shortcut key combi-nation (Ctrl+S). The particular method you use is up to you.
Using menus
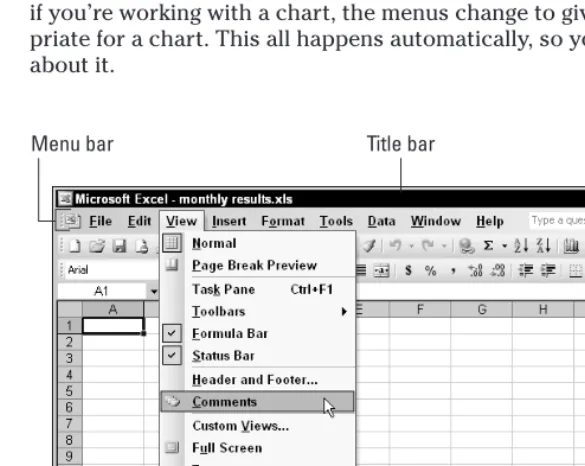
[image:45.639.105.398.347.580.2]Excel, like most other Windows programs, has a menu bar located directly below the title bar (see Figure 1-3). This menu bar is always available and ready for your command. The Excel menus change, depending on what you’re doing. For example, if you’re working with a chart, the menus change to give you options that are appro-priate for a chart. This all happens automatically, so you don’t even have to think about it.
Figure 1-3: When you click an Excel menu, you gain access to the commands that tell the program what you want to do.
Using the menu is quite straightforward. Click the menu that you want to open, and it drops down to display menu items. Click the menu item to issue the command.
To issue a menu command from the keyboard, press Alt and then the menu’s hot key. (The hot key is the underlined letter in the menu.) You can then press the appropriate hot key for a command on the menu. For example, to issue the Print command on the File menu, press Alt+F, followed by P.
Some menu items lead to an additional submenu; when you click the menu item, the submenu appears to its right. Menu items that have a submenu display a small
triangle. For example, the View➪Toolbars command has a submenu, as shown
ear-lier in Figure 1-3. Excel’s designers incorporated submenus primarily to keep the menus from becoming too lengthy and overwhelming to users.
Sometimes, you’ll notice that a menu item appears grayed out. This simply means that the menu item isn’t appropriate for what you’re doing. Nothing happens if you try to select such a menu item.
Menu items that are followed by an ellipsis (three dots) always display a dialog box. Menu commands that don’t have an ellipsis are executed immediately. For example,
the File➪Open command results in a dialog box because Excel needs more
infor-mation about the command. Excel doesn’t need any more inforinfor-mation to execute
the File➪Print Preview command, so Excel performs this command immediately,
without displaying a dialog box.
The Excel menu bar is actually a toolbar in disguise. Consequently, you can move it to a new location if you prefer. To move the menu bar, just click the set of verti-cal gray dashes at the left side of the menu bar and drag it to its new location. You can drag the menu bar to any of the window borders or leave it free-floating.
Tip Tip
Changing Your Mind
Just about every command in Excel can be reversed by using the Edit➪Undo command.
Select Edit➪Undo after issuing a command in error, and it’s as if you never issued the
com-mand. You can reverse the effects of the last 16 commands that you executed by selecting
Edit➪Undo more than once.
Rather than use Edit➪Undo, you may prefer to use the Undo button on the Standard
If this is the case, the adaptive menu option is in effect. I highly recommend that
you turn off this option. To do so, choose View➪Toolbars➪Customize. In the
Customize dialog box, click the Options tab and make sure that a check mark is next to Always Show Full Menus. Note to Microsoft: This is, without a doubt, the dumbest option you guys have ever come up with!
Using shortcut menus
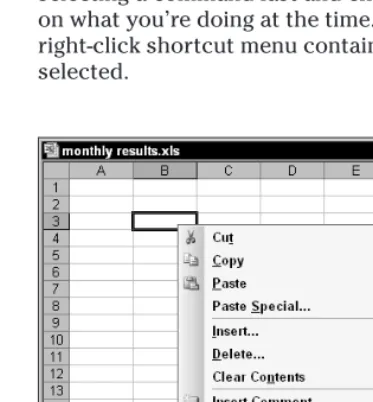
Besides the omnipresent menu bar, Excel features a slew of shortcut menus, which you access by right-clicking just about anything within Excel. Shortcut menus don’t contain every relevant command, just those that are most commonly used for what-ever is selected.
[image:47.639.101.288.337.538.2]As an example, Figure 1-4 shows the shortcut menu that appears when you right-click a cell. The shortcut menu appears at the mouse-pointer position, which makes selecting a command fast and efficient. The shortcut menu that appears depends on what you’re doing at the time. For example, if you’re working with a chart, the right-click shortcut menu contains commands that are pertinent to what is selected.
Using shortcut keys
Some menu items also have shortcut keys associated with them. For example, the File➪Save command’s shortcut key combination is Ctrl+S. As you use Excel, you’ll find that learning the shortcut keys for commands you use often can save you a lot of time.
The best way to learn the shortcut keys is to watch for them on the Excel menus. The most useful ones display next to the menu item when you open the menus.
Using toolbars
Excel includes convenient toolbars that provide another way of issuing commands. In many cases, a toolbar button is simply a substitute for a menu command. For example, the Copy button is a substitute for Edit➪Copy. Some toolbar buttons, however, don’t have a menu equivalent. One example is the AutoSum button, which automatically inserts a formula to calculate the sum of a range of cells.
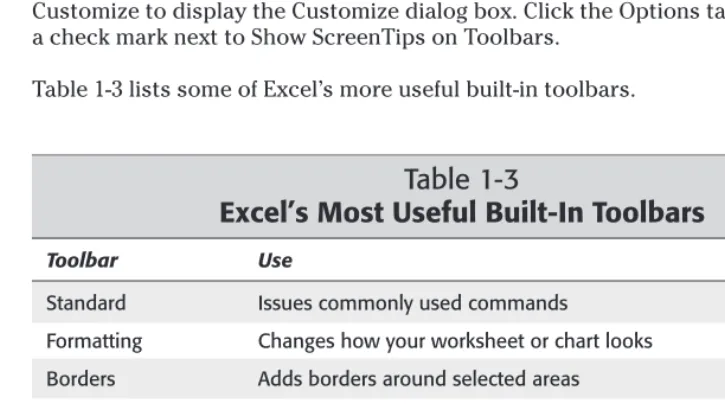
To learn what the toolbar buttons do, you can hold the mouse pointer over a tool-bar button (but don’t click it). A small box that tells you the name of the button appears. Often, this provides enough information for you to determine whether the button is what you want. If these toolbar tips do not display, choose Tools➪
Customize to display the Customize dialog box. Click the Options tab, and place a check mark next to Show ScreenTips on Toolbars.
[image:48.639.104.467.406.608.2]Table 1-3 lists some of Excel’s more useful built-in toolbars.
Table 1-3
Excel’s Most Useful Built-In Toolbars
Toolbar Use
Standard Issues commonly used commands
Formatting Changes how your worksheet or chart looks
Borders Adds borders around selected areas
Chart Manipulates charts
Drawing Inserts or edits drawings on a worksheet
Control Toolbox Adds controls (buttons, spinners, and so on) to a worksheet
Formula Auditing Identifies errors in your worksheet
Picture Inserts or edits graphic images
Toolbar Use
Protection Controls what types of changes can be made in your worksheet
Reviewing Provides tools to use workbooks in groups
Text to Speech Provides tools to read aloud cell contents
Web Provides tools to access the Internet from Excel
WordArt Inserts or edits a picture composed of words
Hiding or showing toolbars
By default, Excel displays two toolbars (named Standard and Formatting). You have complete control over which toolbars are displayed and where they are located. In addition, you can create custom toolbars, made up of buttons that you find most useful.
To hide or display a particular toolbar, choose View➪Toolbars or right-click any toolbar. Either of these actions displays a list of common toolbars (but not all tool-bars). The toolbars that have a check mark next to them are currently visible. To hide a toolbar, click it to remove the check mark. To display a toolbar, click it to add a check mark.
For control over alltoolbars, select Tools➪Customize. In the Customize dialog box, click the Toolbars tab to display a list of all available toolbars. Place a check mark next to the toolbars that you want to be displayed.
Moving toolbars
Toolbars can be moved to any of the four sides of the Excel window, or they can be free-floating. A free-floating toolbar can be dragged on-screen anywhere that you want. You also can change a toolbar’s size simply by dragging any of its borders. To hide a free-floating toolbar, click its Close button.
When a toolbar isn’t free-floating, it’s said to be docked. A docked toolbar is stuck to the edge of the Excel window and doesn’t have a title bar. Therefore, a docked toolbar can’t be resized.
To move a docked toolbar, click the toolbar’s vertical gray dashes and drag. To move a free-floating toolbar, click and drag the toolbar’s title bar. When you drag a toolbar toward the window’s edge, it automatically docks itself there. When a tool-bar is docked, its shape changes to a single row or single column.